1
Translator’s
Workbench
User Guide
COPYRIGHT
TRANSLATOR’S WORKBENCH
USER GUIDE
Copyright © 2007, SDL plc.
All rights reserved. No part of this documentation
may be duplicated in whole or in part or reproduced
in any form without the express written permission
of SDL plc.
All trademarks are the property of their respective
owners. The names of other companies and
products mentioned herein may be the trademarks
of their respective owners. Unless stated to the
contrary, no association with any other company or
product is intended or should be inferred.
Although SDL takes all reasonable measures to
provide accurate and comprehensive information
about the product, this guide is provided “as is”
without warranty, either express or implied.
This guide ships with SDL Trados 2007.
November 2007
DC-T27-TWB-02-EN
2
TRANSLATOR’S WORKBENCH USER GUIDE
CONTENTS
Chapter 1
Translator’s Workbench
About this Guide . . . . . . . . . . . . . . . . . . . . . . . . . . . . . . . . . . . . . . . . . . . . . . . . . . 1-2
Audience Profile . . . . . . . . . . . . . . . . . . . . . . . . . . . . . . . . . . . . . . . . . . 1-2
Introducing Translator’s Workbench . . . . . . . . . . . . . . . . . . . . . . . . . . . . . . . . . . 1-3
Translation Memory Overview . . . . . . . . . . . . . . . . . . . . . . . . . . . . . . . 1-3
Types of Translation Memory . . . . . . . . . . . . . . . . . . . . . . . . . . . . . . . 1-6
Translator’s Workbench Editing Environments . . . . . . . . . . . . . . . . . . . . . . . . . . 1-8
Trados-Word . . . . . . . . . . . . . . . . . . . . . . . . . . . . . . . . . . . . . . . . . . . . . 1-8
TagEditor . . . . . . . . . . . . . . . . . . . . . . . . . . . . . . . . . . . . . . . . . . . . . . . . 1-8
Supported File Formats . . . . . . . . . . . . . . . . . . . . . . . . . . . . . . . . . . . . 1-10
Translator’s Workbench and MultiTerm . . . . . . . . . . . . . . . . . . . . . . . . . . . . . . . . 1-12
Related Documentation . . . . . . . . . . . . . . . . . . . . . . . . . . . . . . . . . . . . . . . . . . . . . 1-13
Accessing Documentation . . . . . . . . . . . . . . . . . . . . . . . . . . . . . . . . . . 1-13
Language Support . . . . . . . . . . . . . . . . . . . . . . . . . . . . . . . . . . . . . . . . . . . . . . . . . 1-14
Multi-user Environments . . . . . . . . . . . . . . . . . . . . . . . . . . . . . . . . . . . . . . . . . . . . 1-15
Chapter 2
Translation Memory Setup, Configuration and Use
Overview . . . . . . . . . . . . . . . . . . . . . . . . . . . . . . . . . . . . . . . . . . . . . . . . . . . . . . . . . 2-2
Audience . . . . . . . . . . . . . . . . . . . . . . . . . . . . . . . . . . . . . . . . . . . . . . . . 2-2
Creating a Translation Memory . . . . . . . . . . . . . . . . . . . . . . . . . . . . . . . . . . . . . . . 2-3
Translation Memory Creation Options . . . . . . . . . . . . . . . . . . . . . . . . . . . . . . . . . 2-5
Source and Target Languages . . . . . . . . . . . . . . . . . . . . . . . . . . . . . . . 2-5
System Fields . . . . . . . . . . . . . . . . . . . . . . . . . . . . . . . . . . . . . . . . . . . . 2-6
Multiple Translations for the Same Source Segment . . . . . . . . . . . . . 2-6
Copying the Setup of an Existing Translation Memory . . . . . . . . . . . . 2-7
Using WinAlign to Create a Translation Memory . . . . . . . . . . . . . . . . 2-7
Translation Memory Setup . . . . . . . . . . . . . . . . . . . . . . . . . . . . . . . . . . . . . . . . . . 2-8
The Setup Dialog Box . . . . . . . . . . . . . . . . . . . . . . . . . . . . . . . . . . . . . . 2-8
TRANSLATOR’S WORKBENCH USER GUIDE
1
Defining General Translation Memory Properties . . . . . . . . . . . . . . .
Defining Translation Memory Fields . . . . . . . . . . . . . . . . . . . . . . . . . .
Defining Font Settings . . . . . . . . . . . . . . . . . . . . . . . . . . . . . . . . . . . . .
Defining Substitution Settings . . . . . . . . . . . . . . . . . . . . . . . . . . . . . . .
Defining Segmentation Rules . . . . . . . . . . . . . . . . . . . . . . . . . . . . . . .
Examples . . . . . . . . . . . . . . . . . . . . . . . . . . . . . . . . . . . . . . . . . . . . . . . .
Defining Non-translatable Text Options . . . . . . . . . . . . . . . . . . . . . . .
Defining Access Rights . . . . . . . . . . . . . . . . . . . . . . . . . . . . . . . . . . . .
2-9
2-11
2-14
2-16
2-19
2-20
2-23
2-23
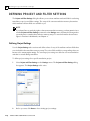
Defining Project and Filter Settings . . . . . . . . . . . . . . . . . . . . . . . . . . . . . . . . . . . 2-24
Defining Project Settings . . . . . . . . . . . . . . . . . . . . . . . . . . . . . . . . . . . 2-24
Defining Filter Settings . . . . . . . . . . . . . . . . . . . . . . . . . . . . . . . . . . . . 2-25
Translation Memory Options . . . . . . . . . . . . . . . . . . . . . . . . . . . . . . . . . . . . . . . .
Accessing Translation Memory Options . . . . . . . . . . . . . . . . . . . . . . .
Defining General Translation Memory Settings . . . . . . . . . . . . . . . . .
Defining Penalties Settings . . . . . . . . . . . . . . . . . . . . . . . . . . . . . . . . .
Defining Substitution Localisation Settings . . . . . . . . . . . . . . . . . . . .
Defining Concordance Settings . . . . . . . . . . . . . . . . . . . . . . . . . . . . . .
Defining Batch Tools Settings . . . . . . . . . . . . . . . . . . . . . . . . . . . . . . .
Tag Settings Files in Translator’s Workbench . . . . . . . . . . . . . . . . . . .
Translated Text Colours . . . . . . . . . . . . . . . . . . . . . . . . . . . . . . . . . . . .
2-27
2-28
2-29
2-35
2-40
2-43
2-46
2-48
2-51
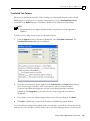
Sharing Translation Memory Settings . . . . . . . . . . . . . . . . . . . . . . . . . . . . . . . . . 2-52
Chapter 3
Translator’s Workbench and Word
Overview . . . . . . . . . . . . . . . . . . . . . . . . . . . . . . . . . . . . . . . . . . . . . . . . . . . . . . . . .
Audience . . . . . . . . . . . . . . . . . . . . . . . . . . . . . . . . . . . . . . . . . . . . . . . .
Trados-Word 2007 Interface . . . . . . . . . . . . . . . . . . . . . . . . . . . . . . . .
Trados-Word 2000-2003 Interface . . . . . . . . . . . . . . . . . . . . . . . . . . .
3-2
3-2
3-2
3-3
General Translation Guidelines . . . . . . . . . . . . . . . . . . . . . . . . . . . . . . . . . . . . . . .
User Interface Language . . . . . . . . . . . . . . . . . . . . . . . . . . . . . . . . . . .
Copy Source on No Match . . . . . . . . . . . . . . . . . . . . . . . . . . . . . . . . . .
Creating Multiple Translations . . . . . . . . . . . . . . . . . . . . . . . . . . . . . .
Translated Text Colours . . . . . . . . . . . . . . . . . . . . . . . . . . . . . . . . . . . .
Non-translatable Text . . . . . . . . . . . . . . . . . . . . . . . . . . . . . . . . . . . . . .
Segment Delimiters . . . . . . . . . . . . . . . . . . . . . . . . . . . . . . . . . . . . . . .
3-6
3-6
3-6
3-6
3-7
3-8
3-11
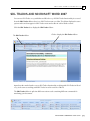
SDL Trados and Microsoft Word 2007 . . . . . . . . . . . . . . . . . . . . . . . . . . . . . . . . . 3-13
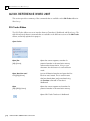
Quick Reference Word 2007 . . . . . . . . . . . . . . . . . . . . . . . . . . . . . . . . . . . . . . . . . 3-14
SDL Trados Ribbon . . . . . . . . . . . . . . . . . . . . . . . . . . . . . . . . . . . . . . . 3-14
Quick Reference Word 2000-2003 . . . . . . . . . . . . . . . . . . . . . . . . . . . . . . . . . . . . 3-18
2
TRANSLATOR’S WORKBENCH USER GUIDE
Translator’s Workbench Toolbar . . . . . . . . . . . . . . . . . . . . . . . . . . . . . 3-18
Trados Menu . . . . . . . . . . . . . . . . . . . . . . . . . . . . . . . . . . . . . . . . . . . . . 3-20
Tips for Translating in Word . . . . . . . . . . . . . . . . . . . . . . . . . . . . . . . . 3-21
Chapter 4
Translator’s Workbench and TagEditor
Overview . . . . . . . . . . . . . . . . . . . . . . . . . . . . . . . . . . . . . . . . . . . . . . . . . . . . . . . . . 4-2
Audience . . . . . . . . . . . . . . . . . . . . . . . . . . . . . . . . . . . . . . . . . . . . . . . . 4-2
What is TagEditor? . . . . . . . . . . . . . . . . . . . . . . . . . . . . . . . . . . . . . . . . . . . . . . . . . 4-2
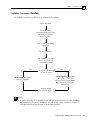
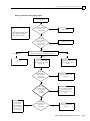
TagEditor Translation Workflow . . . . . . . . . . . . . . . . . . . . . . . . . . . . . 4-7
About Tags . . . . . . . . . . . . . . . . . . . . . . . . . . . . . . . . . . . . . . . . . . . . . . . . . . . . . . . 4-8
Tag Types . . . . . . . . . . . . . . . . . . . . . . . . . . . . . . . . . . . . . . . . . . . . . . . 4-8
Tag Protection . . . . . . . . . . . . . . . . . . . . . . . . . . . . . . . . . . . . . . . . . . . . 4-10
Tag Verification . . . . . . . . . . . . . . . . . . . . . . . . . . . . . . . . . . . . . . . . . . . 4-11
Tags Toolbar . . . . . . . . . . . . . . . . . . . . . . . . . . . . . . . . . . . . . . . . . . . . . 4-11
General Translation Guidelines . . . . . . . . . . . . . . . . . . . . . . . . . . . . . . . . . . . . . . . 4-12
User Interface Language . . . . . . . . . . . . . . . . . . . . . . . . . . . . . . . . . . . 4-12
Copy Source on No Match . . . . . . . . . . . . . . . . . . . . . . . . . . . . . . . . . . 4-12
Creating Multiple Translations . . . . . . . . . . . . . . . . . . . . . . . . . . . . . . 4-12
Working with Tags . . . . . . . . . . . . . . . . . . . . . . . . . . . . . . . . . . . . . . . . . . . . . . . . . 4-13
Internal and External Tags during Translation . . . . . . . . . . . . . . . . . . 4-14
Using the Tags Toolbar . . . . . . . . . . . . . . . . . . . . . . . . . . . . . . . . . . . . 4-16
Customising the Tags Toolbar . . . . . . . . . . . . . . . . . . . . . . . . . . . . . . . 4-18
Segment Level Tag Verification . . . . . . . . . . . . . . . . . . . . . . . . . . . . . . 4-21
Working with PerfectMatch Units . . . . . . . . . . . . . . . . . . . . . . . . . . . . . . . . . . . . . 4-22
XU Properties . . . . . . . . . . . . . . . . . . . . . . . . . . . . . . . . . . . . . . . . . . . . 4-23
XUs during Translation . . . . . . . . . . . . . . . . . . . . . . . . . . . . . . . . . . . . 4-23
XUs after Translation . . . . . . . . . . . . . . . . . . . . . . . . . . . . . . . . . . . . . . 4-24
Finding and Replacing Text in TagEditor . . . . . . . . . . . . . . . . . . . . . . . . . . . . . . . 4-25
Search Target Text . . . . . . . . . . . . . . . . . . . . . . . . . . . . . . . . . . . . . . . . 4-25
Search using Wildcards . . . . . . . . . . . . . . . . . . . . . . . . . . . . . . . . . . . . 4-27
Search Tag Content . . . . . . . . . . . . . . . . . . . . . . . . . . . . . . . . . . . . . . . 4-28
Reviewing Documents in TagEditor . . . . . . . . . . . . . . . . . . . . . . . . . . . . . . . . . . . 4-30
Previewing Word, PowerPoint and Excel Documents . . . . . . . . . . . . . 4-30
Offline Reviewing . . . . . . . . . . . . . . . . . . . . . . . . . . . . . . . . . . . . . . . . . 4-32
Previewing Windows Programming Files in TagEditor . . . . . . . . . . . . 4-33
Using Comments in TagEditor . . . . . . . . . . . . . . . . . . . . . . . . . . . . . . . . . . . . . . . 4-34
View Comments . . . . . . . . . . . . . . . . . . . . . . . . . . . . . . . . . . . . . . . . . . 4-35
TRANSLATOR’S WORKBENCH USER GUIDE
3
About the Comments File . . . . . . . . . . . . . . . . . . . . . . . . . . . . . . . . . .
Share Comments with Other Users . . . . . . . . . . . . . . . . . . . . . . . . . .
Add Comments . . . . . . . . . . . . . . . . . . . . . . . . . . . . . . . . . . . . . . . . . .
Edit or Delete Comments . . . . . . . . . . . . . . . . . . . . . . . . . . . . . . . . . .
4-36
4-36
4-36
4-37
Quick Reference . . . . . . . . . . . . . . . . . . . . . . . . . . . . . . . . . . . . . . . . . . . . . . . . . . . 4-39
Translator’s Workbench Toolbar . . . . . . . . . . . . . . . . . . . . . . . . . . . . . 4-39
Workbench Menu . . . . . . . . . . . . . . . . . . . . . . . . . . . . . . . . . . . . . . . . . 4-41
Chapter 5
Managing Translation Memory Data
Overview . . . . . . . . . . . . . . . . . . . . . . . . . . . . . . . . . . . . . . . . . . . . . . . . . . . . . . . . . 5-2
Audience . . . . . . . . . . . . . . . . . . . . . . . . . . . . . . . . . . . . . . . . . . . . . . . . 5-2
Modifying Translation Memory Data . . . . . . . . . . . . . . . . . . . . . . . . . . . . . . . . . . 5-3
Editing and Deleting Translation Units . . . . . . . . . . . . . . . . . . . . . . . . . . . . . . . . . 5-4
Editing Individual Translation Units . . . . . . . . . . . . . . . . . . . . . . . . . . 5-4
Deleting Translation Units Individually or in Small Numbers . . . . . . 5-6
Chapter 6
Translation Memory Maintenance . . . . . . . . . . . . . . . . . . . . . . . . . . . . . . . . . . . .
Using the Maintenance Command . . . . . . . . . . . . . . . . . . . . . . . . . . .
Defining Filters . . . . . . . . . . . . . . . . . . . . . . . . . . . . . . . . . . . . . . . . . . .
Defining Global Changes . . . . . . . . . . . . . . . . . . . . . . . . . . . . . . . . . . .
Translation Memory Maintenance: Examples . . . . . . . . . . . . . . . . . . .
5-9
5-9
5-12
5-14
5-19
Importing Translation Memory Data . . . . . . . . . . . . . . . . . . . . . . . . . . . . . . . . . .
Using the Import Command . . . . . . . . . . . . . . . . . . . . . . . . . . . . . . . .
Import Mode . . . . . . . . . . . . . . . . . . . . . . . . . . . . . . . . . . . . . . . . . . . .
Import Options . . . . . . . . . . . . . . . . . . . . . . . . . . . . . . . . . . . . . . . . . . .
Workbench-compatible Import Formats . . . . . . . . . . . . . . . . . . . . . . .
5-25
5-26
5-27
5-27
5-30
Exporting Translation Memory Data . . . . . . . . . . . . . . . . . . . . . . . . . . . . . . . . . . .
Using the Export Command to Create a Backup . . . . . . . . . . . . . . . .
Export Formats . . . . . . . . . . . . . . . . . . . . . . . . . . . . . . . . . . . . . . . . . . .
Inverting Translation Memories . . . . . . . . . . . . . . . . . . . . . . . . . . . . .
5-31
5-32
5-33
5-33
Terminology During Translation
Overview . . . . . . . . . . . . . . . . . . . . . . . . . . . . . . . . . . . . . . . . . . . . . . . . . . . . . . . . .
Audience . . . . . . . . . . . . . . . . . . . . . . . . . . . . . . . . . . . . . . . . . . . . . . . .
About MultiTerm . . . . . . . . . . . . . . . . . . . . . . . . . . . . . . . . . . . . . . . . .
About Terminology Recognition . . . . . . . . . . . . . . . . . . . . . . . . . . . . .
Sample Files . . . . . . . . . . . . . . . . . . . . . . . . . . . . . . . . . . . . . . . . . . . . .
4
TRANSLATOR’S WORKBENCH USER GUIDE
6-2
6-2
6-2
6-3
6-4
Setting up Terminology Recognition . . . . . . . . . . . . . . . . . . . . . . . . . . . . . . . . . . . 6-5
MultiTerm and Translator’s Workbench . . . . . . . . . . . . . . . . . . . . . . . 6-5
Term Recognition Settings . . . . . . . . . . . . . . . . . . . . . . . . . . . . . . . . . . 6-10
MultiTerm 7 Term Recognition Window . . . . . . . . . . . . . . . . . . . . . . . . . . . . . . . . 6-11
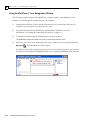
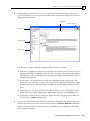
Using the MultiTerm 7 Term Recognition Window . . . . . . . . . . . . . . 6-12
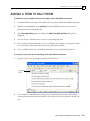
Adding a Term to MultiTerm . . . . . . . . . . . . . . . . . . . . . . . . . . . . . . . . . . . . . . . . 6-15
Chapter 7
Spelling and Verification Plug-ins
Overview . . . . . . . . . . . . . . . . . . . . . . . . . . . . . . . . . . . . . . . . . . . . . . . . . . . . . . . . . 7-2
About TagEditor Plug-ins . . . . . . . . . . . . . . . . . . . . . . . . . . . . . . . . . . . 7-2
Spelling Checker Plug-ins . . . . . . . . . . . . . . . . . . . . . . . . . . . . . . . . . . . . . . . . . . . 7-4
Working with the Spelling Checkers . . . . . . . . . . . . . . . . . . . . . . . . . . 7-4
TagEditor Verification Plug-ins . . . . . . . . . . . . . . . . . . . . . . . . . . . . . . . . . . . . . . . 7-7
About Verification . . . . . . . . . . . . . . . . . . . . . . . . . . . . . . . . . . . . . . . . . 7-7
Generic Tag Verifier . . . . . . . . . . . . . . . . . . . . . . . . . . . . . . . . . . . . . . . 7-8
XML Validator . . . . . . . . . . . . . . . . . . . . . . . . . . . . . . . . . . . . . . . . . . . . 7-9
S-Tag Verifier . . . . . . . . . . . . . . . . . . . . . . . . . . . . . . . . . . . . . . . . . . . . . 7-9
Excel Verifier . . . . . . . . . . . . . . . . . . . . . . . . . . . . . . . . . . . . . . . . . . . . . 7-10
Win32Binary Verifier . . . . . . . . . . . . . . . . . . . . . . . . . . . . . . . . . . . . . . . 7-10
RC Verifier . . . . . . . . . . . . . . . . . . . . . . . . . . . . . . . . . . . . . . . . . . . . . . . 7-10
Using the Verification Plug-ins . . . . . . . . . . . . . . . . . . . . . . . . . . . . . . . . . . . . . . . 7-11
The Verification Process . . . . . . . . . . . . . . . . . . . . . . . . . . . . . . . . . . . . 7-11
Verifier Property Pages . . . . . . . . . . . . . . . . . . . . . . . . . . . . . . . . . . . . . 7-12
Defining Settings for the Generic Tag Verifier . . . . . . . . . . . . . . . . . . 7-13
Defining Settings for the XML Validator . . . . . . . . . . . . . . . . . . . . . . . 7-16
Defining Settings for the S-Tag Verifier . . . . . . . . . . . . . . . . . . . . . . . . 7-17
After Verifying the Target Files . . . . . . . . . . . . . . . . . . . . . . . . . . . . . . . 7-19
Message Filter Plug-ins . . . . . . . . . . . . . . . . . . . . . . . . . . . . . . . . . . . . . . . . . . . . . 7-22
About Message Filters . . . . . . . . . . . . . . . . . . . . . . . . . . . . . . . . . . . . . 7-22
Using the XML Validator Filter . . . . . . . . . . . . . . . . . . . . . . . . . . . . . . . 7-22
TagEditor Plug-Ins . . . . . . . . . . . . . . . . . . . . . . . . . . . . . . . . . . . . . . . . . . . . . . . . . 7-25
Snippet Mark-up Plug-in 1.0 . . . . . . . . . . . . . . . . . . . . . . . . . . . . . . . . . 7-25
Activating and Working with the Snippet Mark-up Plug-in 1.0 . . . . . . 7-30
SDL Trados Terminology Verifier . . . . . . . . . . . . . . . . . . . . . . . . . . . . . . . . . . . . . 7-32
SDL Trados QA Checker 2.0 . . . . . . . . . . . . . . . . . . . . . . . . . . . . . . . . . . . . . . . . . 7-36
Defining Properties for the QA Checker . . . . . . . . . . . . . . . . . . . . . . . 7-37
TRANSLATOR’S WORKBENCH USER GUIDE
5
Chapter 8
Batch Tools: Analyse, Translate, Clean Up
Overview . . . . . . . . . . . . . . . . . . . . . . . . . . . . . . . . . . . . . . . . . . . . . . . . . . . . . . . . . 8-2
Audience . . . . . . . . . . . . . . . . . . . . . . . . . . . . . . . . . . . . . . . . . . . . . . . . 8-2
Preparing your Documents . . . . . . . . . . . . . . . . . . . . . . . . . . . . . . . . . . . . . . . . . . 8-3
Preparing your Translation Memory . . . . . . . . . . . . . . . . . . . . . . . . . . . . . . . . . . . 8-4
Project and Filter Settings . . . . . . . . . . . . . . . . . . . . . . . . . . . . . . . . . . 8-4
Translation Memory Options . . . . . . . . . . . . . . . . . . . . . . . . . . . . . . . 8-5
Analysing Documents . . . . . . . . . . . . . . . . . . . . . . . . . . . . . . . . . . . . . . . . . . . . . . 8-6
Using the Analyse Command . . . . . . . . . . . . . . . . . . . . . . . . . . . . . . . 8-7
Post-analysis Options . . . . . . . . . . . . . . . . . . . . . . . . . . . . . . . . . . . . . 8-8
Chapter 9
Pre-translating Documents . . . . . . . . . . . . . . . . . . . . . . . . . . . . . . . . . . . . . . . . . .
Using the Translate Command . . . . . . . . . . . . . . . . . . . . . . . . . . . . . .
Translate Options . . . . . . . . . . . . . . . . . . . . . . . . . . . . . . . . . . . . . . . . .
Update Changed Translations Options . . . . . . . . . . . . . . . . . . . . . . . .
Translate Terms Options . . . . . . . . . . . . . . . . . . . . . . . . . . . . . . . . . . .
Segment Unknown Sentences . . . . . . . . . . . . . . . . . . . . . . . . . . . . . . .
8-11
8-12
8-14
8-14
8-15
8-16
Cleaning Up Translated Documents . . . . . . . . . . . . . . . . . . . . . . . . . . . . . . . . . . .
Using the Clean Up Command . . . . . . . . . . . . . . . . . . . . . . . . . . . . . .
Clean Up Options . . . . . . . . . . . . . . . . . . . . . . . . . . . . . . . . . . . . . . . . .
Troubleshooting Files after Clean Up . . . . . . . . . . . . . . . . . . . . . . . . .
8-16
8-17
8-18
8-20
The TradosTag Viewer
Plug-in
Overview . . . . . . . . . . . . . . . . . . . . . . . . . . . . . . . . . . . . . . . . . . . . . . . . . . . . . . . . .
Audience . . . . . . . . . . . . . . . . . . . . . . . . . . . . . . . . . . . . . . . . . . . . . . . .
About TradosTag Viewer . . . . . . . . . . . . . . . . . . . . . . . . . . . . . . . . . . .
About Style Sheets . . . . . . . . . . . . . . . . . . . . . . . . . . . . . . . . . . . . . . . .
9-2
9-2
9-2
9-3
Preparing the TradosTag Viewer . . . . . . . . . . . . . . . . . . . . . . . . . . . . . . . . . . . . . .
Activating TradosTag Viewer . . . . . . . . . . . . . . . . . . . . . . . . . . . . . . . .
Selecting a Style Sheet . . . . . . . . . . . . . . . . . . . . . . . . . . . . . . . . . . . . .
Defining Colour and Font Settings . . . . . . . . . . . . . . . . . . . . . . . . . . .
9-5
9-5
9-6
9-8
Launching TradosTag Viewer . . . . . . . . . . . . . . . . . . . . . . . . . . . . . . . . . . . . . . . . 9-9
Deactivating TradosTag Viewer . . . . . . . . . . . . . . . . . . . . . . . . . . . . . . 9-11
6
TRANSLATOR’S WORKBENCH USER GUIDE
Chapter 10
Working with Server-based Translation Memories
Overview . . . . . . . . . . . . . . . . . . . . . . . . . . . . . . . . . . . . . . . . . . . . . . . . . . . . . . . . . 10-2
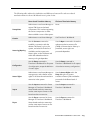
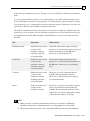
File- and Server-based Translation Memories Compared . . . . . . . . . 10-2
Access Requirements and Restrictions . . . . . . . . . . . . . . . . . . . . . . . . . . . . . . . . . 10-5
Access Requirements . . . . . . . . . . . . . . . . . . . . . . . . . . . . . . . . . . . . . . 10-5
TM Server License Restrictions . . . . . . . . . . . . . . . . . . . . . . . . . . . . . . 10-8
Getting Started . . . . . . . . . . . . . . . . . . . . . . . . . . . . . . . . . . . . . . . . . . . . . . . . . . . . 10-9
Using the Connect Command . . . . . . . . . . . . . . . . . . . . . . . . . . . . . . . 10-10
Using the Add TM Server Wizard . . . . . . . . . . . . . . . . . . . . . . . . . . . . 10-10
Logging in to TM Server . . . . . . . . . . . . . . . . . . . . . . . . . . . . . . . . . . . . 10-14
Selecting a Translation Memory . . . . . . . . . . . . . . . . . . . . . . . . . . . . . 10-16
Managing your TM Server Settings . . . . . . . . . . . . . . . . . . . . . . . . . . . . . . . . . . . . 10-20
The TM Servers Dialog Box . . . . . . . . . . . . . . . . . . . . . . . . . . . . . . . . . 10-20
Modifying your TM Server Settings . . . . . . . . . . . . . . . . . . . . . . . . . . . 10-21
Changing your TM Server Password . . . . . . . . . . . . . . . . . . . . . . . . . . 10-22
Chapter 11
Translation Memory Security and Access Rights
Overview . . . . . . . . . . . . . . . . . . . . . . . . . . . . . . . . . . . . . . . . . . . . . . . . . . . . . . . . . 11-2
Audience . . . . . . . . . . . . . . . . . . . . . . . . . . . . . . . . . . . . . . . . . . . . . . . . 11-2
Translation Memory Security . . . . . . . . . . . . . . . . . . . . . . . . . . . . . . . . . . . . . . . . . 11-3
Overview . . . . . . . . . . . . . . . . . . . . . . . . . . . . . . . . . . . . . . . . . . . . . . . . 11-3
Security in File- and Server-based Translation Memories . . . . . . . . . 11-3
File-based Translation Memory Security . . . . . . . . . . . . . . . . . . . . . . . . . . . . . . . . 11-5
Overview . . . . . . . . . . . . . . . . . . . . . . . . . . . . . . . . . . . . . . . . . . . . . . . . 11-5
Levels of Access in File-based Translation Memories . . . . . . . . . . . . 11-5
Protecting File-based Translation Memories . . . . . . . . . . . . . . . . . . . 11-7
Defining Passwords . . . . . . . . . . . . . . . . . . . . . . . . . . . . . . . . . . . . . . . 11-8
Server-based Translation Memory Security . . . . . . . . . . . . . . . . . . . . . . . . . . . . . 11-10
Overview . . . . . . . . . . . . . . . . . . . . . . . . . . . . . . . . . . . . . . . . . . . . . . . . 11-10
Levels of Access in Server-based Translation Memories . . . . . . . . . . 11-10
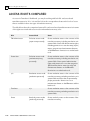
Access Rights Compared . . . . . . . . . . . . . . . . . . . . . . . . . . . . . . . . . . . . . . . . . . . . 11-12
TRANSLATOR’S WORKBENCH USER GUIDE
7
Appendix A
Supported Languages
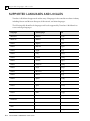
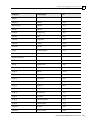
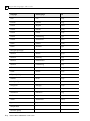
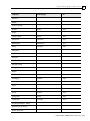
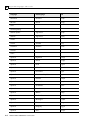
Supported Languages and Locales . . . . . . . . . . . . . . . . . . . . . . . . . . . . . . . . . . . .
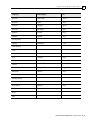
Two-letter Language Codes from ISO 639 . . . . . . . . . . . . . . . . . . . . .
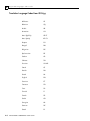
Two-letter Country Codes From ISO 3166 . . . . . . . . . . . . . . . . . . . . . .
Unicode Enhancements in Translator’s Workbench . . . . . . . . . . . . .
Appendix B
A-2
A-8
A-11
A-14
Translator’s Workbench Error Messages
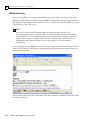
Responding to Error Messages . . . . . . . . . . . . . . . . . . . . . . . . . . . . . . . . . . . . . . . B-2
Error Messages . . . . . . . . . . . . . . . . . . . . . . . . . . . . . . . . . . . . . . . . . . . . . . . . . . . B-2
Glossary
Index
8
TRANSLATOR’S WORKBENCH USER GUIDE
TRANSLATOR’S WORKBENCH
This chapter introduces Translator’s Workbench, the
translation memory system. Sections include:
C
Introducing Translator’s Workbench
C
Translator’s Workbench Editing Environments
C
Translator’s Workbench and MultiTerm
C
Multi-user Environments
Chapter
1
1
About this Guide
ABOUT THIS GUIDE
Welcome to the Translator’s Workbench User Guide.
This guide introduces you to Translator’s Workbench, the translation memory system in the SDL
Trados product suite. It explains how to use Translator’s Workbench to work with various types of
translation memory and in a variety of working contexts. It provides task-based information about
using Translator’s Workbench and related applications for the purposes of translation, quality
assurance, translation memory administration and project management.
The guide is divided into sections, each of which deals with a particular aspect of translation memory
technology, including translation memory administration, interactive translation (editing
environments), quality assurance (TagEditor plug-ins) and project management.
This guide is intended for use with the current release of Translator’s Workbench which is shipped
with SDL Trados 2007.
Audience Profile
This guide is intended for all users of Translator’s Workbench. Whether you use the application for
the purposes of translation, quality assurance, translation memory administration or project
management, this guide will help you find out what you need to know.
Depending on the product you have purchased, you may be working with the Freelance or standard
version of Translator’s Workbench. In general, the information in this guide applies to both
versions. Where necessary, the difference between versions is pointed out. The Freelance icon
(displayed below) is used to indicate information that is specific to Freelance users.
T
1-2
FREELANCE
TRANSLATOR’S WORKBENCH USER GUIDE
Introducing Translator’s Workbench
1
INTRODUCING TRANSLATOR’S WORKBENCH
Translator’s Workbench is a sophisticated database system that is built around the core concept of
translation memory, a method of capturing, storing and reusing translations. Archived translations
are stored in translation memory databases. Translator’s Workbench supports interactive translation
through the interface with popular editing environments such as Microsoft Word and TagEditor.
This interface provides direct access to the translation memory database while translation is in
progress. Translator’s Workbench also offers a wide range of complementary features that support
other aspects of the translation process, including quality assurance, project management and
translation memory administration. All features are available whether the translation memory
database is stored locally for individual access, or made available for multi-user access in an intranet
or Internet environment.
This section describes the key features of translation memory technology and explains the difference
between file- and server-based translation memories. It also provides information about the different
versions of Translator’s Workbench.
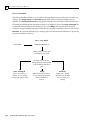
Translation Memory Overview
During translation with Translator's Workbench, the program builds a linguistic database that stores
all translated sentences or segments with their source language equivalents. These segment pairs are
referred to as translation units. At the same time, Translator’s Workbench builds an artificial neural
network that is based on the content of the linguistic database. The neural network is designed to
facilitate fast and efficient searching using fuzzy matching techniques. The linguistic database and
its associated neural network are together referred to as a translation memory. Translator’s
Workbench allows you to manipulate the translation memory in various different ways.
Building Translation Memory
Each new translation memory is empty. You can build translation memory interactively or by
importing aligned sentence pairs.
During interactive translation, Translator’s Workbench automatically updates the translation
memory that is open in the background. Each time you translate a segment of text, the corresponding
translation unit is added to the translation memory. If you encounter the same or similar text in your
source document twice, Translator’s Workbench proposes your previous translation(s). You can
accept, reject or edit these suggestions – both new and updated translations are added to the
translation memory. In this way, the translation memory grows dynamically during the translation
process.
TRANSLATOR’S WORKBENCH USER GUIDE
1-3
1
Introducing Translator’s Workbench
You can also populate new or existing translation memories by importing previously translated
material. The import feature enables you to transfer data from one translation memory to another,
or to load translation memory data from WinAlign alignment projects. In this way, you can take
advantage of existing translations when starting a new project.
Translation Memory Search and Fuzzy Matching
During translation, Translator’s Workbench uses database technology to search the translation
memory and propose previous translations for reuse. The search is based on the degree of similarity
between the source segment for translation and the source segments of translation units that are
stored in translation memory. Translator’s Workbench expresses the degree of similarity between
these source segments in terms of a percentage value. An identical match is therefore known as a
100% match, and is likely to provide the best available translation for the source segment you are
translating.
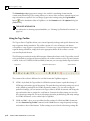
As well as proposing identical matches, Translator's Workbench uses a technique known as fuzzy
matching. Source segments from translation memory that are similar, but not identical, to the source
segment for translation are known as fuzzy matches. Fuzzy match values can range from 99% to
30%, though a minimum match value of 70% is usually enforced during interactive translation.
Translator’s Workbench allows you to view all fuzzy matches in turn, and highlights the differences
between translation memory content and the source segment for translation. This helps you to
choose the best available translation for the source segment you are translating. As usual, you can
accept, reject or edit suggestions.
As well as facilitating interactive translation, the fuzzy matching technique is also used during other
types of translation memory search. The concordance feature and project management utilities such
as document analysis and pre-translation all use fuzzy matching to identify translation memory
content that is suitable for reuse.
Concordance Searching
The concordance feature in Translator’s Workbench allows you to search the translation memory for
fragments of text or subsegments that are similar or identical to the text you are translating.
Translator’s Workbench presents the search results as a list of source segments from translation
memory in which the search text occurs, with their corresponding translations. You can configure
Translator’s Workbench to automatically run a concordance search when no match is found for the
current source segment in translation memory. Alternatively, you can run a manual concordance
search using the Concordance command which is available from the Tools menu in Translator’s
Workbench.
1-4
TRANSLATOR’S WORKBENCH USER GUIDE
Introducing Translator’s Workbench
1
Batch Tools
Translator’s Workbench facilitates project management by providing powerful batch tools for the
analysis, pre-translation and post-production of files. The batch tools are so-called because they allow
you to process files individually or in batches.
The analysis and pre-translation features help you to identify and apply reusable translation memory
content before interactive translation begins. In this way, you can derive maximum benefit from
existing translation memory content and reduce the requirement for human translation on new
projects. The clean up feature is used after translation to remove unwanted source text from
translated documents and update the translation memory in accordance with the latest changes. This
ensures maximum consistency between the content of your translated documents and your
translation memory.
Translation Memory Administration
Translation memory administration involves configuring your translation memory and managing
translation memory data so that you can derive maximum benefit from it at all times.
Translator’s Workbench offers a wide range of settings that allow you to customise the translation
memory to suit different languages and file formats. You can regulate access rights, project settings
and search settings to suit different working contexts and maximise translation memory
performance for a given situation. Translator’s Workbench also enables you to manage translation
memory data effectively over time using the maintenance, import and export features.
Quality Assurance
The maintenance feature in Translator’s Workbench allows you to monitor and modify the content
of your translation memory at translation unit and global levels. This helps to ensure that the content
of your translation memory is of a consistently high quality.
The TagEditor plug-ins provide quality assurance for your translated documents by allowing you to
check and modify spelling and tag content. The Terminology Verifier allows you to check that the
correct terms from your termbase have been used in your translation. The QA Checker allows you
to check the TagEditor document to ensure that the format of the files is kept during translation
TRANSLATOR’S WORKBENCH USER GUIDE
1-5
1
Introducing Translator’s Workbench
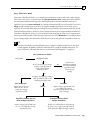
Types of Translation Memory
As we have seen, a translation memory comprises a linguistic database and its associated neural
network. When this translation memory resides as a group of files on your system (local or network),
it is referred to as a file-based translation memory. When a translation memory resides on a database
server, it is referred to as a server-based translation memory. When you use Translator’s Workbench
to work with file-based translation memories, the application is being used in a stand-alone capacity.
When you use Translator’s Workbench to work with server-based translation memories, the
application is being used as a client that is dependent on other components in a client/server
implementation of the translation memory solution.
D
NOTE
All versions of Translator’s Workbench support both file- and server-based translation
memories.
The similarities and differences between the two types of translation memory are outlined in the
following sections.
Translation Memory Data Format
In a file-based translation memory, linguistic data is stored in a TMW file; the TMW file is associated
with a group of neural network files that enable fuzzy search capability. In a server-based translation
memory, linguistic and neural network data is stored as a group of database tables in a database
management system. The database management system resides on a database server.
Although the method of data storage for each type of memory is different, the data format remains
the same. In each case, the basic unit of translation memory data is the translation unit or segment
pair. This means that linguistic data from either type of memory is presented and manipulated in
the same way during interactive translation, project management and maintenance procedures.
Furthermore, server-based translation memories use the same import and export formats as filebased translation memories. This facilitates the exchange of data between the two types of
translation memory.
Manipulating Translation Memory Data
In the case of both server- and file-based translation memories, Translator’s Workbench acts as the
main interface for the manipulation of translation memory data. In the case of a file-based
translation memory, Translator’s Workbench communicates directly with the database files. In the
case of a server-based translation memory, Translator’s Workbench always uses TM Server to
communicate with the database on the database server.
1-6
TRANSLATOR’S WORKBENCH USER GUIDE
Introducing Translator’s Workbench
1
Although the methods of transaction are different, the features in Translator’s Workbench that
control translation memory management, project management and interactive translation are the
same for both types of memory. For more information, see “File- and Server-based Translation
Memories Compared” on page 11-2.
Critical Differences
From a user’s point of view, the main differences between server- and file-based translation
memories have to do with translation memory access, creation and user management.
Translator’s Workbench provides direct access to file-based translation memories, whether they are
stored locally or at a network location. In order to access server-based translation memories,
Translator’s Workbench requires TM Server, a middleware component which is responsible for all
communication with the database server where memories reside. Translator’s Workbench may use
an intranet or an Internet (TM Anywhere) connection to access the TM Server. Use of the Internet
connection type enables Workbench users to share translation memories over the Internet.
In the case of file-based translation memories, the functions of translation memory creation and
user management are carried out in Translator’s Workbench. In the case of server-based translation
memories, these functions are carried out in SDL Trados Server Manager, the administration client
in a client/server implementation of the translation memory solution. Only administrators have
access to SDL Trados Server Manager. The creation of server-based translation memories and the
definition of access rights are therefore restricted features.
V
FOR MORE INFORMATION
For more information about working with server-based translation memories, see Chapter 10.
For more information about translation memory access rights, see Chapter 11.
TRANSLATOR’S WORKBENCH USER GUIDE
1-7
1
Translator’s Workbench Editing Environments
TRANSLATOR’S WORKBENCH EDITING
ENVIRONMENTS
For the purposes of interactive translation, you can choose from a range of Workbench-compatible
editing environments. Each editing environment includes the standard translation interface with
Translator’s Workbench and term recognition with MultiTerm. In each case, the Workbench toolbar
and Trados/Workbench menu commands provide access to translation memory functionality and
content.
TradosTag Bilingual File Format
TradosTag is the default bilingual file format in Translator’s Workbench and TagEditor. During the
translation process, TagEditor converts all formats to TradosTag, which is an XML-based format for
representing tagged text and bilingual data for translation purposes. Text and formatting information
are extracted from the native file format and presented in an abstracted file format, TradosTag.
TradosTag files have a TTX extension.
Trados-Word
For the purposes of translation, Microsoft Word is linked to Translator’s Workbench through a Word
document template. The Word document template integrates the functionality of both applications,
making translation much easier.
The Word editing environment is suitable for translating Word or RTF documents, including RTF
help files and Workbench RTF.
V
FOR MORE INFORMATION
For more information about Translator’s Workbench and Word, see Chapter 3.
TagEditor
TagEditor is a specialized application that is designed for translating, verifying and reviewing tagged
text, Office and DTP file formats. For a full list of supported file types see “Supported File Formats”
on page 1-10. TagEditor also includes a range of plug-in utilities that support tag verification and
spell-checking.
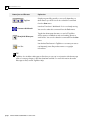
As well as providing support for interactive translation, TagEditor offers the following features:
C
1-8
Tag Settings Manager – allows you to manage the tag settings files that are available on your
system. Tag settings files are necessary to process and format XML, HTML, and SGML
documents for translation purposes. The Tag Settings Manager also provides access to the Tag
Settings Wizard, where you can create and edit settings files.
TRANSLATOR’S WORKBENCH USER GUIDE
Translator’s Workbench Editing Environments
C
1
TagEditor plug-ins – provide support for quality assurance procedures during the translation
of tagged text files. The spelling checker and tag verification plug-ins allow you to verify the
spelling and tag content of all files that have been translated in TagEditor. The TradosTag
Viewer plug-in provides you with advanced previewing and print functionality for TradosTag
files. The SDL Trados Terminology Verifier plug-in allows you to check the terms which have
been used in your document against the terms contained in your termbase or glossary. The
TagEditor plug-in framework also facilitates the development of third-party plug-ins that can
be used to further extend TagEditor functionality. The SDL Trados QA Checker allows you to
run checks on your translated files.
Offline review – a facility that allows you to use TagEditor in stand-alone mode without connecting
to Translator’s Workbench for the purposes of reviewing translated documents.
TRANSLATOR’S WORKBENCH USER GUIDE
1-9
1
Translator’s Workbench Editing Environments
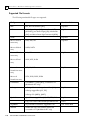
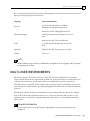
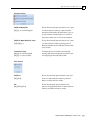
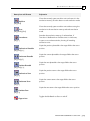
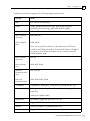
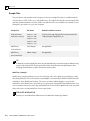
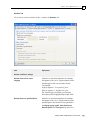
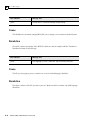
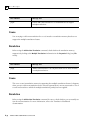
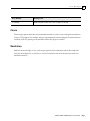
Supported File Formats
The following translatable file types are supported:
File Type
Notes
Translation Tool
XML
XSL, XLIFF documents (XLF)
TagEditor
HTML
Active Server Pages (ASP), Active Server.NET
(ASP.NET), Java Server Pages (JSP), Include files
(INC) and Active Server Page Framework (ASPX).
TagEditor
SGML
TagEditor
Microsoft Word
2000-2003
DOC, DOT, RTF
Microsoft Word
2007
DOCX, DOTX
Microsoft Excel
2000-2003
XLS, XLT
Microsoft Excel
2007
XLSX, XLTX, XLSM
Microsoft
PowerPoint 20002003
PPT, PPS, POT
Microsoft
PowerPoint 2007
PPTX, PPSX, POTX, PPSM
FrameMaker
FrameMaker + SGML (MIF), converted to STF
(Workbench RTF only)
InDesign
InDesign CS 2 Interchange format files (INX) or
InDesign tagged files (ISC, TXT)
TagEditor
TagEditor
TagEditor
TagEditor
InDesign CS1 (INDD), (INDT)
QuarkXPress
1-10
QuarkXPress tagged files QSC, XTG, TTG, TAG
TagEditor
Copy Flow Filter for Mac-based QuarkXPress files
SDLX
PageMaker
P65 and PMD converted to Tagged files TXT
SDL Trados-Word
Interleaf
ILDOC and ILSTY files saved as IASCII and
converted to STF (Workbench RTF only)
TRANSLATOR’S WORKBENCH USER GUIDE
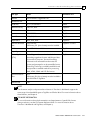
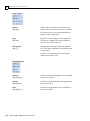
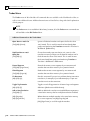
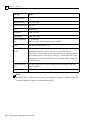
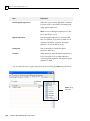
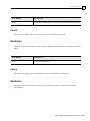
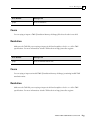
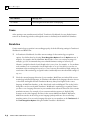
Translator’s Workbench Editing Environments
File Type
Notes
Ventura
VP converted to Tagged files TXT
1
Translation Tool
Workbench RTF
Code files
C, C++, Visual Basic
SDLX
Windows Binary
EXE, DLL, OCX
TagEditor
Windows Resource
RC
TagEditor
Java
PROPERTIES
TagEditor
StarOffice
SXW, SXC, SXI
TagEditor
OpenOffice
ODT, ODS, ODP
TagEditor
Generic delimited
text
CSV, CAT files.
SDLX 2005 SP1 (Lite or better) must be installed.
TagEditor or SDLX
RESX
the .NET XML-based RC format
TagEditor
OpenTag
SDLX
TradosTag files
(TTX)
TradosTag provides a standard method of
describing tagged text formats and bilingual data
for translation purposes. Text and formatting
information are extracted from the native file
format and presented in an abstracted file format,
TradosTag. TradosTag is an XML-based file format
that provides a standard method for processing
XML, HTML, SGML and DTP file formats.
SDLX Translation
files
ITD
SDLX 2005 SP1 (Lite or better) must be installed to
edit SDLX files in TagEditor
Generic Text
TXT
D
NOTE
V
FOR MORE INFORMATION
TagEditor
The document analysis and pre-translation features in Translator’s Workbench support the
same range of translatable file types as TagEditor and Trados-Word. For more information about
these features, see Chapter 8.
For more information about the characteristics and requirements of specific file formats
during translation, see the File Formats Reference Guide. For more information about
Translator’s Workbench and TagEditor, see Chapter 4.
TRANSLATOR’S WORKBENCH USER GUIDE
1-11
1
Translator’s Workbench and MultiTerm
TRANSLATOR’S WORKBENCH AND MULTITERM
MultiTerm is the terminology management solution. Designed as a multilingual, concept-based
terminology system, MultiTerm allows you to store terminology and related information in a
customised database format. We refer to the MultiTerm terminology database
as a termbase.
V
FOR MORE INFORMATION
For more information about the MultiTerm client application, see the MultiTerm User Guide.
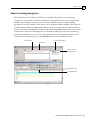
Active Terminology Recognition
MultiTerm is integrated with Translator's Workbench to provide active term recognition during
translation. This means that translations of terms stored in MultiTerm are automatically suggested
as you translate your documents. Even if Translator's Workbench cannot find a suitable segment
match for the current source segment in translation memory, it can still help by retrieving
information at term level. Matching terms from the MultiTerm termbase are highlighted in the
Workbench source window. The corresponding termbase entry is displayed in the Workbench
terminology window. You can easily paste the target term into the document you are translating, or
carry out a further termbase search. Active term recognition uses the fuzzy matching technique to
identify terms that are identical or similar to the content of your source text. Active term recognition
can find not only reduced word forms (for example, base forms of verbs) but also root forms of
compound words, even if the elements of these compound words are spread throughout the source
segment.
You can add terms directly to your termbase from within Translator’s Workbench and Word, or from
within TagEditor, enriching your termbase as you work.
D
1-12
NOTE
For more information about terminology recognition during translation, see Chapter 6.
TRANSLATOR’S WORKBENCH USER GUIDE
Related Documentation
1
RELATED DOCUMENTATION
Below is a list of the documentation included with SDL Trados Synergy:
SDL Trados Installation Guide – contains information for the installation and configuration of all
the SDL Trados components, including Synergy, the translation tools and the server components.
SDL Trados Administrator Guide – contains information about the SDL Trados server components,
including TM Server, Server Manager and Synergy Server.
SDL Trados Synergy User Guide – introduces you to the main concepts in SDL Trados Synergy,
including project creation and the translation workflow in Synergy.
SDL File Formats Reference Guide – contains information about the preparation, conversion and
post-production tasks associated with specific file formats. This guide includes information about
the Tag Settings Manager and Wizard and the SDL Trados Story Collectors.
WinAlign User Guide – contains information about file alignment with WinAlign.
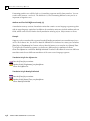
Accessing Documentation
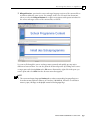
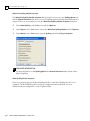
The full set of SDL Trados 2007 guides is available in PDF format:
C in the Doc subfolder of your SDL Trados 2007 installation folder
C from Start > Programs > SDL International > SDL Trados 2007 > Documentation after
installation of the software.
C Some guides are also available from the Start view in SDL Trados Synergy.
There are also several useful tutorials which are available:
C in the Tutorial subfolder of your SDL Trados 2007 installation folder
C from Start > Programs > SDL International > SDL Trados 2007 > Tutorials after installation
of the software.
C Some tutorials are also available from the Start view in SDL Trados Synergy.
Online Help is also available with each of the SDL Trados applications.
TRANSLATOR’S WORKBENCH USER GUIDE
1-13
1
Language Support
LANGUAGE SUPPORT
In general, language support in Translator’s Workbench and related applications corresponds to the
language support that is installed on your system. You can find a complete listing of supported
languages at the end of this guide.
Translator’s Workbench allows you to input content in any language into translation memory text
and attribute fields. It is possible to input any Unicode character into a translation unit.
For more information about specific support for bi-directional and DBCS (double-byte character set)
languages in Translator’s Workbench and TagEditor, see the relevant online help.
Support for Unicode-only languages
SDL Trados 2007 offers support for 20 additional languages, including Hindi and other languages
which do not have a code page. These languages are sometimes described as Unicode-only
languages. Fonts for these languages must have OpenType layout table support.
How to find out if a font supports OpenType Layout Tables
Microsoft ships a special Font Properties Extension tool which can be downloaded from
http://www.microsoft.com/typography/TrueTypeProperty21.mspx. This tool extends the Font Properties
dialog box in Windows and shows which OpenType Layout tables a font supports. The most
important tabs are Features and Char Set/Unicode.
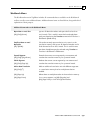
Font recommendations
We recommend that you use Arial Unicode MS which is available on the Microsoft Office CD. This
font supports OpenType Layout tables for rendering complex scripts, and the font contains all
codepages required to type text. This is especially important when mixing complex script content
with Western content. SDL highly recommend to use a font that supports as many OpenType Layout
tables as possible and Arial Unicode MS does so.
For Telugu, the shareware font Code 2000 should be used. For more information on the Code2000
font and to download it see http://home.att.net/%7Ejameskass/code2000_page.htm
1-14
TRANSLATOR’S WORKBENCH USER GUIDE
Multi-user Environments
1
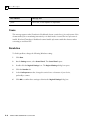
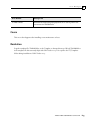
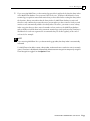
We recommend using Arial Unicode MS for widest support. The following fonts may also be used
but they do not support Western characters:
Language
Font recommendation
Gujarati
Arial Unicode MS. Shruti or Padmaa
(Windows XP standard Gujarati font).
Hindi (Devanagari)
Arial Unicode MS. Mangal (Windows XP
standard Devanagari font), Shruti, may also be
used.
Urdu
Arial Unicode MS, Tahoma (Windows
2000/XP standard Arabic font), may also be
used.
Kannada
Arial Unicode MS, Tunga may also be used.
Telugu
Code 2000
D
NOTE
We recommend using Translator’s Workbench with TagEditor for all languages and all file types
including Word .doc files.
MULTI-USER ENVIRONMENTS
SDL Trados Synergy, SDL Trados TM Server, SDL GXT and SDL TeamWorks are specialized
systems designed to meet the requirements of multi-user groups. Each of these systems is based on
a client/server architecture, incorporating TM Server technologies to provide server-based
translation memory capability. In the context of these systems, Translator’s Workbench acts as the
main translation memory interface, providing full support for both file- and server-based translation
memories.
Outside these systems, Translator’s Workbench can also facilitate multi-user groups by enabling
them to share file-based translation memories over a local area network (LAN). In this case, the
application acts in a stand-alone capacity and provides direct access to network-based translation
memory files.
V
FOR MORE INFORMATION
For more information on using Translator’s Workbench in multi-user environments see
Chapter 10.
TRANSLATOR’S WORKBENCH USER GUIDE
1-15
1
1-16
Multi-user Environments
TRANSLATOR’S WORKBENCH USER GUIDE
TRANSLATION MEMORY SETUP,
CONFIGURATION AND USE
This chapter shows you how to create a file-based translation
memory and how to configure both file- and server-based
translation memories. The following translation memory
configuration options are explained:
C
Defining text and attribute fields
C
Assigning project and filter settings
C
Font and substitution options
C
Segmentation rules
C
Non-translatable text
C
Access rights
The following translation memory options are described:
C
General options
C
Translation memory penalties
C
Concordance tools
Chapter
2
2
Overview
OVERVIEW
This chapter shows you how to create a new file-based translation memory. It explains how to
configure both file- and server-based translation memories using the settings that are available in the
Setup dialog box in Translator’s Workbench. It explains how to use project settings, filters, and
translation memory options in order to gain maximum benefit from your memory during
translation.
Audience
In general, the information in this chapter is relevant to the users of file- and server-based translation
memories. However, access to certain features may be subject to restriction. In the case of file-based
translation memories, the Setup command is only available if you open the memory in exclusive
access mode. In the case of server-based translation memories, the Setup command is only available
if you access the memory with TM Administrator rights.
2-2
TRANSLATOR’S WORKBENCH USER GUIDE
Creating a Translation Memory
2
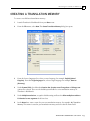
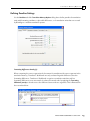
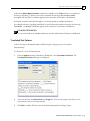
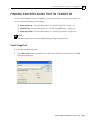
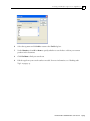
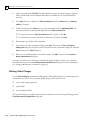
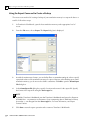
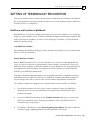
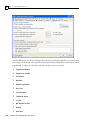
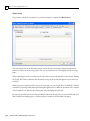
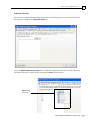
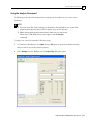
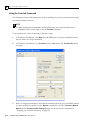
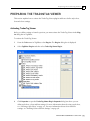
CREATING A TRANSLATION MEMORY
To create a new file-based translation memory:
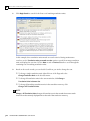
1
Launch Translator’s Workbench from your Start menu.
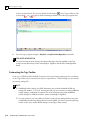
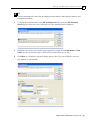
2
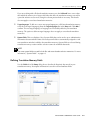
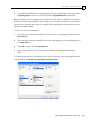
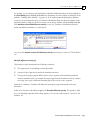
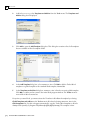
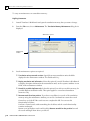
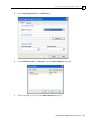
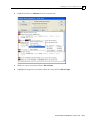
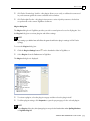
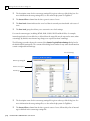
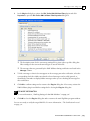
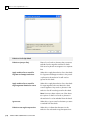
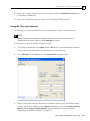
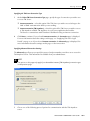
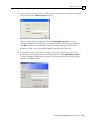
From the File menu, select New. The Create Translation Memory dialog box opens.
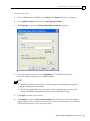
3
From the Source languages list, select a source language, for example, English (United
Kingdom). From the Target languages list, select a target language for example, German
(Germany).
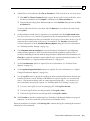
4
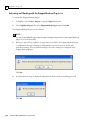
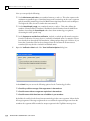
Under System fields, check that the Creation date, Creation user, Change date and Change user
options are selected. These are the default system fields for a new translation memory in
Translator’s Workbench.
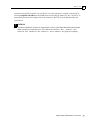
5
Under Multiple translations, accept the default setting and leave the Allow multiple translations
for identical source segments check box clear.
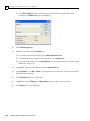
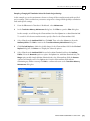
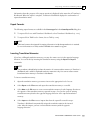
6
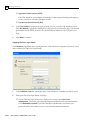
In the Name box, enter a name for your new translation memory, for example, My Translation
Memory. This name is saved in your translation memory and is not the file name itself.
TRANSLATOR’S WORKBENCH USER GUIDE
2-3
2
Creating a Translation Memory
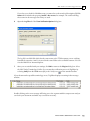
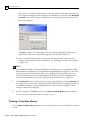
7
In the Copyright notice box, enter a copyright notice, for example, © My Own Software
Company. You can change the copyright notice at any time using the Setup command on the
File menu.
8
In the Description box, enter a description of the contents of your translation memory, for
example, This TM contains all my software product documentation in English and German. You can
change the description at any time using the Setup command on the File menu.
9
Click Create to confirm the settings. Assign a file name to your translation memory
and save it in a folder of your choice. Translator's Workbench automatically adds the
.tmw extension and stores the new translation memory and its associated neural
network files on your hard disk.
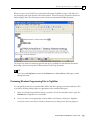
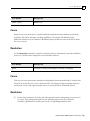
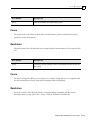
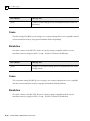
When creating a new translation memory, Translator's Workbench creates five new files: a database
file in which the translation units are stored and four neural network files required for fuzzy
searches.
Extension
Description
*.tmw
Main translation memory database file
*.mdf, *.mtf, *.mwf,*.iix
Neural network files
D
NOTE
C If you want to copy or move a translation memory, copy or move all five files. Otherwise
Translator's Workbench displays an error message when opening the copied translation
memory.
C You cannot create server-based translation memories in Translator’s
Workbench. The creation of server-based translation memories takes place
in Server Manager, the administration client for TM Server-based systems.
Only administrators have access to the Server Manager client.
2-4
TRANSLATOR’S WORKBENCH USER GUIDE
Translation Memory Creation Options
2
TRANSLATION MEMORY CREATION OPTIONS
This section explains the options you can set when creating a new translation memory, using the
Create Translation Memory dialog box in Translator’s Workbench.
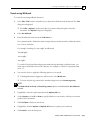
Source and Target Languages
The selection you make in the Source languages list defines the source language of your translation
memory. The selection you make in the Target languages list defines the target language. If a
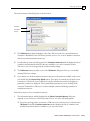
language is not listed, this means your copy of Windows does not yet support it. In Windows 2000,
Windows XP and Windows Vista install additional language support via Start > Settings > Control
Panel > Regional Options. Select the language settings for the system and check the languages that
you require.
T
FREELANCE
If you are using the Freelance version of Translator’s Workbench, only five languages (and
their sublanguages) appear for selection in the source and target language lists. The languages
that are listed correspond to the languages that you selected during installation.
Translator’s Workbench allows you to create monolingual, bilingual and multilingual translation
memories as follows:
C
To create a bilingual translation memory, select different source and target languages. The
bilingual translation memory is the most common type of memory.
C
To create a monolingual translation memory, select the same source and target language.
C
To create a multilingual translation memory, select several target languages by holding down
the [Ctrl] key while you click the required target languages.
D
NOTE
C You cannot undo your choice of source and target languages. However, you can add new
target languages at any time using the Setup command on the File menu.
C You cannot create a monolingual translation memory in the Freelance version of
Translator’s Workbench.
TRANSLATOR’S WORKBENCH USER GUIDE
2-5
2
Translation Memory Creation Options
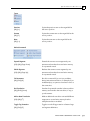
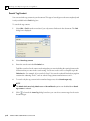
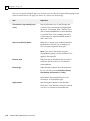
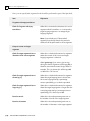
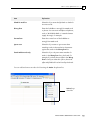
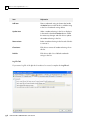
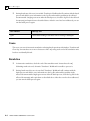
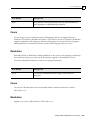
System Fields
Translator's Workbench assigns system fields to each translation unit that is created for your new
translation memory. These system fields store administrative information, such as the date on which
a given translation unit was created. The available system fields are:
System Field
Description
Creation date
The date on which a translation unit was created.
Creation user
The user ID of the user who created a translation unit.
Change date
The date on which a translation unit was last changed.
Change user
The user ID of the user who last changed a translation unit.
Used date
The date on which a translation unit was last used.
Usage counter
The number of times a translation unit was used.
When you select the Used date and Usage counter system fields, Translator’s Workbench updates the
translation memory by means of a write operation each time a translation unit is used. The remaining
system fields do not require write access. Omitting the Used date and Usage counter fields may help
to optimise translation memory access speed.
F
D
WARNING
Once you define your system fields during translation memory creation, you cannot change them.
NOTE
The same range of system fields is available during the creation of server-based translation
memories in SDL Trados Server Manager, the administration client for TM Server-based
systems. For more information, see the SDL Trados Administrator Guide.
Multiple Translations for the Same Source Segment
In certain circumstances, the same source segment may occur in a number of places in a document
for translation. Depending on the context, the same target segment is not always appropriate. If you
select the Allow multiple translations for identical source segments option when you create a new
translation memory, Translator’s Workbench allows you to create multiple translation units with the
same source text and different target text. The default setting is for the option to remain unchecked.
During translation, you can set a translation penalty for translation units that have more than one
target segment. The default penalty is set to 1%.
2-6
TRANSLATOR’S WORKBENCH USER GUIDE
Translation Memory Creation Options
2
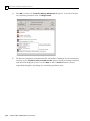
Converting Translation Memories to allow Multiple Translations
You cannot change this setting after you create the translation memory. If you wish to allow multiple
translations for the same source segment in an existing translation memory, you can use the export
and import commands as described below:
1
Export the translation memory to a text file.
2
Create a new translation memory, selecting the Allow multiple translations for identical source
segments option.
3
Import the translation memory data from the text file into the new translation
memory.
Copying the Setup of an Existing Translation Memory
Another way to create a translation memory is to copy the setup of an existing translation memory.
In the Create Translation Memory dialog box, click Copy and select the translation memory whose
setup you wish to copy. Your new translation memory adopts all the properties of the existing
translation memory, for example, source and target languages, system fields, attribute and text
fields.
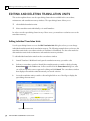
Using WinAlign to Create a Translation Memory
You can create a translation memory import file from existing translation material using WinAlign,
the visual alignment solution.
V
FOR MORE INFORMATION
For more information on WinAlign, see the WinAlign User Guide.
TRANSLATOR’S WORKBENCH USER GUIDE
2-7
2
Translation Memory Setup
TRANSLATION MEMORY SETUP
This section shows you how to configure your translation memory to suit different languages and
file formats using the Setup command on the File menu. The information applies to both file- and
server-based translation memories.
D
NOTE
C The Setup command is subject to access restrictions. In the case of file-based translation
memories, it is only available when a translation memory is open in exclusive access mode.
In the case of server-based translation memories, it is only available when you access the
translation memory with TM Administrator rights. For more information about translation
memory access rights, see Chapter 11.
C By default, the Freelance version of Translator’s Workbench opens all file-based translation
memories in exclusive access mode. This means that Freelance users have automatic
access to the Setup command, unless they are working with password protected or
server-based translation memories.
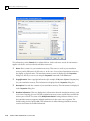
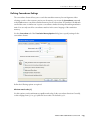
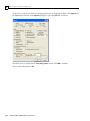
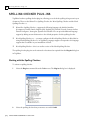
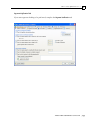
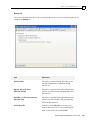
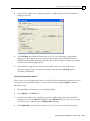
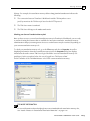
The Setup Dialog Box
To configure your translation memory, select Setup from the File menu. This opens the Setup dialog
box.
E
TIP
The name and location (or address) of the translation memory you are working with is always
displayed in the title bar of the Setup dialog box.
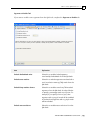
The Setup dialog box consists of a series of tabs with the following configuration options:
2-8
C
General: Specify the name, copyright notice and description of your translation memory. This
tab also displays the source and target languages of your translation memory.
C
Fields: Specify the text and attribute fields for your translation memory.
C
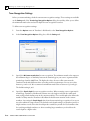
Fonts: Set the default font to be used for displaying source and target language. You can also
define automatic font replacements during translation into such languages as Russian,
Japanese, Arabic or Hebrew.
C
Substitutions: Define which non-translatable items, such as numbers, names and dates,
should be automatically replaced during translation.
C
Segmentation Rules: Set the rules governing the segmentation of your texts based on
punctuation.
TRANSLATOR’S WORKBENCH USER GUIDE
Translation Memory Setup
C
Non-translatable Text: Define non-translatable paragraph or character styles to be ignored
during translation.
C
Access Rights: Define passwords to restrict access to file-based translation memories at
various levels.
D
NOTE
2
The Access Rights tab in the Setup dialog box is not available for server-based translation
memories. Access rights for server-based translation memories are defined outside
Translator’s Workbench by your administrator. For more information,
see “Server-based Translation Memory Security” on page 11-10.
The configuration options on each tab are explained in more detail in the sections that follow.
Further information is available in the online help for Translator’s Workbench.
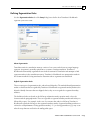
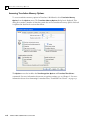
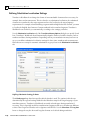
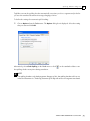
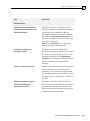
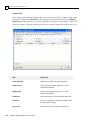
Defining General Translation Memory Properties
Use the General tab of the Setup dialog box to define and view information about general translation
memory properties. Most of these properties apply to both file- and server-based translation
memories.
Some of the information on the General tab is displayed for information purposes only, for example,
information about the list of system fields that are active for the current translation memory and the
status of the multiple translations option. These properties are defined during translation memory
creation (in Translator’s Workbench or SDL Trados Server Manager) and cannot be modified
afterwards.
V
FOR MORE INFORMATION
For more information about the properties that are defined during the creation of file-based
translation memories in Translator’s Workbench, “Translation Memory Creation Options” on
page 2-5. For more information about the creation of server-based translation memories,
see the SDL Trados Administrator Guide.
TRANSLATOR’S WORKBENCH USER GUIDE
2-9
2
Translation Memory Setup
The information on the General tab is explained below. Unless otherwise noted, the information
applies to both file- and server-based translation memories.
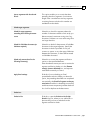
2-10
C
Name: Enter a name for your translation memory. This name is saved in your translation
memory and is different to the file name or, in the case of server-based translation memories,
the display or physical name. The translation memory name is displayed in the Properties
dialog box, which you can access using the Properties command on the File menu.
C
Copyright notice: Enter copyright information (for example, © My Own Software Company Inc.)
for your translation memory. This information is displayed in the Properties dialog box.
C
Description: Describe the contents of your translation memory. This information is displayed
in the Properties dialog box.
C
Database information: This area displays basic information about the translation memory, such
as its source language, the user ID of the translation memory creator and the date on which the
memory was created. The status of the Multiple translations setting indicates whether or not
the translation memory supports multiple translations for the same source segment. The
default setting for this option is No. This information is defined during translation memory
creation and cannot be modified afterwards.
TRANSLATOR’S WORKBENCH USER GUIDE
Translation Memory Setup
2
If you are working with a file-based translation memory, use the Valid until box to enter a date
after which the memory is no longer valid. After this date, the translation memory can only be
opened in exclusive access mode, using the relevant password where necessary. This feature
does not apply to server-based translation memories.
C
Target languages: To add one or more new target languages to a file-based translation memory,
select the new target language(s) from the Target languages list in the Setup tab. Click OK to
confirm. The new target language or languages are irreversibly added to your translation
memory. The option to add new target languages does not apply to server-based translation
memories.
C
System fields: This area displays a list of system fields that can be used to store administrative
information about translation units. Selected system fields are automatically assigned to each
new translation unit that is added to the translation memory. System fields are selected during
translation memory creation and the selection cannot be modified afterwards.
D
NOTE
The same system fields are used for both file- and server-based translation memories. For more
information, “System Fields” on page 2-6.
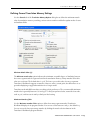
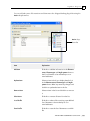
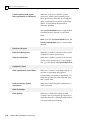
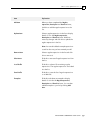
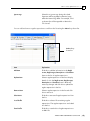
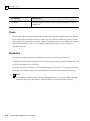
Defining Translation Memory Fields
Use the Fields tab of the Setup dialog box to describe the linguistic data stored in your
translation memory. Descriptive information is stored in text and attribute fields.
TRANSLATOR’S WORKBENCH USER GUIDE
2-11
2
Translation Memory Setup
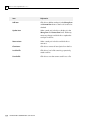
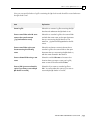
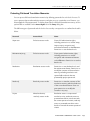
What is an Attribute Field?
An attribute field is a user-defined field that provides classification information about a translation
unit, for example, the name of the client for which the translation was created or whether the
translation has been approved. Attributes are defined when a translation memory is created and may
be assigned to each translation unit created. They may also be used as a criterion for filters.
What is a Text Field?
A text field is a user-defined field that provides information about a translation unit that changes
from project to project, for example, the code identifying a project. Text fields are defined when a
translation memory is created and may be assigned to each translation unit created. They may also
be used as a criterion for filters.
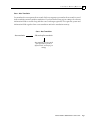
Example
XYZ Corporation has a language service section. Translation projects have the following information
items:
C
Every document to be translated has its own identification code, consisting of the abbreviation
PROJ for project, the year and a number (for example, 05/105, means the 105th translation in
the year 2005).
C
You currently work for three clients: New Chemicals Ltd., Pro Software Inc. and
Heavy Engineering & Co. You specialise in chemistry, software, hardware and engineering.
Adding this information to new translation units allows you to later activate only certain parts of your
translation memory when translating for, say, Pro Software Inc.
Since you do not know the identification code before actually translating the document it belongs to,
you create a text field for this information category. This ensures that you can add new identification
codes to existing ones in your translation memory without any problems. You just enter the ID Code
for new documents when starting a new translation. New translation units for that document are
then stored in the translation memory with the new ID Code.
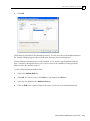
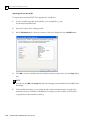
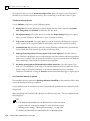
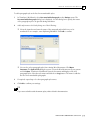
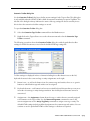
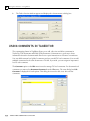
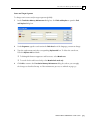
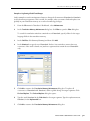
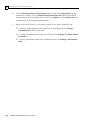
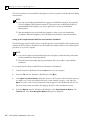
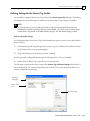
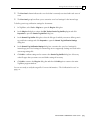
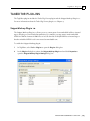
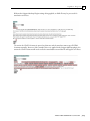
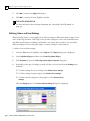
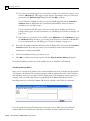
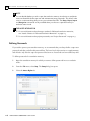
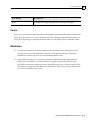
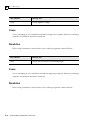
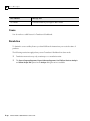
To create an ID Code text field:
2-12
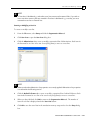
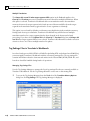
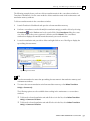
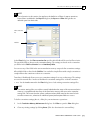
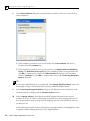
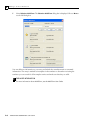
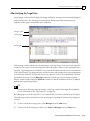
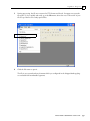
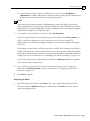
1
Click Text Field in the Text Fields list. This item is highlighted and its name is transferred into
the Field input box.
2
Change the name from Text Field to ID Code in the Field box.
TRANSLATOR’S WORKBENCH USER GUIDE
Translation Memory Setup
3
2
Click Add.
This defines the text fields for this translation memory. You can enter the actual ID code information
(for example, PROJ 05/105) into this text field when starting a new translation project.
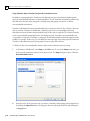
Clients and domain information are easily classified, so it is useful to specify attribute fields for
these. Translator's Workbench allows you to enter a name for the attribute field and specify the
different values the attribute can have.
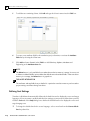
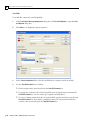
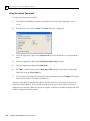
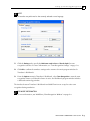
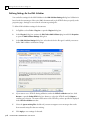
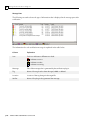
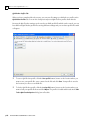
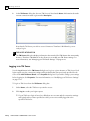
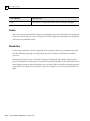
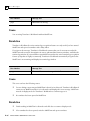
To add a Client and Domain attribute field:
1
Click in the Attribute fields list.
2
Click Add. The cursor moves to the Field box. Type Client in the Field box.
3
Select the item A Value in the Attribute values list.
4
Click the Field box to rename A Value to the name of your first client, New Chemicals Ltd.
TRANSLATOR’S WORKBENCH USER GUIDE
2-13
2
Translation Memory Setup
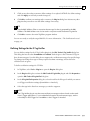
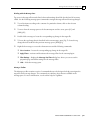
5
To add the two remaining clients, click Add and type the clients' names into the Field box.
6
To create a new attribute field for the translation project domains, re-activate the Attribute
fields list by selecting the Client item.
7
Click Add and enter Domain in the Field box. Add Chemistry, Software, Hardware and
Engineering to the Attribute values list.
D
NOTE
V
FOR MORE INFORMATION
The Delete button is only available for use when the translation memory is empty. You can use it
to delete an added field but cannot delete the default text and attribute fields. If the translation
memory is not empty, the Delete button is grayed out.
The attributes and text fields that you define for a particular translation memory can be used as
project settings and filters during translation.
Defining Font Settings
Translator’s Workbench automatically defines the default font used to display the source and target
languages. If you encounter a problem with the font settings you may want to define them yourself.
Click the Fonts tab of the Setup dialog box to define the default font used to display the source and
target language text.
C
2-14
To change the default font for the source language, select a new font from the Source default
font drop-down list.
TRANSLATOR’S WORKBENCH USER GUIDE
Translation Memory Setup
C
2
To change the default font for the target language, select the required target language from the
Target languages list and select a new font from the Target default font drop-down list.
When translating to or from languages such as Russian, Greek, Japanese and Chinese, Translator’s
Workbench automatically handles the font settings. If you encounter a problem it can be useful to
translate source fonts into target fonts. For example, when translating into Gujarati you may want to
translate from Arial to Shruti.
To add one or more font translations:
1
Select the source font name (usually the font used in your source language documents) on the
Source font list.
2
Select the target font name (usually the font of the target language you are translating into) on
the Target font list.
3
Click Add to add it to the Font translation list.
4
Repeat this procedure for all source fonts that should be translated into different target
fonts.
To always translate whatever font appears in your source documents to the target language default
font, check the box Translate into target default for all other fonts.
TRANSLATOR’S WORKBENCH USER GUIDE
2-15
2
Translation Memory Setup
Defining Substitution Settings
During translation, certain elements (such as numbers, acronyms, dates, time, measurements and
variables) may not need to change. Translator’s Workbench recognises these elements and treats
them as non-translatable elements or placeables that can be transferred directly into your target
document. You can transfer placeables to the target document exactly as they occur in the source
document or in a localised form.
For example, suppose the following English-German translation unit exists in your translation
memory:
Thank you for purchasing Translator’s Workbench 6, the software workstation for translators by
Trados, that was released on 12 October 2003.
Vielen Dank für den Kauf von Translator’s Workbench 6, dem Software-Arbeitsplatz für Übersetzer aus
dem Hause Trados, der am 12. Oktober 2003 auf den Markt kam.
Now suppose that you have to translate the following segment:
Thank you for purchasing Translator’s Workbench 7.5, the software workstation for translators, that was
released on 1 March 2006.
Translator's Workbench can automatically replace Translator’s Workbench 6 with Translator’s
Workbench 7.5 in the new target language segment if it recognises Translator’s Workbench 6 and
Translator’s Workbench 7.5 as being terms that are interchangeable. It can also change the date
accordingly. It transfers the following translation to your document:
Vielen Dank für den Kauf von Translator’s Workbench 7.5, dem Software-Arbeitsplatz für Übersetzer, der
am 1. März 2006 auf den Markt kam.
Use the Substitutions tab of the Setup dialog box to specify whether numbers, acronyms and other
variable elements should be localised according to the conventions of the target language. If the
only items that change in a new segment are non-translatable variables, the program produces a
100% match, as in the example above.
In the Automatic substitutions section of the Substitutions tab, check the options to be replaced
automatically during translation. Any options you leave unchecked are treated as normal,
translatable words. The last item in the group box, Variables, allows you to supply Translator's
Workbench with a customised list of non-translatable variables.
Customised Variable Lists
Translator’s Workbench allows you to include a customised list of variables in the translation
memory setup. Each item on the list is treated as a non-translatable element in Translator's
Workbench.
2-16
TRANSLATOR’S WORKBENCH USER GUIDE
Translation Memory Setup
2
You can create your list in the Variable list box on the Substitution tab (Setup dialog box). You can
modify the list at any time.
List Properties
The properties of the variable list are as follows:
C
Variables must appear exactly as they do in your documents, otherwise Translator's
Workbench will not recognise them.
C
Each item in the list must be on a line of its own. For example:
SDL Trados 2007
SDL MultiTerm
Paris
Bremen
C
Punctuation inside variables, such as hyphens or commas, is not supported.
C
As well as the variables themselves, the list can include comments or headings. Comments or
headings must be directly preceded by the hash symbol (#), for example, #comment.
Creating or Modifying the Variable List
To create or modify the variable list:
1
From the File menu, select Setup and click the Substitutions tab.
2
Under Automatic Substitution, select Variables. This activates the Variable list.
3
Create or modify the list of variables as required. Check that the list is formatted according to
the properties outlined in the previous section.
4
Use [Ctrl] + [Enter] to create a new line.
5
Check the contents of the list as displayed in the Variable list box.
6
Click OK to save the variable list in the translation memory setup and to close the Setup dialog
box.
F
WARNING
If you do not click OK in the Setup dialog box, the changes you have made to the variable list are
discarded.
If the translation memory you are using already contains translation units, reorganise the translation
memory. Translator's Workbench can only process the variables correctly after a reorganisation of
the translation memory.
TRANSLATOR’S WORKBENCH USER GUIDE
2-17
2
Translation Memory Setup
Importing from an external file
To import from an external TXT file to populate the variable list:
1
Create a variable entry that starts with file://, for example file://c:/my
documents/myvariablelist.txt.
2
Enter the location of the existing text file.
3
On the Substitutions tab, check the contents of the list as displayed in the Variable list box.
4
Click OK to save the variable list in the translation memory setup and to close the Setup dialog
box.
D
NOTE
5
2-18
If you do not click OK in the Setup dialog box, the changes you have made to the variable list are
discarded.
If the translation memory you are using already contains translation units, reorganise the
translation memory. Translator's Workbench can only process the variables correctly after a
reorganisation of the translation memory.
TRANSLATOR’S WORKBENCH USER GUIDE
Translation Memory Setup
2
Defining Segmentation Rules
Use the Segmentation Rules tab of the Setup dialog box to define how Translator’s Workbench
segments your source texts.
About Segmentation
Translation units in a translation memory consist of one source and at least one target language
segment. A segment is normally equivalent to a sentence. During translation, Translator's
Workbench automatically segments the text in the document for translation and attempts to find
segment matches in the translation memory. Translator’s Workbench uses punctuation marks in
the document which is being translated to determine where segments start and finish.
Default Segmentation Rules
There are two types of segmentation rule: end rules and skip rules. The end rules identify punctuation
marks or characters that are regarded by Translator’s Workbench as segment boundary markers; the
skip rules identify characters that are skipped, that is, they are not regarded as segment boundary
markers.
The default end rules are based on the full stop, exclamation mark, question mark, colon, tab
character and the paragraph mark. These are regarded as segment boundary markers when they are
followed by a space. For example, in the case of a sentence that ends in a full stop, Translator's
Workbench regards the full stop as the segment boundary marker. Segment boundary markers are
referred to as stop characters. Closing quotation marks (" or ’) or closing parentheses (")") may occur
after the stop character and before the trailing white space.
TRANSLATOR’S WORKBENCH USER GUIDE
2-19
2
Translation Memory Setup
The default skip rule is based on the semicolon (;), that is, the semicolon is not regarded as a stop
character.
D
NOTE
When working in Word, you can use the Expand Segment command from the Trados menu to
resize segments past the stop characters that have been defined for your translation memory.
However, it is not possible to expand a segment past a paragraph mark (¶).
Segmentation Rules for Double-byte Languages
Translator’s Workbench applies a different set of segmentation rules when you select a double-byte
language, such as Chinese, Japanese or Korean, as a source language in your translation memory.
For example, double byte languages use different stop characters, so the Stop character is dot list will
be different.
Changing the Default Segmentation Rules
To change the default segmentation rules:
1
Select the rule you wish to change from the list of End/Skip rules. The selected rule will appear
in the text box above the list.
2
Adjust the parameters in the Rule group box as required. Click OK to confirm.
V
FOR MORE INFORMATION
Refer to the examples that follow and to the online help in Translator’s Workbench for further
information about segmentation rules.
Examples
The examples that follow show you how to modify segmentation rules by creating customised user
lists and by deleting the Tabulator rule.
About User Lists
In the User Lists dialog box on the Segmentation Rules tab, you can create or modify a customised
list of ordinal followers or abbreviations. These lists are included in the translation memory setup
and used in conjunction with the Workbench segmentation rules. Customised ordinal follower and
abbreviation lists are language-independent. They are stored as internal lists in the translation
memory.
2-20
TRANSLATOR’S WORKBENCH USER GUIDE
Translation Memory Setup
D
2
NOTE
In Translator’s Workbench 5.5 and earlier, user lists were stored in external files. If you wish to
use a translation memory that was created in Translator’s Workbench 5.5 or earlier, you must
recreate the user lists as internal lists.
Creating or Modifying a User List
To create or modify a user list:
1
From the File menu, select Setup and click the Segmentation Rules tab.
2
Click User Lists to open the User Lists dialog box.
3
Click the Abbreviations tab to create or modify a customised list of abbreviations. Each item in
the list must be on a line of its own. Press [Ctrl]+[Enter] to move to a new line.
D
NOTE
4
Click the Ordinal Followers tab to create or modify a customised list of ordinal followers. Each
item in the list must be on a line of its own. Press [Ctrl]+[Enter] to move to a new line.
5
When you have finished, click OK to return to the Segmentation Rules tab. The number of
items in each list is displayed under the User Lists button.
6
Click OK to save the users lists in the translation memory setup and to close the Setup dialog
box.
Make sure that the abbreviation list properties are correctly applied. Abbreviation list properties
are outlined in the following section.
TRANSLATOR’S WORKBENCH USER GUIDE
2-21
2
Translation Memory Setup
D
NOTE
If you do not click OK in the Setup dialog box, the changes you have made to the user lists are
discarded.
Abbreviation List Properties
Translator’s Workbench uses an internal language-dependent abbreviation list when segmenting
text. If Translator’s Workbench finds a full stop preceded by text contained in the internal
abbreviation list, it continues reading the text until it reaches the next full stop character. When you
add a customised and language-independent abbreviation list to the translation memory setup,
Translator’s Workbench uses this in conjunction with its own internal list during segmentation.
You must apply the properties outlined below to your own abbreviation list:
C
Each abbreviation must end in a full stop and be on a line of its own, for example:
dr.
mwst.
engl.
C
Use lowercase letters only in the abbreviation list, even if the original abbreviations include
one or more uppercase letters. For example, the German abbreviation MwSt. is listed as mwst.
Importing from an external file
You can import a list of abbreviations from an external TXT file to populate the abbreviation list:
1
Create a abbreviation entry that starts with file://, for example file://c:/my
documents/myabbreviationlist.txt.
2
Enter the location of the existing text file.
3
On the Substitutions tab, check the contents of the list as displayed in the Variable list box.
Deleting the Tabulator Rule
The tab character ends a segment under certain circumstances. If you decide that a tab character
should never indicate the end of a segment, you can delete the rule. To delete the rule:
2-22
1
Select Setup on the File menu. Click the Segmentation Rules tab.
2
Click the Tabulator rule in the list box. Select Delete. This removes Tabulator from the default
end rules for your translation memory.
TRANSLATOR’S WORKBENCH USER GUIDE
Translation Memory Setup
2
Defining Non-translatable Text Options
Translator's Workbench can ignore text formatted with specific paragraph or character styles during
interactive or batch translation. This is especially useful for online help files or other Word-based
document types with character styles designed to identify jump and popup context IDs or similar
non-translatable information.
Use the Non-translatable Text tab of the Setup dialog box to define the list of non-translatable
character styles. Click Save to save existing non-translatable settings to a text file. Non-translatable
settings are stored in a text file with a .wls extension. Click Load to load previously saved nontranslatable settings.
Defining Access Rights
Use the options that are available on the Access Rights tab of the Setup dialog box to define
passwords and protect file-based translation memories. For more information,
see “Defining Passwords” on page 11-8.
D
NOTE
The Access Rights tab in the Setup dialog box is not available for server-based translation
memories. Access rights for server-based translation memories are defined outside
Translator’s Workbench by your administrator. For more information,
see “Server-based Translation Memory Security” on page 11-10.
TRANSLATOR’S WORKBENCH USER GUIDE
2-23
2
Defining Project and Filter Settings
DEFINING PROJECT AND FILTER SETTINGS
The Project and Filter Settings dialog box allows you to activate attribute and text fields for use during
translation as project and filter settings. The setup of the current translation memory determines
which attribute and text fields are available to you.
D
NOTE
If you have Guest or read-only rights to the current translation memory, you have permission to
use the Project and Filter Settings command on the Settings menu, however, the changes that
you make are not saved in the translation memory setup. For more information about access
rights in Translator’s Workbench, see Chapter 11.
Defining Project Settings
Use the Project Settings tab to activate and define values for any of the attribute and text fields that
were included in the translation memory setup. The active fields and their corresponding values are
known as the current project settings. The current project settings are added to each new translation
unit that is created during translation.
To define project settings for a specific translation project:
2-24
1
Select Project and Filter Settings on the Settings menu. The Project and Filter Settings dialog
box appears. The Project Settings tab is active.
2
Before you start, click Reset to clear existing project settings.
TRANSLATOR’S WORKBENCH USER GUIDE
Defining Project and Filter Settings
3
In the Text fields list, select the field whose contents you want to define, and click in the
Text field content box to enter the content. You can enter up to 24 characters of text. The text
fields that you define the project are displayed under Current settings.
4
Select a field in the Attribute fields list to open its picklist on the right. By default, Translator's
Workbench highlights the first attribute in the Attribute fields list and displays its picklist. The
picklist is a multiple list allowing you to select as many items as required. To select an item
from the picklist, click it once. To deselect an item, click it again. The attributes that you define
for the project are displayed under Current settings.
5
Repeat steps 3 and 4 to activate and define as many attribute and text fields as required.
The attribute and text fields that you define for the project are displayed in the Current
settings box.
C
Click Save to save the current project settings for reuse at a later stage. The settings are stored
in an external text file – known as a Workbench project settings file – with the extension .wps.
6
Click OK to confirm your project settings and to close the Project and Filter Settings dialog box.
E
TIP
2
C Translator’s Workbench also allows you to use the current filter settings as project settings.
To do this, click Apply Current Filter Settings. The relevant settings information is displayed
under Current settings on the Project Settings tab.
C To load an existing project settings file, click Load. After opening the relevant file, the
relevant settings information is displayed under Current settings on the Project Settings
tab.
Defining Filter Settings
Use the Filter Settings tab to activate and define values for any of the attribute and text fields that were
included in the translation memory setup. The active fields and their corresponding values are
known as the current filter settings. Translator’s Workbench uses the current filter settings as selection
criteria when searching the translation memory. Where there is more than one possible match for
the same source segment, Translator's Workbench selects the match whose attribute and text fields
are included in the current filter settings. If there is no translation unit in memory whose attribute
and text fields match the current filter settings, Translator's Workbench searches for a matching
translation unit from another project. You can apply an attribute and text field differences penalty to
matching translation units from other projects in the Penalties tab of the Translation Memory
Options dialog box. For more information, “Attribute and Text Field Differences Penalty (%)” on
page 2-36.
TRANSLATOR’S WORKBENCH USER GUIDE
2-25
2
Defining Project and Filter Settings
To define new filter settings:
2-26
1
Click the Filter Settings tab in the Project and Filter Settings dialog box.
2
Before you start, click Reset to clear existing filter settings.
3
In the Text fields list, select the field whose contents you want to define, and click in
the
Text field content box to enter the content. You can enter up to 24 characters of text.
4
Select a field in the Attribute fields list to open its picklist on the right. The picklist is a
multiple list allowing you to select as many items as required. To select an item from
the picklist, click it once. To deselect an item, click it again.
5
Repeat steps 3 and 4 to define as many attribute and text field filters as required. The
filters you define are displayed in the Current settings box.
C
Click Save to save the current filter settings for reuse at a later stage. The settings are stored in
an external text file – known as a Workbench filter settings file – with the extension .wfs. WFS
files are saved as Unicode UTF 8 which means that they will display correctly no matter which
language they are written in.
6
Click OK to confirm your filter settings and to close the Project and Filter Settings
dialog box.
TRANSLATOR’S WORKBENCH USER GUIDE
Translation Memory Options
E
2
TIP
C Translator’s Workbench also allows you to use the current project settings as
filter settings. To do this, click Apply Current Project Settings. The relevant
settings information is displayed under Current settings on the Filter
Settings tab.
C To load an existing filter settings file, click Load. After opening the relevant file, the relevant
settings information is displayed under Current settings on the Filter Settings tab.
TRANSLATION MEMORY OPTIONS
You can define various translation memory options before or during translation to make your
translation memory as effective as possible. These options are not part of the translation memory
setup. They are set by the translator or by the person who is responsible for the translation memory
and they determine how update modes, penalties, substitution settings and concordance are used
during translation.
E
TIP
C If you are using Translator’s Workbench for the first time, we recommend
that you use the default settings for the translation memory options. As you
become more familiar with the Workbench translation process, you can
adjust optional settings to suit your particular requirements.
C You can share the current settings for all translation memory options with
other Workbench users by saving them to an external settings file. For more
information, “Sharing Translation Memory Settings” on page 2-52.
TRANSLATOR’S WORKBENCH USER GUIDE
2-27
2
Translation Memory Options
Accessing Translation Memory Options
To access translation memory options in Translator’s Workbench, select Translation Memory
Options from the Options menu. The Translation Memory Options dialog box is displayed. This
dialog box contains a number of tabs that contain the various translation memory options. Each tab
is explained in detail in the sections that follow.
The Options menu also includes the Term Recognition Options and Translated Text Colours
commands. For more information about term recognition settings, see see Chapter 6. For more
information about colour formatting for translated text, “Translated Text Colours” on page 2-51.
2-28
TRANSLATOR’S WORKBENCH USER GUIDE
Translation Memory Options
2
Defining General Translation Memory Settings
Use the General tab of the Translation Memory Options dialog box to define the minimum match
value for translation memory searching, activate various switches and define update modes for text
and attribute fields.
Minimum Match Value (%)
The Minimum match value option indicates the minimum acceptable degree of similarity between
the source segment and the segment found in the translation memory. Fuzzy matches below this
value are not shown. The default value is 70%. The lower you set this value, the more segments
Translator's Workbench suggests as matches. However, after a certain point, the differences are so
great that displaying a suggested translation is no longer useful.
Translators work with different values according to their preferences. The recommended minimum
match value is generally between 60% and 75%. To find your preferred value, start with a low value,
such as 50%, and increase it until you find your ideal setting.
Maximum Number of Hits
Use the Maximum number of hits option to define how many segment matches Translator's
Workbench displays in its program window. You can set a value between 1 and 50; the default is 5.
You can access the lower percentage matches by clicking the match selection buttons in the
Translator's Workbench program window.
TRANSLATOR’S WORKBENCH USER GUIDE
2-29
2
Translation Memory Options
The higher the value set for the Maximum number of hits option, the longer it takes Translator's
Workbench to search the translation memory. We recommend you work with a value of 5 hits.
Translation Memory Switches
Use the Switches group box to set the following options:
C
Display time: Select this option if you want to display the time in the system fields Creation
date, Change date and Used date in addition to the date itself.
C
Show project settings: Select this option if you want the Project settings dialog box to appear
when you start Translator's Workbench or open a translation memory.
C
Copy source on no match: Select this option if you want Translator's Workbench to copy the
source segment to the target field when it cannot find a match in the translation memory.
C
Insert blank after Tag: Select this option if you want Translator's Workbench to automatically
insert a blank after each internal tag you place in the target field.
C
Strip tags from fuzzy matches if no tags appear in the source segment: Select this option to
have Translator’s Workbench remove unwanted tags from fuzzy matches when no tags appear
in the source segment of the document for translation. Tags are removed when you insert the
fuzzy match target segment into the document for translation.
C
Ask before opening Internet (TM Anywhere) translation memories: Select this option if you
wish to be consulted before connecting to an Internet translation memory. Otherwise, if your
most recently used translation memory is an Internet translation memory, launching
Translator’s Workbench or using the Connect command automatically triggers a login request.
How Translation Memory Is Updated
The translation memory options for Updating attribute and text fields are best understood by looking
at how the translation memory is updated.
As you translate a text, the translation memory is automatically updated with new translations in the
background.
When translating with Translator's Workbench, four different cases arise. These are explained in the
following pages.
E
TIP
C The attribute and text fields that are defined for the current translation
project are known as the project settings. For more information about
defining project settings, “Defining Project Settings” on page 2-24.
C Attribute and text fields are collectively known as information fields.
2-30
TRANSLATOR’S WORKBENCH USER GUIDE
Translation Memory Options
2
Case 1: New Translation
You translate the new segment from scratch. Each new segment you translate from scratch is stored
in the translation memory with its translation. If you have defined any project settings, the relevant
information fields are stored along with the source and target segments. The segments, system and
information fields together form a new translation unit in the translation memory.
Case 1: New Translation
New translation
Edit and confirm translation
New translation unit created
with information fields as
defined in the current project
settings
TRANSLATOR’S WORKBENCH USER GUIDE
2-31
2
Translation Memory Options
Case 2: 100% Match
Translator's Workbench finds a 100% match in the translation memory and you do not make any
changes. The Usage counter and Used date system fields of the matching translation unit are
updated. The Used translation units setting specifies whether the information fields that belong to
the matching translation unit in translation memory are updated. If you select Leave unchanged, the
existing information fields are not changed. If you select Merge, the currently defined project
settings are merged with the information fields that already exist in translation memory. If you select
Overwrite, the currently defined project settings replace the information fields that were previously
present in translation memory.
Case 2: 100% Match
100% match
Accept translation as is
Update Usage Counter and
Used Date system fields
Compare current project
settings with information fields
in the matching translation
unit
Leave unchanged
Ignore current project
settings. Do not change
existing information fields
2-32
Merge
Add current project settings
to the existing information
fields in translation
memory
TRANSLATOR’S WORKBENCH USER GUIDE
Overwrite
Replace the existing
information fields with
the current project
settings
Translation Memory Options
2
Case 3: Edited 100% Match
Translator's Workbench finds a 100% match in the translation memory and you do make changes.
This is the same as Case 2, but this time the Changed translation units setting determines whether
the information fields that belong to the matching translation unit in translation memory are
updated. If you select Leave unchanged, the existing information fields are not changed. If you select
Merge and the translation memory does not support multiple translations for the same source
segment, the currently defined project settings are merged with the information fields that already
exist in translation memory. However, if the translation memory does support multiple translations,
Translator’s Workbench creates a second translation unit featuring the same source segment and
information fields but with a different target segment. If you select Overwrite, the currently defined
project settings replace the information fields that were previously present in translation memory.
E
TIP
Translation memories must be explicitly set up to support multiple translations for the same
source segment. By default, translation memories do not support multiple translations. For
more information, “Multiple Translations for the Same Source Segment” on page 2-6.
Case 3: Edited 100% Match
100% match
Modify translation
Are the current project settings
a subset of the information
fields in the matching
translation unit?
Yes
No
Create a new
translation unit with
the newly translated
segments and the
current project
settings
Compare current project settings
with information fields in the
matching translation unit
Leave unchanged
Replace target segment
with new one. Do not
change the existing
information fields
Translation memory does not
allow multiple translations
Replace target segment with new
one. Do not change the existing
information fields
Overwrite
Merge
Replace target segment with new
one. Replace the existing
information fields with the current
project settings
Translation memory allows
multiple translations
Create a second translation unit featuring
the same source segment and information
fields, but with a different target segment
TRANSLATOR’S WORKBENCH USER GUIDE
2-33
2
Translation Memory Options
D
NOTE
C Merge is the default setting for Changed translation units in the Updating attribute and text
fields group box.
C If you accept and edit the translation unit that is currently on display in the Workbench
translation memory window and the current project settings are different to the information
fields that belong to this unit, Translator’s Workbench automatically creates a new
translation unit. This happens even if the translation memory contains another translation
unit (not currently on display) whose information fields are the same as, or constitute a
superset of, the current project settings. To avoid this situation and the unnecessary
duplication of translations, define a filter that uses the same information fields as the
current project settings. When the filter is active, Translator’s Workbench will always display
the translation unit with matching information fields first.
Case 4: Edited Fuzzy Match
Translator's Workbench finds one or several fuzzy matches and you edit the translation as needed.
This is similar to Case 1, in that the setting of the Updating attribute and text fields group box does
not matter. A new translation unit is created in the translation memory. The current project settings
become the information fields for the new translation unit and the current user ID becomes the
Creation user.
Case 4: Edited Fuzzy Match
Fuzzy match
Edit and confirm translation
New translation unit created with
information fields as defined in the
current project settings
2-34
TRANSLATOR’S WORKBENCH USER GUIDE
Translation Memory Options
2
Defining Penalties Settings
Use the Penalties tab of the Translation Memory Options dialog box to define penalties for translation
units with formatting, attributes or placeable differences, or for translation units that were created
by WinAlign or a machine translation system.
Formatting Differences Penalty (%)
When comparing the source segment in the document for translation with source segments in the
translation memory, Translator's Workbench not only evaluates linguistic differences, but also
formatting differences. Translator's Workbench recognises a translation unit that only has
formatting differences as an exact match. It reduces the match value by applying the Formatting
differences penalty to alert the user to the difference between the two segments. This is illustrated in
the screenshot below:
TRANSLATOR’S WORKBENCH USER GUIDE
2-35
2
Translation Memory Options
Formatting penalties are valid for both 100% matching segments and for fuzzy matches. You can
set this value between 0 and 20%. The default is 1%, since formatting differences may not be as
important as linguistic ones.
Attribute and Text Field Differences Penalty (%)
A translation memory consists of translation units that contain a source language segment together
with its target language equivalent. In addition, the translation units may include attribute and text
fields, which can be used to further classify translation units by project, subject matter or client.
Example
Suppose you have translated the segment Press the [Enter] key to continue in two translation projects –
one for Pro Software Inc., the other for BetaSoft Unlimited. Pro Software Inc. wants you to translate
[Enter] key as [Eingabetaste] in German, whereas BetaSoft wants you to translate it as [Return]-Taste.
To keep the two translations separate, you define two different project attributes for them:
Client: Pro Software Inc. and Client: BetaSoft Unlimited. Translator's Workbench creates two different
translation units for two different translations of the same source language segment.
Translation Unit for Pro Software Inc.
Press the [Enter] key to continue.
Drücken Sie die [Eingabetaste], um fortzufahren.
Client: Pro Software Inc.
Translation Unit for BetaSoft Unlimited
Press the [Enter] key to continue.
Drücken Sie die [Return]-Taste, um fortzufahren.
Client: BetaSoft Unlimited
2-36
TRANSLATOR’S WORKBENCH USER GUIDE
Translation Memory Options
2
For example, you are starting a new translation for BetaSoft Unlimited and set the client attribute in
the Filters Settings tab as BetaSoft Unlimited before translating. For more details on setting the client
attribute, “Defining Filter Settings” on page 2-25. If the segment Press the [Enter] key to continue
occurs in your new translation project, Translator's Workbench finds two identical matches in the
translation memory. Only one, however, has the correct project attribute: Client: BetaSoft Unlimited.
If the Attribute and text field differences penalty is set to 2%, Translator's Workbench treats the
match with different attributes as a 98% match.
You can set the Attribute and text field differences penalty value between 0 and 20%. The default is
2%.
Placeable Differences Penalty (%)
This penalty is only relevant under the following conditions:
C
The segment you are translating contains placeables.
C
A match for the segment is found in the translation memory.
C
The tags in the target segment differ from the source segment of the matching translation
memory translation unit. For example, the target segment in the translation memory contains
more tags, fewer tags or different formatting tags to those in the source segment.
Under these conditions, Translator's Workbench cannot place tags automatically in the new
translation.
In this case, Translator's Workbench applies the Placeable differences penalty. The penalty is valid
for 100% matching segments and for fuzzy matches. You can set a value between 0 and 20%. The
default is 2%.
TRANSLATOR’S WORKBENCH USER GUIDE
2-37
2
Translation Memory Options
Example
The following segment is displayed for translation:
The VR 101 is our
brilliant new
recorder.
There are tags before and after the adjectival phrase brilliant new.
Translator's Workbench finds the following translation unit, in your translation memory, with the
same text but with different tagging in the source and target segments:
The VR 101 is our
Der VR 101 ist unser
brilliant new
toller neuer
video recorder.
Videorecorder.
In the translation, the tagging differs from that in the source segment. Rather than suggesting an
exact match, using the and tags from the new source segment (which might result in incorrect
tagging in the new target), Translator's Workbench suggests the following target segment and
applies a Placeable differences penalty:
Der VR 101 ist unser
toller neuer
Videorecorder.
You can decide whether you want to accept the tagging of the translation memory target segment or
whether you want to use the new tags from the new source segment.
Apply Placeable Penalty also when Source Tags differ
Check this box if you want to apply the Placeable differences penalty every time the tags or placeables
in the new segment differ from those of the source segment in the translation memory. Normally,
Translator's Workbench automatically substitutes changed tags in the new translation. You can
change this behaviour and always apply the Placeable differences penalty when the tags of the new
source segment differ from those of the matching translation memory source segment.
2-38
TRANSLATOR’S WORKBENCH USER GUIDE
Translation Memory Options
2
Alignment Penalty (%)
WinAlign allows you to generate translation memories from existing documents and their
translations.
V
FOR MORE INFORMATION
For more information on WinAlign, see the WinAlign User Guide.
Parts of your documents may be misaligned, that is, they do not actually represent sentence pairs
that are translations of each other. Translator's Workbench allows you to set an Alignment penalty
for translation units created by WinAlign. During interactive translation, if you confirm the
translation of a translation unit created by WinAlign, your user ID is added as the Change user of the
translation unit, so the Alignment penalty no longer applies. You can set the Alignment penalty to a
value between 0% and 30%. The default is 3%.
Machine Translation Penalty (%)
Machine translation (MT) systems translate documents automatically and can be useful for
pre-translation of technical documentation. Translator's Workbench applies the Machine translation
penalty to segments translated by machine translation systems to take into account that there was no
human intervention in the creation of the translation unit. By default, it is set to 15%. In this case,
even if Translator's Workbench finds a perfect match for a new segment in the translation memory,
it displays a match value of only 85% if the corresponding translation unit was created by a machine
translation system. The translation is displayed in a grey target field (instead of the usual yellow
target field) in your document. If you edit and confirm the translation from a machine translation
system, your user ID is added as the Change User of the translation unit, so the Machine translation
penalty no longer applies. You can set the Machine translation penalty to a value between 0% and
30%. The default is 15%.
Multiple Translations Penalty (%)
The Multiple translations penalty option is only available if you have selected the Allow multiple
translations for identical source segments option when you created the translation memory. The
default is set to 1%. Where there are identical source segments with different target segments,
Translator’s Workbench suggests a 100% match and applies a 1% penalty to alert the user to the
presence of the other translation unit in the translation memory.
V
FOR MORE INFORMATION
For more information, “Multiple Translations for the Same Source Segment” on page 2-6.
TRANSLATOR’S WORKBENCH USER GUIDE
2-39
2
Translation Memory Options
Defining Substitution Localisation Settings
Translator's Workbench can change the format of non-translatable elements where necessary, for
example, dates and measurements. This is referred to as substitution localisation: the substituted
elements are transferred to the target segment and are also localised to the target language
requirements. For example, when translating a segment with an English date into German, you want
to localise the English date format to German standards in the translated segment. Translator's
Workbench can do this for you automatically, according to the settings you define.
Use the Substitution Localisation tab of the Translation Memory Options dialog box to specify if, and
how, Translator's Workbench should automatically adapt the format of variable elements, such as
numbers and dates, during translation. Depending on how your translation memory has been set
up, you can define substitution localisation settings for dates, time, numbers and measurements.
Items that are not set up for automatic substitution are greyed out on the Substitution Localisation
tab.
Defining Substitution Settings for Dates
The Calendar type drop-down box specifies which calendar is used. The options in this box are
determined by the regional settings defined in the Windows setup for the target language of your
translation memory. Translator's Workbench can switch calendar types during translation if
necessary. This is especially useful for translation into languages that use a calendar type different
to that of the Gregorian Calendar, such as Japanese and Chinese. Use the Short date and Long date
boxes to change the way the short and long date formats are localised during translation.
2-40
TRANSLATOR’S WORKBENCH USER GUIDE
Translation Memory Options
2
Short Dates Example
Suppose the following segment occurs in your English-German translation: Today is 19/03/007.
Translator's Workbench recognises 19/03/07 as a short date and displays it as a placeable. When you
place it in the target segment, the program checks the Short date setting in the Substitution
Localisation tab. If this is dd.MM.yy (as used in Germany), the transferred date is inserted as 19.03.07.
Long Dates Example
Suppose the following segment occurs in your English-German translation: Today is 19 March 2007
Translator's Workbench recognises 19 March 2007 as a long date and displays it as a placeable.
When you place it in the target segment, the program checks the Long date setting in the Substitution
Localisation tab. If this is d. MMMM. yyyy for German, the transferred date is inserted as 19. März
2007.
Substitution Settings for Time Specifications
Use the Time style box to change how the time format in the source language is adapted to the target
language during translation.
For example, suppose the following segment occurs in your English-German translation: The new
German chancellor will arrive at 10:45. Translator's Workbench recognises 10:45 as a time specification
and displays it as a placeable. When you place it in the target segment, the program checks the Time
Style setting in the Substitution Localisation tab. If this is H.mm' Uhr for German, the transferred
time is inserted as 10.45 Uhr.
Substitution Settings for Numbers
Use the Digit grouping symbol box to specify the symbol used in the target language to group the
digits in large numbers. Use the Decimal symbol box to specify the symbol used for decimal values.
For example, suppose the following segment occurs in your English-German translation: Today, the
DAX was down 11.98 points (= 0.55%) to 4,312.79. Translator's Workbench recognises all numbers and
displays them as placeables. When you place the numbers in the target segment, the program checks
the Digit grouping symbol and Decimal symbol settings in the Substitution Localisation tab.
By default, the dot (“.”) is the digit grouping symbol and the comma (“,”) the decimal symbol in
German. In this case, the numbers are correctly transferred as 11,98, 0,55%, and 4.312,79.
TRANSLATOR’S WORKBENCH USER GUIDE
2-41
2
Translation Memory Options
Defining Substitution Settings for Measurements
Use the Measurement system box to specify the system of measurement for the target language.
Translator's Workbench can automatically switch the measurement system during translation and
determine the correct value for the new measurement unit. For example, the measurement 3 in is
automatically translated to 7,62 cm when translating from English to German.
Suppose the following segment occurs in your English-German translation: Mary is used to working
in temperatures as high as 105 °F. Translator's Workbench recognises 105 °F as a temperature and
displays it as a placeable. When you place it in the target segment, the program checks the
Measurement system setting in the Substitution Localisation tab. If this is Metric for German,
Translator's Workbench converts the temperature to °C (as used in Germany) and inserts it as
40,56 °C.
D
2-42
NOTE
If a segment with the same wording but a different date, time, number or measurement occurs,
Translator's Workbench can still produce a 100% match and transfer the new date, time,
number or measurement in the correct target language format.
TRANSLATOR’S WORKBENCH USER GUIDE
Translation Memory Options
2
Defining Concordance Settings
The concordance feature allows you to search the translation memory for text fragments. After
selecting a word or other sentence part in your document, you can use the Concordance command
on the Tools menu to search the translation memory for the selected text. If Translator's Workbench
can find the same or similar text, it opens a concordance window showing all matching translation
units. You can only search for concordance matches in the source language of the translation
memory.
Use the Concordance tab of the Translation Memory Options dialog box to specify settings for the
concordance feature.
Define the following options as required:
Minimum match value (%)
Use this option to set the minimum acceptable match value for the concordance function. Generally,
a value ranging from 65% to 75% yields the best results. The default is 70%.
TRANSLATOR’S WORKBENCH USER GUIDE
2-43
2
Translation Memory Options
Maximum Number of Hits
Use this option to set the maximum number of translation units to be displayed in the concordance
window. The default is 30. This means that if the search criterion occurs in more than 30 segments,
only the first 30 are found and shown in the concordance window. You can set a value between
1 and 99. The higher the value set for the Maximum number of hits, the longer the concordance
search takes.
Reference (Read-only) Translation Memory
Use this option to set the location of a second reference translation memory for concordance
searches. Use the Browse command to locate both file-based and server-based translation memories.
The contents of the reference translation memory are read-only and cannot be modified, so it may
reside on a CD-ROM or in a write-protected network folder. This also means that read-only or Guest
rights are sufficient for the purposes of referencing a server-based translation memory.
D
NOTE
If Translator’s Workbench finds a concordance match in the main translation memory, the
search stops and the search results appear in the Concordance dialog box. If no concordance
match is found in the main translation memory, Translator’s Workbench continues the search in
the reference translation memory.
Start Concordance Search if no Segment Match is Found
Select this option if you want to run an automatic concordance search when no match is found for
the current source segment in translation memory. The whole of the current source segment is used
as the search text; Translator’s Workbench identifies matching subsegments from translation
memory and displays them in the Concordance dialog box.
Move cursor into Concordance dialog box after search
Select this option if you want to move your cursor from the target segment area of the opened
segment in your editing environment to the Concordance dialog box after a successful concordance
search. By default, this option is not activated.
Search First in Reference Translation Memory
Select this option if you want to search the reference translation memory first for concordance
searches.
D
2-44
NOTE
If Translator’s Workbench finds a concordance match in the reference translation memory, the
search stops and the search results appear in the Concordance dialog box. If no concordance
TRANSLATOR’S WORKBENCH USER GUIDE
Translation Memory Options
2
match is found in the reference translation memory, Translator’s Workbench continues the
search in the main translation memory.
Apply Current Filter Settings
Select this option if you wish to apply the current filter settings to concordance searches. Filter
settings are defined in the Project and Filter Settings dialog on the Settings menu.
Show Most Recent Translation Units First
Select this option if you wish to sort concordance search results by translation unit change and
creation dates, as well as the default criteria, percentage match value. When you select this option,
concordance search results are sorted first by percentage match value, and afterwards in
chronological order by translation unit change and creation date.
Display Translation Unit Information
Select this option if you wish to display translation unit information from the translation memory,
such as Change User: Miller or Project: Software for Europe.
Example
Suppose you want to look for all segments in a translation memory where the word memory has been
translated.
A Minimum match value of 100% only finds exact matches, that is, segments where the word
memory has been used in exactly this form. A value of around 70%, however, also finds segments
where this word starts with a capital letter (Memory) or in the plural form (memories).
The same is true for multi-word units. Looking for every segment where the word memory has been
used in one place and the word translation in another is only successful if you set the Minimum match
value to a value below 100%. Otherwise, you only find those segments where the compound term
translation memory has been used.
D
NOTE
As a general rule, setting the Minimum match value to 70% is more flexible and versatile than
setting it to higher values. We recommend that you experiment with different values until you
find a setting that best suits your needs.
TRANSLATOR’S WORKBENCH USER GUIDE
2-45
2
Translation Memory Options
Defining Batch Tools Settings
Use the Tools tab of the Translation Memory Options dialog box to set various options for the Analyse,
Translate and Clean Up batch tools in Translator's Workbench. The batch tools themselves are
available from the Tools menu.
General Options
The General Options group box contains the following general and file type-specific options:
2-46
C
Strip unused fonts/Strip unused styles (Word documents only): Select these options if you
want Translator's Workbench to remove all unused fonts and/or character styles from Word
documents during batch-translation or clean up.
C
Strip TW4Win styles (Word documents only): Select this option if you want to remove the
styles inserted by Translator’s Workbench (for example, tw4winExternal, tw4winInternal and
tw4winTerm) during clean up.
C
TradosTag XML Workflow for Workbench RTF : Select this option if you wish to automatically
save tagged Workbench RTF files as TradosTag (TTX) during batch translation. If you check
this option, Translator’s Workbench adds the extension ttx to the original file name.
Examples of Workbench RTF files include STF files that have been converted from
FrameMaker MIF or Interleaf ASCII format.
TRANSLATOR’S WORKBENCH USER GUIDE
Translation Memory Options
C
TradosTag XML Workflow for Word .doc files: Select this option if you wish to automatically
save Word .doc files as TradosTag (TTX) during batch translation. If you check this option,
Translator’s Workbench adds the extension ttx to the original file name. You should choose
either one workflow or the other when working with Word files. For more information on
processing Word .doc files as TradosTag see the File Formats Reference Guide.
C
Use same log file for all TMs (all document formats): Select this option if you wish to store the
information from all analysis, pre-translation and clean up operations for all translation
memories in one file. The results for each successive operation are appended to the
information that already exists in the specified log file.
C
CSV log separator (all document formats): Use this option to specify the cell separator you
wish to apply to the presentation of data in CSV log files. You can select one of the items from
the drop-down list, or enter your own cell separator character. Note that cell separators consist
of one character only.
E
TIP
2
Use the CSV log separator option to change the specified cell separator if you have trouble
opening CSV files in Excel. In particular, this may be necessary if you are working with a
localised version of Excel.
Backup Options
The Backup group box contains the following general options:
C
Keep backup: Select this option if you want to keep a backup file (.bak) when running the
Translate and Clean Up functions. Translator’s Workbench creates a backup file in the same
folder as the pre-translated or cleaned up files.
C
Move backup files: Check this if you want to keep a backup file in a different location. Click
Browse to select the folder where the backup files will be saved.
Tag Settings Files
In the Tag settings files group box, specify which initialisation files Translator's Workbench should
use when batch processing XML, HTML and SGML files. The Tag Settings command provides
access to both the Tag Settings Manager and the Tag Settings Wizard.
TRANSLATOR’S WORKBENCH USER GUIDE
2-47
2
Translation Memory Options
Multiple Translations
The Always add as new TU when target segments differ option in the Tools tab applies to the
Clean Up and Translate processes in translation memories that allow multiple translations. When
this option is selected, Translator’s Workbench adds a new translation unit to the translation
memory whenever the target segment in the batch processed document differs from the target
segment in the translation memory (given that the source segments are identical).
This option is not selected by default to avoid unnecessary duplication in the translation memory.
During batch clean up or translation, Translator’s Workbench may still find several multiple
translation matches for a target segment that has been changed in the document for batch
processing. If you have selected Update TM in the Clean Up or Translate dialog box and Always add
new TU when target segment differs is not selected, Translator’s Workbench uses further selection
criteria to choose one of those multiple matches for update.
Tag Settings Files in Translator’s Workbench
In order to batch process XML, HTML or SGML files (including DTD- and schema-based XML files),
you must supply Translator’s Workbench with the relevant tag settings files. The tag settings file
contains information about the elements and entities in the relevant XML/HTML/SGML file, and
how these should be handled during batch tool operations.
Managing Tag Settings Files
Use the Tag Settings Manager to manage the list of tag settings files that are currently available to
Translator’s Workbench. Use the Tag Settings Wizard to create new or edit existing files.
C
2-48
To access the Tag Settings Manager from the Tools tab of the Translation Memory Options
dialog box, click Tag Settings. The Tag Settings Manager is displayed.
TRANSLATOR’S WORKBENCH USER GUIDE
Translation Memory Options
C
2
To access the Tag Settings Wizard from the Tag Settings Manager, click Add and, in the Add
Tag Settings dialog box, select one of the options that allows you to create a new tag settings
file. The Tag Settings Wizard is displayed.
XML/HTML/SGML Document Type Rules
Each XML/HTML/SGML file belongs to a particular document type, as denoted by the root element
of the file. Similarly, each tag settings file makes reference to the root element of the document type
to which the settings correspond. When a tag settings file contains the same root element as a given
XML/HTML/SGML file, the files are said to be matching.
The batch tools allow you to process groups of XML/HTML/SGML files that contain mixed
document types. During batch tool operations, the following rules apply to the selection and use of
tag settings files:
C
Translator’s Workbench refers to the Tag Settings Manager list for information about the tag
settings files that are currently available for batch tool operations.
C
If there is more than one matching tag settings file available for a given document type,
Translator’s Workbench uses the first matching file in the list. This tag settings file is used to
process all files that belong to the relevant document type.
C
If there is no matching tag settings file available for a given document type, Translator’s
Workbench checks to see if the Tag Settings Manager includes a default tag settings file. If so,
the default file is used to process all files that belong to the relevant document type.
TRANSLATOR’S WORKBENCH USER GUIDE
2-49
2
Translation Memory Options
C
If there is no matching tag settings file available for a given document type, and no default tag
settings file, Translator’s Workbench skips all files that belong to that document type.
After a batch tool operation, refer to the log file for information about the choice of tag settings file
for each file that was processed. The log file also indicates which files were skipped.
Predefined Tag Settings Files
SDL Trados ships with a series of built-in files that contain predefined tag settings for certain
document types. These files are as follows:
C
HTML4.ini – suitable for processing all HTML/ASP documents that are based on the
HTML 4.0 DTD and have the root element HTML.
C
XSL.ini – suitable for processing XSL documents that have the root element xsl:stylesheet.
XSL is a particular type of XML.
C
RESX.ini – suitable for processing .NET RESX files that have the root element RESX.
C
XLIFF.ini – suitable for processing XML Localization Interchange File Format files that
have the root element XLIFF.
C
DITA.ini – suitable for processing Darwin Information Typing Architecture XML files.
C
SVG.ini – suitable for processing Scalable Vector Graphics XML files.
Built-in tag settings files are stored in the Workbench installation folder which by default is:
C:\Documents and Settings\All Users\Application Data[SDL International\Filters\... You can create
copies of and modify these files as required. Note that the Application Data folder may be hidden and
you will have to set it to be visible if you want to see this folder and any subfolders. Also, if you want
to make any changes to files in this folder, you must have read/write access to this folder. Consult
your IT department for more information.
D
V
2-50
NOTE
The Tag Settings Manager is shared by SDL Trados Synergy, Translator’s Workbench, TagEditor
and WinAlign.
The changes that you make to the Tag Settings Manager list from one of these applications will
affect the list as viewed from the other applications.
FOR MORE INFORMATION
For more information on the tag settings and the Tag Settings Manager and Wizard see the
online help and the File Formats Reference Guide.
TRANSLATOR’S WORKBENCH USER GUIDE
Translation Memory Options
2
Translated Text Colours
When you pre-translate documents, colour can help you to distinguish between source text and
different types of target text (100% matches, fuzzy matches). Use the Translated Text Colours
command on the Options menu in Translator’s Workbench to define text colour settings.
D
NOTE
C Translated text colours apply to Word documents only and are not fully supported in
TagEditor.
To define colour settings for the text in your Word documents:
1
From the Options menu in Translator’s Workbench, select Translated Text Colours. The
Translated Text Colours dialog box is displayed.
2
Select the colours that you wish to apply from the Source Colour and Target drop-down lists.
There are two target colour lists: one for exact matches and one for fuzzy matches.
Translator’s Workbench will apply the selected colours during interactive and batch
translation. Click Suggestion if you want to use the colours suggested by Translator’s
Workbench.
3
If you wish to restore the default settings and leave text colours unchanged, click Reset.
4
Click OK to confirm and to return to the Translator’s Workbench program window.
To avoid confusion and potential problems at the clean up stage, do not choose colours that already
exist in your source texts. Once you have made a choice of source and target colours, you must retain
TRANSLATOR’S WORKBENCH USER GUIDE
2-51
2
Sharing Translation Memory Settings
them until translation is complete and files are ready for clean up. During clean up, Translator’s
Workbench restores the original colour formatting to the text of your translated files.
V
FOR MORE INFORMATION
For more information about the clean up feature in Translator’s Workbench, see “Cleaning Up
Translated Documents” on page 8-16.
SHARING TRANSLATION MEMORY SETTINGS
In a multi-user setup where several users are working with the same translation memory, it is often
useful to apply common translation memory settings. The use of common settings helps to ensure
that translation is as consistent as possible across the board. To facilitate this, Translator’s
Workbench allows you to save the current translation memory settings to an external settings file
(*.ini).
By default, the following information is saved to the translation memory settings file:
C
All translation memory option settings, as defined in the Translation Memory Options dialog
box.
C
The current user ID, as defined in the User ID dialog box.
C
Translator’s Workbench display settings.
If you intend to share the settings file, we recommend that you edit it first to remove any
non-transferable information such as the user ID. The settings file can be edited in Notepad
or any text editor.
Saving and Loading Translation Memory Settings Files
Press [F8] to save the current translation memory settings to a settings file (ini). Press [Shift]+[F8]
to load a settings file interactively. Note that settings files cannot be loaded if there is a translation
memory open in Translator’s Workbench.
2-52
TRANSLATOR’S WORKBENCH USER GUIDE
Sharing Translation Memory Settings
2
Use the following methods to set up automatic loading of the translation memory settings file:
C
If the settings file is stored in the Workbench installation folder and has the file name
WorkbenchSiteSettings.ini, Translator’s Workbench will automatically load these
settings on startup.
C
If the settings file is associated with a particular (file-based) translation memory, Translator’s
Workbench will automatically load these settings on opening the translation memory. To
create the translation memory association, store the settings file in the same folder as the
translation memory and apply the file naming convention
<TranslationMemoryFileName>Settings.ini.
E
TIP
Translator’s Workbench also allows you to share project and filter settings. For more
information, “Defining Project and Filter Settings” on page 2-24.
TRANSLATOR’S WORKBENCH USER GUIDE
2-53
2
Sharing Translation Memory Settings
2-54
TRANSLATOR’S WORKBENCH USER GUIDE
TRANSLATOR’S WORKBENCH
AND WORD
This chapter explains how to translate documents using
Translator’s Workbench and Word. Translator’s Workbench
supports Word 2000-2003 and Word 2007. Sections include:
C
Trados-Word interface
C
Setting up the Word editing environment
C
General translation guidelines
C
SDL Trados and Microsoft Word 2007
C
Quick reference guide
Chapter
3
3
Overview
OVERVIEW
For the purposes of translation, Word is integrated with Translator’s Workbench, the translation
memory system, and MultiTerm, the terminology management system. The Word editing
environment is ideal for translating Word or RTF documents, including RTF help files and
Workbench RTF. Workbench RTF is a specially marked up Rich Text Format that is compatible with
Translator’s Workbench. For example, you can convert FrameMaker (MIF) and Interleaf (IASCII)
files to Workbench RTF using the S-Taggers.
D
NOTE
C You can also translate Workbench RTF (including STF) files in the TagEditor editing
environment. TagEditor provides advanced tag protection and verification features for
tagged formats.
C Translator’s Workbench now supports Microsoft Word 2007 as well as Microsoft Word
2000-2003.
This chapter introduces the Word editing environment. It includes an introductory tutorial and
some general translation guidelines for translation with Word.
Audience
If you wish to start translating with Translator’s Workbench, MultiTerm and Word, you should read
this chapter. The information is relevant whether you are working with file- or server-based
translation memories.
Before you start work in the Word editing environment, make sure that you have the necessary
translation memory access rights. In the case of file-based translation memories, you require
read-write access to perform translation tasks, and in the case of server-based translation memories,
you require Translator rights. For more information about access rights in both types of memory,
For more information, see “Translation Memory Security” on page 11-3.
Trados-Word 2007 Interface
Translator’s Workbench and Word 2007 communicate via a specially designed document template,
TRADOS8.dotm. When this template is activated in Word, the SDL Trados ribbon is displayed. The
ribbon provides access to the commands that you require for translation with Translator’s
Workbench.
3-2
TRANSLATOR’S WORKBENCH USER GUIDE
Overview
3
Trados-Word 2000-2003 Interface
Translator's Workbench and Word communicate via a specially designed document template,
TRADOS8.dot for Word 2000-2003. When this template is activated in Word, the Trados menu is
added to the Word menu bar; when you open a document for editing, the Workbench toolbar is
displayed. The Trados menu and Workbench toolbar in Word provide access to the commands that
you require for translation with Translator’s Workbench.
During installation of SDL Trados, the setup program tries to determine where the Word Startup
folder is located on your computer. If it is successful, it installs the Trados-Word template and the
next time you launch Word, the interface with Translator’s Workbench is automatically available. If
for some reason the Trados menu is not available in Word 2000-2003 after installation, you may
need to prepare Word manually.
Manually Preparing Word
D
NOTE
During the installation of SDL Trados 2007, the TRADOS8.dot or TRADOS8.dotm is
installed and the previous versions are removed. These steps are included for trouble-shooting
purposes only.
The Trados-Word template, TRADOS8.dot or TRADOS8.dotm, is copied to the TT\Templates
folder during installation of SDL Trados 2007. Use this file to make the interface with
Translator’s Workbench permanently available in Word.
D
NOTE
The procedure for manually setting up the interface between Word 2007 and Translator’s
Workbench differs slightly.
To set up the interface between Word 2000-2003 and Translator’s Workbench:
1
In Windows Explorer, copy the Trados-Word template, TRADOS8.dot, from the TT\Templates
subfolder of your SDL Trados 2007 installation to Word’s template folder.
TRANSLATOR’S WORKBENCH USER GUIDE
3-3
3
Overview
2
In Word 2000-2003, select Templates and Add-ins from the Tools menu. The Templates and
Add-ins dialog box is displayed.
3
Click Add to open the Add Template dialog box. This dialog box contains a list of all templates
that are available in Word’s template folder.
4
In the Add Template dialog box, select TRADOS8.dot. Click OK to add the Trados-Word
template as a global template to the standard Word template, Normal.dot.
5
In the Templates and Add-Ins dialog box, TRADOS8.dot is listed as an active global template.
Click OK to confirm and to return to the main Word program window. The Trados menu is
now visible in Word’s menu bar.
Every time you start Word, you must activate the Translator's Workbench template by selecting
Global Templates and Add-Ins on the Tools menu in Word and selecting TRADOS8.dot in the
Global templates list. For this to happen automatically, copy the Trados-Word template to Word’s
Startup folder (usually C:\Program Files\Microsoft Office\Office\Startup). The template is then
3-4
TRANSLATOR’S WORKBENCH USER GUIDE
Overview
3
activated automatically each time you start Word. You can deactivate the template temporarily by
selecting Templates and Add-Ins on the Tools menu and clearing the TRADOS8.dot check box. To
permanently deactivate the template, delete the TRADOS8.dot file from the Startup folder and
restart Word.
F
WARNING
Translator’s Workbench 8.0 does not support earlier versions of the Trados-Word document template.
Make sure that you install TRADOS8.dot and remove TRADOS7.dot, TRADOS6.dot,
TRADOS5.dot, TW4Win2k.dot, TW4Win97.dot or TW4Win.dot from your computer.
TRANSLATOR’S WORKBENCH USER GUIDE
3-5
3
General Translation Guidelines
GENERAL TRANSLATION GUIDELINES
This section describes a number of options that you can set up to facilitate translation using
Translator’s Workbench and the Word editing environment.
V
FOR MORE INFORMATION
For more information about translation workflow and the preparation of Word documents and
RTF help files for translation, see the File Formats Reference Guide.
User Interface Language
Translator’s Workbench supports different user interface languages. To change the language that
appears in dialog boxes, menus and online help:
1
In Translator's Workbench, select User Interface Language from the View menu. The User
Interface Language dialog box is displayed.
2
Select a language on the Language drop-down list. Click OK to confirm. All dialog boxes,
menus and online help now appear in the selected language.
Copy Source on No Match
Selecting this option means that when Translator’s Workbench finds no match in the translation
memory for the source segment, it automatically copies the source segment to the target field. Then
you overwrite the source text with the translation. To activate this option, choose Translation Memory
Options from the Options menu in Translator’s Workbench. In the Translation Memory Options
dialog box, click to open the General tab and select Copy source on no match.
For more information about the options that are available in this dialog box, see “Translation
Memory Options” on page 2-27.
Creating Multiple Translations
If you are using a translation memory that allows multiple translations, the Add as New Translation
command is available in the Trados menu in Word whenever Translator's Workbench identifies an
exact (multiple translation) or 100% match for the currently open translation unit. This allows you
to create a new translation for the current source segment which is then stored, along with the
original translation unit, as a multiple translation unit in the translation memory.
3-6
TRANSLATOR’S WORKBENCH USER GUIDE
General Translation Guidelines
3
In Word, the Add as New Translation command is available on the Trados menu or as a keyboard
shortcut, [Ctrl]+[Alt]+[↑]. When you use this command, the message New translation added
successfully. Use "Set/Close" to continue appears in the status bar of Translator's Workbench.
By default, Translator's Workbench applies a 1% match penalty to multiple translations.
Accordingly, whenever a multiple translation is retrieved from the translation memory, the message
Exact Match, -1% Multiple Translations appears in the status bar of Translator's Workbench.
V
FOR MORE INFORMATION
For more information on multiple translations, see the online help for Translator's Workbench.
Translated Text Colours
Colour can help you distinguish between different types of target text (100% matches,
fuzzy matches).
To change the colour of translated text:
1
From the Options menu in Translator’s Workbench, select Translated Text Colours. The
Translated Text Colours dialog box is displayed.
2
Select colours from the Source colour and Target lists. There are two target colour lists: one for
exact matches and one for fuzzy matches.
3
Click OK to confirm. This becomes the default setting until you change it again.
TRANSLATOR’S WORKBENCH USER GUIDE
3-7
3
General Translation Guidelines
E
TIP
If you wish to restore the default settings and leave text colours unchanged, click Reset.
To avoid confusion and potential problems when it comes to cleaning up the bilingual file, do not
use colours that already exist in your source texts. Once you have made a choice of source and target
colours, you must retain them until you have finished translation and are ready to clean up the
bilingual file. During clean up, Translator’s Workbench restores the original colour formatting to the
text of your translated files. For more information about the clean up feature in Translator’s
Workbench, see “Cleaning Up Translated Documents” on page 8-16.
Non-translatable Text
When there is text in your documents that does not require translation, you can instruct Translator’s
Workbench to ignore it.
Using Paragraph Styles to exclude Paragraphs from the Translation Process
Excluding paragraphs from the translation process is useful if your text contains paragraphs of
program code or non-translatable examples. When opening a translation unit, Translator's
Workbench checks a list of non-translatable paragraph styles that you have defined. If the current
paragraph style is non-translatable, Translator's Workbench ignores or skips it. Non-translatable
paragraphs must be formatted in styles with unique names so that Translator’s Workbench can
recognise them.
3-8
TRANSLATOR’S WORKBENCH USER GUIDE
General Translation Guidelines
3
To add a paragraph style to the list of non-translatable styles:
1
In Translator's Workbench, select Non-translatable Paragraphs on the Settings menu. The
Non-translatable Paragraphs dialog box is displayed. Use this dialog box to specify the names
of the paragraph styles to be ignored during translation.
2
Add a style name to the list by doing one of the following:
C Select the input box and enter the name of the paragraph style which is not to be
translated. In our example, enter SkipDuringTranslation. Click Add to confirm.
C You can also select paragraph styles from existing Word documents. Click Open
Document. The Style List File dialog box opens. Locate the Word document on your system
and click Open. Translator's Workbench scans the document and displays a list of its
paragraph styles. Select the style name and click the << Copy button. The name is added to
the list of non-translatable paragraphs.
3
If required, repeat Step 2 for other paragraph style names.
4
Click OK to confirm your settings.
E
TIP
If you are not familiar with document styles, refer to Word’s documentation.
TRANSLATOR’S WORKBENCH USER GUIDE
3-9
3
General Translation Guidelines
Using Character Styles to Exclude Text from the Translation Process
In addition to paragraph styles, Translator's Workbench can ignore text formatted with specific
character styles during interactive or batch translation. This is useful when translating online help
files that have character styles designed to identify jump and popup context IDs or similar
non-translatable information.
Translator's Workbench treats non-translatable text as external or internal. If you define a character
style as external, Translator's Workbench completely ignores the corresponding text during
translation and treats all text formatted with that style as the end of a segment. This feature is similar
to the non-translatable paragraph feature described previously. Sometimes non-translatable text
occurs within a segment, for example, a jump topic ID following double-underlined jump text in the
middle of a sentence. In this case, you can define the character style of the jump topic ID as internal.
Translator's Workbench treats the jump topic ID text as a placeable element.
To define the list of non-translatable character styles in the translation memory setup:
3-10
1
In Translator's Workbench, select Setup on the File menu. To access the Setup menu item, you
must open the translation memory in exclusive mode. The Setup dialog box opens. Click the
Non-translatable Text tab.
2
Enter the name of the character style you wish to exclude by either typing it in the input box or
by clicking the Open File button, selecting the character style(s) from the list and clicking the
<< Copy button.
TRANSLATOR’S WORKBENCH USER GUIDE
General Translation Guidelines
3
3
Each character style selected is formatted as internal by default and recognised as a placeable
element by Translator’s Workbench. If the character style should be completely ignored during
translation, highlight the style and check the External radio button. Click OK to confirm.
The double-underlined text jump link must be translated, while the hidden text MyJump following it
must be placed in the target segment since it contains a unique context ID used by the Help compiler
to identify the page with the related topic. The hidden text MyJump is formatted using the character
style JumpContextID. Adding the character style name JumpContextID as an internal style to the list
of non-translatable character style names means that Translator’s Workbench recognises it as a
placeable element during translation.
Segment Delimiters
When you open a sentence using Open , Open/Get
or Set/Close Next Open/Get ,
Translator's Workbench inserts hidden marks into your document. During translation, these marks
function as segment delimiters that separate the translation units (source and target text) in your
document.
indicates the start of a translation unit;
indicates the end of a translation unit.
Source and target segments within the translation unit are separated by <}n{>, where n is the match
value between the current source and the matching segment in the translation memory.
You should set the view options in your word processor to show these hidden segment delimiters
and all other delimiting marks in the files. In Word, for example, to display hidden text, click
Show/Hide
on the Standard toolbar.
As an example of segment delimiters,
in the sentence below means that Translator's
Workbench found an exact 100% match,
means that it found an 85% fuzzy match and
means that it did not find any match. For example, an 85% fuzzy match appears as follows:
This is a new sample sentence.
Dies ist ein neuer Beispielsatz.
After translation, the source segment and all delimiting marks are kept in your document as hidden
text. Your translation is formatted as visible text with all formatting intact. For example:
This is a sample sentence that has already been translated.
übersetzt wurde.
Dies ist ein Beispielsatz, der bereits
TRANSLATOR’S WORKBENCH USER GUIDE
3-11
3
General Translation Guidelines
To have more control over which non-printing characters are displayed in Word, select Options on
the Tools menu in Word. In the Options dialog box, select the View tab, as follows:
Check the boxes as required in the Formatting marks section. Click OK to confirm.
The recommended option is All.
3-12
TRANSLATOR’S WORKBENCH USER GUIDE
SDL Trados and Microsoft Word 2007
3
SDL TRADOS AND MICROSOFT WORD 2007
You can use SDL Trados 2007 with Microsoft Word 2007. All SDL Trados functionality is accessed
from the SDL Trados ribbon; there is no SDL Trados menu or toolbar. The ribbon displays the same
options and icons that appear in SDL Trados menu and toolbar in earlier Word versions.
Click the SDL Trados tab to display the SDL Trados ribbon.
The SDL Trados ribbon
Click to display the SDL Trados ribbon
Apart from the method used to access SDL Trados functionality, working with SDL Trados in Word
2007 is the same as working with SDL Trados in earlier versions of Word.
The SDL Trados ribbon is split into different sections each containing different commands for
translating your document.
TRANSLATOR’S WORKBENCH USER GUIDE
3-13
3
Quick Reference Word 2007
QUICK REFERENCE WORD 2007
This section provides a summary of the commands that are available on the SDL Trados ribbon in
Word 2007.
SDL Trados Ribbon
The SDL Trados ribbon acts as an interface between Translator’s Workbench and Word 2007. The
table below lists the button commands that are available on the different sections of the SDL Trados
ribbon, and briefly explains their purpose.
Open Section
Open/Get
[Alt]+[Home]
Opens the current segment, searches for
potential matches in the translation memory
and transfers the translation, if any, to your
document. Use this button to start translation
mode.
Open Next Non 100%
Ctrl]+[Alt]+[Home]
Ignores all identical matches and opens the first
less than 100% match. This is useful in texts
that have already been partly translated using
the Translate command in Translator's
Workbench.
Open
[Alt]+[Shift]+[Home]
Opens the current segment and searches for
potential matches in the translation memory.
Opens SDL Trados Translator’s Workbench.
3-14
TRANSLATOR’S WORKBENCH USER GUIDE
Quick Reference Word 2007
3
Continue Section
Set/Close Open/Get
[Alt]+[+] on numeric keypad
Closes the currently open translation unit, saves
it in the translation memory, opens the next
sentence and transfers the translation, if any, to
your document. Use this button to confirm a
translation and move on to the next sentence.
Set/Close Open Next Non 100%
[Ctrl]+[Alt]+[+]
Closes the currently open translation unit, saves
it to the translation memory and ignores all
identical matches until it finds the next less than
100% match.
Translate to Fuzzy
[Alt]+[x] on numeric keypad
[Alt]+[*] on some systems
Translates all 100% matches automatically,
starting with the currently open translation unit
and stopping at the next fuzzy match.
Close Section
Set/Close
[Alt]+[End]
Closes the currently open translation unit and
saves it in the translation memory. Use this
button to end translation mode.
Set
[Alt]+[Shift]+[End]
Closes the currently open translation unit
without saving the translation in the translation
memory and ends translation mode.
TRANSLATOR’S WORKBENCH USER GUIDE
3-15
3
Quick Reference Word 2007
Source Section
Restore
[Alt]+[Del]
Undoes the last translation and restores the
original source sentence. This button is useful if
you want to get your source text back without
having to enter a translation.
Copy
[Alt]+[Ins]
Copies the source sentence to the target field.
This button is helpful if the target sentence is
similar to the source sentence.
Concordance
[Alt]+[↑]
Searches the translation memory for selected
text. If Translator's Workbench can find the same
or similar text,
it opens a concordance window, showing all
matching translation units.
Placeable Section
3-16
Previous
[Alt]+[Ctrl]+[←]
Copies the previous placeable to the target field
at the cursor position.
Current
[Alt]+[Ctrl]+[↓]
Copies the current placeable to the target field at
the cursor position.
Next
[Alt]+[Ctrl]+[→]
Copies the next placeable to the target field at
the cursor position.
TRANSLATOR’S WORKBENCH USER GUIDE
Quick Reference Word 2007
3
Terms
Previous
[Alt]+[←]
Copies the previous term to the target field at
the cursor position.
Current
[Alt]+[↓]
Copies the current term to the target field at the
cursor position.
Next
[Alt]+[→]
Copies the next term to the target field at the
cursor position.
Other Commands
Expand Segment
[Ctrl]+[Alt]+[Page Down]
Extends the current source segment by one
sentence and searches the translation memory
for a potential match.
Shrink Segment
[Ctrl]+[Alt]+[Page Up]
Reduces the current source segment by one
sentence and searches the translation memory
for a potential match.
Fix Document
[Alt]+[Ctrl]+[U]
Run this command if you run into problems
during interactive translation, for example, if you
inadvertently try to open two translation units at
the same time.
Get Translation
[Alt]+[Shift]+[Insert]
Searches for potential matches in the translation
memory and transfers the translation, if any, to
your document.
Add as New Translation
[Ctrl]+[Alt]+[↑]
Adds an additional translation unit with different
target text to a translation memory that has
multiple translations enabled.
Toggle Tag Protection
[Alt]+[Ctrl]+[P]
Toggles on and off tag protection of external tags
and segment delimiters.
TRANSLATOR’S WORKBENCH USER GUIDE
3-17
3
Quick Reference Word 2000-2003
QUICK REFERENCE WORD 2000-2003
This section provides a summary of the commands that are available in Word 2000-2003 on the
Workbench toolbar and the Trados menu. This section also includes some tips for translating in
Word.
Translator’s Workbench Toolbar
The Workbench toolbar in Word acts as an interface between Translator’s Workbench and Word.
The table below lists the button commands that are available, and briefly explains their purpose.
Button/Icon and Shortcut
Open
[Alt]+[Shift]+[Home]
Open/Get
[Alt]+[Home]
Get Translation
Explanation
Opens the current segment and searches for potential
matches in the translation memory.
Opens the current segment, searches for potential matches in
the translation memory and transfers the translation, if any, to
your document. Use this button to start translation mode.
Searches for potential matches in the translation memory and
transfers the translation, if any, to your document.
[Alt]+[Shift]+[Insert]
Restore Source
[Alt]+[Del]
Copy Source
[Alt]+[Ins]
Set/Close Next
Open/Get
[Alt]+[+] on numeric keypad
Translate to Fuzzy
[Alt]+[x] on numeric keypad
[Alt]+[*] on some systems
3-18
TRANSLATOR’S WORKBENCH USER GUIDE
Undoes the last translation and restores the original source
sentence. This button is useful if you want to get your source
text back without having to enter a translation.
Copies the source sentence to the target field. This button is
helpful if the target sentence is similar to the source sentence.
Closes the currently open translation unit, saves it in the
translation memory, opens the next sentence and transfers the
translation, if any, to your document. Use this button to
confirm a translation and move on to the next sentence.
Translates all 100% matches automatically, starting with the
currently open translation unit and stopping at the next fuzzy
match.
Quick Reference Word 2000-2003
Button/Icon and Shortcut
Set/Close
[Alt]+[End]
Close
[Alt]+[Shift]+[End]
Concordance
[Alt]+[↑]
Get Previous Placeable
[Alt]+[Ctrl]+[←]
Get Current Placeable
[Alt]+[Ctrl]+[↓]
Get Next Placeable
[Alt]+[Ctrl]+[→]
Get Previous Term
[Alt]+[←]
Get Current Term
3
Explanation
Closes the currently open translation unit and saves it in the
translation memory. Use this button to end translation mode.
Closes the currently open translation unit without saving the
translation in the translation memory and ends translation
mode.
Searches the translation memory for selected text. If
Translator's Workbench can find the same or similar text,
it opens a concordance window, showing all matching
translation units.
Copies the previous placeable to the target field at the cursor
position.
Copies the current placeable to the target field at the cursor
position.
Copies the next placeable to the target field at the cursor
position.
Copies the previous term to the target field at the cursor
position.
Copies the current term to the target field at the cursor
position.
[Alt]+[↓]
Copies the next term to the target field at the cursor position.
Get Next Term
[Alt]+[→]
Toggles the Workbench toolbar on and off.
Flagman icon
TRANSLATOR’S WORKBENCH USER GUIDE
3-19
3
Quick Reference Word 2000-2003
Trados Menu
The Trados menu in Word includes all commands that are available on the Workbench toolbar, as
well as some additional items. Additional menu items are listed below, along with a brief explanation
of their purpose
D
NOTE
The Trados menu is not available in Word 2007, however, all of the Trados menu commands are
still available on the SDL Trados ribbon.
Additional Commands on the Trados Menu
3-20
Open Next no 100% Get
[Ctrl]+[Alt]+[Home]
Ignores all identical matches and opens the first less than
100% match. This is useful in texts that have already been
partly translated using the Translate command in Translator's
Workbench (Tools menu).
Set/Close Next no 100%
Open/Get
[Ctrl]+[Alt]+[+]
Closes the currently open translation unit, saves it to the
translation memory and ignores all identical matches until it
finds the next less than 100% match. This is useful in texts
that have already been partly translated using Translate on
Translator's Workbench's Tools menu.
Expand Segment
[Ctrl]+[Alt]+[Page Down]
Extends the current source segment by one sentence and
searches the translation memory for a potential match.
Shrink Segment
[Ctrl]+[Alt]+[Page Up]
Reduces the current source segment by one sentence and
searches the translation memory for a potential match.
Fix Document
[Alt]+[Ctrl]+[U]
Run this command if you run into problems during interactive
translation, for example, if you inadvertently try to open two
translation units at the same time.
Toggle Tag Protection
[Alt]+[Ctrl]+[P]
Toggles on and off tag protection of external tags and segment
delimiters (Word 2000 and Word 2002).
Add as New Translation
[Ctrl]+[Alt]+[↑]
Adds an additional translation unit with different target text to
a translation memory that has multiple translations enabled.
[Alt]+[Page Up]
[Alt]+[Page Down]
Where there are multiple matches in the translation memory
for a source segment, use [Alt]+[Page Up] and
[Alt]+[Page Down] to scroll through the matches.
TRANSLATOR’S WORKBENCH USER GUIDE
Quick Reference Word 2000-2003
V
3
FOR MORE INFORMATION
For more information about the commands that are available on the Trados menu and the
Workbench toolbar in Word, see the online help for Translator’s Workbench.
Tips for Translating in Word
C
Never delete the segment delimiters (
,
,
,
) used by Translator's Workbench to
identify the main and subsegments of a translation unit. Always activate hidden text in Word
by using the Show/Hide button ¶.
C
Do not delete the carriage return character (¶) at the end of the source and target field,
because you will also delete the colour formatting of the source and target field.
C
As you translate and your translation memory increases in size, use the Concordance
function. Select the word or text in your document and click the Concordance button
. The
Concordance function not only gives you the translations of selected sentence parts, but also
examples of usage.
C
Always work in Normal view rather than in Page Layout or Outline view. When you work in
Normal view, Word does not have to repaginate each time you start translating a new sentence.
To set Normal view, select Normal on the View menu in Word.
C
If your documents contain many graphics, we recommend that you activate the Picture
Placeholders option so that Word will display placeholders rather than the graphics
themselves. This allows Word to work much faster with Translator's Workbench. To set
placeholders, select Options on the Tools menu and click the View tab. Check the Picture
Placeholders option and click OK to confirm. You will now see empty boxes in place of the
graphics in your document.
C
To save space on your screen, you can de-activate certain elements in the Word program
window that you do not need during translation with Translator's Workbench. For example,
you may not need to use the horizontal scroll bar or one or more of Word’s toolbars. To select
and deselect toolbars, either select Toolbars on the View menu or right-click in the toolbar
section of the screen and uncheck the toolbars you do not want.
C
Word optimization: For advanced users, we recommend changing some registry settings to
speed up Word considerably. To do this, use the RegOptions macro from the Support9.dot
template shipped with Word. This template provides macros that can be used for
manipulating the registry. It is not installed by default; select it during Setup. You can also
install it at a later stage or download it from the Microsoft web site at
support.microsoft.com/support/.
TRANSLATOR’S WORKBENCH USER GUIDE
3-21
3
Quick Reference Word 2000-2003
C
The registry options that most speed up Word are CacheSize and BitmapMemory, both of
which are, by default, set to 64. We recommend changing this value to 512 or 1024.
For more information about translating Word documents and RTF help files, see the
File Formats Reference Guide.
3-22
TRANSLATOR’S WORKBENCH USER GUIDE
TRANSLATOR’S WORKBENCH
AND TAGEDITOR
This chapter explains how to translate documents using
Translator’s Workbench and TagEditor. Sections include:
C
Working with tagged text file formats
C
Setting up the TagEditor editing environment
C
General translation guidelines
C
Reviewing documents in TagEditor
C
Adding Comments in TagEditor
C
Quick reference guide
Chapter
4
4
Overview
OVERVIEW
This chapter introduces the TagEditor editing environment. For the purposes of translation,
TagEditor is integrated with Translator’s Workbench, the translation memory system,
and MultiTerm, the terminology management system. TagEditor is the ideal editing environment
for translating tagged text file formats.
This chapter gives an overview of TagEditor and the characteristics of tagged text file formats. It
includes an introductory tutorial and some general guidelines for translation in TagEditor.
Audience
If you wish to start translating using Translator’s Workbench, MultiTerm and TagEditor, you should
read this chapter. The information is relevant whether you are working with file- or server-based
translation memories. In each of these working contexts, the features of the TagEditor editing
environment remain the same.
Before you start work in TagEditor, make sure that you have the necessary translation memory
access rights. In the case of file-based translation memories, you require read-write access to perform
translation tasks, and in the case of server-based translation memories, you require Translator rights.
For more information, see “Translation Memory Security” on page 11-3.
WHAT IS TAGEDITOR?
TagEditor is a specialized application designed for translating and editing tagged text files. Tagged
text formats play an increasingly important role in document authoring and translation. For
example, HTML tags are used to define the structure and layout of pages on the World Wide Web.
Standardised General Markup Language (SGML) and Extensible Markup Language (XML) are also
used for structuring complex documentation.
4-2
TRANSLATOR’S WORKBENCH USER GUIDE
What is TagEditor?
4
TagEditor provides direct support for the following tagged text file formats:
File Type
Notes
XML
XSL, XLIFF documents (XLF)
HTML
HTML, including Active Server Pages (ASP), Active Server.NET
(ASP.NET), Java Server Pages (JSP) and Include files (INC)
SGML
SGM, SGML
Microsoft Word
2000-2003
DOC, DOT, RTF
Microsoft Word
2007
DOX, DOTX
There are two possible workflows for Word documents, RTF-based
workflow and TTX based workflow. To translate Word files in TagEditor
you must use the TTX-based workflow. For more details see the File
Formats Reference Guide.
Microsoft Excel
2000-2003
XLS, XLT
Microsoft Excel
2007
XLSX, XLTX, XLSM
Microsoft
PowerPoint 20002003
PPT, PPS, POT
Microsoft
PowerPoint 2007
PPTX, PPSX, POTX, PPSM
FrameMaker
FrameMaker + SGML (MIF), converted to STF (Workbench RTF only
InDesign
InDesign CS 2 Interchange format files (INX) or InDesign tagged files
(ISC, TXT)
InDesign CS1 (INDD, INDT)
QuarkXPress
QuarkXPress tagged files QSC, XTG, TTG, TAG
PageMaker
Tagged files TXT
Interleaf
IASCII, converted to STF (Workbench RTF only
Ventura
Tagged files TXT
TRANSLATOR’S WORKBENCH USER GUIDE
4-3
4
What is TagEditor?
File Type
Notes
Workbench RTF
Windows Binary
EXE, DLL, OCX
Windows Resource
RC, DLG
Java
PROPERTIES
StarOffice
SXW, SXC, SXI
OpenOffice
ODT, ODS, ODP
Generic delimited
text
CSV, CAT files.
SDLX 2005 SP1 (Lite or better) must be installed.
RESX
the .NET XML-based RC format
TradosTag files
(TTX)
TradosTag provides a standard method of describing tagged text formats
and bilingual data for translation purposes. Text and formatting
information are extracted from the native file format and presented in an
abstracted file format, TradosTag. TradosTag is an XML-based file format
that provides a standard method for processing XML, HTML, SGML and
DTP file formats.
SDLX Translation
files
ITD files. SDLX 2005 SP1 (Lite or better) must be installed to edit SDLX
files in TagEditor
Generic Text
TXT
D
4-4
NOTE
Workbench RTF is a Rich Text Format that is compatible with Translator’s Workbench. You can
use either TagEditor or Word to translate Workbench RTF.
TRANSLATOR’S WORKBENCH USER GUIDE
What is TagEditor?
4
TradosTag (TTX) Bilingual Format
TradosTag is the default file format for bilingual documents in TagEditor. It is an XML-based format
that provides a standard method for representing tagged text formats and bilingual data for
translation purposes. TradosTag files have a *.ttx extension.
During interactive translation, TagEditor converts monolingual source files to the TradosTag
bilingual file format. TagEditor also supports files that have already been converted to TradosTag
before interactive translation. After translation and any post-translation tasks such as review, tag
verification or clean up, target files are saved in the original file format.
Bilingual File (BIF) Format
The BIF file format is still supported for backward compatibility with earlier versions of Trados but
we recommend that you finish projects involving BIF documents in TagEditor 3.x before starting to
use TagEditor 8. Alternatively, you can convert BIF documents to TradosTag and continue
processing them in TagEditor 8.
C
To convert a BIF document to TradosTag (TTX) format, simply open the file in TagEditor 8 and
save. TagEditor converts the file to TradosTag and appends the .ttx extension.
C
When you select the Save Bilingual As command in TagEditor, you can save as either TTX or
BIF. TagEditor appends the .ttx extension by default, so to save as BIF, append the .bif
extension manually.
D
NOTE
In general, limited compatibility may apply between SDL Trados 2007 and Edition 2.x/3.x of the
Trados translation solution. For more information, go to the Customer Support Center
http://support.sdl.com.
TRANSLATOR’S WORKBENCH USER GUIDE
4-5
4
What is TagEditor?
File Preparation and Post-translation Tasks
As well as translation, the TagEditor environment offers the following file preparation and
post-translation features:
4-6
C
Tag Settings Wizard and Manager – these utilities allow you to manage, create and edit tag
settings files. Tag settings files are necessary to process and format HTML, SGML and XML
documents for translation purposes. For more information, see the online help for the Tag
Settings Wizard. The File Formats Reference Guide includes a tutorial that shows you how to
create a new tag settings file in the Tag Settings Wizard.
C
Verification plug-ins – allow you to verify the tag changes in whole documents that have been
translated in TagEditor. The verification plug-ins support all file formats that can be processed
in TagEditor. For more information, see “TagEditor Verification Plug-ins” on page 7-7.
C
Messages pane – displays tag verification messages and provides direct access to the translated
document so that tag errors can be addressed before files are converted back to their original
format. For more information, see “Message Pane” on page 7-20.
C
Message filters – plug-in components that allow you to customise the message lists that are
generated by the verification plug-ins. For more information about these,
see “Message Filter Plug-ins” on page 7-22.
C
TradosStag Viewer plug-in – allows you to preview and print TradosStag (TTX) documents
from within Internet Explorer. You can review documents that have been partially or fully
translated, with optional colour settings to indicate translation memory match values. All
documents are displayed with the correct formatting so that no tags appear. For more
information, see Chapter 9.
C
Offline review – a facility that allows you to use TagEditor in stand-alone mode without
connecting to Translator’s Workbench for the purposes of reviewing translated documents.
For more information, see “Finding and Replacing Text in TagEditor” on page 4-25.
C
SDL Trados Terminology Verifier– allows you to verify the terms in documents against the
termbase.
C
SDL Trados QA Checker– this plug-in incorporates a suite of quality assurance checks that are
performed on the current TagEditor document.
TRANSLATOR’S WORKBENCH USER GUIDE
What is TagEditor?
4
TagEditor Translation Workflow
The TagEditor translation workflow can be summarised as follows:
Source document
Set up the editing
environment and open source
document in TagEditor.
Start translation.
Save as TradosTag during
translation.
Review translation.
Use TagEditor plug-ins to
verify tag changes in
translated document.
Yes
Translator’s Workbench
used at all stages?
No
Save Bilingual As TradosTag
Save Target As original
in TagEditor. Clean up
bilingual files using the Clean
Up command in Translator’s
Workbench.
format in TagEditor.
Target document
in original format.
D
NOTE
C As well as restoring the original file format and removing unwanted source text, the Clean
Up command in Translator’s Workbench also updates the current translation memory in
accordance with the latest changes in the final bilingual files.
TRANSLATOR’S WORKBENCH USER GUIDE
4-7
4
About Tags
ABOUT TAGS
This section contains an overview of tag types, tag display, tag protection and verification in
TagEditor. It also introduces the Tags toolbar.
E
TIP
The TagEditor sample file, Sample.htm, contains examples of the types of tag that are
explained below. We recommend that you open this file in TagEditor before reading this section.
The sample file is installed by default to the following location:
C:\Documents and Settings\All Users\Documents\SDL Trados\Samples
Tag Types
Tags are brief coded statements that contain information about formatting and structure in the
tagged text file. How this information is represented differs from one file format to another; this is
why most tags are file format-specific. However, certain general characteristics apply to all tagged
formats and their representation in TagEditor.
Most tags can be classified as opening, closing or stand-alone tags, depending on how they work:
C
Opening and closing tags – these tags work in pairs to invoke and revoke an instruction. The
opening tag indicates the start of a character format or structural element such as a heading.
The closing tag marks the end of the formatting or structural element. A typical example of
such a tag pair is
and
, indicating the beginning and end of an HTML file, or
and
, indicating the scope of bold formatting. Text and other tag pairs may occur in
between the opening and closing tags for a particular instruction.
C
Stand-alone tags – stand-alone tags work independently, for example the image tag
HTML. Stand-alone tags are easy to recognise since they do not have sharp edges.
in
TagEditor classifies all tags as external or internal, depending on their function:
4-8
C
External tags – external tags have a black border by default, for example, the
tag. They
typically represent structural information. These tags and their content are completely ignored
during translation and can only appear outside sentences. You rarely need to move or delete
external tags during translation.
C
Internal tags – internal tags have a red border by default, for example, the
and
tags.
These tags may represent formatting information (such as bold), surround hyperlinks or other
markers, and may appear inside the text. Most internal tags can be moved around within the
sentence to suit the translation. Depending on the file format, some internal tags can be added
or deleted as required. By default, TagEditor classifies unknown tags as internal.
TRANSLATOR’S WORKBENCH USER GUIDE
About Tags
4
When tags contain text other than structural or formatting information, TagEditor classifies the text
content as translatable or non-translatable:
C
Non-translatable tags – tags containing text that does not require translation are classified as
non-translatable. Most tags that contain text are non-translatable. Non-translatable tags
function as internal tags.
C
Translatable text within tags – when tags contain text that requires translation, TagEditor
displays the tag in three parts: the text to be translated appears as normal text and the parts of
the tag that surround it appear as interconnected parts. For example, in a HTML document,
the following text may occur in an IMG tag:
. This tag
contains translatable text that is shown in place of the image if the image does not display in
the web browser. You can customise the way TagEditor treats translatable text within tags. For
more information, see the online help for TagEditor.
During translation, TagEditor inserts its own tags to mark source and target segments and to provide
information about translation memory match values.
C
Translation unit tags – the
,
and
delimiting tags identify the source segment,
match value and target segment, respectively, of a regular translation unit.
C
PerfectMatch unit tags – the
,
and
delimiting tags identify the source and target
segment of a PerfectMatch unit. Because they are taken from previously reviewed bilingual
documents, PerfectMatch units are considered to be perfect matches from a segment and
context point of view. For this reason, no match value is given. For more information, see
“Working with PerfectMatch Units” on page 4-22.
Tag Display
TagEditor allows you to choose whether tag text is displayed fully, partially or not at all by clicking
the tag text buttons –
– on the TagEditor toolbar or by using the Tag Text commands
from the View menu.
By default, tag text is only partially displayed. To display tag text and delimiters in full, choose
Tag Text > Complete from the View menu, or click the appropriate tag text button –
– on the
TagEditor toolbar. This option may be useful when interpreting generic tags, such as those that are
used to represent formatting instructions in PowerPoint, Excel, and converted FrameMaker or
Interleaf documents.
V
FOR MORE INFORMATION
For more information about file type-specific features and tags, see the File Formats Reference
Guide.
TRANSLATOR’S WORKBENCH USER GUIDE
4-9
4
About Tags
Semi-WYSIWYG View
TagEditor can map tags to formatting to allow a more WYSIWYG (What You See Is What You Get)
view of the document during translation. For example, a heading in HTML is usually surrounded by
heading tags (H1 or H2). TagEditor changes the appearance of the text between the heading tags so
that it appears in a larger font. This formatting is not stored in either the document or the translation
memory, but makes navigation and orientation within the file much easier. For more information
on tag formatting properties and how to change them, see the online help for TagEditor.
Tag Protection
The tag content of each document is vital to its integrity. By default, TagEditor protects both external
and internal tags in a document and ensures that they stay in place during translation. To
demonstrate this, place the cursor after any tag and press the [Backspace] key. The tag is not deleted.
During translation, you may wish to deactivate tag protection temporarily in order to move or delete
tags in the target text. You can adjust tag protection settings using the options that are available from
the drop-down list beside the tag protection button
on the standard toolbar.
The tag protection icon itself indicates whether the current tag protection setting applies to all tags,
to external tags only or to none at all:
– All tags (internal and external) are protected. This is the default setting.
– External tags only are protected.
– No tags are protected because tag protection is turned off.
The full range of tag protection settings is available in the Protection tab of the Options dialog box
(Tools menu). This dialog box also contains protection settings for source and target text in the active
document. We recommend that you do not change the default settings until you are thoroughly
familiar with TagEditor and tagged text formats. For more information, refer to the online help for
TagEditor.
F
4-10
WARNING
You should only make changes to tags in the target text, never in the source text.
TRANSLATOR’S WORKBENCH USER GUIDE
About Tags
4
Tag Verification
Tag verification compares the tag content of target material with the tag content of the original
source material and identifies any changes that were made. Changes in the target material are
acceptable provided that the syntax of tags remains intact and the translated document can be
converted back to its original format. Tag verification helps to ensure that only acceptable changes
are made.
Tag verification can be carried out at segment level or at document level.
C
Segment level verification – during interactive translation, TagEditor automatically verifies the
number, names and order of internal tags in each target segment that you send to the
translation memory. If there are changes, a warning is returned. The settings in the
Verification tab of the Options dialog box (Tools menu) allow you to apply different levels of
strictness to segment level verification. For more information, see “Customising the Tags
Toolbar” on page 4-18.
C
Document level verification – TagEditor allows you to verify the tag content of whole
documents, whether partially or fully translated, using the verification plug-ins that are
available for each of the supported file formats. Document level verification looks at the
internal and external tag content of the target material and identifies any changes that have
been made. We recommend that you use document level verification wherever possible, as it is
fully comprehensive and guarantees conversion of the target file back to its original format.
For more information about document level verification and the plug-ins that are available in
TagEditor, see “TagEditor Verification Plug-ins” on page 7-7.
Tags Toolbar
The Tags toolbar in TagEditor allows you to quickly and easily insert tags and special characters into
target segments during translation. The toolbar consists of a series of buttons; each button
corresponds to a different tag, tag pair or special character. The content of the toolbar is different for
each file format that TagEditor supports. In the case of HTML, SGML and XML documents, the
toolbar can be customised to suit your own requirements. For more information, see “Customising
the Tags Toolbar” on page 4-18.
D
NOTE
Tags and entities can also be inserted using the Insert Tag and Insert Entity commands on the
Edit menu.
TRANSLATOR’S WORKBENCH USER GUIDE
4-11
4
General Translation Guidelines
GENERAL TRANSLATION GUIDELINES
This section describes a number of options you can set up to facilitate translation using
Translator’s Workbench and TagEditor as the translation environment.
User Interface Language
TagEditor supports different user interface languages. To change the language that appears in dialog
boxes, menus and online help:
1
From the View menu, select User Interface Language. The User Interface Language dialog box
is displayed.
2
Select a language on the Language drop-down list. Click OK to confirm. All dialog boxes,
menus and online help now appear in the selected language.
Copy Source on No Match
Selecting this option means that when Translator’s Workbench finds no match in the translation
memory for the source segment, it automatically copies the source segment to the target field. Then
you overwrite the source text with the translation. To activate this option, select Translation Memory
Options from the Options menu in Translator’s Workbench. In the Translation Memory Options
dialog box, click the General tab and select Copy source on no match. For more information about
the options that are available in this dialog box, see “Translation Memory Options” on page 2-27.
Creating Multiple Translations
If you are using a translation memory that allows multiple translations, the Add as New Translation
command is available in TagEditor whenever Translator's Workbench identifies an exact (multiple
translation) or 100% match for the currently open translation unit. This allows you to create a new
translation for the current source segment which is then stored, along with the original translation
unit, as a multiple translation unit in the translation memory.
In TagEditor, the Add as New Translation command is available on the Workbench menu or as a
keyboard shortcut, [Ctrl]+[Alt]+[↑]. When you use this command, the message New translation added
successfully. Use "Set/Close" to continue appears in the status bar of Translator's Workbench.
4-12
TRANSLATOR’S WORKBENCH USER GUIDE
Working with Tags
4
By default, Translator's Workbench applies a 1% match penalty to multiple translations.
Accordingly, whenever a multiple translation is retrieved from the translation memory, the message
Exact Match, -1% Multiple Translations appears in the status bar of Translator's Workbench.
For more information about multiple translations, see the online help for Translator's Workbench.
D
NOTE
You can check whether or not a translation memory supports multiple translations in the
Properties dialog box (File menu) of Translator's Workbench.
WORKING WITH TAGS
This section provides information about features in TagEditor that are designed to facilitate the
translation of tagged text formats. These include:
C
internal and external tags during translation
C
using the Tags toolbar to insert tags and special characters
C
customising the Tags toolbar
C
segment level tag verification.
TRANSLATOR’S WORKBENCH USER GUIDE
4-13
4
Working with Tags
Internal and External Tags during Translation
When you open a tagged text document in TagEditor, the text and tags typically appear as follows:
Get your
free
evaluation copy of XYZ software now!
This sentence contains two external tags ( and
, indicating the scope of the paragraph) and two
internal tags ( and
, indicating bold on/off). During translation, external tags are ignored. The
internal tags, however, must be present in the target text as well. After the sentence for translation
has been opened with Open
, Open/Get
or Set/Close Next Open/Get
, a translation unit
containing the following tagged text opens in the source field:
The internal tags have been read in with the segment in the source window of Translator’s
Workbench. These internal tags are marked as placeables, identified by the blue bracketed line that
underlines them:
Placeables are non-translatable elements such as graphics, fields, numbers or, as in the above
example, tags.
4-14
TRANSLATOR’S WORKBENCH USER GUIDE
Working with Tags
4
To translate this example:
1
Start typing the translation of the English sentence into the target field in TagEditor, for
example, Holen Sie sich Ihre.
2
To insert the first tag, click Get Current Placeable
target field and the tag remains selected.
3
Press the right arrow key [→] to exit the selection.
4
Continue translating until the next tag is required and then click Get Next Placeable
insert the closing
tag into the target field.
. The opening
tag is inserted into the
to
In cases where more internal tags are present, repeat the procedure for each tag until all tags
have been copied to the target field of the currently open translation unit. You can also click Get
Previous Placeable
and Get Next Placeable
to browse through the tags in a sentence.
5
Use Set/Close Next Open/Get
to confirm your translation and move on to the next
segment. Translator’s Workbench looks for the next translatable segment (it ignores all
external tags until it finds the next sentence).
Tip for Translating Documents with Many Internal Tags
If your document contains many internal tags, you may wish to use the Copy source on no match
option. When this option is active, Translator's Workbench copies the source segment into the target
field each time it cannot find a match in the translation memory (this is the same as clicking Copy
Source
interactively). You can then leave the tags in place and just overwrite the text in the target
segment with the translation.
To activate the Copy source on no match option:
1
Select Translation Memory Options from the Options menu in Translator’s Workbench.
2
In the Translation Memory Options dialog box, click the General tab.
3
Under Switches, select Copy source on no match. This is the default setting for all new projects
until you change it again.
D
NOTE
This option is not available when working with Asian or Eastern European languages as source
languages.
TRANSLATOR’S WORKBENCH USER GUIDE
4-15
4
Working with Tags
The External tags only tag protection setting is also useful for translating documents that
contain many internal tags. This setting allows you to insert, delete and move internal tags in your
target document as required. You can change tag protection settings using the Tag Protection
button
on the Standard toolbar in TagEditor or in the Protection tab of the Options dialog box
(Tools menu).
V
FOR MORE INFORMATION
For information on cleaning up translated files, see “Cleaning Up Translated Documents” on
page 8-16.
Using the Tags Toolbar
The Tags toolbar in TagEditor allows you to insert frequently used tags and special characters into
target segments during translation. The toolbar consists of a series of buttons; each button
corresponds to a tag, tag pair or special character. To insert a tag or special character into a target
segment during translation, simply click on the appropriate button in the toolbar or use the
associated keyboard shortcut.
The following screenshot shows the different types of button that feature on the Tags toolbar. As well
as the predefined tag and special character buttons, the toolbar contains a series of generic buttons
to which, in the case of HTML, SGML and XML documents, you can assign further tags and entities.
Tag buttons
Special character buttons
Generic button
The content of the toolbar is different for each file format that TagEditor supports.
4-16
C
HTML – by default, the Tags toolbar for HTML documents features a predefined range of
HTML tags and entities (special characters). The predefined tag and entity settings are stored
in the default tag settings file for HTML documents, HTML4.ini. As well as using the
predefined settings, you can customise the Tags toolbar for HTML documents and change the
tags and entities that are assigned to each button. Customised toolbar settings are stored in
the relevant tag settings file. For more information about the predefined tag and entity settings
for HTML documents, see the online help for TagEditor.
C
SGML and XML – there are no predefined toolbar settings for SGML and XML documents.
Use the Customise Tag Toolbar command on the Tools menu to assign frequently used tags
and entities to the toolbar buttons. Toolbar settings are stored in the relevant tag settings file.
TRANSLATOR’S WORKBENCH USER GUIDE
Working with Tags
C
Word, PowerPoint, Excel, STF, QuarkXPress, InDesign, PageMaker and Ventura – for each of
these file formats, the Tags toolbar features a predefined range of tags and special characters.
The range of tags and characters is fixed; the toolbar cannot be customised. For more
information about the tags and special characters that are available for each of these formats,
see the online help for TagEditor.
V
FOR MORE INFORMATION
4
For more information about customising the Tags toolbar for HTML, SGML and XML
documents, see “Customising the Tags Toolbar” on page 4-18.
Using the Tags Toolbar to Insert Tags and Special Characters
The following example shows you how to use the Tags toolbar to insert tags and special characters
in a target segment during interactive translation. The example features a HTML document and the
corresponding toolbar contents. The same procedure applies to all file formats in TagEditor,
although the content of the Tags toolbar may be different.
D
NOTE
If you wish to insert tags in a target segment, make sure that internal tag protection is switched
off in TagEditor. To turn internal tag protection off, select External tags only on the Protection
tab of the Options dialog box (Tools menu).
To insert tags or special characters using the Tags toolbar:
1
Open the document for translation in TagEditor.
2
Open the segment that you wish to translate using the Open or Open/Get commands.
3
Insert tags, tag pairs or special characters as follows:
C Tag pairs – in the target segment, select the word or words around which you wish to place
the tag pair and then click the appropriate button on the toolbar. TagEditor inserts the tag
pair around the selected target text.
C Stand-alone tags and special characters – in the target segment, place the cursor wherever
you want the new tag or entity to be inserted and then click the appropriate button on the
toolbar. TagEditor inserts the tag or entity at the cursor position.
E
TIP
Use the keyboard shortcuts that are associated with each button on the Tags toolbar to insert
tags or entities in the target segment. The tool tip for each button displays the corresponding
keyboard shortcut.
TRANSLATOR’S WORKBENCH USER GUIDE
4-17
4
Working with Tags
In the screenshot below, the user has clicked the first button
on the Tags toolbar in order
to insert the
and
tag pair for bold formatting around the selected target segment text.
4
Close the target segment using the Set/Close or Set/Close Next Open/Get commands.
V
FOR MORE INFORMATION
For more information about the tags and special characters that are available on the Tags
toolbar for each file format, see the online help for TagEditor and the File Formats Reference
Guide.
Customising the Tags Toolbar
In the case of HTML, SGML and XML documents, the tag and entity assignments for each button
on the Tags toolbar can be customized to suit your requirements. Toolbar settings are stored in the
relevant tag settings file.
D
NOTE
C Predefined toolbar settings for HTML documents are stored in the default HTML tag
settings file, HTML4.ini. If you are using this file, you can continue to use the predefined
toolbar settings or edit them as required. For more information about the predefined
toolbar settings for HTML documents, see the online help for TagEditor.
C In some situations, you may need to work with a read-only tag settings file that cannot be
modified. Because the tag settings file cannot be modified, you cannot customise the Tags
toolbar. In this case, use the default settings on the Tags toolbar instead.
4-18
TRANSLATOR’S WORKBENCH USER GUIDE
Working with Tags
4
Customise Toolbar Dialog Box
Use the Customise Toolbar dialog box to define custom settings for the Tags toolbar. This dialog box
is only available when the HTML, SGML or XML document for translation is open in TagEditor. The
title bar of the dialog box always indicates the name of the tag settings file that is currently in use:
this is where the customised toolbar settings are stored.
To open the Customise Toolbar dialog box:
C
Select the Customise Tags Toolbar command from the Tools menu, or
C
Right-click on the Tags toolbar to access the shortcut menu and select the Customise Tags
Toolbar command.
The following screenshot shows the Customise Toolbar dialog box, with the predefined toolbar
settings for HTML documents, as stored in the default HTML tag settings file.
Toolbar settings are displayed in three columns including the toolbar button icons on the left,
keyboard shortcuts in the centre and tag or entity assignments on the right.
C
Button icons – as well as the button icons for common tags and entities, there are 10 generic
buttons to which further tags and entities can be assigned.
C
Keyboard shortcuts – each button icon has an associated keyboard shortcut that you can use to
insert the relevant tag or entity during translation. Note that keyboard shortcuts cannot be
customised.
C
Assignments – the Assignment column shows the tags or entities that are currently assigned
to the buttons on the Tags toolbar. Use the Remove Assignment command to remove the
current assignment; use the Assign Tag/Entity commands to assign a new tag or entity. The
default HTML settings include predefined assignments for common tags and entities. You can
continue to use the predefined HTML toolbar settings or edit them as required.
TRANSLATOR’S WORKBENCH USER GUIDE
4-19
4
Working with Tags
Assigning Tags and Entities to Buttons on the Tags Toolbar
To define tag and entity assignments for the Tags toolbar:
1
Open the document for translation in TagEditor. TagEditor opens the relevant tag settings file
in the background or prompts you to specify the tag settings file you wish to use.
2
From the Tools menu, select Customise Tags Toolbar. The Customise Toolbar dialog box is
displayed. The title bar of the dialog box specifies the current tag settings file where
customised toolbar settings will be stored.
3
To assign a new tag to a particular toolbar button, select the relevant button icon and click
Assign Tag. Depending on whether the selected button already has a tag assignment, the
Select Tag or Edit Tag dialog box is displayed. Select the new tag that you wish to assign from
the Name drop-down list. By default, the list includes internal tags only; to display both
internal and external tags, select Also show external tags. Click OK to confirm and to return to
the Customise Toolbar dialog box. The new tag is now listed in the Assignment column for the
selected button.
V
FOR MORE INFORMATION
4
To assign a new entity to a particular toolbar button, select the relevant button icon and click
Assign Entity. Depending on whether the selected button already has an entity assignment, the
Select Entity or Edit Entity dialog box is displayed. Select the entity that you wish to assign from
the Entities drop-down list. Click OK to confirm and to return to the Customise Toolbar dialog
box. The new entity is now listed in the Assignment column for the selected button.
5
To delete the current assignment for a particular toolbar button, select the relevant button icon
and click Remove Assignment.
6
Repeat steps 3 to 5 until you are finished customising the toolbar. Click OK to close the
Customise Toolbar dialog box and to return to the main TagEditor program window.
You can also use the Select Tag and Edit Tag dialog boxes to edit tag attributes. For more
information, see the online help for TagEditor.
Use the toolbar buttons or their associated keyboard shortcuts to insert the tags and entities that you
specified in the Customise Toolbar dialog box in the document for translation. For more information,
see “Using the Tags Toolbar” on page 4-16.
4-20
TRANSLATOR’S WORKBENCH USER GUIDE
Working with Tags
4
Segment Level Tag Verification
TagEditor can check whether internal tags have been correctly transferred to the target segment each
time you confirm a translation using the Set/Close Next Open/Get
or Set/Close
commands.
This is known as segment level tag verification.
Segment level verification runs automatically in the background during interactive translation.
TagEditor returns a message if tag changes in the target segment are detected. You can apply
different levels of strictness to segment level verification using the settings that are available on the
Verification tab of the Options dialog box (Tools menu). The levels of strictness are as follows:
C
None – TagEditor does not check tags at all. This is the default setting.
C
Minimal – TagEditor only compares the names of the tags in the current target segment with
those in the source.
C
Medium – TagEditor compares the names and number of tags in the current target segment
with those in the source.
C
Strict – TagEditor compares the names, number and order of tags in the current target
segment with those in the source.
To minimise the possibility of tag errors when you first start translating tagged text formats, we
recommend that you select Strict as the setting for segment level verification. As you become more
accustomed to working with tagged text formats, you can reduce the level of tag verification.
V
FOR MORE INFORMATION
Use the TagEditor plug-ins to carry out document level tag verification. For more information,
see “TagEditor Verification Plug-ins” on page 7-7.
TRANSLATOR’S WORKBENCH USER GUIDE
4-21
4
Working with PerfectMatch Units
WORKING WITH PERFECTMATCH UNITS
PerfectMatch units (XUs) are created when PerfectMatch is applied to a file or group of files in SDL
Trados Synergy. PerfectMatch compares a new source file with a corresponding old translated
bilingual file (in TTX) and transfers the relevant bilingual data from the old file to the new file.
Because applying PerfectMatch includes a check for context, XUs represent those parts of your
document that typically need no further translation or editing.
TagEditor provides full support for XUs. In TagEditor, XUs are identified by the XU markers and
colour formatting. The example below shows a sample HTML file which has had PerfectMatch
applied. The XUs appear in blue:
You can work on files that have had PerfectMatch applied just as you work on any other files in
TagEditor. The nature of XUs, however, means that there are some differences. These are outlined
in the following section.
4-22
TRANSLATOR’S WORKBENCH USER GUIDE
Working with PerfectMatch Units
4
XU Properties
XU segment matches are taken from previously reviewed bilingual files. Because the XU segment
matches have already been reviewed, they typically require no further editing. For this reason, XUs
acquire certain formatting and protection properties in TagEditor by default.
XU Protection
PerfectMatch units (XUs) are protected by default. As long as the default protection settings apply,
XUs are ignored by the Open/Get command during interactive translation and by any spell checking
operations. Copy, paste, search and replace operations are also not possible on protected XUs.
D
NOTE
Files which have PerfectMatch applied may also contain conventional translation units. When
PerfectMatch is applied, conventional translation units are created when the old bilingual files
are marked as unreviewed and PerfectMatch units are created when the old bilingual files are
marked as reviewed. Conventional translation units are formatted as normal and are not
subject to extra protection. In SDL Trados Synergy you can mark an old bilingual file as
unreviewed or reviewed during project creation.
XUs during Translation
In order to make XUs available for editing during interactive translation in TagEditor, you can turn
off XU protection permanently or on a segment by segment basis in order to make them available
for editing. Do this on the Protection tab of the Options dialog box:
TRANSLATOR’S WORKBENCH USER GUIDE
4-23
4
Working with PerfectMatch Units
By default, the Protect PerfectMatch units (XUs) and Restore XU protection when closing segment
check boxes are selected.
C
Clear the Protect PerfectMatch units (XUs) check box if you do not want the XUs in the current
document to be protected. This means that you can edit all XUs during interactive translation.
C
Clear the Restore XU protection when closing segment check box if you do not want the XU
protection to be restored after you have edited and confirmed an XU.
V
FOR MORE INFORMATION
For more information on protection settings in TagEditor, see the TagEditor online help.
Once an XU has been edited, it becomes a normal translation unit with
and
tag markers.
However, if colour formatting has been applied to the XU text, it is retained, making it easy to see
which XUs have been turned into normal TUs. In the translation memory, XUs are always stored as
normal TUs.
XUs after Translation
When you select the Save Target As command in TagEditor, XUs lose any PerfectMatch properties.
The same applies when you clean up translated files using the clean up feature in Translator’s
Workbench.
4-24
TRANSLATOR’S WORKBENCH USER GUIDE
Finding and Replacing Text in TagEditor
4
FINDING AND REPLACING TEXT IN TAGEDITOR
Use the Find and Replace feature in TagEditor to search for and replace text in your document. You
can select from the following search settings:
C Search target only – For more information, see “Search Target Text” on page 1-25.
C Use wildcards –For more information, see “Search using Wildcards” on page 1-27.
C Search tag content – For more information, see “Search Tag Content” on page 1-28.
D
NOTE
TagEditor saves the last 20 find and replace strings during an active session.
Search Target Text
To search the translated target text:
1
Select Edit > Find from the menu bar if you only want to find text in the document. The Find
dialog box is displayed.
TRANSLATOR’S WORKBENCH USER GUIDE
4-25
4
Finding and Replacing Text in TagEditor
C Select Edit > Replace from the menu bar if you want to find and replace text in the
document. The Replace dialog box is displayed.
2
Select Search target only.
3
Enter the search text in the Find what box.
C To search for the whole word only, select Match whole word only.
C To distinguish between uppercase and lowercase, select Match case.
C To search using wildcards, select Use wildcards. For more information, see “Search using
Wildcards” on page 1-27.
4-26
4
If applicable, enter the replacement text in the Replace with box.
5
Under Direction, select UP or Down to specify whether to search above or below your current
position in the document.
6
Click Find Next to find your search text.
7
If applicable, click the Replace and Replace All buttons to replace your search text.
8
Click Cancel to close the dialog box.
TRANSLATOR’S WORKBENCH USER GUIDE
Finding and Replacing Text in TagEditor
4
Search using Wildcards
To search for text using wildcard characters:
1
Select Edit > Find from the menu bar if you only want to find text in the document. The Find
dialog box is displayed.
C Select Edit > Replace from the menu bar if you want to find and replace text in the
document. The Replace dialog box is displayed.
2
Select Use wildcards.
3
Enter the wildcard search text in the Find what box.
Use a question mark ? wildcard to match a single character and an asterisk * wildcard to match
zero or more characters.
For example, searching for “tea * coffee” would match:
“tea and coffee”
“tea or coffee”
“tea, coffee”
To search for literal asterisks and question marks when performing a wildcard search, you
must enter a backslash in front of the character. For example, to search for a question mark
enter “\?”.
4
You can also choose to apply the following options to your search:
C To distinguish between uppercase and lowercase, select Match case.
C To search only the tag content in the translated target text, select Search target only.
D
NOTE
5
If applicable, enter the replacement text in the Replace with box.
6
Under Direction, select UP or Down to specify whether to search above or below your current
position in the document.
7
Click Find Next to find your search text.
8
If applicable, click the Replace and Replace All buttons to replace your search text.
9
Click Cancel to close the dialog box.
The Match whole word only and Search tag content options are disabled when Use wildcard is
selected.
TRANSLATOR’S WORKBENCH USER GUIDE
4-27
4
Finding and Replacing Text in TagEditor
Search Tag Content
You can search the tag content in your document. This type of search ignores the text completely and
is only available in the Find dialog box.
To search the tag content:
1
Select Edit > Find from the menu bar if you only want to find text in the document. The Find
dialog box is displayed.
2
Select Search tag content.
3
Enter the search text in the Find what box.
TagEditor searches for the exact search string that you enter including the spacing between the
characters that you enter in the search string. You do not need to enter a complete tag in the
Find what box. For example, if you search for “href=” the search results will include any tag that
contains the substring “href=”, such as <ahref=”http://www.translationzone.com”>.
4-28
4
To search only the tag content in the translated target text, select Search target only.
D
NOTE
5
Click
to launch the Insert Tag dialog box where you can select common tags for the active
document type.
The Match whole word only, Match case and Use wildcards options are disabled when Search
tag content is selected.
TRANSLATOR’S WORKBENCH USER GUIDE
Finding and Replacing Text in TagEditor
6
Select the tag name and click OK to return to the Find dialog box.
7
Under Direction, select UP or Down to specify whether to search above or below your current
position in the document.
8
Click Find Next to find your search text.
9
Edit the tags from your search results as needed. For more information, see “Working with
Tags” on page 4-13.
TRANSLATOR’S WORKBENCH USER GUIDE
4
4-29
4
Reviewing Documents in TagEditor
REVIEWING DOCUMENTS IN TAGEDITOR
Previewing Word, PowerPoint and Excel Documents
You can preview Word, PowerPoint and Excel documents at any time during translation to check
how the document looks in its native environment.
C
Previewing Word documents – TagEditor converts the document back to its original format,
creates a temporary file, and displays this file externally in Word. If Word is already open on
your system, TagEditor uses this instance for preview purposes; if Word is not already open,
TagEditor launches it.
C
Previewing PowerPoint documents – TagEditor converts the active slide (as determined by the
current location of the cursor) back to its original format, creates a temporary file, and displays
this file externally in PowerPoint. If PowerPoint is already open on your system, TagEditor
uses this instance for preview purposes; if PowerPoint is not already open, TagEditor launches
it.
C
Previewing Excel documents – TagEditor converts the active worksheet (as determined by the
current location of the cursor) back to its original format, creates a temporary file, and displays
this file externally in Excel. If Excel is already open on your system, TagEditor uses this
instance for the preview purposes; if Excel is not already open, TagEditor launches it.
To preview a Word, PowerPoint or Excel document during translation with TagEditor:
1
Make sure that the last translation unit you opened is closed. If a translation unit is open, the
Preview tabs in TagEditor are not available.
2
Place your cursor in an appropriate location within the document for translation. TagEditor
locates the cursor and converts only the relevant slide or worksheet for preview purposes.
D
NOTE
3
If TagEditor fails to determine the location of the cursor, the whole document is converted for
preview purposes. Depending on the size and content of the document, this may take some
time. For this reason, we recommend the following method if you wish to preview the target
language version of the entire document: create a temporary target language version of the
document using the Save Target As command in TagEditor, then open the resulting file in
PowerPoint or Excel.
Click one of the Preview tabs at the bottom of the main TagEditor window to select one of the
following options:
C Source Preview – previews the source language version of the current slide or worksheet.
C Target Preview – previews the target language version of the current slide or worksheet.
4-30
TRANSLATOR’S WORKBENCH USER GUIDE
Reviewing Documents in TagEditor
4
C Bilingual Preview – previews the source and target language versions of the current slide or
worksheet within the same screen. For example, in the case of PowerPoint documents,
when you select the Bilingual Preview tab, a split screen appears with separate windows for
the source and target version of the current slide, as follows:
You can scroll through the source and target texts separately and quickly spot any major
differences between them. You can also print the document preview by clicking in the source
or target pane and selecting Print on the File menu. Alternatively, right-click in the pane you
want to print and select Print from the shortcut menu that appears.
D
NOTE
C The source and target language Preview tabs use the corresponding language flag icons
from the current translation memory in Translator's Workbench. If there is no translation
memory open, UN flags are displayed instead of the language flags.
TRANSLATOR’S WORKBENCH USER GUIDE
4-31
4
Reviewing Documents in TagEditor
Offline Reviewing
You can use TagEditor to edit and review translation projects without connecting to Translator’s
Workbench. This is known as offline reviewing. Offline reviewing is best suited to either partially or
fully translated TradosTag (TTX) documents. To carry out offline reviewing in TagEditor, you need
a valid license for SDL Trados 2007.
D
NOTE
You can also use the TradosTag Viewer plug-in to review translation projects. The
TradosTag Viewer allows you to preview and print TradosTag (TTX) documents from within
Internet Explorer. You can review documents that have been partially or fully translated, with
optional colour settings to indicate translation memory match values. All documents are
displayed with the correct formatting so that no tags appear. For more information,
see Chapter 9.
Launch TagEditor from the Start menu on your computer and open the document that you want to
review. The following screenshot shows a partially translated document that contains both source
and target language data:
All view and preview mode tabs at the bottom of the main window are available for partially or fully
translated documents.
4-32
TRANSLATOR’S WORKBENCH USER GUIDE
Reviewing Documents in TagEditor
4
When you open a non-TradosTag or untranslated document, TagEditor assigns a UN flag to the
target language tabs at the bottom of the main window. This is because the document contains no
target language data. The following screenshot shows an untranslated HTML document:
The target view, dual view and target preview tabs are not available for untranslated documents.
Reviewing is best suited to partly or fully translated TradosTag documents.
E
TIP
You can use the Tag Text command on the View menu to reduce/delete visible tags to make
editing text easier.
Previewing Windows Programming Files in TagEditor
You can quickly view how your translated RC, EXE or DLL file is going to look after translation. This
is useful for checking string lengths are appropriate in the translated dialog box.
1
Make sure that the last translation unit you opened is closed. If a translation unit is open, the
Preview tabs in TagEditor are not available.
2
Place your cursor in an appropriate location within a valid menu or dialog box. TagEditor
locates the cursor and converts only the relevant menu or dialog box for preview purposes.
TRANSLATOR’S WORKBENCH USER GUIDE
4-33
4
Using Comments in TagEditor
3
The Trados Preview window appears and displays the relevant menu or dialog box.
USING COMMENTS IN TAGEDITOR
The commenting feature in TagEditor allows you to add, edit, view and delete comments in
TradosTag TTX documents and SDLX (ITD) documents. Comments are a good way to share
information about the document with other users or pass instructions to reviewers or translators.
You can add document level 'global' comments and you can add TU level comments. You can add
multiple comments for the same document or TU and, if you wish, you can assign an 'importance'
level to each comment.
The Comments option on the Edit menu is used to manage TU level comments. For document level
comments you must select Document Comments from the File menu. The same dialog box, Edit
Comments is displayed for both options. This dialog box is used to add, view, edit or delete
comments.
4-34
TRANSLATOR’S WORKBENCH USER GUIDE
Using Comments in TagEditor
4
View Comments
When a comment has been added to a TU, the comment symbol appears in the TU tags.
To read the comment, click a tag to display the Edit Comments dialog box.
All of the comments relating to a document are listed in the Comments tab of the message pane.
When you open a document that contains comments the message pane is automatically displayed.
You can work with comments in the message pane in the same way that you work with verification
messages.
Document level comments appear at the top of the list. For these comments the word Document
appears in the Location column of the tab. TU comments appear below the document level
comments; they are displayed in TU order and the TU location appears in the Location column. If
more than one comment has been added for a TU, each one appears as a separate entry in the list.
Comments may have one of these symbols attached to them:
Icon
Explanation
This symbol indicates that there is an error in the translation.
This symbol draws your attention to a possible problem with the translation.
This symbol is used when the comment contains information that will be of
interest to you.
TRANSLATOR’S WORKBENCH USER GUIDE
4-35
4
Using Comments in TagEditor
The translation in the TU is highlighted and to go to the TU that 'owns' a comment, you can either,
double-click the comment or place the cursor in the comment, click the right mouse button and
select Go To Location. The translation in the TU is highlighted and the cursor is placed at the end of
the TU. If you want to display the Edit Comments dialog box for the TU, click the right mouse button
and select the Comments option, or click the TU button.
About the Comments File
Comments are stored in a separate file to the translation document. The comments file takes the
name of the TTX file and is given the extension: .comments. For example, the comments file for the
document, MyDoc.htm.ttx would be named, MyDoc.htm.ttx.comments.
D
NOTE
There is no separate comments file for SDLX documents (ITD files), the comments are stored
in the document itself.
The comments file can be viewed as XML in Windows Explorer but it cannot be opened as a
translatable document in TagEditor.
Share Comments with Other Users
When you send a TTX file to another user you must remember to send the comments file too,
otherwise the receiver will not be able to read the comments.
Add Comments
The author name that appears on comments created by you comes from the Author Name box on the
Edit tab of the Options dialog box. You can change this if you wish. To display this dialog box select
Tools>Options.
Add a document level comment
4-36
1
Select File>Document Comments from the menu bar. The Edit Comments dialog box is
displayed.
2
Enter the comment text in the Add/Edit Comment dialog box.
3
If you want to assign a special level of importance to a comment, select it from the drop-down
menu in the Type box.
4
Click OK to save the comment and close the dialog box.
TRANSLATOR’S WORKBENCH USER GUIDE
Using Comments in TagEditor
4
Add a comment to a TU
1
Place the cursor in the TU and either click the right mouse button and select Comments from
the shortcut menu, or click the Comments button on the Messages toolbar. The Edit
Comments dialog box is displayed.
2
Enter the comment text in the Add/Edit Comment dialog box.
3
If you want to assign a special level of importance to a comment, select it from the drop-down
menu in the Type box.
4
Click OK to save the comment and close the dialog box.
Add a comment that quotes from an earlier comment
1
Place the cursor in the TU and either click the right mouse button and select Comments from
the shortcut menu, or click the Comments button on the Messages toolbar. The Edit
Comments dialog box is displayed.
2
Select the comment you want to quote from. The selected comment text appears in the edit
box.
3
Edit the text to create the new comment and click Add.
4
Click OK to save the new comment.
D
NOTE
C If you want to add the comment to the list in the Comments box without closing the dialog
box, click the Add button instead of clicking OK. However, the comment will not be saved
until you click OK to close the dialog box.
C You can also open the Edit Comments dialog box by clicking a TU tag that contains the
comment symbol or by placing the cursor inside the TU and selecting Edit, Comments from
the menu bar.
Edit or Delete Comments
Display the Edit Comments dialog box that contains the comment:
1
For a TU, select a TU tag or, place the cursor inside the TU, click the right mouse button and
select Comments from the shortcut menu.
2
For a document comment, select the comment in the message pane, click the right mouse
button and select Comments from the shortcut menu.
TRANSLATOR’S WORKBENCH USER GUIDE
4-37
4
Using Comments in TagEditor
3
Select the comment to be edited from the list of comments in the Comments box. The
comment text appears in the edit box.
4
Make the required changes to the text in the edit box.
5
Click the Modify button when you have finished.
6
Click OK to close the dialog box.
How to delete all comments for a single TU
1
Place the cursor in the TU (the TU must be closed).
2
Click the Delete Comments button on the Messages toolbar. A confirmation dialog box is
displayed.
3
Click OK.
How to delete a comment - from the Message Pane
1
Select the comment from the list in the message pane.
2
Click the Delete Comments button on the Messages toolbar. A confirmation dialog box is
displayed.
3
Click OK.
How to delete a comment - from the Edit Comments dialog box
If the Edit Comments dialog box is not currently open, open it now:
4-38
1
For a TU, select a TU tag or, place the cursor inside the TU, click the right mouse button and
select Comments from the shortcut menu
2
For a document level comment, select the comment in the message pane, click the right
mouse button and select Comments from the shortcut menu.
3
Select the comment to be deleted from the list of comments in the Comments box.
4
Click the Delete button. A confirmation dialog box is displayed.
5
Click OK.
TRANSLATOR’S WORKBENCH USER GUIDE
Quick Reference
D
4
NOTE
C If you would prefer the message pane not to be displayed automatically when you open a
document containing comments, select Tools> Options> Edit from the menu bar and clear
the Show comments pane automatically box.
C If you want to change the author name that is automatically assigned to comments you
create, select Tools> Options> Edit from the menu bar and edit the value in the Author
Name box.
C Using the Restore Source command deletes all comments added for a TU.
C You can use the Document Comments command to display the Edit dialog box where you
can add a document level comment. Document level comments are displayed in the
Message Pane.
QUICK REFERENCE
This section provides a summary of the commands that are available on the Workbench toolbar and
the Workbench menu in TagEditor. see “Translator’s Workbench Toolbar” on page 3-18. for
information on the icons for Translator’s Workbench. This section specifically covers the icons for
TagEditor.
Translator’s Workbench Toolbar
The Workbench toolbar in TagEditor acts as an interface between Translator’s Workbench and
TagEditor. The table below lists the additional button commands that are available on this toolbar for
TagEditor, and briefly explains their purpose.
Button/Icon and Shortcut
Check Spelling
Verify Tags
Plug-in Settings
Explanation
Starts the spelling checker from the cursor position in the
active document.
Verifies the tag content of the active document using the
active verification plug-in and the current plug-in settings.
Displays the Plug-ins dialog box where you can activate
plug-ins and define plug-in settings.
Tag Protection
Adjusts the tag protection settings.
button and drop-down list
TRANSLATOR’S WORKBENCH USER GUIDE
4-39
4
Quick Reference
Button/Icon and Shortcut
Tag Text
E
4-40
Explanation
Displays tag text fully, partially or not at all, depending on
which button you click. You can also select this command
from the View menu.
Connect to Workbench
Launches Translator’s Workbench if it is not already running.
You can also select this command from the Tools menu.
Show/Hide Whitespace
Toggles the whitespace characters on and off. TagEditor
shows spaces as middle dots and non-breaking spaces as
small circles. You can also select this command from the View
menu.
AutoText
Use the AutoText feature in TagEditor to store text you want to
use frequently, items like product names or copyright
information.
TIP
TagEditor also includes a Messages toolbar that you can use in conjunction with the message
pane to locate tag changes in files that have been verified. For more information about the
Messages toolbar, see the TagEditor Help.
TRANSLATOR’S WORKBENCH USER GUIDE
Quick Reference
4
Workbench Menu
The Workbench menu in TagEditor includes all commands that are available on the Workbench
toolbar, as well as some additional items. Additional menu items are listed below, along with a brief
explanation of their purpose.
Additional Commands on the Workbench Menu
Open Next no 100% Get
[Alt]+[Ctrl]+[Home]
Ignores all identical matches and opens the first less than
100% match. This is useful in texts that have already been
partly translated using the Translate command in Translator's
Workbench (Tools menu).
Set/Close Next no 100%
Open/Get
[Alt]+ [NUM]+
Closes the currently open translation unit, saves it to the
translation memory and ignores all identical matches until it
finds the next less than 100% match. This is useful in texts
that have already been partly translated using Translate on
Translator's Workbench's Tools menu.
Expand Segment
[Alt]+[Ctrl][+[Page Down]
Extends the current source segment by one sentence and
searches the translation memory for a potential match.
Shrink Segment
[Alt]+[Ctrl]+[Page Up]
Reduces the current source segment by one sentence and
searches the translation memory for a potential match.
Add as New Translation
[Alt]+[Ctrl]+[↑]
Adds an additional translation unit with different target text
to a translation memory that has multiple translations
enabled.
[Alt]+[Page Up]
[Alt]+[Page Down]
Where there are multiple matches in the translation memory
for a source segment, use [Alt]+[Page Up] and
[Alt]+[Page Down] to scroll through the matches.
TRANSLATOR’S WORKBENCH USER GUIDE
4-41
4
4-42
Quick Reference
TRANSLATOR’S WORKBENCH USER GUIDE
MANAGING TRANSLATION
MEMORY DATA
This chapter explains the following aspects of translation
memory management:
C
Editing and deleting individual translation units
C
Translation memory maintenance
C
Importing translation memory data
C
Exporting translation memory data
C
Using the export feature to back up your translation
memory
C
Using the export and import features to invert the
translation memory
Chapter
5
5
Overview
OVERVIEW
This chapter provides information on the features in Translator’s Workbench that allow you to
manage the data in your translation memories. It shows you how to edit and delete individual
translation units during interactive translation, maintenance and concordance procedures. It shows
you how to edit and delete batches of translation units using the Maintenance command. It explains
how to import and export translation memory data using the Import and Export commands.
Audience
In general, the information in this chapter is relevant to the users of both file- and server-based
translation memories. However, access to certain features may be subject to restriction. In the case
of file-based translation memories, the Import and Export commands are only available if you open
the memory in exclusive access mode. The Maintenance command is available if you open the
memory in exclusive or read-write access mode. In the case of server-based translation memories,
the Maintenance command is only available if you access the memory with Power User or
TM Administrator rights; the Import and Export commands are only available if you access the
memory with TM Administrator rights.
The option to edit and delete individual translation units during interactive translation or
concordance procedures is available to all users who have read-write access to the translation
memory, including users with Translator rights.
V
5-2
FOR MORE INFORMATION
C For more information, see “Translation Memory Security” on page 11-3.
TRANSLATOR’S WORKBENCH USER GUIDE
Modifying Translation Memory Data
5
MODIFYING TRANSLATION MEMORY DATA
A translation memory increases in size as you add translation units to it. The more people sharing a
translation memory over a network, the larger the translation memory becomes. Because of this, it
is essential to be able to modify the contents of your translation memory from within the translation
memory itself. The maintenance features in Translator's Workbench allow you to access the
contents of your translation memory at different levels:
C
A spot-editing feature allows you to edit and delete individual translation units. You can access
this feature from the maintenance, concordance and translation memory windows in
Translator’s Workbench.
C
The Maintenance command provides access to the Translation Memory Maintenance dialog
box where you can edit and delete the contents of your translation memory at translation unit
and global level.
These features are outlined in detail in the following sections.
TRANSLATOR’S WORKBENCH USER GUIDE
5-3
5
Editing and Deleting Translation Units
EDITING AND DELETING TRANSLATION UNITS
This section explains how to use the spot-editing feature that is available in the concordance,
maintenance and translation memory windows. The spot-editing feature allows you to:
C
edit individual translation units
C
delete translation units individually or in small numbers.
In order to use the spot-editing feature in any of these areas, you must have read-write access to the
translation memory.
Editing Individual Translation Units
Use the spot-editing feature to access the Edit Translation Unit dialog box, where you can change
individual translation units in the translation memory. The following example shows you how to edit
translation units in the concordance window in Translator’s Workbench. Use the same method to
edit translation units in the maintenance and translation memory windows.
To edit individual translation units from the concordance window:
1
Launch Translator’s Workbench and open the translation memory you wish to edit.
2
Perform a concordance search to identify the translation units you wish to edit by selecting
Concordance
on the Tools menu. In the search field of the Concordance dialog box, enter
one of the words in the source segment for editing and click Search. The concordance window
then displays all translation units that match your search criterion.
3
Locate the translation unit you wish to edit and right-click on one of the flags to display the
spot-editing shortcut menu:
Spot-editing shortcut menu
5-4
TRANSLATOR’S WORKBENCH USER GUIDE
Editing and Deleting Translation Units
E
5
TIP
Use the same method to access the spot-editing shortcut menu in the translation memory and
maintenance windows.
4
To modify the translation unit, select Edit Translation Unit. This opens the Edit Translation
Unit dialog box, where the source and target text of the translation unit is displayed.
5
Modify the text of your source and/or target segments as required. Click Style Sheet and Font
Table to decode any character style or font references that feature in your text.
6
Click More >> to display the advanced editing options, where you can modify the content of
text, attribute or system fields.
TRANSLATOR’S WORKBENCH USER GUIDE
5-5
5
Editing and Deleting Translation Units
D
NOTE
7
To modify the content of translation unit text fields:
Permission to modify the content of system fields is subject to restriction. In the case of
file-based translation memories, this permission is available when you open the memory in
exclusive access mode. In the case of server-based translation memories, this permission is
available when you access the memory with Power User or TM Administrator rights. For more
information about access rights, see “Translation Memory Security” on page 11-3.
C Under Text and attribute fields, select the text field whose content you wish to modify.
Existing content is displayed in the Text field content box.
C Change or supplement the content of the text field as required.
8
To modify the content of translation unit attribute fields:
C Under Text and attribute fields, select the attribute field whose content you wish to modify.
The corresponding picklist is displayed in the Attribute picklist and the active values are
highlighted.
C Change the active value(s) and select the new value(s) as required.
9
To modify the content of translation unit system fields:
C Under System fields, identify the field whose content you wish to change and enter the
new content in the corresponding text box. System fields that were not included in your
translation memory setup are not available for modification.
10
When you are satisfied with the changes you have made, click Save to close the Edit
Translation Unit dialog box. The translation memory is updated and the translation unit
changes are now visible in the concordance window.
11
Repeat as required for all translation units you wish to edit.
V
FOR MORE INFORMATION
For more information about editing batches of translation units, see “Translation Memory
Maintenance” on page 5-9.
Deleting Translation Units Individually or in Small Numbers
Use the spot-editing feature to access the Delete Translation Unit(s) command, which allows you to
delete translation units from the translation memory. This command is primarily intended for the
deletion of individual translation units. However, in the maintenance and concordance windows,
you can also use it to delete other translation units that feature above and below the selected
translation unit in the list.
5-6
TRANSLATOR’S WORKBENCH USER GUIDE
Editing and Deleting Translation Units
5
The following example shows you how to delete translation units in the concordance window in
Translator’s Workbench. Use the same method to delete translation units in the maintenance and
translation memory windows.
To delete translation units in the concordance window:
1
Launch Translator’s Workbench and open the relevant translation memory.
2
Perform a concordance search to identify the translation unit(s) you wish to delete by selecting
Concordance
on the Tools menu. In the search field of the Concordance dialog box, enter
one of the words in the source segment for deletion and click Search. The concordance
window then displays all translation units that match your search criterion.
3
Locate the translation unit you wish to delete and right-click on one of the flags to display the
spot-editing shortcut menu:
Spot-editing shortcut menu
E
4
TIP
Use the same method to access the spot-editing shortcut menu in the translation memory and
maintenance windows.
To remove the current translation unit from translation memory, select Delete Translation
Unit(s) > Current only.
The following options are also available when working in the maintenance or concordance
windows:
C To delete the selected translation unit and all above it in the list, select Delete Translation
Unit(s) > Current and all above.
C To delete the selected translation unit and all below it in the list, select Delete Translation
Unit(s) > Current and all below.
TRANSLATOR’S WORKBENCH USER GUIDE
5-7
5
5-8
Editing and Deleting Translation Units
5
Translator’s Workbench highlights the selected translation unit(s) and asks you to confirm the
deletion since this action cannot be undone. Click Yes to remove the translation unit(s) from
translation memory and from the concordance window. Click No to cancel.
V
FOR MORE INFORMATION
For more information about deleting batches of translation units from translation memory,
see “Translation Memory Maintenance” on page 5-9.
TRANSLATOR’S WORKBENCH USER GUIDE
Translation Memory Maintenance
5
TRANSLATION MEMORY MAINTENANCE
The Maintenance command allows you to modify the contents of your translation memory directly
at translation unit or global level without importing or exporting data.
The Maintenance command enables you to:
C
define search criteria to specify which parts of the translation memory you wish to change
C
find and replace text in source and target segments
C
find and replace information in system fields, attribute and text fields
C
delete translation units.
This section provides detailed instruction for each of these maintenance procedures.
D
NOTE
C The Maintenance command is designed for advanced users only, because it allows you to
radically change the contents of your translation memory at all levels. We recommend that
you make a backup copy of your translation memory before making any global changes.
C The Maintenance command is subject to access restrictions. When working with file-based
translation memories, this command is only available when you open the memory in
exclusive or read-write access mode. In the case of server-based translation memories, the
Maintenance command is only available if you access the memory with Power User or
TM Administrator rights.
Using the Maintenance Command
Regardless of the complexity of the changes you wish to make, a maintenance operation always
consists of the following stages: defining the parameters of your maintenance operation, translation
memory search and the maintenance procedures themselves. The instructions below are grouped
accordingly.
TRANSLATOR’S WORKBENCH USER GUIDE
5-9
5
Translation Memory Maintenance
To carry out maintenance on a translation memory:
Defining Parameters
1
Launch Translator’s Workbench and open the translation memory that you want to change.
2
From the File menu, choose Maintenance. The Translation Memory Maintenance dialog box is
displayed.
Maintenance options
Maintenance
window
3
Set the maintenance options as required:
C Translation units processed at a time: Specify how many translation units should be
displayed in the maintenance window. The default value is 5.
C Display translation unit information: Select this option if you wish Translator’s Workbench
to display descriptive information about translation units, such as system, attribute or text
fields, in the maintenance window.
C Search for possible duplicates only: Select this option if you wish to search the memory for
possible duplicate translation units. This option applies to server-based translation
memories only.
C Resume search from last position: If you have set up filters in a search of the translation
memory using the maintenance window, you can set a bookmark to resume the search
from where you left off if the search was not completed in full. You can use this
functionality as follows:
Perform a normal search, without marking the checkbox, and the search functionality
remains unchanged.
Return to an incomplete search and check the Resume search from last position box and
the search will begin from where you left off.
5-10
TRANSLATOR’S WORKBENCH USER GUIDE
Translation Memory Maintenance
4
To define search criteria that will allow you to limit your maintenance operations to a subset of
translation units, click Filter. For more information, see “Defining Filters” on page 5-12.
5
To define global changes, click Find and Replace. The definition of global changes gives you
the option of applying the specified changes to large groups of translation units at once. For
more information, see “Defining Global Changes” on page 5-14.
5
Translation Memory Search
6
Click Begin Search to start searching. Translator's Workbench displays the first set of
translation units that match your search criteria in the maintenance window. The title bar of
the dialog box shows the number range in which the matching translation units have been
found.
7
To search for the next set of matching translation units, click Next >>.
8
To return to the previously displayed set of translation units, click << Previous. Any translation
unit whose source segment you have modified will no longer be included in this list.
9
To start a new search after you have defined new filters or translation unit changes, click
Reset Search.
Maintenance Procedures
10
To edit a single translation unit in the maintenance window, right-click one of its flags and
select Edit Translation Unit. The Edit Translation Unit dialog box is displayed where you can
make the necessary changes. For more information, see “Editing Individual Translation
Units” on page 5-4.
11
If you defined global changes using the Find and Replace command in step 5 above, you can
now decide if, and how, you want to apply these changes:
C To change a single translation unit in the maintenance window, right-click one of its flags
and select Change Translation Unit.
C To change all translation units currently displayed in the maintenance window, click
Change > Translation Units in Current List.
C To change all translation units in the translation memory, click Change > All Translation
Units.
Each time you use one of the Change commands, the translation memory is updated and the
contents of the maintenance window change accordingly.
TRANSLATOR’S WORKBENCH USER GUIDE
5-11
5
Translation Memory Maintenance
12
If you wish to delete translation units from translation memory, the following options are
available:
C To delete a single translation unit from the main window, right-click one of the translation
unit flags and select Delete Translation Unit(s) > Current only. To delete the selected
translation unit and all above it in the list, select Delete Translation Unit(s) > Current and
all above. To delete the selected translation unit and all below it in the list, select Delete
Translation Unit(s) > Current and all below.
C To delete all translation units currently displayed in the main window, click Delete >
Translation Units in Current List.
C If you defined search criteria using the Filter command in step 4 above, you can delete all
matching translation units in the translation memory by clicking Delete > All Translation
Units.
Each time you use one of the Delete commands, the translation memory is updated and the
contents of the maintenance window change accordingly.
13
Repeat steps 10–12 for all maintenance procedures you wish to perform. When you are
satisfied with the results, click Close.
Adding terms from within the Maintenance window
If you have MultiTerm 7 installed and set up, you can add terms to your MultiTerm termbase directly
from the Maintenance window.
1
In the Maintenance window, highlight the term you want to add to the termbase.
2
Right-click and the context menu is displayed.
3
Select Add term from the context menu.
4
Choose Submit to MultiTerm and the Submit to MultiTerm dialog box is displayed.
Defining Filters
Use the Filter dialog box to define filters that will allow you to limit your maintenance operations to
a specific subset of the translation memory. When you define a filter, only those translation units
that match the current filter are displayed or modified.
5-12
TRANSLATOR’S WORKBENCH USER GUIDE
Translation Memory Maintenance
D
5
NOTE
The information in this section also applies to the definition of filters for export operations.
Export filters are defined in the Export dialog box; the Export and Filter dialog boxes are
identical apart from their titles.
Filter constraints
list
Field list
In the Filter dialog box, the Filter constraints list specifies which fields will be used as filter criteria.
The specified fields are known as the constraints settings. The settings are based on the constraints
you define in the Field list, Criterion box and Attribute picklist.
You can use any of the fields in the current translation memory setup to define constraints settings.
All available fields are listed in the Field list. You can define simple filters with a single constraint or
complex filters that contain more than one constraint.
Translator's Workbench allows you to save constraints settings for re-use at a later stage. The settings
are stored in external files - known as Workbench constraints settings files - with the extension
*.wcs. Use the Load command in the Filter dialog box to load existing constraints settings files.
D
NOTE
Constraints settings files can only be correctly loaded when the setup of the current translation
memory is compatible with the setup of the translation memory that was used to create the
settings file. This means that the system, attribute and text fields must be the same for both
translation memories, otherwise an undefined system/attribute/text field error occurs.
To define constraints settings (that is, a filter) for your maintenance operations:
1
In the Translation Memory Maintenance dialog box, click Filter to open the Filter dialog box.
2
Clear any existing settings by clicking Reset. (This also deactivates the current filter.)
TRANSLATOR’S WORKBENCH USER GUIDE
5-13
5
Translation Memory Maintenance
3
Select an item from the Field list. This list includes the source and target language segment
fields, system fields, text and attribute fields that are available in your current translation
memory.
4
Click Add. The item is added to the Filter constraints list, and the Criterion box or Attribute
picklist is activated.
5
Define a criterion in the Criterion box or select an attribute from the Attribute picklist. The
criterion you define is automatically displayed in the Filter constraints list.
C To separate items in the Filter constraints list with a logical or, click Or.
C To exclude the new criterion from the maintenance operation, click Not.
6
Repeat steps 2-4 to define other constraints.
7
If you wish to save the constraints settings, click Save. This opens the Save Constraints
Settings File dialog box. Specify a location and a name for the constraints settings file and click
Save to return to the Filter dialog box.
8
When you are satisfied with the constraints settings, click OK to return to the Translation
Memory Maintenance dialog box.
As long as it remains active, Translator’s Workbench applies the filter each time you search the
translation memory from the Translation Memory Maintenance dialog box. For more information,
see “Using the Maintenance Command” on page 5-9.
Defining Global Changes
Use the Find and Replace command and dialog box to define global changes for translation memory
maintenance procedures. You can specify global change criteria at three levels:
C
source and/or target segments
C
system fields
C
text and attribute fields.
The specified changes are applied to all translation units that are selected for global change in the
Translation Memory Maintenance dialog box.
5-14
TRANSLATOR’S WORKBENCH USER GUIDE
Translation Memory Maintenance
5
Source and Target Segments
To change text in source and/or target segments globally:
1
In the Translation Memory Maintenance dialog box, click Find and Replace to open the Find
and Replace dialog box.
2
Under Segments, type the search text in the Find what box of the language you want to change.
3
Type the replacement text in the corresponding Replace with box. To delete the search text,
leave the Replace with box blank.
C To distinguish between uppercase and lowercase, select Match case.
C To search for the whole word only, select Match whole word only.
4
Click OK to return to the Translation Memory Maintenance dialog box, where you can apply
the changes as described in step 11 of the maintenance process, as outlined on page 5-9.
TRANSLATOR’S WORKBENCH USER GUIDE
5-15
5
Translation Memory Maintenance
Text Fields
To modify the content of a text field globally:
1
In the Translation Memory Maintenance dialog box, click Find and Replace to open the Find
and Replace dialog box.
2
Click More >> to display the advanced options.
3
Under Text and attribute fields, select the text field whose content you wish to modify.
4
Use the Text field content box as follows:
C Delete any previously used criteria from the Text field content box.
C To specify new content for the selected text field, enter the required new content in the
Text field content box. Use the comma (,) to separate text field values.
C To remove existing content from the selected text field, specify content for removal in the
Text field content box. If you wish to completely remove the selected text field and its
contents, enter an asterisk (*) in the Text field content box.
5-16
TRANSLATOR’S WORKBENCH USER GUIDE
Translation Memory Maintenance
5
5
Set the translation unit update option as required:
C The Merge option adds the new text field content to the selected text field.
C The Overwrite option replaces the existing content of the selected text field with the new
text field content.
C The Remove option deletes existing content, as specified in the Text field content box, from
the selected text field.
6
Click OK to return to the Translation Memory Maintenance dialog box, where you can apply
the changes as described in step 11 of the maintenance process, as outlined on page 5-9.
D
NOTE
C It is not possible to directly find and replace text field content during a single maintenance
operation. If you wish to find and replace content in a given text field, you must first add the
required new content using the Merge update option, then delete unwanted content using
the Remove update option.
C While the criterion specified in steps 3 and 4 above is active, the change is applied to all
translation units that are selected for global change in the Translation Memory
Maintenance dialog box. If the specified text field does not already exist in the selected
translation units, it is created.
Attribute Fields
To modify the content of an attribute field globally:
1
Open the Find and Replace dialog box and click More >> to display the advanced options.
2
Under Text and attribute fields, select the attribute field whose content you wish to modify.
The corresponding picklist is displayed in the Attribute picklist.
3
Use the Attribute picklist as follows:
C Check that any previously used criteria are no longer selected.
C To specify new content for the selected attribute field, select the required value(s) in the
Attribute picklist.
C To remove existing content from the selected attribute field, select the value(s) for removal
in the Attribute picklist. If you wish to completely remove the selected attribute field and its
contents, select all values in the Attribute picklist.
TRANSLATOR’S WORKBENCH USER GUIDE
5-17
5
Translation Memory Maintenance
4
Set the translation unit update option as required:
C The Merge option adds the new content to the selected attribute field.
C The Overwrite option replaces the existing content of the selected attribute field with the
new content.
C The Remove option deletes existing content, as specified in the Attribute picklist, from the
selected attribute field.
5
Click OK. You return to the Translation Memory Maintenance dialog box, where you can apply
the changes as described in step 11 of the maintenance process, as outlined on page 5-9.
D
NOTE
C It is not possible to directly find and replace attribute field content during a single
maintenance operation. If you wish to find and replace content in a given attribute field,
you must first add the required new content using the Merge update option, then delete
unwanted content using the Remove update option.
C While the criterion specified in steps 4 and 5 above is active, the change is applied to all
translation units that are selected for global change in the Translation Memory
Maintenance dialog box. If the specified attribute field does not already exist in the
selected translation units, it is created.
System Fields
To change the content of a system field globally:
5-18
1
Open the Find and Replace dialog box and click More >> to display the advanced options.
2
Under System fields, identify the field whose content you wish to change and enter the new
content in the corresponding text box. System fields that were not included in your translation
memory setup are not available for modification.
3
Click OK to return to the Translation Memory Maintenance dialog box, where you can apply
the changes as described in step 11 of the maintenance process.
D
NOTE
Permission to modify the content of system fields is subject to restriction. In the case of
file-based translation memories, this permission is available when you open the memory in
exclusive access mode. In the case of server-based translation memories, this permission is
available when you access the memory with Power User or TM Administrator rights. For more
information about access rights, see Chapter 11.
TRANSLATOR’S WORKBENCH USER GUIDE
Translation Memory Maintenance
5
Translation Memory Maintenance: Examples
The examples in this section are based on the definition of filters and global changes during
maintenance procedures.
Example 1: Searching for all Translation Units Changed after a Certain Date
In this example we use the maintenance feature to display all translation units that have changed
after 30 January 2003. This may be useful for proof-reading or spot-checking translations at regular
intervals.
1
From the File menu in Translator’s Workbench, select Maintenance.
2
In the Translation Memory Maintenance dialog box, click Filter to open the Filter dialog box.
To search for translation units that have changed after a certain date only, specify a filter for the
Change date system field.
3
In the Field list, click the Changed on system field and click Add to add it to the Filter
constraints list. By default, Translator’s Workbench assumes you want to search for all
translation units changed after 01 January 2000. Change this to 30 January 2003.
D
NOTE
The date format on your computer may differ from the date format that features in our example.
TRANSLATOR’S WORKBENCH USER GUIDE
5-19
5
Translation Memory Maintenance
4
Click OK to return to the Translation Memory Maintenance dialog box. To search for the first
set of matching translation units, click Begin Search.
.
5
5-20
The first set of translation units that match the current filter is displayed. In your maintenance
searches, use the Translation units processed at a time option to specify how many translation
units should be displayed at a time. Use the Next >> and << Previous buttons to browse
sequentially through the remaining sets of matching translation units.
TRANSLATOR’S WORKBENCH USER GUIDE
Translation Memory Maintenance
5
Example 2: Performing Global Text Changes
In this example we use the maintenance feature to change the German word Datenbank to Datenbasis
in all relevant target segments. This is useful, for example, when you want to find and replace text
globally in your translation memory as a result of terminology changes.
1
From the File menu in Translator’s Workbench, select Maintenance.
2
In the Translation Memory Maintenance dialog box, click Filter to open the Filter dialog box.
To search for translation units that contain the word Datenbank, specify a filter for the target
language fields in the translation memory.
3
In the Field list, click German (Germany) and then click Add.
4
In the Criterion box, type the word Datenbank. Enclose it in asterisks to ensure that every
occurrence of the word is found, not just those segments that contain the word Datenbank
only.
5
Click OK to return to the Translation Memory Maintenance dialog box. To replace all
occurrences of Datenbank with Datenbasis, define a global change for target segments. Click
Find and Replace. The Find and Replace dialog box opens.
6
Type the word Datenbank in the Find what box for target segments. Type the replacement text,
Datenbasis, in the Replace with box.
7
Click OK to return to the Translation Memory Maintenance dialog box.
TRANSLATOR’S WORKBENCH USER GUIDE
5-21
5
Translation Memory Maintenance
8
Click Begin Search to search for the first set of matching translation units.
In this example, three translation units match our search criteria. During maintenance
searches, use the Translation units processed at a time option to specify how many translation
units are displayed at one time. Use the Next >> and << Previous buttons to scroll through the
remaining sets of matching translation units.
9
Based on the search results, you can decide if, and how, you wish to change the text:
C To change a single translation unit, right-click one of the flags and select
Change Translation Unit on the shortcut menu.
C To change all translation units in the current window, click Change >
Translation Units in Current List.
C To change all matching translation units in the translation memory, click
Change > All Translation Units.
D
5-22
NOTE
Change > All Translation Units changes all translation units that match the current search
criteria from the currently displayed unit to the end of the translation memory.
TRANSLATOR’S WORKBENCH USER GUIDE
Translation Memory Maintenance
5
Example 3: Changing All Translation Units with Certain Project Settings
In this example, we use the maintenance feature to change all the translation units with specified
project settings. This is useful when you want to assign new or changed fields globally to translation
units with specific settings.
1
From the File menu in Translator’s Workbench, select Maintenance.
2
In the Translation Memory Maintenance dialog box, click Filter to open the Filter dialog box.
In this example, we will change the Client attribute from Pro Software Inc. to New Chemicals Ltd.
To search for all relevant translation units, specify a filter for the Client attribute field.
3
Select Client from the Attribute fields list. Click Add. Then select Pro Software Inc. from the
Attribute picklist. Click OK to return to the Translation Memory Maintenance dialog box.
4
Click Find and Replace to define the global change for the Client attribute field. In the Find and
Replace dialog box, click More >> to display the advanced options.
5
Select Client from the Attribute fields list and select New Chemicals Ltd. from the Attribute
Picklist. Select the Overwrite option to replace Pro Software Inc. with New Chemicals Ltd. (The
Merge option would simply add New Chemicals Ltd. to the Client attribute field; the Remove
option would simply remove Pro Software Inc. from the Client attribute field without
substituting any further content.) Click OK to confirm and return to the Translation Memory
Maintenance dialog box.
TRANSLATOR’S WORKBENCH USER GUIDE
5-23
5
Translation Memory Maintenance
6
Select the Display translation unit information option and then click Begin Search. During
maintenance searches, use the Translation units processed at a time option to specify how
many translation units are displayed at one time. Use the Next >> and << Previous buttons to
scroll through sets of matching translation units.
7
Based on the search results, you can decide if, and how, you wish to change the text:
C To change a single translation unit, right-click one of the flags and select Change
Translation Unit on the shortcut menu.
C To change all translation units in the current window, click Change > Translation Units in
Current List.
C To change all translation units in the translation memory, click Change > All Translation
Units.
5-24
TRANSLATOR’S WORKBENCH USER GUIDE
Importing Translation Memory Data
5
IMPORTING TRANSLATION MEMORY DATA
The import feature allows you to load data from previous translations, including those created with
previous versions of Translator's Workbench or with WinAlign, into the current translation
memory. WinAlign is the automatic text alignment solution that generates translation memory
import files from existing translations. Translator’s Workbench and WinAlign import files are in
ANSI code format (with file extension *.txt). You can also import files in the Translation Memory
Exchange (TMX) Level 2 format, TMX 1.4 and TMX 1.4b.
V
FOR MORE INFORMATION
For more information on WinAlign, see the WinAlign User Guide. For more information on TMX,
see the TMX web site at www.lisa.org/tmx.
Access Restrictions in File- and Server-based Translation Memories
The import feature in Translator’s Workbench is valid for both file- and server-based translation
memories, however, permission to use it is subject to restriction.
C
When working with file-based translation memories, the Import command is only available
when you open the translation memory in exclusive access mode. If the translation memory is
password-protected, you must enter the super user password.
C
When working with server-based translation memories, the Import command is only available
when you have TM Administrator access rights.
F
D
WARNING
We strongly recommend that you prevent any other users from accessing the translation memory
while the import operation is in progress. In the case of file-based translation memories, single-user
access is guaranteed when you open the translation memory in exclusive access mode. In the case of
server-based translation memories, you must request that all other users close the translation
memory before import commences. If you have access to the Server Manager client, we recommend
that you add a status comment indicating that the translation memory should not be accessed while
the import is in progress.
NOTE
You can also use the Server Manager client to import data into server-based translation
memories. For more information, see the SDL Trados Administrator Guide.
Importing Data from Older Translation Memories
If you are importing data from a translation memory that was created in Translator’s Workbench 5.5
or earlier, remember that you must recreate the user and variable lists manually after import.
TRANSLATOR’S WORKBENCH USER GUIDE
5-25
5
Importing Translation Memory Data
Using the Import Command
To import data from an external file:
1
In Translator’s Workbench, open the host translation memory at the appropriate level of
access.
2
From the File menu, choose Import. The Import dialog box is displayed.
3
Select the appropriate option under Import mode. For more information, see “Import Mode”
below.
4
Select the appropriate option under Existing translation units group box.
5
Select the appropriate option under New fields.
6
Click OK to confirm and to open the Open Import File dialog box. Specify the format of the
import file using the Files of type list.
7
Locate and select the import file from which data will be imported and click Open. The import
starts and you return to Translator’s Workbench.
Translator's Workbench automatically adds the translation units to your translation memory as
defined in “Import Options” below. Information about the progress of the import operation is
displayed in the status bar. When the import is complete, Translator’s Workbench displays the total
number of imported translation units.
5-26
TRANSLATOR’S WORKBENCH USER GUIDE
Importing Translation Memory Data
5
Import Mode
There are two import modes:
C
The Small import file (no reorganisation) option is useful if you only want to import a small
import file with few translation units. Translator's Workbench reads the translation units from
the text file and adds them to the current translation memory and its associated neural
network files. In the neural network used by Translator's Workbench, it takes slightly more
time to add new translation units than to merge them with it. Merging, however, requires a
complete reorganisation of the network after the import. For example, it is advisable to use
the small import if you want to import 50 translation units into a translation memory of
10,000 units.
C
The Large import file (with reorganisation) option is useful if you want to import a large import
file with many translation units. Translator's Workbench first reads and analyses all
translation units from the text file and then merges them with the existing data in the neural
network files. Merging requires a reorganisation of the network after the import, but merging
and reorganising are generally faster with larger import files than in the Small Import File
mode.
D
NOTE
The reorganisation of translation memory data after import does not apply when the target
translation memory is server-based.
Import Options
Before you run an import, there are a number of options you can set. These options are outlined in
this section.
Existing Translation Units
When specifying an import, you select the appropriate Existing translation units option to decide
what happens when the source segment an imported translation unit matches the source segment
of an existing translation unit in the translation memory:
C
Leave unchanged means the imported unit is always rejected.
C
Keep most recent means that Translator's Workbench always keeps the most recent translation
unit. If an imported unit has the same source segment as a unit in the translation memory
and is newer than the unit in translation memory, it is imported. If it is older, it is rejected.
C
Keep oldest has the opposite effect – the older translation unit is always kept.
TRANSLATOR’S WORKBENCH USER GUIDE
5-27
5
Importing Translation Memory Data
C
Merge means that if attribute and text fields are the only difference between the imported
target segment and the target segment of the translation unit in translation memory, they are
merged with the attribute and text fields of the translation unit in the memory. If the
translation memory allows multiple translations of the same source segment, Translator’s
Workbench creates a new translation unit with a different target segment.
C
Overwrite means that the imported unit is always imported and it overwrites the existing
translation unit in the translation memory.
The diagram on the next page shows how imported translation units affect existing translation units,
depending on which option you have selected.
E
5-28
TIP
Attribute and text fields are collectively known as information fields.
TRANSLATOR’S WORKBENCH USER GUIDE
Importing Translation Memory Data
5
Existing Translation Units During Import
Read new translation unit
from import file.
Is the import
translation unit
(ITU) valid?
Key
ITU = IMPORT TRANSLATION UNIT
TM = TRANSLATION MEMORY
TU = T RANSLATION UNIT
Reject ITU
No
Yes
Is the ITU
source segment
the same as one
or more of the
existing TUs?
Add ITU to TM
No
Yes
Compare information fields of ITU with information
fields of existing TUs. Find the best match.
Leave unchanged
Overwrite
Merge
Compare ITU target
segment with target
segment of best matching
existing TU.
Reject ITU
Is the ITU
target segment
different to the
target of the
existing TU?
ITU overwrites the existing
TU that has the best
matching information
fields.
No
ITU information fields are
merged with those of the
existing TU.
Yes
Do ITU
information fields
match TMTU
information
fields?
No
A new TU is created with
the new target segment
and new information
fields. The old TU is also
kept.
Yes
A new TU is
created with the
new target
segment and the
same information
fields. The old TU
is also kept.
Yes
Multiple
translations for
same source
allowed?
No
ITU target segment
overwrites TU target
segment.
TRANSLATOR’S WORKBENCH USER GUIDE
5-29
5
Importing Translation Memory Data
New Fields
Before running an import, select the appropriate New fields option:
C
Ignore means that Translator's Workbench ignores all new attribute and text fields in the
import file. They are not added to your current translation memory setup.
C
Add to setup means that all new attribute and text fields are added to your current translation
memory setup. For example, if the attribute field Client does not exist in your translation
memory setup but is in the import file, Translator's Workbench automatically adds it.
Check Matching Sublanguages
Check the Check matching sublanguages box if you want Translator's Workbench to compare the
sublanguage codes from the import file with the languages specified in the translation memory.
If you leave this box unchecked, Translator's Workbench imports, for example, English (United
Kingdom) segments even if the translation memory has English (United States) as source or target
language. If you check this option, English (United Kingdom) segments are not imported.
D
NOTE
For a full description of the Translator’s Workbench text format, see the online help for
Translator’s Workbench.
Workbench-compatible Import Formats
The following Workbench-compatible import formats are available in the Files of type list in the
Open Import File dialog box:
5-30
C
To import data from a file in the Translator’s Workbench or WinAlign text format, select
Translator’s Workbench/WinAlign (*.txt).
C
To import data from a file in the Translation Memory Exchange (TMX) Level 2 format, select
TMX (*.tmx).
C
To import data from a file exported from IBM Translation Manager products, select TM/2
(*.exp).
C
To import data from a file that has been pre-translated by Systran, select Systran (*.rtf).
C
To import data from a file that has been pre-translated by Logos, select Logos (*.sgm).
TRANSLATOR’S WORKBENCH USER GUIDE
Exporting Translation Memory Data
D
5
NOTE
TMX Level 2 means that internal formatting information inside the imported units is supported.
For information on TMX, see the TMX Web site at www.lisa.org/tmx. SDL Trados 2007 is fully
compliant with TMX standards.
EXPORTING TRANSLATION MEMORY DATA
The export feature writes the contents of a translation memory to a text file. This is particularly useful
when you want to create a secure backup of your translation memory or when you want to invert the
source and target languages (for example, to change from English-German to German-English).
Access Restrictions in File- and Server-based Translation Memories
The export feature in Translator’s Workbench is valid for both file- and server-based translation
memories, however, permission to use it is subject to restriction.
C
When working with file-based translation memories, the Export command is only available
when you open the translation memory in exclusive access mode. If the translation memory is
password-protected, you must enter the super user password.
C
When working with server-based translation memories, the Export command is only available
when you have TM Administrator access rights.
D
NOTE
You can also use the Server Manager client to export data from server-based translation
memories. For more information, see the SDL Trados Administrator Guide.
TRANSLATOR’S WORKBENCH USER GUIDE
5-31
5
Exporting Translation Memory Data
Using the Export Command to Create a Backup
The most secure method of creating a backup of your translation memory is to export the data to a
text file. Follow these steps:
5-32
1
In Translator’s Workbench, open the host translation memory at the appropriate level of
access.
2
From the File menu, choose Export. The Export dialog box is displayed.
3
As with the maintenance feature, you can define filters or constraints settings in order to specify
a particular subset of the translation memory for export. However, when backing up an entire
translation memory, you do not need to define constraints. Click OK to open the Create Export
File dialog box.
4
In the Create Export File dialog box, specify a location and a name for the export file. Specify
the format of the export file using the Save as type list.
D
NOTE
5
Click Save to start the export operation and to return to Translator’s Workbench.
By default, Translator's Workbench uses the Translator’s Workbench text format for all exports
and adds the *.txt extension to file names. If you are exporting data in TMX Level 2 format,
choose the *.tmx file type from the Save as type list. For more information, see “Export
Formats” below.
TRANSLATOR’S WORKBENCH USER GUIDE
Exporting Translation Memory Data
5
Information about the progress of the export operation is displayed in the status bar of Translator’s
Workbench. When the export is complete, Translator’s Workbench displays the total number of
exported translation units.
Export Formats
The following export formats are available in the Save as type list in the Create Export File dialog box:
C
To export a file for use with Translator’s Workbench, select Translator’s Workbench (*.txt).
C
To export a file in TMX Level 2 format, choose TMX (*.tmx).
D
NOTE
TMX Level 2 means that internal formatting information inside the exported units is retained.
For more information on TMX, see the TMX Web site at www.lisa.org/tmx
Inverting Translation Memories
If you have a bilingual translation memory, you may also want to use it in the opposite language
direction. You can do this by inverting the translation memory using the Export and Import
commands.
D
NOTE
The procedure outlined below involves the creation of a new translation memory in Translator’s
Workbench and is valid for file-based translation memories only. You cannot create a serverbased translation memory in Translator’s Workbench.
To invert a translation memory:
1
Open the translation memory you want to invert at the appropriate level of access.
2
Select Export on the File menu and export the translation memory to a text file.
3
Select New on the File menu to create a new translation memory. Set the language direction to
the opposite of the translation memory exported in step 2. You can also open an existing
translation memory that has the opposite language direction of the exported translation
memory.
4
Select Import on the File menu to import data from the export file created in step 2.
Translator's Workbench automatically assigns the translation units in the inverted
order. After the import, you have a new translation memory with the opposite
language direction.
TRANSLATOR’S WORKBENCH USER GUIDE
5-33
5
5-34
Exporting Translation Memory Data
TRANSLATOR’S WORKBENCH USER GUIDE
TERMINOLOGY DURING
TRANSLATION
This chapter introduces you to the interface between
Translator’s Workbench and MultiTerm. The examples cover
terminology recognition with MultiTerm 7.x. SDL
recommends that you use MultiTerm 7.1 or MultiTerm 7.5,
however, terminology recognition with MultiTerm 6.x (iX) is
still supported. Sections include:
C
About MultiTerm
C
Terminology recognition overview
C
Setting up terminology recognition
C
Working with terminology recognition during translation
C
Searching the termbase from Translator’s Workbench
and TagEditor
C
Adding terms to the termbase during translation
Chapter
6
6
Overview
OVERVIEW
This chapter introduces the interface between Translator’s Workbench and MultiTerm. With this
interface, Translator’s Workbench provides active terminology recognition during translation. The
term recognition feature automatically suggests term translations from your MultiTerm termbase as
you translate your documents. Term recognition is available in all of the Workbench editing
environments, including TagEditor and Microsoft Word. SDL recommends that you use MultiTerm
7.1 or MultiTerm 7.5 termbases, however, MultiTerm 6.x (iX) termbases are still supported.
This chapter explains how to set up term recognition in Translator’s Workbench and how to use term
recognition during translation. The examples are based on MultiTerm 7.
Audience
The information in this chapter is relevant to all users who wish to use term recognition during
translation with Translator’s Workbench.
About MultiTerm
MultiTerm is the terminology management system. It helps you to create, manage, and present your
terminology data. Each MultiTerm termbase can store an unlimited number of entries and each
entry can contain terms and descriptive data in an unlimited number of languages. MultiTerm has
a number of different search options, as well as powerful import and export features that allow you
to exchange data between termbases and with other applications. As a translator, you can use
MultiTerm to manage terminology data that can be accessed directly during translation with
Translator’s Workbench.
Translator’s Workbench supports terminology recognition with the most recent versions of the
terminology management system. In the context of term recognition with Translator’s Workbench,
these versions of MultiTerm are known as terminology providers.
SDL MultiTerm 7.x
MultiTerm is a client/server system that allows you to store termbase data locally on your personal
computer or, in a multi-user setup, on a remote database server. The same client application,
MultiTerm, is used to access termbase data in each case. If you have the MultiTerm Desktop
installed locally, you can use MultiTerm termbases for the purposes of terminology recognition
during translation.
You can access the MultiTerm client application from the Start menu on your computer.
6-2
TRANSLATOR’S WORKBENCH USER GUIDE
Overview
6
About Terminology Recognition
The interface between Translator’s Workbench and MultiTerm provides active terminology
recognition as you translate. Translator’s Workbench compares the current source segment with
termbase data, looking for matching terms. Translator’s Workbench uses a fuzzy matching
algorithm to search the termbase so that terms in your segment (including multiple word terms) can
be matched with identical or linguistically related terms in the termbase. Exact or fuzzy matching
terms are referred to as known terms. Translator’s Workbench highlights known terms in the source
window with a red bracket and displays the corresponding terminology entry in the terminology
window. The translation of a term can be easily transferred from the terminology window to the
document for translation using one of the Get Term buttons on the Workbench toolbar.
Source window
Terminology window
Known term
Known term and
term translation
Workbench toolbar
Get Term buttons
TRANSLATOR’S WORKBENCH USER GUIDE
6-3
6
Overview
Sample Files
The procedures and examples in this chapter are based on sample files that are available with the
current release of SDL Trados 2007 and MultiTerm 7. The table below lists the relevant sample files
and their default installation location. Make sure that these files are available if you intend to work
through the procedures on your own computer.
Sample File
File Name
Default Installation Location
English-German
translation memory
Sample.tmw
Sample.mdf
Sample.mtf
Sample.mwf
Sample.iix
C:\Documents and Settings\All Users\Documents\SDL
Trados\Samples\TW4Win\En_De
MultiTerm 7
local termbase
Local Sample
Not applicable
MultiTerm 7
remote termbase
Admin Sample
Not applicable
E
TIP
To keep the original sample files intact, we recommend that you work through procedures using
copies of the original files. The Program Files folder should not be write protected to allow
changing termbase data as well as translation memory data.
MultiTerm 7 Samples
MultiTerm 7 sample termbases are stored in local (Jet) and remote (SQL Server) databases, rather
than being file-based. The local termbase, Local Sample, is automatically available in MultiTerm after
installation of the MultiTerm Desktop. The remote termbase, Admin Sample, is created after
installation of the MultiTerm 7 client and server components, using MultiTerm Administrator. You
can access this termbase by connecting with MultiTerm Server from the MultiTerm client, provided
that you have the relevant MultiTerm Server login details.
V
6-4
FOR MORE INFORMATION
Contact your local MultiTerm administrator for MultiTerm Server login details.
TRANSLATOR’S WORKBENCH USER GUIDE
Setting up Terminology Recognition
6
SETTING UP TERMINOLOGY RECOGNITION
This section describes how to set up the interface between MultiTerm and Translator’s Workbench.
We recommend that you work through the procedure on your own computer using the MultiTerm
and SDL Trados 2007 sample files.
MultiTerm and Translator’s Workbench
With MultiTerm, you can store termbase data locally on your personal computer or, in a multi-user
setup, on a remote database server. Translator’s Workbench supports terminology recognition with
both local and remote termbases. In order to access both types of termbase, you must install the
MultiTerm Desktop locally.
Local MultiTerm Termbases
After installing the MultiTerm Desktop, you have automatic and exclusive access to termbase data
that is stored in local termbases.
Remote MultiTerm Termbases
Remote MultiTerm termbases are stored on a database server and accessed through MultiTerm
Server. In order to set up term recognition with a remote termbase, you must have access to the
MultiTerm Server computer on which the termbase is stored, MultiTerm Server login details and
user rights in the relevant termbase. User rights in the remote termbase are login-related and
defined by your MultiTerm administrator.
Translator’s Workbench depends initially on the local MultiTerm client to establish a connection
with MultiTerm Server. Once the connection is established, Translator’s Workbench retains the
relevant settings and is able to connect to the remote termbase independently of MultiTerm.
The complete workflow for setting up term recognition with a remote termbase is as follows:
1
Decide which termbase you wish to use for term recognition. Contact your MultiTerm
administrator for the necessary MultiTerm Server login details and information about
termbase user rights.
2
In your local MultiTerm Desktop, use the Termbase Connection dialog box to connect with
and log in to MultiTerm Server. Translator’s Workbench will use the MultiTerm Server
connection that you specify here.
3
In Translator’s Workbench, use the Terminology Recognition Options dialog box to define the
termbase settings, supplying MultiTerm Server login details as necessary.
TRANSLATOR’S WORKBENCH USER GUIDE
6-5
6
Setting up Terminology Recognition
The remote termbase is now available for the purposes of term recognition in the Workbench editing
environments.
D
NOTE
C You may occasionally be prevented from logging in to MultiTerm Server for short periods.
This may happen if the maximum number of concurrent users on MultiTerm Server has
been exceeded. If this happens, you can try again later or contact your MultiTerm
administrator.
C Remote termbases may occasionally be ‘stopped’ in order to carry out maintenance
procedures. When this happens, you will be temporarily unable to access the termbase.
Setting up the Interface Between MultiTerm and Translator’s Workbench
The following procedure describes how to set up the interface between MultiTerm (local and remote
termbases) and Translator’s Workbench. Use the MultiTerm sample termbases to work through the
procedure on your own computer.
D
NOTE
C If you wish to select a remote termbase for term recognition, make sure that you have the
necessary MultiTerm Server login details.
C These instructions describe opening one termbase, but it is possible to open multiple
termbases.
To set up the interface between MultiTerm and Translator’s Workbench:
6-6
1
Launch Translator’s Workbench from the Start menu on your computer.
2
From the File menu in Translator’s Workbench, select Open.
3
In the Open Translation Memory dialog box, browse to the location of the translation memory
you wish to use. Select the translation memory, in this example, Sample.tmw, and click
Open. The name of the selected translation memory appears in the Workbench title bar. The
flag icons in the status bar indicate the language direction of the translation memory.
4
From the Options menu in Translator’s Workbench, select Term Recognition Options. The
Termbase tab of the Term Recognition Options dialog box is displayed.
TRANSLATOR’S WORKBENCH USER GUIDE
Setting up Terminology Recognition
5
Under Terminology Provider, select MultiTerm 7.
6
Under Termbase Location, click Browse to open the Open Termbases dialog box.
7
Click on the Add (+) icon to open the Select Termbases dialog box.
TRANSLATOR’S WORKBENCH USER GUIDE
6
6-7
6
Setting up Terminology Recognition
8
In the Select Termbases dialog box, specify whether you wish to select one or more local or
remote termbases.
C If the termbase you wish to use is stored locally, select Local termbases and choose a
termbase from the Termbases list.
C If the termbase you wish to use is stored remotely, select Remote termbases (MultiTerm
Server). The MultiTerm Server Login dialog box is displayed. Enter your login details and
click OK to confirm and to return to the Select Termbase dialog box. Select a termbase
from the Termbases list. Click OK to confirm and to return to the Terminology Recognition
Options dialog box.
E
TIP
If your login to MultiTerm Server is unsuccessful, select Remote (MultiTerm Server) once more
and try again. If login is still unsuccessful, contact your MultiTerm administrator.
9
In the Terminology Recognition Options dialog box, check that the name and location of the
selected termbase are displayed in the Termbase location text box.
10
Under Language selection, check that the specified language direction for the selected
termbase is correct. In order for terminology recognition to work, the language direction of
the selected termbase must correspond to the language direction of the translation memory
you intend to use.
In the following screenshot, we have selected the local sample termbase, Local Sample, for term
recognition and the language direction is set to English-German.
6-8
TRANSLATOR’S WORKBENCH USER GUIDE
Setting up Terminology Recognition
D
NOTE
11
Click the Settings tab to specify the Minimum match value and Search depth for term
recognition searches. For more information, see “Term Recognition Settings” on page 6-10.
12
Click OK to confirm the termbase settings and to return to the main program window for
Translator’s Workbench.
13
From the Options menu in Translator’s Workbench, select Term Recognition to turn the term
recognition feature on. When this feature is active, the Workbench program window includes
a dedicated terminology window.
6
All searches are performed on the currently selected source language.
The interface between Translator’s Workbench and MultiTerm is now set up for active term
recognition during translation.
V
FOR MORE INFORMATION
For more information, see “MultiTerm 7 Term Recognition Window” on page 6-11.
TRANSLATOR’S WORKBENCH USER GUIDE
6-9
6
Setting up Terminology Recognition
Term Recognition Settings
Before you start translating, check the current term recognition settings. These settings are available
on the Settings tab of the Terminology Recognition Options dialog box and they allow you to define
the minimum match value and search depth for term recognition searches.
To define term recognition settings:
6-10
1
From the Options menu in Translator’s Workbench, select Term Recognition Options.
2
In the Term Recognition Options dialog box, click the Settings tab.
3
Specify the Minimum match value for term recognition. The minimum match value expresses
the minimum degree of similarity between the terminology in your source segment and the
terminology found in MultiTerm. The higher the value, the more alike terms must be.
Translators work with different values according to their requirements. You can set a value
between 30 and 100%. We recommend a minimum match value of between 65% and 75%.
The default setting is 70%.
4
Specify the Search depth for term recognition searches. When scanning source segments for
terminology, Translator's Workbench evaluates not only single words but also multi-word
units, trying to find similar terms in the current termbase. The search depth value defines the
number of fuzzy matches Translator's Workbench should return examine in the current
termbase. Increasing the Search depth value slows down terminology recognition. You can set
any value within the range allowed. The default search depth setting is 20 (matches) and for a
single termbase search, this value should produce satisfactory results for local termbases but
for searching multiple termbases or when searching larger termbases you should set the
search depth to a higher value.
TRANSLATOR’S WORKBENCH USER GUIDE
MultiTerm 7 Term Recognition Window
5
To restore the default match value and search depth settings at any stage, click Default
Settings.
6
To run term recognition independently of the translation memory search, click Run
terminology recognition in the background. When you select this option, Translator’s
Workbench returns the results of each operation separately. Because term recognition
generally takes longer than the translation memory search, this may speed up translation.
This setting is active by default.
7
Click OK to confirm your settings and to return to the main Workbench program window.
6
MULTITERM 7 TERM RECOGNITION WINDOW
The interface between Translator’s Workbench and MultiTerm 7 provides direct access to the
MultiTerm 7 term recognition window, where termbase entries are displayed in full.
To access the MultiTerm 7 term recognition window from Translator’s Workbench:
C
Double-click the dictionary icon for the current term in the Workbench terminology window.
The corresponding termbase entry is displayed in full in the MultiTerm 7 term recognition
window.
C
Select text in any of the Workbench windows and use the Search in MultiTerm or Fuzzy Search
in MultiTerm shortcut menu commands to search the termbase. Search results are displayed
in the MultiTerm 7 term recognition window.
D
NOTE
Searches are performed on the currently selected source index.
As well as displaying entries in full, the MultiTerm 7 term recognition window allows you to change
the entry display and to browse to adjacent termbase entries. These features are outlined in the
following section.
D
NOTE
The MultiTerm 7 term recognition window offers a limited number of search options for the
purposes of terminology recognition during translation. To avail of the full range of
MultiTerm 7 search options including advanced filter functionality, use MultiTerm Desktop. For
more information, see the MultiTerm User Guide.
TRANSLATOR’S WORKBENCH USER GUIDE
6-11
6
MultiTerm 7 Term Recognition Window
Using the MultiTerm 7 Term Recognition Window
The following example is based on the MultiTerm 7 sample termbase, Local Sample. Use this
termbase to work through the example on your own computer.
1
Launch Microsoft Word. Create a new Word document, save it and assign a file name, for
example, Term recognition_MultiTerm 7.doc.
2
Set up the interface between MultiTerm 7 and Translator’s Workbench. For more
information, see “Setting up Terminology Recognition” on page 6-5.
3
To simulate translation, type the following source segment in Word:
The middleware component enables the client to communicate with the server.
4
Reposition your cursor at the beginning of the source segment you have just typed and click
Open/Get
on the Workbench toolbar in Word.
No match is found in the translation memory for the source segment. However, three known
terms have been identified and highlighted in the source segment: middleware, client and server.
6-12
TRANSLATOR’S WORKBENCH USER GUIDE
MultiTerm 7 Term Recognition Window
5
6
Double-click on the dictionary icon for the current term in the terminology window. This
opens the MultiTerm 7 term recognition window, where the full entry for the current term is
displayed in the entry pane.
Entry pane
Browse buttons
Layout list
Current term
Browse pane
Use the term recognition window to display further term data as follows:
C Entry pane – displays the entry that corresponds to the current term or search text. Source
language information is displayed at the top of the entry pane, followed by target language
information. Use the browse pane or browse buttons to display termbase entries that are
alphabetically adjacent.
C Browse pane – the current term or search text is highlighted in the browse pane. The
browse pane also lists up to 20 other source terms that are alphabetically adjacent. Select
another source term in the browse pane to display the corresponding entry in the entry
pane.
C Browse buttons – use the previous and next browse buttons to move through the source
terms in the browse pane, displaying the full termbase entry for each highlighted term.
C Layout list – to change the way entries are displayed in the entry pane, select a different
layout from the Layouts drop-down list.
6
To carry out a normal termbase search from Translator’s Workbench, select client in the source
window, right-click to access the shortcut menu and choose Search in MultiTerm. MultiTerm
finds an exact match in the termbase and the corresponding entry is displayed in full in the
term recognition window.
TRANSLATOR’S WORKBENCH USER GUIDE
6-13
6
MultiTerm 7 Term Recognition Window
7
To carry out a fuzzy search from Translator’s Workbench, select server in the source window,
right-click to access the shortcut menu and choose Fuzzy Search in MultiTerm. MultiTerm
finds several matching terms for the search text and displays the results in the Hit List
dialog box.
C Select a term in the Hit List dialog box and double-click (or click OK) to display the
corresponding entry in the entry pane of the term recognition window.
C Click Cancel to return to Translator’s Workbench where you can carry out another search.
6-14
8
In Translator’s Workbench, finish translating the current source segment, using the Get Term
buttons on the Workbench toolbar in Word to transfer known terms to the target field.
9
Click Set/Close
on the Workbench toolbar to confirm the new translation and to close the
translation unit. This completes the mock translation.
TRANSLATOR’S WORKBENCH USER GUIDE
Adding a Term to MultiTerm
6
ADDING A TERM TO MULTITERM
To add a term to your termbase when you are working in the Trados/Word environment:
1
In Microsoft Word, select the word or phrase that you want to add to the MultiTerm glossary.
2
With the term highlighted, select Add Entry from the MultiTerm menu. You can use the
keyboard shortcut: [Ctrl]+[Shift]+[M]
3
If the Show Quick Entry button is enabled, the MultiTerm Quick Add Entry dialog box is
displayed.
4
You can choose to add the term as a source or target language term.
5
You can add extra information like a note or a definition. For example, you may want to add a
note to say that you have added this term from a particular document.
6
Choose a field from the list of Field labels, and add your note in the Field content box.
To search for a term when you are translating in the Trados-Word environment:
1
Type the term you are searching for into the Search Text box.
Toggle fuzzy
search
2
You do not have to spell the term exactly, you can activate the fuzzy search option and the
search will return terms which are similar to the term you have entered into the Search Text
box.
TRANSLATOR’S WORKBENCH USER GUIDE
6-15
6
Adding a Term to MultiTerm
To add a term to your termbase when you are working in TagEditor:
1
In TagEditor, select the word or phrase that you want to add to the MultiTerm glossary.
2
With the word(s) highlighted right click and choose Add Term from the context menu. You can
use the keyboard shortcut: [Ctrl]+[Alt]+[A]
3
Select Set as Source or Set as Target based on whether the term you are adding is in the source
or target language.
4
Select Add Term > Submit to MultiTerm. The Submit to MultiTerm dialog box is displayed.
5
Enter the corresponding source or target term.
6
Click Add to add the term to the termbase.
7
You can choose to add the term as a source or target language term.
8
You can add extra information like a note or a definition. You may want to add a note to say
that you have added this term from a particular document.
9
Choose a field from the list of Field labels, and add your note in the Field content box.
To add terms from Translator’s Workbench:
You can add terms directly from within Translator’s Workbench, from the Concordance window or
from the Maintenance window or directly from within the source window.
1
6-16
Select the term you want to add by double-clicking and highlighting it.
TRANSLATOR’S WORKBENCH USER GUIDE
Adding a Term to MultiTerm
2
Right-click and choose Add term from the context menu.
3
With your source term selected choose Set as Source.
4
Highlight the target term you want to add to the entry and select Set as Target.
TRANSLATOR’S WORKBENCH USER GUIDE
6
6-17
6
Adding a Term to MultiTerm
5
Select Submit to MultiTerm. The Submit to MultiTerm dialog box is displayed. Choose More to
see the full dialog box:
You can add more information to your entry and include the translation unit as contextual
information. The entry is marked as incomplete in the termbase so that when reviewing the
termbase you can search for all incomplete entries and make sure that they are valid.
V
6-18
FOR MORE INFORMATION
For more information about MultiTerm, see the MultiTerm User Guide.
TRANSLATOR’S WORKBENCH USER GUIDE
SPELLING AND VERIFICATION
PLUG-INS
This chapter introduces the spelling checker and verification
plug-ins in TagEditor. Sections include:
C
Overview of the TagEditor plug-ins
C
Working with the spelling checker plug-ins
C
TagEditor verification plug-ins
C
Defining verification settings
C
Using the plug-ins to verify target files
C
Using the message pane to locate tag changes in the
target file
C
TagEditor message filter plug-ins
C
SDL Trados Terminology Verifier
C
SDL Trados QA Checker
Chapter
7
7
Overview
OVERVIEW
This chapter introduces the TagEditor plug-ins. It shows you how to access the plug-ins in TagEditor
and how to use them for the purpose of spell-checking, verifying and validating target files.
Audience
The information in this chapter is relevant to all users who are working in the TagEditor editing
environment.
D
NOTE
If you are using SDL Trados Synergy, you can validate your files from within this application.
About TagEditor Plug-ins
The following plug-ins are available with TagEditor:
7-2
C
TeamWorks Verifiers– allow you to run verifiers both at global TeamWorks project and at
individual document level in TagEditor so that you can verify thatall errors that a TeamWorks
plug-in has reported have been fixed.
C
Spelling checkers – the WinterTree and Word spelling checkers allow you to check spelling in
your target files.
C
Verifiers – this plug-in category includes the Generic Tag Verifier, the XML Validator, the STag Verifier, the Excel Verifier, the Win32Binary Verifier and the RC Verifier, These plug-ins
allow you to verify or validate the tag content of your target files before converting them back
to their original format. Use the verification plug-ins in conjunction with the message pane in
TagEditor, which provides you with a complete list of verification messages and direct access
to tag errors in the target file.
C
Message filters – a message filter allows you to customise the list of messages that is generated
by the verification and validation plug-ins. TagEditor ships with a message filter for the XML
Validator, called the XML Validator Filter.
C
TagEditor plug-ins – this category includes the TradosTag Viewer plug-in, which allows you to
preview and print TradosTag (TTX) documents from within Internet Explorer and the Snippet
Mark-up Plug-in 1.0, which allows you to convert parts of text embedded in files to internal
tags so that they are not treated as translatable text. It also includes any third-party plug-ins
that are developed to integrate TagEditor with other systems or to provide extra functionality.
V
FOR MORE INFORMATION
For more information about the TradosTag Viewer plug-in, see Chapter 9.
TRANSLATOR’S WORKBENCH USER GUIDE
Overview
C
SDL Trados Terminology Verifier – this plug-in allows you to verify or validate the terms used
in you document against the terms contained in the termbase.
C
SDL Trados QA Checker – this plug-in incorporates a suite of quality assurance checks that
are performed on the current TagEditor document.
7
Plug-ins Dialog Box
The Plug-ins dialog box in TagEditor provides you with a central point of access for all plug-ins. Use
the Plug-ins dialog box to activate plug-ins and define settings.
D
NOTE
Any settings you define here will affect the general verification plug-in settings in SDL Trados
Synergy.
To access the Plug-ins dialog box:
C
Click the Plug-ins Settings button
C
Select Plug-ins from the Tools menu in TagEditor.
on the Standard toolbar in TagEditor, or
The Plug-ins dialog box is displayed.
C
To activate a plug-in, select the plug-in category and then select the plug-in itself.
C
To define plug-in settings, click Properties to open the property page for the selected plug-in.
D
NOTE
In the Plug-ins dialog box, third-party plug-ins may also be listed either under Spelling Checkers
or TagEditor Plug-ins.
TRANSLATOR’S WORKBENCH USER GUIDE
7-3
7
Spelling Checker Plug-ins
SPELLING CHECKER PLUG-INS
TagEditor has three spelling checker plug-ins, allowing you to check the spelling of target text in your
document. These are the WinterTree Spelling Checker, the Word Spelling Checker and the Word
Spelling Checker 2.0.
C
WinterTree Spelling Checker – supports the following languages by default: Brazilian
(Portuguese), Danish, Dutch, English (UK), English (US), Finnish, French, German, Italian,
Iberian Portuguese, Norwegian, Spanish and Swedish. You can provide additional language
support by adding custom dictionaries to the default properties for this spelling checker.
C
Word Spelling Checker 2.0 – you must configure the Word Spelling Checker in Word before
using Word Spelling Checker 2.0 in TagEditor. Language support corresponds to the language
support that is available in your installation of Word.
C
Word Spelling Checker – this is an earlier version of the Word Spelling Checker.
The spelling checker plug-ins can be activated or deactivated as required from the Plug-ins dialog box
in TagEditor.
Working with the Spelling Checkers
To activate a spelling checker:
7-4
1
Select the Plug-ins command from the Tools menu. The Plug-ins dialog box is displayed.
2
Select the spelling checker that you want to use and click OK.
TRANSLATOR’S WORKBENCH USER GUIDE
Spelling Checker Plug-ins
7
TagEditor can run the spelling checker automatically every time you close a segment and/or before
you save the translated document in its target language version.
To define the settings for automatic spell checking:
C
Choose Options from the Tools menu. The Options dialog box is displayed. Select the setting
that you want and click OK.
Alternatively, select Check Spelling on the Tools menu or click
the spelling checker at any time during translation.
D
on the standard toolbar to run
NOTE
The spelling checkers only check target text. Because of this, the spelling checkers will not run
unless the document is a TradosTag document (TTX file) with at least one segment translated.
TRANSLATOR’S WORKBENCH USER GUIDE
7-5
7
Spelling Checker Plug-ins
WinterTree Spelling Checker Properties
The WinterTree Spelling Checker Properties dialog box gives you access to the Spelling Options tab
and the Custom Dictionaries tab, where you can set spelling options and add custom dictionaries as
required. There are several ways to access the WinterTree Spelling Checker Properties dialog box:
C
Select Check Spelling on the Tools menu and click Options.
C
Select Plug-ins on the Tools menu, activate the WinterTree Spelling Checker and click Options.
C
Select Options on the Tools menu, open the Spelling tab and click Plug-in Properties.
V
FOR MORE INFORMATION
For more information on the Spelling Options and Custom Dictionaries tabs, see the online
help for TagEditor.
Word Spelling Checker Properties
There is no property page for the Word Spelling Checker or the Word Spelling Checker 2.0 in
TagEditor. The Word Spelling Checker must be configured in Microsoft Word. For more
information about configuration, see the TagEditor Help.
7-6
TRANSLATOR’S WORKBENCH USER GUIDE
TagEditor Verification Plug-ins
7
TAGEDITOR VERIFICATION PLUG-INS
This section introduces the TagEditor verification plug-ins. It contains general information about
verification and the difference between segment level and document level verification. The
verification plug-ins are used for document level verification.
About Verification
Tag verification compares the tag content of target material with the tag content of the original
source material and identifies any changes that were made. Changes in the target material are
acceptable provided that the syntax of tags remains intact and the translated document can be
converted back to its original format. Tag verification helps to ensure that only acceptable changes
are made.
D
NOTE
Because tag verification involves the comparison of source and target material, files must be in
TradosTag bilingual format (TTX) in order for verification to take place.
Tag verification can be carried out at segment level or at document level.
Segment Level Verification
During interactive translation, TagEditor automatically verifies the number, names and order of
internal tags in each target segment that you send to the translation memory. If there are changes, a
warning is returned. You can define settings for segment level verification in the Verification tab of
the Options dialog box (Tools menu).
V
FOR MORE INFORMATION
For more information, see “Customising the Tags Toolbar” on page 4-18.
Document Level Verification
TagEditor allows you to verify the tag content of whole documents, whether partially or fully
translated, using the verification plug-ins that are available for each of the supported file formats.
The verification plug-ins look at the tag content of the target file as a whole and identify any changes
that have been made during translation. Tag changes are reported in the message pane in TagEditor;
the message pane provides direct access to tag changes in the target file. Tag changes are classified
according to levels of severity and reported as errors, alerts or warnings.
TRANSLATOR’S WORKBENCH USER GUIDE
7-7
7
TagEditor Verification Plug-ins
F
WARNING
Tag changes in the target file that are classified as errors must be fixed before the file can be converted
back to its original format. Tag changes that are classified as alerts and warnings do not prevent
backward conversion but should be checked in order to avoid undesirable effects in the finished
document.
We recommend that you use the verification plug-ins to carry out document level verification
wherever possible. When used in conjunction with the message pane, the verification plug-ins
provide you with a fast and efficient way of fixing tag errors. Successful verification with the plug-ins
can guarantee backward conversion of your target files.
D
NOTE
You can also use the verification plug-ins from within SDL Trados Synergy.
Generic Tag Verifier
The Generic Tag Verifier supports the following file types:
C
HTML, SGML and XML documents
C
PowerPoint documents
C
Workbench RTF files
C
STF files (converted FrameMaker and Interleaf documents)
C
PageMaker, QuarkXPress, InDesign and Ventura tagged text files.
The properties of the Generic Tag Verifier plug-in vary depending on the type of file that is being
processed. For more information, “Defining Settings for the Generic Tag Verifier” on page 7-13.
D
NOTE
C Use the Generic Tag Verifier in conjunction with the XML Validator to verify and validate
XML target files.
C When verifying target STF files, use either the Generic Tag Verifier or the S-Tag Verifier. Using
both plug-ins will result in the duplication of error messages. SDL recommend using the
S-Tag Verifier as successful verification with this plug-in guarantees backward conversion of
the target STF files.
7-8
TRANSLATOR’S WORKBENCH USER GUIDE
TagEditor Verification Plug-ins
7
XML Validator
The XML Validator supports XML documents and uses the XML parser DLL, XercesRS.dll, to
generate verification messages. This DLL is shipped with SDL Trados.
Use the XML Validator in conjunction with the Generic Tag Verifier t0 validate target XML files.
Successful verification with the XML Validator validates the target XML file and guarantees
conversion back to its original format. For more information about XML Validator properties, see
“Defining Settings for the XML Validator” on page 7-16.
D
NOTE
You can also use the XML Validator in conjunction with the XML Validator Filter. The XML
Validator Filter is a message filter plug-in that allows you to customise the message list that is
generated by the XML Validator. For more information, “Message Filter Plug-ins” on
page 7-22.
S-Tag Verifier
The S-Tag Verifier supports STF files. Successful verification with the S-Tag Verifier validates the
target STF file and guarantees conversion back to its original format. For this reason, we recommend
that you use the S-Tag Verifier rather than the Generic Tag Verifier to verify target STF files.
The S-Tag Verifier plug-in in TagEditor uses the same verification messages and error levels as the
stand-alone S-Tagger and S-Tag Verifier applications. For more detailed information about these
messages, see the online help for any of these applications. The S-Tag Verifier plug-in properties
allow you to suppress certain alerts or warnings. For more information, “Defining Settings for the
S-Tag Verifier” on page 7-17.
D
NOTE
The verification process for STF involves the comparison of two separate STF files. For this
reason, the S-Tag Verifier plug-in saves the current bilingual file in TagEditor as target (in TTX,
RTF or TXT format) and then compares the target file to the source material in the bilingual file.
TRANSLATOR’S WORKBENCH USER GUIDE
7-9
7
TagEditor Verification Plug-ins
Excel Verifier
The Excel Verifier supports Excel files translated in TagEditor. There is no property page for the Excel
Verifier in TagEditor.
The Excel Verifier checks to ensure that Excel worksheet names are 31 characters or less and that they
do not include any of the following characters: \ / ? : * [ ].
Select Verify from the Tools menu to start the verification. If invalid worksheet names are found
errors are reported in the message window. You can double-click on the message to jump to the line
that contains the invalid worksheet name and correct it.
Win32Binary Verifier
The Win32Binary Verifier supports Windows Binary files (*.exe, *.dll, *.ocx) translated in TagEditor
and checks for common translation errors such as duplicate hotkeys. For more information see the
File Formats Reference Guide.
RC Verifier
The RC Verifier supports RC files translated in TagEditor and checks for common translation errors
such as duplicate hotkeys. Successful verification with the RC Verifier validates the target RC file.For
more information see the File Formats Reference Guide.
7-10
TRANSLATOR’S WORKBENCH USER GUIDE
Using the Verification Plug-ins
7
USING THE VERIFICATION PLUG-INS
This section provides general information about the verification process at document level. It
describes the properties of each verification plug-in and shows you how to define verification
settings. It shows you how to verify target files using the plug-ins, and how to fix tag errors afterwards
using the message pane in TagEditor.
The Verification Process
Follow these steps to verify target files using the verification plug-ins:
1
In TagEditor, save the file for verification in TradosTag bilingual format (TTX). The file for
verification may be partially or fully translated.
2
In the Plug-ins dialog box, activate the plug-in that you wish to use for verification. Use more
than one verification plug-in where appropriate, for example, activate the XML Validator and
the Generic Tag Verifier to verify XML documents. Activate the XML Validator Filter if you
wish to filter the messages that are generated by the XML Validator.
3
Open the relevant properties page(s) to define settings for the verification and message filter
plug-in(s) you intend to use. Use the Plug-in Properties button on the Verification tab (Options
dialog box) to open the properties pages for all active plug-ins at once. For more information
about verification settings, “Verifier Property Pages” on page 7-12. For more information
about message filter settings, “Using the XML Validator Filter” on page 7-22.
4
Verify the target file. Select the Verify Tags command (Tools menu) or click Verify Tags
on
the Standard toolbar to start the operation. This command verifies the tag content of the active
document using the active verification plug-in and the current plug-in settings. If tag changes
are detected, messages are automatically displayed in the message pane in TagEditor. Each
message contains information about the nature of the tag change, its location in the target file
and the level of severity.
5
Use the message pane and the Messages toolbar to locate tag changes in the target file. For
more information, “After Verifying the Target Files” on page 7-19.
6
Fix all tag errors in the target file as these must be corrected before backward conversion can
take place. Check all alerts and warnings and edit tags as necessary. If necessary, modify tag
protection settings to allow tag content in the target file to be edited.
7
After fixing or editing tags, run the verification process again. Continue verifying the file until
you are satisfied that any remaining alerts or warnings refer to tag changes that are
intentional.
TRANSLATOR’S WORKBENCH USER GUIDE
7-11
7
Using the Verification Plug-ins
8
After the file has been successfully verified, use the Save Target As command in TagEditor to
remove bilingual data and restore the original file format. Alternatively, use the clean up
feature in Translator’s Workbench to remove bilingual data, update the translation memory
and convert the target file to its original format. STF files require further processing in the STaggers to convert back to FrameMaker MIF or Interleaf ASCII format.
V
FOR MORE INFORMATION
For information about using the clean up feature after verification, see “Cleaning Up Translated
Documents” on page 8-16.
Verifier Property Pages
Some of the verification plug-ins have a properties page where you can define settings for the
verification process. Verifier properties are format-specific and the properties page for each plug-in
is different. There is a properties page for the Generic, XML and S-Tag plug-ins only.
The properties page always refers to the document that is currently open in TagEditor (or the relevant
tag settings file) for format-specific information about tag content. With this information, potential
tag errors and error levels are identified.
D
NOTE
You must open a file of the relevant type in TagEditor in order to view properties and define
settings for that format on the properties page.
To access the property page for any of the verification plug-ins:
7-12
C
In the Plug-ins dialog box, activate the plug-in for which you wish to define settings and click
Properties to open the property page.
C
In the Verification tab of the Options dialog box, click Plug-in Properties to open the
Verification Properties dialog box. This dialog box contains property pages for all verification
and message filter plug-ins that are currently active in TagEditor. The Plug-in Properties button
is only available if at least one plug-in is available in the Plug-ins dialog box.
TRANSLATOR’S WORKBENCH USER GUIDE
Using the Verification Plug-ins
7
Defining Settings for the Generic Tag Verifier
You can define settings for the Generic Tag Verifier in the Generic Tag Verifier dialog box. This dialog
box displays the list of all file types for which you can define deneric tag settings in TagEditor.
D
NOTE
In some situations, you may need to work with a read-only tag settings file that cannot be
modified. Because the tag settings file cannot be modified, you cannot customise the settings
for the Generic Tag Verifier or the XML Validator plug-ins. Use the default settings instead.
Generic Tag Verifier Settings
For all document types, the Generic Tag Verifier identifies two generic causes of error and classifies
them as follows:
C
An unknown tag in the target file generates an error. Tags are considered to be unknown if they
do not feature in the relevant tag settings file.
C
A tag order change in the target file generates a warning.
For file types with configurable internal tags, the following cause of error is identifed:
C
Entities that are added to the target file are not reported at all.
The following screenshot shows the content of the Generic Tag Verification Settings dialog box for a
Microsoft Word file. The content of this dialog box is similar for any other documents that do not
contain configurable internal tags.
Current tag
settings file
Generic causes
of error
Error level settings
TRANSLATOR’S WORKBENCH USER GUIDE
7-13
7
Using the Verification Plug-ins
C
The descriptive name for the current tag settings file is given at the top of the dialog box. For
more information about tag settings files, see the online help system for TagEditor.
C
The Cause of Error column lists the three generic causes of error.
C
The Error level column indicates the error level that is currently associated with each cause of
error.
C
The Error Level group box allows you to customise error level settings.
For some document types, including HTML, XML, SGML, XLIFF and ResX files, for example,
internal tags that have been added to or deleted from the target file may be reported as errors, alerts
or warnings. By default, most internal tag changes are reported as alerts or warnings.
The following screenshot shows the content of the Generic Tag Verification Settings dialog box for
the default HTML settings file. The content of this dialog box is similar for any other documents that
contain configurable internal tags.
Error level settings
Current tag settings file
Generic causes of error
Internal tags
7-14
C
The descriptive name for the current tag settings file is given at the top of the dialog box. For
more information about tag settings files, see the online help system for TagEditor.
C
The Cause of Error column lists the three generic causes of error, followed by a list of internal
tags as defined in the current tag settings file.
TRANSLATOR’S WORKBENCH USER GUIDE
Using the Verification Plug-ins
C
The Error level column indicates the error level that is currently associated with each cause of
error.
C
The Error Level group box allows you to customise error level settings for the internal tags.
7
To define generic tag verification settings for documents:
1
In TagEditor, select Tools > Plug-ins to open the Plug-ins dialog box.
2
In the Plug-ins dialog box, activate the SDL Trados Generic Tag Verifier plug-in and click
Properties to open the Generic Tag Verifier dialog box.
3
In the Generic Tag Verifier dialog box, select the file type for which you want to define generic
tag verification settings and click Properties to open the Generic Tag Verification Settings
dialog box.
4
In the Generic Tag Verification Settings dialog box, customise the error level settings for
internal tags (error level settings for external tags are not supported). Settings are saved in the
current tag settings file.
5
Click OK to confirm settings and to return to the Generic Tag Verifier dialog box. Select any
other file types that you want to use and define settings if necessary.
6
Click OK to return to the Plug-ins dialog box and then click OK again to return to the main
TagEditor program window.
You are now ready to verify the target file. For more information, “The Verification Process” on
page 7-11.
TRANSLATOR’S WORKBENCH USER GUIDE
7-15
7
Using the Verification Plug-ins
Defining Settings for the XML Validator
You can define settings for the XML Validator in the XML Validator Settings dialog box. Validation is
based on the document type of the active XML document and/or the DTD file that you specify on the
properties page. Settings are stored in the relevant tag settings file.
To define XML validation settings for documents:
7-16
1
In TagEditor, select Tools > Plug-ins to open the Plug-ins dialog box.
2
In the Plug-ins dialog box, activate the SDL Trados XML Validator plug-in and click Properties
to open the XML Validator Settings dialog box.
3
In the XML Validator Settings dialog box, select the tab for the file type for which you want to
define XML validator verification settings.
4
If you want to use a DTD file during validation, under the DTD for validation text box, click
Browse to open the Select DTD dialog box. Browse to select the DTD file and click Open to
confirm your selection. The name and location of the DTD file you have specified is displayed
in the DTD for validation text box.
5
Select the Ignore missing files checkbox if you want to suppress error messages that result
from external entity files that are missing.
6
Click Apply to save settings for that tab.
TRANSLATOR’S WORKBENCH USER GUIDE
Using the Verification Plug-ins
7
Click on any other tabs you want to define settings for or upload a DTD file for, define settings
and click Apply on each tab you make changes to,
8
Click OK to confirm your settings and to return to the Plug-ins dialog box. Activate any other
plug-ins that you want to use and define settings if necessary.
E
TIP
9
Click OK to return to the main TagEditor program window.
7
Use the XML Validator Filter to customise the message list that is generated by the XML
Validator. The XML Validator can also be used in conjunction with the Generic Tag Verifier.
You are now ready to verify the target XML file. For more information, “The Verification Process”
on page 7-11.
Defining Settings for the S-Tag Verifier
You can define settings for the S-Tag Verifier plug-in in the SDL Trados S-Tag Verifier dialog box.
This dialog box has two tabs: FrameMaker and Interleaf. Each tab gives a list of internal S-Tags in
these document types. Use this dialog box to suppress the verification messages for specified tags.
Tag changes involving these tags are always reported as alerts or warnings, and are therefore
considered safe to ignore.
To define verification settings for STF files:
1
In TagEditor, select Tools > Plug-ins to open the Plug-ins dialog box.
2
In the Plug-ins dialog box, activate the SDL Trados S-Tag Verifier plug-in and click Properties to
open the SDL Trados S-Tag Verifier dialog box.
3
In the S-Tag Verifier Properties dialog box, select the tab for the file type for which you want to
set S-Tagger verification settings (FrameMaker or Interleaf).
4
Select the tags in the list whose messages you wish to suppress.
D
NOTE
The S-Tag Verifier plug-in uses the same verification messages and error levels as the standalone S-Tagger applications. For more detailed information about these messages, see the
online help for the S-Tagger for FrameMaker or the S-Tagger for Interleaf.
TRANSLATOR’S WORKBENCH USER GUIDE
7-17
7
Using the Verification Plug-ins
5
The verification process involves the comparison of S-Tags in the target file with the S-Tags in
the source (RTF/STF) file. For the purposes of this comparison, TagEditor derives a temporary
target file from the current bilingual version of the active document. TagEditor locates the
source file as follows:
C If the source RTF/STF file is available in the same folder as the bilingual TradosTag
document, TagEditor uses this file during verification.
C If the source RTF/STF file is not available in either of the above locations, use the Browse
button beside the Source STF and ORG files box to point to the relevant files.
C If you cannot locate the original source RTF/STF file(s), leave the Source STF and ORG
files box empty. TagEditor will derive a temporary source file from the current bilingual
version of the active document. This temporary file is perfectly adequate for the purposes
of verification.
D
NOTE
6
Click OK to confirm settings and to return to the Plug-ins dialog box.
7
Click OK to return to the main TagEditor program window.
The creation of temporary source and target files for the purposes of S-Tag verification happens
in the background only. Temporary files are unseen during verification and they are deleted as
soon as verification is complete.
You are now ready to verify the target STF file. For more information, “The Verification Process” on
page 7-11.
7-18
TRANSLATOR’S WORKBENCH USER GUIDE
Using the Verification Plug-ins
7
After Verifying the Target Files
If tag changes are detected in the target file during verification, messages are automatically displayed
in the message pane. The following screenshot shows the message and document panes in
TagEditor as they appear immediately after verification.
Messages toolbar
Document pane
Message pane
Each message contains information about the nature of the tag change, its location in the target file
and the level of severity. Use the message pane and the Messages toolbar to locate tag changes in the
target file. Tag changes that are classified as errors must be fixed before the file can be converted back
to its original format. Tag changes that are classified as alerts and warnings do not prevent backward
conversion but should be checked and, if necessary, edited, in order to avoid undesirable effects in
the finished document. Use the Open/Get command to edit the tag content of target segments.
Always confirm changes using the Set/Close command so that the translation memory is updated
with the latest target segment data.
E
TIP
If necessary, modify tag protection settings to allow tag content in the target file to be edited.
For more information, see “Tag Protection” on page 4-10.
After fixing tag errors in the target file, we recommend that you run the verification process again.
This will ensure that the information in the message pane regarding the location of tag changes is
accurate.
C
To show or hide the message pane, select Messages from the View menu.
C
To show or hide the Messages toolbar, select Toolbar > Messages from the View menu.
TRANSLATOR’S WORKBENCH USER GUIDE
7-19
7
Using the Verification Plug-ins
Message Pane
The following screenshot shows the type of information that is displayed in the message pane after
verification.
The information for each verification message is explained in the table below.
Column
Explanation
Icon
Each icon indicates a different error level:
– indicates an error.
– indicates an alert.
– indicates a warning.
7-20
Message
Text of the message that is generated by the verification plug-in.
Tag
Name of the tag that has been changed, added or deleted.
Location
Location of the tag change in the target file.
Verifier
Name of the plug-in that generated the message.
TRANSLATOR’S WORKBENCH USER GUIDE
Using the Verification Plug-ins
7
Working with the Message Pane
Tag errors in the target file must be fixed; alerts and warnings should be checked and, if necessary,
edited. Use the following message pane commands to navigate the target file and locate tag changes:
C
To sort list items according to the contents of a particular column, click on the relevant
column heading.
C
To move from the message pane to the document pane and vice versa, press [F6] and
[Shift]+[F6].
C
Double-click a message to locate the corresponding tag change in the target file.
C
To locate the tag change that is described in the next message, press [F4]. To locate the tag
change that is described in the previous message, press [Shift]+[F4].
C
Right-click a message to access the shortcut menu and the following commands:
C Go to Location – locates the corresponding tag change in the target file.
C Apply Filters – activates and deactivates the message filter for the current plug-in.
C Filter Settings – displays the Message List Filters dialog box, where you can access the
properties page and define settings for the message filter.
C Hide – hides the message pane.
Messages Toolbar
The Messages toolbar contains a series of commands that are also designed to help you navigate the
target file and locate tag changes. The commands are similar to those that are available in the
message pane. For more information, see the online help for TagEditor.
TRANSLATOR’S WORKBENCH USER GUIDE
7-21
7
Message Filter Plug-ins
MESSAGE FILTER PLUG-INS
This section introduces the message filter plug-ins. It explains how to define settings on the message
filter properties page and shows you how to use the message filter after verification.
About Message Filters
Message filters are used in conjunction with the verification plug-ins. A message filter allows you to
reduce the number of messages that are displayed on the message pane after verification by filtering
out or hiding certain messages. This is useful if you are sure that certain types of message can be
safely ignored. It allows you to focus on the most significant messages and the corresponding tag
changes in the target file. You can easily redisplay hidden messages at any stage by deactivating the
message filter.
Use the XML Validator Filter to hide messages that are generated by the XML Validator plug-in. If
you have access to any third-party message filter plug-ins, they will be listed alongside the XML
Validator Filter in the Plug-ins dialog box.
Using the XML Validator Filter
To define settings for the XML Validator Filter:
7-22
1
In TagEditor, open the XML document for which you wish to define settings. TagEditor
activates the relevant tag settings file.
2
From the Tools menu, select Plug-ins to open the Plug-ins dialog box.
TRANSLATOR’S WORKBENCH USER GUIDE
Message Filter Plug-ins
3
7
In the Plug-ins dialog box, activate the SDL Trados XML Validator Filter plug-in and click
Properties to open the SDL Trados XML Validator Filter Properties dialog box.
C The descriptive name for the current tag settings file is given at the top of the dialog box.
Filter settings for the current document type are stored in this file.
C The messages that are generated by the XML Validator during verification are listed in the
Message column.
4
To hide a message so that it does not appear on the message pane after verification, select the
corresponding check box. Make sure that the selected messages can be safely ignored, or,
alternatively, remember to display hidden messages when you are checking the message list
after verification.
5
Click OK to confirm settings and to return to the Plug-ins dialog box. If necessary, activate the
XML Validator plug-in and define settings before closing the Plug-ins dialog box.
V
FOR MORE INFORMATION
6
Click OK to close the Plug-ins dialog box and to return to the main TagEditor program window.
For more information, “Defining Settings for the XML Validator” on page 7-16.
You are now ready to verify the target XML file. For more information, “The Verification Process”
on page 7-11.
TRANSLATOR’S WORKBENCH USER GUIDE
7-23
7
Message Filter Plug-ins
After Verifying the Target XML File
If tag changes are detected in the target XML file during verification, messages are automatically
displayed in the message pane. The message pane also displays information about the number of
messages that are hidden by filters.
C
To display hidden messages in the message pane, deactivate the message filter. To do this,
right-click on any item in the message pane to access the shortcut menu and select Apply
Filters. Alternatively, click Apply Filters
C
To redefine settings for the message filters, right-click in the message pane to access the
shortcut menu and select Filter Settings. This opens the Message List Filters dialog box, where
you can access the properties page and define settings for the XML Validator Filter.
Alternatively, click Filter Settings
dialog box.
V
7-24
on the Messages toolbar.
on the Messages toolbar to open the Message List Filters
FOR MORE INFORMATION
For more information about working with the message pane after verification,
“After Verifying the Target Files” on page 7-19.
TRANSLATOR’S WORKBENCH USER GUIDE
TagEditor Plug-Ins
7
TAGEDITOR PLUG-INS
The TagEditor plug-ins include the TradosTag Viewer plug-in and the Snippet Mark-up Plug-in 1.0.
For more information about the TradosTag Viewer plug-in, see Chapter 9.
Snippet Mark-up Plug-in 1.0
The Snippet Mark-up Plug-in 1.0 allows you to to convert parts of text embedded in files to internal
tags so that they are not included in translation. For example, you may want to mark embedded
HTML in CDATA elements in XML files or in Cell elements in XLS/XLSX files as internal tags, so
that the embedded HTML code is not treated as translatable text.
To enable the Snippet Mark-up plug-in:
1
In TagEditor, select Tools > Plug-ins to open the Plug-ins dialog box.
2
In the Plug-ins dialog box, activate the Snippet Mark-up Plug-in and and click Properties to
open the Snippet Mark-up Plug-in Settings dialog box.
TRANSLATOR’S WORKBENCH USER GUIDE
7-25
7
TagEditor Plug-Ins
Here you can specify which file types you want to be processed by the Snippet Mark-up plug-in and
which elements in those file types you want to be converted to internal tags.
Item
Explanation
File extensions (separated by semicolon)
Enter the file extensions for the file types that
you want to be processed by the Snippet Markup plug-in. For example, enter *.xml here if you
want to mark embedded text in certain elements
in your XML files. If you are adding more than
one file extension, separate each file extension
with a semi-colon.
Remove invisible line breaks
Select this to remove any invisible line breaks in
the elements in the files you are marking up.
This can prevent segments being split.
Note: If you remove line breaks using the
Snippet Mark-up plug-in, the line-breaks will not
appear in the target file.
Element name
Enter the name of the element that you want to
mark up in the file so that it is not treated as
translatable text.
Element type
Select the type of element from the drop-down
list. You can choose from Standalone element,
Start element, End element and entity.
Note: Refer to the example below for more
information on each element type.
RegEx pattern
7-26
TRANSLATOR’S WORKBENCH USER GUIDE
Enter the regular expression that describes
which parts of the element you want to mark-up
so that it is not treated as translatable text.
TagEditor Plug-Ins
7
You can add and remove file extensions and elements to the Snippet Mark-up plug-in list using the
Action drop-down list.
Action dropdown list
Item
Explanation
Add Item
Click this to add the information in the Element
name, Element type and RegEx pattern boxes to
the list of elements to be marked-up as nontranslatable text.
Update Item
Select an item in the list to display details for it
in the Element name, Element type and RegEx
pattern boxes. Make any necessary changes and
click this to update the item in the list.
Remove Item
Select an item in the list and click this to remove
it.
Clear Items
Click this to remove all items from the list.
Load Profile
Click this to select a file containing a pre-defined
list of elements to be marked up as nontranslatable text.
Save Profile
Click this to save the list of elements to an XML
file.
TRANSLATOR’S WORKBENCH USER GUIDE
7-27
7
TagEditor Plug-Ins
D
NOTE
For each element that you want to mark-up as non-translatable text in your file type, you will
need to add a separate entry in the list with a specific regular expression showing what is to be
marked as non-translatable text. For example, if you want to exclude CDATA elements from your
XML files, you will need to add several different element types and regular expressions for the
single element CDATA, as shown in the example below.
Example Regular Expressions for the Snippet Mark-up Plug-in
Element name: cdata
Element type: Start element
RegEx pattern: <\w[^>]*[^/]>
Element name: cdata
Element type: End element
RegEx pattern: <\/[^/>]*>
Element name: cdata
Element type: Standalone element
RegEx pattern: <[^>]*/>
Element name: cdata
Element type: Start element
RegEx pattern: <\w>
Element name: cdata
Element type: End element
RegEx pattern: </\w+>
Element name: cdata
Element type: Entity
RegEx pattern: &nbsp;
7-28
TRANSLATOR’S WORKBENCH USER GUIDE
TagEditor Plug-Ins
7
Without the Snippet Mark-up Plugin settings being applied, an XML file may be processed for
translation as follows:
The text in the CDATA element is opened as plain text, and the translator must copy all HTML
elements manually. However, if the examples above are applied in the Snippet Mark-up plugin, the
text in the CDATA element will not be treated as translatable text and the file will appear as follows:
TRANSLATOR’S WORKBENCH USER GUIDE
7-29
7
TagEditor Plug-Ins
Activating and Working with the Snippet Mark-up Plug-in 1.0
To activate the Snippet Mark-up plug-in:
1
In TagEditor, select Tools > Plug-ins to open the Plug-ins dialog box.
2
Select TagEditor Plug-ins, then select Snippet Mark-up Plug-in 1.0 and click OK.
The Snippet Mark-up Plug-in is now activated.
D
NOTE
3
When you open a file in TagEditor of a type which you added to the Snippet Mark-up Plug-in,
a confirmation message is displayed, asking whether you want to process the file with
predefined settings. These predefined settings refer to the settings you configured in the
Snippet Mark-up plug-in.
You must have added file types, element types and regular expressions to the Snippet Mark-up
plug-in for it to work correctly.
Click Yes.
4
A confirmation message is displayed stating that the file has been successfully processed.
Click OK.
7-30
TRANSLATOR’S WORKBENCH USER GUIDE
TagEditor Plug-Ins
5
During processing, the file was converted to TTX format and closed. You must now open the
file again. To do so quickly and easily, go to the File menu, where the new TTX version of your
file is top of the list of recently-opened files.
6
Click the file name to open it.
7
The file is now opened and any elements which you configured in the Snippet Mark-up plugare excluded from translatable segments.
TRANSLATOR’S WORKBENCH USER GUIDE
7-31
7
SDL Trados Terminology Verifier
SDL TRADOS TERMINOLOGY VERIFIER
Using the SDL Trados Terminology Verifier you can check your current document to ensure that the
terms contained in the termbase have been used during translation. You must have MultiTerm 7.x
installed.
To check that you have used the correct terminology in your document:
1
In TagEditor, select Tools > Plug-ins to open the Plug-ins dialog box.
2
In the Plug-ins dialog box, activate the SDL Trados Terminology Verifier plug-in and click
Properties to open the Term Verification Options dialog box.
3
The Term Verification Options dialog box opens on the Termbase tab.
C Click Browse to open the Open Termbase dialog box and select the termbase you want to
use.
D
7-32
NOTE
Only one termbase at a time can be used for verification.
TRANSLATOR’S WORKBENCH USER GUIDE
SDL Trados Terminology Verifier
7
C In the Open Termbases dialog box, use the Add (+) icon to add a termbase if there are
none listed. Remember you can only verify terminology against one termbase. If you
already have termbases open, the default termbase will be used.
C Click OK to close the Open Termbases dialog box and return to the Termbase tab of the
Term Verification Options dialog box. The selected termbase now appears in the Termbase
location box.
C In the Language selection box, the available languages in the termbase will appear in the
Source language and Target language drop-down lists. Select the languages that will be
used for your source and target files.
4
Once you have selected the termbase you want to verify your document against, open the
Settings tab of the Term Verification Options dialog box.
TRANSLATOR’S WORKBENCH USER GUIDE
7-33
7
SDL Trados Terminology Verifier
Here you can specify the following:
C Under Minimum match value, set a number between 30 and 100. This value expresses the
minimum acceptable degree of similarity between the terminology in the source segment
and the matching terminology found in MultiTerm using fuzzy match search techniques.
The higher the value, the more similar the terms must be.
C Under Search depth (10-90), set a number between 10 and 90. This value defines the
number of fuzzy matches Translator’s Workbench should examine from the MultiTerm
database. Increasing the Search depth value slows down terminology recognition;
decreasing the value speeds it up.
C In the Segments to exclude from verification, include or exclude specific match categories
from the verification. You may choose to exclude PerfectMatch units, for example, as these
have already been through the full translation, editing and proofing cycle. However, if you
know that a particular term has been changed since the last time the document was
translated you may decide to include PerfectMatch units.
5
Open the Verification Criteria tab of the Term Verification Options dialog box.
In the Criteria box you can set the following options for the Terminology Verifier:
C Check for possible non-usage of the target terms in the termbase
C Check for terms without a target term equivalent in the termbase
C Check for terms which have been set as forbidden in your termbase
By default, the verifier checks for any known terminology in the source segment. It then checks
the target segment. If the target segment does not contain the expected target term from the
termbase the segment will be marked as suspect segment in the TagEditor message view.
7-34
TRANSLATOR’S WORKBENCH USER GUIDE
SDL Trados Terminology Verifier
7
If you choose to check for forbidden terms, you must choose the term-level descriptive field like
Status which includes the property Invalid or Do not use, for example. The verifier will flag
these terms in the message view if they are used.
6
Open the Log File tab of the Term Verification Options dialog box.
The log file is an XML file which has the same name as the TTX document you are verifying
but with the extension *.xml. It is stored in the same folder as the verified document. You can
view the XML file in Internet Explorer.
7
Once you are satisfied with your settings, click OK to return to the Plug-ins dialog box. Select
the SDL Trados Terminology Verifier. You can start the verification process in TagEditor by
selecting Verify from the Tools menu (F8) or the Verify icon
on the standard toolbar.
If your document has possible terminology errors, TagEditor displays a warning in the message
window.
Double-clicking on the error message will bring you to the segment with the suspect term and you
can check your document and make any corrections necessary.
TRANSLATOR’S WORKBENCH USER GUIDE
7-35
7
SDL Trados QA Checker 2.0
SDL TRADOS QA CHECKER 2.0
The SDL Trados QA Checker 2.0 incorporates a suite of quality assurance checks that are performed
on the current TagEditor document. The checks are broken down into the following areas: Segment
Verification, Segments to Exclude, Punctuation, Numbers, Regular Expressions, Word List,
Inconsistencies, Trademark Check and Advanced.
Segment Verification checks look for:
C
Forgotten and empty translations
C
Identical source and target text
C
Target segments that are shorter or longer than the source by a specified percentage
C
Target segments that contain more than a specified number of characters
C
Target segments that contain forbidden characters.
Segments to Exclude:
C
Enables you to exclude certain segments, such as exact matches or new translations, from the
QA check.
Punctuation checks look for:
C
Matching punctuation at the end of source and target segments
C
Spaces before punctuation
C
French compliant check for spaces that must occur before punctuation
C
Correct use of Spanish punctuation
C
Double spacing
C
Double dots
Number checks look for:
C
Number formatting.
Regular Expressions:
C
Enables you to create regular expressions and use them to find particular character patterns in
the source or target segments.
Word List looks for:
7-36
TRANSLATOR’S WORKBENCH USER GUIDE
SDL Trados QA Checker 2.0
C
7
Incorrect or inconsistent use of language and terminology.
Inconsistency checks look for:
C
Repeated segments which have been translated inconsistently.
Trademark checks:
C
Enable you to verify that all trademark characters have been correctly transferred to the target
text.
Advanced checks:
C
Enable you to perform advanced, customized checks using regular expressions.
You can perform as many or as few of the checks as you wish. You can also:
C
use the QA Checker Profiles tab to save any settings you define as a profile.
C
use the Backup tab to save a backup of your file while you are running the QA Checker on it.
C
use the Log File tab to create a log file of the QA check results every time the QA Checker is
run.
Defining Properties for the QA Checker
To define properties for the QA Checker:
1
In TagEditor, select Tools > Plug-ins to open the Plug-ins dialog box.
2
In the Plug-ins dialog box, activate the SDL Trados QA Checker plug-in and click Properties to
open the SDL Trados QA Checker 2.0 Options dialog box.
3
The SDL Trados QA Checker 2.0 Options dialog box opens on the Segment Verification tab.
TRANSLATOR’S WORKBENCH USER GUIDE
7-37
7
SDL Trados QA Checker 2.0
Use this dialog box to specify the settings to be used when performing a QA Check. It contains a tab
for each type of check that can be performed. Each tab contains settings that control how the check
is performed. Complete the tabs that control the checks you want to perform:
7-38
C
Segment Verification
C
Segments to Exclude
C
Punctuation
C
Numbers
C
Regular Expressions
C
Word List
C
Inconsistencies
C
Trademark Check
C
Log File
C
QA Checker Profiles
C
Backup
C
Advanced
TRANSLATOR’S WORKBENCH USER GUIDE
SDL Trados QA Checker 2.0
7
Segment Verification Tab
If you want segment checking to be performed, complete the Segment Verification tab.
TRANSLATOR’S WORKBENCH USER GUIDE
7-39
7
SDL Trados QA Checker 2.0
Here you can specify what segment checks should be performed as part of the QA check:
Item
Explanation
Forgotten and empty translations
Check for forgotten and empty
translations
Select this to examine the document for source
segments which have either: no corresponding
target language segment or an empty target
language segment.
Note: If you exclude 100% TM matched
segments from the QA check, this particular
check will still be performed on those segments.
Compare source and target
segments
Check for target segments that are
identical to their source segments
Select this to check the document for segments
where the content of the source and target
language segments is identical.
Select Ignore tags if you want to ignore tags
during this check. Segments will be regarded as
identical, even when the internal tags differ. For
example, This is a <b>test<\b> will be regarded
as identical to This is a test.
7-40
Check for target segments that are
shorter by (%)
Select this to check the document for segments
where the target language text is shorter than
the source language text by a percentage
amount specified by you in the box provided.
Check for target segments that are
longer by (%)
Select this to check the document for segments
where the target language text is longer than the
source language text by a percentage amount
specified by you in the box provided.
Based on words
Select this to base the percentage amount on
the number of words in the target segment.
Based on characters
Select this to base the percentage amount on
the number of characters in the target segment.
TRANSLATOR’S WORKBENCH USER GUIDE
SDL Trados QA Checker 2.0
Ignore segments with less than #
words
7
This option enables you to restrict the three
preceding checks to segments of a minimum
length. Enter a number here and any segments
containing fewer words than this number are
excluded from the checks.
Check target segments
Check for target segments
exceeding the following character
count
Select this to check for segments where the
number of characters exceeds a limit set by you.
We recommend a maximum string size of 255
characters. Problems can occur with strings that
are longer than this.
Check for forbidden characters (no
delimiter required)
Select this to check for the presence of forbidden
characters in the target segments. Specify the
characters in the box provided. Do not put
commas or spaces or any other type of delimiter
between the characters, as these will be treated
as forbidden characters.
Check only text enclosed in the
following element(s)
Select this to restrict the segment verification
options to the specified elements.
Enter the element names you want to restrict the
segment verification checks to in the Element
name(s) (comma-delimited) box, and separate
each element name by a comma.
Apply Excel settings
Click this if you are checking an Excel
spreadsheet translation. When you select this
option, the preceding three fields are completed
automatically, the Check for forgotten and empty
translations check box is selected (to ensure that
worksheet names are present) and the check will
also look for duplicate worksheet names.
Exclusions
Exclusion list
Click this to open the Exclusion List for QA
Check dialog box, where you can add words or
phrases that you want to exclude from the
segment verification check.
TRANSLATOR’S WORKBENCH USER GUIDE
7-41
7
SDL Trados QA Checker 2.0
Exclusion List for QA Check
Exclusions (one per line):
Enter a list of words or phrases that you want to
exclude from the segment verification check.
Each word or phrase must appear on a separate
line.
Apply exclusion list to search for
forgotten and empty translations
Select this to apply the exclusion list to the check
for forgotten and empty translations. Any words
or phrases in the exclusion list will now be
ignored in this check.
Apply exclusion list to search for
target segments identical to source
Select this to apply the exclusion list to the check
for target segments that are identical to their
source segments. Any words or phrases in the
exclusion list will now be ignored in this check.
Note: You must select at least one of the above
two options for the list of words or phrases in
the exclusion list to be excluded from the check.
7-42
Ignore case
Select this to ignore case for the items you want
to exclude from the check.
Exclusions use regular expressions
Select this to indicate that the terms in the
exclusion list are based on regular expressions.
TRANSLATOR’S WORKBENCH USER GUIDE
SDL Trados QA Checker 2.0
7
Segments to Exclude Tab
If you want to exclude some segments from the QA check, complete the Segments to Exclude tab.
Item
Explanation
Exclude PerfectMatch units
Select this to exclude locked segments
translated by PerfectMatch from the QA check.
Exclude exact matches
Select this to exclude segments translated with a
100% translation memory (TM) match from the
QA check.
Exclude fuzzy matches down to
Select this to exclude some fuzzy TM matched
segments from the QA check. Use the slide bar
to specify a percentage match cut-off point. For
example, if you specify a limit of 90%, then
segments with a 90-99% match will be included
in the check and segments with a 75-89% match
will be excluded.
Exclude new translations
Select this to exclude new translations from the
QA check.
TRANSLATOR’S WORKBENCH USER GUIDE
7-43
7
SDL Trados QA Checker 2.0
Report all non-excluded segments
Select this if you want to see a list of all
segments that were included in the check
displayed in the message pane when the check
is complete.
Example:
Select the PerfectMatch units, Exact matches,
Fuzzy matches down to options but do not
select the New translations box. Now select this
option and perform the QA check. A list of all
new segments will be displayed in the message
pane because these were the only segments not
excluded.
Punctuation Tab
If you want to perform punctuation checks, complete the Punctuation tab.
7-44
TRANSLATOR’S WORKBENCH USER GUIDE
SDL Trados QA Checker 2.0
Item
7
Explanation
End Punctuation
Check that source and target end
with the same punctuation for the
following characters
Select this if you want to check that source
segments and their corresponding translations
end with the same punctuation. Add any
punctuation characters you want to include in
the check to the Punctuation characters box. If
you want to exclude a character from the check,
remove it from this box.
Note: Click the Default button to display the
default list of punctuation characters.
Include Asian punctuation
characters in check
Select this if you want to include Asian
punctuation characters in the check. If you select
this option, only enter the Asian version of the
punctuation character into the Punctuation
characters box. The QA check will automatically
check for all variants of the punctuation
character.
Check for Spanish punctuation
Select this if you are translating into Spanish and
want the QA check to ensure that Spanish
punctuation rules have been correctly applied.
For example sentences that end with ? or ! must
also begin with an inverted version of the same
character.
Check for unintentional spaces
before the following end
punctuation characters
Select this to check for translations where a
space has been inserted before the punctuation
character that terminates the translation text.
Enter the punctuation characters that you want
to check in the text box provided.
TRANSLATOR’S WORKBENCH USER GUIDE
7-45
7
SDL Trados QA Checker 2.0
French compliant check (spaces
before punctuation are intentional)
Select this if you want to check for French
translations, where a space generally occurs
before punctuation characters. If you apply this
option, the check will only return results where
there is no space before the punctuation
characters specified.
Click the French Default button to apply default
French punctuation characters to the space
check.
Note: If you click the French Default button, the
French compliant check option is automatically
selected.
Extra dots and spaces
Check for multiple spaces
Select this to check for translations that contain
a sequence of spaces (at least two).
Check for multiple dots
Select this to check for translations that contain
a series of dots (at least two). To ignore ellipsis
dots (...) in this check, select Ignore ellipsis dots.
Capitalization check
Check capitalization of initial letters
Select this to check for initial letters that do not
start with a capital letter, although the
corresponding source letter is capitalized, or to
check that all sentences in the target text start
with a capital letter.
Check consistency of global
capitalization
Select this to check that global capitalization is
used consistently.
Check for brackets
Check brackets
7-46
TRANSLATOR’S WORKBENCH USER GUIDE
Select this to check that brackets are used
correctly in the target segment (for example, to
check that there are no opening brackets without
a closing bracket and vice versa).
SDL Trados QA Checker 2.0
7
Numbers Tab
If you want to perform number checks, complete the Numbers tab.
Item
Explanation
Number verification settings
Number format from source
language
Select this to check translated text for numbers
that appear to be in error. Target numbers will be
checked against the source number format.
For Example:
English segment = “You give me 5,000.”
German segment = “Du gibst mir 5500.”
The German figure should be 5.000 and this
discrepancy will be highlighted by the QA check.
Number format as specified below
Select this to check translated text for numbers
that appear to be in error. Target numbers will be
checked against the number format specified in
the Digit grouping symbol, Short date format,
Decimal symbol and Time style drop-down lists.
TRANSLATOR’S WORKBENCH USER GUIDE
7-47
7
SDL Trados QA Checker 2.0
Number verification checks
Check numbers
Select this to check that the correct number
format is applied in the target segments.
Check dates - short date format
only
Select this to check that the correct date format
is applied in the target segments.
Check times
Select this to check that the correct time format
is applied in the target segments.
Verification settings
Note: You must select a number verification
check for the four options below to be enabled.
Check number consistency (same
numbers in source and target)
Select this to check that numbers in the target
segments match the numbers in the source
segments. Only numbers found in the source
segment are searched for in the target segment.
Check both source and target
recursively
Select this to check that numbers in the target
segments match the numbers in the source
segments. Checks are performed in both source
and target segments. This can find extra
numbers in target segments that are not in
source segments, but it may affect performance.
Check number only segments
Select this to include segments containing
numbers only in the check (these are skipped by
default). All numbers, dates and times are
checked if you select this option. You must have
selected Check for forgotten and empty
segments on the Segment Verification tab for
this check to work.
This check is useful if you want to carry out tasks
on number segments only.
Numbers, dates and times in target
segments should be localized
7-48
TRANSLATOR’S WORKBENCH USER GUIDE
Select this to check that numbers in target
segments have been localized (that is, adapted
to the requirements of the target language).
SDL Trados QA Checker 2.0
7
Regular Expressions Tab
If you want to create new checks of your own, complete the Regular Expressions tab.
Complete this tab if you want to use regular expressions to find particular string patterns in the
document. All regular expressions in the list are applied to the translation document.
Regular expressions are used to search text for all occurrences of a particular sequence, or pattern,
of characters. They differ from standard search tools because they use special metacharacters.
Metacharacters enable you to create a single regular expression that will find all occurrences of a
basic pattern and also specific variations of the pattern.
This tool is for users who know how to create and use regular expressions. However, a list of example
regular expressions is provided and non-expert users can simply add these.
TRANSLATOR’S WORKBENCH USER GUIDE
7-49
7
SDL Trados QA Checker 2.0
Item
Explanation
Search regular expressions
Select this if you want the QA check to check for
incorrect words or incorrectly formatted words
using regular expressions.
Note: You must add regular expressions to the
list for the check to work.
Regular expression
Enter the regular expression you want to add
here. For example, if you want to search for all
numbers followed by a comma, the regular
expression for this would be: [0-9]+,
Description
Enter a description of what the regular
expression does here.
Search in
Select where you want the regular expression to
look for matches. You can select either the
source language segments, the target language
segments or both.
You can add and remove regular expressions to the list using the Action drop-down list.
Action dropdown list
7-50
TRANSLATOR’S WORKBENCH USER GUIDE
SDL Trados QA Checker 2.0
Item
Explanation
Add Item
When you have completed the Regular
expression, Description and Search in boxes,
click this to add the regular expression to the
list.
Update Item
Select a regular expression in the list to display
details for it in the Regular expression,
Description and Search in boxes. Make any
necessary changes and click this to update the
regular expression in the list.
7
Note: You can edit default example expressions
as well as the ones you have created yourself.
Remove Item
Select a regular expression in the list and click
this to remove it.
Clear Items
Click this to remove all regular expressions from
the list.
Load Profile
Click this to select a file containing regular
expressions. The regular expressions are loaded
into the list.
Save Profile
Click this to save the list of regular expressions
to an XML file.
Examples
Click this and select an example to display
details for it in the the Regular expression,
Description and Search in boxes. You can then
add the example to your list by clicking Add
Item.
TRANSLATOR’S WORKBENCH USER GUIDE
7-51
7
SDL Trados QA Checker 2.0
Word List Tab
If you want to check for consistent use of words and terms, complete the Word List tab.
This check looks for words that must not be used or that are incorrectly formatted, and lists all
instances of these in the message pane. The correct word forms are also displayed in the message
pane.
Before running the check, you must create a list of incorrect words and their correct forms. During
the check, SDL Trados examines the document for any of the words that appear in your incorrect
word list.
When you have created a list of incorrect/correct words, you can save the list to an XML file. This file
can then be selected (loaded) when performing the QA check on a different document. The contents
of the loaded file are added to the existing list of words displayed in this tab.
Because the word list can be saved to an XML file which can be reused, you can have different word
lists for different industry types or clients and you can share word lists with colleagues.
7-52
TRANSLATOR’S WORKBENCH USER GUIDE
SDL Trados QA Checker 2.0
7
.
Item
Explanation
Check for word list
Select this if you want the QA check to check for
incorrect words.
Wrong form
Enter the forbidden or wrongly formatted word
or phrase. You can enter multiple word phrases,
such as 'World Wide Web' or 'network element
supply shortage', for example.
Correct form
Enter the correct form of the forbidden or
wrongly formatted word.
Ignore case
Select this if you want to ignore case when
matching words in the translation documents
against the words in the Wrong form list.
Search whole words only
Select this if you only want exact matches for
words in the Wrong form list to be found. For
example, if you have the word flex in the Wrong
form list and you select this option, the words
reflex and flexible will not be found by the check.
You can add and remove words to the list using the Action drop-down list.
Action dropdown list
TRANSLATOR’S WORKBENCH USER GUIDE
7-53
7
7-54
SDL Trados QA Checker 2.0
Item
Explanation
Add Item
Click this to add the word pair in the Wrong form
and Correct form boxes to the list of words to be
checked.
Update Item
Select a word pair in the list to display it in the
Wrong form and Correct form boxes. Make any
necessary changes and click this to update the
word pair in the list.
Remove Item
Select a word pair in the list and click this to
remove it.
Clear Items
Click this to remove all word pairs from the list.
Load Profile
Click this to load a file containing a previously
saved word list.
Save Profile
Click this to save the current word list to a file.
TRANSLATOR’S WORKBENCH USER GUIDE
SDL Trados QA Checker 2.0
7
Inconsistencies Tab
If you want to check for inconsistent translations in repeated segments, complete the Inconsistencies
tab.
You can check for the following types of inconsistencies:
Item
Explanation
Check for inconsistent translations
Select this to check for identical source
segments that have different translations. When
the QA check results are displayed in the
Message pane, the identical source segments
are listed and the first translation found is
displayed.
TRANSLATOR’S WORKBENCH USER GUIDE
7-55
7
7-56
SDL Trados QA Checker 2.0
Ignore internal tags in source
segments
Select this if you want the check to ignore
internal tags (internal formatting, for example)
in the source segments.
Example:
The two source segments 'This is a test.' and
'This is a <b>test</b>.' would normally be
regarded as two different source segments.
However, if you instruct QA checker to ignore
the internal tags in source segments, they are
regarded as identical. Consequently their
translations should also be identical.
Ignore internal tags in target
segments
Select this if you want the check to ignore
internal tags (internal formatting, for example)
in the target segments.
Example:
The two target segments 'Dies ist ein Test.' and
'Dies ist ein <b>Test</b>.' would normally be
regarded as two different translations and may
be flagged as inconsistent. However, if you
instruct QA checker to ignore the internal tags in
target segments, the two translations are
regarded as identical.
Ignore case
Select this to prevent an inconsistency error
from being generated when the target text is an
exact match but the case is different.
Check for repeated words in target
Select this to check for words which are repeated
in the target segment.
Ignore numbers
Select this to ignore repeated numbers in the
repeated words check.
Ignore case
Select this to ignore case when checking for
repeated words in the target segments.
TRANSLATOR’S WORKBENCH USER GUIDE
SDL Trados QA Checker 2.0
7
Trademark Check Tab
If you want to verify whether all trademark characters and strings have been correctly transferred to
the target text, complete the Trademark Check tab.
Select the Check trademark characters box to enable the trademark check. You can add and remove
trademark characters to and from the list using the Action drop-down list.
Action dropdown list
TRANSLATOR’S WORKBENCH USER GUIDE
7-57
7
SDL Trados QA Checker 2.0
Item
Explanation
Add Item
Enter a trademark string in the text box beside
the Action button and click this to add the string
to the list of trademark strings below.
Update Item
Select a trademark string in the list to display it
in the text box beside the Action button. Make
the necessary changes and click this to update
the trademark string in the list.
Remove Item
Select a trademark string in the list and click this
to remove it.
Clear Items
Click this to remove all trademark strings from
the list.
Default
Click this to add a list of default trademark
strings to the list.
Log File Tab
If you want a log file of the QA check results to be created, complete the Log File tab.
7-58
TRANSLATOR’S WORKBENCH USER GUIDE
SDL Trados QA Checker 2.0
7
Here you can specify whether a log file containing the QA check results should be created whenever
the QA check is run.
Item
Explanation
Create log file
Select this to create a log file containing the QA
check results whenever the QA check is run.
Save to same folder and with same
name as the open document
(_log.html extension used)
Select this to save the log file to the same folder
and with the same name as the open document
that you are running the QA check on. The
extension _log.html will be appended to the file
name.
Save to same folder as the open
document using the following
name
Select this and enter a name in the text box to
save the log file to the same folder as the open
document that you are running the QA check on,
with the name entered in the text box.
Save to selected folder using a new
name
Select this and click Browse to browse to the
location where you want to save your log file,
enter a name for the file and click Save.
Save as XML (you must select this
option if you want to save multiple
QA checks in one file)
Select this if you want to save the log file as
XML. You must select this option if you want to
save multiple QA checks in one file.
TRANSLATOR’S WORKBENCH USER GUIDE
7-59
7
SDL Trados QA Checker 2.0
QA Checker Profiles Tab
When you have completed the tab screens, you can save all settings you defined as a profile on the
QA Checker Profiles tab. You can also load previously-saved QA Checker profiles from this tab.
Because the QA Checker settings can be saved to an XML profile file which can be reused, you can
have different QA Checker profile files storing different settings and you can share profile files with
colleagues.
7-60
C
To save a QA Checker profile, click the Save profile button, browse to the location where you
want to save your profile file, enter a name for the file and click Save. Your profile is saved to
the location you choose as an XML file.
C
To load a QA Checker profile, click the Load profile button, browse to the location where you
want to load your profile file from and click Open. The profile is loaded and the tabs in the SDL
Trados QA Checker Options dialog box reflect this.
TRANSLATOR’S WORKBENCH USER GUIDE
SDL Trados QA Checker 2.0
7
Backup Tab
If you want a backup of the file you are running the QA check on to be created during the check,
complete the Backup tab.
Item
Explanation
Create backup
Select this to create a backup of the file you are
running the QA check on whenever the QA
check is run.
Append .bak to file name
(filename.ext.bak)
Select this to save the backup file with the same
name as your file but with .bak appended to the
file extension.
Add tilde (~) to file name extension
(filename.~ext)
Select this to save the backup file with the same
name as your file but with a tilde (~) appearing
before the file extension.
Save backup file
Select this and click Browse to browse to the
location where you want to save your backup file,
enter a name for the file and click Save.
TRANSLATOR’S WORKBENCH USER GUIDE
7-61
7
SDL Trados QA Checker 2.0
Advanced Tab
If you want to perform advanced QA checks on your documents, which you define using regular
expressions, complete the Advanced tab. This tab provides similar functionality to the Regular
Expressions tab, but it allows you to specify a particular condition for reporting the results of the
check (for example, reporting if both target and source match, if target only matches and so on).
7-62
Item
Explanation
Advanced check
Select this to enable the advanced check.
RegEx source
Enter the source regular expression for the
advanced check here.
RegEx target
Enter the target regular expression for the
advanced check here.
Description
Enter a description of the advanced check here.
Condition
Choose a condition for the advanced check from
the drop-down list here.
Ignore case
Select this to ignore case during the check.
TRANSLATOR’S WORKBENCH USER GUIDE
SDL Trados QA Checker 2.0
Ignore tags
7
Select this to ignore tags during this check.
Segments will be regarded as identical, even
when the internal tags differ. For example, This is
a <b>test<\b> will be regarded as identical to
This is a test.
You can add and remove regular expressions to and from the list using the Action drop-down list.
Action dropdown list
Item
Explanation
Add Item
Click this to add the information in the RegEx
source, RegEx target, Description and Condition
boxes to the list of regular expressions.
Update Item
Select a regular expression in the list to display
details for it in the RegEx source, RegEx target,
Description and Condition boxes . Make any
necessary changes and click this to update the
regular expression in the list.
Remove Item
Select a regular expression in the list and click
this to remove it.
Clear Items
Click this to remove all regular expressions from
the list.
Load Profile
Click this to select a file containing regular
expressions. The regular expressions are loaded
into the list.
Save Profile
Click this to save the list of regular expresions to
an XML file.
TRANSLATOR’S WORKBENCH USER GUIDE
7-63
7
SDL Trados QA Checker 2.0
Example Advanced Check
To check if all hyperlinks were correctly transferred to the target segment, you would enter the
following settings:
RegEx source
w{3}\.\w+\.\w{3}
RegEx target
w{3}\.\w+\.\w{3}
Description
Hyperlinks correctly transferred to target
segment
Condition
Report if source matches but not the target
This would check whether www.sdl.com was transferred correctly to the target segment, for
example, and had not been changed to sdl.com or www.sdl.de.
When you have completed the tab screens, click OK to confirm your settings and to return to the
Plug-ins dialog box and click OK again to close this and return to the main TagEditor window.
7-64
TRANSLATOR’S WORKBENCH USER GUIDE
BATCH TOOLS: ANALYSE,
TRANSLATE, CLEAN UP
This chapter shows you how to use the batch tools in
Translator’s Workbench. Sections include:
C
How to prepare files and translation memories before
using the batch tools
C
Analysing files against a translation memory and
interpreting the results
C
Creating a project translation memory
C
Exporting frequent and/or unknown segments for
separate processing
C
Pre-translating files using translation memory content
C
Cleaning translated files and updating translating
memory
Chapter
8
8
Overview
OVERVIEW
This chapter provides information about the Analyse, Translate and Clean Up commands in
Translator’s Workbench. The Analyse and Translate commands facilitate translation project
management by allowing you to analyse and pre-translate documents before interactive translation
takes place. The Clean Up command allows you to finalise translated documents and update the
translation memory. The Analyse, Translate and Clean Up commands can be used to process files
individually or in batches. For this reason, they are also known as the batch tools.
The batch tools are described below.
C
Analyse (Tools menu) – this command is used to analyse one or more source documents in
order to obtain statistics about word count and leverage. The content of the document(s) is
compared to the content of an existing translation memory in order to calculate the number of
suitable segment matches that exist in the translation memory. For more information, see
“Analysing Documents” on page 8-6.
C
Translate (Tools menu) – this command is used to pre-translate one or more documents by
automatically inserting matching segments from the current translation memory and known
terms from the current MultiTerm database. Unknown sentences in the document(s) for
translation are segmented.
For more information, see “Pre-translating Documents” on page 8-11.
C
Clean Up (Tools menu) – this command is used to remove hidden source text and segment
delimiting marks from one or more translated documents. Clean Up can also be used to
update the translation memory in accordance with changes that have been made to the
translated document(s) outside Translator’s Workbench. For more information, see “Cleaning
Up Translated Documents” on page 8-16.
Audience
In general, the information in this chapter is relevant to the users of both file- and server-based
translation memories. However, access to the batch tools in Translator’s Workbench may be subject
to restriction. In the case of file-based translation memories, the batch tools are always available
unless the translation memory is password-protected. If the translation memory is
password-protected, the batch tools are available to all users except those who open the memory in
read-only access mode. In the case of server-based translation memories, the batch tools are only
available if you access the memory with Power User or TM Administrator rights.
8-2
TRANSLATOR’S WORKBENCH USER GUIDE
Preparing your Documents
V
8
FOR MORE INFORMATION
C For more information about access rights in file- and server-based translation memories,
see Chapter 11.
PREPARING YOUR DOCUMENTS
Prepare the files for analysis, translation and clean up as described below.
Word Documents
There are no special preparation steps necessary for analysing, translating or cleaning up Word
documents, including DOC and online help RTF formats.
PowerPoint and Excel Documents
Translator’s Workbench provides direct support for PowerPoint (PPT, PPS, POT, PPTX, PPSX,
POTX, PPSM) and Excel (XLS, XLT, XLSX, XLTX, XLSM) documents. The following
recommendations apply when processing these file types:
C
To process PowerPoint documents in Translator’s Workbench, you must have PowerPoint
installed on the local computer. The same applies for Excel documents and Excel. We
recommend that you use the most recent available version of PowerPoint or Excel in order to
avoid any loss of data due to backward compatibility issues. We also recommend that you
always the same version of PowerPoint or Excel for all tasks involving the same set of files.
C
Before processing Excel documents in Translator’s Workbench, check that the system locale
settings on the local computer are compatible with the target language setting in the current
translation memory. This will enable Excel to read numeric data in the target language
correctly.
For more information about preparing PowerPoint and Excel documents for conversion and batch
processing, see the File Formats Reference Guide.
STF Documents
Translator’s Workbench provides direct support for the analysis and pre-translation of STF
documents in TradosTag and Workbench RTF format. Although clean up of STF documents
(TradosTag and Workbench RTF) occurs as part of the backward conversion process in the STaggers, SDL recommends that you use the Clean Up command in Translator’s Workbench before
converting back to MIF or IASCII. This allows you to update your translation memory and to fix any
corrupt segment delimiters.
TRANSLATOR’S WORKBENCH USER GUIDE
8-3
8
Preparing your Translation Memory
XML, HTML or SGML Documents
To analyse, translate or clean up XML, HTML or SGML documents, ensure that the correct tag
settings have been specified in the Tag Settings Manager. You can access the Tag Settings Manager
directly from the Tools tab of the Translation Memory Options dialog box. For more information, see
“Tag Settings Files in Translator’s Workbench” on page 2-48.
DTP File Formats
Translator’s Workbench provides direct support for PageMaker, QuarkXPress, InDesign and
Ventura tagged text export file formats. Once the translatable text has been exported from the
originating application, no further preparation is required before analysing or translating source
documents.
V
FOR MORE INFORMATION
For more information about generating tagged text export file formats from the DTP packages,
see the File Formats Reference Guide.
PREPARING YOUR TRANSLATION MEMORY
Before using the batch tools, you need to prepare the translation memory by making any necessary
changes to the following settings:
C
project and filter settings
C
translation memory options: general, penalties, substitution localisation and tools.
This section describes how these settings affect the batch functions and refers you to other sections
in this user guide where they are explained in more detail.
Project and Filter Settings
Select Project and Filter Settings on the Settings menu in Translator’s Workbench. If you select
specific project settings or set a filter, Translator’s Workbench only considers those matches that
match the project or filter settings during the Analyse or Translate processes. For more information,
see “Defining Project and Filter Settings” on page 2-24.
E
8-4
TIP
The Options command in the Analyse, Translate and Clean Up dialog boxes provides you with
direct access to the Project and Filter Settings dialog box.
TRANSLATOR’S WORKBENCH USER GUIDE
Preparing your Translation Memory
8
Translation Memory Options
There are four tabs in the Translation Memory Options dialog box that contain options affecting the
batch functions: general, penalties, substitution localisation and tools.
General
Set the minimum match value. During the Analyse or Translate processes, Translator’s Workbench
considers only those matches whose value exceed the specified minimum match value. For more
information, see “Minimum Match Value (%)” on page 2-29.
Penalties
Assign a percentage penalty to translation units based on their content. Not all of the penalties
necessarily apply as they depend both on the type of text for translation and the origin of the
translation memory. For example, if your translation memory was not created with an alignment tool
and your text has not been processed using a machine translation system, neither the alignment
penalty nor the machine translation penalty apply. Or, if your translation memory supports multiple
translations, the multiple translations penalty applies during translation. You can customise the
percentage value for each of the penalties. For more information, see “Defining Penalties Settings”
on page 2-35.
Substitution Localisation
Under Substitution Localisation, you specify how Translator’s Workbench handles dates, numbers,
measurement and time formats during the Translate process. For more information, see “Defining
Substitution Localisation Settings” on page 2-40.
Tools
The Tag Settings command on the Tools tab provides direct access to the Tag Settings Manager
where you can manage the tag settings file list for batch operations that involve XML/HTML/SGML
documents. For more information, see “Tag Settings Files in Translator’s Workbench” on page 2-48.
The Tools tab also contains settings for batch processing different file formats, log file handling,
backup and multiple translations. For more information, see “Defining Batch Tools Settings” on
page 2-46.
E
TIP
The Options command in the Analyse, Translate and Clean Up dialog boxes provides you with
direct access to the Translation Memory Options dialog box.
TRANSLATOR’S WORKBENCH USER GUIDE
8-5
8
Analysing Documents
ANALYSING DOCUMENTS
D
NOTE
If you are using SDL Trados Synergy, your documents are analysed for you as part of the project
creation process.
The Analyse command in Translator’s Workbench analyses one or more documents by comparing
them to the currently selected translation memory. Translator’s Workbench reads the documents
segment by segment and determines the corresponding match value by searching for identical or
similar sentences in your translation memory. Translator's Workbench also examines the text for
repetitions. The first occurrence of a segment with no identical match in the translation memory is
counted as either a fuzzy match or a no match. Any subsequent occurrence of the same segment is
counted as a repetition match. When a document in Word or TagEditor is being translated, a
repetition match need only be translated once. The next time the same sentence occurs in the source
text, Translator’s Workbench recognises it as a 100% match. In documents that have had
PerfectMatch applied, Translator’s Workbench also recognises PerfectMatch units (XUs) and counts
these as a separate match type.
During analysis, the calculated match values are accumulated for each file and then for all files
combined. Translator’s Workbench also counts the number of segments, words and placeable
elements, such as tags, graphics and fields. This information is displayed on screen and written to
log files that you can consult later. In the case of placeables, the information is written to the log files
only. The Analyse function takes account of penalties set in the translation memory options. For
more information, see “Defining Penalties Settings” on page 2-35.
After analysis, you can create a project translation memory. This is a subset of a translation memory
containing only those translation units relevant to the new documents for translation. You can also
export frequent and unknown segments from the analysed documents into different text files for
further processing by, for example, a machine translation system.
T
FREELANCE
The Create Project TM option is not available in the Freelance version of Translator’s
Workbench.
Use the Analyse function to assess the scope of a translation project, as a basis for assigning
translation work among members of a translation team and as a means of drawing up a project
budget based on the number of exact and fuzzy matches.
8-6
TRANSLATOR’S WORKBENCH USER GUIDE
Analysing Documents
8
Using the Analyse Command
The following section provides instructions for carrying out an analysis on one or more source
documents.
D
NOTE
C If you are using SDL Trados Synergy, your documents are analysed for you as part of the
project creation process and you will not need to carry out this process.
C When working with server-based translation memories, you must have
Power User or TM Administrator access rights to use the Analyse
command.
To analyse one or more documents, follow these steps:
1
In Translator’s Workbench, select Open from the File menu to open the translation memory
that you wish to use for the analysis operation.
2
Select Analyse from the Tools menu. The Analyse Files dialog box opens.
TRANSLATOR’S WORKBENCH USER GUIDE
8-7
8
Analysing Documents
3
Before you begin the analysis, check that the translation memory, project and filter settings
you have specified are suitable. Use the Options command to access the Translation Memory
Options and the Project and Filter Settings dialog boxes directly. For more information,
“Preparing your Translation Memory” on page 8-4.
4
Add the files to be analysed to the Files to analyse list. This can be done in one of two ways:
C Click Add. The Files to Analyse dialog box opens. Browse to the location of the files, select
the files for analysis and click Open to add them to the Files to analyse list.
C Drag and drop the file(s) from Windows Explorer or the Find Files dialog box into the Files
to analyse list.
To remove files from the list, select them and click Remove. You can delete the entire list by
clicking Clear.
5
Use the Log File control to specify the log file(s) in which statistical information about the
analysis operation is saved. Translator's Workbench creates two log files: one in text format
with a .log extension and the other in comma-separated form with a .csv extension. The
CSV format can be directly imported into spreadsheet applications such as Microsoft Excel
and presents the analysis results in a tabular form. This makes it easier to process the analysis
results for budgeting and scheduling purposes. By default, the log files are located in the same
folder and have the same file name as the current translation memory. For more information
about log file options, see “Defining Batch Tools Settings” on page 2-46.
C To create a new log file or locate an existing log file, click Log File > Browse.
C To view the log file that is currently specified, click Log File > View.
C To delete the log file that is currently specified, click Log File > Delete.
6
Click Analyse to start the analysis. Translator's Workbench displays two progress indicators:
one for the current file and one for the total number of files.
As the analysis is performed, Translator’s Workbench displays a summary of the results in the
Analyse Files dialog box.
Post-analysis Options
After analysis is complete, Translator's Workbench offers a range of options in the Analyse Files
dialog box:
8-8
C
View Log File
C
Create Project TM
C
Export Frequent Segments
TRANSLATOR’S WORKBENCH USER GUIDE
Analysing Documents
C
Export Unknown Segments
C
Use TM from previous analysis.
8
View Log File
Select View Log File to load the text-only log file that is created during analysis into Windows
Notepad, where you can view and edit it. The log file contains a file-by-file breakdown of the statistical
information of the analysis. In addition to the information displayed on screen during the analysis,
the log file also includes the number of characters per word and the number of placeable elements.
This information helps you to estimate how much non-translatable material is contained in the
source documents analysed.
Creating a Project Translation Memory (TM)
Sometimes it is useful to create a smaller translation memory that contains only those translation
units that are relevant to a particular project or file set. You do this by analysing the files for
translation against the main translation memory. After the analysis is complete you create a project
translation memory by following these steps:
1
Click Create Project TM in the Analyse Files dialog box.
2
Assign a file name to the project translation memory. Translator's Workbench extracts the
relevant translation units from the current translation memory and adds them to your project
translation memory.
T
FREELANCE
The Create Project TM option is not available in the Freelance version of
Translator’s Workbench.
Exporting Frequent Segments and Unknown Segments
Where the text for translation contains many repeated sentences, you can export the source
segments that occur more than a specific number of times (the default is 5) to a an export file (either
text or RTF format).
Export frequent and unknown segments to a RTF file. Open the file in Word and translate using the
translation memory from which the segments were exported. After you have completed the
translation of the RTF file all frequent or unknown segments have been added to the translation
memory.
To create a frequent segments text file, follow these steps:
1
Specify the minimum number of times a segment should occur to qualify as frequent in the or
more occurrences box of the Analysis results group box (the default is 5).
TRANSLATOR’S WORKBENCH USER GUIDE
8-9
8
Analysing Documents
2
Click Export Frequent Segments.
Similarly, you can create a text file of segments that fall below a minimum fuzzy match value:
1
Specify a minimum fuzzy match value in the % or lower match value box (the default is 85%).
2
Click Export Unknown Segments.
Translator's Workbench exports all sentences falling below the specified match value to a text file or
an RTF file for processing in Word. In some cases, it may be useful to use a Translator's Workbenchcompatible machine translation system, such as LOGOS™ or Systran® Professional for Windows,
to machine-translate this file. To export all unknown segments directly into a file that LOGOS or
Systran can process from the Export Unknown Segments dialog box, select Systran (*.rtf) or
Logos (*.sgm) from the Save as Type drop-down list.
The machine translation system can then produce a rough translation of all unknown segments.
After this rough translation, you can import the machine-translated units back into the translation
memory. As a result, you get a mixed translation memory containing both high-quality translation
units from the current translation memory and machine-translated segments. Translator's
Workbench applies its machine translation penalty to the machine-translated segments. For more
information, see “Machine Translation Penalty (%)” on page 2-39.
Use TM from Previous Analysis
This option is useful when comparing different translation projects, even if you have an empty
translation memory.
For example, you want to analyse two releases or versions of a manual called Manual1.doc and
Manual2.doc and you have an empty translation memory called Manuals.tmw. To see the
differences between the two versions, follow these steps:
1
Analyse the first version of the manual (Manual1.doc) using Manuals.tmw. As it analyses
files, Translator's Workbench builds a temporary translation memory containing all source
sentences from the analysed files. In this example, Translator's Workbench creates a
temporary translation memory containing all the sentences in Manual1.doc.
2
Remove Manual1.doc from the Files to analyse list by clicking Clear and add
Manual2.doc. Check the Use TM from previous analysis option and click Analyse. During
the second analysis, Translator's Workbench uses the temporary translation memory created
during the first analysis (which contains all source sentences from Manual1.doc) rather
than Manuals.tmw. This analysis shows you the differences between the two manuals.
This procedure is also useful when determining whether an alignment of old translation material is
worthwhile or not.
8-10
TRANSLATOR’S WORKBENCH USER GUIDE
Pre-translating Documents
8
PRE-TRANSLATING DOCUMENTS
Sometimes you may wish to pre-translate documents before translating them interactively.
C
Automatically translate all segments from one or more documents of a specified match value
in the current translation memory.
C
Replace translations of known terms from a MultiTerm termbase or insert them as
annotations in segments for which no match is found in the translation memory.
C
Update a translation memory with translated segmented documents where changes were
made to the documents outside the Translator’s Workbench interactive environment.
C
Segment unknown sentences in your document so that they can be translated without
Translator's Workbench and later imported into the translation memory.
TRANSLATOR’S WORKBENCH USER GUIDE
8-11
8
Pre-translating Documents
Using the Translate Command
The following section provides instructions for pre-translating one or more source documents using
an existing translation memory.
D
NOTE
C When working with server-based translation memories, you must have Power User or
TM Administrator access rights to use the Translate command.
To pre-translate one or more documents, follow these steps:
8-12
1
In Translator’s Workbench, select Open from the File menu to open the translation memory
that you wish to use for pre-translation.
2
In Translator's Workbench, select Translate from the Tools menu. The Translate Files dialog
box opens.
3
Before you begin pre-translation, check that the translation memory, project and filter settings
you have specified are suitable. Use the Options command to access the Translation Memory
Options and the Project and Filter Settings dialog boxes directly. For more information,
“Preparing your Translation Memory” on page 8-4.
TRANSLATOR’S WORKBENCH USER GUIDE
Pre-translating Documents
4
8
Add the files to be translated to the Files to Translate list. This can be done in one of two ways:
C Click Add. The Files to Translate dialog box opens. Browse to the location of the files, select
the files for translation and click Open to add them to the Files to translate list.
C Drag and drop the file(s) from Windows Explorer or the Find Files dialog box into the Files
to translate list.
To remove files from the list, select them and click Remove. You can delete the entire list by
clicking Clear.
5
Set the minimum match value for segments to be translated in the % or higher match value
box. If you set it to 100%, only those segments from the documents that have an exact match
in the current translation memory are translated. If you set it to a lower value, such as 95%, all
segments whose match value is at least 95% are translated. The Translate command takes
account of penalties set in the Translation Memory Options dialog box. For more information,
see “Defining Penalties Settings” on page 2-35.
6
Check Segment unknown sentences if you want Translator's Workbench to put delimiting
marks around segments for which no match is found in the translation memory. This is
useful for translating documents without using Translator's Workbench. After translation, use
Clean Up to update the translation memory based on the segmented translated sentences. For
more information, see “Segment Unknown Sentences” on page 8-16.
7
Set the Translate terms options as required. For more information, see “Translate Terms
Options” on page 8-15.
8
Set the Update changed translations options as required. For more information, see “Update
Changed Translations Options” on page 8-14.
9
Use the Log File control to specify the log file(s) in which statistical information about the pretranslate operation is saved. Translator's Workbench creates two log files: one in text format
with a .log extension and the other in comma-separated form with a .csv extension. For
more information about log file options, see “Defining Batch Tools Settings” on page 2-46.
C To create a new log file or locate an existing log file, click Log File > Browse.
C To view the log file that is currently specified, click Log File > View.
C To delete the log file that is currently specified, click Log File > Delete.
10
Click Translate to start the translation process. Translator's Workbench displays two progress
indicators: one for the current file and one for the total number of files.
When pre-translation is complete, click View Log File to examine the log file containing the statistical
information of the translation.
TRANSLATOR’S WORKBENCH USER GUIDE
8-13
8
Pre-translating Documents
Translate Options
While pre-translation is in progress, Translator's Workbench counts the number of terms and
segments that are being processed. This information is displayed on screen and written to a log file
that you can consult when pre-translation is complete.
After pre-translation, the translated files are saved to the hard disk. By default, Translator's
Workbench also backs up each RTF -based workflow file that is processed. These backup files have
the same name as the original with the extension .bak. If you clear the Keep backup box in the Tools
tab of the Translation Memory Options dialog box, no backup copies are kept.
Update Changed Translations Options
The Update changed translations options apply to documents that can be categorised in one of the
following ways:
C
They have already been partially or entirely translated with Translator's Workbench, so they
contain translation units (hidden source text with target text translation).
C
The translation memory used for the Translate function is the same as the one that was used
for the previous translation.
C
Changes were made to the translation units in the document without using Translator's
Workbench, which means that these changes were not updated in the translation memory. As
a result, some translation units in the document differ from those in the translation memory.
Use the Update changed translations options to decide what should happen to the pre-translated
document and the corresponding translation memory:
8-14
C
If Don't is selected, changes made to the translation units in the document stay untouched
and are not updated to the translation memory. This is the default.
C
If Update TM is selected, changes made to translation units in the document are updated to
the translation memory. This is especially useful after spell-checking or after making other
changes to the translated document without using Translator's Workbench. If source text has
been changed in one or more document translation units, Translator's Workbench compares
the new source text to the translation memory. If a corresponding translation unit exists in the
translation memory, it is overwritten. Otherwise a new translation unit is created in the
translation memory with the new source text from the document, together with its translation.
TRANSLATOR’S WORKBENCH USER GUIDE
Pre-translating Documents
D
C
8
NOTE
If the translation memory supports multiple translations, Translator’s Workbench checks
the Always add new TU when target segments differ option on the Tools tab of the Translation
Memory Options dialog box before deciding whether to create a new translation unit or
overwrite an existing one.
If Update document is selected, changes made to the translation units in the document
are undone and the translations in the translation memory are used instead.
Translate Terms Options
When you run the Translate command, you can set different Translate terms options. The Translate
terms options apply to segments for which no match is found in the translation memory and where
terms within the segments are found in the corresponding MultiTerm termbase:
C
If Don't is selected, Translator's Workbench does not translate known terms. This is the
default.
C
If Replace is selected, Translator's Workbench replaces known terms with their translations
from the MultiTerm database. If multiple translations are present, the first is used. Translated
terms are formatted in a special character style called tw4winTerm to help you identify terms
more easily. If you choose to replace known terms, we recommend you also check Segment
unknown sentences. This ensures that translations are inserted only into the target sentence;
your source sentences are left as they are (as hidden text).
C
If Insert is selected, Translator's Workbench inserts translated terms as comments. If multiple
translations are present, they are separated by a comma inside the annotation or comment.
Translator's Workbench identifies any annotations or comments it inserts as [tw1], [tw2],
[tw3] and so on. Comments appear in a separate window; double-click the annotation or
comment mark in Word to open the window. The comment mark appears in your document
as hidden text. Click Show/Hide ¶ on Word's Standard toolbar to display annotation and
comment marks in a Word document. For further information on working with comments,
see the online help for Word.
D
NOTE
You cannot use the Insert function when pre-translating documents for use with TagEditor as
TagEditor does not support annotations or comments.
TRANSLATOR’S WORKBENCH USER GUIDE
8-15
8
Cleaning Up Translated Documents
Segment Unknown Sentences
Running the Translate command in Translator’s Workbench allows you to automatically insert
matches from a translation memory into source documents for translation. Activating the Segment
Unknown Sentences option duplicates the source text as target text and inserts Translator’s
Workbench delimiters around the translation unit. Translators who do not have access to a
translation memory can translate the target text portion without a translation memory. The
translation memory can be updated at a later time. While this approach may be useful for small
updates to a project, it is not recommended where several translators may be working on the same
set of documents. In this case, sharing a translation memory over a network improves consistency
and translation quality.
D
NOTE
Translator's Workbench also uses Word's built-in language features to segment text. Ensure
that the correct language is set.
CLEANING UP TRANSLATED DOCUMENTS
After translation and, in the case of tagged file formats, tag verification, your target files are still in
bilingual format. Bilingual files contain hidden source text and segment delimiting marks that must
be removed before the target files are converted back into their original format. The process of
removing this bilingual data from the target files is known as clean up.
The clean up process also involves some secondary functions. For files that have been reviewed and
edited independently of Translator’s Workbench, the clean up process allows you to update the
translation memory in accordance with the latest changes in the target files. Also, if you used the
Translated Text Colours option in Translator’s Workbench to apply colour formatting to text during
translation, clean up restores the original colour formatting of text.
Use the Clean Up command to process translated documents as follows:
8-16
C
Remove hidden source text and segment delimiting marks from your document(s).
C
Update the translation memory in accordance with changes that have been made to the target
files outside Translator’s Workbench. The Clean Up feature counts the number of segments
and words that are updated during the process. The summary data is displayed on screen and
written to a log file.
E
TIP
The option to update the translation memory is not available when you use the Save Target As
command in TagEditor to clean translated documents.
TRANSLATOR’S WORKBENCH USER GUIDE
Cleaning Up Translated Documents
C
Restore the original colouring of your text if you have used the Translated Text Colours option
in Translator’s Workbench.
C
Restore the original file extension, in the case of TradosTag (TTX) documents.
8
Using the Clean Up Command
The following section provides instructions for cleaning up one or more source documents.
D
NOTE
When working with server-based translation memories, you must have Power User or
TM Administrator access rights to use the Clean Up command.
To clean up one or more documents, follow these steps:
1
In Translator’s Workbench, select Open from the File menu to open the translation memory
that you was used to translate the documents that you wish to clean up.
2
Select Clean Up from the Tools menu. The Clean Up Files dialog box opens.
3
Before you begin the clean up, check that the translation memory, project and filter settings
you have specified are suitable. Use the Options command to access the Translation Memory
Options and the Project and Filter Settings dialog boxes directly. For more information,
“Preparing your Translation Memory” on page 8-4.
TRANSLATOR’S WORKBENCH USER GUIDE
8-17
8
Cleaning Up Translated Documents
4
Add the files to be cleaned to the Files to Clean up list. This can be done in one of two ways:
C Click Add. The Files to Clean up dialog box opens. Browse to the location of the files, select
the relevant files and click Open to add them to the Files to Clean up list.
C Drag and drop the file(s) from Windows Explorer or the Find Files dialog box into the Files
to Clean up list.
To remove files from the list, select them and click Remove. You can delete the entire list by
clicking Clear.
5
Set the Changed Translations options you require. For more information, see “Changed
Translations Options” on page 9-19.
6
Use the Log File control to specify the log file(s) in which statistical information about the
clean up operation is saved. Translator's Workbench creates two log files: one in text format
with a .log extension and the other in comma-separated form with a .csv extension. For
more information about log file options:
C To create a new log file or locate an existing log file, click Log File > Browse.
C To view the log file that is currently specified, click Log File > View.
C To delete the log file that is currently specified, click Log File > Delete.
7
Select the name of the log file where Translator's Workbench saves the statistical information.
8
Click Clean Up to start the process of cleaning and updating. Translator's Workbench displays
two progress indicators: one for the current file and another for the total number of files.
After clean up, click View Log File to examine the log file containing the statistical information of the
clean up process. Open the clean documents in the relevant target application to verify that the
source text and segment delimiting marks have been removed. Some file formats, such as STF and
the DTP file formats, may require further processing and/or conversion before the final translation
can be viewed in the target application.
V
FOR MORE INFORMATION
For more information about the workflow for DTP file formats, see the File Formats Reference
Guide.
For more information about the RTF-based and TTX-based workflows for Word documents see
the File Formats Reference Guide.
Clean Up Options
By default, Translator's Workbench makes a backup copy of each file before clean up with the same
name as the original and the extension .bak. If you do not want this, deselect Keep Backup in the
Tools tab of the Translation Memory Options dialog box.
8-18
TRANSLATOR’S WORKBENCH USER GUIDE
Cleaning Up Translated Documents
8
Changed Translations Options
The Changed translations options apply to documents that meet the following requirements:
C
They have been translated with Translator's Workbench, so they contain translation units
(hidden source text with target text translation).
C
The translation memory used for the Clean Up function is the same as the one that was used
for the translation of the documents.
C
Changes were made to the translation units in the document without using Translator's
Workbench, which means that these changes were not updated in the translation memory. As
a result, some translation units in the document differ from those in the translation memory.
Use the Changed translations options in the Clean Up Files dialog box to decide what should happen
to the document and the corresponding translation memory:
C
If Don't update is selected, changes made to the translation units in the document stay
untouched and are not updated to the translation memory. This is the default setting.
C
If Update TM is selected, changes made to translation units in the document are updated to
the translation memory. The translation memory is updated according to the changes made
to the document. This is useful after spell-checking or if you have made other changes to the
translated document without using Translator's Workbench. If source text has been changed,
Translator's Workbench compares the new source text to the translation memory. If a
corresponding translation unit exists in the translation memory, it is overwritten. Otherwise
a new translation unit is created in the translation memory with the new source text from the
document, together with its translation.
D
NOTE
C
If Update document is selected, changes made to the translation units in the document are
undone and the translations in the translation memory are used instead.
C
If Don't clean up is selected, translation units in the document that differ from their
counterparts in the translation memory are untouched during clean up. Unlike the
Don't update option, Don't clean up does not remove the hidden source part and delimiting
marks of the changed document translation units. This allows you to check the differences
between the translation units in the document and those in the translation memory after
clean up. The Don't clean up option is not available for TradosTag (TTX) that have been
translated in TagEditor.
If the translation memory supports multiple translations, Translator’s Workbench checks the
Always add new TU when target segments differ option in the Tools tab of the Translation
Memory Options dialog box before deciding whether to create a new translation unit or
overwrite an existing one.
TRANSLATOR’S WORKBENCH USER GUIDE
8-19
8
Cleaning Up Translated Documents
Cleaning up HTML, SGML and XML Documents
Before cleaning up HTML, SGML and XML documents in TradosTag format, ensure that the correct
tag settings have been specified in the Tag Settings Manager so that the target SGML, XML or HTML
files can be created. You can access the Tag Settings Manager directly from the Tools tab of the
Translation Memory Options dialog box, For more information,
see “Tag Settings Files in Translator’s Workbench” on page 2-48.
Troubleshooting Files after Clean Up
The information in this section is only valid for Word (DOC or RTF) documents.
During document translation, Translator’s Workbench segments your text. During clean up,
Translator’s Workbench removes segment delimiters. It displays error messages if it encounters
problems during this batch process. You can find a complete list of these error messages in the online help. These error messages are also written to the log files (both .log and .csv).
You cannot interactively troubleshoot errors as they occur during a batch process. Translator's
Workbench inserts a special tag in the document at the point where an error occurs and continues
with the batch process. This special tag is a double arrow, pointing to where the error occurred —
« ([Alt]+[0171]) and/or » ([Alt]+[0187]). The arrow is formatted in a character style called tw4winError,
which displays text in a bright green colour.
D
NOTE
The character style tw4winError does not appear if the Strip TW4Win styles options is selected
in the Tools tab of the Translation Memory Options dialog box.
To locate the errors after clean up is complete, follow these steps:
8-20
1
Open the file(s) containing the error(s) in Word.
2
Select Find from the Edit menu. Click More to display the entire Find dialog box. This is not
necessary in earlier versions of Word.
TRANSLATOR’S WORKBENCH USER GUIDE
Cleaning Up Translated Documents
3
Search for the double arrow « ([Alt]+[0171]) and/or » ([Alt]+[0187]), which is formatted in a
bright green colour.
4
Click Find Next. Word finds the first double arrow. The error is probably a segmentation
tagging error (for example, the start of a main segment has been accidentally deleted or a
subsegment start mark cannot be found). Refer to the online help for a complete description
of errors and troubleshooting options.
5
After troubleshooting all errors in the document files, remove the error markers and
batch-process them again. Save and close the files in Word and run Clean Up again in
Translator’s Workbench.
8
Removing the tw4winError Markers
After you have removed segmentation errors, you should delete the tw4winError markers before you
clean up the corresponding files again. To remove these markers using the Replace command,
follow these steps:
1
Open the file(s) containing the error marker(s) in Word.
2
Select Replace on the Edit menu.
3
Search for the double arrow « ([Alt]+[0171]) and/or » ([Alt]+[0187]), which is formatted in a
bright green colour. Click More to display the entire Replace dialog box. This is not necessary
in earlier versions of Word. Leave the Replace with box empty.
4
Click Replace All to remove all error markers in one go. Then save your documents again.
TRANSLATOR’S WORKBENCH USER GUIDE
8-21
8
8-22
Cleaning Up Translated Documents
TRANSLATOR’S WORKBENCH USER GUIDE
THE TRADOSTAG VIEWER
PLUG-IN
This chapter introduces the TradosTag Viewer plug-in in
TagEditor. Sections include:
C
Overview of the TradosTag Viewer plug-in
C
How to use TradosTag Viewer
C
Activating TradosTag Viewer
C
Defining style sheet, font and colour settings
C
Launching TradosTag Viewer
Chapter
9
9
Overview
OVERVIEW
This chapter introduces the TradosTag Viewer plug-in. It explains how to use TradosTag Viewer to
preview and print TradosTag documents. It shows you how to define style sheet, font and colour
settings and how to activate and launch the TradosTag Viewer from TagEditor.
Audience
The information in this chapter is relevant to all users who are working in the TagEditor editing
environment.
About TradosTag Viewer
TradosTag Viewer is a TagEditor plug-in that allows you to preview and print TradosTag (TTX)
documents from within Internet Explorer. It is easy to use and fully integrated with TagEditor:
C
To launch TradosTag Viewer, you click on the Preview tabs in the main TagEditor window.
TradosTag Viewer then uses Internet Explorer to create a formatted version of the bilingual
TradosTag document.
C
To return to edit mode where the document can be modified as necessary, you click on the
Edit tab in the main TagEditor window.
As long as the TradosTag Viewer plug-in is activated, you can switch freely back and forth between
the preview and edit modes.
With TradosTag Viewer, you can preview documents that have been partially or fully translated. The
Preview tabs allow you to choose between previewing only the target version of a bilingual TradosTag
document, or previewing both the source and target versions side-by-side.
Document Display
TradosTag Viewer uses style sheet technology to transform the TradosTag document into an HTMLbased format that is semi-WYSIWYG. When you use the correct style sheet, the previewed document
is displayed without tags and formatting elements such as headings, tables and bulleted lists are
correctly rendered. For more information, see “About Style Sheets” in the following section.
With TradosTag Viewer, you can apply colour and font settings to distinguish between newly
translated text and text that has been recycled from translation memory. Colour settings also allow
you to distinguish between different match types, including PerfectMatch, exact, fuzzy and no
matches. With colour and font settings applied, you can easily prioritise specific parts of the
translation for review.
9-2
TRANSLATOR’S WORKBENCH USER GUIDE
Overview
9
TradosTag Viewer allows you to define different colour and font settings for screen and print output.
The default settings for print output present different match types in different font weights and
shades of grey. For more information about font and colour settings, see “Defining Colour and Font
Settings” on page 9-8.
Prerequisites
Before you start working with TradosTag Viewer:
C
Make sure that Microsoft Internet Explorer 6.0 or higher is installed on your system.
C
Make sure that the font Tahoma is installed on your system. Tahoma is the default font used to
display text in Internet Explorer. The Tahoma font is available in all recent versions of
Microsoft Windows.
C
Make sure that you have the necessary style sheets for the documents you wish to preview.
About Style Sheets
For each TradosTag document that you wish to preview, TradosTag Viewer requires a suitable style
sheet. The style sheet contains information about the original file format of the TradosTag document.
It allows TradosTag Viewer to interpret formatting information and to render the document correctly
in Internet Explorer. For more information about selecting a style sheet for the document you are
about to preview, see “Selecting a Style Sheet” on page 9-6.
Default Style Sheets
TradosTag Viewer ships with some default XSL-based style sheets:
C
HTML.xsl – style sheet for previewing and printing HTML documents that have been
converted to TradosTag. The HTML style sheet can be used as is. All formatting is preserved
except for graphics which are displayed as placeholders. Note that this style sheet does not
currently support ASP and JSP files.
C
STF.xsl – style sheet for previewing and printing FrameMaker or Interleaf documents that
have been converted to TradosTag. The STF style sheet needs to be customised so that
user-defined style names from the original FrameMaker and Interleaf documents can be
interpreted correctly.
C
InDesign CS 2.xsl– style sheet for previewing and printing InDesign CS2 files that have
been converted to TradosTag.
C
OpenOffice.xsl– style sheet for previewing and printing OpenOffice and StarOffice
documents that have been converted to TradosTag.
TRANSLATOR’S WORKBENCH USER GUIDE
9-3
9
Overview
C
PowerPoint.xsl– style sheet for previewing and printing PowerPoint documents that have
been converted to TradosTag.
C
TableView.xsl– style sheet for viewing TradosTag files in a tabular format.
With these style sheets, TradosTag Viewer displays the different match types in the TradosTag
document using the colour and font settings you define in the Colour and font settings dialog box.
The default installation location for the style sheets is:
C:\Program Files\SDL International\T2007[_FL]\PlugIns\TTXPreview\Stylesheets.
Custom Style Sheets
TradosTag Viewer also supports custom style sheets. To use your own style sheet(s) with TradosTag
Viewer, copy the file(s) to the Stylesheets subfolder of your SDL Trados installation. The style sheet is
then made available for selection in the TradosTag Viewer Plug-in Properties dialog box.
Customisation Services
TradosTag Viewer also supports other file types. SDL provides customisation services.
9-4
TRANSLATOR’S WORKBENCH USER GUIDE
Preparing the TradosTag Viewer
9
PREPARING THE TRADOSTAG VIEWER
This section explains how to activate the TradosTag Viewer plug-in and how to define style sheet,
font and colour settings.
Activating TradosTag Viewer
Before you define settings or launch a preview, you must activate the TradosTag Viewer in the Plugins dialog box in TagEditor.
To activate the TradosTag Viewer:
1
From the Tools menu in TagEditor, select Plug-ins. The Plug-ins dialog box is displayed.
2
Select TagEditor Plug-ins and then select TradosTag Viewer Plug-in.
3
Click Properties to open the TradosTag Viewer Plug-in Properties dialog box where you can
define style sheet, colour and font settings. For more information about choosing a style sheet,
see “Selecting a Style Sheet” on page 9-6. For more information about colour and font
settings, see “Defining Colour and Font Settings” on page 9-8.
TRANSLATOR’S WORKBENCH USER GUIDE
9-5
9
Preparing the TradosTag Viewer
4
Click OK to close the Plug-ins dialog box and to return to the main TagEditor program
window.
TradosTag Viewer is now ready for use. Use the Preview tabs at the bottom of the main TagEditor
window to launch the viewer. For more information, see “Launching TradosTag Viewer” on
page 9-9.
D
NOTE
While the TradosTag Viewer plug-in is not active, the Preview tabs provide access to the internal
viewer that is available with TagEditor. For more information, see “Deactivating TradosTag
Viewer” on page 9-11.
Selecting a Style Sheet
For each TradosTag document that you wish to preview, TradosTag Viewer requires a suitable style
sheet. The style sheet contains information about the original file format of the TradosTag document.
Use the default style sheets that ship with TagEditor to preview HTML and STF documents, or create
a custom style sheet to preview other file formats. For more information, see “About Style Sheets”
on page 9-3.
9-6
TRANSLATOR’S WORKBENCH USER GUIDE
Preparing the TradosTag Viewer
9
To select a style sheet:
1
From the Tools menu in TagEditor, select Plug-ins. The Plug-ins dialog box is displayed.
2
Select TagEditor Plug-ins and then select TradosTag Viewer Plug-in.
3
Click Properties to open the TradosTag Viewer Plug-in Properties dialog box.
4
Select the required style sheet from the Stylesheets list. The HTML and STF style
sheets that ship with TagEditor are available by default.
D
NOTE
C The HTML style sheet can be used as is. All formatting is preserved except for graphics
which are displayed as placeholders.
C The STF style sheet needs to be customised so that user-defined style names from the
original FrameMaker and Interleaf documents can be interpreted correctly.
5
Click Apply to confirm your selection.
6
Click Settings to open the Colour and font settings dialog box where you can define further
display settings for the document you wish to preview. For more information, see “Defining
Colour and Font Settings” in the following section.
TRANSLATOR’S WORKBENCH USER GUIDE
9-7
9
Preparing the TradosTag Viewer
7
Click OK to return to the Plug-ins dialog box.
8
Click OK to return to the main TagEditor window.
V
FOR MORE INFORMATION
For more information about starting the preview, see “Launching TradosTag Viewer” on
page 9-9.
Defining Colour and Font Settings
With TradosTag Viewer, you can apply colour and font settings to differentiate between types of text
in the TradosTag document. TradosTag Viewer provides settings for source text, untranslated text,
and different match types, including PerfectMatch, exact, fuzzy and no matches. You can define
different settings for screen and print output, or custom settings for other purposes.
To define colour and font settings:
1
From the Tools menu in TagEditor, select Plug-ins. The Plug-ins dialog box is displayed.
2
Select TagEditor Plug-ins and then select TradosTag Viewer Plug-in.
3
Click Properties to open the TradosTag Viewer Plug-in Properties dialog box.
4
Depending on the type of settings you wish to define, select an item from the Settings dropdown list:
C To define settings for screen viewing, select Screen colour settings.
C To define settings for print output, select Printer colour settings.
C To define custom settings for other purposes, select Custom colour
settings.
Click the Settings button. The Colour and font settings dialog box is displayed.
9-8
TRANSLATOR’S WORKBENCH USER GUIDE
Launching TradosTag Viewer
5
9
Define settings for each match type as follows:
C Select a Match type from the list.
C Click Font to open the Font dialog box where you can define font and font
size settings for the selected match type.
C Click Colour to open the Colour dialog box where you can define colour
settings for the selected match type.
6
To apply only the specified colour settings to the selected match type, select Apply
colour settings only. In this case, the specified font settings are ignored; formatting
properties defined in the current style sheet are applied instead.
7
When you are satisfied with the settings you have defined, click OK to return to
TradosTag Viewer Plug-in Properties dialog box.
8
Repeat steps 4 to 6 to define settings for each type of output.
9
Click OK to close the TradosTag Viewer Plug-in Properties dialog box and to return to
the main TagEditor window.
TradosTag Viewer is now ready for use. The next section shows you how to start the preview.
LAUNCHING TRADOSTAG VIEWER
Before you start, make sure that you have selected a suitable style sheet for the document you wish
to preview. For more information, see “Selecting a Style Sheet” on page 9-6. You can also define
colour and font settings to differentiate between newly translated text and different match types in
the TradosTag document. For more information, see “Defining Colour and Font Settings” on
page 9-8.
To launch TradosTag Viewer and preview a TradosTag document:
1
In TagEditor, save the file that you wish to preview in TradosTag bilingual format (TTX) using
the Save Bilingual As command. The file may be partially or fully translated.
2
Click any of the Preview tabs at the bottom of the main TagEditor window to launch Internet
Explorer where the document preview is displayed.
D
NOTE
The source and target language Preview tabs in TagEditor use the corresponding language flag
icons from the current translation memory in Translator's Workbench. If there is no translation
memory open, UN flags are displayed instead of the language flags.
TRANSLATOR’S WORKBENCH USER GUIDE
9-9
9
Launching TradosTag Viewer
The screenshot below shows a TradosTag document in preview mode in Internet Explorer. The
different font colours indicate different match types, as defined in the Colour and font settings
dialog box:
C By default, Internet Explorer displays the target text only. To display both
source and target segments, click Show Source Segments. To hide the
source text again, click Hide Source Segments.
C To display general information about the current document, click Show
Doc Info. To hide the document information again, click the Hide Doc Info
button.
3
To return to edit mode where the document can be modified as necessary, click on the
Edit tab in the main TagEditor window.
As long as the TradosTag Viewer plug-in is activated, you can continue to switch freely back and forth
between the preview and edit modes.
9-10
TRANSLATOR’S WORKBENCH USER GUIDE
Launching TradosTag Viewer
9
Deactivating TradosTag Viewer
To deactivate TradosTag Viewer:
1
From the Tools menu in TagEditor, choose Plug-ins. The Plug-ins dialog box opens.
2
To deactivate TradosTag Viewer, clear the TradosTag Viewer Plug-in box.
3
Click OK to close the Plug-ins dialog box and to return to the main TagEditor window.
TradosTag Viewer is now deactivated. When you select any of the Preview tabs at the bottom of the
main TagEditor window, the file format-specific preview that is available with TagEditor is launched.
TagEditor uses Internet Explorer to display fully formatted HTML documents in an internal viewer;
it uses external instances of PowerPoint and Excel to display fully formatted PowerPoint and Excel
documents. All other formats are displayed as tagged text files without formatting.
V
FOR MORE INFORMATION
For more information about previewing HTML, PowerPoint and Excel documents in TagEditor,
see Chapter 4.
TRANSLATOR’S WORKBENCH USER GUIDE
9-11
9
9-12
Launching TradosTag Viewer
TRANSLATOR’S WORKBENCH USER GUIDE
WORKING WITH SERVER-BASED
TRANSLATION MEMORIES
This chapter explains how to work with server-based
translation memories in Translator’s Workbench.
Sections include:
C
File- and server-based translation memories compared
C
TM Server connection types
C
Translation memory access requirements
C
License restrictions
C
How to access a server-based translation memory from
Translator’s Workbench
C
Managing your TM Server settings
C
Changing your TM Server password
Chapter
10
10
Overview
OVERVIEW
This chapter explains how to work with server-based translation memories in Translator’s
Workbench. It outlines the similarities and differences between file- and server-based translation
memories from a Workbench user’s point of view. It explains how to access a server-based
translation memory and how to manage your TM Server settings.
Audience
The information in this chapter applies primarily to the use of server-based translation memories in
the TM Server environment.
File- and Server-based Translation Memories Compared
As a user in Translator’s Workbench, you will find that there are certain differences between file- and
server-based translation memories. The main differences have to do with translation memory
creation and the definition of access rights. In the case of file-based translation memories, these
functions are carried out by various users in Translator’s Workbench. In the case of server-based
translation memories, these functions are carried out by your administrator using the Server
Manager client. Otherwise, although data transactions are handled in different ways, the features in
Translator’s Workbench that control translation, translation memory administration and project
management are the same for both file- and server-based translation memories.
10-2
TRANSLATOR’S WORKBENCH USER GUIDE
Overview
10
The following table outlines the similarities and differences between file- and server-based
translation memories from a Workbench user’s point of view.
Server-based Translation Memory
File-based Translation Memory
None.
Prerequisites
Administrators use Server Manager to
register TM Server and related
components. This involves registering
the various components to make
them available to users of the system.
Creation
Administrators use Server Manager.
Use Translator’s Workbench.
Accessing/Opening
Use the Connect command to
establish a connection with the
relevant TM Server, log in to the
system, and select from the list of
available translation memories.
Access rights on the TM Server and
within the selected translation
memory are login-dependent.
Use the Open command to locate the
relevant translation memory file
(TMW). If the translation memory is
protected, access rights are
password-dependent.
Configuration
Use the Setup command in
Translator’s Workbench for all aspects
of configuration, except the definition
of access rights.
Use the Setup command in
Translator’s Workbench for all aspects
of translation memory configuration.
Administrators use Server Manager to
manage users, and to define access
rights for all server-based translation
memories in the system.
Use the Access Rights tab in the
Setup dialog box to protect
translation memory files and define
passwords for different levels of
access.
Use the Import command in
Translator’s Workbench.
Import
Use the Import command in Server
Manager or Translator’s Workbench.
Server-based translation memories
use the same import formats as filebased translation memories.
Use the Export command in
Translator’s Workbench.
Export
Use the Export command in Server
Manager or Translator’s Workbench.
Server-based translation memories
use the same export formats as filebased translation memories.
Access Rights
TRANSLATOR’S WORKBENCH USER GUIDE
10-3
10
Overview
Server-based Translation Memory
File-based Translation Memory
Project and Filter
Settings
Use the Project and Filter Settings
command in Translator’s Workbench.
Use the Project and Filter Settings
command in Translator’s Workbench.
Translation Memory
Options
Use the relevant commands on the
Options menu in Translator’s
Workbench.
Use the relevant commands on the
Options menu in Translator’s
Workbench.
Batch Tool
Operations
Use the relevant commands on the
Tools menu in Translator’s
Workbench.
Use the relevant commands on the
Tools menu in Translator’s
Workbench.
Interactive
Translation
Use Translator’s Workbench in
conjunction with the Workbench
editing environments. The
concordance and term recognition
features are available as normal.
Use Translator’s Workbench in
conjunction with the Workbench
editing environments. The
concordance and term recognition
features are available as normal.
Maintenance
Use the Maintenance command in
Translator’s Workbench to carry out
unit-level and global maintenance
procedures. Administrators may use
the third-party database management
system to carry out additional
maintenance procedures such as
backup and restore. However, it is not
possible to use the database
management system for the direct
manipulation of translation memory
data.
Use the Maintenance command in
Translator’s Workbench to carry out
unit-level and global maintenance
procedures. The Search for possible
duplicates option is not available for
file-based translation memories.
D
10-4
NOTE
When working with server-based translation memories in Translator’s Workbench, your access
rights are dependent on the login that you receive from your administrator. When working with
file-based translation memories that are protected, access to certain features is passworddependent. For more information about access rights in both types of translation memory,
see Chapter 11.
TRANSLATOR’S WORKBENCH USER GUIDE
Access Requirements and Restrictions
10
Alternating between File- and Server-based Translation Memories
Translator’s Workbench allows you to switch freely from file- to server-based translation memories
and vice versa. Likewise, provided that the translation memory setups are compatible, you can easily
transfer data from one type of translation memory to the other, using the import and export features
in Translator’s Workbench.
ACCESS REQUIREMENTS AND RESTRICTIONS
This section explains the access requirements and license restrictions that govern access to
server-based translation memories.
Access Requirements
In TM Server and other such environments, the TM Server middleware component is responsible
for managing all communication between Translator’s Workbench and the database server(s) where
translation memories are stored. In a given setup, there may be more than one instance of
TM Server, each of which provides access to one or more database containers and the translation
memories they contain.
To access a server-based translation memory from Translator’s Workbench, you must establish a
connection with the relevant TM Server. To do this, you need to specify the type of TM Server
connection you wish to use and submit your TM Server login details.
TM Server Connection Types
From Translator’s Workbench, you can access TM Server using one of two different connection
types:
C
Intranet connection – this type of connection is always available, provided that the TM Server
you wish to access belongs to the LAN or WAN environment in which you are working.
C
Internet connection (TM Anywhere) – this type of connection is available if the TM Server you
wish to access is TM Anywhere-enabled. TM Anywhere is a web server application that
enables TM Server to communicate with Translator’s Workbench using an Internet
connection.
TRANSLATOR’S WORKBENCH USER GUIDE
10-5
10
Access Requirements and Restrictions
The type of connection you use to access TM Server depends entirely on the type of infrastructure
that is available to you. The Internet connection type is ideal if you are a remote online user. The
intranet connection type is ideal if you are working within the same LAN or WAN environment as
the TM Server you wish to access. The connection type you choose in no way affects the user
interface or the range of features that are available to you when working with server-based translation
memories in Translator’s Workbench. These factors are the same for both types of connection.
If you intend to use an Internet connection to access TM Server, ask your administrator for the
following information:
C
The name of the computer and domain on which the TM Anywhere-enabled instance of
TM Server is installed. For example, server01.sdl.com indicates that the relevant instance of
TM Server resides on the computer server01, which belongs to the trados.com domain.
C
The recommended protocol for accessing the TM Anywhere server. The TM Anywhere server
supports HTTP (Hypertext Transfer Protocol) and TCP (Transmission Control Protocol). If
the HTTP protocol is recommended, find out whether or not the TM Anywhere server
employs SSL (Secure Sockets Layer) technology and requires a secure connection.
C
The port number for accessing the TM Anywhere server.
C
Make sure the TM Server login you receive is based on a Trados, rather than Windows, user
account. A Trados user account is required in order to access TM Server using the Internet
connection type. For more information about Trados and Windows user accounts and the
associated authenticaion modes, see the next section.
C
Find out if you need to use a proxy server with TM Anywhere.
C
When using a proxy server with TM Anywhere to access TM Server, your administrator may
need to provide you with a copy of the configuration file, TW4Win.exe.config. Your
administrator will also need to provide you with the proxy server login information. See Lan
Settings.
D
NOTE
A proxy server is a server that allows clients, such as a browser, to make indirect network
connections to other servers. A client connects to the proxy server, then requests a connection,
file, or other resource available on a different server. The proxy server provides the resource by
connecting to the specified server.
The Freelance version of Translator’s Workbench does not support intranet connections to
TM Server. TM Server can only be accessed using the Internet (TM Anywhere) connection type.
10-6
TRANSLATOR’S WORKBENCH USER GUIDE
Access Requirements and Restrictions
10
TM Server Login
As a prospective user of server-based translation memories, you will receive a TM Server login from
your administrator. As well as enabling you to log in to the system, the TM Server login determines
which (server-based) translation memories are available to you, and the access rights you have within
each of these. When you receive login details from your administrator, it is important that you ask
for information about the associated translation memory access rights.
The TM Server login information you require is outlined below.
C
Authentication mode – Each TM Server login is authenticated by reference to a Windows or
Trados user account. Find out which authentication mode applies to your TM Server login.
D
NOTE
C
Login ID and password – If your TM Server login is based on a Trados user account, you must
supply the relevant login ID and password. If your TM Server login is based on a Windows
user account, no further details are required; the login ID and password are automatically
picked up from the operating system.
E
TIP
C
Translation memory and TM Server details – find out which translation memories in the
system are available to you. If there is more than one instance of TM Server in your
environment, find out the name(s) of the TM Server(s) with which each available translation
memory is associated.
C
Translation memory access rights – ask your administrator for information about the rights
that are associated with your TM Server login. The rights you have within each translation
memory are determined by your membership of translation memory roles. Find out which
role you belong to in each translation memory.
D
NOTE
The type of TM Server connection you use may determine the authentication settings for your
TM Server login. If you are using an Internet connection (TM Anywhere) to access TM Server,
you must use Trados authentication. If you are using an intranet connection to access
TM Server, you may use either Windows or Trados authentication. Contact your administrator if
you need to change the authentication settings for your TM Server login.
If your TM Server login is based on a Trados user account, you can change your password from
Translator’s Workbench. For more information, see “Changing your TM Server Password” on
page 10-22.
Your administrator is responsible for user management and the definition of access rights
within the system. These tasks are carried out in Server Manager rather than in Translator’s
Workbench. Only administrators have access to the Server Manager client.
TRANSLATOR’S WORKBENCH USER GUIDE
10-7
10
Access Requirements and Restrictions
Translation Memory Roles
In the case of server-based translation memories, levels of access are expressed in terms of
translation memory roles. Each translation memory role represents a predefined set of user rights;
each set of user rights represents the type of access that is required to carry out tasks in a given area.
To access a given translation memory, you must belong to one of the translation memory roles. The
administrator may assign you to a Guest, Translator, Power User, TM Administrator or a custom
role.
V
FOR MORE INFORMATION
For more information about the rights that are associated with each translation memory role,
see “Levels of Access in Server-based Translation Memories” on page 11-10.
Role membership is translation memory-specific: the rights you acquire as a role member in a given
translation memory do not grant access to, or rights within, any other translation memory.
Furthermore, you can belong to different roles in different translation memories. If the TM Server
login you receive from your administrator grants permission to access several translation memories,
make sure you find out which role you have been assigned to in each one.
E
TIP
To find out which level of access a you have, you can look it up in File Properties after logging
into the server translation memory
TM Server License Restrictions
Depending on the terms of the license that applies in your working environment, use of Translator’s
Workbench as a client of TM Server may be subject to restriction. In particular, the license stipulates
the maximum number of users that can connect to TM Server concurrently in order to access a
server-based translation memory. The license differentiates between the following types of user:
10-8
C
Windows intranet – intranet users whose TM Server login is based on a Windows user
account;
C
Trados intranet – intranet users whose TM Server login is based on a Trados user account;
C
TM Anywhere – Internet users whose TM Server login is based, by definition, on a Trados
user account.
TRANSLATOR’S WORKBENCH USER GUIDE
Getting Started
10
The central license server in your environment monitors the number and type of connections that
are currently active on TM Server. Each time you try to log in to TM Server, your request is classified
according to user type. If the maximum number of concurrent connections for your user type has
already been reached, you may be temporarily prevented from logging in. In this case, you must wait
for one of the existing users in your category to finish before you can log in to TM Server yourself.
Alternatively, you can try to log in again as a different type of user. If necessary, contact your
administrator and inform him of your requirements.
Connection Time-out
Your administrator may specify a time-out value for some or all of the server-based translation
memories in the system. The time-out value for a given translation memory specifies the length of
time for which the underlying TM Server connection can remain inactive (unused) before it is
considered to be idle. Once the connection is idle, it may be closed to accommodate other login
requests on the network. If the connection you are using is closed under these circumstances, you
must log in to TM Server again.
E
TIP
Ask your administrator for information about the time-out value that is defined for each of the
server-based translation memories you are using.
GETTING STARTED
This section shows you how to get started in a TM Server-based environment. It explains how to gain
access to a server-based translation memory from Translator’s Workbench. The procedure we
outline assumes that you are starting from scratch and involves the following stages:
C
Using the Connect command
C
Using the Add TM Server Wizard to add a new TM Server to Translator’s Workbench
C
Selecting the appropriate TM Server connection type
C
Specifying advanced connection settings for an Internet (TM Anywhere) connection
C
Supplying TM Server login details
C
Logging in to TM Server
C
Selecting a translation memory.
TRANSLATOR’S WORKBENCH USER GUIDE
10-9
10
Getting Started
If the TM Server you wish to access is already known to Translator’s Workbench, not all of the steps
in this procedure will be relevant. For more information about using the TM Servers dialog box
(Settings menu) to work with existing settings, see “Managing your TM Server Settings” on
page 10-20.
Before you Start
Before you start, make sure you have the necessary information about your TM Server connection
type, login and associated access rights. For more information, see “Access Requirements” on
page 10-5. Once you have the necessary details, you are ready to connect.
Using the Connect Command
Use the Connect command to initiate the process of connecting and logging in to TM Server to
access the required translation memory. Note that TM Server connection settings and login details
that were previously specified in Translator’s Workbench may be stored in the local registry. The
procedure outlined here assumes that no such settings exist and that you are starting from scratch.
To access a server-based translation memory from scratch in Translator’s Workbench, select
Connect from the File menu. The Add TM Server Wizard is displayed.
D
NOTE
If you have already specified connection settings and these are still available to Translator’s
Workbench, the Connect command automatically triggers a login request for the most recently
used TM Server. (In the case of a connection that is based on a Trados user account, you may
be prompted to resubmit your TM Server password.)
If the login request is successful, the Select Translation Memory dialog box is displayed with a
list of the translation memories that are available to you on the selected TM Server. You then
have the option of selecting a translation memory from this list or connecting to a different
TM Server altogether. For more information, see “Selecting a Translation Memory” on
page 10-16.
Using the Add TM Server Wizard
The Add TM Server Wizard allows you to add a new TM Server to Translator’s Workbench and to
specify the necessary connection settings and login details.
Review the information that is provided on the first page of the wizard and click Next to continue.
10-10
TRANSLATOR’S WORKBENCH USER GUIDE
Getting Started
10
Specifying the TM Server Connection Type
1
On the Select TM Server Connection Type page, specify the type of connection you wish to use
to access TM Server:
C Intranet connection – select this option if the TM Server you wish to access belongs to the
LAN or WAN environment in which you are working.
C Internet connection (TM Anywhere) – select this option if the TM Server you wish to access
is TM Anywhere-enabled. TM Anywhere is a web server application that enables
TM Server to communicate with Translator’s Workbench using an Internet connection.
2
Click Next to continue. If you selected Intranet connection, the Connection page is displayed.
For more information about the settings on this page, see “Supplying TM Server Login
Details” on page 10-12. If you selected Internet connection, the Advanced page is displayed. For
more information about the settings on this page, see the next section.
Specifying Advanced Connection Settings
The Advanced page allows you to specify the prot0col and port number you wish to use to access the
TM Anywhere server. This information is available from your administrator.
D
1
NOTE
The options on this page only apply if you selected the Internet (TM Anywhere) connection type
on the previous page.
Choose one of the following protocol options for communication with the TM Anywhere
server:
TRANSLATOR’S WORKBENCH USER GUIDE
10-11
10
Getting Started
C Hypertext Transfer Protocol (HTTP).
If the TM Anywhere server employs SSL (Secure Sockets Layer) technology and requires a
secure connection, select the sub-option as well.
C Transmission Control Protocol (TCP).
2
In the Port number box, specify the port you wish to use to access the TM Anywhere server.
Click Use Default to specify the default port for the protocol you selected in step 1. The default
port number for the HTTP protocol is 80; the default port number for the TCP protocol is
8503.
3
Click Next to continue.
Supplying TM Server Login Details
The Connection page allows you to specify the name of the TM Server computer you want to access
and to submit your TM Server login details.
1
In the TM Server name box, specify the name of the TM Server computer you wish to access.
2
Enter your TM Server login details as follows:
C If your TM Server login is based on a Trados user account, select Use Trados
authentication. Then enter your login ID and password details in the relevant text boxes.
Select Remember password if you wish Translator’s Workbench to memorise your
password and use it for future access to server-based translation memories.
10-12
TRANSLATOR’S WORKBENCH USER GUIDE
Getting Started
10
C If your TM Server login is based on a Windows user account, select Use Windows
authentication. No further information is required as the necessary login ID and password
details are automatically picked up from the operating system.
D
NOTE
3
If you wish to test your TM Server connection, click Test Connection.
If you are using an Internet connection (TM Anywhere) to access TM Server, you must use
Trados authentication. If you are using an intranet connection to access TM Server, you may use
either Windows or Trados authentication. Contact your administrator if you need to change the
authentication settings for your TM Server login.
If you are using an Internet connection with a proxy server and you click Test Connection, you
will see a dialog box asking you to log in to the proxy server. If you are using HTTP
authentication, a second dialog box appears asking you to log in to the computer hosting the
TM Server.
If the settings you specified are valid, the connection is verified. If the settings you specified are
invalid or inaccurate, the connection fails. In this case, you can revise your settings immediately
and test the connection again or continue to work your way through the wizard and modify your
settings later. For more information, see “Modifying your TM Server Settings” on page 10-21.
Note that the specified server will be added to the list in the TM Servers dialog box regardless
of the outcome of the connection test.
4
If your TM Server login is based on a Trados user account and you wish to change your
password, click Change Password. For more information, see “Changing your TM Server
Password” on page 10-22.
5
Click Next to continue.
Completing the Wizard
1
On the final page of the wizard, click Finish to close and to add the specified server to the
TM Server list in the TM Servers dialog box. Alternatively, click Cancel to close the wizard
without modifying this list.
TRANSLATOR’S WORKBENCH USER GUIDE
10-13
10
Getting Started
2
In the TM Servers dialog box, the new TM Server is listed under Name. Information about the
current connection status is given under Description.
Now that the TM Server you wish to access is known to Translator’s Workbench, you are
ready to log in.
V
FOR MORE INFORMATION
The TM Servers dialog box displays information about each of the TM Servers that are currently
known to Translator’s Workbench. It also allows you to modify your TM Server settings. For
more information, see “Managing your TM Server Settings” on page 10-20.
Logging in to TM Server
Use the Log In button in the TM Servers dialog box to log in to a given instance of TM Server. Each
login request uses the connection settings and login details that were previously specified for the
server in the Add TM Server Wizard or the Properties dialog box. If you wish to change your settings
before logging in, click Properties. For more information, see “Modifying your TM Server Settings”
on page 10-21.
To log in to TM Server from the TM Servers dialog box:
1
Under Name, select the TM Server you wish to access.
2
Click Log In to make your login request.
C If your TM Server login is based on a Windows user account and the connection settings
and login details you have specified are valid, you are successfully logged in to the
specified TM Server.
10-14
TRANSLATOR’S WORKBENCH USER GUIDE
Getting Started
10
C If your TM Server login is based on a Trados user account, you may be prompted to submit
your password in the TM Server Login dialog box.
Enter your password in the appropriate box. Click Remember password if you want
Translator’s Workbench to memorise your password and use it for future login requests.
Click OK to confirm. Provided that the connection settings and login details you have
specified are valid, you are successfully logged in to the specified TM Server.
C If in Internet scenarios your TM server login goes through a proxy server you are also
prompted to enter the login information for the proxy server. Click Remember password if
you want Translator’s Workbench to memorise your password and use it for future login
requests. Click OK to confirm.
TRANSLATOR’S WORKBENCH USER GUIDE
10-15
10
Getting Started
If the proxy server requires authentication, you are prompted to enter login information for
the computer hosting the Internet TM Server (TM Anywhere) component. Click Remember
password if you want Translator’s Workbench to memorise your password and use it for
future login requests.
Click OK to confirm. Provided that the connection settings and login details you have
specified are valid, you are successfully logged in to the specified TM Server.
C If the connection fails and login is denied, you may wish to modify your connection
settings or login details. For more information, see “Modifying your TM Server Settings”
on page 10-21.
D
NOTE
3
In the TM Servers dialog box, the result of your login request is indicated under Description. If
your login request is successful, a description of the relevant TM Server is displayed (if there is
no available description, no text is displayed). If the connection fails and login is denied, a
message to this effect is displayed.
4
If you are logged in, click OK to proceed to the Select Translation Memory dialog box where
you can select the translation memory you wish to access.
If the maximum number of concurrent TM Server connections for your user type has already
been reached on the network, you may be temporarily prevented from logging in. In this case,
you must wait for one of the existing users in your category to finish before you can log in
yourself. If necessary, contact your administrator and inform him of your requirements. For
more information about this issue, see “TM Server License Restrictions” on page 10-8.
Selecting a Translation Memory
Use the Select Translation Memory dialog box to select the translation memory with which you wish
to work.
10-16
TRANSLATOR’S WORKBENCH USER GUIDE
Getting Started
10
The main elements of this dialog box are shown below:
Container
Translation
memory
C
The TM Server drop-down list displays a list of the TM Servers that are currently known to
Translator’s Workbench. Each TM Server provides access to one or more database containers
and the associated translation memories.
C
Provided that you have already logged in, the Translation memories window displays the list of
containers and translation memories that are available to you on the currently selected
TM Server. If you are not logged in, the window remains empty.
C
The TM Servers button provides access to the TM Servers dialog box where you can modify
existing TM Server settings.
C
If you want to see all the translation memories that are in all containers available on the server
you should click the Expand all by default option. This option is normally not checked so that
connection to TM Server is more efficient as only the translation memories belonging to a
particular container are displayed. This is particularly important if you are working in the
context of TeamWorks as TM Server can have multiple containers with large numbers of
translation memories.
Follow these steps to select a translation memory:
1
The information that is initially displayed in the Select Translation Memory dialog box
depends on your TM Server connection status. Choose one of the following options:
C If you have just logged in to an instance of TM Server, the relevant server is selected in the
TM Server list and the Translation memories window displays the list of containers and
translation memories that are available to you. Proceed to step 2.
TRANSLATOR’S WORKBENCH USER GUIDE
10-17
10
Getting Started
C If you are not currently logged in or if you wish to make a new connection, select a server
from the TM Server list. This triggers a login request. If prompted, enter your TM Server
password in the TM Server Login dialog box and click OK to confirm.
If your TM Server settings are valid, you are successfully logged in and the Translation
memories window displays the list of containers and translation memories that are
available to you. Proceed to step 2.
If your connection fails and login is denied, you may wish to modify your TM Server
settings and try again. For more information, see “Modifying your TM Server Settings” on
page 10-21.
C If the TM Server you require is not available on the TM Server list, click TM Servers to open
the TM Servers dialog box where you can add a new TM Server to Translator’s Workbench.
For more information, see “Modifying your TM Server Settings” on page 10-21.
2
Review the descriptive and status information that is displayed for each item in the Translation
memories window. Note that you cannot access a translation memory that is locked for
maintenance or marked unavailable.
3
Select the translation memory you wish to access.
4
Click OK to confirm your selection and to close the Select Translation Memory dialog box.
The selected translation memory is made available for use in Translator's Workbench.
Translation Memory Address
Once you are connected, the address of the current translation memory is displayed in the title bar
of Translator’s Workbench. The translation memory address indicates the name of the TM Server
with which the memory is associated, and the display name of the translation memory itself. For
example, in the screenshot that follows, tm://work0261/En-Fr Master TM indicates that the
translation memory is called En-Fr Master TM, and it is available on the TM Server work0261.
If you are using an Internet (TM Anywhere) connection to access TM Server, the translation
memory address also indicates the active protocol and the domain to which the TM Server
10-18
TRANSLATOR’S WORKBENCH USER GUIDE
Getting Started
10
belongs. For example, the translation memory address http://work0261.trados.com indicates the
following:
C
The connection between Translator’s Workbench and the TM Anywhere server
(and, by extension, the TM Server) is based on the HTTP protocol.
C
The TM Server name is work0261.
C
The TM Server belongs to the trados.com domain.
Checking your Current Translation Memory Role
Once you have access to a server-based translation memory in Translator’s Workbench, you are ready
to start work using the features that are available for interactive translation, translation memory
administration and project management. Access to certain features may be restricted, depending on
your current translation memory role.
To check your translation memory role, go to the File menu and choose Properties. As well as
displaying information about the translation memory itself, the Properties dialog box displays
information about the current TM Server login ID and the associated translation memory role
(privileges). In the screenshot below, the user is logged in to TM Server as Paul
and is a member of the TM Administrator role for the current translation memory.
V
FOR MORE INFORMATION
For more information about the rights that are associated with each translation memory role,
see “Levels of Access in Server-based Translation Memories” on page 11-10.
TRANSLATOR’S WORKBENCH USER GUIDE
10-19
10
Managing your TM Server Settings
MANAGING YOUR TM SERVER SETTINGS
Use the TM Servers dialog box to view the list of TM Servers that are currently known to Translator’s
Workbench, to manage your TM Server settings and to make login requests. The information and
options that are available to you in this dialog box are outlined in the following section.
The TM Servers Dialog Box
To open the TM Servers dialog box, select TM Servers from the Settings menu. The TM Servers dialog
box is displayed with a list of the TM Servers that are currently known to Translator’s Workbench.
The following information is available for each TM Server in the list:
C
Name – the name of the TM Server computer. The icons that precede each item in the list
indicate the connection type that is currently defined for the TM Server.
– represents an intranet connection.
– represents an Internet (TM Anywhere) connection. Furthermore, the name of
the TM Server indicates whether the connection is based on the HTTP or TCP
protocol. For example, http://work0733 indicates that the connection is based on the
HTTP protocol; https://work0733 indicates that the server requires a secure connection
based on the HTTPS protocol; tcp://work0733 indicates that the connection is based on
the TCP protocol.
C
10-20
Description – the current connection status of the TM Server.
TRANSLATOR’S WORKBENCH USER GUIDE
Managing your TM Server Settings
D
10
NOTE
TM Server connection type is defined in the Add TM Server Wizard and cannot be modified
afterwards. You can however use the Properties button to modify the advanced connection
settings that are associated with the Internet connection type. For more information, see
“Specifying Advanced Connection Settings” on page 10-11.
Modifying your TM Server Settings
Use the button commands in the TM Servers dialog box (Settings menu) to modify your TM Server
settings. The range of commands is as follows:
C
Add – provides access to the Add TM Server Wizard where you can add a new server to the
TM Servers list. see “Using the Add TM Server Wizard” on page 10-10.
C
Remove – removes the currently selected TM Server from the list.
C
Properties – provides access to the Properties dialog box for the currently selected TM Server.
This dialog box allows you to view and modify the connection settings and login details that
are currently defined for that server.
D
NOTE
The settings that are available in the Properties dialog box are the same as those in
the Add TM Server Wizard.
C For more information about login settings on the Connection tab,
see “Supplying TM Server Login Details” on page 10-12.
C For more information about Internet (TM Anywhere) connection settings on
the Advanced tab, see “Specifying Advanced Connection Settings” on page 10-11.
C
Log In – use this button to log in to the currently selected TM Server. For more information,
see “Logging in to TM Server” on page 10-14.
C
Lan Settings – use this button to enter a proxy server name and port number. If you were
provided with a configuration file by your administrator, or you are not using a proxy server,
you do not need to enter any information here.
TRANSLATOR’S WORKBENCH USER GUIDE
10-21
10
Managing your TM Server Settings
Changing your TM Server Password
If your TM Server login is based on a Trados user account, you have the option of changing your
password from Translator’s Workbench.
To change your TM Server password:
1
From the Settings menu, choose TM Servers. The TM Servers dialog box is displayed.
2
Select the TM Server whose login password you want to modify and click Properties. The
Properties dialog box is displayed.
3
On the Connection tab, click Change Password to open the Change Password dialog box.
4
Change your password as follows:
C In the Old password box, enter your current password.
C In the New password box, enter your new password and then confirm by re-entering it in
the Confirm new password box.
5
Click OK to return to the Connection tab of the Properties dialog box.
6
Select Remember password if you want Translator’s Workbench to memorise your new
password for future login requests.
7
Click OK to save your changes and to return to the TM Servers dialog box.
Your new password becomes effective immediately.
10-22
TRANSLATOR’S WORKBENCH USER GUIDE
TRANSLATION MEMORY
SECURITY AND ACCESS RIGHTS
This chapter outlines how translation memory security works
in a multi-user environment. Sections include:
C
Overview of translation memory security
C
Password protection in file-based translation memories
C
Levels of access in file-based translation memories
C
Login protection in TM Server
C
Levels of access in server-based translation memories
C
Comparison of access rights in file- and server-based
translation memories
Chapter
11
11
Overview
OVERVIEW
This chapter explains how translation memory security works in a multi-user environment. It
outlines the different methods of protection and the levels of access that are available when you work
with file- and server-based translation memories. It shows you how to define access rights and apply
password protection to file-based translation memories.
Audience
The information in this chapter is particularly relevant if you are working with server-based
translation memories in a TM Server-based environment, or file-based translation memories that
already have, or require, password protection.
Information about the exclusive and read-write modes of access applies to all file-based translation
memories, whether they are protected or not.
11-2
TRANSLATOR’S WORKBENCH USER GUIDE
Translation Memory Security
11
TRANSLATION MEMORY SECURITY
This section introduces the concept of translation memory security and explains why it is necessary.
It compares the different methods of protection that are used in file- and server-based translation
memories.
Overview
Translation memory security involves the protection of translation memories at different levels in
order to restrict access to translation memory data and control the use of certain features in
Translator’s Workbench. Each level of access represents a predefined set of user rights; each set of
user rights represents the type of access that is required to carry out tasks in a given area, for
example, in the area of interactive translation, translation memory administration or project
management.
This type of protection is often necessary in a multi-user setup where translation memories are
shared and there is a division of labour. By applying the different levels of protection and providing
each user group with a level of access that is appropriate to the tasks they wish to perform, translation
memory data integrity and optimal performance are ensured. Translation memory protection works
in the same way whether the memory is being used by several users concurrently, or by different
users at different times. This means that you can protect data that is sensitive or simply not relevant
before handing translation memories off to external or third-party users.
Limits of Translation Memory Security
Translation memory security does not affect access to user-specific settings or search-based
functions. User-specific settings include the settings on the Options menu that are used primarily
to enhance translation memory search during interactive translation. Search-based functions
include the various search commands that are available during translation and the concordance
feature on the Tools menu. These features do not involve modifying the contents of the translation
memory in any way; they are available to all Workbench users, regardless of access rights.
Security in File- and Server-based Translation Memories
File- and server-based translation memories use different models of security. This is linked to the
basic difference between the two types of translation memory, where one is made up of an
independent group of files, and the other must be considered within the context of the TM Server
system.
TRANSLATOR’S WORKBENCH USER GUIDE
11-3
11
Translation Memory Security
In the case of file-based translation memories, protection is optional and password-based. When
protection is applied, all passwords are defined in Translator’s Workbench and stored internally in
the translation memory setup. The definition of passwords and access rights is usually carried out
by the translation memory owner, that is, the translation memory creator or super user.
In the case of server-based translation memories, protection is automatically applied and logindependent. Logins and access rights are defined externally as part of the system of user management
that controls access to the TM Server system as a whole. User management data for the system is
stored in a dedicated user management database. User management tasks are carried out by your
administrator in the User Manager module of the administration client, SDL Trados Server
Manager. Only administrators have access to the SDL Trados Server Manager client.
The Role of Translator’s Workbench
In the same way, Translator’s Workbench plays a different role in the security of file- and serverbased translation memories. In the first case, Translator’s Workbench acts in a stand-alone capacity
to protect and provide access to translation memory files. In the second case, Translator’s
Workbench acts as a client that is dependent on other components in the TM Server system for
protection of, and access to, server-based translation memories.
Levels of Access
Although there are differences between the security models that apply to file- and server-based
translation memories, both models are based on the definition of levels of access. Each level of access
represents a set of user rights. In the case of file-based translation memories, levels of access are
expressed in terms of access modes. In the case of server-based translation memories, levels of access
are expressed in terms of translation memory roles. Although the terminology is different in each case,
the levels of access are defined in a similar way. This facilitates Workbench users who work with both
file- and server-based translation memories.
The levels of access that are available in each type of memory are outlined in detail in the remaining
sections of this chapter. For more information about the correspondance between access modes and
translation memory roles, see “Access Rights Compared” on page 12-12.
11-4
TRANSLATOR’S WORKBENCH USER GUIDE
File-based Translation Memory Security
11
FILE-BASED TRANSLATION MEMORY SECURITY
This section outlines the different levels of access that are available in file-based translation
memories. It explains how to protect your translation memory by defining passwords in
Translator’s Workbench.
Overview
In file-based translation memories, levels of access are expressed in terms of predefined access
modes. You can protect the translation memory by defining passwords for each level of access,
however, protection of the translation memory is entirely optional. If no passwords have been
defined, the translation memory remains unprotected and users have unrestricted access to all data
– provided that they open the translation memory in exclusive access mode. Otherwise, passwords are
defined on the Access Rights tab of the Setup dialog box in Translator’s Workbench and stored in the
translation memory setup. The task of password definition is usually carried out by the owner of the
translation memory, that is, the translation memory creator or super user.
Levels of Access in File-based Translation Memories
You can open a file-based translation memories in exclusive, read-write or read-only access mode.
These modes of access are described below.
Exclusive Access Mode
When you open a translation memory in exclusive access mode, you have read-write access to the
contents, including translation unit system fields. You have access to important administrative
functions on the File menu such as translation memory setup, reorganisation, maintenance, import
and export. You also have access to the batch tool commands on the Tools menu. The creator of a
new translation memory has exclusive access to the memory immediately after creation. Otherwise,
use of the exclusive access mode is restricted in the following ways:
C
You cannot open the translation memory in exclusive access mode unless all other users are
logged out. If necessary, you can disconnect other users using the Access Exclusively button
command in the Current Users of Translation Memory dialog box. This dialog box is only
displayed when you attempt to open the translation memory in exclusive access mode and
Translator’s Workbench detects that the memory is already being used.
TRANSLATOR’S WORKBENCH USER GUIDE
11-5
11
File-based Translation Memory Security
C
If the translation memory is password-protected, you must supply the correct password to
open the translation memory in exclusive access mode. To do this, you can use either the
super user or the maintenance/reorg password. The super user password grants full
translation memory administration rights; the maintenance password grants partial
administration rights. For more information about the properties of each password, see
“Protecting File-based Translation Memories” on page 11-7.
It is important to note that if the translation memory is not protected, then any user can open it in
exclusive access mode. For this reason, we recommend that you protect translation memories that
are available in a multi-user setup. For more information, see “Defining Passwords” on page 11-8.
D
NOTE
T
FREELANCE
To open a translation memory in exclusive access mode, select the Exclusive option in the
Open Translation Memory dialog box.
By default, the Freelance version of Translator's Workbench opens each translation memory in
exclusive access mode. There is no Exclusive option in the Open Translation Memory dialog
box. If the translation memory is protected, passwords are required as normal.
Read-write Access Mode
In read-write access mode, you have read-write access to the contents of the translation memory,
excluding translation unit system fields and units that are protected by project passwords.
Translation unit system fields and units that are protected by project passwords are available as
read-only and cannot be modified. In read-write access mode, you have permission to use the
Maintenance command on the File menu and the batch tool commands on the Tools menu. You have
permission to use the Project and Filter Settings command on the Settings menu, and any changes
that you make are saved in the translation memory setup. Access to the translation memory setup,
import, export and reorganise functions on the File menu is denied.
Read-only Access Mode
In read-only access mode, you can view the contents of the translation memory, but you cannot
modify them in any way. You do not have permission to access any of the translation memory
administration commands on the File menu, or the project management commands on the Tools
menu. You have permission to use the Project and Filter Settings command on the Settings menu,
however, the changes that you make are not saved in the translation memory setup.
Read-only access is the minimum level of access in a file-based translation memory.
11-6
TRANSLATOR’S WORKBENCH USER GUIDE
File-based Translation Memory Security
11
Protecting File-based Translation Memories
You can protect file-based translation memories by defining passwords for each level of access. To
open a password-protected translation memory and gain access to a particular set of features, you
must supply the relevant password. To define passwords for a file-based translation memory, use the
options that are available on the Access Rights tab of the Setup dialog box.
The different types of password and the levels of access they correspond to are outlined in the table
below.
Password
Access Mode
Notes
Super user
Exclusive access mode
Grants full administrative rights,
including permission to use the setup,
import, export, reorganise and
maintenance features on the File menu.
Permission to use the batch tools.
Maintenance/reorg
Exclusive access mode
Grants partial administrative rights,
including permission to use the
reorganise and maintenance features
on the File menu. Permission to use the
batch tools.
Read-write
Read-write access mode
Permission to use the batch tools and
the maintenance feature. Permission to
modify the contents of the translation
memory, excluding translation unit
system fields and units that are
protected by project passwords.
Read-only
Read-only access mode
Permission to view the contents of the
translation memory, which includes use
of the concordance feature. Does not
grant permission to modify the
contents in any way.
Project
Mixed read-write/
read-only access mode
Read-write access to unprotected
translation units; read-write access to
protected translation units that match
the current password criteria; read-only
access to protected translation units
that do not match the current password
criteria.
TRANSLATOR’S WORKBENCH USER GUIDE
11-7
11
File-based Translation Memory Security
D
V
NOTE
You can decide whether you wish to open the translation memory in exclusive or read/write
access mode with both the super user and maintenance/reorg passwords. This allows other
users to continue working while you carry out maintenance tasks. The Setup, Export, Import
and Reorganise commands are only available when you choose to open the memory in
exclusive access mode.
FOR MORE INFORMATION
C For more information about the access modes for file-based translation memories,
see “Levels of Access in File-based Translation Memories” on page 11-5.
C For more information about project passwords, see “Project Passwords” on page 11-9.
Defining Passwords
If you wish to protect your translation memory, we recommend that you always define a super user
password, and that you define this password first. The lower levels of protection are complementary,
and effective only after the super user password has been set. Passwords can be modified any time.
To define passwords for a translation memory:
11-8
1
Open the translation memory for which you want to define passwords in access exclusive
mode.
2
From the File menu, select Setup. The Setup dialog box opens.
3
Select the Access Rights tab.
TRANSLATOR’S WORKBENCH USER GUIDE
File-based Translation Memory Security
4
11
Define the required password:
C To define a super user password, type it into the Super user password box and confirm it in
the Confirm super user password box.
C To define a maintenance/reorg, read-write or read-only password, type it in the relevant
box.
C To define a project password, select an attribute, enter the password in the Passwords box
and click Add. Repeat this procedure for each attribute that you want to protect. Note that
you can apply one or more project passwords to each attribute.
5
Repeat step 4 for each password you want to set. Click OK to confirm and to close the Setup
dialog box.
Once the passwords have been defined, translation memory protection is effective immediately.
Remember to distribute passwords as necessary to users of the translation memory.
Project Passwords
You can define project passwords for each attribute field and value in the translation memory setup.
Translation units with password-protected attributes are automatically protected against
unauthorised writing.
When you open a translation memory using a project password, you have the following access rights:
C
read-write access to protected translation units that match the current password criteria
C
read-only access to protected translation units that do not match the current password criteria
C
read-write access to any unprotected translation units
C
permission to create new translation units.
With a project password, you have access to the Maintenance command on the File menu, however
you can only modify translation units to which you have read-write access. You do not have
permission to modify translation unit system fields.
The project password also allows you to use the batch tools on the Tools menu.
D
NOTE
This type of password can only be defined if a super user password has already been set. This
type of password is not supported by TM Server.
TRANSLATOR’S WORKBENCH USER GUIDE
11-9
11
Server-based Translation Memory Security
SERVER-BASED TRANSLATION MEMORY SECURITY
This section outlines the different levels of access that are available in server-based translation
memories.
Overview
All server-based translation memories must be considered within the context of the TM Server
system. To log into the system from Translator’s Workbench, you must have a valid TM Server login.
As well as granting access to the system, the login defines which translation memories you have
permission to access and the access rights you have within each translation memory. Levels of access
are expressed in terms of predefined translation memory roles. These include the Guest, Translator,
Power User and TM Administrator roles.
Logins and access rights are defined by your administrator. These tasks are carried out in the User
Manager module of SDL Trados Server Manager, the administration client for the system. Only
administrators have access to the Server Manager client.
D
NOTE
The Access Rights tab in the Setup dialog box of Translator’s Workbench allows you to define
passwords and access rights for file-based translation memories only. You cannot define access
rights for server-based translation memories in Translator’s Workbench.
TM Server Login Information
Contact your administrator for TM Server login details and information about the associated access
rights. For each translation memory that you have permission to access, find out which role you
belong to. Translation memory roles and their associated access rights are outlined in the following
section.
V
FOR MORE INFORMATION
For more information about the TM Server login and what you need to ask your administrator,
see “Access Requirements” on page 10-5.
Levels of Access in Server-based Translation Memories
For each translation memory that you have permission to access in the TM Server environment, you
may be assigned to a Guest, Translator, Power User or TM Administrator role. Each role represents
a set of user rights; each set of user rights represents the type of access that is required to carry out
tasks in a given area. For example, membership of the Translator role for a given translation memory
allows you to open the memory in read-write mode, with permission to read, modify or add content
11-10
TRANSLATOR’S WORKBENCH USER GUIDE
Server-based Translation Memory Security
11
to the memory at translation unit level. This type of access is suitable for all interactive translation
tasks.
To access a given translation memory, a user must belong to one of the translation memory roles.
Role membership is translation memory-specific: role membership in a given translation memory
does not grant access to, or rights within, any other translation memory. Furthermore, the same user
can belong to different roles in different translation memories.
The full list of translation memory roles and their associated access rights are outlined below. The
hierarchy of roles is such that each role inherits the rights that are associated with lower-level roles,
and supplements this with additional rights. TM Administrator is the most powerful role in the
hierarchy.
Role
Data Access
Feature Access
TM Administrator
Read-write access to the
contents of the
translation memory,
including translation
unit system fields.
Grants full administrative rights, including
permission to use the setup, import, export and
maintenance features on the File menu.
Permission to use the batch tools.
Power User
Read-write access to the
contents of the
translation memory,
including translation
unit system fields.
Grants partial administrative rights, with
permission to use the maintenance feature on
the File menu. Permission to use the batch
tools.
Translator
Read-write access to the
contents of the
translation memory,
excluding translation
unit system fields.
Permission to use all commands that are
available during interactive translation.
Permission to edit translation units during
concordance searches.
Guest
Read-only access to the
contents of the
translation memory.
Permission to carry out concordance searches
and to use the search commands that are
available during interactive translation. These
features do not involve modifying the contents
of the translation memory in any way.
D
NOTE
C When you access a server-based translation memory from Translator’s Workbench,
any features that you do not have permission to use are greyed out or unavailable.
C There may also be custom roles in your setup which differ from the roles described here.
TRANSLATOR’S WORKBENCH USER GUIDE
11-11
11
Access Rights Compared
ACCESS RIGHTS COMPARED
As a user in Translator’s Workbench, you may be working with both file- and server-based
translation memories. If so, it is useful to look at the correspondence between the levels of access
that are available in these two types of translation memory.
The table below shows the comparison between file- and server-based translation memories in terms
of the rights associated with access modes and translation memory roles.
11-12
Role
Access Mode
Notes
TM Administrator
Exclusive access mode
(super user password)
Grants read-write access to the contents of the
translation memory, including translation unit
system fields. Grants full administrative rights,
including permission to use the setup, import,
export, reorganise and maintenance features
on the File menu. Permission to use the batch
tools.
Power User
Exclusive access mode
(maintenance/reorg
password)
Grants read-write access to the contents of the
translation memory, including translation unit
system fields. Grants partial administrative
rights, with permission to use the reorganise
(file-based translation memories only) and
maintenance features on the File menu.
Permission to use the batch tools.
n/a
Read-write access mode
(read-write password)
Grants read-write access to the contents of the
translation memory, excluding translation unit
system fields and units that are protected by
project passwords. Permission to use
maintenance feature on the File menu and the
batch tools.
Translator
n/a
Grants read-write access to the contents of the
translation memory, excluding translation unit
system fields.
Guest
Read-only access mode
(read-only password)
Grants read-only access to the contents of the
translation memory.
TRANSLATOR’S WORKBENCH USER GUIDE
SUPPORTED LANGUAGES
This appendix covers supported languages and locales for
Translator’s Workbench.
Appendix
A
A
Supported Languages and Locales
SUPPORTED LANGUAGES AND LOCALES
Translator’s Workbench supports the widest array of languages in the translation software industry
including Eastern and Western European, bi-directional, and Asian languages.
The following table identifies the languages and locales supported by Translator’s Workbench as
source and target languages.
Language
SubLanguage
ID
Afrikaans
Default
1078
Albanian
Albania
1053
Arabic
Algeria
5121
Arabic
Bahrain
15361
Arabic
Egypt
3073
Arabic
Iraq
2049
Arabic
Jordan
11265
Arabic
Kuwait
13313
Arabic
Lebanon
12289
Arabic
Libya
4097
Arabic
Morocco
6145
Arabic
Oman
8193
Arabic
Qatar
16385
Arabic
Saudi Arabia
1025
Arabic
Syria
10241
Arabic
Tunisia
7169
Arabic
UAE
14337
Arabic
Yemen
9217
Default
1069
Armenian
Assamese
Azeri
Basque
A-2
TRANSLATOR’S WORKBENCH USER GUIDE
Supported Languages and Locales
Language
SubLanguage
ID
Bulgarian
Default
1026
Byelorussian
Default
1059
Catalan
Default
1027
Chinese
Hong Kong
3076
Chinese
PRC
2052
Chinese
Singapore
4100
Chinese
Taiwan
1028
Croatian
Croatia
1050
Czech
Czech Republic
1029
Danish
Denmark
1030
Dutch
Belgium
2067
Dutch
Netherlands
1043
English
Australia
3081
English
Bellize
10249
English
Canada
4105
English
Caribbean
9225
English
Ireland
6153
English
Jamaica
8201
English
New Zealand
5129
English
South Africa
7177
English
Trinidad
11273
English
United Kingdom
2057
English
United States
1033
Estonian
Estonia
1061
Faeroese
Faeroe Island
1080
A
Bengali
Divehi (Maldives)
TRANSLATOR’S WORKBENCH USER GUIDE
A-3
A
Supported Languages and Locales
Language
SubLanguage
ID
Farsi
Iran
1065
Finnish
Finland
1035
French
Belgium
2060
French
Canada
3084
French
France
1036
French
Luxembourg
5132
French
Switzerland
4108
Gaelic
Ireland
1084
Gaelic
Scotland
3132
German
Austria
3079
German
Germany
1031
German
Liechtenstein
5127
German
Luxembourg
4103
German
Switzerland
2055
Greek
Greece
1032
Israel
1037
Hungarian
Hungary
1038
Icelandic
Iceland
1039
Indonesian
Indonesia
1057
Italian
Italy
1040
Italian
Switzerland
2064
Japanese
Japan
1041
Georgian (Georgia)
Gujarati (India)
Hebrew
Hindi (India)
Kampuchean
Kannada (India)
A-4
TRANSLATOR’S WORKBENCH USER GUIDE
Supported Languages and Locales
Language
SubLanguage
ID
Korea
1042
Latvian-Lettish
Latvia
1062
Lithuanian
Lithuania
1063
Macedonian
Macedonia
1071
Malay
Malaysia
1086
Norwegian
Bokmal
1044
Norwegian
Nynorsk
2086
Polish
Poland
1045
Portuguese
Brazil
1046
Portuguese
Portugal
2070
A
Kashmiri
Kazakh
Konkani (India)
Korean
Kyrgyz
Malayalam
Maltese
Manipuri
Maori
Marathi (India)
Mongolian
Nepali
Northern Sotho
Oryia
Persian
Punjabi (Gurmukhi - India)
Quechua (all variants)
Rhaeto-Romance
TRANSLATOR’S WORKBENCH USER GUIDE
A-5
A
Supported Languages and Locales
Language
SubLanguage
ID
Romanian
Romania
1048
Russian
Russia
1049
Serbian-Cyrillic
Yugoslavia
3098
Serbian
Yugoslavia
2074
Slovak
Slovakia
1051
Slovenian
Slovenia
1060
Spanish
Argentina
11274
Spanish
Bolivia
16394
Spanish
Chile
13322
Spanish
Colombia
9226
Spanish
Costa Rica
5130
Spanish
Dominican Republic
7178
Spanish
Ecuador
12298
Spanish
El Salvador
17418
Spanish
Guatemala
4106
Spanish
Honduras
18442
Spanish
Mexico
2058
Spanish
Modern Sort
3082
Spanish
Nicaragua
19466
Spanish
Panama
6154
Spanish
Paraguay
15370
Spanish
Peru
10250
Sami
Sanskrit (India)
Sindhi
Sorbian
Sotho
A-6
TRANSLATOR’S WORKBENCH USER GUIDE
Supported Languages and Locales
Language
SubLanguage
ID
Spanish
Puerto Rico
23562
Spanish
Spain
1034
Spanish
Uruguay
14346
Spanish
Venezuela
8202
Swedish
Finland
2077
Swedish
Sweden
1053
Philippines
1124
Thailand
1054
Turkish
Turkey
1055
Ukrainian
Ukraine
1058
Urdu
Pakistan
1056
Vietnamese
Vietnam
1066
Welsh
Wales
2108
A
Syriac (Syria)
Tagalog
Tamil (India)
Tatar
Telugu (India)
Thai
Tsonga
Tswana
Uzbek (Cyrillic)
Uzbek (Latin)
Xhosa
Zulu
TRANSLATOR’S WORKBENCH USER GUIDE
A-7
A
Supported Languages and Locales
Two-letter Language Codes from ISO 639
A-8
Afrikaans
AF
Albanian
SQ
Arabic
AR
Armenian
HY
Azeri (Cyrillic)
AZ-LT
Azeri (Latin)
AZ-CY
Basque
EU
Bengali
BN
Bulgarian
BG
Byelorussian
BE
Catalan
CA
Chinese
ZH
Croatian
SH-HR
Czech
CS
Danish
DA
Dutch
NL
English
EN
Estonian
ET
Faeroese
FO
Farsi
FA
Finnish
FI
French
FR
Gaelic
GA
Georgian
KA
German
DE
Greek
EL
TRANSLATOR’S WORKBENCH USER GUIDE
Supported Languages and Locales
Gujarati
GU
Hebrew
HE
Hindi
HI
Hungarian
HU
Icelandic
IS
Indonesian
ID
Irish
= Gaelic (Ireland)
Italian
IT
Japanese
JA
Kampuchean
KA
Kannada
KN
Kazakh
KK
Konkani
KOK
Korean
KO
Kazakh
Laothian
KK
LO
Latvian, Lettish
LV
Lithuanian
LT
Macedonian
MK
Malay
(Brunei Darussalam)
MS-BN
Malay
(Malaysia)
MS-MY
Malayalam
MAL
Maltese
MT
Maori
MI
Marathi
MR
Mongolian
MN
Northern Sotho
NSO
TRANSLATOR’S WORKBENCH USER GUIDE
A
A-9
A
A-10
Supported Languages and Locales
Norwegian
NO
Polish
PL
Portuguese
PT
Punjabi
PA
Quechua
QU
Rhaeto-Romance
RM
Romanian
RO
Russian
RU
Sami
SE
Sanskrit
SA
Scots Gaelic
= Gaelic (Scotland)
Serbian
SH-YU
Slovak
SK
Slovenian
SL
Sotho
ST
Spanish
ES
Syriac
SYR
Swahili
SW
Swedish
SV
Tagalog
TL
Tamil
TA
Tatar
TT
Telugu
TE
Thai
TH
Tsonga
TS
Tswana
TN
Turkish
TR
Ukrainian
UK
TRANSLATOR’S WORKBENCH USER GUIDE
Supported Languages and Locales
Urdu
UR
Uzbek
UZ
Vietnamese
VI
Welsh Gaelic
= Gaelic (Wales)
Xhosa
XH
Zulu
ZU
A
Two-letter Country Codes From ISO 3166
Algeria
DZ
Argentina
AR
Australia
AU
Austria
AT
Azerbaijan
AZ
Bahrain
BH
Belgium
BE
Bolivia
BO
Brazil
BR
Canada
CA
Caribbean
CB
Chile
CL
China
CN
Colombia
CO
Costa Rica
CR
Croatia (Hrvatska)
HR
Dominican Republic
DO
Ecuador
EC
Egypt
EG
TRANSLATOR’S WORKBENCH USER GUIDE
A-11
A
A-12
Supported Languages and Locales
El Salvador
SV
Finland
FI
France
FR
Germany
DE
Guatemala
GT
Honduras
HN
Hongkong
HK
Indonesia
Iraq
ID
IQ
Ireland
IE
Israel
IL
Italy
IT
Jamaica
JM
Johab
JH
Jordan
JO
Korea
KR
Kuwait
KW
Lebanon
LB
Libyan Arab Jamahriya
LY
Liechtenstein
LI
Luxembourg
LU
Malaysia
MY
Malta
MT
Mexico
MX
Modern
EM
Moldova
MD
Morocco
MA
Netherlands
NL
TRANSLATOR’S WORKBENCH USER GUIDE
Supported Languages and Locales
New Zealand
NZ
Nicaragua
NI
Norway (Bokmal)
NO
Norway (Nynorsk)
NY
Oman
OM
Panama
PA
Paraguay
PY
Peru
PE
Philippines
PH
Portugal
PT
Puerto Rico
PR
Qatar
QA
Reunion
RE
Romania
RO
Russia
RU
Saudi Arabia
SA
Scotland
CT
Singapore
SG
South Africa
ZA
Spain
ES
Sweden
SE
Switzerland
CH
Syrian Arab Republic
SY
Taiwan
TW
Trinidad
TT
Tunisia
TN
United Arab Emirates
AE
United Kingdom
GB
TRANSLATOR’S WORKBENCH USER GUIDE
A
A-13
A
Supported Languages and Locales
United States
US
Uruguay
UY
Venezuela
VE
Vietnam
VN
Wales
WA
Yemen
YE
Unicode Enhancements in Translator’s Workbench
You can create translation memories with the newly supported languages as both source and target
languages, if the support for these languages is installed on the computer. The proper font should
be set for the target language, ideally Arial Unicode MS or where applicable Code 2000.
Here is a list of some of the benefits afforded to you now that Unicode characters are fully supported:
A-14
C
You can assign any file name containing any special character to file-based translation
memories.
C
In the Translation Memory Properties dialog box any file names or other details should display
correctly.
C
Substitutions, most specifically variables, can contain Unicode characters.
C
When exporting translation memories to version 6. x Unicode characters in source or target
segments in 8.x TMs should come out as \u… sequences in 6.x TXT files, so that they can be
correctly imported into 6.x TMs. Unicode (non-ANSI 1252 codepage) characters in text and
attribute fields will not be supported in 6.x TXT files.
C
In the Maintenance Filter dialog box, you can filter according to Unicode/non-Western/nondefault codepage data. For instance, you can filter only certain Hindi segments in a translation
memory with Hindi as target language. The same applies to Unicode characters in text or
attribute fields and even system fields such as Creation and Change User.
C
The Find and Replace option in Maintenance dialog box allows you to find and replace
Unicode only characters and it is also possible to change text and attribute fields with Unicode
data in them.
C
You can view Unicode/non-1252 characters in both translation units (TUs) and metadata
fields.
TRANSLATOR’S WORKBENCH USER GUIDE
Supported Languages and Locales
C
You can save and load constraints settings which have Unicode or non-Western file names
and/or non-Western content in both text/attribute field names and content.
C
You can use Unicode values in text and attribute fields and for applying project and filter
settings.
C
Style lists, file names and content can store non-default codepage Unicode content.
C
You can save/load project/filter settings files with Unicode/non-Western file names and/or
non-Western content in both text/attribute field names and content.
C
You can use reference file-based Concordance translation memories with Unicode file names.
The Unicode file name will display correctly in the title bar of the Concordance window.
D
NOTE
C
You can store new tag settings files with Unicode file names, descriptive names and/or
Unicode content in tags. These files, however, can only be used in SDL Trados 2007, not in
previous versions.
C
You can connect to MultiTerm termbase(s) with Unicode characters in their names.
C
You can batch-process documents with Unicode characters in their names.
C
Batch-processing and full Analyse/Translate/Cleanup roundtrips into Unicode only languages
is possible, both using interactively translated TTX files and batch-processed TTX files.
C
Terms from Unicode only languages are correctly inserted into documents using the Translate
feature.
C
Log files can contain Unicode file names, both in .csv and .log format.
C
Any concordance search strings work, even if the system default codepage is not the same as
the codepage used for the Concordance search. For instance, it is possible to, say, search for a
Greek string in Concordance with Greek as source language, even when working on an
English operating system. Also past search terms are stored correctly in the Concordance
Search History drop-down list.
C
You can edit and display any string in any language from the source/target window of a
translation unit (provided the right font settings are used). This applies to both normal and
advanced editing.
A
Server-based translation memories do not yet support Unicode names.
TRANSLATOR’S WORKBENCH USER GUIDE
A-15
A
Supported Languages and Locales
C
You can copy and paste Unicode text from any Unicode-enabled application (such as Notepad,
Word, Internet Explorer) into the Edit Translation Unit dialog box in Translator’s Workbench,
both in normal and advanced editing. You can paste Unicode text back into target applications
such as Notepad.
Unicode Enhancements in TagEditor
A-16
C
Provided the correct font is used in Translator’s Workbench, you can translate into all newly
supported languages without any problems, including Maltese. Also, it is possible to mix any
Western with Unicode-only content.
C
The codepage of files saved as target into Unicode only languages should be Unicode, even if
the input file used an ANSI codepage.
C
It is possible to save/open documents with any file name, containing any non-default
codepage string in the file name.
C
You can search and replace any Unicode/non-Western string in TTX files.
C
You can insert terms from Unicode only languages into the document in both source and
target.
C
You can place placeables with any non-Western/Unicode only content in them, e.g. variables
or such content in tags.
C
Spell checking is possible for target languages whose codepage does not match the current
system default codepage. Suggestions in those target languages are shown and replaced
correctly.
C
The message pane in TagEditor supports Unicode/non-Western content. For instance, the
new terminology verifier can report term issues also for Unicode only and other non-Western
languages.
C
You can use Unicode content in the AutoText feature which can insert Unicode/non-Western
content anywhere in the document.
TRANSLATOR’S WORKBENCH USER GUIDE
TRANSLATOR’S WORKBENCH
ERROR MESSAGES
This section provides information on how to understand and
respond to the information provided in error messages.
Each message is listed in a table with its number (if applicable)
and followed by the cause of the message and a proposed
resolution.
Appendix
B
B
Responding to Error Messages
RESPONDING TO ERROR MESSAGES
The responses listed in this document are based on the most likely causes of the error that occurred.
However, an error may occur for other unanticipated reasons and require a different response.
Contact technical support if you are unable to resolve an error with any of the suggested responses
in this document.
ERROR MESSAGES
The following sections list some of the most common errors. Information is included on possible
causes and resolution based on the most common reasons for the errors.
Error Number
Message Text
2
The system cannot find the file specified. [Drive:Path\File name]
Cause
This error message occurs whenever the operating system (Windows) cannot find a file.
Resolution
This error typically occurs when opening a translation memory. In this case it indicates that you have
moved or copied the translation memory to a new location without moving or copying all translation
memory files.
In all other cases, be sure the file you are trying to access actually exists.
B-2
TRANSLATOR’S WORKBENCH USER GUIDE
Error Messages
Error Number
Message Text
31050 – 31200
Database errors
B
Cause
Database errors occur when there is a problem with the translation memory database and its fuzzy
index files.
Resolution
Use the Reorganise method to repair the translation memory, or export it into a text file that you reimport into a new translation memory. Other error messages you may get are Invalid record
reference or Key not found. If you get either of these messages, Reorganise immediately.
Error Number
Message Text
31051
Couldn't obtain database lock. Couldn't open [file name.tmw].
Probably already open exclusively.
Cause
This error indicates that you are trying to open a translation memory that has already been opened
in exclusive mode by another user, probably your Translator's Workbench system administrator.
Exclusive mode is necessary for reorganising a translation memory and for other critical operations.
Resolution
Wait until your system administrator makes the translation memory available again to everyone. If
this is not the cause, please contact technical support.
TRANSLATOR’S WORKBENCH USER GUIDE
B-3
B
Error Messages
Error Number
Message Text
31055
Database corrupt! Run export, create a new TM and re-import
Cause
You are trying to open a translation memory database that has been corrupted, for example, due to
a power failure.
Resolution
Translator's Workbench will try to let you run a so-called "emergency export" when this error occurs.
After the export, you can create a new translation memory and re-import the exported file.
If Translator's Workbench does not offer you the "emergency export" function, please contact
technical support.
Error Number
Message Text
31101
Invalid record reference
Cause
There is a problem with the database and its fuzzy index files.
Resolution
Use the Reorganise command to repair the translation memory. Alternatively, export it into a text file
and re-import into a new translation memory.
B-4
TRANSLATOR’S WORKBENCH USER GUIDE
Error Messages
Error Number
Message Text
32000 – 32015
Matrix errors
B
Cause
Matrix errors occur when there is a problem with the translation memory database and its fuzzy
index files. This affects the fuzzy searching capabilities of Translator's Workbench and/or
MultiTerm. Matrix errors in Translator's Workbench always include the name of the file in which
the error occurred.
Resolution
Use the Reorganise command to repair the translation memory. Alternatively, export the translation
memory to a text file and re-import into a new translation memory.
Error Number
Message Text
33200
The mark for ending a subsegment is missing or damaged
Cause
This error can occur in interactive translation or during batch operations with Analyse, Translate and
Clean Up. It means that one or more characters of the <n} string (n being any number between 1
and 9) at the end of a sub-segment (index entries, footnotes) has been accidentally deleted.
Resolution
C
In interactive translation, check the end of the translation unit’s subsegments you want to save
or reopen. Every subsegment must have the delimiting mark n at its end, otherwise
Translator's Workbench is unable to process the corresponding translation unit.
TRANSLATOR’S WORKBENCH USER GUIDE
B-5
B
Error Messages
C
During batch runs, this error is non-fatal. Translator's Workbench will continue with the batch
process and add the error information to the log file and mark the problem in the affected
document with a bright green arrow. After the batch process, check the log file for the affected
document(s) and repair them as described above. After the error has been addressed, you can
run the batch process again.
Error Number
Message Text
33201
The mark for ending a translation unit is missing or damaged
Cause
This error can occur in interactive translation or during batch operations with Analyse, Translate and
Clean Up. It means that one or more characters of the <0} string at the end of the translation unit
has been accidentally deleted.
Resolution
B-6
C
In interactive translation, check the end of the translation unit. It must have the <0}
delimiting mark at its end, otherwise Translator's Workbench is unable to process it.
C
During batch runs, this error is non-fatal. Translator's Workbench will continue with the
batch process and add the error information to the log file and mark the problem in the
affected document with a bright green arrow. After the batch process, check the log file for the
affected document(s) and repair them as described above. After the error has been addressed,
you can run the batch process again.
TRANSLATOR’S WORKBENCH USER GUIDE
Error Messages
Error Number
Message Text
33202
The mark for starting a subsegment is missing or damaged
B
Cause
This error can occur in interactive translation or during batch operations with Analyse, Translate and
Clean Up. It means that one or more characters of the {n> string (n being any number between 1
and 9) at the beginning of a subsegment (index entries, footnotes) have been accidentally deleted.
Resolution
C
In interactive translation, check the beginning of the translation unit’s subsegment. Every
subsegment must have the delimiting mark {n> at its beginning, otherwise Translator's
Workbench is unable to process the corresponding translation unit.
C
During batch runs, this error is non-fatal. Translator's Workbench will continue with the
batch process and add the error information to the log file and mark the problem in the
affected document with a bright green arrow. After the batch process, check the log file for the
affected document(s) and repair them as described above. After the error has been addressed,
you can run the batch process again.
TRANSLATOR’S WORKBENCH USER GUIDE
B-7
B
Error Messages
Error Number
Message Text
33203
The mark for starting a translation unit is missing or damaged.
Cause
This error can occur in interactive translation or during batch operations with Analyse, Translate and
Clean Up. It means that one or more characters of the {0> string at the beginning of the translation
unit has been accidentally deleted.
Resolution
In interactive translation, check the beginning of the translation unit. Every translation unit must
have the delimiting mark {0> at its beginning, otherwise Translator's Workbench is unable to
process it.
During batch runs, this error is non-fatal. Translator's Workbench will continue with the batch
process and add the error information to the log file and mark the problem in the affected document
with a bright green arrow. After the batch process, check the log file for the affected document(s) and
repair them as described above. After the error has been addressed, you can run the batch process
again.
B-8
TRANSLATOR’S WORKBENCH USER GUIDE
Error Messages
Error Number
Message Text
33204
Subsegment has already been placed
B
Cause
Pressing [Alt] + [n] to place a sub-segment inside the target field (n being the number of the
subsegment you want to place), when you have already placed a subsegment with that number inside
the target field. It cannot be placed twice. Translator's Workbench displays the above error message.
Resolution
Use Show/Hide in Word to display hidden text. Delete the subsegment and place it in a different
location.
Error Number
Message Text
33205
Subsegment not found
Cause
Pressing [Alt] + [n] to place a subsegment inside the target field (n being the number of the
subsegment you want to place), when the source segment of the current translation unit does not
contain any subsegment with the number you pressed with the [Alt] key. Translator's Workbench
displays the above error message.
Resolution
It is not possible to place a subsegment that does not exist in the source segment of a translation unit.
If you want to insert, say, an extra index entry inside the target field — that is, an index entry that
does not exist in the source field — use normal Word methods.
TRANSLATOR’S WORKBENCH USER GUIDE
B-9
B
Error Messages
Error Number
Message Text
33206
The mark for delimiting source and target is missing or damaged
Cause
This error can occur in interactive translation or during batch operations with Analyse, Translate and
Clean Up. It means that one or more characters of the <}0{> string between the source and target
segment of the translation unit have been accidentally deleted.
Resolution
In interactive translation, check the string between the source and target segment of the translation
unit. It must have the delimiting mark <}0{> exactly as shown, otherwise Translator's Workbench
is unable to process it.
During batch runs, this error is non-fatal. Translator's Workbench will continue with the batch
process and add the error information to the log file and mark the problematic spot in the affected
document with a bright green arrow. After the batch process, check the log file for the affected
document(s) and repair them as described above. After the error has been addressed, you can run
the batch process again.
B-10
TRANSLATOR’S WORKBENCH USER GUIDE
Error Messages
Error Number
Message Text
50000
Invalid password
B
Cause
The password typed to access the translation memory is invalid, or the access mode (exclusive, readwrite, read-only) does not match the rights attached to your password. The translation memory
cannot be opened.
Resolution
Open the translation memory you want to access in exclusive mode using the super user password,
and verify the password settings in the Access Rights tab of the Setup dialog (File menu). Then use
these settings when opening the translation memory.
Error Number
Message Text
50001
You are not authorised to write to this TU
Cause
The operation you are trying to perform – for example, saving or a new translation unit or changing
an existing one – cannot be completed because the translation memory has been opened using a
read-only password.
Resolution
Open the translation memory in an access mode that allows saving new translation units or
changing existing ones.
TRANSLATOR’S WORKBENCH USER GUIDE
B-11
B
Error Messages
Error Number
Message Text
50003
Cannot obtain desired permissions
Cause
The necessary permissions could not be obtained while opening a translation memory.
Resolution
Modify the access rights for the translation memory you want to use. To achieve this, open the
translation memory you want to access in exclusive mode using the super user password, and verify
the password settings in the Access Rights tab of the Setup dialog box (File menu).
Error Number
Message Text
50005
This translation memory has passed its "Usable Until" expiry date.
Cause
The translation memory you want to open has passed its Usable Until date.
Resolution
Open the translation memory in exclusive mode, and change the Usable Until date in the General tab
of the Setup dialog box (File menu).
B-12
TRANSLATOR’S WORKBENCH USER GUIDE
Error Messages
Error Number
Message Text
50006
You must obtain exclusive TM access to perform this operation.
B
Cause
This error occurs when a third-party application calls a Translator's Workbench function which
requires exclusive translation memory access. Examples of such functions are Reorganise, Import,
and Export.
Resolution
Open the translation memory in exclusive access mode and try again.
Error Number
Message Text
50007
File type not supported for import.
Cause
You are using the Import command to import an unsupported file into the current translation
memory. This can occur when you save an imported file in Word as a Word document.
Resolution
When you import, be sure to use one of the file types supported by Translator's Workbench.
TRANSLATOR’S WORKBENCH USER GUIDE
B-13
B
Error Messages
Error Number
Message Text
50008
File type not supported for export.
Cause
You are using the Export command to export the current translation memory to an unsupported file
format.
Resolution
When you export, be sure to use one of the file types supported by Translator's Workbench.
Error Number
Message Text
50009
File not found: [file name].
Cause
You are trying to use a reference translation memory that does not exist for concordance searches.
Resolution
Be sure to specify either an existing reference translation memory, or none at all, when using the
concordance feature.
B-14
TRANSLATOR’S WORKBENCH USER GUIDE
Error Messages
Error Number
Message Text
50010
Error in file format: unknown statement.
B
Cause
The Workbench filter (WFS) or project (WPS) settings file you are trying to use contains illegal
expressions.
Resolution
Check the contents and syntax of the WFS/WPS file. Make sure that it complies with the Translator's
Workbench format for this type of file.
Error Number
Message Text
50011
Error in file format: illegal directive.
Cause
The Workbench filter (WFS) or project (WPS) settings file you are trying to use contains illegal fields.
Resolution
Check the contents and syntax of the WFS/WPS file. Make sure that it complies with the Translator's
Workbench format for this type of file and that they do not contain any invalid fields.
TRANSLATOR’S WORKBENCH USER GUIDE
B-15
B
Error Messages
Error Number
Message Text
50012
Format error in constraint settings file [file name].
Cause
The Workbench constraints settings (WCS) file you are trying to use contains an invalid format.
Resolution
Check the contents and syntax of the WCS file. Make sure that it complies with the Translator's
Workbench format for this file type.
Error Number
Message Text
50013
The language ID <ID> is unknown and cannot be processed.
Cause
The file you are trying to process contains one or more invalid language identifiers.
Resolution
Check the contents of the file you want to process. Make sure that it contains only valid language
identifiers.
B-16
TRANSLATOR’S WORKBENCH USER GUIDE
Error Messages
Error Number
Message Text
50014
The system field identifier <ID> is unknown and cannot be processed.
B
Cause
The file you are trying to process contains one or more invalid system fields.
Resolution
Check the contents of the file you want to process. Make sure that it contains only valid system field
labels.
Error Number
Message Text
50015
Error in time expression
Cause
The file you are trying to process contains one or more invalid time specifications.
Resolution
Check the contents of the file you want to process. Make sure that it contains only valid time
specifications.
TRANSLATOR’S WORKBENCH USER GUIDE
B-17
B
Error Messages
Error Number
Message Text
50016
Don't use ; as list separator in style name.
Cause
This message appears when Translator's Workbench detects a semicolon (;) in a style name of the
document that you are translating interactively or in batch mode. A semicolon in a style name is
invalid. Word and Translator's Workbench cannot handle style names with this character when
converting to and from RTF.
Resolution
To fix this problem, change the following Windows setting:
B-18
1
Click Start.
2
On the Settings menu, select Control Panel. The Control Panel opens.
3
Double-click the Regional Settings icon. The Regional Settings dialog box opens.
4
Click the Number tab.
5
In the List Separator text box, change the semicolon to a character of your choice,
preferably a comma.
6
Click OK to confirm these settings to dismiss the Regional Settings dialog box.
TRANSLATOR’S WORKBENCH USER GUIDE
Error Messages
Error Number
Message Text
50017
Internal parameter error/bad calling syntax
B
Cause
The syntax used to call a function in the API is invalid. Ensure you have included all necessary
parameters in the call statement.
Resolution
Check the syntax of the call and make sure it complies with the documentation of the respective API
call.
Error Number
Message Text
50018
Contents of project settings file are incompatible with the current TM
[file name].
Cause
The project settings file (WPS) you are trying to use contains settings that are not compatible with
the current translation memory setup (text and attribute fields and picklists).
Resolution
Check the contents of the WPS file. Ensure it contains settings compatible with the current
translation memory setup (check File – Setup – Fields in Translator's Workbench).
TRANSLATOR’S WORKBENCH USER GUIDE
B-19
B
Error Messages
Error Number
Message Text
50019
Contents of filter settings file are incompatible with the current TM
[file name].
Cause
The filter settings file (WFS) you are trying to use contains settings that are not compatible with the
current translation memory setup (text and attribute fields and picklists).
Resolution
Check the contents of the WFS file. Ensure it contains settings compatible with the current
translation memory setup (check File – Setup – Fields in Translator's Workbench).
Error Number
Message Text
50020
Contents of constraints settings file are incompatible with the current
TM [file name].
Cause
The constraints settings file (WCS) you are trying to use contains settings that are not compatible
with the current translation memory setup (text and attribute fields & picklists).
Resolution
Check the contents of the WCS file. Ensure it contains settings compatible with the current
translation memory setup (check File – Setup – Fields in Translator's Workbench).
B-20
TRANSLATOR’S WORKBENCH USER GUIDE
Error Messages
Error Number
Message Text
50021
The translation memory [file name] cannot be accessed because it
uses languages not selected during installation.
B
Cause
You are trying to open a translation memory with languages that are not supported by your
installation of Translator's Workbench Freelance. The Freelance version of Translator’s Workbench
supports a maximum of five languages and their sublanguages. You must select these languages
during installation. If a translation memory contains other languages, this error occurs.
Resolution
Reinstall Translator’s Workbench. During installation, be sure to choose the languages contained in
the translation memory you want to open. Alternatively, upgrade to the standard version of
Translator's Workbench which does not have any language limitations.
Error Number
Message Text
50022
This version of Workbench doesn’t support V8.0 translation
memories.
Cause
The version of Workbench must be incompatible with the translation memories created in
SDL Trados 2007.
Resolution
Upgrade your version of Workbench to SDL Trados 2007.
TRANSLATOR’S WORKBENCH USER GUIDE
B-21
B
Error Messages
Error Number
Message Text
50050
Source segment is empty!
Cause
You are attempting to save a translation unit with an empty source segment. Both source and target
segments of a translation unit must contain text.
Resolution
Before saving a translation, ensure that the source and target segments contain valid text.
Error Number
Message Text
50051
Cannot save translation unit with empty target.
Cause
You are attempting to save a translation unit with an empty target segment. Both source and target
segments of a translation unit must contain text.
Resolution
Before saving a translation, ensure that the source and target segments contain valid text.
B-22
TRANSLATOR’S WORKBENCH USER GUIDE
Error Messages
Error Number
Message Text
50052
Inconsistent data. Please reorganise the database or run an
export/import.
B
Cause
The translation memory you are using contains inconsistent data and must be reorganised or
exported and re-imported into a new translation memory.
Resolution
Use the Reorganise method to repair the translation memory. Alternatively, export the translation
memory to a text file and re-import into a new translation memory.
Error Number
Message Text
50100
Invalid parameter file [file name].
Cause
This error only occurs when using Translator's Workbench via its API. It indicates that the job file
used for one of the batch functions Analyse, Translate and Clean Up contains invalid settings or
commands.
Resolution
Check the syntax of the commands and settings used in the job file. Ensure it complies with the
specifications of the Translator's Workbench API.
TRANSLATOR’S WORKBENCH USER GUIDE
B-23
B
Error Messages
Error Number
Message Text
50101
File empty.
Cause
You are processing an empty file with one of the batch functions (Analyse, Translate and Clean Up).
Resolution
Check the files to be processed and make sure they are not empty.
Error Number
Message Text
50102
Invalid tag settings file [file name].
Cause
You are using an invalid tag settings file (INI) when processing SGML/HTML/XML documents with
the batch functions (Analyse, Translate and Clean Up).
Resolution
Make sure that the tag settings file (INI) is valid for the SGML/HTML/XML documents you want to
process. Specify the tag settings file in the Tools tab of the Translation Memory Options dialog box
(Options menu).
B-24
TRANSLATOR’S WORKBENCH USER GUIDE
Error Messages
Error Number
Message Text
50103
Unknown file format [file name].
B
Cause
You are trying to process an unsupported file format with one of the batch functions (Analyse,
Translate and Clean Up).
Resolution
Ensure that you only process file formats supported by the batch functions in Translator's
Workbench.
Error Number
Message Text
50104
Folder does not exist, was moved or renamed [folder name].
Cause
This error occurs if the folder containing the log files used during batch processing no longer exists.
Resolution
Make sure that the folder containing the log files exists, or specify a different log file.
TRANSLATOR’S WORKBENCH USER GUIDE
B-25
B
Error Messages
Error Number
Message Text
50152
MultiTerm not running.
Cause
You are using Translator's Workbench without MultiTerm.
Resolution
Translator's Workbench's active terminology recognition feature can only work if you have started
MultiTerm and opened a termbase with a fuzzy index.
If you ignore the message, Translator's Workbench assumes that you do not want to work with
MultiTerm at the moment. It maximises its source and translation memory windows, and hides the
terminology window. If you would like to start MultiTerm and use the active terminology recognition
feature (a step that we highly recommend), Translator's Workbench automatically recognises that
MultiTerm is now running and displays its terminology window.
Error Number
Message Text
50153
Timeout while communicating with MultiTerm.
Cause
This error can have the following causes:
C
You are editing a term entry and MultiTerm is therefore in edit mode. Translator's Workbench
cannot access MultiTerm while it is in edit mode and displays this error message. MultiTerm
must be in display mode for Translator's Workbench to send messages to it.
C
No termbase has been opened in MultiTerm.
Resolution
B-26
C
Finish working in MultiTerm’s edit mode and click Save to return to display mode.
C
If no termbase has been opened, switch to MultiTerm and open a termbase.
TRANSLATOR’S WORKBENCH USER GUIDE
Error Messages
Error Number
Message Text
50154
No termbase has been opened in MultiTerm.
B
Cause
Translator's Workbench cannot access the terminology stored in MultiTerm as no termbase has
been opened.
Resolution
Switch to MultiTerm and open a termbase.
Error Number
Message Text
50155
Current MultiTerm termbase has no fuzzy index.
Cause
Translator's Workbench cannot access the terminology stored in MultiTerm as no fuzzy index has
been created for the current terminology database.
Resolution
For Translator's Workbench to work correctly with MultiTerm databases, they must be available in
"fuzzy format". You must create a fuzzy index for the terminology database. To do this, select Create
Fuzzy Index from the File menu in MultiTerm. MultiTerm now works through the database and
creates fuzzy images of all its terms in all languages, adding them to neural network files that are
created in addition to your terminology database. For this reason, please make sure that you have
enough space on your hard disk before starting this process.
A message in the status bar confirms that MultiTerm is creating a fuzzy index. This can take a few
minutes. Wait until MultiTerm has finished creating the fuzzy index or the neural network may be
incomplete or even damaged. A message appears in the status bar after the fuzzy index has been
created successfully.
TRANSLATOR’S WORKBENCH USER GUIDE
B-27
B
Error Messages
Error Number
Message Text
50156
MultiTerm database too large for demo mode. Connect dongle to
parallel or USB port!
Cause
You are running Translator's Workbench in demo mode (without dongle). In demo mode,
Translator's Workbench can only access terminology databases with a maximum of 100 entries.
Resolution
Open a termbase that complies with file size restrictions in demo mode, or attach a valid dongle to
the parallel or USB port of your computer.
Error Number
Message Text
50157
Source term not found! Changed or deleted since Create Fuzzy Index.
Cause
The source term Translator's Workbench is trying to access no longer exists in the current
MultiTerm database. It has probably been deleted or renamed since the fuzzy index for the termbase
was last created.
Resolution
Switch to MultiTerm and select Create Fuzzy Index from the File menu to update the fuzzy index.
B-28
TRANSLATOR’S WORKBENCH USER GUIDE
Error Messages
Error Number
Message Text
50158
No target term available in MultiTerm entry.
B
Cause
Translator's Workbench has found a term in the sentence for which no target term exists in the
current MultiTerm entry.
Resolution
This is a non-fatal error. You can continue accessing Translator's Workbench and MultiTerm.
Error Number
Message Text
50159
No read access to target term.
Cause
Translator's Workbench has found a term in the sentence but you do not have read authorization for
the current entry the term belongs to.
Resolution
Make sure you have read access to the MultiTerm database. See the MultiTerm Administrator’s
Guide for more information on access rights.
TRANSLATOR’S WORKBENCH USER GUIDE
B-29
B
Error Messages
Error Number
Message Text
50163
Illegal index
Cause
This error can have multiple causes. The most probable one is that Translator's Workbench has
found a term in the sentence but you do not have read authorization for the current entry the term
belongs to.
Resolution
Make sure you have read access to the MultiTerm termbase.
Error Number
Message Text
50250
Invalid OLE parameter.
Cause
This error occurs when a third-party application is using Translator's Workbench via its API and
uses an invalid parameter. For instance, if the application tries to search the translation memory with
an empty string.
Resolution
Contact the vendor of the third-party application for support.
B-30
TRANSLATOR’S WORKBENCH USER GUIDE
Error Messages
Error Number
Message Text
50251
No translation memory has been opened.
B
Cause
You have no translation memory open.
Resolution
Open a translation memory.
Error Number
Message Text
50300
No previous search! Could not save translation unit. Use "Close"
without saving.
Cause
This message appears after you perform the following steps:
1
Closing the current translation memory or exiting Translator's Workbench before closing the
currently open translation unit in Word with Set/Close.
2
Re-opening a translation memory or re-starting Translator's Workbench.
Resolution
The program displays the above message when you try to save the open translation unit. To fix the
problem and save the translation unit in translation memory:
1
Close the translation unit by clicking Close.
2
Place the cursor somewhere inside the translation unit you have just closed, and click
Open/Get to re-open it.
3
Click Set/Close to save the translation unit in translation memory. If you want to go on
to the next unit immediately, click Set/Close Next Open/Get.
TRANSLATOR’S WORKBENCH USER GUIDE
B-31
B
Error Messages
Error Number
Message Text
50302
Cannot add a new translation to a TM which does not support
multiple translations.
Cause
You are trying to add a new translation for a 100% match to a translation memory that does not
support the multiple translations feature.
Resolution
Before using the Add As New Translation command, check whether the translation memory
supports it by looking at the Multiple Translations information in the Properties dialog box (File
menu).
Error Number
Message Text
50303
"Add as new translation" can only be used in case of 100% matches
or multiple translations.
Cause
This error occurs in translation memories supporting the multiple translations feature. It happens
when you try to add a new translation for the current segment but it is not an exact match or one of
several exact matches to which the multiple translations penalty has been applied.
Resolution
Before using the Add As New Translation command, be sure to check whether you can actually use
it in the current situation. For more information, refer to the Translator's Workbench
documentation.
B-32
TRANSLATOR’S WORKBENCH USER GUIDE
Error Messages
Error Number
Message Text
50400
Error in TMX error.
B
Cause
You are trying to import a TMX (Translation Memory eXchange) file whose header is not valid.
Resolution
Make sure the TMX file you are trying to import is valid and complies to level 1 or 2 of the TMX
specifications. For more information, visit the TMX web site at http://www.lisa.org/tmx.
Error Number
Message Text
50401
Error in TMX translation unit.
Cause
You are trying to import an invalid TMX (Translation Memory eXchange) containing invalid TMX
translation units.
Resolution
Make sure the TMX file you are trying to import is valid and complies to level 1 or 2 of the TMX
specifications. For more information, visit the TMX web site at http://www.lisa.org/tmx.
TRANSLATOR’S WORKBENCH USER GUIDE
B-33
B
Error Messages
Error Number
Message Text
50403
Unexpected end of file while processing TMX file.
Cause
You are trying to import a TMX (Translation Memory eXchange) file that has an unexpected end.
Resolution
Make sure the TMX file you are trying to import is valid and complies to level 1 or 2 of the TMX
specifications. For more information, visit the TMX web site at http://www.lisa.org/tmx.
Error Number
Message Text
50450
Unknown TMX error
Cause
You are trying to import an invalid TMX (Translation Memory eXchange) file.
Resolution
Make sure the TMX file you are trying to import is valid and complies to level 1 or 2 of the TMX
specifications. For more information, visit the TMX web site at http://www.lisa.org/tmx.
B-34
TRANSLATOR’S WORKBENCH USER GUIDE
Error Messages
Error Number
Message Text
no fixed number
Outdated document template (tw4win2k.dot or earlier). Please use
current version TRADOS8.dot.
B
Cause
This error often happens after installing a new maintenance release.
Resolution
Copy the template file, TRADOS8.dot, to the Template or Startup directory of Word. TRADOS8.dot
is the template file that currently ships with SDL Trados 2007. It is copied to the TT\Templates
folder during installation of SDL Trados 2007.
TRANSLATOR’S WORKBENCH USER GUIDE
B-35
B
Error Messages
Error Number
Message Text
no number
Different target in TM. Use "Get" to update document or "Set" to
update TM.
Cause
This message appears when the target segment of the currently open translation unit is not the same
as its counterpart in translation memory. In this case you can decide whether you want to use the
target segment from translation memory, update the translation memory according to the changes
in the current translation unit, or cancel without making any changes to your document or
translation memory:
Resolution
To transfer the target segment from translation memory to your document, click Get.
To update the translation memory based on the target segment in the current translation unit, click
Set/Close Next Open/Get or Set/Close.
To change neither the document nor the translation memory, click Close. This allows you to keep
the target text in your document without changing the translation unit in translation memory.
D
B-36
NOTE
If the current translation memory allows multiple translations, you can also add the changed
translation unit in your document as a new translation unit in the translation memory
TRANSLATOR’S WORKBENCH USER GUIDE
Error Messages
Error Number
Message Text
no number
New Translation Unit! Use "Set" to add it to the TM.
B
Cause
This message appears when the current translation unit does not have any counterpart in translation
memory. This happens, for example, after pre-segmenting a document using the Translate function
and then, in Word, opening a new translation unit in the pre-processed file.
Resolution
Make the desired changes, if any, to the target segment of the translation unit in Word and click
Set/Close Next Open/Get or Set/Close to save the translation unit in the document as well as in
translation memory.
TRANSLATOR’S WORKBENCH USER GUIDE
B-37
B
Error Messages
Error Number
Message Text
no number
Term recognition: known terms not displaying
Cause
After opening a new translation unit in Word, Translator's Workbench does not display known
terms in its terminology window, although the terms are definitely in the MultiTerm termbase.
Resolution
If active terminology recognition is not working properly, check the following settings in Translator's
Workbench and MultiTerm:
B-38
C
In Translator's Workbench, check the current settings for the terminology recognition
options. You define them by selecting Term Recognition Options from the Options menu. It
might be, for example, that the Minimum Match Value is set to a too strict percentage, for
example, 95%. We recommend that you work with fuzziness settings of around 70%.
Likewise, it might be that the Search Depth value is set too low, for example, 10. For mediumscale termbases, we recommend a Search Depth value of 20-40. Note that you can also set
maximum values stretching far beyond 900. Note, however, that with these high settings, the
search time of the terminology recognition takes considerably more time than with settings of,
say, 100.
C
Check the current language direction of your termbase. MultiTerm uses index fields to store
terminology in different languages. In Translator's Workbench, the language direction is more
or less fixed. An English-German Translation Memory always has English as the source
language. A MultiTerm database, on the other hand, can be multilingual. This is why, before
being able to work correctly with Translator's Workbench's terminology recognition feature,
you have to set a language direction in your termbase that reflects the direction of the current
translation memory. For example, if your current translation memory is English (UK)German, set the same language direction in the current MultiTerm database. Otherwise,
MultiTerm searches in the wrong source language (index) and hence does not find any
matching entries. You can set the language direction in your termbase on the Termbase tab of
the Term Recognition Options dialog box within Translator's Workbench.
TRANSLATOR’S WORKBENCH USER GUIDE
Error Messages
C
If you are using MultiTerm 5 as the terminology provider, it might also be that the fuzzy index
of the MultiTerm database is not current. If this is the case, Translator's Workbench's active
terminology recognition cannot find entries that you have added after creating the fuzzy index
the last time. Always remember that the fuzzy index of a MultiTerm database is static and
therefore only contains those terms that were present when you last created it. Newly created
entries are not automatically added to the fuzzy index. Therefore, you must re-create a fuzzy
index every time that you have entered a number of new entries to the MultiTerm database
and would like to include them in the automatic terminology search performed by Translator's
Workbench for each new segment. We recommend that you do this regularly, at the end of
each week, for example.
D
NOTE
B
If you are using MultiTerm iX or 7 as the terminology provider, the fuzzy index is automatically
recreated.
For MultiTerm to be able to create a fuzzy index, make sure that no translation unit is currently
open in Translator's Workbench. Alternatively, deactivate term recognition temporarily using the
Term Recognition toggle from the Options menu.
TRANSLATOR’S WORKBENCH USER GUIDE
B-39
B
Error Messages
Error Number
Message Text
no number
Translation memory too large for demo mode
Cause
You do not have a valid license for Translator's Workbench.
Resolution
To obtain the correct softkey license you should follow the instructions you received at time of
purchase.
The following restrictions apply when you run Translator's Workbench in demo mode:
B-40
C
Translation memories may only contain up to 100 translation units.
C
The Export Frequent Segments, Export Unknown Segments, Use TM from Previous Analysis
and Create Project TM options in the Analyse dialog box are not available.
TRANSLATOR’S WORKBENCH USER GUIDE
GLOSSARY
ANSI
A
ANSI (American National Standards
Institute) is a character set used by Windows.
It is a collection of special characters and
associated codes adopted by the ANSI
standards organization. The ANSI character
set includes many foreign characters, special
punctuation, and business symbols.
Access rights
The rights of a user or group of users to
access, read, or write to, a translation
memory. Access rights for file-based
translation memories are defined in
Translator’s Workbench; access rights for
server-based translation memories are
defined in SDL Trados Server Manager.
ASCII
ASCII (American Standard Code for
Information Interchange) is a character set
which represents English characters as
numbers, with each letter assigned a
number from 0 to 127. For example, the
ASCII code for uppercase M is 77. Most
computers use ASCII codes to represent
text, which makes it possible to transfer data
from one computer to another.
Alignment
Process of building a translation memory
from previously translated material.
WinAlign is the alignment tool.
Analysis
Feature in Translator’s Workbench that
allows you to assess the number of
translation matches in a document for
translation by comparing the document to
an existing translation memory.
Ancillary file
TradosTag, RTF or text-only file that is
generated during the conversion of
MIF/IASCII documents to STF using the
S-Taggers. The ancillary file contains shared
text that cannot be accessed in the STF file
but requires translation.
B
Batch processing
The practice of processing multiple files at
one time. The Analyse, Translate and Clean
Up utilities in Translator’s Workbench can
be used to process files individually or in
batches. For this reason, they are known as
batch tools.
TRANSLATOR’S WORKBENCH USER GUIDE
G-1
G
CMP file
C
File generated by the S-Tagger verification
feature. It details all errors, alerts and
warnings about tag changes in the target file.
Also known as the verifier report.
Character set
A character set is a defined list of characters
recognised by computer hardware and
software. Each character is represented by a
number.
Concordance
Feature in Translator’s Workbench that
allows you to search the translation memory
for text fragments during interactive
translation. The Concordance tab in the
Translation Memory Options dialog box in
Translator’s Workbench defines the
parameters for concordance searching.
See also “ANSI” and “ASCII”.
Character style
Font attribute (typeface, size, bold, italic) that
can be given a character style and applied to
individual or sets of characters.
In Interleaf, character style formatting can
be applied through the use of inline
components.
Customise verification
Settings that allow you to suppress certain
alerts and warnings during the verification
process. These settings are available in the
S-Taggers and in the S-Tag Verifier plug-in
in TagEditor. When you select to suppress
messages relating to a particular tag, any
alerts or warnings referring to that tag are
suppressed in the verifier report or Message
pane.
Clean Up
Feature in Translator’s Workbench that
removes source segments from translated
documents. The source segments have been
stored in the translated document during the
translation process. The clean up feature
also allows you to update the translation
memory in accordance with the latest
changes in the target files.
Client computer
Computer in a network that hosts a frontend application, which accesses a server to
obtain data (information, files, application
data). The client interface (GUI) is the point
at which the user interacts with the system.
Client/server
Computer system architecture in which
clients request a service and a server provides
that service. SDL Trados 2007 can be
deployed as a client/server system in a multiuser environment.
G-2
TRANSLATOR’S WORKBENCH USER GUIDE
D
Database server
The back end in a client/server installation of
the SDL Trados 2007. This is where all
server-based translation memories are
stored.
DBCS
Double-byte Character Set. DBCS languages
such as Japanese, Korean and Chinese
require special DBCS fonts.
G
Demo mode
External tag
Certain applications can be used in
demonstration mode when the necessary
license information is not available. When
an application is running in demo mode, file
size limitations and feature restrictions may
apply.
Tag type used in tagged text files to store
structural information. Paragraph styles,
anchored frames and tables are usually
represented as external tags. During the
translation process, external tags are treated
differently to internal tags.
DTD
Document Type Definition. An ASCII file
that defines the structure, elements and
conventions to which an SGML, XML or
HTML document must conform. The DTD
file is separate from the document it defines.
An example of a widely used DTD is the
HTML 4.0 DTD; all HTML 4.0 documents
are based on this DTD.
DTP
Desktop Publishing.
E
Excel filter
Filter component that converts Excel
documents (XLS, XLT) to and from
TradosTag (TTX). The Workbench batch
tools and the TagEditor editing environment
provide direct support for Excel documents
by automatically converting them to
TradosTag.
F
Font Mapper for FrameMaker
Font Mapper for FrameMaker facilitates
changing the fonts in FrameMaker MIF
documents translated into or from Asian
languages. Font Mapper for FrameMaker
maps, or replaces, the fonts in the original
document with fonts that you specify.
Font Mapper for Interleaf
Font Mapper for Interleaf facilitates
changing the fonts in Interleaf ASCII
documents translated into or from Japanese.
It maps, or replaces, the fonts in the original
document with fonts that you specify.
FrameMaker
FrameMaker is a powerful desktop
publishing and book-building package from
Adobe. It runs on several platforms; UNIX,
Macintosh and Windows.
See also “S-Tagger for FrameMaker”.
Extended characters
Accented letters and symbols which do not
appear in the standard ASCII character set,
for example, ‘à’ or ‘é’.
TRANSLATOR’S WORKBENCH USER GUIDE
G-3
G
Fuzzy match
One of five match types identified by
Translator’s Workbench.Indicates that a
similar, but not identical, match to the
source segment has been found in the
translation memory. You can define the
minimum match value which indicates the
minimum acceptable degree of similarity
between the source segment and the
segment found in the translation memory.
Fuzzy matches below the indicated value are
not suggested as matches.
Index marker
Index entries are stored in index markers.
The cursor is placed at the point in the text
where you want an index entry to be
referenced to and the text is typed into the
index marker. In STF files, index markers
are moved to the ends of the paragraphs they
were originally contained in.
Interleaf
A desktop publishing package from
BroadVision, which has some similar
features to FrameMaker. The STF produced
from Interleaf files is similar to the STF
produced from FrameMaker files. Interleaf
runs on several platforms; UNIX, DOS and
Windows.
H
HTML
Hypertext Markup Language. HTML is the
authoring language used to create
documents on the World Wide Web. HTML
is similar to SGML, although it is not a strict
subset. HTML defines the structure and
layout of a Web document by using a variety
of tags and attributes.
See also “S-Tagger for Interleaf”.
Internal tag
Tag type used in tagged text files to store
formatting commands that do not affect the
overall structure of the file. Character styles,
variables special characters, and nonbreaking spaces are represented as internal
tags. During the translation process, internal
tags are treated differently to external tags.
I
IASCII
Interleaf ASCII. IASCII is a text file format
which allows you to exchange information
between Interleaf and other applications. All
formatting, file and page layout is retained in
the IASCII file.
InDesign
Desktop publishing package from Adobe.
SDL Trados supports tagged text files from
InDesign 2.0 or later.
L
LAN
Local area network. A computer network that
spans a relatively small area. LAN computers
are usually linked to each other via Ethernet
connections. SDL Trados 2007 can be
deployed as a client/server system on a LAN.
See also “WAN”.
See also “Story Collectors”.
G-4
TRANSLATOR’S WORKBENCH USER GUIDE
G
License file
File that contains information about your
license. In order to run SDL Trados software
in comprehensive mode on your computer,
you must provide the necessary license
information by locating the relevant license
file or attaching a dongle to the parallel or
USB port.
Modifier key
The modifier keys are [Ctrl], [Alt] and [Shift]
or a combination of the three. When pressed
with the correct hotkey, they allow access to
a menu item or dialog box control.
MultiTerm
MultiTerm is a scalable terminology
management system that provides the end
user with access to terminology data.
MultiTerm can be used locally or, in a multiuser setup, on a LAN or WAN or online. The
main client interface for MultiTerm is called
MultiTerm Desktop.
See also “Demo mode”, “DTD”.
License Manager
This is a third party softkey license system
that supports use of the SDL Trados
products. The administrator uses the
License Manager to communicate with the
SDL FLEXlm License Server for license
management functions.
See also “Term recognition”.
MultiTerm Extract
The terminology application for extracting
terms from documents. MultiTerm Extract
extracts terms and presents them in an easyto-use interface for validation and export.
Terminology data can be exported directly
from MultiTerm Extract to local and remote
MultiTerm termbases.
M
Middleware
In a client/server architecture, the
middleware sits between the client
components and the back-end database
server. The main purpose of the middleware
is to facilitate successful communication
between the database server and its clients.
TM Server acts as the middleware in a
client/server implementation of the SDL
Trados 2007.
See also “TM Server”.
MIF
Maker Interchange Format, a text format
used by FrameMaker which allows you to
exchange information between FrameMaker
and other applications. All formatting and
page layout information is retained in the
MIF document.
O
ORG file
File containing structural information for
the conversion of STF files to original format
using the S-Taggers. The S-Taggers produce
an ORG file for each MIF/IASCII file that is
converted to STF. The ORG file is used to
convert the translated STF file back to its
original MIF/IASCII format.
TRANSLATOR’S WORKBENCH USER GUIDE
G-5
G
PerfectMatch Units (XU)
P
Page break
In Interleaf and FrameMaker, you can set up
a component/paragraph style so that it
always starts at the top of a page or always
stays with the following paragraph. Most
documents will contain some
components/paragraph styles whose
pagination attributes are overridden, for
example, when a forced page break has to be
inserted.
PageMaker
Desktop publishing package from Adobe.
SDL Trados 2007 supports tagged text files
from PageMaker version 6.5 or later.
See also “Story Collectors”.
PerfectMatch
PerfectMatch refers to the use of previously
translated documents as a type of translation
memory that allows segment matches to be
checked for context as well as content. The
PerfectMatch process compares updated
source files to old bilingual documents
rather than a translation memory. Segment
matches, known as PerfectMatch units
(XUs,) are checked for context and extracted
from the old bilingual documents and
transferred to the updated source files. This
results in a new set of bilingual documents
that have the extension *.ttx.
PerfectMatch can be applied when creating
projects in SDL Trados Synergy.
G-6
TRANSLATOR’S WORKBENCH USER GUIDE
PerfectMatch units (XUs) are translation
units that appear in your bilingual document
after having PerfectMatch applied.
PerfectMatch units represent segment
matches that come from the previous
version of the bilingual document rather
than the translation memory. Because the
PerfectMatch process includes a check for
context, XU segment matches represent
those parts of your document that typically
need no further translation or editing.
Placeable
Part of a segment that has been identified as
a non-text item in Translator’s Workbench,
for example a number or a hyperlink.
Placeables to not require translation but
must be placed in the correct location in the
target segment.
PowerPoint filter
FIlter component that converts PowerPoint
documents (PPT, PPS, POT, PPTX, PPSX,
POTX, PPSM) to and from TradosTag
(TTX). The Workbench batch tools and the
TagEditor editing environment provide
direct support for PowerPoint documents by
automatically converting them to TradosTag.
Pre-translation
Automatically inserts matches from the
translation memory into the document for
translation. This allows already translated
material be inserted before the translator
begins their tasks. Using pre-translate allows
a translator to concentrate on only new
material.
G
Public entity set
A standardised set of character entities.
Typically, a character entity represents a
special character not available in the ASCII
character set. For example, the public entity
set ISO Added Latin 1 contains
representations for all umlaut and accented
characters, as used in Western European
alphabets.
Q
QuarkXPress
Desktop publishing package from Quark.
SDL Trados 2007 supports tagged text files
from QuarkXPress version 4.1 or later.
See also “Story Collectors”.
R
Repetition match
One of five match types identified by
Translator’s Workbench. A repetition match
is defined as any match that occurs more
than once in a document for translation. The
first time a segment occurs in a document, it
is counted as a 100% match, a fuzzy match
or a no match. The next time the same
segment occurs, it is counted as a repetition
match.
RTF
Rich Text Format. This is an interchange file
format invented by Microsoft.
See also “Workbench RTF”.
S
SDL FLEXlm License Server
This is a third party application that stores all
license information. You can access and
manipulate license information using the
License Manager.
SDL Trados TM Server
Middleware component in a client/server
implementation of the SDL Trados 2007.
TM Server is responsible for all
communication between the server-based
translation memory and clients of the
system, including Translator’s Workbench
and Server Manager. Clients can
communicate with TM Server using an
intranet or an Internet connection. The
Internet connection type is only available if
TM Anywhere is installed as part of the
system.
SDL Trados Server Manager
SDL Trados Server Manager is the
administration client for a client/server
implementation of SDL Trados 2007. It
comprises two separate modules: TM
Manager and User Manager.
TM Manager is used to configure TM Server
and related components, to create serverbased translation memories, and to import
and export translation memory data. User
Manager is required for user management
and the definition of access rights within the
TM Server and – where applicable –
TeamWorks systems.
See also “TM Server”.
Server computer
A computer on which server software is
installed.
TRANSLATOR’S WORKBENCH USER GUIDE
G-7
G
SGML
Standard Generalized Markup Language, a
language used for designing tagged text
formats.
Shift-JIS
A standard for Japanese character encoding,
used mainly under Windows and
Macintosh.
Smart quotes
Curly left and right quotation marks instead
of straight quotation marks. Smart quotes
can have different formats, depending on the
language they are used in; for example,
German smart quotes are different to
English smart quotes.
Source Language
Refers to the original language a project is
written in. For example, if your project is to
translate an English manual to Spanish,
English is the source language.
Special characters
Symbols like ‘®’, ‘™’, ‘©’, as well as accented
characters such as á and ì. Special characters
and symbols must be inserted into the STF
file using the Alt keyboard sequence. They
may not be inserted using the Insert Symbol
command in Microsoft Word for Windows.
S-Tagger for FrameMaker
The conversion solution for FrameMaker. STagger for FrameMaker converts MIF files
to STF. All FrameMaker page layouts and
character formatting are preserved during
translation. S-Tagger for FrameMaker
supports MIF files from all platforms
supported by FrameMaker and from
FrameMaker versions 4.0 or later.
G-8
TRANSLATOR’S WORKBENCH USER GUIDE
S-Tagger for Interleaf
The conversion solution for Interleaf. STagger for Interleaf converts Interleaf ASCII
files to STF. All Interleaf page layouts and
character formatting are preserved during
translation. S-Tagger for Interleaf supports
IASCII files from all Interleaf platforms and
from Interleaf version 5.2 or later.
S-Tags
Brief coded statements in STF files that
represent formatting in FrameMaker and
Interleaf documents. S-Tags are divided into
external tags and internal tags.
STF file
File produced when you convert
MIF/IASCII files to STF using the
S-Taggers. Formatting from the
FrameMaker/Interleaf documents is
represented by brief coded statements
(S-Tags). STF files are translated using
Translator’s Workbench in the TagEditor or
Microsoft Word editing environments.
STF file format
When using the S-Taggers to convert
FrameMaker (MIF) and Interleaf (IASCII)
files to STF, you choose the file format of the
STF files. They can be saved in TTX
(TradosTag), RTF (Rich Text Format) or as
ANSI text.
Story Collectors
SDL Trados 2007 provides Story Collectors
for the most widely-used desktop publishing
(DTP) packages – InDesign, QuarkXPress
and PageMaker. Each Story Collector
facilitates the export of tagged text from DTP
files and the subsequent re-import of text
after translation.
G
TeamWorks Manager
T
TagEditor
The translation editor for tagged text formats
including HTML, SGML, XML, STF
(Workbench RTF and TradosTag); DTP file
formats including InDesign, QuarkXPress,
PageMaker and Ventura; and Microsoft
formats including PowerPoint and Excel.
TagEditor also includes the DTD Settings
Manager, tag verification and spelling
checker plug-ins.
Tag Settings File
Document that contains information
necessary for processing documents that
conform to a particular DTD. For example, a
tag settings file is required to process and
format HTML, SGML, and XML documents
for translation purposes. Tag settings files
(also known as initialization files) have the
extension *.ini.
Tag Settings Manager
The Tag Settings Manager is used to manage
the tag settings files that are available on
your file system. The Tag Settings Manager
provides access to the Tag Settings Wizard
where you can create and edit tag settings
files. You can access both the manager and
the wizard from TagEditor, WinAlign,
Translator’s Workbench and SDL Trados
Synergy.
Target Language
Refers to the language a project is to be
translated to. For example, if your project is
to translate a manual from English to
Spanish, Spanish is the target language.
TeamWorks Manager is an administrative
tool for the TeamWorks system that is used
to configure server components and define
system-wide settings. TeamWorks Manager
can run independently or it can be hosted
within the SDL Trados Server Manager.
Term recognition
Feature in Translator’s Workbench that
makes use of the interface between
Translator’s Workbench and MultiTerm.
When you activate term recognition, terms
stored in the selected MultiTerm termbase
are automatically suggested to you during
translation.
Termbase
Database used to store terminology and
related information.
TM Anywhere
In a client/server implementation of SDL
Trados 2007, TM Anywhere is a web server
application that enables TM Server to
communicate with Translator’s Workbench
using an Internet connection.
TM Server
Middleware component in a client/server
implementation of SDL Trados 2007. TM
Server is responsible for all communication
between the server-based translation
memory and clients of the system, including
Translator’s Workbench and SDL Trados
Server Manager. Translator’s Workbench
can communicate with TM Server using an
intranet or an Internet connection. The
Internet connection type is only available if
TM Anywhere is installed as part of the
system.
TRANSLATOR’S WORKBENCH USER GUIDE
G-9
G
TradosTag
An XML-based file format for representing
tagged text and bilingual data. TradosTag
(TTX) provides a standard method for
processing XML, HTML, SGML, PPT, XLS
and DTP file formats and replaces BIF as the
file format for bilingual documents in SDL
Trados.
TradosTag is one of the STF file format
options that you can select in the S-Taggers.
Translation memory
Translation memory provides the ability to
identify reusable content from previous
translation projects. SDL Trados translation
memory uses database technology to store
content from previous translation projects
and automatically propose suggestions to the
translator when translating new content.
The database stores segment or sentence
pairs. Each source language segment is
paired with its corresponding target
language segment.
Translator’s Workbench
Translation memory database and
management system with document
analysis, pre-translation and clean up
features. Translator's Workbench can be
used in conjunction with a variety of editing
environments including Microsoft Word
and TagEditor. Translator's Workbench is
also integrated with the MultiTerm
terminology management system for the
purposes of term recognition during
translation.
TTX
See “TradosTag”.
G-10
TRANSLATOR’S WORKBENCH USER GUIDE
V
Validation
In TagEditor, validation refers to the process
of validating an XML document after
translation using the XML Validator plug-in.
Ventura
Desktop publishing package from Corel.
SDL Trados supports tagged text files from
Ventura version 5 or later.
Verification
Refers to the comparison of tags in the target
file with tags in the source file. During and
after translation, translators should verify
that they have placed all the tags in the
translated files in the correct sequence and
position.
All tagged text files can be verified using the
verification plug-ins in TagEditor. In
addition, STF files can be verified using the
verification feature in the S-Taggers.
Verification plug-in
SDL Trados verification plug-ins provide
advanced tag verification functionality for
whole documents that have been translated
in TagEditor. Verification plug-ins include
the Generic Tag Verifier, the XML Validator
and the S-Tag Verifier.
G
X
W
WAN
Wide-area-network. A computer network
that spans a relatively large geographical
area. Typically, a WAN consists of two or
more local-area networks (LANs). The
largest WAN in existence is the Internet.
XML Validator
SDL Trados plug-in that allows you to
validate XML documents that have been
translated in TagEditor.
See also “LAN”.
Warning
Message which is generated during tag
verification in TagEditor or the S-Taggers.
Certain warnings may be suppressed during
the verification process by customising the
verifier report. Warnings identify changes in
tags which do not affect the structure of the
file, only the formatting of the text within the
file. Warnings do not prevent backward
conversion of the target file but should be
checked in order to avoid undesirable effects
in the finished document.
WinAlign
SDL Trados visual alignment tool that allows
you to create translation memory import
files from previously translated source and
target texts. WinAlign also includes the Tag
Settings Manager.
Workbench RTF
Workbench RTF documents (also referred to
as tagged RTF documents) are files that
comply with the Translator’s Workbench
standard for tagged RTF. These files contain
tags that have been marked up with the
tw4winExternal and tw4winInternal tag styles.
Workbench RTF is one of the STF file format
options that you can select in the S-Taggers.
TRANSLATOR’S WORKBENCH USER GUIDE
G-11
G
G-12
TRANSLATOR’S WORKBENCH USER GUIDE
INDEX
A
■
C
■
Abbreviation lists, translation memory 2-22
Chinese, translation memory
font translations 2-15
localising dates 2-40
segmentation rules 2-20
Access Levels, Server-based Translation Memories 11-10
Access rights
in server-based translation memories 11-10
Access Rights, Translation Memories 11-12
Active Terminology Recognition 1-12
Add TM Server Wizard 10-10
Adding
a term to MultiTerm 6-15
Alignment penalties 2-39
Analyse Command 8-7
Analyse function, overview 8-6–8-10
Anywhere, TM 10-5
Asian languages, translation memory
font translations 2-15
segmentation rules 2-20
Attribute fields, translation memory
activating 2-24–2-27
creating 2-13–2-14
defining as filters 2-26, 2-34
in import file 5-30
setup 2-12
updating 2-30–2-34
Authentication Mode 10-7
Clean Up Command 8-17
Clean Up function, Translator’s Workbench
Changed Translations options 8-19
overview 8-16
Concordance function, Translator’s Workbench
background search 2-44
displaying information 2-44
maximum number of hits 2-44
minimum match value 2-43
search 2-43, 5-4
Concordance Searching 1-4
Concordance tab 2-43
Connect Command 10-9, 10-10
Connection Settings, TM Server
modifying 10-21
overview 10-5
specifying 10-11
Connection Time-out 10-9
Connection Type, TM Server 10-5
Constraints Settings 5-13
Context TM 4-22
Context TM match units 4-22
B
■
Context TM Units
properties 4-23
protection settings 4-23
Batch processing
document analysis 8-6–8-10
See also Analyse function
Creating
Translation Memories 2-3
BIF 4-5
Create Export File dialog box 5-33
Customise Toolbar dialog box 4-19
Bilingual format, see TTX
TRANSLATOR’S WORKBENCH USER GUIDE
I-1
I
D
■
Dates
localising 2-40
Defining
Project and Filter Settings 2-24
Text Colours 2-51
Defining Passwords
file-based translation memories 11-8
Deleting Translation Units 5-4
description ofTagEditor 1-8
Document analysis, see Analyse function
Document Comments
Adding Comments to documents 4-34
Document Preparation 8-3
Filter
defining attributes as 2-26, 2-34
Filter and Project Settings, Defining 2-24
Fonts, translation memory
changing default font of source/target text 2-14–2-15
setting options 2-14–2-15
translation of source to target 2-15
Formatting
in TMX Level 2 exported units 5-33
non-translatable text 2-23
tags 4-10
Formatting, translation memory
fonts of source and target text 2-14
penalties 2-35
Double-byte languages, translation memory
segmentation rules 2-20
Fuzzy Matching 1-4
E
■
Fuzzy terminology recognition
setting options 6-10
Editing Environments 1-8
G
■
Editing Translation Units 5-4
Error Messages A-1
Excel documents
previewing in TagEditor 4-30
support in TagEditor 4-3
Expand Segment command 3-20, 4-41
Export Formats 5-33
Export function
export formats 5-33
exporting TMX Level 2 format 5-33
inverting translation memory 5-33
translation memories 5-31
Exporting Frequent Segments and Unknown Segments 8-9
F
■
Fields tab, translation memory setup
activating fields 2-24–2-27
attribute fields 2-12, 2-13
setting options 2-11–2-18
text fields 2-12–2-13
File Formats, Supported 1-10
File-based Translation Memories
Access Rights 11-7
I-2
Defining Passwords 11-8
File-Based Translation Memory
Security 11-5
TRANSLATOR’S WORKBENCH USER GUIDE
Fuzzy matching
maximum number of hits 2-29
minimum match value 2-29
General tab, translation memory
setting options 2-29–2-34
translation memory setup 2-9
Generic Tag Verifier plug-in 7-8
Graphics
displaying placeholders in Word 3-21
Greek, translation memory
font translations 2-15
H
■
HTML documents
during translation 4-14
handling multiple internal tags 4-15
HTTP Protocol 10-11
I
■I
M
■
IBM Translation Manager 5-30
Machine translation systems
penalties 2-39
Import function, Translator’s Workbench
import modes 5-27
importing TMX Level 2 format 5-25
importing WinAlign export file 5-25
inverting translation memory 5-33
setting options 5-27–5-30
Installation, Translator’s Workbench
of additional languages 2-5
Internet Connection, TM Server 10-5
Intranet connection, TM Server 10-5
Maintenance Command 5-9
Maintenance function, Translator’s Workbench
examples of 5-19
Managing
TM Servers 10-20
Measurements, localisation of 2-42
Message filter plug-ins
overview 7-22
Message pane in TagEditor 7-20
Messages toolbar in TagEditor 7-21
J
■
Japanese, translation memory
font translations 2-15
localising dates 2-40
segmentation rules 2-20
K
■
Korean, translation memory
segmentation rules 2-20
L
■
Multilanguage support in Windows 2-5
Multiple Translations 2-7
MultiTerm 1-12
about 6-2
adding a term 6-15
batch translations 8-15
MultiTerm 7 6-2
and Translator’s Workbench 6-6
remote termbases 6-5
term recognition window 6-11
MultiTerm 7 with Translator’s Workbench 6-5
N
■
Neural network, Translator’s Workbench 5-27
files created 2-4
Non-printing characters 3-12
Language Support 1-14
Non-translatable Paragraphs dialog box 3-9
Language, translation memory
installing additional languages 2-5
inverting source and target 5-31, 5-33
Non-translatable Text tab 2-23, 3-10
Licence Restrictions
TM Server 10-8
Logging In to TM Server 10-14
Login Details, TM Server 10-7
modifying 10-21
supplying 10-12
Non-translatable text, see Text non-translatable
Numbers, localisation of 2-41
O
■
OpenType Layout Tables 1-14
Login, TM Server 10-7
Logos 5-30
TRANSLATOR’S WORKBENCH USER GUIDE
I-3
I
P
■
R
■
Passwords
in TM Server 10-22
Reviewing documents
in TagEditor 4-32
Penalties, translation memory
Alignment Penalty 2-39
attribute differences 2-36
Attribute Differences Penalty 2-36
Formatting Differences Penalty 2-35
Machine Translation Penalty 2-39
Placeable Differences Penalty 2-37
setting options 2-35–2-39
reviewing translation projects 4-32
Placeables
translation memory penalties 2-37–2-38
Russian, translation memory
font translations 2-15
S
■
SDL Trados Terminology Verifier 7-32
Plug-ins
dialog box 7-3
Security, Translation Memories 11-3
Port Number
TM Anywhere server 10-12
Segment Unknown Sentences option 8-15
PowerPoint and Excel Documents 8-3
Segmentation rules, translation memory
changing 2-22
double-byte languages 2-20
setting options 2-20
PowerPoint documents
previewing in TagEditor 4-30
support in TagEditor 4-3
Segment delimiters 3-11, 3-21
Segmentation Rules 2-19
Pre-translating Documents 8-11
Selecting
Translation Memory 10-16
Previewing
Excel and PowerPoint documents in TagEditor 4-30
Server-Based Translation Memories
in Translator’s Workbench 10-2
Project and Filter Settings, Defining 2-24
Server-based Translation Memories
access levels 11-10
address 10-18
how to access 10-9
security 11-10
Preparing your Document 8-3
Project attributes, Translator’s Workbench
defining different 2-36
merging 2-34
setting 2-11–2-13
Project Settings, Translator’s Workbench 2-24, 2-30
Protocol
accessing the TM Anywhere server 10-11
Q
■
Quick Reference
commands 3-12
Server-based translation memories
access rights 11-10
characteristics of 1-6
Setting Up
Terminology Recognition 6-5
Setup dialog box, translation memory
setting options 2-8–2-23
SharingTranslation Memory Settings 2-52
Source Language, Translation Memory
setting option 2-3
Source language, translation memory
setting option 2-5
Spelling checker plug-ins
settings 7-5
WinterTree 7-4
Word 7-4
Spelling checkers in TagEditor
Word 7-6
I-4
TRANSLATOR’S WORKBENCH USER GUIDE
I
SSL (Secure Sockets Layer) 10-11
STF Documents 8-3
Strip TW4Win Styles option 2-46
Substitution Localisation tab, translation memory
setting options 2-40
Substitutions tab, translation memory setup
setting options 2-16–2-40
Supported File Formats 1-10
Supported Languages and Locales A-2
Unicode-only A-8
Switching between Translation Memories 10-5
System fields, translation memory 2-6
setting options 2-3, 2-11
Systran 5-30
T
■
Tag Settings file 4-18
Tag Verification
segment level 4-21
Tag verification
document level 7-7
messages 7-19
process 7-11
segment level 7-7
using the message pane 7-21
TagEditor 1-8
annotations and comments 8-15
copy source on no match 4-12
editing environment 4-2
overview 4-2
previewing documents 4-30
protected tags 4-10
reviewing documents 4-25
spelling checkers 7-4
Tags toolbar 4-11
translation workflow 4-7
user interface language 4-12
TagEditor plug-ins
Generic Tag Verifier 7-8
message filters 7-22
overview 7-2
spelling checkers 7-4
third-party plug-ins 7-2
verification 7-7
XML Validator 7-9
Tags in TagEditor
tag types 4-8
overview 4-11
Tags, in TagEditor
tag display 4-9
tag protection 4-10
tag verification 4-11
Target Language, Translation Memory
setting option 2-3
Target language, translation memory
setting option 2-5
TCP Protocol 10-11
Term Recognition Options, Translator’s Workbench
setting parameters 6-10
Terminology Recognition
overview 6-3
Terminology recognition 6-11
setting up 6-5
Terminology Verifier 7-32
Text Colours 3-7
Text Colours, defining 2-51
Text fields, translation memory 2-12
activating 2-24–2-27
creating 2-12–2-13
in import file 5-30
updating 2-30–2-34
Text, non-translatable
external character styles 3-10
format of 2-23
internal character styles 3-10
using paragraph styles to exclude paragraphs 3-8
Time, localisation of 2-41
TM Anywhere 10-5
TM Server
access requirements 10-5
licence restrictions 10-8
login 10-7
TM Server Login 10-7
TM Servers
Managing 10-20
TMX Level 2 format
exporting 5-33
formatting support 5-33
importing 5-25
Toolbars
Translator’s Workbench 3-18
Tools tab, Translator’s Workbench
setting options 2-46
Trados Authentication 10-7
Trados menu
in Word 3-20
Tags toolbar
customising 4-18
inserting tags and special characters 4-17
TRANSLATOR’S WORKBENCH USER GUIDE
I-5
I
Trados7.dot 3-3, 3-4
TRADOStag 4-5
TradosTag
Bilingual File Format 1-8
TradosTag Viewer
activating 9-5
deactivating 9-11
TRADOStag Viewer plug-in
style sheets 9-3
TradosTag Viewer plug-in 4-32, 9-2
custom style sheets 9-4
default style sheets 9-3
overview 9-2
preview translated documents 9-2
selecting a style sheet 9-6
setting colour and fonts 9-8
source, target, bilingual file preview 9-9
Trados-Word interface 3-3
Translate Command 8-12
Translate function
Segment Unknown Sentences option 8-15
Translate Terms options 8-15
Update Changed Translations options 8-14–8-15
Translation Memories
Access Rights 11-12
Creating 2-3
server-based 10-2
switching between 10-5
Translation Memory 1-3
address 10-18
exporting 5-31–5-33
importing 5-25–5-31
inverting 5-33
managing 5-3
Security 11-3
Selecting 10-16
setting languages 2-3
substitution localisation 2-40
types of 1-6
Translation memory
concordance 2-43–2-45
configuration of 2-8–2-23
copying an existing 2-4, 2-7
creation options 2-5–2-7
document analysis 8-6–8-10
fields (text and attribute) 2-8–2-11
file naming 2-4
files created 2-4
fonts 2-14–2-15
fuzzy matching 2-29–2-30
general options 2-9
importing 2-7
merging 2-34, 5-27
moving 2-4
I-6
TRANSLATOR’S WORKBENCH USER GUIDE
multilingual target languages 2-5
penalties 2-35–2-39
searching 2-29–2-30, 2-43–2-45
segmentation rules 2-20
switches (TM) 2-30
system fields 2-3, 2-6
updating 2-30–2-34
variables, non-translatable 2-16–2-18
Translation Memory Filters dialog box 2-26
Translation Memory Options 2-28, 8-5
Translation Memory Roles 11-10
Translation Memory Security
server-based 11-10
Translation Memory Settings, Sharing 2-52
Translation tools
TagEditor 4-2
Translation Units
Editing and Deleting 5-4
Translation units 2-19
effect of importing on existing 5-29
import mode, size of 5-27
merging of project attributes 2-34
Translator’s Workbench
copy source on no match 3-6
creating multiple translations 3-6
non-translatable text 3-8
segment delimiters 3-11
translated text colours 3-7
user interface language 3-6
Translator’s Workbench toolbar 3-18
in TagEditor 4-39
in Word 3-18
TTX
cleaning up TTX documents 8-16
TU Comments
Adding Comments to TUs 4-34
tw4Win styles, removing 2-46
U
■
Unicode-only languages 1-14
Unicode-Only Languages, Supported A-8
User interface language
TagEditor 4-12
Translator’s Workbench 3-6
I
V
■
X
■
Variables, non-translatable 2-16
creating new list of ??–2-18
localisation of 2-40, 2-40–2-42
XML Validator Filter plug-in
defining settings 7-22, 7-32
Verification messages in TagEditor 7-19
XUs in TagEditor 4-22
XML Validator plug-in 7-9
Verification plug-ins
defining settings 7-12
properties pages 7-12
tag verification process 7-11
Verification, Tags 4-11
W
■
WinAlign
alignment penalties 2-39
creating translation memory import file 2-7
importing translation memory 5-25
Windows
multilanguage support 2-5
Windows Authentication 10-7
windows in Translator’s Workbench
Concordance window 3-19
WinterTree spelling checker plug-in
language support 7-4
properties 7-6
Word
annotations 8-15
comments 8-15
editing environment 3-2
interface with Translator’s Workbench 3-3
manually preparing 3-3
Trados-Word interface 3-2
Workbench RTF files 2-30
Word spelling checker plug-in 7-4
Workbench menu
in TagEditor 4-41
Workbench RTF
Insert Blank after Tag option 2-30
WYSIWYG
in TagEditor 4-10
in the TradosTag Viewer plug-in 9-2
TRANSLATOR’S WORKBENCH USER GUIDE
I-7
I
I-8
TRANSLATOR’S WORKBENCH USER GUIDE