1
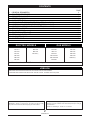
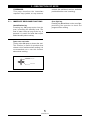
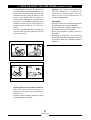
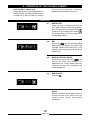
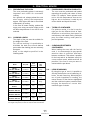
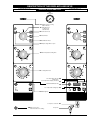
USER'S MANUAL
COMBINATION OVEN
WITH STEAM GENERATOR
M/X VERSION
EN
Technical service
00000000rev00
16 • DETTAGLI
OPERATIVI
CONTENTS
1 •
2 •
3 •
4 •
5 •
6 •
7 •
8 •
9 •
10 •
11 •
12 •
13 •
14 •
PAGE
3
4
5
6
7
8
9
10
11
12
13
13
14
15
GENERAL REMINDERS
POINTS TO REMEMBER
DESCRIPTION OF KEYS
STARTING COOKING
OVEN OPERATION
COOKING WITH THE CORE PROBE ( VERSION X ONLY)
HINTS ON USING THE CORE PROBE (VERSION X ONLY)
OPERATION OF THE HOLDING CABINET (MG A.... ONLY)
PRACTICAL ADVICE
DAILY CLEANING
ROUTINE MAINTENANCE
DESCALING THE BOILER
MAJOR SERVICING
WHAT TO DO IF...
ELECTRIC MODELS
ME 106
GAS MODELS
ME C24
MG 106
MG C20
ME 110
ME S40
MG A06
MG S24
ME 210
ME C40
MG 110
MG C24
ME 211
ME 227(1)
MG A10
MG S40
ME S20
MG 210/211
MG C40
ME C20
MG A21/A22
MG 227(1)
ME S24
MG S20
(1) All versions of model M. 227 . have two independent ovens.
VERSION
M Standard electromechanical devices with manual controls and humidifier.
X Standard electromechanical devices with manual controls, humidifier and core probe.
The manufacturer accepts no liability for any inaccuracies in this manual
attributable to printing or copying errors. We reserve the right to modify
our products as we deem fit, without impairing their basic features.
The reproduction or copying of any part of this manual by any means
whatsoever is strictly forbidden unless authorized previously in writing by
the manufacturer.
donadini & c. advertising © - 016.38.122 - 16.02.2000
2
00000000rev00
1 • GENERAL REMINDERS
Repairs may become necessary over
time; these and all major servicing
operations must be entrusted
exclusively to a Lainox technician or a
Lainox authorized service agent.
1.1
1.2
1.3
3N
TYP. VE 106 "X"
2000
NR xxxxxxxxxx
AC
400
V
50 Hz
8
• Carefully read the directions given in this
manual; they contain important information
on safety during installation, operation and
maintenance.
Keep the manual in a safe place for
future consultation!
IPX 5
• This appliance must be put only to the use
for which it is specifically intended, i.e.
cooking foods. Any other type of use is
improper and therefore dangerous.
- 98
LX TYP. VG 110 "P"
2000
AC 230 V
kPa
150 - 500
kW
TYP.
NR xxxxxxxxxx
1.00 kW
kPa
50 - 500
• Only trained kitchen staff should be
allowed to use the appliance.
A1
1.4
• The oven must not be left unattended
during operation.
IT
1.5
• There are surfaces of the oven that
become hot during operation. Take care!
IPX 5
1.6
• Ask the installer for information on correct
operation and use of the water softener;
incorrect or incomplete regeneration of the
resins will result in inadequately treated
water, which could damage the oven.
1.7
• Should it become necessary to call out a
service technician, all essential
identification details of the appliance are
shown on the data plate.
B21
P mbar
20; 28-30/37
8; 20
0085
1.8
• In the event of technical assistance being
required, the trouble must be described
in as much detail as possible, so that a
service technician will be able straight
away to understand the nature of the
problem.
1.9
• The room in which the oven is to operate
must be well ventilated!
1.10 • In the event of breakdown or faulty
operation, switch off the oven
immediately!
3
00000000rev00
2 • POINTS TO REMEMBER
2.1
• Before any food is cooked in a new oven,
the interior must be thoroughly cleaned
(see the “Daily Cleaning” heading).
2.2
• At the end of the working day, clean the
oven thoroughly inside and out; this will
ensure smooth operation of the appliance
and prolong its useful life.
2.3
• Do not use high pressure water jets
when cleaning the oven!
2.4
• For daily cleaning, use non-corrosive
products (alkali based) suitable for the
purpose. Abrasive materials and products
should not be used as they will damage the
surfaces.
2.5
• Always switch off the appliance when work
is finished, and shut off all energy supplies
(electricity, water, and gas if connected).
2.6
• Avoid any operation that might cause
cooking salt to be deposited on the steel
surfaces of the oven; if salt is accidentally
spilled, rinse off immediately and
thoroughly.
2.7
• After steam cooking, open the door
carefully to avoid being hit by the rush of
residual steam escaping from the oven.
Failure to observe this warning may be
dangerous for the operator.
2.8
• To ensure safe operation of the oven do
not obstruct the vents or any other
opening in the casing!
2.9
• To ensure long term efficiency and
reliability of the oven, major servicing
should be carried out at least once a
year. With this in mind, customers are
recommended to sign a service
agreement.
Failure to observe basic safety
guidelines may jeopardize the smooth
operation of the oven and expose the
operator to serious danger!
The manufacturer accepts no liability if
the original function of the oven is
altered or there is tampering or failure
to observe the instructions given in the
manuals.
4
00000000rev00
3 • DESCRIPTION OF KEYS
FOREWORD
This page describes the immediate
response keys (which, at any moment,
activate the additional services available,
provided that the oven is working).
3.1 • IMMEDIATE RESPONSE FUNCTIONS
Oven light key.
Pressing key 29 switches on the oven light,
permitting the operator to check the
progress of the cooking.
Humidification key.
Pressing key 38 sprays water into the
oven, increasing the humidity level. The
flow of water lasts as long as the key is
pressed. It is useful for foods that require
added humidity when cooking.
Open oven vent valve.
Turning valve 39 opens or closes the vent.
This function is useful for products that
release a lot of moisture when cooking. It is
recommended not to use this function
when steam cooking.
Vent open
Vent closed
5
00000000rev00
4 • STARTING COOKING
OPERATIONS
4.1
• SELECT
Turn knob 41 to select the cooking mode:
convection 42, steam 43, combination 44.
4.4 • END OF COOKING
If infinite time [
] has been selected,
switch off the oven manually using key 41
for setting the cooking mode.
If a cooking time or core probe temperature
has been entered, a beep will be generated
when the time expires or the temperature
has been reached, to indicate that cooking
has terminated and the oven has switched
itself off. To interrupt the signal, simply
open the oven door.
Remove the food from the oven, following
the directions given under paragraph 2.7 of
the “Points to remember” heading.
∞
4.2 • SET
Set the cooking temperature with knob 18.
4.3 • SETTING - START
Set the cooking time with knob 21.
At this point the oven begins cooking.
Or
you can set the cooking temperature
regulated by the core probe in the product:
- press key 46, to activate the function;
- press keys 23, to set the required
temperature, which will appear on the
display.
At this point the oven begins cooking.
GAS MODELS ONLY
(MG 106, MG A06, MG 110, MG A10,
MG 210/211, MG A21/A22 AND MG 227)
When key 40 lights up, this means that the
burners are inhibited. Press the key to
reset ignition.
6
00000000rev00
5 • OVEN OPERATION
OPERATIONS
5.1
• MAIN
SWITCH
AND
KNOB
ALLOWING
SELECTION
OF
COOKING MODE AND COOLING
WITH OVEN DOOR OPEN
To switch on the oven turn the knob 41
onto the required cooking mode:
5.3
∞
42 convection
43 steam
∞
44 combination
The indicator light above knob 41 comes on
to show that the oven is powered up.
To cool the oven quickly, open the door
and turn the knob onto the symbol 45. This
activates the fan, which rapidly lowers the
temperature in the oven. This function can
be used when the next product to be cooked
requires a much lower oven temperature.
5.2
• COOKING TIME SETTING KNOB
Use knob 21 to set the required cooking
time. When cooking is not controlled by time,
].
position the knob on infinite [
The oven will not come into operation until
this final setting has been made.
If a set cooking time has been selected the
oven will switch itself off when the time
elapses and emit a beep; this can be
interrupted either by opening the door or by
switching off the oven. Whereas, if infinite
], the oven must
time has been selected [
be switched off manually, by returning the
knob to the zero position.
When the indicator is alight, the oven is in
operation.
GAS MODELS ONLY
(MG 106, MG A06, MG 110, MG A10,
MG 210/211, MG A21/A22 AND MG 227)
When key 40 lights up, this means that the
burners are inhibited. Press the key to reset
ignition.
• TEMPERATURE SETTING KNOB
Use knob 18 to set the preheat temperature
with the oven empty, or the required cooking
temperature.
When the set temperature is reached in the
oven, the indicator light located near the
knob will go out. The temperature in the
oven is shown on the thermometer above
the cooking mode selector.
The light indicates the operation of the
thermostat control:
if the indicator is alight, the heating elements
or burners are OFF;
if the indicator is not alight, the heating
elements or burners are OFF.
7
00000000rev00
6 • COOKING WITH THE CORE PROBE (version X only)
OPERATIONS
Warning
When cooking with this accessory, the
timer function can not be used!
1•
2•
3•
4•
5•
Changing the set value during cooking
If the value set at the start of cooking
needs to be changed (increased or
decreased), proceed as follows:
8 • Press and hold key [ + ] 23 for at least 2
seconds if the value needs to be
increased, or key [ - ] 23 if it needs to be
decreased;
9 • Release the key as soon as the required
temperature appears on the display;
10 • After a few seconds, the display will revert
automatically to the actual core
temperature.
Plug the probe connector into the panel
socket (36). Insert the probe into the food
(see also illustrations in the next heading).
Select the cooking mode, as described in
previous headings;
Set the required oven temperature;
Press key 46 to activate the function;
Set the core temperature using the keys
23; the selected temperature will remain in
the display for a few seconds. Once this
time has elapsed, the same display will
show the actual core temperature.
As soon as the temperature at the core of
the product reaches the selected value the
oven will switch itself off and emit a beep,
which can be interrupted either by opening
the door or by switching off at the controls.
When using the core probe, make certain it
is properly connected to the panel.
When the core probe is not being used,
replace the probe in its case and make
sure the safety cap is fitted correctly.
Displaying the set time during cooking
If the set core temperature needs to be
checked during cooking, proceed as
follows:
6 • Press momentarily any one of the keys 23;
7 • The set temperature value will appear in
the display for approximately 3 seconds,
after which the actual temperature at the
core of the product returns automatically.
8
00000000rev00
7 • HINTS ON USING THE CORE PROBE (version X only)
Optional: On request and without any
specific adaptation, it is possible to
connect the needle probe to the front
panel to control the temperature of
vacuum-packed foods.
In cooking with this device, the position of
the core probe is extremely important. The
probe must be positioned from the top
downwards at the centre of gravity of the
food to cook and be fully inserted. In
pieces whose thickness is less than twice
the probe, it is inserted horizontally to the
tabletop so that the tip of the probe is
anyhow in the middle of the food (see
figure).
It is also recommended that the probe be
inserted with the food positioned at the
centre of the oven.
NO
YES
NO
YES
Advantages
• Improves control over the cooking process,
eliminating the risk of loss and waste;
• Permits accurate cooking irrespective of
the quality or mass of the product;
• Saves time because cooking control is
automatic;
• Guarantees hygiene; with precision
monitoring of the core temperature, there is
no need for food to be handled, poked or
prodded.
Cooking with the core probe is ideal for:
• large items that require cooking in a
particular way at the core (roast-beef,
salmon, etc.);
• cooking vacuum-packed products (using
the needle probe, optional).
9
00000000rev00
8 • OPERATION OF THE HOLDING CABINET
that per mits maintaining a constant
temperature of between 50 and 75 °C.
Note: For MG A.. models only.
These appliances are also equipped with a
holding cabinet; the compartment beneath
is fitted with a door and electric heating
OPERATIONS
8.1 • SWITCH ON
When the oven is powered up with the
main switch upstream from the appliance,
the LED comes on associated with key
.
To switch on the cabinet press the key
.
The display shows the actual temperature
in the holding cabinet.
8.2 • SET
Using keys
set the required holding
temperature. The display will indicate the
selected temperature blinking for a few
seconds, then returning to show the actual
temperature.
8.3 • DISPLAY THE SET VALUE
Briefly press one of the keys
: the
display will show the previously set
temperature for a few seconds and then
automatically go back to showing the
actual temperature.
8.4 • SWITCH OFF
Press key
.
Advice
Food can of course only be kept warm for a
limited period of time, which must not
exceed current health and hygiene
regulations.
10
00000000rev00
9 • PRACTICAL ADVICE
9.1 • PREHEATING THE OVEN
The oven preheating phase is extremely
important and useful for successful
cooking.
As a general rule, always preheat the oven
when empty, setting the temperature
approx. 20% higher than that to be utilized
subsequently in cooking.
In the case of steam cooking, preheat the
empty oven using convection mode as this
will allow temperatures of over 100°C to be
selected.
9.3 • FROZEN/DEEP-FROZEN PRODUCTS
The oven must be preheated and loaded
respecting the quality and nature of these
foods. For example, frozen spinach must
not be hit with temperatures that are too
high as, due to its nature, it could dry out
on the outside and impair the result.
9.4 • TYPES OF CONTAINER
For optimum results, it is vital to use the
right pan for the different kinds of food:
aluminium or aluminium plate pans for
confectionery and baked foods, perforated
pans for steam cooking, mesh pans for
pre-fried potatoes.
9.2 • COOKING LOADS
The depth of the pan must be suitable for
the height of the food.
For uniform cooking it is preferable to
distribute the load over several shallow
pans rather than loading just one extremely
deep pan.
Keep to the weights specified in the
following table:
Model
No. pans
Load
per pan
Maximum
oven
load
ME 106.
MG 106. / MG A06.
6 x GN 1/1
4 kg
24 kg
ME 110.
MG 110. / MG A10.
10 x GN 1/1
4 kg
40 kg
ME 210.
MG 210. / MG A21.
10 x GN 2/1
8 kg
80 kg
ME 211.
MG 211. / MG A22.
20 x GN 1/1
4 kg
80 kg
ME 227.
MG 227.
2 x 8 x GN 2/1
8 kg
2 x 64 kg
ME S20. / ME C20.
MG S20. / MG C20.
20 x GN 1/1
4 kg
80 kg
ME S24. / ME C24.
MG S24. / MG C24.
12 x GN 2/1
24 x GN 1/1
8 kg
4 kg
96 kg
ME S40. / ME C40.
MG S40. / MG C40.
20 x GN 2/1
40 x GN 1/1
8 kg
4 kg
160 kg
9.5 • CLEARANCE BETWEEN
CONTAINERS
When loading the oven with the food to
cook, it is recommended to pay special
attention there is sufficient clearance
between containers. This makes it possible
for the heat and air to distribute evenly for
a more uniform result, which would not be
possible if the food in one pan were in
contact with the pan above.
9.6 • LESS SEASONING
By using this type of oven it is possible to
virtually eliminate the use of seasoning, oil,
butter, fat and flavouring. Minimizing the
use of such ingredients in cooking, the
natural flavours of the food are highlighted
and the nutritional content remains intact,
bringing the benefits of a more dietconscious type of cuisine.
Note: When loading the oven you should clearly consider not only
the weight of the product, but also its size, firmness and thickness.
11
00000000rev00
10 • DAILY CLEANING
10.1 • THOROUGH CLEANING ...
... is a prerequisite for faultless cooking
and better yields:
• the food’s own flavour remains unchanged;
• during operation, there are no fumes
caused by previous remains of food that
burn;
• energy savings;
• less maintenance work and a longer
service life;
• in addition, the simplicity of the procedure
means that a thorough clean can be
carried out in just a few minutes:
- 5 minutes approximately to spray clean
- 10 minutes steam cycle
- rinsing
- drying
10.2 • WARNING
Never use direct or high-pressure jets of
water to clean the outside of the oven.
Never use corrosive and/or abrasive
substances on steel surfaces, and avoid
scouring or scrubbing with steel wool or
wire brush, as irreparable damage could
occur. Similarly, aggressive detergents of
non-alkaline formulation containing high
percentages of sodium and ammonia can
soon damage the seals, jeopardizing oven
efficiency and operation.
The outside of the oven is washed with a
sponge and warm water with an ordinary
detergent suited to the purpose.
10.3 • CLEANING THE OVEN ...
... at the end of work, proceed as
follows:
1 • with the mode selector positioned on
cooling with the door open (45), allow the
oven to cool down to approximately
60 °C. If the oven is cold, preheat the
chamber
with
steam
up
to
60 °C;
2 • remove any cooking spills, using a spatula
that will not scratch the steel surface;
3 • spray the inside with a proprietary oven
cleaner. Use a non-corrosive alkaline
product;
4 • close the door and allow the chemical to
act for the time indicated by the
manufacturer (generally between 5 and 10
minutes);
5 • switch on the oven, in steam mode, for 4 to
10 minutes. Switch off the appliance
completely and open the oven door slowly;
6 • rinse the oven thoroughly with plenty of
clean water and wipe the door seals with a
sponge. The use of a hand-held shower
(optional) is recommended;
7 • switch on again, and select a convection
cycle of about 5 minutes duration;
8 • stop and shut off all utilities (electricity,
water and gas, if connected).
Leave the door slightly ajar when the
appliance is not in use.
12
00000000rev00
11 • ROUTINE MAINTENANCE
11.1 • PERIODICALLY ...
... the deflector and pan racks should be
cleaned as required.
In this connection, proceed as follows:
• Stop and shut off all utilities (electrical
power supply, water, and gas if connected);
• take out the pan racks;
• unscrew the deflector screws with the right
sized screwdriver;
• remove the deflector and wash thoroughly
under running water or in a dishwasher;
• for best results when washing and rinsing
the oven, the use of a hand-held shower
(optional) is recommended;
• dry with a clean cloth;
• refit the deflector and secure in place with
the two screws.
11.2 • PROLONGED IDLE PERIODS
If the oven is to stand idle for any length of
time (e.g. holidays or seasonal closing) it
must be cleaned thoroughly, leaving no
traces of food or dir t. Leave the door
slightly ajar so that air can circulate inside
the oven. Be absolutely certain to shut off
all utilities (electrical power supply, water,
and gas if connected). For added care after
cleaning, the exter nal surfaces can be
protected by applying a proprietary metal
polish.
12 • DESCALING THE BOILER
To maintain the appliance in optimum
working condition, the boiler should be
descaled after every 200 hours operation
at least. If this operation is not carried out
at the prescr ibed inter vals, the
performance of the oven will be noticeably
affected. In this event, descale the boiler
without delay before too much damage is
done.
The operation of descaling the steam
generator should normally be carried out in
the mor ning, before r unning nor mal
cooking cycles, with the appliance
unheated and already clean (see the
“Daily cleaning” heading). The frequency of
this operation depends on the hardness of
the water used in the boiler and the
number of hours operation.
The formation of scale will fur up the
steam g enerator and ultimately
jeopardize its smooth operation!
OPERATIONS
3 • After approximately 5 minutes, remove the
cap “A”.
4 • Pour in the descaler (the dilution per litre, if
necessary, should be done according to
the manufacturer’s instructions) taking into
account the boiler capacity (see table on
page 14).
12.1 • PUTTING IN THE DESCALER
1 • Shut off the softened water with the tap
upstream, which supplies the boiler and
humidifier.
2 • Switch on the oven with the main switch,
turning the cooking mode selector (41)
onto convection (42). Wait for the water in
the boiler to be completely drained and
check water comes out of the drain pipe.
13
00000000rev00
12 • DESCALING THE BOILER
OPERATIONS
Models
Litres
Models
Litres
ME 106.
3.3
MG C24.
11
MG 106.
9
ME 210.
14
MG A06.
9
ME 211.
14
ME 110.
9
MG 210.
14
MG 110.
9
MG 211.
14
MG A10.
9
MG A21.
14
ME S20.
14
MG A22.
14
14
11
ME S40.
21
ME C40.
21
MG C20.
11
MG S40.
29
ME S24.
14
MG C40.
29
ME C24.
14
ME 227.
9+9
MG S24.
11
MG 227.
9+9
,
ME C20.
MG S20.
12.3 • RINSE CYCLE
9 • After this time, switch the oven on in steam
mode (43). The boiler will empty; check
that the boiler drains freely, otherwise
contact a Lainox service technician as the
drain outlet may be blocked, in which case
the boiler requires professional attention.
10• Set a temperature of 100 °C (18) and a
time of 30 min (21).
This cycle serves to clean the boiler and
the steam distribution system of the more
stubborn particles of scale.
It is recommended to rinse the boiler at
least twice.
A
Warning:
This operation should only be carried
out under strict supervision by the
operator!
The operator must meticulously follow
the directions for the product being
used as regards safety precautions
(face-mask, gloves, etc.)!
5 • Close cap “A”.
12.2 • DESCALING ACTION
6 • Turn on the water tap. The boiler fills to
capacity with water.
7 • Wait for approximately 5 minutes for the
boiler to fill.
8 • Switch off the appliance and leave it to
stand so that the descaling agent acts for
the time indicated by the manufacturer,
generally at least 2 hours.
13 • MAJOR SERVICING
13.1 • To ensure correct and safe operation, the
oven must be inspected and serviced at
least once a year by a Lainox technician or
authorized service agent.
13.2 • With this in mind, customers are
recommended to sign a service
agreement.
14
00000000rev00
14 • WHAT TO DO IF...
This heading gives a summary of the faults
that can be remedied by the user, or of
situations that do not jeopardize safety.
WARNING FOR GAS MODELS
(MG 20, MG 24 and MG 40)
Gas appliances are fitted with ignition
devices incorporating an automatic reset
function. If the burner fails to light, the
temperature in the oven will not rise; it is
therefore necessary to open the door, keep
it open for 60 sec., then close it again. This
simple remedy will reset the ignition. If the
fault persists, contact a Lainox technician
or authorized service agent.
14.1 • ... the power indicator does not light up
when the cooking mode selector is turned.
Check that the isolating switch between
the appliance and the electrical power
supply has been turned on, and in the case
of gas models, that the gas shutoff valve is
open.
14.2 • ... no steam is generated in the oven
when steam cooking mode has been
selected. Check that the water shutoff
valve is open, and in the case of gas
models, that the gas shutoff valve is open.
14.3 • ... the convection system does not work,
the oven does not heat up
after selecting and switching on. Check
that the door is properly shut.
14.4 • CORE PROBE FAULT INDICATION
If, when using the core probe, the [ err ]
message appears on the display (25),
check that the connector is plugged
properly into the panel socket. If the
message continues to be displayed,
contact a Lainox technician or authorized
service agent.
The oven can still be used without the core
probe.
WARNING FOR GAS MODELS
(MG 106, MG A06, MG 110, MG A10,
MG 210/211, MG A21/A22 AND MG 227)
Gas appliances are fitted with ignition
devices incorporating a manual reset
function. If the burner fails to light, the
temperature in the oven will not rise, and
the key (40) lights up. Press the key. This
simple remedy will reset the ignition. If the
fault persists, contact a Lainox technician
or authorized service agent.
If, after carefully carrying out these
checks, the appliance still does not
function properly, call a Lainox
technician or authorized service agent.
Note: When contacting Lainox service
technicians, try to explain the fault in as
much detail as possible, referring all the
information
indicated
on
the
identification data plate (see page 3).
15
00000000rev00
NOTES
16
00000000rev00
DESCRIPTION OF THE DISPLAYS AND KEYS
VERSION M
DISPLAYS, KNOBS AND KEYS
Oven
thermometer
200
150
250
300
100
50
˚C
350
valve for cooking
39 Butterfly
cabinet exhaust
switch and
41 Main
cooking mode
selection knob
42 Convection mode
43 Steam mode
44 Combination mode
45 Rapid cooling with door open
18 Oven temperature setting knob
21 Cooking timer knob
46
Core temperature function
activation key
Core temperature display (actual/set)
22
Manual humidification key
38
Core temperature setting keys
23
29 Oven light key
Core probe connection
for gas ovens:
40 Only
Button for burners re-starting
Core probe
36
VERSION X