1
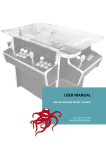
SCORPION XG-1 USER MANUAL Copyright © 2013 - Digital Systems Design CONTENTS PACKAGE CONTENTS SCORPION XG-1 OVERVIEW SCORPION XG-1 FEATURES CONNECTION TO PC KEYMAPPING USING ARCADE EMULATORS TROUBLESHOOTING PACKAGE CONTENTS Thank you for purchasing the SCORPION XG-1 arcade controller for PC, designed and manufactured in the UK by Digital Systems Design. Although you will be eager to get it up and running, we strongly recommend reading the ‘Connection to PC ’ section to avoid any problems with compatibility with Accessibility Functions and Hotkey features. In the shipping carton, you should find the following items: 1 x Scorpion XG-1 Controller Unit 1 x USB A to B Connecting cable 4 x Rubber Adhesive Mounting Feet 1 x Pop n Pop PC CD-ROM Software 1 x Operations Manual If any of the above items are missing from you package, please contact support@digitalsystemsdesign.co.uk to have the missing item(s) replaced. Note: Please DO NOT use any abrasive cleaning utensils or ammonia-based liquids on your controller as this may lead to permanent damage. SCORPION XG-1 OVERVIEW Your Scorpion XG-1 Controller is designed to be used as an arcade-style controller, used in conjunction with games software and emulation software that utilizes keyboard inputs for control. Traditionally, keyboards do not give the ‘feel’ of playing arcade games, and it is not possible to recreate ‘combo’ moves as easily as it would be using actual arcade controls, but using the Scorpion XG-1 controller, this is all made much simpler. The controller acts as a keyboard emulator, converting the signals from the arcade controls directly into keyboard inputs, which are then sent via the USB bus direct to your computer. USB keyboard data is structured differently to PS2 data, in that the data pipe, can only handle a limited number of simultaneous key presses, which can result in lost or missing keystrokes, or ghosting. Using a unique keymapping set, this problem is overcome on the Scorpion XG-1 controller, where the keymap structure is programmed so that combo moves are not affected by USB restrictions. The controller is fully HID compatible as a USB keyboard device, so that no drivers are required for users with Operating Systems from Windows 2000 onwards. SCORPION XG-1 FEATURES High Quality Arcade Joysticks The Scorpion XG-1 Controller uses actual arcade joysticks which are 4-way and 8way compatible, High Quality Arcade Buttons The Scorpion XG-1 Controller features actual arcade buttons and microswitches, as used in our own arcade game cabinets. USB Plug & Play The Scorpion XG-1 incorporates USB technology, to allow plug and play operation in PC and Mac computers. The use of the USB bus allows for hot swapping of devices so that there is no need to power down the computer before plugging in or removing the controller. 15 Bit Digital Input Using a 15-bit keymap, the Scorpion XG-2 allows for more buttons and joystick inputs than most other single player controllers allow, giving unprecedented control of your emulation system, direct from your controller. CONNECTION TO PC/MAC Connecting to a PC or Mac computer is made very simple with the Scorpion XG-2 Controller. Simply plug the USB cable into the rear of the controller and then connect the other end of the cable directly to your computer system. On connecting your controller to your PC for the first time, you will see the ‘Found New Hardware’ connection notification, in the bottom right hand corner of your primary display (fig 1). Your PC will detect that it is a standard Human Interface Device (HID) and will allocate it the correct driver, in this case, that of a USB keyboard. Once the device is recognized the following notification will be displayed: Once the connection notification message disappears, your controller is ready for use. The controller will send the appropriate keyboard signals to your computer that correspond to the arcade controls on the panel. After the first successful installation of your controller, you will not see these messages again on successive installations. When using your controller with games and applications, remember, the controller functions essentially as a USB keyboard, so make sure you select the keyboard option in your game controller selection menu in your software (do not select Joystick unless you are using one of those in addition to your Scorpion controller). STICKY KEYS Sticky Keys is a Windows accessibility function, that allows for certain keystroke combinations to be accessed by only pressing one key at a time. The normal key sequence that activates the Sticky Keys menu is by pressing the SHIFT key 5 times in rapid succession, and this will bring up the following info box: As the Scorpion (and other controllers) utilize the SHIFT key for gameplay, it is necessary to disable this feature for use with PC gameplay. The Sticky Keys menu can be brought up in one of 2 ways: 1 – Pressing the SHIFT key, 5 times in rapid succession, and then Left Click on the ‘Settings’ tab. 2 – START > CONTROL PANEL > ACCESSIBILITY OPTIONS When the menu comes up, click on the SETTINGS tab, which brings up the Sticky Keys Settings sub-menu. Ensure that the ‘Use Shortcut’ checkbox is cleared, and that should prevent the menu being activated when the SHIFT button is activated via the controller, then Left Click on the ‘OK’ tab which will take you back to the Accessibility Options main menu. Left Click on the ‘Apply’ tab and then you are complete. GRAPHICS CONTROLLER HOTKEYS Certain graphics controllers allow for screen rotation and flipping within their controller settings; some of these are activated by default, and some need to be selected in the graphics controller advanced menu tabs. Some of these functions are activated using combinations of special function keys, eg CRTL, ALT, SHIFT etc, and if they are enabled, you may find that your screen inadvertently rotates in one direction or another. This is a potential issue associated with all keyboard emulator types, but can be easily modified. There are several ways to access the Graphics Hotkey Menus, but this is a simple way: Right click on the Windows Desktop area (ensure that you are just looking at the background image on the main screen and that no programs are filling the screen area). Left Click on the ‘Properties’ tab in the sub-menu – this will bring up the ‘Display Properties’ menu. Left Click on the ‘Settings’ tab – this will bring up the main display control menu. Left Click on the ‘Advanced’ tab – this will bring up your Display Controller options menu. Now you need to locate the menu which controls the screen rotation options; for ATI controllers, there is usually a ‘Rotation’ tab to click on, and Intel controllers usually have a ‘Hotkeys’ tab. Ensure that all ‘Hotkey’ activation boxes are unchecked, save your changes and exit back to your desktop environment. KEYMAPPING The following table shows the pre-programmed keycodes that are built into your Scorpion XG-2 controller circuit board: Connector Pin Keycode Function Wiring CN 1 - Pin 1 CN 1 - Pin 2 CN 1 - Pin 3 CN 1 - Pin 4 CN 1 - Pin 5 CN 1 - Pin 6 CN 1 - Pin 7 CN 1 - Pin 8 CN 1 - Pin 9 CN 1- Pin 10 N/A TAB Numpad 8 Numpad 6 Numpad 2 Numpad 4 Enter C Left Control N/A GND TAB/ UI MENU P1 – UP P1 – RIGHT P1 – DOWN P1 – LEFT FUNCTION/ UI SELECT P1 – BUTTON 4 P1 - BUTTON 1 BLACK RED/BLACK WHITE/BLUE WHITE/GREEN WHITE/BLACK WHITE/RED RED/YELLOW WHITE/PINK WHITE/GREY CN 2 - Pin 1 CN 2 - Pin 2 CN 2 - Pin 3 CN 2 - Pin 4 CN 2 - Pin 5 CN 2 - Pin 6 CN 2 - Pin 7 CN 2 - Pin 8 CN 2 - Pin 9 CN 2 - Pin 10 N/A TAB Numpad 8 Numpad 6 Numpad 2 Numpad 4 Enter C Left Control N/A GND TAB/ UI MENU P1 – UP P1 – RIGHT P1 – DOWN P1 – LEFT FUNCTION/ UI SELECT P1 – BUTTON 4 P1 - BUTTON 1 GND BLACK RED/BLACK WHITE/BLUE WHITE/GREEN WHITE/BLACK WHITE/RED RED/YELLOW WHITE/PINK WHITE/GREY BLACK CN 3 - Pin 1 CN 3 - Pin 2 CN 3 - Pin 3 CN 3 - Pin 4 CN 3 - Pin 5 CN 3 - Pin 6 CN 3 - Pin 7 CN 3 - Pin 8 CN 3 - Pin 9 CN 3- Pin 10 N/A Left Alt 3 Left Shift Escape Z Spacebar 1 N/A N/A GND P1 - BUTTON 2 COIN 1 P1 - BUTTON 5 FUNCTION/ UI EXIT P1 - BUTTON 6 P1 - BUTTON 3 START 1 N/A GND BLACK WHITE/ORANGE PURPLE WHITE/PURPLE PINK WHITE/YELLOW WHITE/BROWN WHITE N/A BLACK CN 4 - Pin 1 CN 4 - Pin 2 CN 4 - Pin 3 CN 4 - Pin 4 CN 4 - Pin 5 CN 4 - Pin 6 CN 4 - Pin 7 CN 4 - Pin 8 CN 4 - Pin 9 CN 4 - Pin 10 N/A Left Alt 3 Left Shift Escape Z Spacebar 1 N/A N/A GND P1 - BUTTON 2 COIN 1 P1 - BUTTON 5 FUNCTION/ UI EXIT P1 - BUTTON 6 P1 - BUTTON 3 START 1 N/A GND BLACK WHITE/ORANGE PURPLE WHITE/PURPLE PINK WHITE/YELLOW WHITE/BROWN WHITE N/A BLACK The above table is correct with Jumper J1 in place – all factory units will ship in this configuration. USING ARCADE EMULATORS The Scorpion XG-1 Controller was designed to function with arcade emulators such as MAME ™, and to that end, it is essentially a Plug & Play unit. However, the preprogrammed keymapping codes do not correspond with the original MAME ™ keycodes, due to the requirements of the USB Keyboard design structure. The MAME ™ control options can be reprogrammed using the MAME ™ User Interface Menu – normally accessed using the TAB key, which then takes you into a series of submenus where you can change the User Interface keys to match your controller, and then you can change the Player Controls keys to those of your controller. Once programmed into MAME ™, under normal circumstances, these will remain until you change them. However if data is corrupted, MAME ™ can default back to the original settings and you have to reprogram the key settings again which can be frustrating. However, there is a much quicker way to do this, using the Controller Config options in MAME ™ and other emulators. Configuration files have been prepared for you, to allow MAME ™ to load with a default keymap which corresponds to your controller each time it loads. One of these files is for basic use, where you are using the controller purely for joystick and button use in your games, and another enhanced configuration file has been prepared so that analogue controls (Steering Inputs, Pedals, Analogue Joysticks) can be controlled by your Scorpion XG-2 Controller: scorpionxg.cfg scorpionxgplus.cfg - Standard Configuration File Enhanced Configuration File Both of these files are available via e-mail: support@digitalsystemsdesign.co.uk or directly for download on the website: www.digitalsystemsdesign.co.uk Controller configuration files should be put into the ctrlr subdirectory of the MAME ™ software folder – eg: C:\mame\ctrlr\scorpionxg.cfg When using MAME ™ in DOS mode, the controller config file can be enabled using the standard controller selection – eg: mame puckman -ctrlr scorpionxg If you are using a Front End to interface with MAME ™, then this is usually added in the emulator configuration folder of your front end software. For example, using mamewah, the config data is in the following file: C:\mamewah\config\mame\mame.ini The same text can be inserted into the emulator command line option, in the Execution Settings section, along with your other variables – eg: emulator_commandline C:\mame\mame.exe [game] -skip_gameinfo -ctrlr -scorpionxg USING ARCADE EMULATORS(continued) If you wish to use multiple controllers on the same PC system, you can take advantage of the multi-keyboard function that is available in MAME; you won’t be able to use the automapping which is available using the scorpionxg.cfg file, but you can manually map MAME to both keyboards, providing you use the following argument during the MAME launch command: -multikeyboard TROUBLESHOOTING In the unlikely event that you encounter a problem with your Scorpion XG-1 Controller, you can carry out the following checks: Check the security of your USB Cable – if in doubt try an alternative cable Check that your PC software is functioning correctly – you can check the controller output by opening up Word or Notepad software to see if the Controller is outputting keystroke data. Alternatively you can load the Key This software which will identify all keys being pressed at any time. Check the USB connectivity with your PC’s operating system in the following way: Click START > CONTROL PANEL - then double-click on the ‘System’ tab Click on the ‘Hardware’ Tab - then click on ‘Device Manager’ Expand the ‘Human Interface Devices’ list by clicking on the ‘+’ symbol as shown below: Then Left Click on the USB Human Interface Device Item and Right Click – select ‘Properties’ from the drop-down menu and you should get a display as show below if your PC has recognized the controller and it is functioning correctly: In the event that you cannot locate your problem, please feel free to contact technical support via e-mail at: support@digitalsystemsdesign.co.uk