1
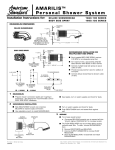
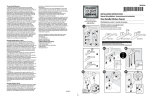
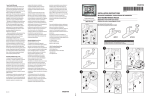
MT036C ® HAND-HELD PULSATION SHOWERS INSTALLATION INSTRUCTIONS MODEL 3980 MODEL 3992 OR 52710 MODEL 3985 Hand-held Pulsation head and gasket only. Hand-held Pulsation head, double spiral hose with gaskets vacuum breaker and 30" slide bar. THIS BAR IS NOT A GRAB BAR. DO NOT USE FOR SUPPORT. Hand-held Pulsation head, white vinyl hose, shower arm diverter, vacuum breaker, and showerhead holder. CAUTION: do not use flat gasket when flow restrictor is used --flow restrictor serves as gasket. FLOW RESTRICTOR ➤ MODEL 3991 Consists of all parts in Model 3989, plus a shower arm diverter. Install it between the shower arm and showerhead. ➤ MODEL 3989 Hand-held Pulsation head, double spiral hose with gaskets, two swivel wall brackets and vacuum breaker FLAT GASKET See Installation instructions continued on following page. CAUTION: Do not connect hand-held shower unit directly to the tub drop in a tub shower installation, excessive back pressure will result in shared water between the hand-held unit and the showerhead. TO INSTALL WALL BRACKETS: Models using wall brackets are furnished with two. One is used to mount the Pulsation head in a fixed position for a standing shower. The other can be used as a holder above the tub, within easy reach for a seated shower. The standard distance above the floor for the upper bracket is six feet; however, this can be varied to suit the comfort of the user. Mount the lower one within easy reach from a sitting position in the tub and high enough to clear the rim. Mark the screw hole positions and drill 1/4" holes to fit the screw anchors furnished. Vacuum Breaker must be installed more than 2" above rim of tub. STATIONARY SHOWERHEAD NOT FURNISHED TO INSTALL SLIDE BAR: Mount vertically with the lower end 54" above the floor, or in a position to suit the comfort of the user. Mark the screw hole positions and drill 1/4" holes to fit the screw anchors furnished. THIS BAR IS NOT A GRAB BAR. DO NOT USE FOR SUPPORT. TO INSTALL PULSATION SHOWERHEAD HOLDER: Remove the showerhead. If the installation is on a flat wall, remove the shower arm flange. On walls offset by tile, leave the flange on the arm. Use plumbers putty in the cavity around the shower arm. Apply the two-sided adhesive pad to the back of the holder, either side up, just above the opening. Remove outer protective paper. Press and work the holder over the shower arm. This is an interference fit on the arm and it is a tight fit over the thread. Press it against the wall to seal. Install diverter and showerhead as shown. Tighten all joints. Trim edges of adhesive pad. 91869 ADHESIVE PAD ➤ BACK VIEW OF SHOWERHEAD HOLDER HELPLINE: Call our toll free Helpline number, (800) 289-6636; for answers to any product, installation, replacement parts, or warranty questions. ® MT036C APR 98 25300 Al Moen Drive, North Olmsted, OH 44070 © Moen Incorporated, 1998 Printed in U.S.A.