1
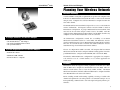
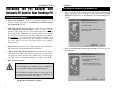
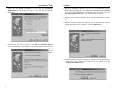
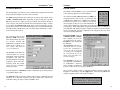
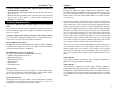
Instant WirelessTM Series
P C I Adapter
Use this Guide to install the:
WDT11
User Guide
COPYRIGHT & TRADEMARKS
Copyright © 2001 Linksys, All Rights Reserved. Instant Wireless™ is a registered trademark of Linksys. Microsoft, Windows, and the Windows logo are registered trademarks
of Microsoft Corporation. All other trademarks and brand names are the property of their
respective proprietors.
LIMITED WARRANTY
Linksys guarantees that every Instant Wireless™ Network PC Card and PCI Adapter is
free from physical defects in material and workmanship under normal use for one year
from the date of purchase. If these products prove defective during this warranty period,
call Linksys Customer Support in order to obtain a Return Authorization Number. BE
SURE TO HAVE YOUR PROOF OF PURCHASE AND A BARCODE FROM THE PRODUCT'S PACKAGING ON HAND WHEN CALLING. RETURN REQUESTS CANNOT BE
PROCESSED WITHOUT PROOF OF PURCHASE. When returning a product, mark the
Return Authorization Number clearly on the outside of the package and include your
original proof of purchase. All customers located outside of the United States of America
and Canada shall be held responsible for shipping and handling charges.
IN NO EVENT SHALL LINKSYS’ LIABILITY EXCEED THE PRICE PAID FOR THE PRODUCT FROM DIRECT, INDIRECT, SPECIAL, INCIDENTAL, OR CONSEQUENTIAL DAMAGES RESULTING FROM THE USE OF THE PRODUCT, ITS ACCOMPANYING SOFTWARE, OR ITS DOCUMENTATION. LINKSYS DOES NOT OFFER REFUNDS FOR ANY
PRODUCT. Linksys makes no warranty or representation, expressed, implied, or statutory, with respect to its products or the contents or use of this documentation and all
accompanying software, and specifically disclaims its quality, performance, merchantability, or fitness for any particular purpose. Linksys reserves the right to revise or
update its products, software, or documentation without obligation to notify any individual or entity. Please direct all inquiries to:
Linksys P.O. Box 18558, Irvine, CA 92623.
FCC STATEMENT
These products have been tested and comply with the specifications for a Class B digital device, pursuant to Part 15 of the FCC Rules. These limits are designed to provide
reasonable protection against harmful interference in a residential installation. This
equipment generates, uses, and can radiate radio frequency energy and, if not installed
and used according to the instructions, may cause harmful interference to radio communications. However, there is no guarantee that interference will not occur in a particular installation. If this equipment does cause harmful interference to radio or television
reception, which is found by turning the equipment off and on, the user is encouraged to
try to correct the interference by one or more of the following measures:
•
•
•
•
Reorient or relocate the receiving antenna
Increase the separation between the equipment or device
Connect the equipment to an outlet other than the receiver’s
Consult a dealer or an experienced radio/TV technician for assistance
FCC Radiation Exposure Statement
This equipment complies with FCC radiation exposure limits set forth
for an uncontrolled environment. This equipment should be installed and operated
with minimum distance 20cm between the radiator and your body.
UG-WDT11-041002 BW
Instant WirelessTM Series
Network PC Card and PCI Adapter
Table of Contents
Introduction
The Instant WirelessTM Network PC Card and PCI Adapter
Features
Package Contents for the PCI Adapter
System Requirements for the PCI Adapter
1
1
1
2
2
Planning Your Wireless Network
Network Topology
Roaming
3
3
3
Installing the PCI Adapter and Network PC Card in Your Desktop PC 4
Installing the PCI Adapter
4
Installing the PCI Drivers for Windows 98
5
Installing the PCI Drivers for Windows ME
8
Installing the PCI Drivers for Windows NT
10
Installing the PCI Drivers for Windows 2000
21
Installing the PCI Drivers for Windows XP
24
Configuring the Network PC Card
Configuring the Network PC Card for Windows 98, and ME
Configuring the Network PC Card for Windows NT
Configuring the Network PC Card for Windows 2000
26
26
31
38
Installing Network Protocols
Installing Network Protocols for Windows 98, and ME
40
40
Configuration Utility
Installing the Configuration Utility
Ad-Hoc versus Infrastructure Mode
Infrastructure Mode
Ad-Hoc Mode
Configuring the Network PC Card with the Configuration Utility
42
42
45
46
48
51
Troubleshooting
Common Problems and Solutions
Frequently Asked Questions
55
55
56
Appendix
Specifications for the PCI Adapter
Environmental Information for the PCI Adapter
Warranty Information
Contact Information
60
60
60
61
62
Instant WirelessTM Series
Network PC Card and PCI Adapter
Introduction
The Instant WirelessTM Network PC Card and PCI Adapter
Put the “mobile” back into mobile computing with the Linksys Instant
Wireless ™ Network PC Card and PCI Adapter! Whether you’re at your desk
or in the boardroom, the Linksys Instant Wireless™ Network PC Card and PCI
Adapter allow you to share printers, files, and more anywhere within your wireless LAN infrastructure, increasing your productivity and keeping you “in
touch.”
The Instant Wireless™ Network PC Card and PCI Adapter gives you the freedom to work your way, from where you want, letting you take full advantage of
your notebook PC’s portability, while providing you with access to all your network resources. A high-powered built-in diversity antenna means that you’re
covered—at a distance of up to 457 meters. Compatible with Windows 98, ME,
NT 4.0 and 2000, the Instant Wireless™ Network PC Card and PCI Adapter
from Linksys are true necessities for all your wireless PC applications.
Features
•
•
•
•
•
•
•
•
•
•
•
•
11 Mbps High-Speed Transfer Rate
Interoperable with IEEE 802.11b (DSSS) 2.4GHz-compliant Equipment
Plug-and-Play Operation Provides Easy Setup
Utilizes Intersil HFA3841/HFA3842 chip sets
Advanced Power Management Features Conserve Valuable Notebook PC
Battery Life
Direct Sequence Spread Spectrum Compatible to Prevent Lost Connections
Rugged Metal Design with Integrated Antenna
Compatible with Windows 98, Millennium, NT 4.0 (SP 6.0 and higher),
2000, and XP
Works with All Standard Internet Applications
Capable of up to 128-Bit WEP Encryption
Free Technical Support—24 Hours a Day, 7 Days a Week
Full 1-Year Warranty
1
Instant WirelessTM Series
Network PC Card and PCI Adapter
Planning Your Wireless Network
Network Topology
A wireless LAN is exactly like a regular LAN, except that each computer in the
LAN uses an Instant Wireless™ Network PC Card to connect to the network
using no wires. Computers in a wireless LAN must be configured to share the
same radio channel.
Pac
Package Contents for the PCI Adapter
• One Instant WirelessTM PCI Adapter
• One Setup CD-ROM with User Guide
• One Quick Installation
System Requirements for the PCI Adapter
• Pentium 90 or Faster
The Instant Wireless™ Network PC Card provides access to a wired LAN for
wireless workstations. An integrated wireless and wired LAN is called an
Infrastructure configuration. A group of Instant Wireless™ Network PC Card
users and an Access Point compose a Basic Service Set (BSS). Each PC
equipped with an Instant Wireless™ Network PC Card in a BSS can talk to any
computer in a wired LAN infrastructure via the Access Point.
An infrastructure configuration extends the accessibility of an Instant
Wireless™ Network PC Card PC to a wired LAN, and doubles the effective
wireless transmission range for two Instant Wireless™ Network PC Card PCs.
Since the Access Point is able to forward data within its BSS, the effective
transmission range in an infrastructure LAN is doubled.
The use of a unique ID in a BSS is essential. All computers that have Instant
Wireless™ Network PC Cards configured without roaming options in an independent BSS must be configured with a BSS ID (that is used in the BSS).
• Minimum 16MB of RAM
• PCI Local Bus 2.1 compliant
The Wireless LAN Infrastructure configuration is appropriate for enterprisescale wireless access to a central database, or as a wireless application for
mobile users.
Roaming
Infrastructure mode also supports roaming capabilities for mobile users. More
than one BSS can be configured as an Extended Service Set (ESS). This continuous network allows users to roam freely within an ESS. All Instant
Wireless™ Network PC Card PCs within one ESS must be configured with the
same ESS ID and use the same radio channel.
Before enabling an ESS with roaming capability, selecting a feasible radio
channel and optimum Access Point position is recommended. Proper Access
Point positioning combined with a clear radio signal will greatly enhance performance.
2
3
Instant WirelessTM Series
Installing the PCI Adapter and
Network PC Card in Your Desktop PC
Installing the PCI Adapter
PCI Adapter
Installing the PCI Drivers for Windows 98
1. Once you boot up your PC, Windows 98 will automatically identify the PCI
Adapter and prompt you to install the necessary driver. Insert the Setup
Utility CD (included) into your CD-ROM drive and click the Next button to
proceed.
1. Turn off your desktop PC. (If you are just installing the WPC11 on your
notebook computer, please skip to the Installing the Network PC Card in
your Notebook PC section.)
2. With the PC Card facing up (the black arrow will be facing up), insert the
card completely into the PCI Adapter. These two devices must be
installed together. While the card can be inserted either way, when it is
inserted properly, the “Instant Wireless” logo on the front of the card will not
be seen. If seen from the opposite side, only a small portion of the barcode
and no numbers can be seen when the card is inserted completely. If in
doubt, try inserting the card both ways. The card will slide in further when
it is correct. Failure to insert the card properly will prevent the equipment
from functioning.
3. Open your PC case and locate an available PCI slot on the motherboard.
Check with your computer manufacturer for instructions.
2. Make sure Search for the best driver for your device is selected and click
the Next button.
4. Slide the PCI Adapter into the PCI slot. Make sure that all of its pins are
touching the slot's contacts. You may have to apply a bit of pressure to slide
the card all the way in. After the card is firmly in place, secure its fastening tab to your PC's chassis with a mounting screw. Then, close your PC.
5. Power on your desktop PC.
WARNING:
For the PCI Adapter to be installed correctly, you must complete the installation with the Network PC Card in place.
This card is not hot-swappable. Whenever you are ready to use
the Network PC Card in the PCI Adapter, you must boot up
your PC with the Network PC Card in place.
The Hardware Installation is complete.
4
5
Instant WirelessTM Series
3. Make sure that Specify a location is selected and type D:\WPC11WDT11\Driver in the location box (where “D” is the letter of your CDROM drive).
PCI Adapter
5. During the installation, Windows may ask you for your Windows 98 CDROM. When prompted, place your Windows 98 CD-ROM in the CD-ROM
drive and click the Next button. If Windows does not find the file, enter
C:\windows\options\cabs in the drop down box that will appear.
6. Windows is now ready to install the driver. Click the Next button to continue.
7. Windows will then display the following screen, indicating that the PCI
Adapter installation is now complete. Click the Finish button.
4. At this point, you will be returned to the Add New Hardware Wizard
screen. Verify that the correct folder is selected to install the driver and click
t h e
Next
button.
8. Windows will now ask you to restart your computer. Click the Yes button to
restart. Once your computer has restarted, you can continue on to the
Configuration Utility section.
6
7
Instant WirelessTM Series
Installing the PCI Drivers for Windows ME
1. Windows Millennium will automatically identify the Network PC Card, once
it is connected to the PC, and prompt you to install the necessary driver.
Make sure the Setup Utility CD is in your CD-ROM drive, select “Specify
the location of the driver (Advanced)”, and click the Next button to proceed.
PCI Adapter
3. At this point you will be returned to the Add New Hardware Wizard screen.
Make sure that the correct folder is selected to install the driver. Click the
Next button to continue.
4. This screen will appear when the installation is finished. Click the Finish
button.
2. Click the button for Search for the best driver for your device.
(Recommended). Select Specify a location: and enter D:\WPC11WDT11\Driver in the location field (if “D” is the letter of your CD-ROM
drive.) Click the Next button.
5. Windows will now ask you to restart your computer. Click the Yes button to
restart. Once your computer has restarted, you can continue on to the
Configuration Utility section.
8
9
Instant WirelessTM Series
Installing the PCI Drivers for Windows NT
Windows NT will setup the Network PC Card differently depending upon
whether you’ve previously installed network hardware or not. Please follow the
instructions appropriate for you.
PCI Adapter
3. Installation will begin and you will reach the screen shown below. You will
want to select the box that reads Wired to the network since you are adding
network hardware. Then, click the Next button to continue.
If You Have Never Installed Network Hardware:
1. Windows NT is not a Plug-and-Play Operating System and will not automatically identify the PCI Adapter. To begin setup, insert Setup Utility CD
(included) into your CD-ROM drive and select Start, then Settings, and
bring up the Control Panel. Then, double-click on the Network icon.
4. The next screen will not show any Network Adapters installed on your system, which signifies that no network hardware has been previously installed.
You will want to click the Select from list button to continue.
2. Windows will notify you that Networking is not installed. Click the Yes button to continue.
10
11
Instant WirelessTM Series
5. A list of adapters will appear on the next screen. You will not want to select
one of these, however, as your Setup Utility CD has all of the appropriate
drivers. Click the Have Disk button to continue.
6. On the Insert Disk screen, type “D:\WPC11-WDT11\Driver\WinNT”
(where D: is the letter of your CD-ROM drive) in the field provided. Then,
click the OK button to continue.
PCI Adapter
8. On the next screen, make sure there is a check mark in the box beside Instant
Wireless - Network PCI Card. Then, click the Next button to continue.
9. The next screen will show a list of network protocols. While the TCP/IP
Protocol is already selected by default, you should check with your networked computers before installing any additional network protocols. Click
the Next button to continue.
Note: Linksys does not provide technical support for TCP/IP configuration or troubleshooting.
7. The Select OEM Option screen will show two options from which to
choose. You will want to highlight Instant Wireless - Network PCI Card
and click the OK button to continue.
12
13
Instant WirelessTM Series
10. On the screen showing Network Services, the selections are automatically
made. Simply, click the Next button to continue.
11. At this point, Windows NT will be ready to start installing Networking
Components. Review your selections and click the Next button to continue
if everything is correct. Or, click the Back button to make any necessary
corrections.
14
PCI Adapter
12.Windows NT may request
further files at this point.
Type
“D:\WPC11WDT11\Driver\WinNT”
in the field provided and
click the Continue button.
If files are still requested,
insert your Windows NT
CD into your CD-ROM
drive and type “D:\i386”
(where “D” represents your
CD-ROM drive). Then,
click the Continue button.
13. You will now reach the
screen shown here. This is
called the Properties
screen. Please check with
your other wireless computers for the proper settings. For more information concerning these settings, refer to the section
called Configuring the
Network PC Card for
Windows NT. Adjust the
settings as are appropriate
and click the OK button.
15
Instant WirelessTM Series
14. After setting the Properties fields, Windows NT will begin installing the
network components you previously selected. You may be asked if you
would like to configure the protocols with a DHCP server on your network.
If this screen comes up, check with your Network Administrator before
clicking the Yes or No button to continue.
PCI Adapter
17. Verify that the correct information is presented on this screen, which will
appear next. To make any corrections, click the Back button. To continue,
click the Next button.
15. After the network component installation is complete, the following screen
may appear. Click the Next button to continue.
8. Windows NT has now completed installing the network. Click the Finish
button to continue and then restart your computer. Once your computer has
restarted, you can continue on to the Configuration Utility section.
16. At this point, Windows NT will let you know that it is ready to start the network. If you wish to make any corrections, click the Back button. To continue, click the Next button.
NOTE: After you have installed the PCI Adapter, reapply the
Windows NT service pack.
16
17
Instant WirelessTM Series
If You Have Installed Network Hardware Before:
1. Windows NT is not a
Plug-and-Play Operating
System and will not
automatically identify
the PCI Adapter. To
begin setup, insert
Setup Utility CD into
your CD-ROM drive
and click Start then
Settings to bring up the
Control Panel. Then,
double-click on the
Network icon.
2. To add the Network PC
Card, you will click the
Adapters tab and then click
the Add button to continue.
PCI Adapter
3. A list of adapters will
appear on the next
screen. You will not
want to select one of
these, however, as
your installation disk
(Setup Utility CD)
has all of the appropriate drivers. Click
the Have Disk button
to continue.
4. On the Insert Disk screen,
type
“D:\WPC11WDT11\Driver\WinNT”
in the field provided (where
“D” is the letter of your CDROM drive). Make sure the
Setup Utility CD is inserted
in the CD-ROM drive. Then,
click the OK button to continue.
5. The Select OEM
Option screen will
show two options from
which to choose. You
will want to highlight
Instant Wireless Network PCI Card
and click the OK button to continue.
18
19
Instant WirelessTM Series
6. You will now reach the
screen shown here. This is
called the Properties
screen. Please check with
your other wireless computers for the proper settings.
For more information concerning these settings, refer
to the section called
Configuring the Network
PC Card for Windows NT.
Adjust the settings as are
appropriate and click the
OK button.
7. The PCI Adapter has now
been installed. You will see it
added onto this screen. Click
the Close button to continue
and then restart your computer. Once your computer has
restarted, you can continue on
to the Configuration Utility
section.
PCI Adapter
Installing the PCI Drivers for Windows 2000
1. Windows 2000 will automatically identify the Network PC Adapter, once it
is connected to the PC, and prompt you to install the necessary driver. Make
sure that the Setup Utility CD (included) is inserted into your CD-ROM
drive and click the Next button on the Found New Hardware Wizard screen
to proceed.
2. Select Search for a suitable driver... and click the Next button. This will
search for the Windows 2000 driver.
NOTE: After you have installed the PCI Adapter, reapply the
Windows NT service pack.
20
21
Instant WirelessTM Series
3. Select Specify a
location, and click
the Next button.
Insert the Setup
Utility CD into
your
CD-ROM
drive.
On the following screen,
type in D:\WPC11WDT11\Driver (where
“D” is the letter of your
CD-ROM drive) in the
Copy manufacturer’s
files from field and click
the OK button.
PCI Adapter
5. The Digital Signature Not Found screen is a notification by Windows 2000.
However, this does not mean that there is a problem. Click the Yes button to
continue.
6. Windows will now install the driver files. The installation is now complete.
Click the Finish button when completed and restart your computer. Then,
see the Configuration Utility section of this manual.
4. Windows will now search for the driver. After Windows acknowledges finding the driver, click the Next button.
22
23
Instant WirelessTM Series
Installing the PCI Drivers for Windows XP
Windows XP will automatically identify the Network PC Adapter, once it is
connected to the PC, and prompt you to install the necessary driver. Make sure
that the Setup Utility CD (included) is inserted into your CD-ROM drive.
PCI Adapter
3. Windows will notify you that the driver has not passed Windows logo testing. Since this product has been tested to work with Windows XP, click the
Continue Anyway button.
1. Select the Install from a list or specific location (Advanced) on the Found
New Hardware Wizard screen . Click the Next button to continue.
4. Windows will tell you when it has finished installation of the new driver.
Click the Finish button.
2. Click the button next to Search for the best driver in these locations.
Select Include this location in the search:, and enter D:\WPC11WDT11\Driver in the location field (if “D” is the letter of your CD-ROM
drive.) Click the Next button.
The Hardware Installation is complete. Next, go to “Configuring the
Network PC Card with the Configuration Utility”.
24
25
Instant WirelessTM Series
Configuring the Network PC Card
Configuring the Network PC Card for Windows 98, and ME
After installing the Network PC Card, Windows 98, or Millennium will automatically identify the card. Next, you will need to configure the Network PC
Card’s driver software.
NOTE: For the easiest way to configure your Network PC Card, please refer to
the Configuration Utility section.
1. After installing the Network PC Card, the Instant Wireless - Network PC
Card Properties screen (shown below) may automatically come up. If it
does not appear automatically, click on the Start button, choose Settings
and then Control Panel. Double click on the Network icon and choose the
the Instant Wireless Network PC Card. Click the Properties button, and
then choose the Advanced tab.
Select Authentication Algorithm from the list provided and select a Value
from the drop down menu on the right. As indicated, you should always use
WECA Compliant unless you have some other reason to do so. Choose
Channel to continue or the OK button to finish. If you choose to finish now,
continue to the Installing Network Protocols section.
26
PCI Adapter
2. Select Channel from the list
provided and select a Value,
from the drop down menu on
the right, between 1 and 11.
This Channel must be the
same for all wireless devices
on your network. Click
Network Type to continue or
the OK button to finish. If
you choose to finish now,
continue to the Installing
Network Protocols section.
3. The Fragmentation Threshold
Value indicates how much of
the network resources are
devoted to recovering packet
errors. The value should
remain at its default setting of
2,432. If you experience high
packet error rates, you can
increase this value, but it will
likely decrease overall network performance. Only
minor modifications of this
value are recommended.
Click Network Type to continue or the OK button to finish. If you choose to finish
now, continue to the
Installing
Network
Protocols section.
27
Instant WirelessTM Series
4. Select Network Type and
select a Value, from the drop
down menu, of either
802.11b Ad-Hoc, Ad-Hoc,
o r I n f r a s t r u c t u re .
The Infrastructure mode
allows a wireless adapter to
communicate with a wired
network employing an Access
Point, while the Ad-Hoc
modes allow wireless-towireless, peer-to-peer communication. 802.11b Ad- Hoc
is for connecting with other
Wireless Adapters that comply with the 802.11b standard. Click Power Save
Mode to continue or the OK
button to finish. If you
choose to finish now, continue to the Installing Network
Protocols section.
5. Select Power Save Mode and
select either Enabled or
Disabled for a Value.
Disabled will allow for uninterrupted data communication. Selecting Enabled
allows your notebook to enter
“sleep” mode and could
interrupt data communication. For further information
about Power Save Mode, see
the
chapter
entitled
Configuration Utility. Click
Preamble Mode to continue
or the OK button to finish If
you choose to finish now,
continue to the Installing
Network Protocols section.
28
PCI Adapter
6. A preamble is a signal used
to synchronize the transmission timing between two or
more systems. A series of
transmission pulses is sent
before the data to indicate
that "someone is about to
transmit data". This ensures
that systems receiving the
information correctly interpret when the data transmission starts. The Preamble
Mode should be set to Long
(if in a “noisy” network environment), Short (if the environment is clear), or Auto (to
let the card interpret the environment). Click OK to finish and continue to the
I n s t a l l i n g N e t wo r k
Protocols section.
7. The RTS Threshold Value
should remain at its default
setting of 2,432. Should you
encounter inconsistent data
flow, only minor modifications are recommended. Click
SSID to continue or the OK
button to finish. If you choose
to finish now, continue to the
Installing
Network
Protocols section.
29
Instant WirelessTM Series
8. The Value for SSID depends
on what Network Type
selected in item 2. (SSID is
also commonly known as
ESSID.) If the Network Type
you
have
chosen
is
"Infrastructure", it should
have the same SSID or ESSID
name as the Access Point. If
the Network Type is "AdHoc", all clients should share
the same SSID name. Click
Use Wep to continue or the
OK button to finish and continue to the Installing
Network Protocols section.
9. Select either Disabled, 40
bit, or 128 bit as the Value
under Use Wep. Wired
Equivalent Privacy (WEP) is
an encryption scheme used to
protect wireless data communication. The Disabled setting prevents the sharing of
data with other computers on
a WEP Network. For data
sharing to be enabled, select
either 40 or 128 bit encryption, depending on your
needs. For further information, see the Configuration
Utility section of this guide.
Once your card is configured,
click OK and continue.
30
PCI Adapter
Configuring the Network PC Card for Windows NT
The Resources and Properties
screen allows you to make
modifications
to
your
Network PC Card, optimizing
performance. Check with
your other wireless PCs
before making any changes
and then follow these steps
when
configuring
the
Resource and Properties
Fields:
1. The I/O Base setting should
be unique and not conflict
with any other device settings
in your system.
NOTE: In order to
check for potential
IRQ conflicts,
run
WINMSD by selecting
RUN from the Start
menu and typing winmsd.exe and pressing
the Enter key.
31
Instant WirelessTM Series
32
PCI Adapter
2. The IRQ Base level can be
changed in order to avoid
possible conflicts with other
system devices.
4. The SSID depends on what
Mode is selected. If the Mode
is Infrastructure, it should
have the same SSID name as
the Access Point. If the Mode
is Ad-Hoc, all clients should
share the same SSID name.
3. The Mode setting should be
either Infrastructure or AdHoc, depending upon your
network’s
settings.
The
Infrastructure mode allows a
wireless adapter to communicate with a wired network
employing an Access Point,
while the Ad-Hoc mode
allows wireless-to-wireless,
peer-to-peer communication.
5. The DS Channel setting must
be the same for all wireless
points in the network. Use the
settings, 1-11, to find the best
channel for your connection.
33
Instant WirelessTM Series
34
PCI Adapter
6. RTS Threshold
should
remain Disabled as set by
default. Do not change the
setting of the RTS Threshold
unless connection quality is
poor. Then, increase this setting by the smallest value first
to establish a better connection.
8. Select Power Save Mode and
select either “Enabled” or
“Disabled”. “Disabled” will
allow for uninterrupted data
communication. Selecting
“Enabled” allows your notebook to enter “sleep” mode
and could interrupt data communication. For further information about Power Save
Mode, see the chapter entitled
Configuration Utility.
7. Fragmentation Threshold
should remain Disabled as set
by default. Do not change the
setting of the Fragmentation
Threshold unless connection
quality is poor. Then, increase
this setting by the smallest
value first to establish a better
connection.
9. The setting for Use Wep
should be either “Disabled”
or “Mandatory”. Wired
Equivalent Privacy (WEP) is
an encryption scheme used to
protect wireless data communication. The “Disabled” setting prevents the sharing of
data with other computers on
a WEP Network. For data
sharing to be enabled, select
“Mandatory”.
35
Instant WirelessTM Series
10. The ATIM Window should
remain Disabled as set by
default. Changing the setting
of the ATIM Window may
reduce performance.
PCI Adapter
12. The TX Rate setting should
remain Fully Auto as set by
default. Changing this to a
different transfer rate will
lock in that rate and may
result in dropped connections.
You may choose between 1, 2,
5.5, 11, or Fully Auto. Click
the OK button to continue.
11. The Listen Interval setting
should remain at 1 Beacon
per Second. Setting this
higher could result in slower
connection speeds.
36
37
Instant WirelessTM Series
PCI Adapter
Configuring the Network PC Card for Windows 2000
After installing the Network PC Card, Windows 2000 will automatically identify the card. Next, you will need to configure the Network PC Card’s driver
software.
4. On the Properties screen, click
the Configure button to configure your card.
1. From the Start
Menu, select Settings
and bring up the
Control Panel. From
the Control Panel,
double-click
the
Network and DialUp
Connections
icon.
2. At the Network and
Dial-Up Connections
screen, double-click the
Local Area Connection
## icon. (The number
on this icon will vary
with your computer.)
3. The General Local Area
Connection Status screen
will show the status of the
Network PC Card’s connection. Click the Properties
button to continue.
38
5. The next screen that you
will see will be the
General tab. This will
give you information on
the status of the
Network PC Card. Click
the Advanced tab to
configure your card.
From this point forward,
the configuration of the
card is the same as for
Windows 98 and ME.
Continue on to the
Configuring
the
Network PC Card for
Windows 98, and ME
section.
39
Instant WirelessTM Series
Installing Network Protocols
PCI Adapter
3. Highlight Protocol and
click the Add button.
Protocols are necessary for computers to be recognized on your network.
Windows NT and 2000 users need to check their Windows User Guides for protocol installation.
Installing the Network Protocols for Windows 98 and
ME
1. From the Start
Menu,
select
Settings
and
bring up the
Control Panel.
From the Control
Panel, doubleclick on the
Network icon.
2. Select Network PC Card
from the list and click the
Add button.
Note: Before adding
any network protocols, verify that the
protocol
is
not
already
installed.
Never install duplicate protocols for
network
adapters
installed.
40
4. Select Microsoft
from the list of
“Manuf acturers”
and TCP/IP from
the list of “Network
Protocols” and click
the OK button.
Note: Linksys does not
provide technical support for TCP/IP configuration or troubleshooting.
5. At this point, you must restart your computer. Installation is complete.
41
Instant WirelessTM Series
Configuration Utility
PCI Adapter
3. TheWelcome screen appears next. After reading this screen, click the Next
button to continue.
The Configuration Utility is provided to allow you further customization of
the Network PC Card, the PCI Adapter, and your wireless network.
Installing the Configuration Utility
1. To install the Configuration Utility, first put the Setup Utility CD into
your CD-ROM drive. Then, click the Start button, choose Run, and type
D:\Setup.exe in the drop down box as shown (where “D” is the letter of your
CD-ROM Drive).
2. Click the Install tab to install the Configuration Utility.
42
4. The next screen that appears will be the Warranty Policy. Read the entire
policy by pressing the Page Down button on your keyboard. Click on the
Yes button if you agree, or No if you disagree. Clicking No will terminate
the installation. If you click Yes, the installation will continue.
43
Instant WirelessTM Series
5. The following window will appear next. To install the Configuration Utility
in the default directory (recommended), click the Next button. If you prefer to install the Utility in another directory, click the Browse button, locate
the preferred directory then click the Next button.
6. When the following screen appears, choose either Infrastructure mode or
Ad-Hoc mode, depending on your needs. If you are unsure whether to
choose Infrastructure or Ad-Hoc, refer to the next section for more information. Once you have made your choice, click the Next button.
PCI Adapter
Ad-Hoc versus Infrastructure Mode
Unlike wired networks, wireless networks have two different modes in which
they may be set up: Infrastructure and Ad-Hoc. Choosing between these two
modes depends on whether or not the wireless network needs to share data or
peripherals with a wired network or not.
If the computers on the wireless network need to be accessible by a wired network or need to share a peripheral, such as a printer, with the wired network
computers, the wireless network should be set up in the Infrastructure mode.
The basis of Infrastructure mode centers around an access point, which serves
as the main point of communications in a wireless network. Access points
transmit data to PCs equipped with wireless network adapters, which can roam
within a certain
radial range of
the access point.
Multiple access
points can be
arranged to work
in succession to
extend the roaming range, and
can be set up to
communicate
with
your
Ethernet hardware as well.
If the wireless network is relatively small and needs to share resources only
with the other computers on the wireless network, then the Ad-Hoc mode can
be used. Ad-Hoc mode allows computers equipped with wireless transmitters
and receivers to communicate directly with each other, eliminating the need for
an access point. The drawback of this mode is in the fact that, in Ad-Hoc mode,
wireless-equipped computers are not able to communicate with computers on
a wired network.
And, of course, communication between
the wireless-equipped
computers is limited
by the distance and
interference directly
between them.
44
45
Instant WirelessTM Series
Infrastructure Mode
1. If you have chosen Infrastructure mode, the following screen will appear.
If you have chosen Ad-Hoc mode, skip to the next section.
You will be prompted to enter an SSID value in the box provided. The
SSID may be up to 32 characters in length and may include any character
on the keyboard. All SSID values on your wireless network must match. If
you are unsure, use the default value of “linksys”. Then, click the Next button. Note: All characters are case-sensitive.
PCI Adapter
3. The following screen will appear, indicating that all of the appropriate files
are being copied onto your drive. Click the Cancel button if you need to
stop the installation for any reason.
4. Once Windows has finished copying the necessary files, the following
screen will appear. In order for the drivers to be installed properly, you
must restart your computer. If you choose to do it now, select Yes, I want
to restart my computer now. If you do not want to do it now, choose No,
I will restart my computer later. Once you have made your choice, click
the Finish button to continue.
2. The next screen to appear will be the Review Settings screen. Verify that
all the settings are correct and click the Next button to continue.
46
47
Instant WirelessTM Series
Ad-Hoc Mode
1. If you have chosen Ad-Hoc mode, the following screen will appear. If you
have chosen Infrastructure mode, refer to the previous section.
You will be prompted to choose a Channel from the list provided. All
computers on your wireless network must be using the same channel in
order to communicate with each other. If you are unsure about which channel to use, select the default channel (Channel 6). Once you have chosen
your channel, click the Next button.
48
PCI Adapter
2. The following screen should appear. You will be prompted to enter an SSID
value in the box provided. All SSID values on your wireless network must
match. If you are unsure, use the default value of “linksys”. Then, click the
Next button.
3. The next screen to appear will be the Review Settings screen. Verify that
all the settings are correct and click the Next button to continue.
49
Instant WirelessTM Series
4. The following screen will appear, indicating that all of the appropriate files
are being copied onto your drive. Click the Cancel button if you need to
stop the installation for any reason.
PCI Adapter
Configuring the Network PC Card with
the Configuration Utility
After you start up the utility from the Program Folder as specified in the previous
section, you will see the Wireless LAN Configuration Utility screen. This utility
is divided into four parts: Link Info, Configuration, Encryption, and About.
Each part will be explained here. It is recommended that you change all configuration settings for your Network PC Card using this utility and not under the
Network Properties section in your Control Panel.
LINK INFO
The Link Info screen provides information about the current link between the
Network PC Card and the wireless Access Point.
The Current Channel field shows to what channel the Network PC Card is set.
The Current Tx Rate field
shows the transfer rate in
megabits per second.
5. Once Windows has finished copying the necessary files, the following
screen will appear. In order for the drivers to be installed properly, you
must restart your computer. If you choose to do it now, select Yes, I want
to restart my computer now. If you do not want to do it now, choose No,
I will restart my computer later. Once you have made your choice, click
the Finish button to continue.
The Throughput fields show
the rate at which data is transferred and received in Bytes per
second.
The Link Quality and Signal
Strength indicators show the
strength of the connection in
percentages
After installation, the Wireless
Note: When in AdHoc
mode, Link Quality and
Signal Strength indicators
will not be available.
Network PC Card Configuration Utility icon will appear on your system tray.
Green signifies a good connection or strong signal. Yellow signifies an acceptable
connection or signal. Red signifies a poor connection or weak signal. Double-click
on the Configuration Utility icon, and the screen above will appear.
50
51
Instant WirelessTM Series
CONFIGURATION
ENCRYPTION
The Configuration screen allows you to customize the settings for the Network
PC Card, the PCI Adapter, and your wireless network.
The 40-bit or 128-bit WEP keys can be generated from
a user-defined passphrase or entered manually.
The Mode setting determines the architecture of your wireless network. Select
Ad-Hoc or Infrastructure Mode depending on your network type. The AdHoc mode is used for a simple peer-to-peer network and allows the sharing of
local resources only between Network PC Cards without needing a wireless
Access Point. The Infrastructure mode allows a wireless network to be integrated into an existed, wired network through an Access Point. Infrastructure
networks permit roaming between Access Points while maintaining a connection to all network resources.
An acronym for Wired Equivalent Privacy, WEP is an
encryption scheme used to protect your wireless data
communications. WEP uses a combination of 40-bit or
128-bit keys to provide access control to your network
and encryption security for every data transmission. To
decode a data transmission, each point in a network must use an identical 40-bit
or 128-bit key. When using 40-bit encryption, remember that it is identical to
and compatible with 60-bit encryption. Higher encryption levels mean higher
levels of security, but, due to the complexity of the encryption, they may mean
decreased network performance.
An acronym for Service Set
Identifier, SSID is the unique
name shared among all points
in a wireless network. The
SSID must be identical for all
points in the network. It is
case sensitive and must not
exceed 32 characters.
The Tx Rate field shows the
current transfer rate for the
Network PC Card. To optimize
performance and range, the
TX Rate should be set to Fully
Automatic, which will automatically adjust the transfer
speed for best performance
and longest range.
Power Saving Mode, or PS Mode, enables or disables the power saving features
of your Network PC Card.
The Channel setting specifies the channel used in wireless communication and
should be set to the same channel as the other points in the wireless network.This setting can only be adjusted in AdHoc mode.
52
PCI Adapter
Note: Please
make sure that
each point in
your wireless
network is set at
an
identical
WEP value.
Encryption (WEP) can be set
to Disabled, 40-bit, or 128-bit.
Once enabled, you can create
an encryption key by using a
Passphrase, or by entering the
key manually.
(The Passphrase method is recommended; however, you may
need to enter a manual key in
order to meet the requirements
of existing wireless equipment
on your network. If you are
unsure, check your other wireless PCs’ settings.)
The Passphrase can be any
text string with a maximum of
31 alphanumeric characters
and is strongly recommended
because it is the easiest way to generate WEP keys.
Once you have chosen your key encryption method and entered either the
Passphrase or manual key, click the Apply button. Then click the OK button
and the encryption portion of the setup is complete.
Note: Not all Wireless Access Points or Adapters
support 128-bit WEP Encryption, which may
result in network errors. Check your wireless
device’s documentation for more information.
53
Instant WirelessTM Series
ABOUT
The About screen shows the release information for the Driver Version,
Configuration Utility Version, and Firmware Version.
PCI Adapter
Troubleshooting
Common Problems and Solutions
This chapter provides solutions to problems usually occurring during the installation and operation of the Network PC Card. Read the description below to
solve your problems. If you can’t find an answer here, check the Linksys website at www.linksys.com.
1. My computer does not recognize the Network PC Card.
• Make sure that the Network PC Card is properly inserted into the PCMCIA
slot. Note that the card can be inserted either way, but when it is inserted
properly, the “Instant Wireles” logo on the front of the card will not be seen.
If seen from the opposite side, only a small portion of the barcode and no
numbers can be seen when the card is inserted completely. If in doubt, try
inserting the card both ways. The card will slide in further when it is correct.
2. The Network PC Card does not work properly.
• Reinsert the Network PC Card into your notebook’s PCMCIA slot. A beep
should be heard if the adapter is properly inserted.
• For non-Windows environments, make sure that a PCMCIA card service
driver is installed in your PC.
• Click on the Control Panel and then on PC-Card. Check whether it has a
PCMCIA card in one of the sockets or not. If you find Network PC Card in
one of the sockets, it means the card is detected properly. If you see a yellow
question mark, the resources are conflicting.
Right click on My Computer and select Properties. Select the device manager and click on the Network Adapter. You will find the Network PC Card
if it is installed successfully. If you see the yellow exclamation mark, the
resources are conflicting. Click on PCMCIA card and then on PCMCIA card
service. You will see the status of the Network PC Card. If there is a yellow
question mark, please check the following:
• Make sure your notebook supports a 5.0V card.
• Make sure your notebook has a free IRQ.
• Make sure you have inserted the right card and installed the proper
driver.
If the Network PC Card does not function after attempting the above steps,
remove the card and do the following:
• Uninstall the driver software from your PC.
• Restart your PC and repeat the hardware and software installation as
specified in this User Guide.
54
55
Instant WirelessTM Series
3. I cannot communicate with the other computers linked via Ethernet in
the Infrastructure configuration.
• Make sure that the notebook PC to which the Network PC Card is associated is powered on.
• Make sure that your Network PC Card is configured on the same channel and
with the same security options as with the other computers in the
Infrastructure configuration.
Frequently Asked Questions
Can I run an application from a remote computer over the wireless network?
This will depend on whether or not the application is designed to be used over
a network. Consult the application's user guide to determine if it supports operation over a network.
Can I play computer games with other members of the wireless network?
Yes, as long as the game supports multiple players over a LAN (local area network). Refer to the game's user guide for more information.
What is IEEE 802.11 standard?
The IEEE 802.11 Wireless LAN standards subcommittee, which is formulating
a standard for the industry. The objective is to enable wireless LAN hardware
from different manufacturers to communicate.
What IEEE 802.11 features are supported?
The product supports the following IEEE 802.11 functions:
• CSMA/CA plus Acknowledge protocol
• Multi-Channel Roaming
• Automatic Rate Selection
• RTS/CTS feature
• Fragmentation
• Power Management
What is Ad-hoc?
An Ad-hoc wireless LAN is a group of computers, each with a WLAN adapter,
connected as an independent wireless LAN. Ad hoc wireless LAN is applicable at a departmental scale for a branch or SOHO operation.
PCI Adapter
What is Roaming?
Roaming is the ability of a portable computer user to communicate continuously while moving freely throughout an area greater than that covered by a single Access Point. Before using the roaming function, the workstation must
make sure that it is the same channel number with the Access Point of dedicated coverage area.
To achieve true seamless connectivity, the wireless LAN must incorporate a
number of different functions. Each node and Access Point, for example, must
always acknowledge receipt of each message. Each node must maintain contact
with the wireless network even when not actually transmitting data. Achieving
these functions simultaneously requires a dynamic RF networking technology
that links Access Points and nodes. In such a system, the user’s end node undertakes a search for the best possible access to the system. First, it evaluates such
factors as signal strength and quality, as well as the message load currently
being carried by each Access Point and the distance of each Access Point to the
wired backbone. Based on that information, the node next selects the right
Access Point and registers its address. Communications between end node and
host computer can then be transmitted up and down the backbone.
As the user moves on, the end nodes RF transmitter regularly checks the system to determine whether it is in touch with the original Access Point or
whether it should seek a new one. When a node no longer receives acknowledgment from its original Access Point, it undertakes a new search. Upon finding a new Access Point, it then reregisters, and the communication process continues.
What is BSS ID?
A specific Ad hoc LAN is called a Basic Service Set (BSS). Computers in a
BSS must be configured with the same BSS ID.
What is ESS ID?
An Infrastructure configuration could also support roaming capability for
mobile workers. More than one BSS can be configured as an Extended Service
Set (ESS). Users within an ESS could Roam freely between BSSs while served
as a continuous connection to the network wireless stations and Access Points
within an ESS must be configured with the same ESS ID and the same radio
channel.
What is Infrastructure?
An integrated wireless and wired LAN is called an Infrastructure configuration. Infrastructure is applicable to enterprise scale for wireless access to central database, or wireless application for mobile workers.
56
57
Instant WirelessTM Series
What is ISM band?
The FCC and their counterparts outside of the U.S. have set aside bandwidth
for unlicensed use in the ISM (Industrial, Scientific and Medical) band.
Spectrum in the vicinity of 2.4 GHz, in particular, is being made available
worldwide. This presents a truly revolutionary opportunity to place convenient
high-speed wireless capabilities in the hands of users around the globe.
What is Spread Spectrum?
Spread Spectrum technology is a wideband radio frequency technique developed by the military for use in reliable, secure, mission-critical communications systems. It is designed to trade off bandwidth efficiency for reliability,
integrity, and security. In other words, more bandwidth is consumed than in the
case of narrowband transmission, but the trade off produces a signal that is, in
effect, louder and thus easier to detect, provided that the receiver knows the
parameters of the spread-spectrum signal being broadcast. If a receiver is not
tuned to the right frequency, a spread-spectrum signal looks like background
noise. There are two main alternatives, Direct Sequence Spread Spectrum
(DSSS) and Frequency Hopping Spread Spectrum (FHSS).
PCI Adapter
Can Instant WirelessTM products support printer sharing?
Instant WirelessTM products perform the same function as LAN products.
Therefore, Instant WirelessTM products can work with NetWare, Windows
NT/2000, or other LAN operating systems to support printer or file sharing.
What is WEP?
WEP is Wired Equivalent Privacy, a data privacy mechanism based on a 40 bit
shared key algorithm, as described in the IEEE 802.11 standard.
What is DSSS? What is FHSS? And what are their differences?
Frequency-Hopping Spread-Spectrum (FHSS) uses a narrowband carrier that
changes frequency in a pattern that is known to both transmitter and receiver.
Properly synchronized, the net effect is to maintain a single logical channel. To
an unintended receiver, FHSS appears to be short-duration impulse noise.
Direct-Sequence Spread-Spectrum (DSSS) generates a redundant bit pattern
for each bit to be transmitted. This bit pattern is called a chip (or chipping
code). The longer the chip, the greater the probability that the original data can
be recovered. Even if one or more bits in the chip are damaged during transmission, statistical techniques embedded in the radio can recover the original
data without -the need for retransmission. To an unintended receiver, DSSS
appears as low power wideband noise and is rejected (ignored) by most narrowband receivers.
Would the information be intercepted while transmitting on air?
WLAN features two-fold protection in security. On the hardware side, as with
Direct Sequence Spread Spectrum technology, it has the inherent security feature of scrambling. On the software side, WLAN series offer the encryption
function (WEP) to enhance security and Access Control. Users can set it up
depending upon their needs.
58
59
Instant WirelessTM Series
Appendix
PCI Adapter
Warranty Information
Specifications for the PCI Adapter
Standards:
PC97/98/99 SUPPORT
PCI Local Bus 2.1 compliant
PC Card-16 bit Standard Specification
Card Type:
32-bit PCI
Environmental Information for the PCI Adapter
60
Dimensions:
6” x 4.75” x .75” (152mm x 121mm x 19mm)
Unit Weight:
3 oz. (0.09 kg)
Power Required:
5V
Certifications:
FCC Class B, CE Mark Commercial
Operating Temp.:
32ºF to 131ºF (0ºC to 55ºC)
Storage Temp.:
-4ºF to 158ºF (-20ºC to 70ºC)
Operating Hum.:
0% to 70% Non-Condensing
Storage Hum.:
0% to 95% Non-Condensing
BE SURE TO HAVE YOUR PROOF OF PURCHASE AND A BARCODE
FROM THE PRODUCT'S PACKAGING ON HAND WHEN CALLING.
RETURN REQUESTS CANNOT BE PROCESSED WITHOUT PROOF OF
PURCHASE.
IN NO EVENT SHALL LINKSYS’ LIABILITY EXCEED THE PRICE PAID
FOR THE PRODUCT FROM DIRECT, INDIRECT, SPECIAL, INCIDENTAL, OR CONSEQUENTIAL DAMAGES RESULTING FROM THE USE
OF THE PRODUCT, ITS ACCOMPANYING SOFTWARE, OR ITS DOCUMENTATION. LINKSYS DOES NOT OFFER REFUNDS FOR ANY PRODUCT.
LINKSYS OFFERS CROSS SHIPMENTS, A FASTER PROCESS FOR PROCESSING AND RECEIVING YOUR REPLACEMENT. LINKSYS PAYS
FOR UPS GROUND ONLY. ALL CUSTOMERS LOCATED OUTSIDE OF
THE UNITED STATES OF AMERICA AND CANADA SHALL BE HELD
RESPONSIBLE FOR SHIPPING AND HANDLING CHARGES. PLEASE
CALL LINKSYS FOR MORE DETAILS.
61
Instant WirelessTM Series
PCI Adapter
Contact Information
For help with the installation or operation of this product, contact Linksys
Customer Support at one of the phone numbers or Internet addresses below.
Sales Information
Tech Support
RMA Issues
Fax
Email
Web
FTP Site
62
800-546-5797 (LINKSYS)
866-242-8558
949-261-1288
949-261-8868
support@linksys.com
http://www.linksys.com
ftp.linksys.com
63
http://www.linksys.com
© Copyright 2001 Linksys, All Rights Reserved.