1
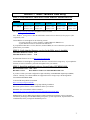
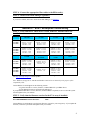
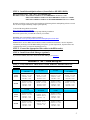
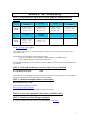
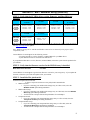
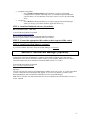
HP ProLiant Storage Server
SAN Connection and Management
Connecting to a SAN
The instructions below are an aid to customers connecting to their Storage Area Network
(SAN). Check the HP web site at http://www.hp.com for any possible updates to the SAN
Connection and Management documentation prior to executing instructions from this
guide. The latest updates to the HP SAN Design Guide are available on the HP web site
at http://h18006.www1.hp.com/storage/saninfrastructure.html.
Important: HP strongly recommends that you install the software components before
you connect fiber cables to the storage server.
Specific steps for proper connection to a SAN are based upon the Fibre Channel (FC)
array to which the storage server will be attached. The basic steps are as follows:
1. Verify, and update if needed, the BIOS/firmware/driver for your FC HBA
(FCA2404, FCA2214, and so on).
2. Verify, and update if needed, the firmware of the FC array.
3. Install Multipathing software.
4. Connect FC cables.
5. Present Logical Unit Numbers (LUNs) to the storage server.
Quick links: (Click the section for your FC array type.)
•
Section 1: MSA – Modular SAN Array
•
Section 2: EVA – Enterprise Virtual Array
•
Section 3: XP – Disk Array XP
•
Section 4: VA – Virtual Array
•
Section 5: MA – Modular Array (HSG-80)
2
Section 1: MSA – Modular SAN Array
STEP 1: Verify that the FC HBA driver version, firmware, and Boot BIOS are
installed.
FCA2101
Windows Storage
Server 2003 R2
Driver: 5-5.10a10
Firmware: 3.92a2
Boot Bios: 1.70a1
FCA2214
FCA2214D
Driver: 9.0.0.13
Firmware: 1.34
Boot Bios: NA
FCA2404
FCA2404DC
Driver: 5-5.10a10
Firmware: 1.90a4
Boot Bios: 1.70a1
A7387A
A7388A
Driver: 5-5.10a10
Firmware: 1.90a4
Boot Bios: 1.70a1
KGPSA-CB
176479-B21
Driver: 5-5.10a10
Firmware: 3.92a2
Boot Bios: 1.70a1
The above table shows the latest Driver/Firmware/Boot Bios for the supported FC HBAs. Check the HP
web site http://www.hp.com/go/msa for updates to these revisions.
Note: Windows® Storage Server 2003 R2 and Windows 2003 32-bit are identical for the purpose of this
compatibility table.
Contact HP Service and Support for the following reasons:
- To get the latest driver version, firmware, or BOOT BIOS for HBA drivers
- If your HBA PCI cards are not listed in the table above
If you update the HBA driver version, firmware, or BOOT BIOS, be sure to reboot the system after the
update before you continue.
STEP 2: Verify that the firmware version for the MSA array is installed.
MSA1500cs Firmware revision: 5.02
MSA1000 Firmware revision:
4.48
Download the firmware for free at http://www.hp.com/go/msa.
Contact HP Service and Support to get the latest firmware version for their storage array. If you update the
firmware, be sure to reboot the system after the update before you continue.
STEP 3: Install the multipath software (SecurePath or HP MPIO DSM).
HP SecurePath version: v4.0C SP1.1
HP MPIO version:
Basic DSM for Windows for MSA1000/MSA1500 v1.10
If you have a NAS system unit configured for high availability, install MultiPath Input/Output (MPIO)
software. Currently, two software MPIOs are supported for these storage arrays: HP StorageWorks
SecurePath and HP MPIO DSM.
To obtain HP StorageWorks SecurePath:
http://www.hp.com/go/SecurePath
Do not install the AutoPath driver when prompted during installation.
Reboot the system after the software installation before you continue.
HP MPIO users can install the software located at
http://h18006.www1.hp.com/products/sanworks/multipathoptions/index.html
IMPORTANT: Review MPIO documentation (readme, installation instructions). Review important
information pertaining to the HP MPIO DSM (prerequisites, system requirements, important notes and
considerations) before you begin the installation process.
3
STEP 4: Connect the appropriate fiber cables to the HBA card(s).
STEP 5: Install SecurePath Manager (optional).
If you use SecurePath, and want to install SecurePath Manager, see Section 6
Section 2: EVA – Enterprise Virtual Array
STEP 1: Verify that the FC HBA driver version, firmware, and Boot BIOS are
installed.
KGPSA-CB
176479-B21
FCA2101
FCA2355
FCA2404
FCA2404DC
EVA5000
EVA3000
SCSIPort: 5-5.10a11
StorPort: 5-5.1.02a7
Firmware: 3.92a2
Boot Bios: 1.70a1
SCSIPort: 5-5.10a11
StorPort: 5-5.1.02a7
Firmware: 3.92a2
Boot Bios: 1.70a1
SCSIPort: 5-5.10a11
StorPort: 5-5.1.02a7
Firmware: 3.92a2
Boot Bios: 1.70a1
SCSIPort: 5-5.10a11
StorPort: 5-5.1.02a7
Firmware: 1.90a4
Boot Bios: 1.70a1
EVA8000
EVA6000
EVA4000
SCSIPort: 5-5.10a11
StorPort: 5-5.1.02a7
Firmware: 3.92a2
Boot Bios: 1.70a1
SCSIPort: 5-5.10a11
StorPort: 5-5.1.02a7
Firmware: 3.92a2
Boot Bios: 1.70a1
SCSIPort: 5-5.10a11
StorPort: 5-5.1.02a7
Firmware: 3.92a2
Boot Bios: 1.70a1
SCSIPort: 5-5.10a11
StorPort: 5-5.1.02a7
Firmware: 1.90a4
Boot Bios: 1.70a1
FCA2408
FCA2214
FCA2214DC
A7387A
A7388A
A7560A
EVA5000
EVA3000
SCSIPort: 5-5.10a11
StorPort: 5-5.1.02a7
Firmware: 1.90a4
Boot Bios: 1.70a1
SCSIPort: 9.0.2.11
StorPort: 9.0.2.16
Firmware: 1.45
SCSIPort: 5-5.10a11
StorPort: 5-5.1.02a7
Firmware: 1.90a4
Boot Bios: 1.70a1
SCSIPort: 5-5.10a11
StorPort: 5-5.1.02a7
Firmware: 1.90a4
Boot Bios: 1.70.a1
EVA8000
EVA6000
EVA4000
SCSIPort: 5-5.10a11
StorPort: 5-5.1.02a7
Firmware: 1.90a4
Boot Bios: 1.70a1
SCSIPort: 9.0.2.11
Firmware: 1.34
SCSIPort: 5-5.10a11
StorPort: 5-5.1.02a7
Firmware: 1.90a4
Boot Bios: 1.70a1
The above table shows the latest driver/firmware/Boot Bios for the supported FC HBAs. Check the HP web
site http://www.hp.com/go/eva for the updates.
Note: Windows Storage Server 2003 R2 and Windows 2003 32-bit are identical for the purpose of this
compatibility table.
Contact HP Service and Support for the following reasons:
- To get the latest driver version, firmware, or BOOT BIOS for your HBA drivers
- If your HBA PCI cards are not listed in the table above
If you update the HBA driver version, firmware, or BOOT BIOS is required, be sure to reboot the system
after the update before you continue.
STEP 2: Verify that the firmware version for the EVA array is installed.
EVA 3000/5000 Firmware Revision:
EVA 4000/6000/8000 Firmware Revision:
3.028 or 4.001
5.030
Contact HP Service and Support to get the latest firmware version for your storage array. If you update the
firmware, reboot the system after the update before you continue.
4
STEP 4: Install the multipath software (SecurePath or HP MPIO DSM).
HP SecurePath version: v4.0C SP1.1 (EVA3000/5000 only)
HP MPIO version: Basic DSM for Windows for EVA3000/5000 for VCS 3.xxx v1.01
Full Featured DSM for Windows for EVA3000/5000 for VCS 4.xxx v1.00.00
Full Featured DSM for Windows for EVA4000/6000/8000 VCS 5.xxx v1.00.02
Windows with EVA storage requires the installation of HP StorageWorks multipathing software on each
host to achieve high-availability, multiple-path capability.
To obtain HP StorageWorks SecurePath:
http://www.hp.com/go/SecurePath
Do not install the AutoPath driver when prompted during installation.
Reboot the system after you install the software you continue.
HP MPIO users can install the software located at:
http://h18006.www1.hp.com/products/sanworks/multipathoptions/index.html
IMPORTANT: Review MPIO documentation (readme, installation instructions). Review important
information pertaining to the HP MPIO DSM (prerequisites, system requirements, important notes and
considerations) before you begin the installation process.
STEP 5: Connect the appropriate fiber cables to the HBA card(s).
STEP 6: Install SecurePath Manager (optional).
If you use SecurePath, and want to install SecurePath Manager, see Section 6
Section 3: XP – Disk Array XP
STEP 1: Verify that the FC HBA driver version, firmware, and Boot BIOS are
installed.
KGPSA-CB
176479-B21
FCA2101
FCA2355
FCA2404
FCA2404DC
XP128
XP1024
SCSIPort: 5-5.20a9
StorPort: 5-5.1.11a0
Firmware: 3.93a0
Boot Bios: 1.70a3
SCSIPort: 5-5.20a9
StorPort: 5-5.1.11a0
Firmware: 3.93a0
Boot Bios: 1.70a3
SCSIPort: 5-5.20a9
StorPort: 5-5.1.11a0
Firmware: 3.93a0
Boot Bios: 1.70a3
SCSIPort: 5-5.20a9
StorPort: 5-5.1.11a0
Firmware: 1.91a1
Boot Bios: 1.70a3
XP12000
SCSIPort: 5-5.20a9
StorPort: 5-5.1.11a0
Firmware: 3.93a0
Boot Bios: 1.70a3
SCSIPort: 5-5.20a9
StorPort: 5-5.1.11a0
Firmware: 3.93a0
Boot Bios: 1.70a3
SCSIPort: 5-5.20a9
StorPort: 5-5.1.11a0
Firmware: 3.93a0
Boot Bios: 1.70a3
SCSIPort: 5-5.20a9
StorPort: 5-5.1.11a0
Firmware: 1.91a1
Boot Bios: 1.70a3
FCA2408
FCA2214
FCA2214DC
A7387A
A7388A
XP128
XP1024
SCSIPort: 5-5.20a9
StorPort: 5-5.1.11a0
Firmware: 1.91a1
Boot Bios: 1.70a3
SCSIPort: 9.0.2.11
StorPort: 9.0.2.16
Firmware: 1.45
SCSIPort: 5-5.20a9
StorPort: 5-5.1.11a0
Firmware: 1.91a1
Boot Bios: 1.70a3
XP12000
SCSIPort: 5-5.20a9
StorPort: 5-5.1.11a0
Firmware: 1.91a1
Boot Bios: 1.70a3
SCSIPort: 9.0.2.11
StorPort: 9.0.2.16
Firmware: 1.45
SCSIPort: 5-5.20a9
StorPort: 5-5.1.11a0
Firmware: 1.91a1
Boot Bios: 1.70a3
5
The above table shows the latest driver/firmware/Boot Bios for the supported FC HBAs. Check the HP
web site http://www.hp.com for updates.
Note: Windows Storage Server 2003 R2 and Windows 2003 32-bit are identical for the purpose of this
compatibility table.
Contact HP Service and Support for the following reasons:
- To get the latest driver version, firmware, or BOOT BIOS for your HBA drivers.
- If your HBA PCI cards are not listed in the table above.
If you update the HBA driver version, firmware, or BOOT BIOS, reboot the system after the update before
you continue.
STEP 2: Verify that the firmware version for the XP array is installed.
XP 128/1024 Firmware Revision:
XP 12000 Firmware Revision:
21.12.02.00/00
50.04.31.00/00
Contact HP Service and Support to get the latest firmware version for your storage array. If you update the
firmware, reboot the system after the update before you continue.
STEP 3: Install the multipath software (SecurePath or HP MPIO DSM).
HP SecurePath version: v4.0C SP1
V4.0C SP2-1
HP MPIO version: Full Featured DSM for Windows for XP v1.00.01
Windows with XP storage requires the installation of HP StorageWorks multipathing software on each
host to achieve high-availability, multiple-path capability.
To obtain HP StorageWorks SecurePath:
http://www.hp.com/go/SecurePath
Reboot the system after you install the software before you continue.
HP MPIO users can install the software located at
http://h18006.www1.hp.com/products/sanworks/multipathoptions/index.html
IMPORTANT: Review MPIO documentation (readme, installation instructions). Review important
information pertaining to the HP MPIO DSM (prerequisites, system requirements, important notes and
considerations) before you begin the installation process. For all XP storage arrays, you must install
MultiPath Input/Output (MPIO) software. Currently, two software MPIOs are supported for these storage
arrays: HP StorageWorks SecurePath and HP MPIO DSM.
STEP 4: Connect the appropriate fiber cables to the HBA card(s).
STEP 5: Install SecurePath Manager (optional).
If you use SecurePath, and want to install SecurePath Manager, see Section 6
6
Section 4: VA – Virtual Array
STEP 1: Verify that the FC HBA driver version, firmware, and Boot BIOS are
installed.
VA7x10
VA7x00
VA7x10
VA7x00
KGPSA-CB
176479-B21
FCA2101
FCA2355
FCA2404
FCA2404DC
SCSIPort: 5-4.82a16
Firmware: 3.92a2
Boot Bios: 1.63a1
SCSIPort: 5-5.10.a11
Firmware: 3.92a2
Boot Bios: 1.70a1
SCSIPort: 5-5.10.a11
Firmware: 3.92a2
Boot Bios: 1.70a1
SCSIPort: 5-5.10.a11
Firmware: 1.90a4
Boot Bios: 1.70a1
FCA2408
FCA2214
FCA2214DC
SCSIPort: 5-5.10.a11
Firmware: 1.90a4
Boot Bios: 1.70a1
SCSIPort: 9.0.2.11
Firmware: 1.45
The above table shows the latest driver/firmware/Boot Bios for the supported FC HBAs. Check the HP web
site http://www.hp.com for updates.
Note: Windows Storage Server 2003 R2 and Windows 2003 32-bit are identical for the purpose of this
compatibility table.
Contact HP Service and Support for the following reasons:
- To get the latest driver version, firmware, or BOOT BIOS for your HBA drivers
- If your HBA PCI cards are not listed in the table above
If you update the HBA driver version, firmware, or BOOT BIOS, reboot the system after the update before
you continue.
STEP 2: Verify that the firmware version for the VA array is installed.
VA 7x10 Firmware Revision:
VA 7x00 Firmware Revision:
A140
HP22
Contact HP Service and Support to get the latest firmware version for your storage array. If you update the
firmware, reboot the system after the update before you continue.
STEP 3: Install the multipath software (SecurePath):
HP SecurePath version: v4.0C
To obtain HP StorageWorks SecurePath:
http://www.hp.com/go/SecurePath
Reboot the system after the software installation before you continue.
STEP 4: Connect the appropriate fiber cables to the HBA card(s).
STEP 5: Install SecurePath Manager (optional):
If you use SecurePath, and want to install SecurePath Manager, see Section 6
7
Section 5: MA – Modular Array (HSG-80)
STEP 1: Verify that the FC HBA driver version, firmware, and Boot BIOS are
installed.
EMA12000
EMA16000
MA8000
ESA12000
RA8000
EMA12000
EMA16000
MA8000
ESA12000
RA8000
KGPSA-CB
176479-B21
FCA2101
FCA2355
FCA2404
FCA2404DC
SCSIPort: 5-4.82a16
Firmware: 3.92a2
Boot Bios: 1.70a1
SCSIPort: 5-4.82a16
Firmware: 3.92a2
Boot Bios: 1.70a1
SCSIPort: 5-4.82a16
Firmware: 3.92a2
Boot Bios: 1.70a1
SCSIPort: 5-4.82a16
Firmware: 1.01a2
Boot Bios: 1.63a1
FCA2408
FCA2214
FCA2214DC
SCSIPort: 5-4.82a16
Firmware: 1.01a2
Boot Bios: 1.52a1
SCSIPort: 8.2.0.72
Firmware: 1.33
The above table shows the latest driver/firmware/Boot Bios for the supported FC HBAs. Check the HP web
site http://www.hp.com for updates.
Note: Windows Storage Server 2003 R2 and Windows 2003 32-bit are identical for the purpose of this
compatibility table.
Contact HP Service and Support for the following reasons:
- To get the latest driver version, firmware, or BOOT BIOS for your HBA drivers
- If your HBA PCI cards are not listed in the table above
If you update the HBA driver version, firmware, or BOOT BIOS, reboot the system after the update before
you continue.
STEP 2: Verify that the firmware version for the HSG-80 array is installed.
HSG-80 Firmware Revision:
ACS 8.8-2
Contact HP Service and Support to get the latest firmware version for your storage array. If you update the
firmware, reboot the system after the update before you continue
STEP 3: Install the MA platform kit.
Install the MA platform kit located at
C:\hpnas\components\SANConnect\MA_PlatformKit\ACS88WinKit
• Multibus Switch:
o If you are connecting your multibus MA storage array to a fibre switch, select the
Multibus Switch option during installation.
• Multibus Hub (loop):
o If you are connecting your multibus MA storage array to a fibre hub, select the Multibus
Hub (loop) option during installation.
o You MUST enter a unique arbitrated loop IP address for each adapter.
• Transparent Switch:
o If you are connecting your transparent MA storage array to a fibre switch, select the
Transparent Switch option during installation.
• Transparent Hub (loop):
o If you are connecting your transparent MA storage array to a fibre hub, select the
Transparent Hub (loop) option during installation.
o You MUST enter a unique arbitrated loop IP address for each adapter.
8
•
•
Extended Configuration:
o Select Extended Configuration during installation, if you have an Extended
Configuration for your back-end storage array. An extended configuration should be
selected when five or more Window Servers have exclusive access to the same RAID
arrays.
HS Service:
o Select HS Service during installation if you require logging environmental changes
within your storage system in the Windows Application Event Log.
STEP 4: Install the Multipath software (SecurePath).
HP SecurePath version: v4.0C SP2
To obtain HP StorageWorks SecurePath:
http://www.hp.com/go/SecurePath
Do not install the AutoPath driver when prompted during installation.
Reboot the system after the software installation before you continue
STEP 5: Connect the appropriate fiber cables to their respective HBA card(s).
STEP 6: Install SecurePath Manager (optional).
If you use SecurePath, and want to install SecurePath Manager, see Section 6
Section 6: SecurePath Manager (Optional)
Secure Path Manager (SPM) provides web-based management capability for cross-platform Secure Path
configurations. This application displays a graphical representation of multiple path configurations,
indicating the status of a user-defined set of hosts, storage systems and paths. SPM runs on web-based
clients that support Sun Java™ 2 Runtime environment (JRE) Version 1.3.1 or later.
To obtain HP StorageWorks SecurePath:
http://www.hp.com/go/SecurePath
Important:
Currently, HP NAS only supports SecurePath Manager (SPM) version 4.0C or later. If you have older SPM
versions, contact HP Service and Support and upgrade, if you want to use SPM on your NAS system.
HP Insight Manager must be installed for administrators to use SecurePath Manager.
SPM can be accessed on web-based clients that have Sun Java 2 Runtime Environment (JRE) version 1.3.1,
or later, installed.
9
Expand Storage in a SAN environment
Expansion is the process of adding physical disks to an array that has already been configured. The logical
drives (or volumes) that exist in the array before the expansion takes place are unchanged, because only the
amount of free space in the array changes. The expansion process is entirely independent of the operating
system.
Note: See your storage array hardware user documentation for further details about expanding storage on
the array.
Expand storage for MSA storage arrays
The Array Configuration Utility enables online capacity expansion of the array and logical drive for
specific MSA storage arrays, such as the MSA1000 and MSA1500.
Expand array
Expanding an existing LUN is accomplished using the storage array configuration software applicable to
the storage array in use. In the case of the Smart Array controller, this is accomplished using the Array
Configuration Utility. LUN expansion may occur in disk arrays where space is available. If insufficient
space is available, additional physical disks may be added to the array dynamically.
IMPORTANT: An array expansion, logical drive extension takes about 15 minutes per gigabyte, or
considerably longer if the controller does not have a battery-backed cache. While this process is occurring,
no other expansion or extension can occur simultaneously on the same controller.
Figure 1 Expanding a LUN (Smart Array only)
10
Note: The Expand Array task is listed only if there is an unassigned physical drive on the controller. The
unassigned drive must also have a capacity no less than that of a drive in an existing array. If these
conditions are not fulfilled, install at least one suitable drive on the controller, and then click Refresh.
Add storage scenarios (Smart Array storage arrays only):
•
Add an unassigned physical disk to the array.
•
Add a new disk to the appropriate storage device.
For information, use the ACU online Help or the procedures to “Expand Array” in the Array Configuration
Utility User Guide.
Expand logical drive
This option in the ACU increases the storage capacity of a logical drive by adding unused space on an array
to the logical drive on the same array. The unused space is obtained either by expanding an array, or by
deleting another logical drive on the same array.
Add storage scenarios (Smart Array storage arrays only):
•
Extend an existing storage LUN where space is available in the array.
•
Extend an existing storage LUN where space is not available in the array (Smart Array only).
For information, use the ACU online Help or the procedures to “Extend logical drive” in the Array
Configuration Utility User Guide.
Expand storage for EVA storage arrays (single node environment)
Presenting a virtual disk offers its storage to a host. To make a virtual disk available to a host, you must
present it. You can present a virtual disk to a host during or after virtual disk creation. The virtual disk must
be completely created before the host presentation can occur. If you choose host presentation during virtual
disk creation, the management agent cannot complete any other task until that virtual disk is created and
presented. Therefore, HP recommends that you wait until a virtual disk is created before presenting it to a
host.
To extend a virtual disk (single node environment):
1.
Using HP StorageWorks Storage Management Appliance (SMA), or Command View EVA hosted on a
server, create or extend the virtual disk presented to the storage server.
2.
On the storage server, open Device Manager, right-click the EVA LUN, and Scan for hardware
changes.
3.
Open command prompt and run DiskPart.exe.
4.
List the current volumes of the system (List Volumes).
5.
Select the volume to be extended (select volume X).
11
6.
Extend the volume (extend [size=n]) size is optional.
7.
Extend a LUN for EVA storage arrays (clustered environment)
To extend a LUN on an EVA storage array in a cluster:
1.
Review requirements and procedures from the storage array hardware provider for expanding or
extending storage.
2.
Ensure that Microsoft Windows Server 2003 SP1 is installed.
3.
Run Command View EVA on the storage server to increase the size of the presented EVA LUN.
4.
Run Microsoft DiskPart.exe to add the additional space to the volume.
For additional information associated with extending a LUN in a cluster, see the following Microsoft KB
articles:
•
How to extend the partition of a cluster shared disk
http://support.microsoft.com/default.aspx?scid=kb;en-us;304736
•
How to replace a disk that is in a cluster and use of the Cluster Recovery utility
http://support.microsoft.com/kb/305793
12