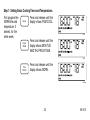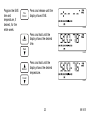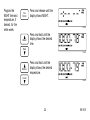
1
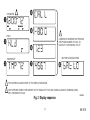
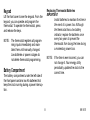
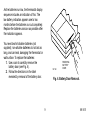
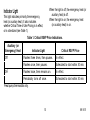
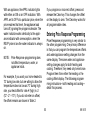
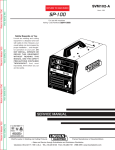
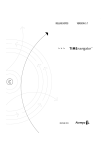
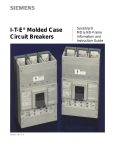
T7516A,B,C
Energy Management System
USER’S GUIDE
Weekday/Weekend 7-day Programmable
Heat and/or Cool Conventional
and Heat Pump
1
69-1611
Welcome to the world of comfort and energy savings with your new Honeywell T7516A,B,C Energy
Management Thermostat brought to you by your energy utility. This thermostat allows up to seven
separate days of programming. You can set the thermostat to control the temperature in your
home, your water heater, and another appliance (such as a swimming pool pump) according to
your personal schedule and preferences. This thermostat keeps you comfortable, and saves you
energy.
Besides being programmable, this thermostat contains a communications module that allows your
energy utility to communicate with your thermostat so you can take advantage of Residential
Service Variable Price (RSVP) Rate.
Residential Service Variable Price (RSVP) Rate. The T7516A,B,C Energy Management Thermostat informs you of the energy price in effect at any given time (see Fig. 1). A special feature of this
thermostat allows you to program it to automatically adjust your energy use for each price. These
prices are: Low (least expensive), Medium, High, and Critical (most expensive). The thermostat
also provides you with the ability to operate your electric water heater and another appliance based
on the price in effect.
2
69-1611
AM
INDICATOR FOR RSVP CURRENT PRICE
M12661A
Fig. 1. RSVP Rate indications.
3
69-1611
Table of Contents
Getting to Know Your Thermostat ............................................................................................
Standard Display .....................................................................................................................
Keypad ....................................................................................................................................
Battery Compartment ..............................................................................................................
Replacing Thermostat Batteries .........................................................................................
Indicator Light ..........................................................................................................................
Programming Overview ...........................................................................................................
User Operations ......................................................................................................................
Present Setting ...................................................................................................................
Overrides ............................................................................................................................
Hold ...............................................................................................................................
Temporary ......................................................................................................................
Recovery From Setback .....................................................................................................
Programming Your Thermostat ................................................................................................
Price Response .......................................................................................................................
Entering Schedule Programming ............................................................................................
Inputting Basic Program .....................................................................................................
Changing Parts of the Program ..........................................................................................
4
6
6
8
8
8
10
10
10
10
12
12
13
14
15
17
18
19
39
69-1611
Programming Price Response ..................................................................................................
Overview .................................................................................................................................
Entering Price Response Programming ..................................................................................
Controlling Heat/Cool System ..................................................................................................
Changing the System Setting ..................................................................................................
Controlling Fan ...........................................................................................................................
Troubleshooting .........................................................................................................................
Personal Programming Charts .................................................................................................
Customer Assistance ................................................................................................................
Warranty ......................................................................................................................................
5
48
48
50
59
59
60
61
66
71
71
69-1611
Getting to Know Your Thermostat
Standard Display
The current room temperature and time are
always part of the standard display. Other
displayed data includes heating and air
conditioning (Heat/Cool) status, day of the
week, schedule period, water heater and
appliance status, and the RSVP current price
(see Fig. 2). The thermostat display automatically sequences several displays (see Fig. 3).
The thermostat has a display, a covered 15 key
keypad, a covered battery compartment, and
an indicator light on the front panel (see Fig. 2).
Fig. 2 shows the thermostat, display, and all
display segments.
NOTE: The colon in the time display blinks,
except when in the programming
mode.
AM
PM
TM
Scientific
Atlanta
Program
Device
Time Temperature
Water
On-Off-Clr
Ahead
Warmer
Day of
Week
Back
Cooler
Appl
On-Off-Clr
Time
Period
Present
Setting
Hold
Fan
Auto-On
Clear
Heat
Cool
Price
Response
INDICATOR LIGHT
M15533
Fig. 2. T7516 Energy Management
Thermostat.
6
69-1611
�
STANDARD
1
�
AM
�
�
�
2
HOLD
A SERIES OF SCREENS THAT PROVIDE
THE PHONE NUMBER TO CALL TO
CONTACT YOUR ENERGY UTILITY.
�
TEMPORARY
BATTERY LOW INDICATION
�
�
1
THIS SCREEN IS ALWAYS PART OF THE DISPLAY SEQUENCE.
2
ONLY APPEARS: WHEN YOUR ENERGY UTILITY SIGNALS IT TO DO SO; DURING A LOSS OF COMMUNICATION,
OR A THERMOSTAT FAULT.
Fig. 3. Display sequence.
7
M20426
69-1611
Replacing Thermostat Batteries
IMPORTANT
Install batteries to maintain the time in
the event of a power loss. Although
the thermostat has a low battery
indicator, replace the batteries once
every two years to prevent the
thermostat from losing the time during
a momentary power loss.
Keypad
Lift the front cover to see the keypad. From the
keypad, you can operate and program the
thermostat. To operate the thermostat, press
and release the keys.
NOTE: The thermostat registers all programming inputs immediately and maintains them until manually changed.
Low batteries or power outages do
not delete thermostat programming.
NOTE: If the time is ever incorrect, you can
not change it. Your energy utility
periodically updates the clock to the
correct time.
Battery Compartment
The battery compartment under the left side of
the front panel contains two AA batteries that
keep the clock running during a power interruption.
8
69-1611
As the batteries run low, the thermostat display
sequence includes an indication of this. The
low battery indication appears one to two
months before the batteries run out completely.
Replace the batteries as soon as possible after
the indication appears.
You need two AA alkaline batteries (not
supplied); non-alkaline batteries do not last as
long, and can leak, damaging the thermostat or
wall surface. To replace the batteries:
1. Use a coin to carefully remove the
battery door (see Fig. 4).
2. Follow the directions on the label
revealed by removal of the battery door.
M1719C
REMOVING
BATTERY
DOOR
Fig. 4. Battery Door Removal.
9
69-1611
When the light is off, the emergency heat (or
auxiliary heat) is off.
When the light is on, the emergency heat
(or auxiliary heat) is on.
Indicator Light
This light indicates primarily the emergency
heat (or auxiliary heat). It also indicates
whether Critical Time-of-Use Pricing is in effect,
or is scheduled (see Table 1).
Table 1. Critical RSVP Price Indications.
Auxiliary (or
Emergency) Heat
Off
On1
Indicator Light
Critical RSVP Price
Flashes three times, then pauses.
In effect.
Flashes once, then pauses.
Scheduled to start within 30 min.
Flashes twice, then remains on.
In effect.
Periodically turns off once.
Scheduled to start within 30 min.
1Heat pump thermostats only.
10
69-1611
Programming Overview
User Operations
Complete the Personal Programming Charts
(Tables 3 through 6) before you program your
thermostat.
Present Setting
Press and release the Present Setting key to
return to standard display from any other
display. The display first switches to show the
current settings. After a few seconds the
thermostat returns to the standard display.
You can program the thermostat with separate
schedules for heat, cool, electric water heater,
and one appliance (such as a pool pump).
Each device schedule is for seven separate
days and up to four periods. For convenience,
you can program the seven days individually,
or simultaneously in any one of the following
groupings: Monday through Sunday, Monday
through Friday, or Saturday and Sunday. The
four periods are: Morning (MORN), Day (DAY),
Evening (EVE), and Night (NIGHT).
NOTE: If the heating and cooling are both off,
the display will show Set - -.
CAUTION
Equipment Damage Hazard.
Use of sharp fingernails or pencil
points can damage the keypad
beyond repair.
Use the ball of your finger or a soft
pencil eraser when pressing the keys.
11
69-1611
Overrides
An override is a setting used to manually
change the setting without affecting the
program memory.
Hold
A hold is a setting used to override the program
for an extended period of time. A hold maintains a setting until manually changed.
From the standard display, press the Clear key
to clear any temperature override in effect.
The hold display indicates all items currently
set on hold.
M15508
M15505
Press and release the Hold key to get to the
hold display. Modifying any item being permanently held (with Warmer, Cooler, Water, and
Appl keys) also brings up the hold display.
Press Warmer or Cooler keys with hold
displayed to increase or decrease the setpoint.
To clear Water or Appliance overrides, press
the Water or Appl key until the display shows
neither On nor Off underneath Water or Appl.
Water
On-Off-Clr
or
M15470
Appl
On-Off-Clr
M15471
12
69-1611
Press Water or Appl keys to toggle the hold
status.
Water switches between: no hold and hold
off.
Appl cycles through: no hold, hold on, hold
off, and back to no hold.
RSVP Price changes to Critical, or the thermostat enters the next scheduled period.
The temporary display indicates the items set
on temporary.
NOTES:
— Only items being held appear on the
display.
— Water cannot be permanently held on,
but it can be permanently held off.
— With no temperature displayed, no
hold exists.
M15506
From the standard display, press the Warmer
or Cooler key to get to the temporary display.
Use these keys to increase or decrease the
room temperature setting.
Temporary
A temporary is a setting used to override the
program for a brief period of time. Temporary
settings maintain a setting until either the
13
69-1611
—
Press Water or Appl keys to display the
temporary display and toggle the water or
appliance state.
—
—
—
M15509
NOTES:
— A temporary cannot clear or replace a
hold.
— With a hold in effect, an attempt to set
a temporary changes the display to
the hold display.
— Only items being held appear on the
display.
In spite of period changes, a temporary Water override, by default, lasts
for one hour.
With no temperature displayed, no
temporary exists.
Press the Hold key twice to get to the
temporary display.
A temporary ends when the RSVP
price changes to a rate programmed
to switch on the Water or Appliance.
Recovery From Setback
Recovery is the time when the thermostat
operates the heating or cooling equipment to
return the house from the energy savings to
the temperature you prefer when you are
present and awake.
14
69-1611
This thermostat uses a recovery process that
turns your heating/cooling equipment on or off
at the time you program the temperature to
change. For example, if you set the thermostat
to heat to 72°F at 6:00 AM, the heating
equipment comes on at 6:00 AM and begins
warming the house to 72°F. If you want the
temperature in the house to be 72°F at 6:00
AM, you must set the thermostat to turn on
earlier; for example, 5:30. (The amount of time
required to warm or cool your house to the
temperature you want depends on many
factors such as the size of your heating/cooling
equipment and the outdoor temperature.)
Programming Your Thermostat
IMPORTANT
Press and release the Present Setting
key to exit programming and return to
the standard display.
NOTES:
— Energy prices supplied by your
energy utility may influence the times
you choose to schedule periods for
maximum energy efficiency.
— Each period can occur at any programmed time; for example, you can
set morning at 9 PM. When you
program the thermostat, be careful to
use the correct time to avoid confusion.
NOTE: If the thermostat is for a heat pump
system, the thermostat uses a method
of recovery that helps reduce the use
of auxiliary heat.
15
69-1611
has time to reach the desired temperature before you get there.
NIGHT is the time you usually go to sleep.
While you are sleeping, you can save
energy by setting the thermostat to
control the temperature higher or lower
(depending on the season).
MORN is the time you get up. Generally,
you want the house at a comfortable
temperature when you wake up. Set the
MORN time earlier than your alarm clock
so your home has time to reach the
desired temperature.
DAY is the time you leave for work or
school. Generally, once you leave your
home, you want the temperature higher
or lower (depending on the season) so
that you can save energy while you are
away.
EVE is the time you return from work or
school. Again, you want your home at a
comfortable temperature when you
return and go about the normal activities
of your evening. Set the EVE time earlier
than the time you arrive so your home
If you choose not to program the thermostat, it
controls the temperature using the following
defaults:
• The cooling temperature remains set to a
constant 78°F.
• At 6:00 AM every day, the thermostat sets
the heating temperature to 68°F.
• At 10:00 PM every night, the thermostat
reduces the heating temperature to 60°F
You do not need to enter a time and tempera16
69-1611
As the cost of energy increases, the thermostat
uses your pre-programmed choices to reduce
usage by temporarily changing the setpoint;
that is, it changes the temperature setting—
increasing it for cooling, decreasing it for
heating—or turns off the water heater and/or
appliance.
ture program for every period if your schedule
does not require it; for example, if your home is
occupied during the day on weekdays, you can
program only the MORN and NIGHT times.
NOTE: You cannot set temperatures higher
than 88°F or lower than 45°F.
NOTE: You can enter the number of degrees
you want the thermostat to change
the temperature (offsets) for each
price except Low. The Low price
always uses whatever schedule
programming exists and it is the basis
for the offsets. The one exception is
the water heater, which is always
enabled during the low price.
Price Response
You can also program the thermostat based on
the current price of electricity. Use Tables 7 and
8 to plan the Price Response program.
Price Response programming allows the
thermostat to respond to changes in the RSVP
prices. Your energy utility tells the thermostat
what the current RSVP price is for electricity.
These prices are: Low (least expensive),
Medium, High, and Critical (most expensive).
17
69-1611
NOTE: Before programming the thermostat,
remove the clear protective plastic
display overlay.
CAUTION
Equipment Damage Hazard.
Use of sharp fingernails or pencil
points can damage the keypad
beyond repair.
Use the ball of your finger or a soft
pencil eraser when pressing the keys.
Entering Schedule Programming
Refer to your Personal Programming Charts
and proceed as follows:
IMPORTANT
The thermostat registers all programming inputs immediately and maintains them until manually changed.
Low batteries or power outages do
not delete thermostat programming.
IMPORTANT
When programming for the appliance,
make certain that you consider
potential safety issues; for example:
with a pool pump during winter
freezing weather, you will have to
operate the pool pump as you have
always done to prevent pump and
pipe freezing.
18
69-1611
IMPORTANT
Because this procedure can affect up
to seven days of programming, be
careful when making changes with
multiple days selected.
NOTE: When setting a program time or
temperature, the instructions direct
you to “Press and hold until the
display shows the desired time (or
temperature).” This changes the
setting quickly in the selected
direction. Use this method when the
change is large (for example, two
hours, or ten degrees). Once the
setting is close, press and release the
key to move the setting one step at a
time.
NOTES:
— If you delete all programming with the
CLEAR key, the thermostat uses the
default program.
— PGM is an indication that you are in
programming mode.
Inputting Basic Program
The most efficient way to program the thermostat is to first input a basic program for the
entire week. Then, you can make changes to
specific days to fit your needs.
19
69-1611
Step 1: Setting Basic Cooling Times and Temperatures.
First program the
MORN time and
temperature, if
desired, for the
entire week.
Device
Press and release until the
display shows PGM COOL.
AM
M15403
Day of
Week
Press and release until the
display shows MON TUE
WED THU FRI SAT SUN.
AM
M15403
Time
Period
Press and release until the
display shows MORN.
AM
M15403
20
69-1611
Ahead
Press and hold until the
display shows the desired
time.
AM
Back
M15404
Warmer
Press and hold until the
display shows the desired
temperature.
AM
Cooler
M15405
21
69-1611
Program the
DAY time and
temperature, if
desired, for the
entire week.
Time
Period
Press and release until the
display shows DAY.
M15406
Ahead
Press and hold until the
display shows the desired
time.
AM
Back
M15407
Warmer
Press and hold until the
display shows the desired
temperature.
AM
Cooler
M15408
22
69-1611
Program the EVE
time and
temperature, if
desired, for the
entire week.
Time
Period
Press and release until the
display shows EVE.
M15409
Ahead
Press and hold until the
display shows the desired
time.
PM
Back
M15410
Warmer
Press and hold until the
display shows the desired
temperature.
PM
Cooler
M15411
23
69-1611
Program the
NIGHT time and
temperature, if
desired, for the
entire week.
Time
Period
Press and release until the
display shows NIGHT.
M15412
Ahead
Press and hold until the
display shows the desired
time.
PM
Back
M15413
Warmer
Press and hold until the
display shows the desired
temperature.
PM
Cooler
M15414
24
69-1611
Step 2: Setting Basic Heating Times and Temperatures.
First program the
MORN time and
temperature, if
desired, for the
entire week.
Device
Press and release until the
display shows PGM HEAT.
M15415
Day of
Week
Press and release until the
display shows MON TUE
WED THU FRI SAT SUN.
M15415
Time
Period
Press and release until the
display shows MORN.
AM
M15416
25
69-1611
Ahead
Press and hold until the
display shows the desired
time.
AM
Back
M15417
Warmer
Press and hold until the
display shows the desired
temperature.
AM
Cooler
M15418
26
69-1611
Program the
DAY time and
temperature, if
desired, for the
entire week.
Time
Period
Press and release until the
display shows DAY.
M15419
Ahead
Press and hold until the
display shows the desired
time.
AM
Back
M15420
Warmer
Press and hold until the
display shows the desired
temperature.
AM
Cooler
M15421
27
69-1611
Program the EVE
time and
temperature, if
desired, for the
entire week.
Time
Period
Press and release until the
display shows EVE.
M15422
Ahead
Press and hold until the
display shows the desired
time.
PM
Back
M15423
Warmer
Press and hold until the
display shows the desired
temperature.
PM
Cooler
M15424
28
69-1611
Program the
NIGHT time and
temperature, if
desired, for the
entire week.
Time
Period
Press and release until the
display shows NIGHT.
PM
M15425
Ahead
Press and hold until the
display shows the desired
time.
PM
Back
M15425
Warmer
Press and hold until the
display shows the desired
temperature.
PM
Cooler
M15426
29
69-1611
Step 3: Setting Basic Water Times and On/Off Settings.
First program the
MORN time and
on/off setting, if
desired, for the
entire week.
Device
Press and release until the
display shows PGM
WATER.
PM
M15427
Day of
Week
Press and release until the
display shows MON TUE
WED THU FRI SAT SUN.
PM
M15427
Time
Period
Press and release until the
display shows MORN.
AM
M15428
30
69-1611
Ahead
Press and hold until the
display shows the desired
time.
AM
Back
M15429
Water
On-Off-Clr
Press and release until the
display shows the desired
on/off setting.
AM
M15429
31
69-1611
Program the
DAY time and
on/off setting, if
desired, for the
entire week.
Time
Period
Press and release until the
display shows DAY.
M15430
Ahead
Press and hold until the
display shows the desired
time.
AM
Back
M15431
Water
On-Off-Clr
Press and hold until the
display shows the desired
on/off setting.
AM
M15431
32
69-1611
Program the EVE
time and on/off
setting, if
desired, for the
entire week.
Time
Period
Press and release until the
display shows EVE.
M15432
Ahead
Press and hold until the
display shows the desired
time.
PM
Back
M15433
Water
On-Off-Clr
Press and hold until the
display shows the desired
on/off setting.
PM
M15433
33
69-1611
Program the
NIGHT time and
on/off setting, if
desired, for the
entire week.
Time
Period
Press and release until the
display shows NIGHT.
PM
M15434
Ahead
Press and hold until the
display shows the desired
time.
PM
Back
M15434
Water
On-Off-Clr
Press and hold until the
display shows the desired
on/off setting.
PM
M15434
34
69-1611
Step 4: Setting Basic Appliance Times and On/Off Settings.
First program the
MORN time and
on/off setting, if
desired, for the
entire week.
Device
Press and release until the
display shows PGM APPL.
PM
M15443
Day of
Week
Press and release until the
display shows MON TUE
WED THU FRI SAT SUN.
PM
M15443
Time
Period
Press and release until the
display shows MORN.
AM
M15436
35
69-1611
Ahead
Press and hold until the
display shows the desired
time.
AM
Back
M15437
Appl
On-Off-Clr
Press and hold until the
display shows the desired
on/off setting.
AM
M15437
36
69-1611
Program the
DAY time and
on/off setting, if
desired, for the
entire week.
Time
Period
Press and release until the
display shows DAY.
M15438
Ahead
Press and hold until the
display shows the desired
time.
AM
Back
M15439
Appl
On-Off-Clr
Press and hold until the
display shows the desired
on/off setting.
AM
M15439
37
69-1611
Program the EVE
time and on/off
setting, if
desired, for the
entire week.
Time
Period
Press and release until the
display shows EVE.
M15440
Ahead
Press and hold until the
display shows the desired
time.
PM
Back
M15441
Appl
On-Off-Clr
Press and hold until the
display shows the desired
on/off setting.
PM
M15441
38
69-1611
Program the
NIGHT time and
on/off setting, if
desired, for the
entire week.
Time
Period
Press and release until the
display shows NIGHT.
M15442
Ahead
Press and hold until the
display shows the desired
time.
PM
Back
M15443
Appl
On-Off-Clr
Press and hold until the
display shows the desired
on/off setting.
PM
M15443
IMPORTANT
Because this procedure can affect up
to seven days of programming, be
careful when making changes with
multiple days selected.
Changing Parts of the Program
After you input the basic program for the entire
week, make changes to specific days to tailor
the program to fit your needs.
39
69-1611
Step 5: Changing Individual Cooling Times and Temperatures.
The following example illustrates modifying the Sunday Morning Cooling program.
First, select
COOL, and the
desired day and
period for the
change.
Device
Press and release until the
display shows PGM COOL.
PM
M15414
Day of
Week
Press and release until the
display shows the desired
day(s).
PM
M15445
Time
Period
Press and release until the
display shows the desired
period.
AM
M15444
40
69-1611
Adjust the time
that the period
begins.
Ahead
Press and hold until the
display shows the desired
time.
AM
Back
M15446
Warmer
Press and hold until the
display shows the desired
temperature.
AM
Cooler
M15448
OR
Delete the
programming
from the period
for the days
shown on the
display.
Press and release.
Clear
M15447
41
69-1611
Step 6: Changing Individual Heating Times and Temperatures.
The following example illustrates modifying the Saturday Day Heating program.
First, select
HEAT, and the
desired day and
period for the
change.
Device
Press and release until the
display shows PGM HEAT.
PM
M15426
Day of
Week
Press and release until the
display shows the desired
day(s).
AM
M15449
Time
Period
Press and release until the
display shows the desired
period.
AM
M15450
42
69-1611
Adjust the time
that the period
begins.
Ahead
Press and hold until the
display shows the desired
time.
Back
M15451
Warmer
Press and hold until the
display shows the desired
temperature.
Cooler
M15452
OR
Delete the
programming
from the period
for the days
shown on the
display.
Press and release.
Clear
M15453
43
69-1611
Step 7: Changing Individual Water Times and On/Off Settings.
The following example illustrates modifying the Saturday Evening Water program.
First, select
WATER, and the
desired day and
period for the
change.
Device
Press and release until the
display shows PGM
WATER.
AM
M15431
Day of
Week
Press and release until the
display shows the desired
day(s).
AM
M15454
Time
Period
Press and release until the
display shows the desired
period.
PM
M15455
44
69-1611
Adjust the time
that the period
begins.
Ahead
Press and hold until the
display shows the desired
time.
PM
Back
M15456
Water
On-Off-Clr
Press and release until the
display shows the desired
on/off setting.
OR
Delete the
programming
from the period
for the days
shown on the
display.
PM
M15458
Clear
Press and release. The
WATER indication shows
neither on nor off.
M15457
45
69-1611
Step 8: Changing Individual Appliance Times and On/Off Settings.
The following example illustrates modifying the Saturday Day Appliance program.
First, select
APPL, and the
desired day and
period for the
change.
Device
Press and release until the
display shows PGM APPL.
AM
M15436
Day of
Week
Press and release until the
display shows the desired
day(s).
AM
M15459
Time
Period
Press and release until the
display shows the desired
period.
AM
M15460
46
69-1611
Adjust the time
that the period
begins:
Ahead
Press and hold until the
display shows the desired
time.
AM
Back
M15481
Appl
On-Off-Clr
Press and release until the
display shows the desired
on/off setting.
OR
Delete the
programming
from the period
for the days
shown on the
display:
AM
M15483
Clear
Press and release. APPL
indication shows neither on
nor off.
M15482
47
69-1611
NOTE: If you set the period start times so the
next period begins before the current
period then the Heat/Cool system
uses periods out of expected order;
for example, NIGHT can occur before
EVE.
Programming Price Response
Overview
Price response allows the thermostat to
respond to changes in the RSVP prices. Your
energy utility tells the thermostat what the
current RSVP price is for electricity. These
prices are: Low (least expensive), Medium,
High, and Critical (most expensive). As the cost
of energy increases, the thermostat reduces
usage by temporarily changing the setpoint;
that is, it changes the temperature setting—
increasing it for cooling, decreasing it for
heating—or turns off the water heater and/or
appliance. If you do not enter any price offsets,
the thermostat uses the default settings (see
Table 2).
48
69-1611
Table 2. Price Response Program Defaults.
Setpoint Offset (°°F or °C)
Price Rate
Heat
Cool
Hot Water
Appl
Low1
0
0
on
on
Medium
-1
+1
on
on
High
-2
+2
on
on
Critical
-5
+5
off
off
1The Low Price Response settings are fixed and cannot be changed.
temperature to change from what you programmed for normal operation to save money
at each price. Think of the Price Response
programming as what you are willing to give up
to save money when RSVP prices increase.
Heat offsets are always negative (less heat to
save energy). Cool offsets are always positive
(less cooling to save energy). Hot Water and
Appliance settings are simply on or off.
The offset entered is the number of degrees
you are willing to allow the heating or cooling
49
69-1611
If you program an incorrect offset, press and
release the Clear key. This changes the offset
on the display to zero. The Clear key works for
all programmable rates.
With an appliance, the APPL indicator lights
with either an ON or an OFF indication. With
APPL set to OFF at a particular price, when the
price reaches that level, the appliance load
turns off, ignoring the program schedule. The
water indicator works identically to the appliance indicator with one exception: when the
RSVP price is low the water indicator is always
on.
Entering Price Response Programming
Price Response programming is very similar to
the other programming. One primary difference
is that you can program the temperature offsets
and water/appliance setting changes from the
same display. The same water and appliance
setting changes apply for both heating and
cooling. Therefore, they need only be set once.
Program them from either the heating or the
cooling offset display. The following programming instructions—both heating and cooling—
detail this process.
NOTE: Price Response programming does
not affect temperature, water, or
appliance holds.
For example, if you want your home heated to
72° during low rate, but are willing to allow the
temperature down as low as 70° during high
rate, your heat offset for rate H (high) is -2
(72° -2° = 70°). If you do not enter an offset,
the offset remains as shown in Table 2.
50
69-1611
Step 1: Setting Price Offsets for Cooling.
First, program
the Medium
offset.
Device
Press and release until the
display shows PGM COOL.
Price
Response
Press and release the key
to show OF (indicating
temperature offset).
AM
M15485
M15487
Warmer
Cooler
Press and release until the
display shows the desired
(positive) temperature
offset.
M15487
51
69-1611
Water
On-Off-Clr
Press and release until the
display shows the desired
Water on/off setting for the
Medium offset.
M15487
Appl
On-Off-Clr
Press and release until the
display shows the desired
Appliance on/off setting for
the Medium offset.
M15487
Next, program
the High offset.
Price
Response
Press and release the key
to show OF (indicating
temperature offset).
M15488
52
69-1611
Warmer
Cooler
Press and release until the
display shows the desired
(positive) temperature
offset.
M15489
Water
On-Off-Clr
Press and release until the
display shows the desired
Water on/off setting for the
High offset.
M15489
Appl
On-Off-Clr
Press and release until the
display shows the desired
Appliance on/off setting for
the High offset.
M15490
53
69-1611
Then, program
the Critical
offset.
Price
Response
Press and release the key
to show OF (indicating
temperature offset).
M15491
Warmer
Cooler
Press and release until the
display shows the desired
(positive) temperature
offset.
M15493
Water
On-Off-Clr
Press and release until the
display shows the desired
Water on/off setting for the
Critical offset.
M15493
Appl
On-Off-Clr
Press and release until the
display shows the desired
Appliance on/off setting for
the Critical offset.
M15493
54
69-1611
Step 2: Setting Price Offsets for Heating.
First, program
the Medium
offset.
Device
Press and release until the
display shows PGM HEAT.
AM
M15494
Price
Response
Press and release until the
display shows OF
(indicating temperature
offset).
M15497
Warmer
Cooler
Press and release until the
display shows the desired
(negative) temperature
offset.
M15497
55
69-1611
Water
On-Off-Clr
Press and release until the
display shows the desired
Water on/off setting for the
Medium offset.
M15497
Appl
On-Off-Clr
Press and release until the
display shows the desired
Appliance on/off setting for
the Medium offset.
M15497
Next, program
the High offset.
Price
Response
Press and release the key
to show OF (indicating
temperature offset).
M15498
Warmer
Cooler
Press and release until the
display shows the desired
(negative) temperature
offset.
M15499
56
69-1611
Water
On-Off-Clr
Press and release until the
display shows the desired
Water on/off setting for the
High offset.
M15501
Appl
On-Off-Clr
Press and release until the
display shows the desired
Appliance on/off setting for
the High offset.
M15501
Then, program
the Critical
offset.
Price
Response
Press and release the key
to show OF (indicating
temperature offset).
M15502
Warmer
Cooler
Press and release until the
display shows the desired
(negative) temperature
offset.
M15503
57
69-1611
Water
On-Off-Clr
Press and release until the
display shows the desired
Water on/off setting for the
Critical offset.
M15503
Appl
On-Off-Clr
Press and release until the
display shows the desired
Appliance on/off setting for
the Critical offset.
M15503
After you have
finished
programming
offset values,
return to
standard display.
Present
Setting
Press and release to return
to the standard display.
M15484
58
69-1611
Controlling Heat/Cool System
With a conventional heating/cooling system, you can set the system to: HEAT, COOL or OFF. With
a heat pump system, you can set the system to: COOL, HEAT, EM HEAT, or OFF.
Changing the System Setting
Manually change
the system
setting.
Heat
Cool
Press and release until the
display shows the desired
system status.
AM
M15504
HEAT: The thermostat controls your heating system according to the schedule you programmed.
Heat pump models display AUX and the indicator light flashes denoting auxilliary heat
element operation, see Table 1.
EM HEAT: The emergency heater element of the heat pump is enabled.
COOL: The thermostat controls your cooling system according to the schedule you programmed.
No status displayed: Both the heating and cooling systems are off.
59
69-1611
Controlling Fan
There are two fan settings: AUTO and ON.
To select the fan setting, press the Fan key. Each time you press the key, the fan status changes to
the next setting.
With FAN displayed, the fan is on continuously. Use this setting for improved air circulation or
during special occasions of short duration.
With nothing displayed, the fan is in AUTO mode (it comes on with the heating or cooling equipment, as needed). AUTO is the typical setting. If you have a two-speed fan, it usually runs on high
with cooling and on low with heating.
60
69-1611
Troubleshooting
IF…
THEN…
Display does not come on. • There is no power being supplied to the thermostat. Check fuse
or circuit breaker.
• Check the furnace air filter. A dirty filter will choke the airflow
causing safety shutdown; replace or clean, if necessary.
Temperature display does
not go lower than 45°F or
higher than 88°F during
programming.
• You have reached the thermostat setting limit. The setting
range is 45°F to 88°F.
Temperature change
occurs at the wrong time.
• Check programming for the period in question. Be sure the
time—including AM/PM indication—is correct. Reprogram if
necessary.
• Keep in mind that it takes time for the system to recover.
Refer to the Recovery from Setback section for details.
(continued)
61
69-1611
Troubleshooting Guide (continued)
IF…
THEN…
Heating unit does not
come on.
• Check that the thermostat is set to heat. If it is not, press the
Heat/Cool key until the display indicates HEAT.
• If the temperature setting is higher than current temperature,
and display indicates HEAT, contact your energy utility.
• Heat pump thermostats have a built-in five minute time delay
for heating. After changing the setting, the thermostat delays
before starting the heating to prevent equipment damage.
Cooling does not come on. • Check that the thermostat is set to cool. If it is not, press the
Heat/Cool key until the display indicates COOL.
• Check the fuse or circuit breaker and replace or reset, if
necessary.
• The thermostat has a built-in five minute time delay for cooling.
After changing the setting, the thermostat delays before
starting the cooling to prevent equipment damage.
62
69-1611
IF…
THEN…
Cooling does not come on
(continued).
• If temperature setting is lower than current temperature and
the display indicates COOL, set the system control OFF for
ten minutes. After ten minutes, return the system control to
cool. If the cooling comes on, the compressor may have
reached a safety limit and shut down. If the air conditioner
does not come on after ten minutes and the display shows
COOL, contact your energy utility.
The house is too warm or
too cool.
• Press the Present Setting key to check the temperature
setting.
• If desired, change the temperature setting (see Holds section).
• The RSVP Rate may be adjusting the setting beyond what you
desire. Check your offset temperatures; you may need to
change them to provide a more comfortable temperature.
System ON indicated but
• Allow time for the furnace or heat pump to heat up and the fan
no heat is coming from the
to come on before checking for heat at the vent.
vents.
(continued)
63
69-1611
Troubleshooting Guide (continued)
IF…
THEN…
Thermostat current setting • Be aware that it is normal for the current setting and display
temperature to differ on occasion.
does not match the display
• During recovery from setback or setup, setting and display
temperature.
temperatures may differ during the recovery period.
Incorrect room
• The thermostat is factory-calibrated and cannot be adjusted.
temperature is showing on
thermostat display.
Thermostat is flashing
CALL followed by a phone
number.
• Your thermostat has lost communication with your energy
utility. Call the number displayed on the thermostat.
Hot water and appliance
• Verify programming for loads and Time-of-Use rate.
devices are not functioning • Communications are not properly functioning. Contact your
energy utility.
per schedule.
Temperature displayed as • Temperature sensor has failed.
• Temperature is out of thermostat operating range.
“- -”.
64
69-1611
IF…
THEN…
Clock gives erroneous
reading.
• Check to see if display shows low battery, if so replace
batteries.
• Gulf Power sets the clock and it cannot be adjusted by the
customer. If necessary, contact your energy utility.
Clock occasionally
changes more than one
minute at a time.
• Your energy utility periodically resets the clock to the correct
time. This can change the time more than one minute (see
Replacing the Batteries section).
Thermostat displays:
“bUSY”.
• If condition persists for more than one minute, the thermostat
cannot establish the communication link; contact your energy
utility.
65
69-1611
Personal Programming Charts
Table 3. Cooling Schedule (For Summer Use).
Morning
Cool
Time
Setting
Day
Time
Evening
Setting
Time
Setting
Night
Time
Setting
Mon
Tue
Wed
Thur
Fri
Sat
Sun
66
69-1611
Table 4. Heating Schedule (For Winter Use).
Morning
Heat
Time
Setting
Day
Time
Evening
Setting
Time
Setting
Night
Time
Setting
Mon
Tue
Wed
Thur
Fri
Sat
Sun
67
69-1611
Table 5. Water Schedule (For Hot Water Control).
Morning
Water
Time
On/Off
Day
Time
Evening
On/Off
Time
On/Off
Night
Time
On/Off
Mon
Tue
Wed
Thur
Fri
Sat
Sun
NOTE: The On setting refers to enabling the operating mode; you cannot program a water heater
“on”.
68
69-1611
Table 6. Appliance Schedule (For One Appliance Control).
Morning
Appl
Time
On/Off
Day
Time
Evening
On/Off
Time
On/Off
Night
Time
On/Off
Mon
Tue
Wed
Thur
Fri
Sat
Sun
69
69-1611
Table 7. Offset Values for RSVP Rate.
Offsets (+) for Cooling (setpoint increase)
Offsets (-) for Heating (setpoint decrease)
Price L
Price L
Price M
Price H
Price C
N/A
Price M
Price H
Price C
N/A
Table 8. Water and Appliance Offsets for RSVP Rate.
On/Off setting for Water
Price L
Price M
Price H
On/Off setting for Appliance
Price C
N/A
Price L
Price M
Price H
Price C
N/A
70
69-1611
Warranty
Honeywell warrants this product, excluding battery, to be free from defects in the workmanship or materials, under normal use and service, for a
period of one (1) year from the date of purchase by the consumer. If, at any time during the warranty period, the product is defective or malfunctions,
Honeywell shall repair or replace it (at Honeywell’s option) within a reasonable period of time.
If the product is defective,
(i) return it, with a bill of sale or other dated proof of purchase, to the retailer from which you purchased it, or
(ii) package it carefully, along with proof of purchase (including date of purchase) and a short description of the malfunction, and mail it,
postage prepaid, to the following address:
Honeywell Return Goods
1885 Douglas Drive
Golden Valley, MN 55422
This warranty does not cover removal or reinstallation costs. This warranty shall not apply if it is shown by Honeywell that the defect or malfunction
was caused by damage which occurred while the product was in the possession of a consumer.
Honeywell’s sole responsibility shall be to repair or replace the product within the terms stated above. HONEYWELL SHALL NOT BE LIABLE FOR
ANY LOSS OR DAMAGE OF ANY KIND, INCLUDING ANY INCIDENTAL OR CONSEQUENTIAL DAMAGES RESULTING, DIRECTLY OR
INDIRECTLY, FROM ANY BREACH OF ANY WARRANTY, EXPRESS OR IMPLIED, OR ANY OTHER FAILURE OF THIS PRODUCT. Some states
do not allow the exclusion or limitation of incidental or consequential damages, so this limitation may not apply to you.
THIS WARRANTY IS THE ONLY EXPRESS WARRANTY HONEYWELL MAKES ON THIS PRODUCT. THE DURATION OF ANY IMPLIED
WARRANTIES, INCLUDING THE WARRANTIES OF MERCHANTABILITY AND FITNESS FOR A PARTICULAR PURPOSE, IS HEREBY LIMITED
TO THE ONE YEAR DURATION OF THIS WARRANTY. Some states do not allow limitations on how long an implied warranty lasts, so the above
limitation may not apply to you.
This warranty gives you specific legal rights, and you may have other rights which vary from state to state.
If you have any questions concerning this warranty, please write to Home and Building Control Customer Relations, Honeywell Inc., 1985 Douglas
Drive North, Minneapolis, Minnesota 55422. In Canada, Honeywell Limited/Honeywell Limitée, Dynamic Drive, Scarborough, Ontario, M1V 4Z9.
71
69-1611
Automation and Control Solutions
Honeywell Limited-Honeywell Limitée
Honeywell
35 Dynamic Drive
1985 Douglas Drive North
Scarborough, Ontario
Golden Valley MN 55422
M1V 4Z9
Copyright © 2002 Honeywell
All Rights Reserved ® U.S. Registered Trademark
69-1611 2-02 G.H.
Printed in U.S.A. on recycled
paper containing at least 10%
72 paper fibers.
post-consumer
www.honeywell.com/yourhome
69-1611