1
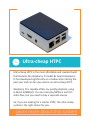
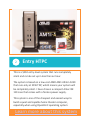
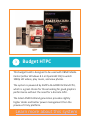
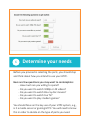
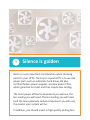
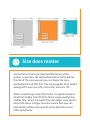
A PUBLICATION BY
MY MEDIA EXPERIENCE
HOME THEATER PC:
LESSONS LEARNED
Things I Wish I Would Have Known Before I Built My First HTPC
2015 EDITION
TABLE OF CONTENTS
1. GETTING STARTED
2. GENERAL LESSONS LEARNED
3. HOW TO BUILD A HTPC
4. HOW TO CONFIGURE IT
5. HOW TO SET UP SOFTWARE
CHAPTER ONE
GETTING
STARTED
About this eBook
Choosing the right hardware and software for your first Home
Theater PC (HTPC) can be a difficult process.
I wanted to make it easy for you and keep you from wasting
your time and your money on tedious research, so I built and
tested five reference HTPC builds myself and combined all of
the key lessons learned into this compact and practical eBook.
If you are looking for some excellent hardware and software
tips, this eBook will definitely save your time and money. The
content in this eBook is for informational purposes only.
You should always seek the advice of a professional before
acting on something that I have published or recommended. No
part of this publication shall be reproduced, transmitted or sold
without the prior consent of the author.
I'm the founder of the popular HTPC
resource called My Media Experience,
founded in 2009. I have over 15 years of
experience in building HTPCs.
- Tuukka Komssi, Author
How to use this eBook
I've organized this eBook into chapters and they include one
lesson learned on each of the page, so you can easily locate the
information that is most relevant to your situation.
Chapter 1 is about introducing you to the subject.
Chapter 2 is about basic lessons learned on HTPC principles.
Chapter 3 is about component selection.
Chapter 4 is about configuring and making the most out of it.
Chapter 5 is about front-end and back-end software.
You will not only find a lot of useful information on each page,
but some of the lessons include a link to
mymediaexperience.com website, where you will find more
relevant and up-to-date information on the particular subject.
So, whenever you wish to get more information on the
subject, just follow this link:
Learn more about this (click here)
Introduction
A Home Theater Personal Computer, HTPC for short, is a
computer connected to your TV that plays local media (movies,
music, and photos) and internet media content. If you want to
reach the full potential of connected home entertainment, then
getting a HTPC is the way to go. HTPC brings most of the home
theater devices into one box.
HTPCs are often smaller and quieter compared to desktop
computers, as they are designed to be used in the living room.
The not-so-silent hum of your desktop PC might not be a
problem in the office, but it can be a significant annoyance to
people in your living room trying to enjoy a movie.
What are the benefits of a HTPC?
- It reduces the number of home theater devices
- It provides a large degree of flexibility
- It has a faster user interface
- It has custom fanart and metadata for your media
- It has large storage capacity for media files
- It supports many media formats
- It has built in DVR capability
In this chapter, I will introduce five reference HTPCs that I
currently use in my home:
1
Ultra-cheap HTPC
Ultra-cheap HTPC is the most affordable and smallest build
that features the Raspberry Pi model B+ board. Raspberry
Pi has developed significantly as a media center during the
past year and can be now used as an ultra-cheap HTPC.
Raspberry Pi is capable of Blu-ray quality playback, using
H.264 at 40MBits/s. You can also play MPEG-2 and VC1
video files, but you need to buy a separate license.
So, if you are looking for a starter HTPC, this ultra-cheap
system is the right choice for you.
Learn more about this system
2
Entry HTPC
This is a $250 entry-level system that runs completely
silent and can be set up in less than an hour.
The system is based on a low-cost AMD AM1 Athlon 5350
that runs only at 25W TDP, which means your system will
be completely silent. I have chosen a compact Antec ISK
110 case that comes with a fanless power supply.
This system is one of the cheapest and easiest ways to
build a quiet and capable home theater computer,
especially when using OpenELEC operating system
Learn more about this system
3
Budget HTPC
This budget build is designed to be used with XBMC Media
Center (either Windows 8.1 or OpenELEC OS) to watch
1080p HD videos, play music, and view photos.
The system is powered by AMD’s A6-6400K Richland CPU,
which is a great choice for those looking for good graphics
performance without the need for a discrete GPU.
The latest AMD Richland generation provides slightly
higher clocks and better power management than the
previous Trinity platform.
Learn more about this system
4
Value HTPC
This value HTPC provides the best HD video and 3D Blu-ray
performance with an excellent value to price ratio.
When using the aftermarket CPU cooler and case fan, this
build is practically silent. This is the HTPC at the moment.
This system includes an Intel Core i3 processor, which
many people regard as the standard in HTPC applications.
If you are not planning to play the latest games with your
HTPC, you will be fine without a separate graphics card.
Learn more about this system
5
Performance HTPC
This performance HTPC is a project for building a near
silent HTPC that is capable of 1080p gaming. I am using an
Intel Core i5-4570S processor, which is a 65W CPU that
runs super cool and keeps everything quiet while providing
enough performance even for games.
I chose a Gigabyte 750 Ti Windforce graphics card, which is
an excellent choice for silent running HTPCs whilst offering
strong performance. I am using a Silverstone ML07 case,
which has an advanced layout designed for maximum
performance and a PCI-E riser.
Learn more about this system
CHAPTER TWO
GENERAL
LESSONS 6-19
The rule of thumb
You already own a camera or smart-phone to take photos. You
already own an MP3 player to listen to digital music. You
probably watch online videos from YouTube or other services.
Why wouldn’t you bring all of this technology into your TV?
You might have already heard about home theater computers
that allow you to take your media experience to the next level.
However, reading online technology discussion forums or
visiting a local computer store might feel overwhelming to you,
as there are too many products available and you don't
necessarily know which products are good values.
As I have spent thousands of dollars and countless hours to find
out how to build the ultimate media experience, in this chapter
I will share the basic lessons learned.
“
Getting your HTPC together is a bit
different from setting up a regular PC.
You should be thinking about power
efficiency, form factor size and noise
levels. And most importantly, you should
be thinking about the user friendliness.
6
Determine your needs
Before you proceed in selecting the parts, you should stop
and think about how you intend to use your HTPC.
Here are few questions you may want to contemplate:
- How much are you willing to spend?
- Do you want to watch 1080p or 4K videos?
- Do you want to watch Blu-ray disc movies?
- Do you want to watch live TV?
- Do you want to play modern games?
You should focus on the key use of your HTPC system, e.g.,
is it a media server or gaming HTPC. You will need to know
this in order to decide on the type of parts you need.
7
Take the time to research
There is no rush to build your HTPC, so take the time to
carefully research components to make sure they are all
compatible with each other.
I would suggest assessing carefully all the ”internet forum
advice”. There is a lot of good advice out there, but you
need to do your own research to find out what you really
need and not buy something you will later regret.
In case you have no idea what to choose, there are
five builds that I have built and tested for a beginner HTPC.
While these components are working well, you need to
understand basic principles in component selection.
8
Find the right balance
Building a home theater computer is about finding the
right balance among:
- acceptable noise levels
- power consumption and performance
- the appearance and size of the case
- how much you are willing to spend on it
Some common considerations when choosing parts are:
cost, performance, form factor (size) of parts, power
consumption, ease of cooling, storage capacities, driver
stability, etc. You should focus on the two often ignored
factors, noise and power efficiency.
9
Silence is golden
Noise is a very important consideration when choosing
parts for your HTPC. The key to a quiet HTPC is to use low
power parts such as solid state hard drives, 80 plus
certified fanless power supplies, and low power CPUs,
which generate less heat and thus require less cooling.
The more power efficient components you will use, the
less cooling you will need. The less cooling you will need
(and the more passively cooled components you will use),
the quieter your system will be.
In addition, you should invest in high-quality cooling fans.
Mini-ITX
Micro-ATX
ATX
10
Size does matter
A form factor means the physical dimensions of the
system. In practice, the motherboard form factor defines
the size of the case you can use, so choose the case,
motherboard, and CPU first. The most popular form factors
among HTPC users are ATX, micro ATX, and mini ITX.
When considering a case form factor, it is good to keep in
mind that smaller mini ITX form factor cases usually have
smaller fans, which are louder than the larger ones used in
micro ATX cases. A larger case also means that you can
have better airflow and room for more hard drives and
other peripherals.
11
Focus on low TDP rating
A processor, graphics processing unit, and power supply
are the main sources generating heat inside a case.
When choosing a processor or graphics card, it is advisable
to check not only the performance, but also its Thermal
Design Power (TDP), which indicates the power
consumption of a CPU or graphics card.
The TDP describes the maximum amount of power in the
cooling system in a HTPC is required to dissipate. You
should choose a processor or GPU with a max TDP of no
more than 65 watts. The low-power CPU runs at reduced
voltages and emits less heat, which requires less cooling.
12
Don't buy the latest parts
It is better to wait at least 6 months after the release of
new components such as a CPU or graphics card. When I
first purchased AMD A6-6400K Richland processor, it was
not supported by the latest OpenELEC operating system at
that time, but I needed to find a special OpenELEC version
that included the necessary drivers. Nowadays, it works
flawlessly with the latest versions of OpenELEC.
The same happened again, when I first bought an AMD
AM1 platform based AMD Athlon 5350 APU. The drivers
were not mature enough and I had some occasional
freezing before more solid drivers became available.
13
Don't try to future-proof
Future-proofing your system is very difficult. You can buy
components that will be fine in 3 years, but it is not
possible to buy something today that will be really good
when you eventually need it.
So, if you want to build a HTPC that is ready for the future,
unfortunately, the components needed for that are not
available today. For example, I would not suggest trying to
future-proof your system for the ultra HD 4K resolutions if
you don't need that capability today.
My advice is to buy the components that you really need
today and upgrade or build a new one in the coming years.
14
Check the compatibility
When building your first HTPC, you want to know for sure
if these parts are compatible. Unfortunately, I’ve faced
several compatibility issues building HTPCs.
So, be sure to check that
- the motherboard supports selected CPU chipset
- the size of the PSU is compatible with the case
- the PSU is powerful enough for the system
- the aftermarket CPU cooler will fit inside the case
- the memory cards fit next to the CPU cooler
- the graphics card is not too long or tall
- the larger capacity 2.5” hard drive fits if the case
only supports 2.5” HDDs
15
Store media on NAS
I would recommend storing all media files to a separate
Network Attached Storage (NAS) or back-end home media
server that also does all the heavy lifting such as recording
live TV or transcoding video files.
Network Attached Storage (NAS) is storage that can be
accessed over a home network as opposed to single
computer access. In other words, a NAS server allows you
to share media between several PCs and other devices.
An additional benefit is that NAS servers include multiple
HDDs that allow you to back-up and mirror media files.
16
Ditch optical disk drive
Nowadays, many people are downloading or streaming
digital content from iTunes, Spotify, Netflix, Hulu or by
other means from the Internet. If this is the case for you,
perhaps you do not even require a DVD or Blu-ray drive.
In fact, you do not necessarily need an optical disk drive at
all as it is possible to install both Windows and Linux
operating systems from a USB drive.
In general, it is a good idea to remove the optical disk drive
from your HTPC as they use power and are noisy. If you
occasionally need to watch DVDs, you can have an external
USB DVD drive on hand.
17
Positive air pressure
It is a good idea to build positive air pressure flow within
the case. Positive air pressure inside your case will make a
huge difference in keeping dust out.
The case with positive air pressure can prevent dust from
penetrating into the case through the use of filters on
intake fans and forcing air out of the case through
unfiltered vents and gaps. Therefore, intake fans should
provide higher combined airflow compared to exhaust fans
in order to achieve positive pressure inside the case.
Often, the main point is to have the fans nearest to the
CPU drawing out air, and the opposites drawing air in.
18
Clear that cable clutter
Cable management improves internal airflow by reducing
cable clutter to promote accelerated heat removal. In
order to reduce the cable clutter, it is recommended to use
modular PSUs and cable ties.
A modular power supply provides connectors at the power
supply end, allowing unused cables to be detached from
the power supply. You should also use cable ties that will
help you to make your cabling clutter free and thus
improve the airflow.
Another tip is to run the cables along the edges or under
the motherboard.
19
Monitor temperatures
Use temperature-monitoring apps such as SpeedFan to
ensure you have enough cooling after finishing the build.
SpeedFan is a hardware monitoring software that is able to
change fan speeds according to system temperatures. In
the SpeedFan application, you should look at the Core # for
the best temp gauges. The optimal temp is about 5 to 8
degrees C warmer than the ambient temp in the room.
You may need to play around with the number of cooling
fans, fan speeds and temperature levels over time to find
out what nets you the best balance between good
temperatures and good noise levels.
CHAPTER THREE
BUILD IT
LESSONS 20-44
Media Streamers
If getting a HTPC sounds too complicated for you, another
option is to get a media streamer such as Apple TV, Roku or
Google Chromecast. These devices allow you to stream content
from the Internet and other computers to enjoy videos on TV.
They are not as versatile as HTPCs, but as streamers, they are a
good alternative.
If you want to have more flexibility but still don’t want to build
a custom HTPC, then you should consider setting up the very
popular Raspberry Pi mini computer or Ouya game console.
Both of these little devices allow you to install media center
software such as Kodi (was XBMC), which allows you to
customize your media experience much more than the
commercial media streamers.
“
In my opinion, Ouya looks like a very
promising alternative to run Kodi (XBMC)
thanks to its low cost and excellent
performance. However, it does not have
as active development community as
Raspberry Pi at the moment.
20
Linux-based Raspberry Pi
Raspberry Pi is an amazing little computer that can be used
as a complete Kodi entertainment center solution.
I have written a complete and up-to-date tutorial on how
to install and configure Kodi on Raspberry Pi that you can
find by clicking the link below.
You will learn how to build a HTPC front-end by installing
and configuring a Raspberry Pi Kodi distribution called
Raspbmc. You will also learn how to optimize Raspbmc to
run significantly faster for better user experience.
Learn more about Raspberry Pi
21
Android-based Ouya
If you are looking for optimal hardware for use as an XBMC
media platform, the Android-based Ouya game console is
the right choice for you.
In a complete guide that you can find by following the link
below, I will show you easy and advanced ways to set up
XBMC on Android to turn the Ouya game console into the
ultimate media box.
Ouya is great for anyone who wants an affordable and
good media center with the ability to run retro games.
Learn more about Ouya
22
Other Android devices
Some of My Media Experience readers have been really
surprised that I haven't embraced the ready built
inexpensive computers such as Amazon Fire TV,
Chromebox and other Android boxes as clients.
The Ouya game console is the only Android device I
currently own, but I have read many positive reviews
about Amazon Fire TV running with Kodi (was XBMC). The
reason why I have not tested Fire TV is simply because it
hasn't been released in the country where I live. However,
I would definitely suggest trying out Amazon Fire TV.
Learn more about Android boxes
Custom HTPCs
Nowadays, there are all kinds of small media streamers and
smart TVs, so why would you need a HTPC in your living room?
Many of my friends view videos through their Xbox, PlayStation
or Blu-ray player, yet they had no idea what an HTPC was. After
they had seen my home theater PC setup for the first time, they
were amazed at what you can do with your TV.
The key reason to build your own HTPC is the flexibility and
quality. You can have exactly the kind of hardware and user
interface you need.
An HTPC is only as expensive as you make it. You can build an
HTPC for less than 300 dollars. You can even build one using old
PC components you might already have. Furthermore, most
media center software such as Kodi (was XBMC) or Plex, is
entirely free. And, by the way, they look stunning!
“
I enjoy using an HTPC in my living room
because it is tailored exactly to my
family's needs. Favorite TV shows and
movies are easily accessible, and even
my young children know how to access
their own videos from the main menu.
23
Get the right tools
When building my latest performance HTPC using
Silverstone ML07 case, it was really frustrating attaching
the power supply's holder cage back to the case without
having a thin magnetized Phillips screwdriver as the screws
were in difficult places.
So, if you want to save your nerves, I would recommend
getting a thin magnetized Phillips screwdriver.
Secondly, it is a good idea to have placeholders for all the
tiny screws because otherwise you will easily waste time
searching for the lost screws.
24
Start with a case
It is good to start choosing components with a case. The
case size will determine the size of the motherboard you
will need. Remember to pick a good quality case.
The height of the case will also determine what kind of
CPU cooler you can use and whether or not you can use
full or half-height graphics or TV tuner cards.
There are three common form factors: mini-ITX, micro-ATX
and ATX. For HTPC use, the mini-ITX and micro-ATX are
preferred and most common sizes.
25
Use a low power CPU
Nowadays, integrated graphics processing units inside the
processors are powerful enough for HTPC use.
Intel Haswell processors are currently the best choice
when it comes to performance and power efficiency. The
recommended Intel Haswell options are Intel Core i34130T (35W TDP) and Intel Core i5-4570S (65W TDP).
If you want to have cheaper alternatives, the
recommended AMD APUs are AMD AM1 Athlon 5350
(25W TDP) and AMD A6-6400K (65W TDP).
Learn more about HTPC CPUs
26
Compatible motherboard
In addition to the processor, the other important purchase
you should focus on is the motherboard because it will
make or break the performance of all the components that
will be attached later.
The type of motherboard you choose will depend on the
CPU chipset you choose. For Intel Haswell, I would
recommend getting H97 or Z97 series motherboards. For
AMD Richland, you should get AMD FM2 or the newer
FM2+ motherboard.
In addition, you should choose a motherboard with at least
two connectors for controlling case fans.
27
Get enough SATA ports
You should pay attention to the number of SATA ports.
Usually, mini-ITX and micro-ATX motherboards include 4 or
6 SATA ports. If you plan to have several HDDs, for
example, for a media server, be sure to choose a
motherboard that has 6 SATA ports.
If you are planning to use an optical drive and multiple
hard drives, this is an important consideration for you.
For example, when I bought an ASUS AM1I-A mini-ITX
motherboard, I realized that it had only two SATA ports, so
I was only able to use one hard disk in addition to the
optical drive.
28
Use good thermal paste
I would recommend applying a good thermal paste such as
Arctic Silver 5 and Noctua NT-H1 to the processor as it will
help drop the CPU's temperature a couple of degrees.
You should use no more than a pea-sized amount and
spread it in a thin layer over the entire processor surface.
Adding too much thermal paste will slow the transfer of
heat, making it more difficult to cool the CPU quickly.
Ideally, you should use slightly less thermal paste than the
amount shown in the above image.
29
Use a quiet CPU cooler
Stock CPU coolers come free with your CPU but are often
too noisy for HTPC use. Intel Haswell's S- (power saving)
and T- (thin chassis) models have slightly quieter cooling
fans, but they still are not on par with the best coolers.
I would recommend getting an aftermarket CPU cooler
such as Noctua NH-L9A (AMD), NH-L9I (Intel) or Scythe Big
Shuriken 2 (AMD or Intel), which are designed to be quiet.
It is important to install the aftermarket CPU cooler with
the motherboard outside the case as the cooler retention
plate mounts underneath the motherboard.
30
Use low voltage RAM
The most important thing to remember about memory is
to get at least 2 GB for Linux and 4 GB for Windows.
The DDR3-1333 MHz and DDR3-1600 MHz RAM memory
are supported by most motherboards, and while the 1333
is enough for HTPCs, 1600 is better for overclockers.
You should not use memory modules with heatspreaders,
especially with larger CPU coolers as they may not fit
under the heatsink. You should use lower voltage memory
modules as less power consumption means less cooling is
required. This will also save on the electric bill.
31
Use low noise case fans
Often stock case fans are too noisy, so you should use
quality brands such as Noctua 120 mm fans as they move
air much efficiently with less noise compared to smaller
fans. Dust filters are also great for keeping the HTPC clean.
I would recommend getting a fan controller as
motherboards often adjust fans to run faster (and louder)
than needed. Depending on the case, you will need one to
three case fans in addition to a CPU cooler, but it's good to
test with stock case fans to discover how many fans you
need to reach optimal temperature and air flow.
You can also adjust the speed of fans from the BIOS.
32
Use SSD as a boot drive
A solid state drive (SSD) is the single best upgrade you can
make for an HTPC to improve the speed while making the
system quieter.
An SSD will make your user interface feel snappier, for
example by helping with the loading of 1080p fanarts and
other metadata.
As an additional benefit, your system will boot and shut
down much faster, and the system will just feel much
snappier overall. SSDs are really light-weight, so even if
your case does not have a slot for it, you can use an
adhesive tape to attach it anywhere inside the case.
33
Use media hard drives
You should use a standard hard drive for storing media
files and recordings since you won’t see any performance
gain using an SSD for playing media files.
2-4 TB hard drives are currently optimal sizes in terms of
storage and price. Green hard drives that run at slower
5400 RPM speed are a great choice as media hard drives.
Keep in mind that the more hard drives you use inside the
HTPC case, the more noise and heat they will generate.
Please note that HDDs larger than 2TB cannot be
recognized properly by older 32-bit versions of Windows,
so in order to use 3TB+ HDDs, you should use 64-bit OS.
34
Graphics card for gaming
If you are going to get a discrete graphics card for gaming,
be sure to check the dimensions of the card and its
Thermal Design Power carefully before purchasing.
For example, I bought a passive cooled graphics card, but it
did not fit inside my case because it was slightly higher
than regular cards due to its passive cooling solution.
Also, make sure that the power supply you have chosen is
powerful enough for the graphics card. For example, I
chose 450W SFX PSU for Geforce 750Ti graphics card,
which was enough, but PSU's cooling fans were a bit too
noisy as it was running too close to its limits.
35
Optional optical drive
Nowadays, an optical disk drive is not necessarily needed
as you can install an operating system using a USB stick.
However, if you have a large DVD or Blu-ray disc collection,
you will need either an internal or external disc drive.
An internal drive integrates better with your case, but disc
drives can have compatibility issues with aftermarket CPU
coolers, so be sure to check that. An external drive might
be a better choice if you need the disc drive only rarely.
Last but not least, many optical disk drives have a lot of
text in the front panel, so choose the one that has the
most stylish front panel for your HTPC.
36
Get a quiet power supply
I would strongly recommend getting a good-quality power
supply with an 80 Plus Bronze, Silver, Gold or Platinum
efficiency rating. The better efficiency means less heat. If
possible, choose a modular semi-fanless power supply.
Less and flat cables mean less clutter and better air flow.
However, be sure to choose a PSU that fits into the case, as
modular PSUs are often longer compared to standard
ATXs. Smaller SFX PSUs are often used in mini-ITX cases.
Another alternative is a PicoPSU that is small and efficient
PSU. You will need to get a PicoPSU and an external AC/DC
adapter. I'd recommend PicoPSUs to advanced builders.
37
Plug in all the cables
After you have installed all the components, it is time to
plug in all the cables. You should follow the motherboard's
and PSU's manuals to plug in all the connectors properly.
When plugging in the front-panel connectors, keep in mind
that colored wire is usually the positive (+) and the white is
negative (-). Sometimes the positive side is marked with a
small triangle on the connector.
I would not recommend connecting the case power light or
hard drive light cables to the motherboard, as the blue
light in a dark living room can be very annoying.
38
Troubleshooting tips
So, you finished your HTPC build, put the case cover back
in place, plugged in the power cord and pressed the power
button. Then, nothing happens. Don’t worry; this has
happened to me as well. Before you return your
components back to the store, these troubleshooting
questions may help you.
- Did you plug in CPU and motherboard power cables?
- Did you connect front panel’s power connections?
- Did you push memory cards to their slots properly?
- Did you install the CPU chip with the proper alignment?
- Did you turn on the power switch behind the PSU?
39
Use a USB TV tuner
If you want to watch live TV with your HTPC, be sure you
find the right TV tuner that fits your needs. For example,
do you need multiple TV tuners, and do you need an
internal PCI-e or an external USB tuner?
It is impossible to give a TV tuner recommendation that is
compatible with all broadcasting technologies around the
world, so it is important that you do your own research. Be
sure to check that the selected tuner works with your OS.
For example, if you are using Linux, it is a good idea to
Google first if this particular tuner has Linux drivers and
the experiences of others with the product.
40
Use any remote control
You don´t necessarily need to get a new remote control,
but you can use either the HDMI CEC adapter or Flirc USB
adapter and pair it with your existing remote control.
If you have a modern TV, a HDMI CEC adapter allows you
to use your existing remote to send key presses to HTPC
via the HDMI interface on your TV.
If you have an older TV, or you need more flexibility, Flirc
remote companion is another interesting adapter that
turns IR signals of any remote into keyboard commands.
Learn more about the Flirc
41
Get a universal remote
A remote control plays an important role in the user
experience. If you have multiple home theater devices, a
universal remote is a must. Logitech’s Harmony remotes
are excellent for controlling TV, A/V receiver and HTPC
with one single remote.
You can use a universal remote together with a Flirc device
to control your HTPC. The IR receiver has to be located
close to TV to have a direct line of sight.
You should set up the remote so that you can control the
volume on the A/V receiver while other buttons control
the HTPC.
42
Get a compact keyboard
Even if you use a remote to control your HTPC, it is good to
have a keyboard and mouse combo available in the TV
cabinet in case you need it. I’ve been using Logitech K400
and slightly more stylish K830 keyboards for quite some
time now, and I really like their compact size and shape.
Logitech K400 and K830 both have a touchpad mouse, so
you will not need a separate mouse. The downside of the
keyboard is that it does not fit into one hand like a remote,
and it can easily look “out of the place” in the living room.
Learn more about keyboards
43
Get a game controller
If you intend to play games with your HTPC, I would
recommend getting the Xbox 360 wireless game controller.
The latest Windows 8.1 supports the Xbox 360 controller
out-of-the-box, and I have not experienced any lag when
playing games like Dirt 3 or Assassin's Creed 4 with my
performance HTPC.
You can also use the game controller to control your media
center software if you wish. There is even a chatpad
keyboard for Xbox 360 game controller that allows you to
type text.
44
Set up a gigabit network
While the wireless network is convenient, it is also too
slow when it comes to streaming high-definition video files
from the external back-end server to your front-end HTPC.
Therefore, it is a good idea to get a gigabit router and
connect your front-end and back-end systems with Cat 6
ethernet cables.
Keep in mind that your Internet connection is not going to
be faster than 100mbit, but your internal home network
will be much faster.
CHAPTER FOUR
CONFIGURE
LESSONS 45-48
Configuring your HTPC
So, you diagrammed your system, spent hours assembling the
hardware for your HTPC, and spent an entire day putting the
system together.
Now, how do you make most out of it? Before you can start
enjoying all the media files with your HTPC, you need to
configure the BIOS, install the operating system and configure it
properly.
In this chapter, you will learn how to configure the BIOS to set
the correct boot priority and other important settings. I will also
introduce the two main operating systems I use in my HTPC
builds: Windows 8.1 and OpenELEC.
“
If you want to save some money in the
operating system and get a real
appliance-type of look and feel, I would
recommend installing the OpenELEC
operating system for your front-end
home theater computer.
45
Configure BIOS
Press the ”Delete” key to enter the BIOS setup on startup.
Change the boot priority if you want to install an OS from
a USB stick. Change the USB drive as the first line in the
”Hard Drive BIOS Priorities” in the ”BIOS Features” menu.
You can underclock your CPU to consume less power
making it run cooler. I underclocked the AMD A6-6400K
from 1.4V to 1.2V, reducing the consumption by 20 watts.
If you wish to wake up the HTPC over LAN, for example
with your iPhone, you need to enable the “LAN PXE Boot
Option ROM” setting in the “BIOS Features” menu.
46
Install operating system
Microsoft Windows 7 and 8.1 are the most common
operating systems and they are often used in HTPCs.
Linux-based operating systems such as OpenELEC, Mint or
Ubuntu are good choices for tech-savvy users who are
knowledgeable enough to fix any issues that occur.
If you are wondering between 32bit and 64bit version, you
should get a 32bit OS if you have older hardware or less
than 4GB RAM memory. Keep in mind that there can be
some compatibility issues with 64bit OS on some software,
but this has become less in the past years.
47
Windows 8.1
For most users, Windows 8.1 System Builder Edition 64-bit
is the recommended operating system if you wish to watch
Blu-ray disc movies, use media server applications such as
PlayOn or play games. After installing Windows 8.1,
remember to install all necessary drivers such as the
graphics drivers.
I'd recommend setting up an automatic login and
launching your media center app automatically to make
your Windows-based HTPC feel more like an appliance. I'm
using Windows 8.1 with my value and performance HTPCs.
Learn more about Windows
48
OpenELEC
Kodi entertainment center has been the favorite HTPC
software of advanced users for years, but thanks to the
distribution called OpenELEC, it is easier than ever to install
Kodi on Linux to turn your HTPC into an appliance.
The benefit of using Linux instead of Windows is that you
will get a fast booting computer that is instantly ready to
be used as a media center.
As OpenELEC advertised, I was able to install the OS and
media center to my budget HTPC in less than 15 minutes.
Learn more about OpenELEC
CHAPTER FIVE
SOFTWARE
LESSONS 49-60
Front-end software
A lot of people don't see the point in using a third-party media
application when the built-in capabilities of the PC already play
music and videos. The reason that you might want to get the
extra application is both ease of use and superior playback.
The user interface makes a huge difference in the way you view
your media center, so by getting an open source media player,
you are giving yourself more control over what you are able to
watch and how easily you are able to watch it.
Secondly, media centers like the XBMC are able to support
different video and audio codecs, so no matter what your
media format is, it should be able to play it without a problem.
In this chapter, I will introduce the most popular media center
software that you should choose as a front-end.
“
While there are many good media center
alternatives, I prefer using XBMC as it
allows me to customize the user
interface exactly the way I want.
However, I'd recommend testing several
front-end options to find your favorite.
49
Kodi (was XBMC)
Kodi was originally designed as a media center interface
for the Xbox game console. The latest version (14) has
been renamed as Kodi, and it is a powerful entertainment
center for Windows, Linux, Android and Mac OS X that is
capable of playing most available media file types.
The user interface looks very elegant even without any
customization. However, you can customize the interface
with skins that you can download online. There are several
add-ons available, which allow you to truly customize your
media experience.
Learn more about Kodi
50
Windows Media Center
Windows Media Center is no longer included by default in
Windows 8 and 8.1, so you'll need to install it separately.
However, it is still great media center software for
beginners (and for advanced users) who wish to, for
example, get live TV working very easily.
Windows Media Center is one of the few media centers
that will allow you to integrate a Blu-ray player into the
interface.
51
MediaPortal
Another good media center with TV tuner support is
MediaPortal. It is an open source application similar to
Kodi for turning a computer into a DVR.
MediaPortal does not limit the number or type of TV
tuners, so it is a good choice if you wish to have multiple
tuners recording different channels and doing timeshifting
at the same time.
MediaPortal allows you to do advanced customization such
as selecting which codes you use for different media
formats.
52
JRiver Media Center
JRiver Media Center is a jukebox-style media center like
iTunes. However, it comes with a nice 10-foot optimized
interface called Theater View. The great thing about JRiver
is that it supports even the most advanced codecs out of
the box, and it is known to playback your music with
excellent sound quality.
JRiver even comes with Netflix, Hulu, and YouTube services
integrated, so it is suitable for playing online video
content, too. It is a perfect choice, especially if you are an
audiophile and like to play lossless formats of audio such
as FLAC, AC3, APE, or WM files. JRiver costs about $50.
53
Steam Big Picture
Valve's Steam is the most popular game platform and
using Steam's Big Picture mode allows you to buy and
launch PC games from your sofa. When you integrate
Steam's Big Picture mode with Kodi, you will get a really
powerful combination that gives much more control over
your media experience compared to any game console.
As this is essentially HTPC, you can use Kodi entertainment
center as the main platform where the computer will boot.
Then you can integrate Steam Big Picture to the Kodi main
menu using an Advanced Launcher add-on.
Learn more about gaming HTPC
Back-end software
Have you ever wondered about creating a media server to link
multiple TVs and to store all the media into a centralized server
(as opposed to a dedicated hard drive)? In this chapter, I will
cover the main back-end software you will need to set up your
own media server back-end to store all your media in a cloud.
Network Attached Storage (NAS) is a media server that can be
accessed over a home network, as opposed to a single
computer access. You can use your HTPC as a back-end as well,
or you can build another computer as a media server.
The main advantage of the NAS server is that you can store all
your media files in one centralized place and then stream the
files to your HTPC or an other device. An additional benefit is
that NAS servers often include multiple hard drives, which allow
you to back-up and mirror data between multiple hard drives.
“
I prefer using a combination of Plex and
PlayOn media server software. Plex
allows me to transcode media files to
portable devices such as iPad while I use
PlayOn to stream premium content
channels to Kodi-based HTPCs.
54
Organize media files
Before installing and setting up back-end media server
software, you should take a moment to think about how
you will organize your media files.
I would recommend using folders and sub-folders to
organize your media files. Remember to put each movie
into a separate sub-folder with the full movie title so that
the media scrapers can find the artwork and other details.
Last but not least, do something special for your spouse,
too. Make sure that your spouse’s movie collection can be
easily found from the hard drive.
55
Plex Media Server
Plex Media Server is a back-end application for Windows,
Linux and Mac OS X-based computers that is great for
streaming media files across your home network.
In addition to its own front-end software, Plex Home
Theater, the back-end server application is compatible
with many other front-ends such as Kodi (with Plexbmc).
There are also mobile front-end apps available. The most
interesting feature is the ability to transcode your videos
depending on your device and network speed.
Learn more about Plex
56
UnRAID NAS software
Linux-based unRAID NAS software has some very
impressive plugins that enable your media server to serve
all your media with their meta-data information and live
TV stream on any device such as HTPC or iPad.
By following the link below, you will find a guide that will
help you to set up Lime-Technology’s unRAID Network
Attached Storage and install Plex Media Server and
Tvheadend TV server into to it. After completing this
practical tutorial, you will be able to transcode media files
and also provide live TV streaming to other devices.
Learn more about unRAID
57
FreeNAS software
Building a centralized storage for your media files does not
necessarily need to be expensive.
By following the link below, you will learn how to build
your own home media server with a Linux-based FreeNAS
software by utilizing old computer parts.
FreeNAS is an open source storage operating system that
supports sharing files across Windows, Max OS X and
Linux-like systems. FreeNAS is an excellent choice if you
want to use Samba (SMB) protocol to share files.
Learn more about FreeNAS
58
Mediabrowser 3
If you use your Windows-based HTPC primarily for
watching movies and TV shows from your media
collection, then Mediabrowser 3 might be the right choice.
You can even launch all your games from the front-end.
Mediabrowser 3 is similar to Plex, but its strength is
definitely the beautiful user interface. Mediabrower 3 has
three applications that work well together: MB Serve
(back-end), MB Home Theater (standalone front-end) and
MB Classic (Windows Media Center front-end).
In addition, MB Server supports clients such as Roku, web
client, Android, Windows Phone, and Apple IOS.
59
PlayOn Media Server
Windows-based PlayOn Media Server allows you to stream
premium content channels into Kodi running on any
operating system or other UPnP compatible device.
As the Kodi entertainment center supports UPnP standard,
you can serve media files with PlayOn Media Server even
to Linux-based HTPCs or Raspberry Pis.
The software is around $50 (one-time fee) and you will get
access to your favorite TV shows, movies, and sports from
Hulu, Netflix, ESPN, Amazon Prime, HBO Go and more.
Learn more about PlayOn
60
AnyDVD HD
Blu-ray playback is not supported out-of-the-box in
Windows, but there is a simple way to play Blu-ray movies
with your favorite media center such as Kodi. The secret
playing Blu-ray discs is to get and install a software called
AnyDVD HD. After installing AnyDVD HD, just launch Kodi
and start playing the Blu-ray disc. AnyDVD HD will do the
necessary decryption in the background.
As the AnyDVD HD uses decryption technology that
circumvents DRM protection used in Blu-ray discs, it is up
to you to follow this suggestion, and My Media Experience
cannot be held responsible for any issues.
Final thoughts
Congratulations! If you've made to this point, you're an HTPC
expert who knows more about HTPCs than 98% of other people.
There is always a balance between the price you pay and the
quality you get. The best thing you can do is only buy what you
really need for HTPC use.
Focus on getting a good-quality case with a 300-400W 80+ rated
PSU, Intel Core i3, AMD AM1 or A6 series processor and a
compatible motherboard. Then add 4 GB RAM and get an SSD as
a system boot drive. You can buy a separate graphics card,
quieter cooling fans, and other components later if needed.
I would recommend testing different kinds of media center
software to find out what best suits your needs.
“
Your HTPC is an ever-growing project
that needs updating from time to time.
Do not try to finish this project on the
spot, because you will most probably be
upgrading it after a while. I wish you
good luck with your new hobby!
WHAT'S NEXT?
This eBook contains recommendations on optimal components that
are suitable for HTPC use.
I thought it would be helpful to create an HTPC comparison page
that you can always come to for the latest and tested component
recommendations.
Please note that some of the links at My Media Experience are
affiliate links, and I will earn a commission (at no extra cost to you)
if you purchase through those links.
Thank you for supporting my hard work.
So, what are you
waiting for? Click below
to build your own!
HTPC Builds for 2015