1
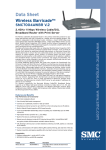
Barricade™ 2.4GHz 11 Mbps Wireless
Cable/ DSL Broadband Router with Print Server
EZ 3-Click Installation - Barricade™ 2.4GHz 11 Mbps Wireless Cable/DSL Broadband Router with Print Server
EZ 3-Click Installation - Barricade™ 2,4 GHz 11 MBit/s Wireless Kabel-/DSL-Breitband-Router mit Printserver
Installation EZ 3-Click - Routeur Barricade™ sans fil haut débit Câble/DSL 2.4GHz 11Mbps avec serveur d’impression
Instalación EZ 3-Click - Router de banda ancha de cable/DSL con acceso inalámbrico de 2,4 GHz
y 11 Mbps Barricade™ con servidor de impresión
Configurazione guidata EZ 3-Click - Router a banda larga wireless via cavo/DSL 2,4GHz 11 Mbps Barricade™
dotato di Print Server
EZ 3-Click Installation - Barricade™ 2,4 GHz 11 Mbps trådlös kabel/DSL-bredbandsrouter med skrivarserver
Quick Installation Guide
Installationskurzanleitung
Guide d'installation rapide
Guía de inicio rápido
Guida rapida all'avvio
Snabbinstallation
Model Number: SMC7004AWBR
Publication Number: 150200006400A
Edition Number: E022002-R01 F1.0
Part Number: 01-750-9819-QIG
Issue: May 2003
S M C 7 0 0 4 AW B R
English
2-8
Step 1... Unpack
1
Deutsch
9 - 15
Français
16 -22
Español
23 -29
Italiano
30 -36
Svenska
37 -43
Compliances, Copyright & Notes
44 -48
SMC7004AWBR
Thank you for choosing the SMC Networks Barricade™ Wireless
Cable/DSL Broadband Router. This EZ Quick Installation Guide
provides simple setup instructions. For more additional
information, see the manual included on the CD-ROM.
Note: If the PC you are
running this installation
utility from has a static IP
address, you will need to
change the IP settings to
DHCP. For information on
how to do this, please see
the manual.
English
Contents
BarricadeTM 2.4 GHz 11 Mbps Wireless Cable/DSL Broadband
Router with Print Server
Box Contents:
• One Barricade™ Wireless Broadband Router
• One Power Adapter
• One Ethernet Cable
• One Quick Installation Guide
• One EZ 3-Click Installation Wizard, Drivers and Documentation
CD-ROM
Before you begin verify the following:
• All of the box contents are included.
• At least one windows-based computer has a CD-ROM Drive*
• You have any additional CAT-5 Ethernet cables required to
connect other computers.
• Each computer has an internal or external Ethernet Network
adapter correctly installed.
• A Cable/DSL modem is installed and the Internet connection
is working on at least one computer.
*Note: A CD-ROM drive is only required if you want to use the EZ 3-Click
Installation Wizard application to configure your Barricade™. The process
can be completed manually through the web interface. Directions are
outlined in the manual.
2
Step 3... Begin
Step 2... Get Connected
Connect all of the computers that you want to have share your
Internet connection. This is necessary to detect that each device
is properly connected. It is safe to connect and disconnect
Ethernet cables from your computer(s), Barricade™, or broadband
modem when it is turned on.
Use the diagram below to assist you with setting up your network.
Note: Please use standard Category 5 (CAT-5) Ethernet cables with RJ-45
connectors.
English
Power Adapter
• Remove the CD-ROM from the box.
• If the computer is off, turn it on.
• When the computer boots up, insert the CD-ROM into the
CD-ROM drive of the computer that is connected to the
Barricade™.
Note: The screen shown below will appear only if the Autorun feature is
enabled. If the EZ 3-Click Installation Wizard does not start automatically,
follow the steps below to start the program:
1. Double-click the [My Computer] icon.
2. Double-click on CD-ROM or Compact Disc icon to view the
contents of the CD.
3. Click on the [EZ Install] Icon to launch the program.
English
PDA with
Wireless Compact
Flash Card
Once you have all of your computers connected, you are ready
to install the EZ 3-Click Installation Wizard.
To AC Wall
Outlet
Broadband
Modem(Cable/DSL)
Ethernet
Cables
To Computer
Two
3
Computer One
Macintosh Users!
If you are setting up the Barricade™ Router in an ALL
Macintosh network, please see Appendix A for specialized
directions on configuring and setting up the Barricade™
manually. The EZ 3-Click Installation Wizard is not compatible
with the MacOS.
4
Configuring Your Macintosh Computer
Once you have connected the Barricade™ Router to your Broadband
modem, then connect your Macintosh to the Barricade™, you are
ready to configure your computer to connect to your Barricade™.
2. In the TCP/IP dialog box, make sure that [Ethernet] is selected
in the [Connect Via:] field.
Once you have connected these devices, using CAT-5 Ethernet
cabling, please check the Barricade™ port lights to verify that
you have a good connection.
English
Once you have verified that you have a good network connection
to all of your devices, then you will need to check your computers
network settings. To do this, please follow the following steps:
Step 1 - Configure TCP/IP Settings
1. Pull down the Apple Menu, then click
the [Control Panels] option and select
[TCP/IP].
If the [Using DHCP Server] is already selected in the [Configure]
field, then your computer is already configured for a DHCP
connection. Please verify your IP information against the
information outlined below:
English
• The WAN light verifies that you have good connection from your
broadband modem to the Barricade™.
• The PORT light verifies that you have a good connection
between a computer and the Barricade™. This light will also
display the connection speed (10Mbps or 100Mbps).
If you connect all the devices together and don’t get a valid
WAN / PORT light status, then please check the cables.
• IP address is now 192.168.2.xxx (Where xxx is a number
from 1-253).
• Subnet Mask is 255.255.255.0.
• Default Gateway is 192.168.2.1.
If you have that information listed in your IP information then
you are ready to configure the Barricade™. Please go to:
Step 2 – Disable HTTP Proxy.
If not, then please continue with the steps below.
3. Set the [Configure] option to [Using DHCP Server], then close
the TCP/IP dialog box and you will be prompted to save the
settings.
4. Click the [Save] button to save the new changes.
5
6
Step 2 - Disable HTTP Proxy
Netscape
Once you have a valid IP address on your computer, you are ready
to configure the Barricade™ for your Internet Provider. Before you
can access the web-based administration page, you will need to
verify that the HTTP Proxy feature of your Web browser is disabled.
To do this, please follow the steps below depending
on the browser you are using.
1. Open Netscape and click [Stop].
Click [Edit] and select [Preferences].
2. In the [Preferences] dialog box, on the
left-hand column labeled [Category],
click the [Advanced] option.
Internet Explorer
2. In the Internet Explorer
Preferences window, under
Network, select [Proxies].
3. Uncheck all checked boxes
and click [OK].
7
3. Under the [Advanced] category, select
the [Proxies] option.
4. Select [Direct Connection to the
Internet] option and click [OK].
English
English
1. Open Internet Explorer and click [Stop].
Click [Edit] and select [Preferences].
Step 3 – Configure the Barricade™
When you can access the web-based Administration page, follow
the configuration steps outlined in the manual. Because the
Barricade™ uses a platform-independent design, the configuration
for Windows-based machines is the same for computers running on
Apple OS.
8
Schritt 1... Auspacken
BarricadeTM 2,4 GHz 11 MBit/s Wireless Kabel-/DSL-BreitbandRouter mit Printserver
SMC2804AWBR
Danke, dass Sie sich für den Barricade™ Wireless Kabel-/DSLBreitband-Router von SMC Networks entschieden haben. Dieses
Handbuch enthält eine einfache Konfigurationsanleitung. Weitere
Informationen finden Sie im Handbuch auf der CD-ROM.
Deutsch
Lieferumfang:
• Ein Barricade™ Wireless Breitband-Router
• Ein Netzteil
• Ein Ethernet-Kabel
• Eine Installationskurzanleitung
• Eine CD-ROM mit EZ 3-Click-Installationsassistent, Treibern und
Dokumentation
Prüfen Sie vor Beginn Folgendes:
• Der Packungsinhalt ist vollständig.
• Mindestens ein Windows-basierter Computer verfügt über
ein CD-ROM-Laufwerk.*
• Sie verfügen über alle zusätzlichen Ethernet-Kabel (Kat. 5), die
für den Anschluss an andere Computer erforderlich sind.
• An jedem Computer ist ein interner oder externer EthernetNetzwerkadapter ordnungsgemäß installiert.
• Ein Kabel-/DSL-Modem ist installiert und mindestens ein
Computer hat eine Internet-Verbindung.
9
*Hinweis: Ein CD-ROM-Laufwerk ist nur erforderlich, falls Sie Ihren
Barricade™ mit dem EZ 3-Click-Installationsassistent konfigurieren möchten.
Der Prozess kann manuell über die Web-Schnittstelle beendet werden.
Anweisungen hierzu finden Sie im Handbuch.
Schließen Sie alle Computer an, die Ihre Internet-Verbindung
nutzen sollen. Dies ist notwendig, um zu prüfen, ob alle Geräte
ordnungsgemäß angeschlossen sind. Sie können Ethernet-Kabel
problemlos mit Ihrem Computer bzw. mit Ihren Computern, Ihrem
Barricade™ oder Breitbandmodem verbinden oder die Verbindung zu
diesen trennen, während diese Geräte eingeschaltet sind.
Richten Sie Ihr Netzwerk mit Hilfe des nachstehenden Diagramms ein.
Hinweis: Bitte verwenden Sie Ethernet-Standardkabel der Kategorie 5
(CAT-5) mit RJ-45-Steckern.
PDA mit
Wireless Compact
Flash-Karte
Deutsch
Hinweis: Wenn der PC, von
dem Sie dieses Installationshilfsprogramm ausführen, über
eine statische IP-Adresse
verfügt, müssen Sie die IPEinstellungen in DHCP ändern.
Weitere Informationen zu den
hierzu erforderlichen Schritten
finden Sie im Handbuch.
Schritt 2... Anschließen
Netzteil
Zur
Netzsteckdose
Breitbandmodem
(Kabel/DSL)
EthernetKabel
Zum zweiten
Computer
Erster Computer
10
Schritt 3... Anfangen
Wenn Sie alle Computer verbunden haben, können Sie
den EZ3-Click-Installationsassistenten installieren.
• Nehmen Sie die CD-ROM aus dem Paket.
• Wenn der Computer ausgeschaltet ist, schalten Sie ihn ein.
• Legen Sie die CD-ROM beim Start des Computers in das
CD-ROM-Laufwerk des Computers ein, der mit dem Barricade™
verbunden ist.
1. Doppelklicken Sie auf das Symbol [My Computer] (Arbeitsplatz)
auf Ihrem Desktop.
2. Doppelklicken Sie auf die CD-ROM- oder das CD-Symbol,
um den Inhalt der CD anzuzeigen.
3. Klicken Sie auf [EZ Install] (Installation), um das Programm
zu starten.
Nachdem Sie diese Geräte mit Ethernet-Kabel (Kat. 5) verbunden
haben, prüfen Sie bitte die Port-LEDs des Barricade™, um zu prüfen,
ob eine gute Verbindung besteht.
• Die WAN-LED zeigt an, dass zwischen dem Breitbandmodem
und dem Barricade™ eine gute Verbindung besteht.
• Die PORT-LED zeigt an, dass zwischen einem Computer und dem
Barricade™ eine ordnungsgemäße Verbindung besteht. Diese LED
zeigt zudem die Verbindungsgeschwindigkeit an (10 Mbit/s oder
100 Mbit/s).
Wenn Sie alle Geräte miteinander verbinden und keinen
ordnungsgemäßen WAN-/PORT-LED-Status erhalten, prüfen
Sie bitte die Kabel.
Deutsch
Deutsch
Hinweis: Der Bildschirm unten wird nur angezeigt, wenn die Autostartfunktion aktiviert ist. Wenn der EZ 3-Click-Installationsassistent nicht
automatisch startet, befolgen Sie die unten aufgeführten Schritte, um
das Programm zu starten:
Konfiguration Ihres Macintosh-Computers
Nachdem Sie den Barricade™ Router mit Ihrem Breitbandmodem und
dann Ihren Macintosh mit dem Barricade™ verbunden haben, können
Sie Ihren Computer für die Verbindung zu Ihrem Barricade™ konfigurieren.
Wenn Sie sichergestellt haben, dass zu all Ihren Geräten eine
ordnungsgemäße Netzwerkverbindung hergestellt wurde, müssen
Sie die Netzwerkeinstellungen Ihres Computers überprüfen. Führen
Sie hierzu die folgenden Schritte aus:
Schritt 1. Konfiguration der TCP/IPEinstellungen
Hinweis für Macintosh-Benutzer:
Wenn Sie den Barricade™ in einem Netzwerk mit ausschließlich Macintosh-Computern einrichten, lesen Sie bitte
in Anhang A die speziellen Anweisungen zur manuellen
Konfiguration und Einrichtung des Barricade™. Der EZ 3-ClickInstallationsassistent ist nicht mit MacOS kompatibel.
11
1. Öffnen Sie das Menü [Apple], klicken Sie
auf [Control Panels] (Kontrollfelder) und
wählen Sie dann [TCP/IP] aus.
12
Wenn die Option [Using DHCP Server] (DHCP Server) bereits im
Feld [Configure] (Konfigurationsmethode) ausgewählt ist, ist Ihr
Computer bereits für eine DHCP-Verbindung konfiguriert. Bitte
vergleichen Sie Ihre IP-Informationen mit den unten aufgeführten
Informationen:
• Die IP-Adresse ist jetzt 192.168.2.xxx (xxx ist hierbei eine Zahl
von 1-253).
• Die Subnetzmaske (Subnet Mask) ist 255.255.255.0.
• Der Standardgateway (Default Gateway) ist 192.168.2.1.
Wenn diese Informationen bei Ihren IP-Informationen aufgelistet
werden, können Sie den Barricade™ konfigurieren. Bitte fahren Sie
mit folgendem Schritt fort: Schritt 2. Deaktivieren des HTTP-Proxy.
Schritt 2. Deaktivieren des HTTP-Proxy
Wenn Sie über eine gültige IP-Adresse für Ihren Computer
verfügen, können Sie den Barricade™ für Ihren Internet-Anbieter
konfigurieren. Bevor Sie auf die Web-basierte Administrationsseite
zugreifen können, müssen Sie sich vergewissern, dass die HTTPProxy-Funktion Ihres Web-Browsers deaktiviert ist. Führen Sie
hierzu bitte je nach dem von Ihnen verwendeten Browser die
entsprechenden Schritte aus.
Internet Explorer
1. Öffnen Sie den Internet Explorer und klicken
Sie auf die Schaltfläche [Stop] (Abbrechen).
Klicken Sie auf [Tools] (Extras) und anschließend
auf [Internet Options] (Einstellungen).
Deutsch
Deutsch
2. Vergewissern Sie sich, dass im Dialogfeld [TCP/IP] die Option
[Ethernet] im Feld [Connect Via:] (Verbindung) ausgewählt ist.
2. Wählen Sie im Fenster
[Preferences] (Einstellungen)
unter [Network] (Netzwerk) die
Option [Proxies] (Proxys) aus.
3. Deaktivieren Sie alle Optionen
und klicken Sie auf [OK].
Fahren Sie andernfalls mit den nachstehenden Schritten fort.
3. Setzen Sie die Option [Configure] (Konfigurationsmethode)
auf [Using DHCP Server] (DHCP Server) und schließen Sie das
Dialogfeld [TCP/IP]. Anschließend werden Sie aufgefordert,
die Einstellungen zu speichern.
4. Klicken Sie auf [Save] (Sichern), um die neuen Änderungen
zu speichern.
13
14
Netscape
Routeur Barricade™ sans fil haut débit Câble/DSL 2.4GHz 11Mbps
avec serveur d’impression
1. Öffnen Sie den Netscape-Browser und klicken
Sie auf die Schaltfläche [Stop] (Abbrechen).
Klicken Sie auf [Edit] (Bearbeiten) und wählen
Sie [Preferences] (Einstellungen).
SMC7004AWBR
Merci d’avoir choisi le routeur Barricade™ sans fil haut débit
Câble/ DSL de SMC Networks. Ce Guide d’installation rapide fournit des
instructions d’installation simples. Pour plus d’informations, consultez
le manuel présent sur le CD-ROM.
2. Wählen Sie im Dialogfeld [Preferences]
(Einstellungen) in der linken Spalte [Category]
(Kategorie) die Option [Advanced] (Erweitert).
Remarque : si le PC à partir
duquel vous exécutez cet utilitaire
d’installation est doté d’une adresse
IP statique, vous devrez paramétrer
IP en DHCP.
Pour des informations sur la manière
de procéder, consultez le manuel.
3. Wählen Sie in der Kategorie [Advanced]
(Erweitert) die Option [Proxies]
(Proxys) aus.
4.Wählen Sie [Direct Connection to the
Internet] (Direkte Verbindung zum
Internet) aus und klicken Sie auf [OK].
Schritt 3 – Konfiguration des Barricade™
Wenn Sie auf die Web-basierte Administrationsseite zugreifen
können, führen Sie die im Handbuch aufgeführten Konfigurationsschritte aus. Da der Barricade™ ein plattformunabhängiges Design
besitzt, sind die Konfigurationsschritte für Windows-basierte und
Mac OS Computer identisch.
15
Contenu de l’emballage :
• Un routeur Barricade™ haut débit sans fil
• Un cordon d’alimentation
• Un câble Ethernet
• Un Guide d’installation rapide
• Un CD-ROM contenant l’assistant EZ 3-Click Installation Wizard,
les drivers et la documentation
Avant de commencer, vérifiez les points suivants :
• Le contenu de l’emballage doit être complet.
• Un ordinateur sous Windows au moins doit disposer d’un lecteur
de CD-ROM*.
• Vous devez disposer de tous les câbles Ethernet CAT-5
supplémentaires éventuellement nécessaires à la connexion
d’autres ordinateurs.
• Chaque ordinateur doit disposer d’une carte réseau Ethernet
interne ou externe correctement installée.
• Un modem câble/DSL doit être installé et la connexion Internet
doit fonctionner sur au moins un ordinateur.
*Remarque : un lecteur de CD ROM n’est nécessaire que si vous souhaitez
utiliser l’application EZ 3-Click Installation Wizard pour configurer votre
routeur Barricade™. L’opération peut être effectuée manuellement au travers
16
de l’interface Web. Des instructions sont fournies dans le manuel.
Français
Deutsch
Étape 1… Déballez
Étape 3… Démarrez
Étape 2… Connectez
Connectez tous les ordinateurs qui devront bénéficier du partage
de votre connexion Internet. Cette opération est nécessaire pour
détecter que chaque périphérique est correctement raccordé. Vous
pouvez sans danger connecter et déconnecter les câbles Ethernet
des ordinateurs, du routeur Barricade™ ou du modem haut débit
lorsque ceux-ci sont sous tension.
Aidez-vous du schéma ci-dessous pour installer votre réseau.
PDA avec
carte Compact Flash
sans fil
Prise
d’alimentation
• Retirez le CD-ROM de son boîtier.
• Si l’ordinateur est éteint, allumez-le.
• Lorsque l’ordinateur a démarré, insérez le CD-ROM dans
le lecteur de CD-ROM de l’ordinateur connecté au routeur
Barricade™.
Remarque : l’écran présenté ci-dessous n’apparaît que si la fonction de
démarrage automatique est activée. Si l’assistant EZ 3-Click Installation
Wizard ne démarre pas automatiquement, effectuez les étapes ci-dessous
pour le faire démarrer.
1. Double-cliquez sur l’icône [My Computer] (Poste de travail).
2. Double-cliquez sur l’icône de CD-ROM ou de disque compact
pour voir le contenu du CD-ROM.
3. Cliquez sur l’icône [EZ Install] pour lancer le programme.
Français
Français
Remarque : utilisez des câbles Ethernet standard de catégorie 5 (CAT-5)
avec des connecteurs RJ-45.
Lorsque vos ordinateurs sont tous connectés, vous êtes prêt
à installer l’assistant EZ 3-Click Installation Wizard.
Vers la prise
secteur murale
Modem haut débit
(Câble/DSL)
Câbles
Ethernet
Vers
Ordinateur 2
17
Ordinateur 1
Utilisateurs de Macintosh !
Si vous installez le routeur Barricade™ dans un réseau
spécifiquement Macintosh, consultez l’annexe A pour des
directives spéciales sur la configuration et l’installation
manuelles du routeur Barricade™. L’assistant EZ 3-Click
Installation Wizard n’est pas compatible avec MacOS.
18
Configuration de votre ordinateur Macintosh
Une fois que vous avez connecté le routeur Barricade™ à votre
modem haut débit puis connecté votre Macintosh au routeur
Barricade™, vous êtes prêt à configurer votre ordinateur pour
la connexion à votre routeur Barricade™.
2. Dans la boîte de dialogue TCP/IP, vérifiez que l’option [Ethernet]
est sélectionnée dans la zone [Connect Via:] (Se connecter via).
• Le témoin WAN atteste du bon fonctionnement de la connexion
entre votre modem haut débit et le routeur Barricade™.
• Le témoin PORT atteste du bon fonctionnement de la connexion
entre l’ordinateur et le routeur Barricade™. Ce témoin montre
aussi la vitesse de la connexion (10 Mbps ou 100 Mbps).
Si, après avoir connecté tous les périphériques, vous n’obtenez pas
un état correct des témoins WAN / PORT, vérifiez les câbles.
Après avoir vérifié la connexion réseau avec tous vos
périphériques, vous devez vérifier les paramètres réseau
de vos ordinateurs. Pour ce faire, procédez
comme suit :
Étape 1 - Configuration des paramètres
TCP/IP
1. Déroulez le menu Apple, cliquez sur
l’option [Control Panels] (Tableaux de
bord) et sélectionnez [TCP/IP].
Si l’option [Using DHCP Server] (Utiliser un serveur DHCP) est
sélectionnée dans la zone [Configure] (Configuration), votre
ordinateur est déjà configuré pour une connexion DHCP. Vérifiez
vos informations IP par rapport aux informations suivantes :
Français
Français
Après avoir connecté ces périphériques au moyen d’un câblage
Ethernet CAT-5, examinez les témoins lumineux des ports du
routeur Barricade pour vérifier que votre connexion est correcte.
• L’adresse IP doit maintenant être 192.168.2.xxx (où xxx est
un nombre compris entre 1 et 253).
• Le masque de sous-réseau doit être 255.255.255.0.
• L’adresse de la passerelle par défaut doit être 192.168.2.1.
Si vos informations IP correspondent, vous êtes prêt à configurer
le routeur Barricade™. Consultez la section :
Étape 2 - Désactivation du Proxy HTTP.
Si elles ne correspondent pas, continuez en effectuant les
opérations indiquées à la page suivante.
3. Affectez la valeur [Using DHCP Server] (Utiliser un serveur
DHCP) à la zone [Configure] (Configuration), puis refermez
la boîte de dialogue TCP/IP ; un message vous demande
d’enregistrer les paramètres.
4. Cliquez sur le bouton [Save]
(Enregistrer) pour enregistrer
les modifications.
19
20
Étape 2 - Désactivation du Proxy HTTP
Netscape
Lorsque l’adresse IP de votre ordinateur est correcte, vous êtes prêt
à configurer le routeur Barricade™ pour votre Fournisseur d’Accès
Internet. Avant d’accéder à la page Web d’administration, vous
devez vérifier que la fonctionnalité Proxy HTTP de votre navigateur
Web est désactivée. Pour ce faire, effectuez les étapes suivantes en
fonction du navigateur que vous utilisez.
1. Ouvrez Netscape et cliquez sur
le bouton [Stop] (Arrêter).
Cliquez sur [Edit] (Edition), puis
sur [Preferences] (Préférences).
1. Ouvrez Internet Explorer et cliquez sur le bouton
[Stop] (Arrêter). Cliquez sur [Edit] (Edition), puis
sur [Preferences] (Préférences).
3. Dans la zone [Advanced] (Avancé),
sélectionnez [Proxies] (Serveur proxy).
2. Dans la boîte de dialogue qui
s’affiche, sous Network (Réseau),
sélectionnez [Proxies] (Serveur
proxy).
4. Activez l’option [Direct Connection to
the Internet] (Connexion directe
à Internet), puis cliquez sur [OK].
3. Désactivez toutes les cases à
cocher, puis cliquez sur [OK].
Étape 3 - Configuration du routeur Barricade™
Français
Français
Internet Explorer
2. Dans la boîte de dialogue qui s’affiche,
dans la colonne de gauche [Category]
(Catégorie), cliquez sur l’option
[Advanced] (Avancé).
Lorsque vous pouvez accéder à la page Web d’administration,
effectuez les étapes de configuration indiquées dans le manuel.
Comme le routeur Barricade™ utilise une conception indépendante de
la plate-forme, la configuration des ordinateurs sous Windows est la
même que celle des ordinateurs sous MacOS.
21
22
1er paso... Desempaquetar
2º paso... Conectar
Router de banda ancha de cable/DSL con acceso inalámbrico de
2,4 GHz y 11 Mbps BarricadeTM con servidor de impresión
Conecte todos los ordenadores que quiera que compartan la
conexión a Internet. Esta operación sirve para comprobar que todos
los dispositivos estén conectados correctamente. No es peligroso
conectar ni desconectar cables Ethernet en el ordenador, el
Barricade™ o el módem de banda ancha cuando está encendido.
Nota: Si el PC desde el que ejecuta
esta utilidad de instalación posee
una dirección IP estática, deberá
cambiar los parámetros de IP y
seleccionar DHCP. Encontrará
información sobre este tema en
el manual.
Contenido de la caja:
• Un router de banda ancha con acceso inalámbrico Barricade™
• Un adaptador de corriente
• Un cable Ethernet
• Un manual de instalación rápida
• Un CD-ROM con un asistente de instalación EZ 3-Click
y documentación
Antes de empezar compruebe que:
• La caja contenga todos los componentes.
• Como mínimo un ordenador con Windows disponga de unidad
de CD-ROM*.
• Tenga cables Ethernet CAT-5 adicionales para conectar otros
ordenadores.
• Todos los ordenadores tengan bien instalado un adaptador
de red Ethernet interno o externo.
• Haya instalado un módem de cable/DSL y que como mínimo un
ordenador disponga de conexión a Internet.
Consulte el diagrama de abajo para montar la red.
Nota: Utilice cables Ethernet estándares de la Categoría 5 (CAT-5)
con conectores RJ-45.
PDA con
tarjeta Compact
Flash inalámbrica
Adaptador de
corriente
Español
Español
SMC7004AWBR
Gracias por escoger el router de banda ancha de cable/DSL con acceso
inalámbrico Barricade™ de SMC Networks. En este manual de instalación
rápida EZ encontrará instrucciones de instalación sencillas.
Si desea más información, consulte el manual incluido en el CD-ROM.
A la toma de
corriente CA
Módem de banda
ancha (cable/DSL)
Cables
Ethernet
Al segundo
ordenador
Primer
ordenador
*Nota: La unidad de CD-ROM sólo se necesita si desea utilizar el asistente
de instalación EZ 3-Click para configurar el Barricade™. Este proceso puede
efectuarse manualmente a través de una interfaz de red. Las instrucciones
aparecen en el manual.
23
24
3er paso... Empezar
Una vez conectados todos los ordenadores, ya puede instalar
el asistente de instalación EZ 3-Click.
• Quite el precinto del CD-ROM.
• Encienda el ordenador.
• Introduzca el CD-ROM en la unidad de CD-ROM del ordenador
conectado al Barricade™.
1. Haga doble clic en el icono [My Computer] (Mi PC).
2. Haga doble clic en el icono del CD-ROM o el compact disc para
ver el contenido del CD.
3. Pulse el icono [EZ Install] (EZ Install) para ejecutar el programa.
Después de conectar estos dispositivos, utilizando cables Ethernet
CAT-5, observe las luces de los puertos del Barricade™ para saber
si dispone de una buena conexión.
• La luz WAN indica si existe una buena conexión entre el módem
de banda ancha y el Barricade™.
• La luz PORT comprueba que haya una buena conexión entre
el ordenador y Barricade™. También muestra la velocidad
de conexión (10 Mbps o 100 Mbps).
Si conecta todos los dispositivos entre sí y el estado de la luz
WAN / PORT no es válido, revise los cables.
Español
Español
Nota: La pantalla de abajo sólo aparecerá si la función de ejecución
automática Autorun está activada. Si el asistente de instalación EZ 3-Click
no se inicia de forma automática, siga los pasos indicados a continuación
para ejecutar el programa:
Configuración de un ordenador Macintosh
Una vez que haya conectado el router Barricade™ con el módem de
banda ancha y el Macintosh con el Barricade™, ya podrá configurar el
ordenador para que se conecte con el Barricade™.
Una vez comprobado que posee una buena conexión de red
en todos los dispositivos, deberá repasar los ajustes de red
de los ordenadores. A continuación le
indicaremos cómo hacerlo:
1er paso: Configurar los ajustes TCP/IP
1. Despliegue el menú Apple, pulse la
opción [Control Panels] (Paneles de
Control) y seleccione [TCP/IP] (TCP/IP).
¡Usuarios de Macintosh!
Si configura el router Barricade™ en TODA la red Macintosh,
consulte el Apéndice A, donde encontrará instrucciones
especiales sobre cómo instalar y configurar el Barricade™
manualmente. El asistente de instalación EZ 3-Click no es
compatible con MacOS.
25
26
2. En el cuadro de diálogo TCP/IP, asegúrese de que esté
seleccionado [Ethernet] (Ethernet) en el campo [Connect Via:]
(Conectar a través de:).
2º paso: Desactivar el proxy HTTP
Una vez que su ordenador posea una dirección IP válida, ya podrá
configurar el Barricade™ para su proveedor de Internet. Antes
de acceder a la página de administración basada en red, deberá
comprobar que la función [HTTP Proxy] (Proxy HTTP) del navegador
de Internet esté desactivada. Siga los pasos descritos a
continuación según el navegador que utilice.
Internet Explorer
Español
1. Abra Internet Explorer y pulse el botón [Stop]
(Detener). Pulse [Edit] (Edición) y seleccione
[Preferences] (Preferencias).
• La dirección IP ahora es 192.168.2.xxx (donde xxx es un
número del 1 al 253).
• La máscara de subred es 255.255.255.0.
• La puerta de enlace predeterminada es 192.168.2.1.
2. En el apartado [Network] (Red)
de la ventana [Preferences]
(Preferencias) de Internet
Explorer, seleccione [Proxies]
(Proxies).
Si estos datos ya aparecen en la información de IP, ya puede
configurar Barricade™ Vaya a:
2º paso: Desactivar el proxy HTTP.
3. Quite las marcas de todas
las casillas de verificación
y pulse [OK] (Aceptar).
Español
Si en el campo [Configure] (Configurar) ya está seleccionado
[Using DHCP Server] (Usar servidor DHCP), el ordenador ya está
configurado para una conexión DHCP. Compruebe que su
información IP coincida con la que se facilita a continuación:
Si no, siga con los pasos que vienen a continuación.
3. Seleccione [Using DHCP Server] (Usar servidor DHCP) en
[Configure] (Configurar) y cierre el cuadro de diálogo TCP/IP.
Se le preguntará si desea guardar los ajustes.
4. Pulse el botón [Save] (Guardar) para guardar los nuevos cambios.
27
28
Passaggio 1... Disimballaggio
Netscape
1. Abra Netscape y pulse el botón
[Stop] (Detener).
Pulse [Edit] (Edición) y seleccione
[Preferences] (Preferencias).
3. En la categoría [Advanced] (Avanzada),
seleccione la opción [Proxies] (Proxies).
4. Seleccione [Direct Connection to the Internet]
(Conexión directa a Internet) y pulse [OK] (Aceptar).
3er paso: Configurar el Barricade™
Cuando acceda a la página de administración basada en red, siga
las instrucciones de configuración descritas en el manual.
Al utilizar un diseño independiente de plataforma, la configuración
del Barricade™ es idéntica tanto en sistemas operativos Windows
como Apple.
29
SMC7004AWBR
Grazie per aver scelto il router a banda larga wireless via cavo/DSL
di SMC Networks Barricade™. La presente guida rapida all’installazione
di EZ fornisce istruzioni semplificate per la configurazione. Per ulteriori
informazioni, consultare il manuale contenuto nel CD-ROM.
Nota: se il PC da cui si esegue
il programma d’installazione
dispone di indirizzo IP statico,
è necessario modificare le
impostazioni IP su DHCP.
Per informazioni relative
all’esecuzione di questa
procedura, consultare il manuale.
Italiano
Español
2. Seleccione la opción [Advanced] (Avanzada)
en la columna [Category] (Categoría),
situada a la izquierda del cuadro
de diálogo [Preferences] (Preferencias).
Router a banda larga wireless via cavo/DSL 2.4 GHz 11 Mbps
BarricadeTM dotato di Print Server
Contenuto della confezione:
• Un router a banda larga wireless Barricade™
• Un adattatore di corrente
• Un cavo Ethernet
• Una guida rapida all’installazione
• Un CD-ROM contenente l’installazione guidata EZ 3-Click
e la documentazione.
Prima d’iniziare, verificare che:
• Tutti gli elementi della confezione siano presenti;
• Almeno un computer con interfaccia a finestre disponga
di un’unità CD-ROM*;
• Si disponga di cavi Ethernet CAT-5 aggiuntivi, necessari
al collegamento di altri computer;
• Ciascun computer disponga di una scheda di rete Ethernet,
interna o esterna, installata correttamente;
• Sia installato un modem via cavo/DSL e che la connessione
Internet sia funzionante su almeno un computer.
*Nota: L’unità CD-ROM è necessaria solo se si desidera utilizzare
l’applicazione EZ 3-Click Installation Wizard per configurare Barricade™.
È possibile completare la procedura manualmente tramite l’interfaccia Web.
Le istruzioni sono illustrate nel manuale.
30
Passaggio 3... Inizio
Collegare tutti i computer che si desidera condividano la
connessione Internet. Questa operazione è necessaria per rilevare
che ciascuna periferica sia collegata in modo appropriato.
È possibile eseguire il collegamento e lo scollegamento dei cavi
Ethernet dal/i computer, dal router Barricade™ o dal modem
a banda larga in sicurezza anche quando le apparecchiature
sono accese.
Dopo aver collegato tutti i computer è possibile iniziare
l’installazione di EZ 3-Click Installation Wizard.
Per la configurazione della rete fare riferimento allo schema
riportato di seguito.
Nota: La schermata riportata di seguito sarà visualizzata soltanto se è
attivata la funzione Esecuzione automatica. Se l’EZ 3-Click Installation
Wizard non si avvia automaticamente, attenersi alla procedura descritta
di seguito per l’avvio:
Nota: utilizzare cavi Ethernet standard appartenenti alla categoria 5
(CAT-5) con connettori RJ-45.
PDA con
scheda Compact
Adattatore di
Flash wireless
corrente
1. Fare doppio clic sull’icona [My Computer] (Risorse del computer).
2. Fare doppio clic sull’icona del CD-ROM o del Compact Disc per
visualizzare il contenuto del CD.
3. Fare clic sull’icona [EZ Install] per avviare il programma.
• Estrarre il CD-ROM dalla confezione.
• Se il computer è spento, accenderlo.
• All’avvio, inserire il CD-ROM nella relativa unità del computer
collegato al router Barricade™.
Italiano
Italiano
Passaggio 2... Esecuzione dei collegamenti
Alla presa
elettrica in CA
Modem a banda larga
(via cavo/DSL)
Cavi Ethernet
Al Computer Due
Computer Uno
31
Utenti Macintosh!
Se si configura il router Barricade™ in una rete comprendente
SOLTANTO computer Macintosh, consultare l’Appendice A per
le istruzioni specifiche sulla configurazione e l’impostazione
manuale di Barricade™. L’installazione guidata EZ 3-Click non
è compatibile con i sistemi operativi Mac.
32
Configurare un computer Macintosh
Dopo aver collegato il router Barricade™ al modem a banda larga e,
successivamente, il Macintosh al router Barricade™, è possibile
avviare la configurazione del computer da collegare a Barricade™.
2. Accertarsi che, nella finestra di dialogo TCP/IP, sia selezionato
[Ethernet] nel campo [Connect Via:] (Connetti tramite:).
Dopo aver collegato queste periferiche tramite cablaggi Ethernet
CAT-5, controllare i LED delle porte di Barricade™ per verificare che
la connessione sia stabile.
Italiano
Dopo essersi accertati che tutte le periferiche dispongano di una
connessione di rete stabile, è necessario verificare le impostazioni
di rete dei computer. Per eseguire questa operazione attenersi alla
procedura riportata di seguito:
Passaggio 1 - Configurazione
delle impostazioni TCP/IP
1. Visualizzare il menu Apple, quindi
fare clic sull’opzione [Control Panels]
(Pannelli di controllo) e selezionare
[TCP/IP].
Se l’opzione [Using DHCP Server] (Utilizzo del server DHCP) nel
campo [Configure] (Configura) è selezionata, il computer è già
configurato per la connessione DHCP. Verificare le informazioni
IP con i dati riportati di seguito:
Italiano
• Il LED WAN verifica che la connessione dal modem a banda larga
a Barricade™ sia stabile.
• Il LED PORT segnala la stabilità della connessione fra un
computer e il router Barricade™. Questo led serve inoltre a
visualizzare la velocità della connessione (10Mbps o 100Mbps).
Se tutte le periferiche sono connesse tra di loro, ma il LED WAN /
PORT non si accende correttamente, controllare i cavi.
• L’IP address (Indirizzo IP) adesso è: 192.168.2.xxx (dove xxx
è un numero compreso tra 1 e 253).
• Subnet mask: 255.255.255.0.
• Default Gateway (Gateway predefinito): 192.168.2.1.
Se questi dati sono elencati nelle informazioni IP, allora è possibile
iniziare la configurazione del router Barricade™. Passare a:
Passaggio 2 - Disattivazione del proxy HTTP
Se così non fosse, procedere secondo i passaggi riportati di
seguito.
3. Impostare l’opzione [Configure] (Configura) su [Using DHCP
Server] (Utilizzo del server DHCP), quindi chiudere la finestra
di dialogo TCP/IP. A questo punto viene richiesto di salvare
le impostazioni.
4. Clic sul pulsante [Save]
(Salva) per salvare le
modifiche.
33
34
Passaggio 2 - Disattivazione del proxy HTTP
Netscape
Una volta impostato un indirizzo IP valido sul proprio computer
è possibile iniziare la configurazione del router Barricade™ per
il provider Internet. Prima di poter accedere alla pagina
dell’amministrazione basata su Web, è necessario verificare che
la funzione HTTP Proxy del browser sia disabilitata. Per eseguire
questa operazione, attenersi alla procedura riportata di seguito,
a seconda del browser in uso.
1. Avviare Netscape e fare clic sul pulsante [Stop]
(Termina).
Fare clic su [Edit] (Modifica) e selezionare
[Preferences] (Preferenze).
Internet Explorer
Italiano
2. Nella finestra delle preferenze di
Internet Explorer, in [Network]
(Rete), selezionare [Proxies]
(Proxy).
3. Nella categoria [Advanced] (Avanzate),
selezionare l’opzione [Proxies] (Proxy).
Italiano
1. Avviare Internet Explorer e fare clic sul pulsante
[Stop] (Termina). Fare clic su [Edit] (Modifica)
e selezionare [Preferences] (Preferenze).
2. Nella finestra di dialogo [Preferences]
(Preferenze), nella colonna di sinistra
denominata [Category] (Categoria), fare
clic su l’opzione [Advanced] (Avanzate).
4. Selezionare [Direct connection to the
Internet] (Connessione diretta a
Internet), quindi fare clic su [OK].
Passaggio 3 - Configurazione di Barricade™
3. Deselezionare tutte le caselle
di controllo e fare clic su [OK].
35
Non appena è possibile accedere alla pagina dell’amministrazione
basata su Web, attenersi alla procedura di configurazione illustrata
nel manuale. La procedura di configurazione è la stessa sia per i
computer che utilizzano Windows sia per quelli che utilizzano il
sistema operativo Apple, poiché Barricade™ si basa su un concetto
indipendente dalla piattaforma.
36
Steg 1... Packa upp
BarricadeTM 2.4 GHz 11 Mbps trådlös kabel-/DSLbredbandsrouter med skrivarserver
SMC7004AWBR
Tack för ditt val av SMC Networks Barricade™ — trådlös kabel/DSLbredbandsrouter. Den här snabbinstallationsguiden hjälper dig
igång. Mer detaljerad information finns i handboken på CD-skivan.
Lådan innehåller:
• En Barricade™ trådlös bredbandsrouter
• En nätadapter
• En Ethernet-kabel
• En snabbinstallationsguide
• En CD-ROM med programmet EZ 3-Click Installation Wizard,
drivrutiner och dokumentation
Kontrollera följande innan du börjar:
• Lådan innehåller allt som ska finnas med.
• Minst en av Windows-datorerna som ska användas har
en CD-enhet.*
• Du har de Ethernet-kablar (CAT-5) som krävs för att ansluta
alla datorer.
• Alla datorerna har ett fungerande internt eller externt
Ethernet-nätverkskort.
• Du har ett kabel/DSL-modem och minst en av datorerna
har en fungerande Internet-anslutning.
Anslut alla datorer som ska dela Internet-anslutningen.
Anslutningen måste kunna kontrolleras för samtliga enheter.
Du kan lugnt ansluta och koppla från Ethernet-kablarna till
och från datorer, Barricade™ och bredbandsmodemet medan
strömmen är på.
Ta diagrammet nedan till hjälp när du konfigurerar nätverket.
Obs! Använd standardkablar för Ethernet av typen Category 5 (CAT-5) med
RJ-45-kontakter.
PDA med
trådlöst Compact
Flash-kort
Svenska
Svenska
Obs! Om du kör
installationsprogrammet
från en PC med fast IPadress måste du ändra IPinställningarna till DHCP.
Anvisningar för detta finns
i handboken.
Steg 2... Anslut dig
Nätadapter
Till
vägguttaget
Bredbandsmodem
(kabel/DSL)
Ethernetkablar
Till Dator 2
Dator 1
*Obs! En CD-enhet krävs bara om du vill använda programmet EZ 3-Click
Installation Wizard för att konfigurera Barricade™. Processen slutförs
manuellt via webbgränssnittet. Anvisningar för detta finns i handboken.
37
38
Steg 3... Börja
När alla datorerna är anslutna kan du installera programmet
EZ 3-Click Installation Wizard.
• Ta fram CD-skivan.
• Starta datorn om den är avstängd.
• När datorn startas sätter du in CD-skivan i CD-enheten
på den dator som är ansluten till Barricade™.
1. Dubbelklicka på ikonen [My Computer] (Den här datorn).
2. Dubbelklicka på CD-skivans ikon så att skivans innehåll visas.
3. Starta programmet genom att klicka på ikonen [EZ Install].
När enheterna är anslutna med Ethernet-kablar (CAT-5) enligt
ovan kontrollerar du att anslutningarna fungerar med hjälp av
portlamporna på Barricade™.
• WAN-lampan visar om anslutningen mellan bredbandsmodemet
och Barricade™ fungerar.
• PORT-lampan visar om anslutningen mellan Barricade™
och datorn fungerar. Den visar också anslutningshastigheten
(10 Mbps eller 100 Mbps).
Om alla enheter är anslutna och WAN /PORT-lamporna inte lyser
som de ska, kontrollera kablarna.
Svenska
Svenska
Obs! Fönstret nedan öppnas bara om Autorun-funktionen är aktiverad.
Om EZ 3-Click Installation Wizard inte startas automatiskt gör du så här:
Inställningar på Macintosh
Anslut först Barricade™-routern till bredbandsmodemet, ansluter du
din Macintosh till Barricade™ och ställer in datorn för anslutning
till Barricade ™ på datorn.
När du vet att nätverksanslutningen fungerar för samtliga enheter
måste du kontrollera datorns nätverksinställningar. Gör så här:
Steg 1 - Ställa in TCP/IP
1. Välj alternativet [Control Panels]
(Inställningar) i Apple-menyn och
välj [TCP/IP].
Macintosh-användare!
Om du tänker använda Barricade™-routern i ett nätverk
med ENBART Macintosh-datorer följer du de särskilda
anvisningarna för hur man ställer in Barricade™ manuellt
i Appendix A. Programmet EZ 3-Click Installation Wizard
fungerar inte med MacOS.
39
40
2. Kontrollera att [Ethernet] är valt i fältet [Connect via:]
(Anslut via:) i dialogrutan TCP/IP.
Steg 2 - Avaktivera HTTP-proxy
Nu när datorn har en giltig IP-adress är du klar att ställa in
Barricade™ för din Internet-leverantör. Innan du kan gå till
den webbaserade administrationssidan måste du kontrollera att
funktionen HTTP-proxy i webbläsaren är avaktiverad. Följ stegen
nedan för den webbläsare du använder.
Internet Explorer
Svenska
• IP-adressen är nu 192.168.2.xxx (där xxx är ett tal mellan 1
och 253).
• Delnätmasken är 255.255.255.0.
• Standardgateway är 192.168.2.1.
Finns informationen i IP-informationen är du klar att konfigurera
Barricade Barricade™. Fortsätt med:
Steg 2 - Avaktivera HTTP-proxy.
1. Öppna Internet Explorer och klicka
på [Stop] (Stoppknappen). Välj [Preferences]
(Inställningar) i menyn [Edit] (Redigera).
Svenska
Om alternativet [Using DHCP Server] (Använder DHCP-server) redan
är valt i fältet [Configure] (Konfigurera:) är datorn inställd för
anslutning med DHCP. Kontrollera att datorns IP-inställningar
stämmer med följande:
2. I dialogrutan Inställningar
för Internet Explorer väljer
du [Proxies] (Proxyservrar)
under Nätverk.
3. Avmarkera alla markerade
kryssrutor och klicka på [OK].
I annat fall fortsätter du enligt nedan.
3. Välj [Using DHCP Server] (Använder DHCP-server) under
[Configure] (Konfigurera:) och stäng dialogrutan TCP/IP.
Du blir tillfrågad om du vill spara ändringarna.
4. Klicka på [Save] (Spara).
41
42
Netscape
1. Öppna Netscape och klicka på [Stop]
(Stoppknappen).
Välj [Preferences] (Inställningar) i menyn
[Edit] (Redigera).
3. Välj alternativet [Proxy] i kategorin
[Advanced] (Avancerat).
4. Välj [Direct Connection to the Internet]
(Direktanslutning till Internet) och
klicka på [OK].
• Reorient or relocate the receiving antenna.
• Increase the separation between the equipment and receiver.
• Connect the equipment into an outlet on a circuit different
from that to which the receiver is connected.
• Consult the dealer or an experienced radio/TV technician for help.
Steg 3 - Konfigurera Barricade™
FCC Caution: Any changes or modifications not expressly approved
by the party responsible for compliance could void the user's
authority to operate this equipment.
När du kan öppna den webbaserade administrationssidan följer
du de stegvisa anvisningarna i handboken. Eftersom Barricade™
är plattformsoberoende går konfigureringen till på samma sätt för
Windows-datorer som för datorer med Apple OS.
43
Compliances
Svenska
2. Klicka på alternativet [Advanced]
(Avancerat) i kolumnen [Categories]
(Kategorier) till vänster i dialogrutan
[Preferences] (Inställningar).
Federal Communication Commission Interference Statement
This equipment has been tested and found to comply with the
limits for a Class B digital device, pursuant to Part 15 of the FCC
Rules. These limits are designed to provide reasonable protection
against harmful interference in a residential installation. This
equipment generates, uses and can radiate radio frequency energy
and, if not installed and used in accordance with the instructions,
may cause harmful interference to radio communications.
However, there is no guarantee that interference will not occur
in a particular installation. If this equipment does cause harmful
interference to radio or television reception, which can be
determined by turning the equipment off and on, the user is
encouraged to try to correct the interference by one of the
following measures:
This device complies with Part 15 of the FCC Rules. Operation is
subject to the following two conditions: (1) This device may not
cause harmful interference, and (2) this device must accept any
interference received, including interference that may cause
undesired operation.
44
Full Installation Manual
Full installation manuals are provided on the Installation CD-Rom.
Manuals in other languages than those included on the CD-Rom are
provided on www.smc-europe.com (section support).
This transmitter must not be co-located or operating in
conjunction with any other antenna or transmitter.
Firmware and Drivers
For latest driver, technical information and bug-fixes please visit
www.smc-europe.com (section support).
Industry Canada - Class B
This digital apparatus does not exceed the Class B limits for radio
noise emissions from digital apparatus as set out in the
interference-causing equipment standard entitled “Digital
Apparatus,” ICES-003 of the Department of Communications.
Cet appareil numérique respecte les limites de bruits
radioélectriques applicables aux appareils numériques de Classe B
prescrites dans la norme sur le matérial brouilleur: « Appareils
Numériques », NMB-003 édictée par l’Industrie.
45
Limited Lifetime Warranty Statement
For detailed information on SMC’s limited lifetime warranty please
check the English full manual on this CD-Rom or visit
www.smc-europe.com (section support, product registration).
Copyright
Compliances
IMPORTANT NOTE:
FCC Radiation Exposure Statement: This equipment complies with
FCC radiation exposure limits set forth for an uncontrolled
environment. This equipment should be installed and operated
with minimum distance 20cm between the radiator & your body.
Contact SMC
Contact details for your relevant countries are available on
www.smc-europe.com and www.smc.com.
Statement of Conditions
In line with our continued efforts to improve internal design,
operational function, and/or reliability, SMC reserves the right to
make changes to the product(s) described in this document
without notice. SMC does not assume any liability that may occur
due to the use or application of the product(s) described herein.
In order to obtain the most accurate knowledge of installation,
bug-fixes and other product related information we advise to visit
the relevant product support page at www.smc-europe.com before
you start installing the equipment. All information is subject to
change without notice.
46
Copyright
Information furnished by SMC Networks, Inc. (SMC) is believed to
be accurate and reliable. However, no responsibility is assumed by
SMC for its use, nor for any infringements of patents or other
rights of third parties which may result from its use. No license is
granted by implication or otherwise under any patent or patent
rights of SMC. SMC reserves the right to change specifications at
any time without notice.
Notes
Copyright
Limitation of Liability
In no event, whether based in contract or tort (including
negligence), shall SMC be liable for incidental, consequential,
indirect, special or punitive damages of any kind, or for loss of
revenue, loss of business or other financial loss arising out of or
in connection with the sale, installation, maintenance, use,
performance, failure or interruption of its products, even if SMC or
its authorized reseller has been adviced of the possiblity of such
damages.
Trademarks
SMC is a registered trademark and EZ Connect is a trademark of
SMC Networks, Inc. Other product and company names are
trademarks or registered trademarks of their respective holders.
47
48