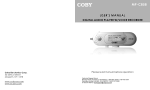
1
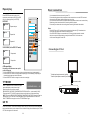
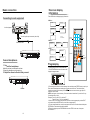
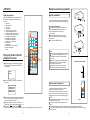
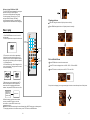
7” TFT LCD PORTABLE DVD PLAYER
MODEL:SDVD7045
USER MANUAL
Please read and keep these instructions
1
Safety information
Troubleshooting (Continued)
Symp tom [D VD]
CAUTION:
Reme dy
Play does not start even
when title is selected.
Confirm the reg ion code setting is right.
Audio soundtr ack and/or s ubtitle
la nguage is no t the initial s ettings.
If the audio soundtrack and/or subtitle language does no t
exist on the disc, t he language selected at t he initial sett ings
will not be seen/he ard.
Subtitles appear only wit h discs which contain them.
Subtitles are cleared from the TV mon itor, Perform the
steps display the subtitles.
No subt itles.
Alternative audio soundtrack
(or subtitle) languages f ail to be
selected.
Angle cannot be changed.
The password for rating level
has be en forgotte n.
An alter native language is not sele cted with discs wh ich
do not c ontain m ore than o ne langu age.
In the c ase of some discs, the alter native lan guage ca n
not be s elected b y operati ng the LA NGUAGE or
SUBTIT LE button. Try sel ecting it f rom the D VD menu if
one is a vailable.
This function is dependent on software ava ilability. Eve n if a
disc has a number of angles re corded, these angles ma y be
recorded for spec ific scenes o nly.
P lease contact your local s ales dealer.
Symptom [Video CD]
Remedy
This fu nction works only for Video CDs with playback
control.
No menu play.
Region code setting
DVD/VIDEO CD/CD PLAYER I S A CL ASS 1 LASER PR ODUCT. HOWEVE R THIS DVD /
VIDEO ,CD/ CD PL AYER USES A VIS IBLE LASER BEAM WH ICH C OULD CAUS E
HAZA RDOUS RA DIATIO N EX PO SURE IF DIRECTED. BE SURE T O OPE RATE THE
DVD/VIDEO CD/CD PLAYER CORRECTLY AS INSTRU CTED .
WHEN THIS DVD/ VIDEO CD/C D PLAYER IS PLU GGED TO T HE WALL OUTLET, DO
NOT P LACE YOUR EYE S CLO SE TO THE OPEN ING O F THE DISC TRAY AND
OTHE R OPE NING S TO LOOK INTO THE IN SIDE OF TH IS PL AYER .
USE O F CO NTRO LS OR ADJU STME NTS O R PE RFOR MANCE OF PROC EDUR ES
OTHE RTHA N THO SE S PECIF IED H EREIN MAY RESU LT IN HAZARDOU S
RADI ATION EXPO SURE .
DO NOT OP EN CO VERS AND REPA IR YO URSE LF. RE FER S ERVIC ING T O QU ALIFI ED
PERS ONNE L
THIS D EVIC E IS IN TEND ED FO R CO NTINU OUS OPER ATION !
TO R EDUC E THE RISK OF F IRE OR ELE CTRIC SHOC K, AND ANNOYIN G
INTE RFER ENCE , USE THE RECOM MENDED ACCESSORI ES ON LY.
WARNING:
-TO PRE VENT FIRE OR SH OCK HAZARD. DO NOT USE THIS P LUG W ITH AN
E XTENSION CORD. RECEPTACLE OR OTHER OUTLET UNLESS THE BLADES CAN
B E FUL LY INSERTED TO PREV ENT B LADE EXPO SURE.
-TO PRE VENT FIRE OR SH OCK HAZARD. DO NOT EXPO SE TH IS AP PLIANCE TO RAIN
O R MO ISTUR E.
CAUTION - LA SER RADIATION W HEN OPEN , DO NOT STARE INTO B EAM .
Region coding : All DVD discs are coded by the sales territo ry. Please note the playe r
is set to regio n 1 coding b y the factory whi ch cannot b e changed. This is in co mplia nce
with the D VD patent r equire ments .
VENT ILATION WA RNING - THE NORM AL VE NTILATION OF THE PRO DUC T SHA LL
NOT B E IMP EDED FOR I NTEN DED U SE.
C A U T I O N
The r egion numbe r for th is DV D play er is
RISK OF ELECTRIC SHOCK
DO NOT OPEN
1
The lightning flash and
arrow head within the
triangle is a warning
sign alerting you of
“ dangerous voltage”
inside the product.
CAUTION: TO REDUCE THE RISK
OF ELECTRIC SHOCK. DO NOT
REMOVE COVER (OR BACK).
NO USER SERVICEABLE PARTS
INSIDE. REFER SERVICING TO
QUALIFIED SERVICE
PERSONNEL.
The exclamation
point within the
triangle is a warning
sign alerting you of
important instructions
accompanying the
product.
Alw ays f ollow basic safety preca utions whe n usin g elec trical produ cts, e speci ally
when children are present .
WARNING: To a void t he risk of electrical shock , make sure the pro duct i s unpl ugged from
the electr ical ou tlet be fore re locati ng, servicing , or cle aning it.
28
1
Troubleshooting
Read all instructions before using
Do not use this prod uct near water.
Do not ceiling- or wa ll-mount the product.
Ins tall the p roduct in accorda nce with the ope rating in structions.
Do not set the produ ct near h eat sources, suc h as rad iators, h eat regis ters, sto ves, or o ther
app aratus ( including amplifi ers) that produce heat.
Pro tect the power co rd from being wa lked on or pinch ed, parti cularly a t plugs, c onvenie nce
rec eptacles , and the point w here the y exit the product.
Do not use attachme nts not recomme nded or sold by the prod uct manu facturer as a risk of fire,
ele ctrical sh ock, or s erious p ersonal injury m ay result .
Unplug the product during lig htning s torms or when unused for long pe riods of time.
Do not expo se the p roduct to dripping or spla shing wa ter. Do n ot place objects filled wi th liquid
(e.g ., vases ) on the product.
Do not place in or ex pose the produc t to direc t sunligh t, extrem e heat, humid or dusty lo cations .
Never operate this p roduct if it has a damage d power cord or p lug, is n ot workin g prope rly, has
bee n dropp ed, dama ged, or exposed to moisture, water, or oth er liquid s. Do no t attemp t to
exa mine or repair th is produ ct yourse lf; take the product to a s ervice c entre for inspecti on and
rep air.
Before requesting servic e for th is player, ch eck th e char t below for a possible cau se of t he
proble m you are experiencing. Some simple checks or a n adju stmen t on yo ur par t may
elimin atethe problem and resto re pro per op eration.
Sym ptom( Comm on)
No power.
Pla y fails to s tart even when
PLAY is pressed.
Pla y starts bu t then sto ps
imm ediately.
Ke ep ma gnetic objec ts such as sp eaker s,at a distance from the p layer.
No pi cture.
LASER SAFETY
No sound .
Dis torted sound .
This set employs an optical la ser be am system in the CD mec hanism desi gned
with built-in safeguards . Do n ot atte mpt to disassemble. Exposure to this
invis ible la ser lig ht bea m may be ha rmful t o the human eye. T his is a Clas s-1
laser produ ct. Us e of controls , adjustment s or pr ocedu res other tha n thos e
spec ified h erein may re sult in hazar dous laser light beam exposure . This
compact disc pla yer should not be a djuste d or re paired by an yone e xcept
qual ified service personnel. T he las er mechanis m in th e set c orresponds to the
stylu s (nee dle) of a record pla yer. Althoug h this produc t uses a lase r pick -up
lens, it is completely sa fe whe n operated accord ing to directi ons.
NOTE: The man ufacturer is not r esponsi ble for any radio or TV int erferenc e caused by unauthorized
modifica tions. Such mod ifications could v oid the u ser's au thority to operate the equ ipment.
1) Operate turni ng contro ls and switches as instru cted in the manu al.
2) Befor e turning on the p ower for the firs t time,make sure that the power co rd is pro perly
installed .
3) Store your dis cs in a cool area to avoid damage from heat.
Battery Handling and Usage
Rem edy
Insert t he AC adaptor securely into the power outlet.
Cond ensation has formed: wait about 1 to 2 hours
to allow the play er to dry ou t.
This player cann ot play a d isc other th an DVD, V CD and
CD.
The d isc may be dirty and may require cleaning.
Ensure that the disc is inst alled with the label sid e up.
En sure that the equipment is connected properly.
Ensure that th e equipment is connected properly.
Ensure that th e input settin g for the TV and stereo
sy stem are correct.
Adjust the master volume t o a suitable v olume by rotating
the volume knob at the side of the player.
Picture is di storted during rapid
advance or rapid reverse .
Th e picture will be somewhat distorted a t times: this is
normal.
No rapid adv ance or rapid
reverse play
Some discs may have sections which proh ibit rapid
advance (or rapid reverse.)
No operations can be performed
with the remote cont rol unit.
No key operation (by the main
unit and/or the remote control
unit) is effective.
Check the batteries are installed with the correct polarities.
The batteries are exhausted: replace them with new ones.
Point remote control at the remote control sensor and
operate.
Operate the remote control unit at a distance of not
more than 6 m from the remote control sensor.
Remove the obstacles between the remote control and
remote control sensor.
Disconnect the power adaptor and then reconnect it. (The
player may not be operating prop erly due to lightning, static
electricity or some other external factor.)
NOTE: This style player c ontain s rech argeable Li- ion battery . There is a CR 2025
battery for remote control.
1). Never throw batteries into a fire. Do not expose batte ries to fire or other heat s ources .
2). Battery Disposal: Spent or discharged batterie s must be properly dispos ed of and
recycled in complianc e with all applicable laws. For detailed information, contact your
loc al solid waste authority.
2
—To be con tinue d
27
Specifications
DISC handling and maintenance
Power requirements:
AC 1 00 -24 0V~ 5 0/60Hz
DC 12V---800m A
P ower
consumption: < 9.6W
Signal system: N TSC/ PAL
Resolution: 480X3 (RGB) X 234
Dots Distance: 0 .107 (W ) X 0 .370 (H ) mm
Visible Range: 15 4.08 ( W) X 8 6.58 ( H) mm
Discs played:
(1 ) DVD -VIDE O disc
12 cm singl e-side d,sing le-laye r
12 cm singl e-side d,dual -layer
12 cm doub le-side d,sing le-lay er
8 cm single -sided ,singl e-laye r
8 cm single -sided ,dual-layer
8 cm doubl e-side d,sing le-laye r
(2 ) Com pact d isc(VI DEO C D)
12 cm disc
8 cm disc
Video output level: 1 V p- p
Audio output level : 1 .2V
Handling p recau tions
Ho ld the disc b y the e dges s o the surfac e will n ot be soiled with fi ngerpr ints. F ingerp rints,
dirt and scratches ca n caus e skip ping a nd distortion .
Do not write on the la bel sid e with a ball-point pen or other writing utens ils.
Do not use re cord c leaning sprays, benzine, thinne r, stat ic electricity prevention liquids .
Be careful no t to drop or bend the disc.
Do not instal l more than 1 disc on the disc compartment.
Do not try to close the dis c cover when the disc is not installed p roperly.
Be sure to store the disc i n its exclusive case when not in use.
I f the s urfac e is so iled
Wipe g ently w ith a s oft, da mp (w ater o nly) cloth.
When w iping discs, alway s mov e the c loth from the centre hole toward the o utside , which
w ill not cause disto rtion. ( If you wipe th e disc s usin g a cir cular m otion , circular scratches are
l ikely to occu r, whic h will c ause distort ion.)
If the disc is brou ght fr om a c old to a war m env ironm ent m oisture may
form on the disc
Wipe this moisture off wi th a so ft, dry, lint-free clo th befo re usi ng the disc.
Improper disc storag e
You can d amag e discs if you store them i n the f ollowing plac es:
A reas e xpose d to direct sunlight
Humid or dus ty area s
A reas d irectly exposed to a heat outlet or heating a pplian ce
Earphone output level:
(1KH z , 0d B, 25m W )
Pickup: Wav e leng th: 65 5nm
Maintenance
Lase r powe r: CLA SS-1
Spe cifica tions are su bject to cha nge w ithou t notic e.
Be su re to d isconnect the AC adaptor before maintaining the player.
Wipe the player with a dry, soft cloth.
If the surfac es are extremely dirty ,wi pe clean with a cloth which has been dipped
in a weak soap-an d-water solution and wrung out thoroughly, and then wipe again
with a dry cloth.
Never use alcohol , benzine, thinner, cleaning fluid or other chemicals. And do not use
compressed air to remove dust
Accessories
TF T M OD E
1
2
3
N /P
4
5
6
OS D
7
8
9
G OTO
0
1 0+
S TOP
PLAY/PAUSE
FR
FF
P RE V
N EXT
Z OO M
SLOW
A- B
R EPE AT
PRO G RAM AN GLE
STE P
L/ R
SET UP
EN TER
TIT LE
SUB TIT LE LA NG UAG E VOL
M UTE
M EN U
V OL
Remote control
......................1
+
L ith ium Cell
CR202 5
3V DZ
Battery for
remot e control
..................1
7” T FT L CD P O RTABL E DV D P L AY E R
M ODEL :SDVD7 04 5
US ER MANUAL
P le a se re a d a nd k e e p the s e in st ruc tion s
Instruction
manual
... ......... ....1
1
A C adaptor
................1
Cigarette lighter
........ ...............1
Earpho ne
................1
Pict ure in instruc tion manual just supply the reference, all accessories regard p racticality as norm.
26
3
Definition of terms
Table of contents
DVD
Getting Sta rted:
Safe ty info rmati on… … … … … … … … … … … … … … … … … … … … … … … … … … … 1- 2
Disc hand ing an d mai ntena nce… … … … … … … … … … … … … … … … … … … … … … … - 3
Acce ssori es … … … … … … … … … … … … … … … … … … … … … … … … … … … … 3
Feat ures … … … … … … … … … … … … … … … … … … … … … … … … … … … … … … 5
Control referenc e guid e… … … … … … … … … … … … … … … … … … … … … … … … … 6- 7
Basi c conn ectio n … … … … … … … … … … … … … … … … … … … … … … … … … … … 8-1 0
Rem ote co ntrol preparation … … … … … … … … … … … … … … … … … … … … … … … … 11
Basic Operation:
Bas i c pl a y.. .... .... .... . .... ... . .... ... . .... ... . .... ... ...... .. . ..... .. . ..... .. . . .... ... ...... .. ...... .. ...... 1 2
Stop ping p lay… ……… ……… ……… … … … … … ……… …… ……… ……… …… … …… … …1 3
Skip ping a head or bac k… … … … … … … … … … … … … … … … … … … … … … … … … … 1 3
Fast forwa rd or b ackw ard … ……… … …… … … … … … … … … … … … … … … … … … … 1 3
Paus e or play … … … … … … … … … … … … … … … … … … … … … … … … … 13
Slow -moti on pla y [DVD/VCD]… … … … … … … … … … … … … … … … … … … … … … … 1 4
MP3 playb ack …… … … … … … … … … … … … … … … … … … … … … … … … … … … … … 1 4
MP4 playb ack … … … … … … … … … … … … … … … … … … … … … … … … … … … … … 1 5
JPEG CD … …… … …… …… … …… …… … … … … … … … … … … … … … … … … … … 16-1 8
Enjo ying V ideo C D wit h play back contro l… … … … … … … … … … … … … … … … … … … 1 8
On s creen displa y info rmati on … … … … … … … … … … … … … … … … … … … … … … 1 9
Advanced O peration:
Prog ram p lay… … … … … … … … … … … … … … … … … … … … … … … … … … … … … … … 1 9
Repe at pla y … … … … … … … … … … … … … … … … … … … … … … … … … … … … … … … 2 0
Repeat viewing … … … … … … … … … … … … … … … … … … … … … … … … … … … … … … … … … 20
A-B repe at play… … … … … … … … … … … … … … … … … … … … … … … … … … … … … … … … … 20
T FT MO D E. . .. . .. . . . . . .. . . . . ... . . . . . .. . . . . . ... . . . . . .. . . . . . .. .. . . . .. . . . . . .. . . .. . .. . . . . . .. . . . . ... . . . . . .. . . . . . .. .. . . . .. . . . . . .. . . .. 2 0
GO T O… … … … … … … … … … … … … … … … … … … … … … … … … … … … … … … … … … 2 0
Chan ging subtit le lan guage (DVD only)… … … … … … … … … … … … … … … … … … … 2 1
ZO O M pl a y.. ... .... ... . ... ... .. ..... ... . ... .... . .. .... . . ..... .. . . ... .... ... .... . ...... .. . .... ... .... ... . ... ... 2 1
Chan ging audio sound tracklangu age(D VD/VC D dis c)… … … … … … … … … … … … … 2 1
View ing from dif ferent angle (DVD only)… … … …… … … … … … … …… … … … … … … …… 2 2
Initi al Settings:
Gene ral se tup… …… … … … … … … …… … …… … … … …… … …… … … … …… … …… … 22-2 3
Audi o setu p… … … … … … … … … … … … … … … … … … … … … … … … … … … … … … … … 2 3
Pass word set up …… … … … …… … … … … … … …… … … … … … … …… … … … … … … 23-2 4
For Reference:
Defin ition of terms… … … … … … … … … … … … … … … … … … … … … … … … … … … … 2 5
Spec ificat ions… … … … … … … … … … … … … … … … … … … … … … … … … … … … … … 2 6
Trou blesh ooting …… … … … …… … … … … … … …… … …… … … … … … … …… … … … 27-2 8
Regi on co de set ting … … … … … … … … … … … … … … … … … … … … … … … … … … … 2 8
T his refers to a high -density opti cal dis c on which h igh-qu ality p icture s and s ound have b een
o btaine d by m eans of digital sign als. In corpo ration a new video compr ession techn ology
( MPEG II) and high- densit y reco rding t echno logy, DVD en ables aesth eticall y pleasing
full-mo tion video to be rec orded over lo ng pe riods o f time (for in stance , a wh ole mo vie ca n
b e reco rded). DVD has a s tructu re con sisting of two 0.6 m m thin discs which are ad hered
to each other. Since the th inner t he dis c, the higher the de nsity at whic h the i nform ation c an
b e reco rded, a DVD disc h as a g reater capac ity tha n a sin gle 1.2 mm thick di sc. Sin ce the
two thin discs are ad hered to eac h othe r, the re is th e pote ntial to achie ve double-s ided pl ay
s ometim e in t he futu re for even l onger duration pla y.
Video CD
T his co ntains recordings o f pictu res an d sound who se quality is on a p ar with that o f vide o
tape. T his pla yer als o sup ports Video CDs wi th play back contro l (vers ion 2.0 ).
MP3
T hese c ontain recor dings of mus ic whi ch are compressed , allow ing a signifi cantly larger
a mount of mu sic to be stor ed on a CD.
Angle
R ecord ed ont o som e DVD discs are sc enes which h ave been simultan eously shot from
a numb er of d ifferen t angles (the same scene is sho t from the front, fro m the left sid e, from
the righ t side, etc.). With s uch di scs, th e ANG LE bu tton ca n be u sed to view the sce ne fro m
d ifferen t angl es.
Subtitles
T his is the ap pearan ce of the dia logue at the bottom of the scree n whi ch are prerec orded on
s ome D VD dis cs.
Title number
T hese numbe rs are record ed on DVD d iscs. When a disc contains two or mo re mov ies, th ese
movies are nu mbered as t itle 1, title 2, etc.
Chapter number
T hese numbe rs are record ed on DVD d iscs. A title i s sub- divide d into many sections, eac h
o f whic h is nu mbere d, and speci fic par ts of vi deo pr esentations can be searc hed q uickly
u sing th ese n umber s.
Time number
T his ind icates the p lay tim e whic h has elapse d from the start of a disc or a tit le. It c an be
u sed to find a specif ic sce ne quickly.(It may n ot wor k with some discs. )
Playback control (PBC)
T his is record ed on a Vide o CD ( versio n 2.0). The s cenes or info rmatio n to b e view ed
( or liste ned to ) can be sele cted i nterac tively with th e TV m onitor by loo king a t the m enu
s hown on the TV mo nitor.
Track number
T hese numbe rs are assign ed to the tra cks wh ich ar e re- c orded on Vid eo CD s and CDs. T hey
e nable specif ic trac ks to b e loca ted qu ickly.
4
25
3.PASSW ORD S ET UP
Features
--PA SSWORD SETUP PA GE-PASSW ORD
PARENTAL
7" T FT DI SPLAY
This playe r has a built - in 7" T FT dis play w indow, to pro vide c lear vision, a nd low radia tion.
Bui lt-in re charg eable Lithi um ba ttery
SLI DE SHOW IN 17 M ODES
MULTI TV SYST EM SU PPORT
The playe r can p lay dis cs wit h sign al syst em of PAL an d NTS C.
GO TO PASSWORD SE TUP PAGE
3.1 PASSW ORD - It is used to change the password, an d the proced ure of chang ing pa ssword
is des cribed as fol lowing s:
Enter old password in the OLD PASSWO RD ro w
Enter ne w password in the NEW PASSWORD row
Enter th e new password ag ain in the CO NFIRM PWD row
Pr ess OK button on the screen to return to the Password Setup P age, then the
Password h as been changed.
NOTE: The original password i s 136900, you can change it, b ut you should write it
down and keep it s afe. If you forget th e pas sword, pleas e use the original password:136900.
3.2 PARENTAL - This se tting a llows c ertain peopl e to vi ew certain discs, which may be
especially u seful t o forbi d children from vie wing s ome u nbefitt ing dis cs. When you
have entere d the Parent al Con trol, the screen wil l display:
--PASSWO RD SETU P PAGE-PASS WORD
PARENTAL
GRA PHIC AL US ER INTERFACE SCREEN
Sim ply by pressing the DISP LAY bu tton o n the r emote contro l, info rmatio n on th e play er and
disc can b e disp layed o n the screen for ea sy ide ntifica tion, T he pla yer's o perat ions an d
sett ings can be p erform ed by opera ting th e rem ote co ntrol w hile m onitoring scr een.
MULTI-AU DIO F UNCT ION
The audio sound track can be heard in up to 8 lan guag es. (Th e num ber of audio sound
lang uages depe nds on the so ftware .)
MULTI-SU BTITLES FUNCTI ON
Sub titles m ay be displa yed in one o f a ma ximum of 32 langu ages d epend ing on the so ftware .
MULTI-AN GLE FUNCTION
This funct ion allows yo u to ch oose the vie wing a ngle o f scen es wh ich we re sho t from a
num ber of different an gles. (Limite d to DV D rec orded with m ultiple came ra ang les.)
PAR ENTAL LOCK FUNCTIO N
This preve nts pl ay uns uitable for ch ildren .
DIS C FOR MATS SUPP ORTE D BY PLAY ER
The playe r can p lay ba ck disc s bea ring an y of th e follo wing m arks:
1 KID SAFE
2G
3PG
4 PG 13
5 PGR
6R
7 NC 17
8 ADULT
SET PARENTAL CO NTROL
S croll d own th e alte rnative s by m oving Up or Down Navigation b utton, press ENTE R butt on
a nd ent er the passw ord which yo u has set be fore, then yo u have set a Paren tal Co ntrol .
T here a re eight diffe rent s ettings from“ Kid Safe”t o “Ad ult” w hich y ou ca n choo se.
1
24
5
1 .2 TV DISPL AY - it is for s electing TV output mode .
Options: No rmal /PS: P an & s can mode
Normal / LB: L etter b ox mo de
Wide : 16:9 wi de scr een m ode
Control reference guide
Main unit
SIDE VIEW
17
18
19
20
1
21
1 .3 ANGLE M ARK - it is us ed to s elect whether or n ot the multi- angle icon is displa y on screen
w hen a Multi-angle DVD disc is p laying .
Options: On: Icon will b e disp layed
Off: Ico n will b e turn ed off
1 .4 OSD LANG - It is used to cho ose th e desi red language for di fferent user. In this player, you
can cho ose ENGLIS H/ FRENCH /SPANISH languages.
22
1 .5 CAPTION S - It is used to switch the caption ON/OFF when p laying DVD d isc.
8
00
1 .6 SCREEN SAVER - whe n the player is not in use for 5 minutes, a run ning DVD lo go wil l move
a cross the scr een to prote ct the TV CRT.
Options: On: Scr een saver is enabled
Off: Screen saver is disabled
SCALE1.0
2
P LA Y /P A US E
LCD ON/ O FF
3
9
SE T UP
ST O P
10
4
1 .7 DEFAULT - It is used to reset to fac tory settings .
M E NU
V OL +
5
11
VO L -
6
7
PR E V
OP E N
12
14
FR
FF
13
15
16
2. AUDIO SET UP
NE X T
--AUDIO SETUP PAGE-1.TFT Display window- Displ ays all in formatio n about DVD work scene.
2..Bu ilt-in Speaker.
3. PLAY/PAU SE button - Pres s this button to s tart or pa use play ing the d isc.
4 . STO P button -Pres s this button to st op playin g.
5. VOLUME + button - Press th is button to turn u p the vo lume .
6. VOLUME - button - Press th is button to turn d own the volume .
7. OP EN butt on - Pres s this bu tton to o pen the disc cover.
8. Re mote co ntrol se nsor.
9. LC D ON/OF F button- Press this butt on to tur n on/off the displ ay scree n.
10.SE TUP bu tton -Pr ess this button to enter in itial setti ngs men u.
11. ME NU but ton - Pre ss this b utton to return to the root menu(D VD) or t o turn on /off the PBC (VC D).
12.OK button - Press this butt on to confirm a s election.
13.UP /PREV button- P ress UP button t o up, an d if you k eep pre ssing it fo r more t han 2 se conds, t he
playe r will ski p to the p revious chapter or title(for DVD)o r track ( for CD).
14.LE FT/FR button-P ress LE FT butto n to left, and if yo u keep p ressing it for mor e than 2 seconds , the
playe r will pla y the dis c backward at sp eed:x2,x 4,x8,x16x32.
15. RI GHT/FF button - Press R IGHT bu tton to ri ght, and if you ke ep pressing it for more th an 2 sec onds,
the pl ayer will play the disc forward at s peed:x2 ,x4,x8,x 16,x32.
16.DO WN/NE XT button- Press DOWN button t o down, and if yo u keep p ressing it for mor e than 2
secon ds, the player will skip to the next chapter or title(DVD) or track (fo r CD).
17.Power Sw itch - Sw itch this knob to turn on/off the pl ayer.
18.DC In Jack - Powe r input ja ck.
19.Ch arge indicator.
20.POWER in dicator.
21.Phone - C onnect h eadphon e to this jack for share lis tening.
22. AV Out Ja ck - Con nect to TV or othe r extern al AV eq uipment to use th e player as a sig nal sour ce.
6
SPEAKER SETUP
EQUALI ZER
GO TO AUDIO SETUP PAGE
2. 1 SPEA KER SETUP - it is us ed to s et the s peaker Outpu t levels
Optio ns: LT/RT-Left /Right mix mode
STEREO - Select this op tion if y ou don't Have a 2.1 channel amplifier.
V S URR- It is used to set dumm y surrou nding audio e ffective ness.
2.2 EQUALIZER SETUP - It is used to c ompensate for frequency disto rtion to impro ve its
frequency response in audio systems(not applicable).
Options: EQ TYPE-It is for sele cting the Eq ualizer Type, in thi s unit, you ca n choose
Mono, Rock, Pop, Live, Dance, Techno, Classic or Soft.
BASS BOOST- It is us ed to turn the Bass Boost ON or OFF.
SUPER BASS- It is us ed to turn the Supe r Bass ON o r OFF.
TREBLE BOOST- It is used to turn the Treble Boost O N or O FF.
23
Viewing from different
angle (DVD only)
Control reference guide
Remote control
Som e DVD s may conta in sce nes wh ich ha ve
bee n shot simult aneou sly fro m a nu mber of
diffe rent a ngles. For th ese discs, th e sam e
scen e can be vie wed fr om ea ch of these
diffe rent a ngles using t he AN GLE b utton.
Pres s ANG LE du ring p lay, nu mber o f angl e
bein g play ed will be dis played in the scree n,
pres s the b utton to cha nge to differe nt ang les.
TFT MODE
Initial Settings
1
2
3
4
5
6
7
8
9
N/P
O nce the initia l prog rammi ng is e ntered it is
reta ined in mem ory unt il chan ged, t he pla yer ca n
alwa ys be operated un der the same condi tions.
The sett ings w ill be r etaine d in th e mem ory
unti l the se ttings are ch anged even after s etting
the player to the standb y mod e.
Com mon procedure for init ial set tings
NUMERIC
BUTT ONS
OSD
GOTO
0
10+
PLAY /PAU SE
STOP PLAY/PAUSE
ANGLE
FR
FF
PREV
NEXT
ZOOM
SLOW
A-B
RE PEAT
SETUP
PROGRAM ANGLE
SET UP
1.Pr ess SE TUP b utton.
ST EP
2. Use the navigation b uttons to sel ect pre ferred
ite m, and press ENTE R but ton, ea ch screen
for settin g the value i s displayed. Then m ove
the navig ation button to set the ite m and press
EN TER button to con firm th e settings.
L/R
EN TER
TITLE
SUBTITLE LANGUAGE VOL
ENTER
NAVIGATION
BU TTONS
MENU
VOL
MUTE
3.Pr ess SE TUP b utton to clos e setu p men u in
an y mod e.
4.Us e left naviga tion bu tton to switc h to an other
main set up item s
1.GENERAL SET UP
-- GENERAL SETU P PAGE -TV TYPE
NTSC
TV DISPLAY
WID E
AN GLE MARK
ON
OS D LANG
EN G
CA PTIONS
OF F
SC REEN SAV ER
ON
DE FAULT
1.1 TV TYPE - i t is for select ing the TV
sys tem a ccordi ng to the colour sys tem o f
the TV.
Option s :PAL
NTSC
TF T M OD E
1 TFT MODE butto n- Pre ss thi s butto n to se lect
1
BRIGH TNES S, CO NTRA ST, SH ARPN ESS,
SATUR ATIO N, HUE or 16 :9/4:3 scree n mod e
14
3
1
2
and then pre ss left or righ t butto n to a djust a s you like.
N/P
2 NUM ERIC butto ns - Press th ese bu ttons to inpu t
2
5
6
4
15
numer ic informatio n, such as tra ck nu mber, chapte r
OSD
numbe r and so on.
7
8
9
16
3 FR b utton - Pres s this b utton to play the d isc
GOTO
backw ard at speed s:x2,x 4,x8,x 16,x32 .
17
0
10+
4 FF button - Pres s this button to pla y the d isc
STOP PLAY/PAUSE
18
forwar d at sp eeds: x2,x4, x8,x16 ,x32.
3
19
5 ZOO M but ton -P ress this button to enlarg e picture
FR
FF
PREV
NEXT
4
20
size, m ax.to X 4 or to shri nk pict ure siz e, min . to X 1 /4.
5
21
6 SLO W but ton -P ress this button to play th e disc at
ZOOM
A-B
RE PEAT
SLOW
6
22
speeds:1/2,1 /4,1/8 ,1/16.
7
23
7 PRO GRAM butt on -Pr ess this button to s etup the
PROGRAM ANGLE
SETUP
8
24
memory orde r of ch apter or title (for D VD) or tracks
25
9
STEP
(for VC D/CD ).
ENTER
8 ANG LE bu tton - Press this bu tton to displ ay the
26
10
TITLE
MENU
L/R
angle numbe r and c hange to different angles.
11
27
9 STEP butt on- Press th is butt on to p lay th e
12
SUBTITLE LANGUAGE VOL
VOL
file for ward s tep by step.
28
13
10 L/R butto n- To c hange audio outpu t mod e: Left
29
MUTE
Mono, Right Mono, Mix-m ono a nd Ste reo so undtra ck.
11 TIT LE bu tton -Press this bu tton to return to
title menu (fo r DVD).
12 SUBTITL E button-Pr ess th is butt on to d isplay
and ch ange s ubtitle langu age(F or DV D only ).
13 LA NGUA GE BU TTON - To s elect t he sou ndtrac k lang uage( DVD).
1 4 N/P butto n - Pre ss thi s butto n to se lect N TSC o r PAL system (For DVD o nly).
15 OS D button -P ress O SD bu tton co ntinuo usly d uring playba ck, the scree n will displa y the
playing information , such as ela psed time, re maini ng tim e and so on.
16 GO TO button- Press this b utton t o set the player to p lay di sc star ting at a cert ain po int.
17 PL AY/PAUSE b utton - Pres s this button to sta rt or pa use p laying the dis c.
18 STOP bu tton -P ress t his bu tton to halt p laying .
19 NEXT but ton -P ress this button to play th e next chapt er(for DVD) or trac k(for V CD/C D).
20 PREV bu tton -Press this bu tton to play t he pre vious c hapte r(for D VD) o r track (for VCD/CD).
21 REPEAT butto n -Pre ss this button to rep eat pl aying one ch apter or one title ( forDVD ) or
repea t playing the curren t trac k or the whole track s (for VCD/C D).
22 A-B button -Pr ess thi s butto n to re peat p laying sections be tween two sp ecific points (A-B) .
23 SE TUP b utton -Press this b utton to ente r initia l settin gs me nu.
24 ENTER b utton --Pres s this b utton to con firm w hat you have selec ted.
25 navigatio n buttons - Press this bu tton to move up,do wn,left or rig ht.
26 ME NU bu tton -Press this bu tton to retur n to the root m enu( for DV D) or t o turn on/off the
PBC (f or VCD ).
27 VOLUME + butt on- Press th is but ton to turn up the vo lume .
28 VO LUME - butt on- P ress th is but ton to turn do wn the volum e.
29 MU TE bu tton- Press t his bu tton to mute the sou nd.
GO TO GENERAL SETUP PAGE
22
7
Changing subtitle
language (DVD only)
Basic connection
E nsure all the cable s are d iscon nected from the ma in unit before conn ecting to AC power
s ource by AC power adapt or.
Read th rough the in structi ons be fore c onnec ting ot her eq uipme nt.
Do not charge up th e batte ry whi le the DVD p layer i s work ing with the battery.
Connecting to AC power source
It is possib le to c hange the su btitle langua ge to
a different language fro m the one se lected at
the i nitial s etting s.( Thi s operation w orks o nly
with discs on wh ich mu ltiple s ubtitle
lang uages are re corde d)
1.Pr ess SU BTITLE but ton du ring pl ay, the
scre en will displa y the c urren t langu age.
2. Press S UBTIT LE button ag ain to chang e
lang uage o r turn off.
TFT MOD E
1
2
3
4
5
6
7
8
9
0
10+
N/P
AV OUT
PHON E
NOTE: W hen no sub titles are re corde d,
p ress this bu tton w ill no t work .
POWER
OFF ON
OS D
IN PUT 9 -1 2V- - -
GOT O
C HANGING S UBTITLE LA NGUAGE
S UBT ITL E 01 /03 CHI NES E
To power outlet
Main unit
STOP
PLAY/PAUSE
SUB TITL E 0 1/03 EN GLIS H
FR
FF
PR EV
NE XT
Z OOM
SLOW
A-B
RE PEAT
ZOOM
AC adaptor
NOTE:
Before connecting to AC power, push the
POWER ON/OFF switch to OFF.
PROGRA M A NGLE
ZOOM PLAY
ST EP
SE TUP
ENTER
NAVIGAT ION
BUTTONS
ENTER
L/R
This function allo ws you to en joy a m otion
pictu re.
Press ZO OM b utton w hen p laying , the s creen
shows:
Rechargeable Battery Use
2X
The playe r built-in a cha rgeable Lithiu m battery.
3X
L/R
T IT LE
MEN U
SUBTITLE
LANGUAGE
SU BTITL E LAN GUAGE V OL
VOL
MUTE
4X
1. Charge the battery
-Connect the adaptor to the DC 12V IN JACK ,then s et the unit in t he POWER ON
mode for fully charged.(FAST RECHA RGE)
-It needs more time for fully charged if switch the PO WER on .(SLO W RECHARG E)
And the in dicator is red during chargin g; it gets green when chargin g completed.
1/ 4
1/3
1/ 2
Press NAVIGATION b utton to scro ll acro ss the
enla rged p icture.
2. Tim e to recharge the battery
Recharge and playback time depends on battery pac k capacity and the temperature condition.
Generally speaking, The battery needs to be charged about 3 hours in FAST CHA RGE mode
And about 12 hours in SLOW CHARGE mode.
3. Using and Maintaining Rechargeable Battery
-.The norm al working co ndition temperature is: 0 ~45 ;
-.Always u nplug AC/DC power supply for the unit whe never not playing.
NOTE: A n ew battery wh ich has not be en used or one which has no t been used fo r more
than a mo nth, may appe ar to not recha rged enough , this is due to t he characteris tic of this
battery an d is not a malf unction. In this case, recharg e it two or thre e times before the first
use and it needs more th an 6 hours to recharge batte ry.
Noises m ay be generate d during recha rging. In this c ase, use a mo re distant pow er socket.
Do not rec harge or disch arge battery n ear a heating element such as a heater or direct sunlight.
8
Changing audio soundtrack language (DVD/VCD/CD disc)
It is po ssible to cha nge th e audi o soun dtrack langu age to a different l angua ge from the o ne
selected at th e initi al sett ings (T his op eratio n work s only with d iscs o n whic h multiple au dio
soundtrack la nguages are recorded).
Pres s LANGUAG E button wh ile play ing D VD dis c the s creen will di splay t he number o f curre nt
soun dtrack langu ages,pressi ng the button again will c hange the la nguag e.
Pressin g L/R b utton while p laying VCD/ CD dis c will chang e audi o outp ut mod e: Mono Left,
M ono Right, M ix-mo no and Stere o soun dtrack .
NOT E: Wh en no soun dtrack langu ages are re corde d, pre ssing this b utton will no t
wor k.Whe n the power is tur ned on or th e disc is rem oved , the la ngua ge he ard is the
one selec ted at the in itial se ttings.
21
Repeat play
Basic connection
Press REPEAT butto n duri ng play, it wil l
re peat p lay one chap ter or one tit le (for DVD
di sc), or repea t play track (for VCD/CD) .
It is recommended to connect a multi- system TV.
Ensure that this pla yer an d othe r equipment to be connected are set to the O FF m ode an d
discon nect t he AC adaptor befo re com menc ing connecti on.
Do no t block ventil ation h oles of equip ment and ar range them s o that air can circu late fr eely.
Read through the i nstructions b efore conne cting o ther equipm ent.
Ensure that you observe the color cod ing wh en co nnecti ng aud io and video cables.
TFT M ODE
DV D DISC
CHAPTER
1
2
3
4
5
6
7
8
9
Rep eat ch apter
N/P
Note:
OSD
TITLE
GO TO
GOTO
Rep eat titl e
0
10+
STOP
PLAY/PAUSE
FR
FF
PR EV
NEXT
ZOOM
SLOW
A-B
REPEAT
ALL
During DVD play, t he TV volume may be at a lower level than d uring T V broadcast s, etc.
If this i s the c ase, adjust t he vol ume to the desired level.
If the D VD/VCD/CD playe r is co nnect ed to the TV throug h a video cas sette record er,
the pic ture may not be played back no rmally with s ome DVDs. If this is the c ase,
do not conne ct the player via the VCR.
A-B
RE PEAT
Rep eat all
PROGRAM ANGLE
VC D/CD D ISC (In the PBC OFF mode)
SET UP
ENTER
EN TER
ST EP
Connecting to a TV set
TRACK
L/R
T IT LE
MENU
Re peat track
SUBTITLE LAN GUA GE VOL
VOL
MUTE
ALL
Re peat d isc
TV set
A-B repeat play
Rep eating sect ions b etwee n two speci fic
points(A- B repe at)
1. Press A-B RE PEAT button during play a t the p oint w here r epeat play is to be started (A).
2. Press A-B RE PEAT button at the point w here repeat play i s to be ended (B). R epeat play o f
th e sele ction b etwee n poin ts A a nd B starts.
3. Press A-B RE PEAT button once a gain t o return to normal play.
To vide o input/output conn ector (yellow)
To audio input/ output connectors (re d, white)
Video/audio cab le
TFT MODE
Pre ss TF T MODE butt on, the botto m at right of
C ON TRA ST IIIIIIII II.... .... 0 0
screen w ill disp lay as the pic ture a t right:
Pre ss this butto n cont inuous ly to s elect
BR IGHTNESS, CONT RAST, SHAR PNES S,SATURAT ION, HUE o r scre en mo de(16:9/4:3).
Then pre ss the LEFT or RIG HT na vigatio n butt on to a djust t he lev el of th e sele cted it em.
NO TE: The leve l of BRIGHT NESS , CON TRAS T, SHA RPNE SS,SATURATION and H UE can be
adj usted from -20 to + 20. An d the SCRE EN MO DE ca n be s witche d betw een 1 6:9 an d 4:3.
Pre ss TF T MODE butt on aga in to e xit the TFT M ODE Menu Page.
AV OUT
POWER
OFF ON
IN PUT 9 -1 2 V-- -
GO TO
Press GO TO button , the screen will display a menu , then you can mov e Up o r Down Navigation
button and enter dire ctly a time, chapter or tra ck, th e disc will pla y from the selected point . Pres s
G O TO button again to exit the menu.
20
PH ON E
9
On screen display
information
Basic connection
P ress O SD bu tton to displa y play ing informat ion.
Connecting to audio equipment
DVD disc
TITL E E LAPSE D
T:02/03 C: 07/2 8
T ITL E RE MAIN
T: 02/03 C: 07/28
0:1 9:20
1:17: 00
Audio equip ment
CHAPTER EL APS ED
T: 02/03 C: 07/28
0:01:53
CHAPTE R REM AIN
T: 02/03 C: 07/2 8
0:0 1:34
To audio input/ output connector (red, white)
TFT M ODE
DISPLAY OF F
T = TIT L E NO.
C = CHAP TER Nu mber
SINGL E ELAP SED
TRAC K 02/03 0:19:2 0
SINGL E REMA IN
TRACK 02/03 1:17:00
2
3
4
5
6
N/P
NUMERIC
BUTT ONS
VCD disc
Video/a udio c able
1
7
8
0
10+
STOP
PLAY/PAUSE
FR
FF
PR EV
NEXT
ZOOM
SLOW
A-B
REPEAT
GOTO
10+
AV O UT
PH ON E
TOTAL REM AIN
TRA CK 02 /03 1:17:00
PROGRAM
POWER
OFF ON
PROGRAM ANGLE
IN PU T 9- 1 2V- --
S INGL E R EMAIN
TR ACK 02/03 0:01:34
Connect headphones
L/R
Program play
Adjust the volume to mini mize the volume.
Connect the head pho nes to phone jac ks .
2. Adju st the volume to the level that you want.
AV OUT
P HON E
SET UP
SINGL E ELAPSE D
TRACK 02/03 0:01:53
EN TER
ST EP
1. Con nect the headphones.
9
D ISPLAY OF F
CD disc
TO TAL EL APSED
TR ACK 02/03 0 :19:20
OSD
OSD
T IT LE
SUBTITLE LAN GUAGE VOL
T he pla yer pla ys the files i n an d esired order.
1 . Pres s PRO GRAM butto n and the scr een w ill
d isplay the pr ogram menu .
ENTE R
NAVIG ATION
BUTT ONS
MENU
VOL
MUTE
POWER
OFF ON
IN P UT 9- 1 2V- --
1. Phones
10
2. Pre ss nav igation butto ns to c hoose memory ind ex and then press ENTER butto n to start inp ut.
Enter desire d titles /chap ters nu mbers by us ing the nume ric bu ttons. The se lected titles /
chapte rs are store d into t he me mory. Select
on the m enu to see th e next page . Up to 20
memo ries ca n be s tored.
NOTE : Lead ing ze ro is n ot nece ssary. If the track numbe r is mo re tha n 10, p ress t he 10+ key
first an d then the u nit dig it.
Exam ple: Tr ack 12 , press "10+" and th en "2 "
Tr ack 21 , pres s "10+ " twice and th en "1"
3. Select START on the m enu a nd pre ss EN TER b utton t o start program pla y or se lect E XIT
on the menu and p ress E NTER button to exit witho ut pro gram p lay.
4. To c lear p rogram med i tems, scroll t he nav igatio n butto n to th e item to be cleare d and press
ENTER button, the selec ted ite m will be del eted.
5. To s top th e prog ram, p ress P ROGR AM bu tton s elect S TOP o n the menu, then p ress
ENTER button.
19
Remote control preparation
JPEG CD
Slide show effects
Press PRO GRAM button to se lect on e of th e
effects whe n changing from one picture to
another:
1
2
3
4
5
6
7
8
9
10
11
12
13
14
15
16
17
2 OPEN
Battery installation
Insert the ba tteries while observ ing th e corre ct
(+) and (-) po laritie s as ill ustrate d at ri ght(Fi g 1).
W IPE TOP
W IPE BOTTOM
W IPE LEFT
W IPE RIGHT
D I AGONAL WI PE LEFT TO P
D I AGONAL WI PE RIGHT T OP
D I AGONAL WI PE LEFT BO TTOM
D I AGONAL WI PE RIGHT B OTTOM
EX TEND FROM CENTRE H
EXTEND FROM CENTRE V
CO MPRESS TO CENTER H
C OMPRESS T O CENTER V
W INDOW H
W INDOW V
W IPE FROM E DGE TO CENTRE
MOVE IN FRO M TOP
N ONE
PUSH 1
Service life of b atte ries
The batteries no rmally last fo r abou t one
year a lthoug h this depen ds on how of ten,
and fo r what opera tions, the rem ote
contro l is us ed.
If th e remo te con trol fa ils to work ev en
when it is op erated near the pla yer, re place
the ba tteries .
Use one s ize CR 2025 battery.
TFT MODE
1
2
3
4
5
6
7
8
9
N/P
3
OSD
GOTO
0
10+
10+
PL AY/PAUSE
STOP
PLAY/PAUSE
NEXT
Enjoying Video CD with
playback control
FR
FF
PREV
NE XT
ZOOM
SLOW
A-B
REPEAT
PR EV
PROG RAM
PROGRAM ANGLE
ST EP
When playi ng VC D 2.0 with PB C, the playe r
will s how th e VCD versi on and PBC s tatus
on th e scre en.
L/R
SETUP
EN TER
T IT LE
SU BTITLE LANGUAGE VOL
EN TER
NAVIGATION
BUTTONS
MENU
VO L
4
Note :
Do not use rechargea ble (N i-Cd) batteri es.
Do not at tempt to rec harge, short- circuit ,
disas semb le, hea t or th row th e batte ries
into t he fire .
Do not dr op, step on or othe rwise impac t
the remote contro l. This may d amag e the
parts or lea d to m alfunc tion.
If t he remote co ntrol i s not g oing to be
used for a l ong tim e, rem ove the battery.
Fi g 1
REMOTE CONTROL SENSOR
MUTE
6m
VCD2.0
PBC ON
30 C
After a few se conds , a me nu wil l appe ar on
the scr een.
30 C
TF T MODE
Remote control operation
1
2
3
4
5
6
7
8
9
N/P
OSD
GOTO
0
1 WHAT WILL I DO
2 HEAR ME CRY
3 WITHOUT YOU
4 MOVE CLOSER
10+
STOP PL AY/ PAUS E
1. Remov e the p rotect ive pla stic ta b befo re
ope rating the re mote c ontrol(Fig 1 ).
2. Point th e rem ote co ntrol fr om no more than
abo ut 6 m from t he rem ote co ntrol sensor and
with in abo ut 60 o of the front o f the p layer( Fig 2).
NO TE:
T he operating distance ma y vary according to
Fi g 2
the bright ness o f the r oom.
Do not point b right l ights a t remo te con trol
sen sor.
Do not p lace o bjects betwe en the remo te cont rol an d the r emote contro l sens or.
Do not u se this remo te con trol wh ile sim ultane ously opera ting th e remo te con trol of any
oth er equ ipmen t.
FR
FF
PR EV
NEXT
ZOOM
SLOW
A- B
REPEAT
PROGRAM AN GL E
STEP
L/R
SETU P
E N TE R
TITLE
SU BTITL E LAN GUAGE VOL
MUTE
P ress n umeric buttons to select corres pondi ng
t rack, i f the tr ack nu mber is under 10, choose
o ne of the nu meric button s 0 ~ 9 .
I f the tr ack nu mber is exce ed 10 , press 10+
b utton firstly, then p ress n umeri c butto ns 0 ~ 9.
P ress N EXT
b utton o r PRE V
b utton, the pl ayer w ill play the n ext or previo us trac k in th e sche duled seque nce on the d isc.
18
11
MENU
VOL
Before enjoying DVD/Video CD/CD
The O n-Screen menu languag e of yo ur player
has been factory p re-set to English.
If you want t o change the menu langu age
to oth er language, pleas e refer to "Initial
settin gs / General setup / OSD lang ”.
In the explanation below it is assume d that
English has been selected a s menu l angua ge.
R OTAT I NG
Flipping pictures
Pre ss UP naviga tion button t o flip th e pict ure ve rtically.
Pre ss DO WN na vigatio n butt on to f lipthe picture horiz ontally.
Basic play
TFT M ODE
1. Push POWER k nob on the unit to s witch
on the powe r.
2. Push the open b utton to ope n the d isc co ver.
1
2
3
4
5
6
7
8
9
N/P
NUMER IC
BUTTO NS
OPEN
OSD
GOTO
0
10+
PLAY/PAUSE
STOP PLAY/PAUSE
3. Pl ace a d isc on to the disc c ompartment.
Hold the di sc with out to uching either of its
surfa ces, p osition it with the p rinted title si de
facin g up, a lign it with th e guid es, an d plac e it
in its prope r posi tion.
4. Clo se th e disc c over, after c losing the di sc
cove r , play begin s. The playe r starts to rea d
the d isc im media tely.
FR
FF
PREV
NEXT
ZOOM
SLOW
A-B
RE PEAT
PROGRAM ANGLE
SET UP
ENTE R
NAVI GATION
BUTT ONS
EN TER
STEP
PR EV
NEXT
Picture Shrink/Zoom
Pre ss ZO OM bu tton to ente r the zo om m ode
MENU
TITL E
L/R
TIT LE
SUBTITLE LANGUAGE VOL
MENU
Pre ss FF button to en large p icture to 100 %, 12 5%, 1 50% a nd 200 %
VOL
Pre ss FR butto n to sh rink pi ctures to 50% , 75% , and 100%
MUTE
LOADING
DVD-V IDE O
ZOOM 150%
5. When a m enu sc reen appear s on the TV,
move the na vigatio n butt ons or press the
numeric butt ons to selec t prefe rred tr ack
number, then press ENTER but ton to confirm.
1 WHAT WILL I DO
2 HEAR ME CRY
3 WI THOUT YOU
4 M OVE CL OSER
ZOOM 50%
If the pi cture i s enla rged, y ou ma y pres s navi gation butto ns to se e othe r port ions o f the p icture.
WITHOUT YOU
6.W hen the men u conti nues o nto an other
scre en , pr ess NEXT bu tton to view the
next scree n, or p ress P REV b utton to skip
to pr eviou s scree n.
NOT E: Du e to th e diffe rent de sign o f some softw are tit les, NE XT bu tton m ay no t alway s wor k.
7.To stop p lay an d retu rn to th e men u scre en, pr ess TITLE bu tton, o r MEN U but ton.
12
17
Stopping play
JPEG CD
F or JPEG pic ture C D, select the folder you w ant to play b y the n avigation bu ttons a nd
pres s ENT ER bu tton to confir m.
T he file s in th is fold er are displa yed an d sele ct you r pictu res by using the up /down
nav igation butto ns and press ENTE R butt on to s tart pl aybac k. Thum bnail of pic ture will be
disp layed while y ou sc rolling acros s the fi le nam e.
Press the STOP button to sto p play ing a d isc.
NOTE : Wh en pla yer is s toppe d, the player
records the point where STOP was p ressed
(RES UME f unctio n). Pre ss PL AY aga in,
playb ack will resu me fro m this point . When the
tray is Open ed or STOP is pres sed a gain, t he
RESU ME fu nction will b e clear ed.
Be lle
Skipping ahead or back
DISC
O nce a folder and fil e is se lected , the p icture is load ed onto the s creen .
TFT MODE
Skipping ahead
Pre ss NEX T
butto n durin g play
A ch apter (DVD) or a track (V ideo CD/CD) is
skip ped each tim e the button is pre ssed.
Skipping back
Pre ss PRE V
butto n during play
A ch apter( DVD) or a track (Vi deo C D/CD) is
skip ped each tim e the button is pre ssed.
1
2
3
4
5
6
7
8
9
N/P
OSD
GOTO
0
PLAY /PAU SE
10+
FF
FR
STOP
PLAY/PAUSE
FR
FF
PREV
NE XT
ZOOM
SLOW
A-B
RE PEAT
PROGRAM AN GLE
ST EP
NOT E: The time to load and d isplay pictur e depe nds o n the file size of the pictu res.
L/R
Dur ing pla yback, pres s MENU button to return to folder se lectio n or STOP b utton to
e nter p review mode.
Press REPEAT button to change p lay mode:
-
SHU FFLE: All the files will be rando mly so rted and play by the orde r.
- RAN DOM: random ly se lect an y file t o play.
- SING LE: p lay on e file o nly.
- REPEAT O NE: re peat o ne file .
- REPEAT FO LDER : all th e files in the folder will b e playe d repe atedl y.
- FOLDER: a ll the f iles in the fol der wi ll be pl ayed.
Rapid advance(Rapid
reverse)
PREV
NEXT
SET UP
EN TER
T IT LE
SUBTITLE LAN GUAGE VOL
MENU
VOL
MUTE
During play back, press FF
butto n or F R
butto n to fa st forw ard/re wind. Press
PLAY butto n to re sume norma l play.
Fast fo rward
2X
FF 4X
F F 8X
FF
16 X
32 X
Fast b ackward
2X
Skip to next/previous picture
FR 4 X
FR 8 X
FR 1 6 X
32 X
Pre ss NEX T but ton to skip to the ne xt pict ure or PREV button to sk ip to th e prev ious p icture.
If no key is press ed for 5 seco nds, i t will s kip to n ext pi cture a utom atically.
Pause or play
Rotating pictures
Press RIG HT na vigation button to rotate the picture clockwise.
Press LEF T navigation button to rotate the pictu re cou nter-c lockwise.
16
Durin g play back, press PLAY /PAUS E
play, press PLAY butto n.
b utton , the p lay wi ll be p aused , To re sume norma l
13
Slow-motion play (DVD/VCD)
MPEG4 playback
P ress th e SLO W but ton du ring pl aybac k.
1 ) Plays the d isc at a 1/2 of norma l spee d at
fir st. Each time the b utton i s press ed, th e
pl ay spe ed bec omes 1/4,1/ 8,1/16 .
2 ) Pres s PLAY butto n, the unit wi ll retur n to
no rmal p lay.
1 . Inser t the d isc con tainin g the f iles in MPEG 4
fo rmat t o be p layed and after a fe w sec onds,
th e scre en of the mo nitor will sho w all the
fo lders on the disc:
00 :00 0 0: 00
00 1/124
MP3 playback
TFT MO DE
SW EA R
1. Insert the di sc con taining the fi les in Mp3
fo rmat to be pl ayed a nd aft er a fe w seco nds,
th e scre en of t he mo nitor will sho w all th e
fo lders o n the disc:
1
2
3
4
5
6
LOV E
N/P
NUMERIC
BUTTONS
7
00:00 00:00
001/124
8
DISC
9
NUMERIC
BUTTO NS
10+
PLAY/PAUSE
STOP P LAY /PA US E
MUSIC
SONGS
LOVE
SLOW
FR
FF
PREV
PREV
NEXT
NEXT
REPEAT
ZOOM
DISC
SLOW
A-B
PROGRAM A NGLE
2. Selec t the fo lder y ou want to pl ay by the
na vigati on but tons a nd pre ss the ENTE R
bu tton to confi rm.
3. The fi les in t his fol der are displ ayed a nd
se lect th e desired so ng by naviga tion b uttons ,
th en pre ss the PLAY button to sta rt play back.
STEP
2
3
4
5
6
REPEAT
SETUP
ENTE R
NAVIG ATION
BUTTO NS
ENTER
2. Select the folder y ou want to play by the
navigation buttons and pre ss the ENTER
button to confirm.
3 . The files in this folder are displayed and
se lect the desired fire by navigation buttons,
then press the PLAY button to start playback.
7
8
0
10+
TITLE
SUBTITL E LANGUAGE VOL
PLAY/PAUSE
FR
FF
PR EV
NE XT
Z OOM
SLOW
A-B
RE PEAT
REPEAT
PR OGRAM ANGL E
00:00 0 0:00
001/124
Current
folder
S ETUP
L/R
ENTER
T ITLE
ENTER
NAVIGATION
BU TTONS
MEN U
SWEAR
SUBTITLE LA NGUA GE VOL
AV
AV
AV
AV
AV
01:53 04 0:36 160
001/124
PLAY/PAUSE
STOP
PREV
NEXT
Volume level indicator
Playback indicator
AV
MUTE
Curre nt song/Tota l songs M P3 b it rat e ind icato r
Volume level indicator
Play t ime
Play back indicator
Total time
Equalizer indicator
9
Current file/Total files
MENU
VOL
G O TO
GOTO
ST EP
L/R
OSD
OS D
GOTO
0
1
N/P
OSD
C u rrent f older
TF T MODE
STORY
KING
FIGHT
PEACE
LIVE
LILY
SECRE T
VOL
MUTE
DISC
M USIC
Mp3
Mp3
Mp3
Mp3
Mp3
Mp3
C ur re n t me d ia file ty pe
A LAN
B UZZ
C ANDY
D IANA
M ANDY
S IMPSON
DISC
C ur rent m edia file ty pe
4. Press NEXT or PRE V but ton to turn th e
cu rrent m enu p age to the ne xt or p reviou s
me nu pa ge.
5. Press REPE AT but ton to chang e play mode.
- SING LE: p lay one file o nly.
- REPEAT O NE: re peat o ne file .
- REPEAT FO LDER: all th e files in the folde r will b e play ed rep eatedl y.
- FOLDER: a ll the f iles in the fo lder wi ll be p layed
- SHUFFLE: All the files w ill be random ly so rted an d play ed by the ord er.
- RANDOM : rando mly se lect an y file to play.
14
4. Press NEXT or PREV bu tton, then press
ENTER button , the p layer will pla y the next or
pr evious file.
5. Press the SLOW b utton to play the di sc at
a1/2,1/4 ,1/8 o r 1/16 of normal speed.
6. Press REPEAT bu tton to change play mode .
- SIN GLE: p lay on e file o nly.
- REPEAT O NE: re peat one file.
- REPEAT ALL: al l the fil es in t he folder
will be played repeatedly.
- REPEAT O FF: n o files in the folder will be playe d repe atedly.
- SHUFFLE : all th e files will be rando mly
sort ed and playe d by the orde r.
- RANDOM : rand omly s elect any file to pla y.
N OTE: The player ca n only play t he dis c with MPEG -4 format. The disc with o ther formats
m ay not be pla yed on this u nit.
15