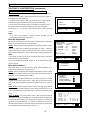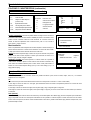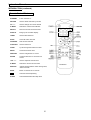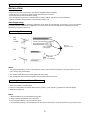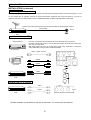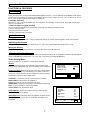
1
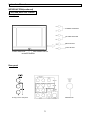
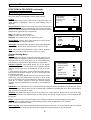
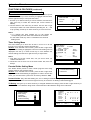
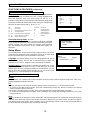
0DQXDOGH,QVWUXFFLRQHV £$'9(57(1&,$
1RGHMHHODSDUDWRPRMDUVHSRUODOOXYLDQLKXPHGDGDILQGHSUHYHQLULQFHQGLRRFKRTXHHOpFWULFR
(ODSDUDWRQRGHEHVHUH[SXHVWRDJRWHUDRVDOSLFDGXUDGHDJXDDOJXQD\QLQJ~QREMHWRFRQOtTXLGRFRPRHOYDVRGHEHVHUSXHVWR
VREUHHODSDUDWR
&XLGDGRSDUDUHGXFLUHOULHVJRGHFKRTXHHOpFWULFRQRTXLWHOD
FXELHUWDRHOSDQHOSRVWHULRU1RKD\QLQJXQDSLH]DHQHOLQWHULRUTXH
VLUYDDOXVXDULR3DUDFXDOTXLHUVHUYLFLRDFXGDDOSHUVRQDOGHVHUYLFLR
FDOLILFDGR
&$87,21
5,6.2)(/(&75,&6+2&. '212723(1
(VWHVtPERORLQGLFD³YROWDMHSHOLJURVR´HQHOLQWHULRUGHO
SURGXFWRGHPDJQLWXGVXILFLHQWHFRPRSDUDSURYRFDUXQULHVJRGH FKRTXHHOpFWULFRRGDxRSHUVRQDO
(VWHVtPERORLQGLFDLQVWUXFFLRQHVLPSRUWDQWHV
DOVHUYLFLRGHOPDQHMRGHOSURGXFWR
&XLGDGR
3DUDSUHYHQLUHOULHVJRGHFKRTXHHOpFWULFRLQVHUWHSOHQDPHQWHODSDWLWDDQFKDGHODFODYLMDHQODDEHUWXUDDQFKD
/HDODHWLTXHWDLGHQWLILFDFLyQFODVLILFDFLyQLGHQWLILFDWLRQUDWLQJODEHOORFDOL]DGDHQHOSDQHOSRVWHULRUGHOSURGXFWRSDUDODRSHUDFLyQDGHFXDGDGHO
YROWDMH
&XLGDGR (O XVR GH MXHJRVGHYLGHRRGHFXDOTXLHUDFFHVRULRH[WHUQRFRQLPiJHQHVILMDVGXUDQWHXQWLHPSRH[FHVLYRSXHGHGHMDUORV
SHUPDQHQWHPHQWH LPSUHVRV HQ HO WXER GH LPDJHQ R WXERV GH LPDJHQ GHO WHOHYLVRU GH SUR\HFFLyQ $6,0,602 DOJXQRV ORJRV GH
UHGSURJUDPDQ~PHURVGHWHOpIRQRHWFSXHGHFDXVDUGDxRVVLPLODUHV(VWHWLSRGHGDxRVQRHVWiFXELHUWRSRUVXJDUDQWtD
,QVWDODFLyQGHO7HOHYLVRUSRU&DEOH (VWDLQVWUXFFLyQH[LJHTXH8GSRQJDDWHQFLyQDO$UWtFXORGHO&yGLJR(OpFWULFR1DFLRQDO6HFFLyQ
GHO&yGLJR(OpFWULFR&DQDGLHQVH3DUWHHOFXDOGDJXtDSDUDHOVLVWHPDGHWLHUUDDSURSLDGR\HQSDUWLFXODUHVSHFLILFDTXHSDUDXVRSUiFWLFR
ODWLHUUDGHFDEOHGHEHHVWDUFRQHFWDGDFRQHOVLVWHPDGHWLHUUDGHOHGLILFLRORPiVFHUFDSRVLEOHFRQUHVSHFWRDOSXQWRGHHQWUDGDGHOFDEOH
5HJLVWURGHO&OLHQWH
8GHQFRQWUDUiHOQ~PHURGHPRGHOR\HOQ~PHURGHFKDVLVGHVXWHOHYLVRUHQODSDUWHWUDVHUDGHOWHOHYLVRU5HJLVWUHHVWRVQ~PHURVHQORVHVSDFLRV
GDGRVDEDMR&RQV~OWHORVHQFDVRGHOODPDUDOFHQWURGHVHUYLFLRSDUDFOLHQWHVGHRDVXYHQGHGRUGHFRQUHVSHFWRDHVWHSURGXFWR
1~PHURGHPRGHOR
1~PHURGHFKDVLV
,
Manual de Instrucciones
IMPORTANTES INSTRUCCIONES DE SEGURIDAD
1. Lea estas instrucciones.
2. Guarde bien estas instrucciones.
3. Observe todas las advertencias.
4. Observe todas las instrucciones.
5. No use este aparato cerca del agua.
6. Limpie este producto sólo con tela seca.
7. No tape ninguna abertura de ventilación del televisor. Debe instalar el televisor según las instrucciones del fabricante.
8. No instale el televisor cerca de ninguna fuente de calor como radiadores, calentadores, hornos y otros aparatos (amplificadores incluidos) que
pueden producir calor.
9. No debe dejar perder la función de seguridad de la clavija polarizada o de tierra. La clavija polarizada tiene 2 patitas, una es más ancha que la
otra; la clavija de tierra cuenta con dos patitas y un diente de tierra. La patita ancha y el diente de tierra le sirven para su seguridad. Si la clavija
proporcionada no puede entrar en su enchufe, llame a un electricista para cambiar el enchufe caducado.
10.Proteja bien el cable de potencia evitando que sea pisado o apretado sobre todo en alguna clavija, bajo un recipiente de uso o en el punto
donde sale del aparato.
11.Use sólo los aditamentos/accesorios especificados por el fabricante.
12.Use solamente el estante, el trípode, el soporte o la mesa especificados por el fabricante. Si mueve el aparato puesto
encima, hágalo con cuidado para que el mismo no se vuelque.
13.Saque la clavija del televisor en caso de relámpagos o cuando no va a usarlo por mucho tiempo.
14.Encargue todos los servicios al personal de servicio calificado. Hay que reparar el producto si ocurre cualquiera de los siguientes casos: el
cable de potencia o la clavija está damnificado; en el aparato ha entrado líquido o ha caído algún objeto; el aparato ha sido expuesto a la
lluvia o humedad; el aparato no trabaja normalmente o ha caído al piso.
15.Advertencia--Sólo los técnicos calificados y autorizados pueden reparar el producto. No abra la caja del producto ni repararlo de otra
manera para prevenir daños graves o muerte causados por el choque eléctrico, y su intento también puede aumentar el riesgo de
incendio.
Advertencia de FCC
Dispositivo de Computación de Clase B
Información para el usuario
Este equipo ha sido probado y está conforme con los límites para Dispositivos Digitales de Clase B de la parte 15 de FCC Rules. Estos límites han
sido diseñados para ofrecer la protección razonable contra la interferencia dañina en su instalación en casa. El aparato genera, utiliza e irradía
energía de frecuencia de radio, y puede causar interferencia dañina a las comunicaciones de radio si no está instalado y utilizado de acuerdo con
las instrucciones. No obstante, no hay garantía para que la interferencia no ocurra en una instalación particular. Si el producto recibe interferencia
cuando se enciende y apaga, el usuario puede intentar corregir la interferencia con una o más de las siguientes medidas:
1) Reoriente o recoloque la antena de recepción.
2) Aumente la distancia entre el equipo y el televisor
3) Conecte el equipo con una toma de corriente en un circuito diferente de la que está conectado el televisor.
4) Consulte al vendedor o a un técnico experimentado de radio/TV para obtener ayuda y sugerencias adicionales.
El usuario puede encontrar que es útil el folleto preparado por la Comisión de Comunicaciones Federal:“How to Identify and Resolve Radio-TV
Interference Problems”. El folleto se consigue de la Oficina de Imprenta del Gobierno de EE.UU. Washington, D.C.20402, Stock No.
004-000-00345-4.
Advertencia de FCC
El usuario está advertido de que los cambios o modificaciones no explícitamente aprobados por el fabricante pueden anular la autoridad del
usuario para operar el equipo.
Nota: Se debe utilizar cables resguardados en la instalación del producto para estar de acuerdo con los límites para Dispositivos de
Clase B.
II
Manual de Instrucciones
TABLA DE CONTENIDOS
INTRODUCCIÓN
Especificaciones........................................................................................................................................... 1
Descripciones de las Características ........................................................................................................... 2
Perfiles de las Unidades Frontal y Posterior ................................................................................................ 3
Características del Control Remoto.............................................................................................................. 4
INSTALACIÓN
Conexión de la Antena ................................................................................................................................. 5
Instalación de las Pilas del Control Remoto ................................................................................................. 5
Conexión de la Entrada del Equipo A/V ....................................................................................................... 6
Entrada del Dispositivo al Televisor ..................................................................................................... 6
Salida del Televisor al Dispositivo ......................................................................................................... 6
FUNCIONES Y CARACTERÍSTICAS
Encender/Apagar.......................................................................................................................................... 7
Funciones Básicas........................................................................................................................................ 7
Menús de Selección de Funciones............................................................................................................... 7
Características Útiles del Control Remoto.................................................................................................... 10
GUÍA PARA LA ELIMINACIÓN DE FALLAS.................................................................................................. 12
ESPECIFICACIONES
EMTV21785
MODELO
Sistema de Televisor
PAL-M, PAL-N, NTSC
Cobertura de Canales
Cobertura de TV por Cable
VHF 2-13, UHF 14~69
Mid Band (A-8~A-1, A~I)/Super Band (J~W)
Hyper Band (AA~ZZ, AAA, BBB)/Ultra Band (65~94, 100~125)
Preinstalación de Canales
181
Entrada de Antena
75 ohm (no equilibrado)
Dimensiones de la pantalla
406x305 mm
Salida de Audio
2W+2W (THD≤7%)
Fuente de Potencia
110-240V~ 50/60Hz
Peso de la Unidad
23kg
Dimensiones de la Unidad
595x461x484mm
Consumo de Potencia
100W
1
Manual de Instrucciones
INTRODUCCIÓN
Descripciones de las Características
Sintonización de 181 Canales – número total de canales que el televisor puede recibir: 2-69 en el modo Air, o 1-125 en el modo Cable
Entrada de AV (Posterior) – entrada compuesta estándar diseñada para uso con dispositivos A/V, tales como el reproductor de VCR o DVD
Entrada de AV (Lateral) – entrada diseñada para uso no frecuente, por ejemplo, con una videocámara o unidad de videojuegos
Salida de AV (Posterior) –señales de salida del televisor a un dispositivo como el VCR
Entrada de S-Video – entrada diseñada para mayor claridad y definición; conocida también como S-VHS
Entrada de DVD (Posterior) – entrada estándar diseñada para uso con el reproductor de DVD
Orificio de Entrada de Radiofrecuencia – orificio de antena coaxial estándar
Recuperación del Canal– retorno instantáneo al último canal que se haya visto
Revelación del Cuadro Cerrado – función que revela el cuadro o texto cerrado de una transmisión por el Televisor
Control de los Padres – función que los padres usan para cerrar un tipo seleccionado de programas
Tamaño de la Pantalla – tamaño diagonal de la pantalla del Televisor
Modos de Imagen Elegibles– estándares preinstalados para la revelación en el Televisor: Usuario, Normal, Película y Deporte
Modos de Sonido Elegibles– estándares preinstalados para el sonido del televisor: Usuario, Normal, Habla, Música y Película
Revelación multilenguaje en la Pantalla (OSD en inglés) - Revelación en la pantalla del televisor. Pude ser inglés, francés, portugués o español
Estéreo MTS /Estéreo de Video - sonido estéreo para una experiencia superior de ver televisión
Canal Favorito – se usa para instalar canales favoritos
Designación del Canal – se usa para designar canales
Temporizador Encender/Apagar – función que permite al usuario instalar un temporizador para encender/apagar el televisor y sintonizar el
televisor en un canal preinstalado en la hora preinstalada
CARACTERÍSTICAS
EMTV21785
Sintonizador de 181 Canales
Entrada de AV (Posterior)
2
Entrada de AV (Lateral)
1
Entrada de S-Video
1
Entrada de DVD (Posterior)
1
Salida de AV (Posterior)
1
Tamaño de la Pantalla
21”
Tubo de Imagen Plano
Control Remoto Universal
Programa Automático
Recuperación del Canal
Cuadro Cerrado
Control de los Padres
Modos de Imagen
OSD
Modos de Sonido
Estéreo MTS/Estéreo AV
Canal Favorito
Designación del Canal
Temporizador de Encender/Apagar
Apagado Automático de Dormir/Apagar en el Modo TV
AVC (Control de Volumen Automático)
Control de la Temperatura del Color
Protección contra los Rayos X
Corrección Geométrica Digital
Cerradura para con los Niños
Extensión del Nivel Negro
Ajuste del Equilibrio del Blanco Automático
2
Manual de Instrucciones
INTRODUCCIÓN (continuación)
Perfiles de las Unidades Frontal y Posterior
Panel frontal
BAJAR SUBIR EL CANAL
BAJAR/SUBIR EL VOLUMEN
SELECCIÓN DE MENÚ
SELECCIÓN DE TV/AV
POTENCIA CONDUCIDA
INTERRUPTOR DE ELECTRICIDAD
SENSOR INFRARROJO
Rear panel
AV IN(1)
VIDEO
L/MONO
AUDIO
R
ANTENNA IN
AV IN(1) on the side panel
3
Manual de Instrucciones
4
Manual de Instrucciones
INSTALACIÓN
-Lea todas las instrucciones sobre la seguridad en este manual antes de la instalación.
-Instale su televisor en un lugar donde la luz solar no pueda dar directamente en la pantalla.
-La luz suave e indirecta es la mejor para ver televisión.
-Espacio suficiente, de 4 pulgadas al menos entre el TV y cualquier pared de la habitación a favor de la ventilación.
-Distancia óptima para ver televisión: 3-5 veces el tamaño de la pantalla.
Desmagnetización Automática
El televisor de color se afecta fácilmente por el magnetismo, lo cual puede resultar en la distorsión del color en la pantalla. Si
su televisor es afectado por un componente magnético o aparato cercano, apáguelo por unos minutos por favor. El circuito
instalado para la desmanegtización automática eliminará la interferencia magnética.
Conexión de la Antena
75Ωcable coaxial (no suministrado)
VHF
UHF
or Cable
300Ωalimentador doble (no suministrado)
adaptador de antena
VHF
(no suministrado)
Entrada de RF
(detrás de la unidad del TV)
Mezclador de U/V
UHF
(no suministrado)
Notas:
1.Se recomienda usar el cable coaxial de 75Ω para eliminar la interferencia y el ruido que puedan aparecer debido a las
transmisiones de radios cercanas.
2.El cable de antena no debe ser atado a otro hilo de potencia.
3.Instale un pararrayos y chequéelo regularmente cuando usa una antena externa.
Instalación de las Pilas del Control Remoto
1.Abra la tapa de las pilas.
2.Instale dos pilas de tamaño AAA con los terminales + y – en posiciones correctas.
3.Cierre la tapa de las pilas.
Notas:
1. Se recomienda usar pilas alcalinas.
2. Al efectuar el cambio de pilas, asegúrese de reemplazar ambas pilas simultáneamente.
3. No exponga las pilas al fuego ni ábralas.
4. Asegúrese de extraer las pilas si no va a usar el control remoto durante largo tiempo,
para evitar el escape del líquido de éstas.
5. Una vez puestas las pilas, ci el control remoto presenta problemas de disfunción, remueva las pilas, mantenga pulsada la
tecla “F” por más de 5 segundos, coloque las pilas de nuevo y vuelva a ensayar.
5
Manual de Instrucciones
INSTALACIÓN (continuación)
Conexión del Equipo A/V
Los siguientes diagramas muestran las instrucciones básicas para agregar equipos exteriores tales como el reproductor de VCR o DVD a su
televisor. Consulte los manuales de operación del equipo exterior de audio/video si desea conectar un tal equipo con su unidad, a fin de obtener
instrucciones adicionales. FAVOR DE APAGAR TODA LA FUENTE DE ELECTRICIDAD POR COMPLETO ANTES DE CONECTAR LOS
DISPOSITIVOS.
Conecte el terminal de Salida de RF de la VCR en el orificio de Entrada de RF ubicado en el panel trasero
del televisor
Cable Coaxial
RF IN
VCR
Entrada del Dispositivo al Televisor
AUDIO/VIDEO IN
Reproductor DVD
Con el terminal S - VIDEO
VIDEO
AUDIO
Receptor-grabadora
AV IN(1)
VIDEO
YCbCr
L/MONO
VCR
AUDIO
Salida del Televisor al Dispositivo
R
AUDIO/VIDEO OUT
VIDEO
AUDIO
VCR
Los terminales laterales pueden usarse más fácilmente, con una receptor-grabadora. Las conexiones son idénticas.
6
Manual de Instrucciones
FUNCIONES Y CARACTERÍSTICAS
Encender/Apagar
1. Encender
Inserte el enchufe de potencia, y pulsando el INTERRUPTOR DE ELECTRICIDAD en el televisor. El televisor entrará en el modo Standby (en
espera). Se encenderá también la luz del indicador de potencia en el televisor.Pulsando el STANDBY o CH +/ - en el control remoto, el televisor se
encenderá. Entonces se apagará la luz del indicador de potencia en el televisor.
2. En Espera (Ligeramente Apagodo)
Ahora que el televisor es encendido, pulse la tecla STANDBY. Esto hará al televisor entrar en el modo Standby o Soft Off.
3. Apagado automático cuando no hay señal recibida
El televisor entra automáticamente en el modo Standby cuando llena las siguientes condiciones.
1) El televisor está en el modo de antena.
2) El canal actual no tiene señal.
3) Ninguna tecla pulsada durante 15 minutos
Funciones Básicas
Cambiar el Canal
Cuando el televisor está en el modo de Sintonizador, pulse las teclas CH +/ - para cambiar el canal, o use las teclas numéricas para pasar a un
nuevo canal.
Ajustar el Volumen
Para aumentar o bajar el volumen, pulse las teclas VOL +/ -. El ajuste del volumen varía de 0 a 100.
Poner Mudo el Volumen
Para silenciar el volumen, pulse la tecla MUTE. Para restaurar el volumen, pulse el MUTE otra vez.
Menús de Selección de Funciones
El menú principal son accesibles si Ud. pulsa la tecla MENU en el control remoto o en el panel superior. La navegación por los menús puede
hacerse con las teclas de flecha y la tecla ENTER en el control remoto o las teclas - CH + y - VOL + en el panel superior. Para salir se usa la tecla
MENU.
Menú de Video
Este menú le permite ajustar las diversas instalaciones de imágenes.
Acceso:Pulse en la pantalla del menú Principal la tecla de flecha izquierda o
derecha hasta que el Video se encienda. Entonces se revela el ménu de Video
Setting.
Modo de Imagen: Use la tecla de flecha izquierda o derecha para seleccionar
entre Usuario, Normal, Película y Deporte.
Control de Imagen: Pulse la tecla de flecha “arriba” o “ abajo” para
seleccionar el Control de Imagen, y la tecla de flecha derecha o la tecla ENTER
para acceder a los submenús. Use la tecla de flecha “arriba” o “abajo” para
moverse entre las diversas instalaciones, y la tecla de flecha izquierda o derecha
para ajustarlas.
Contraste: De 0 (contraste mínimo) a 100 (contraste máximo)
Brillo: De 0 (más opaco) a 100 (más brillante)
Color: De 0 (color mínimo) a 100 (color máximo)
Nitidez: De 0 (definición mínima) a 100 (definición máxima)
Tinte: -50 (más purpúreo) a +50 (más verde)
Temp. de Color: Frío, Cálido, Estándar
Extensión en Negro: Esta función mejora la graduación de la imagen. Pulse
la tecla de flecha izquierda o derecha para instalar en Encender o Apagar
después que se haya iluminado Extensión en Negro.
7
Video
Modo de Imagen
Control de Imagen
Extensión en Negro
Mover:←→ Entrar: ENTER
Control de Imagen
Contraste
Brillo
Color
Nitidez
Tinte
→Temp. de Color
Mover:↑
↓ ADJ.: ←→
Normal
Enc.
Salir: MENU
50
50
50
50
10
Cálido
Salir: MENU
0DQXDOGH,QVWUXFFLRQHV )81&,21(6<&$5$&7(5Ì67,&$6FRQWLQXDFLyQ
0HQ~VGH6HOHFFLyQGH)XQFLRQHVFRQWLQXDFLyQ 0HQ~GH$XGLR
(VWHPHQ~OHSHUPLWHDMXVWDUODVGLYHUVDVLQVWDODFLRQHVGHDXGLR
$FFHVR
3XOVHHQODSDQWDOODGHOPHQ~3ULQFLSDOODWHFODGHIOHFKDL]TXLHUGDR
GHUHFKDKDVWDTXHVHLOXPLQHHO$XGLR(QWRQFHVVHUHYHODHOPHQ~$XGLR
&RQWUROGH6RQLGR 3XOVHODWHFODGHIOHFKDGHDUULEDRDEDMRSDUDVHOHFFLRQDU
$XGLR
0RGRGH6RQLGR 8VXDULR
&RQWUROGH6RQLGR
(QYROYHQWH $SDJ $9&$SDJ
HO &RQWUROGH6RQLGR\ODWHFODGHIOHFKDGHUHFKDRODWHFOD(17(5SDUDDFFHGHUDO
VXEPHQ~8VHODWHFODGHIOHFKDGHDUULEDRDEDMRSDUDPRYHUVHHQWUHODVGLYHUVDV
LQVWDODFLRQHV\ODWHFODGHIOHFKDL]TXLHUGDRGHUHFKDSDUDDMXVWDUODV
0RYHU
(QWUDU (17(5
6DOLU 0(18
%DMR 'HPHQRV%DMRDPiV%DMR
7LSOH'HPHQRV7LSOHDPiV7LSOH
%DODQFH 9ROXPHQGHO/DGR,]TXLHUGRD9ROXPHQGHO/DGR'HUHFKR
0RGRGH6RQLGR 8VHODWHFODGHIOHFKDL]TXLHUGDRGHUHFKDSDUDVHOHFFLRQDU
HQWUH8VXDULR1RUPDO3HOtFXOD+DEOD\0~VLFD
&RQWUROGH6RQLGR
%DMR 7LSOH %DODQFH (QYROYHQWH (VWDIXQFLyQRIUHFHHIHFWRVDF~VWLFRVGLQiPLFRV,OXPLQH
(QYROYHQWH\XVHODWHFODGHIOHFKDL]TXLHUGDRGHUHFKDSDUDLQVWDODUODHQ
(QFHQGHUR$SDJDU
0RYHU
$'-
6DOLU 0(18
$9&(VWDIXQFLyQFRQWURODUiHOYROXPHQDXWRPiWLFDPHQWH,OXPLQH$9&\XVHOD
WHFODGHIOHFKDL]TXLHUGDRGHUHFKDSDUDLQVWDODUHQ(QFHQGHUR$SDJDU
0HQ~GH&DQDO $FFHVR
3XOVHHQODSDQWDOODGHOPHQ~3ULQFLSDOODWHFODGHIOHFKDL]TXLHUGDR
GHUHFKDKDVWDTXHVHLOXPLQH&DQDO(QWRQFHVHOPHQ~GH&KDQQHO6HWWLQJVH
UHYHOD8VHODWHFKDGHIOHFKD³DUULED´R³DEDMR´SDUDPRYHUVHHQWUHODVGLYHUVDV
LQVWDODFLRQHV\ODWHFODGHIOHFKDL]TXLHUGDRGHUHFKDSDUDDMXVWDUODV
&DQDO)DYRULWR (VWDIXQFLyQOHSHUPLWHLQVWDODUFDQDOHVIDYRULWRV8VHODWHFOD
GHIOHFKD³DUULED´R³DEDMR´SDUDLOXPLQDUHO&DQDO)DYRULWR\ODWHFODGHIOHFKD
GHUHFKDR(17(5SDUDYLVLWDUHOVXEPHQ~
&DQDO
&DQDO)DYRULWR
$xDGLU%RUUDU $xDGLU
$QWHQD &DEOH
&RORU $XWR
$XWRSURJUDPDFLyQ (PSH]DU
/HWUHURGH&DQDO
&XDQGRHO0RGHHVWiLQVWDODGRHQ$XWRXVHODVWHFODVQXPpULFDVSDUDKDFHU
HQWUDUORVQ~PHURVGHORVFDQDOHVIDYRULWRV(OWHOHYLVRUVyORDOPDFHQDORV~OWLPRV
0RYHU
(QWUDU (17(5
6DOLU 0(18
FLQFRFDQDOHVHIHFWLYRV
&XDQGRHO0RGH HVWiLQVWDODGRHQHO0DQXDOHOWHOHYLVRUDOPDFHQDORVFDQDOHVIDYRULWRVHQHOPRGR$LUR&DEOHUHVSHFWLYDPHQWH8VHODWHFOD
GHIOHFKD³DUULLED´R³DEDMR´SDUDPRYHUVHHQWUHODVGLYHUVDVVHOHFFLRQHV\ODWHFODGHIOHFKDL]TXLHUGDRGHUHFKDRODVWHFODVQXPpULFDVSDUD
VHOHFFLRQDUORVQ~PHURVGHOFDQDOIDYRULWR3XOVHODWHFOD(17(5SDUDFDPELDUHOWHOHYLVRUDOFDQDOVHOHFFLRQDGR
$xDGLU%RUUDU (VWDIXQFLyQOHSHUPLWHDxDGLURUHPRYHUODUHYHODFLyQDFWXDOGHOFDQDOHQODSDQWDOODGHVGHODOLVWDGHFDQDOHVDFWLYRV3RU
HVWDOLVWDVHUHILHUHDODGHFDQDOHVTXHHVWiGLVSRQLEOHVLSXOVDORVERWRQHV&+8VHODWHFODGHIOHFKDL]TXLHUGDRGHUHFKDSDUDVHOHFFLRQDU
$xDGLU R %RUUDU $QWHQD (VWDIXQFLyQLQVWDODHOVLQWRQL]DGRUGHOWHOHYLVRUSDUDXQDDQWHQD$LUHR&DEOH8VHHOPRGR$LUH FXDQGRHPSOHDXQDDQWHQDDpUHD
H[WHULRUXVHHOPRGR&DEOH VLWLHQHXQFDEOHHQJDQFKDGR8VHODWHFODGHIOHFKDL]TXLHUGDRGHUHFKDSDUDVHOHFFLRQDUHQWUHODVGRVRSFLRQHV
&RORU (QFDVRTXHQRWHTXHHOFRORUGHODLPDJHQTXHXVWHGHVWiPLUDQGRQRHVQRUPDO8VWHGSRGUiDMXVWDUORLQJUHVDQGRHQHVWDRSFLyQ
$XWRSURJUDPDFLy Q (VWDIXQFLyQLQVWDODODOLVWDGHFDQDOHV$FWLYRVSDUDHOXVXDULR/DOLVWDLQFOXLUiVyORORVFDQDOHVFRQXQDVHxDOGHWHFWDGD
3XOVHODWHFODGHIOHFKDGHUHFKDSDUDHPSH]DU\ODWHFODGHIOHFKDL]TXLHUGDSDUDVXVSHQGHUHOSURFHVR
8
Manual de Instrucciones
FUNCIONES Y CARACTERÍSTICAS (continuación)
Menús de Selección de Funciones (continuación)
Letrero de Canal: Esta función le permite designar los canales hasta 5 caracteres.
Use la tecla de flecha “arriba” o “abajo” para iluminar el Letrero de Canal, y la tecla de
flecha derecha para visitar el submenú.
1. Use la tecla de flecha “arriba” o “abajo” para escoger el Canal, y la tecla de flecha
izquierda o derecha para seleccionar el canal (el canal actual está omitido).
2. Escoja el Denominar de la misma manera como acabamos de mencionar. Use la
Letrero de Canal
121
→Canal
Denominar
(
)
tecla de flecha izquierda o derecha para seleccionar algunos de los caracteres
(incluyendo 0-9, &, /, - y A-Z) por turno, y la tecla de flecha “arriba” o “abajo” para mover
el cursor.
Mover:↑
↓ ADJ: ←→ Salir: MENU
Notas:
Si un canal ha sido designado, el televisor revelará el nombre del canal
correspondiente cuando haya pasado al canal.
Menú del Temporizador
Este menú le permite instalar la hora de encender o apagar el televisor y sintonizar el
televisor con un canal específico en la hora preinstalada.
Acceso: Pulse en la pantalla del menú Principal la tecla de flecha izquierda o derecha
hasta que el Temporizador (instalación del temporizador) se ilumine. Entonces el
menú del Temporizador se revela. Use la tecla de flecha “arriba” o “abajo” para moverse
entre las diversas instalaciones, y la tecla de flecha izquierda o derecha para ajustarlas.
Notas:
1. Sólo después de instalar la hora actual, podrá usted instalar Tiempo de Encender,
Canal de Encender y Tiempo de Apagar.
Temporizador
Tiempo Actual
Tiempo
1: 07:30PM
2: 04:00PM
3: 09:45AM
4: - - : - 5: - - : - Hora de Apag.
01:00AM
Canal
121
Una Vez
80
Siempre
40
Apag.
--Apag.
--Apag.
- - : - - Siempre
Mover:↑
↓ ADJ:←→
Salir: MENU
2. La hora de Apagar/Encender puede instalarse en uno de estos tres modos: Apag,
Una Vez y Siempre.
Guía Paterna
Menú del Guía Paterna
----
→Contraseña
Esta función permite a los padres bloquear ciertos programas basados en la
Poner Contraseña
clasificación de programas para que no sean vistos.
Acceso: Pulse en la pantalla del menú Principal la tecla de flecha izquierda o derecha
hasta que se ilumine el Guía Paterna. Para acceder a este menú, debe hacer entrar una
contraseña. La que ha puesto la fábrica es 1225.
Guía Paterna: Sólo usando el Clasificar Enc., se revelan el Clasif. de TV y el Clasif.
de MPAA. Pulse la tecla de flecha “arriba” o “abajo” para moverse entre los ítems y
pulse la tecla de flecha derecha para acceder a la abertura Clasif. de TV o Clasif. de
MPAA.
Clasif. de TV: Cuando usa la tecla de flecha “arriba” o “abajo” para navegar entre las
Guía Paterna
→Clasificar
Clasif. de TV
Clasif. de MPAA
Instalar Contraseña
Enc.
Mover:↑
↓ ADJ: ←→ Salir: MENU
clasificaciones, pulse la tecla de flecha izquierda o derecha para seleccionar U o B. La
U indica una clasificación que no está bloqueada, y la B indica una clasificación que sí
lo está.
Clasif. de MPAA: Use la tecla de flecha “arriba” o “abajo” para navegar entre las
clasificaciones. Pulsando la tecla MENU con una clasificación iluminada, se bloqueará
esa clasificación particular para que no sea mostrada en el televisor. La U indica una
clasificación que no está bloqueada, y la B indica una clasificación que sí lo está.
Acuérdese que bloqueando una clasificación más baja (por ejemplo, PG) se bloquearán
todas las clasificaciones más elevadas (PG-13, R, NC-17, X).
9
Clasif. de TV
Rating
TV-Y →U
TV-Y7
U
TV-G
U
TV-PG U
TV-14
B
TV-MA B
FV D
L S V
U
U
B
Mover:↑
↓ ADJ:←→
U U U
B B B
B B B
Salir: MENU
Manual de Instrucciones
FUNCIONES Y CARACTERÍSTICAS (continuación)
Menús de Selección de Funciones (continuación)
Edad
Definida como
TV – Y
Todos los Niños
TV - Y7
Dirigido a los Niños Mayores
FV
(más de 7 años)
D
Diálogo Sexual
L
Lenguaje de Adulto
S
Situación Sexual
V
Violencia
TV - G
Contenidos
Espectadores Generales
TV - PG
Guía Sugerida para los Padres
TV - 14
Precaución Especial para los Padres
TV – MA
Sólo para las Personas Maduras
Definidos como
Violencia de Fantasía
Clasif. de MPAA
→G
PG
PG-13
R
NC-17
X
U
U
U
U
B
B
Mover:↑
↓ ADJ: ←→ Salir: MENU
Instalar Contraseña: Esta función le permite cambiar el código de acceso al menú de
los Padres. Pulse la tecla de flecha derecha o ENTER para entrar en el submenú. Ahora
escriba la nueva contraseña usando las teclas numéricas. Si el número correcto ha
entrado, se revela en la pantalla la frase “Contraseña nueva, ¡OK!". Y si no, se revela la
frase "Inválido, ¡ intente de nuevo!".
Menú Instalación
Pulse en la pantalla del menú Principal la tecla de flecha izquierda o derecha hasta que se
Instalar Contraseña
→Contraseña Nueva - - - Confirmar
----
Poner Contraseña
ilumine Instalación. Entonces se revela el menu Instalación. Use la tecla de flecha “arriba”
o “abajo” para moverse entre las diversas selecciones en este menú.
Idioma: Esta función le permite elegir un idioma de uso para la revelación en la pantalla
(OSD). Use la tecla de flecha izquierda o derecha para seleccionar el idioma de su
elección– Inglés, Francés, Portugués o Español.
Instalación
→ Idioma
Subtitulos Cerrados
Español
CC1
Subtítulos Cerrados: Esta función permite a su televisor revelar en la pantalla el
cuadro cerrado. También le permite a usted revelar la señal del texto de televisión. Hay
nueve modos de instalación diferentes para el cuadro cerrado. Usted puede instalar su
televisor en el del 4 Closed Caption settings (CC1-4), el del 4 Text settings (T1-4), o el
Mover:↑
↓ ADJ: ←→
Salir: MENU
Apag (CCD/Text Apag).
Funciones Útiles del Control Remoto
Display (revelación)
Esta tecla le permite revelar la información actual de la pantalla del televisor (canal, modo de antena, tiempo, video, etc.). La revelación
desaparece en unos 6 segundos.
0-9
Pulse las teclas 0-9 para hacer entrar directamente los números de canal (2-69 en el modo Aire o 1-125 en el modo Cable).
1. Para elegir un número de canal de un solo dígito, pulse directamente la tecla del número correspondiente pasando así al número del canal
deseado en unos 3 segundos.
2. Para elegir un número de canal de dos dígitos, entre el primer dígito y luego el segundo dígito en 3 segundos.
3.Para elegir un número de canal de tres dígitos, entre el primer dígito, el segundo y el tercero en este orden de la misma manera que acabamos
de mencionar.
Scan (rastrear)
Pulse la tecla SCAN para revelar el número del canal actual y el modo Barrer (Barrer Enc o Barrer Apag). Pulse la tecla primero para revelar Barrer
Apag en la pantalla. Pulse de nuevo la tecla para revelar Barrer Enc en la pantalla. Y el televisor empieza a rastrear a través de todos los canales
activos. Hecha esta operación, el televisor vuelve automáticamente al canal actual y cambia al modo Barrer Apag. Pulsando cualquier tecla, usted
puede interrumpir el rastreo.
10
Manual de Instrucciones
FUNCIONES Y CARACTERÍSTICAS (continuación)
Funciones Útiles del Control Remoto (continuación)
Picture (imagen)
Su televisor tiene los modos de imagen preinstalados por la fábrica que le permiten optimizar la contemplación. Para activar estos modos de
imagen, pulse la tecla PICTURE, y así puede elegir entre Usuario, Normal, Película y Deporte.
Sound (sonido)
Pulse la tecla SOUND repetidamente, y así puede escoger entre Usuario, Normal, Película, Habla y Música.
Recall (regresar)
Esta tecla le permite volver al último canal que usted estaba viendo. Pulsándola de nuevo, regresará al canal que acaba de dejar.
Favorite (favorito)
Esta tecla revelará el canal favorito si éste ha sido instalado.
CC
Pulsando la tecla CC, usted activará la Subtítulos Cerrados o Text que ha elegido. Pulse la tecla repetidamente para seleccionar otro modo en su
reemplazo.
Apag.
CC1
CC2
CC3
CC4
T1
T2
T3
T4
Video:
Esta tecla le permite cambiar entre el modo de antena y los diferentes modos de video por turno.
Child Lock (cerradura para con los niños):
La función del Child Lock impide ver televisión sin permiso. Para activar, pulse y mantenga pulsada la tecla F, y luego pulse MUTE. Esto dejará
cerrados todas las funciones del control remoto (excepto la de Standby), y Cerradura para Niños Enc se revelará por 6 segundos. Usted puede ver
solamente el canal actual con la imagen y el sonido normales. Con el Cerradura para Niños instalado antes de apagar, no habrá imagen ni sonido
si se enciende el televisor de nuevo, pero se revela tan sólo el Cerradura para Niños Enc. Para salir de la cerradura, pulse y mantenga pulsada la
tecla F y pulse MUTE. Esto permite que el televisor salga de la cerradura. Sepa por favor que la única forma de activar o desactivar la función del
Cerradura para Niños es usando el control remoto – asegúrese que éste sea bien conservado.
Sleep (dormir):
Pulse la tecla SLEEP repetidamente para cambiar el televisor a uno de los siguientes modos por turno: Apag.→15→30→45→60→90→120→
150→180 (Unidad: Minuto). Una vez instalado el Dormir Apag, pulse la tecla SLEEP primero para revelar el tiempo remanente y luego púlsela otra
vez para reinstalar el tiempo de Dormir Apag..
La frase " El TV se apagará pronto! " se revelará en la pantalla durante un minuto antes de que el temporizador Dormir comience a trabajar.
MTS/SAP:
En el modo de TV, el Televisor puede identificar automáticamente los modos de sonido estéreo MTS con uno de Mono, Stereo, Stereo/SAP y
Mono/SAP. En condición de no señal, el modo de audio no aparece en la pantalla.
Una vez recibidas las señales del equipo exterior en el modo Video, el Stereo se define como omisión. Pulse la tecla MTS/SAP repetidamente para
instalar el Input al Stereo, L o R.
Pulse primero la tecla después de que el OSD haya desaparecido para revelar el modo MTS autoidentificado. Púlsela otra vez antes de que el
OSD desaparezca para instalar obligatoriamente otro modo MTS.
Señal Recibida
Pulse la tecla MTS/SAP
STEREO
STEREO, MONO
MONO/SAP
SAP, MONO
STEREO/SAP
STEREO, SAP, MONO
MONO
MONO
Label (designar):
Esta tecla funciona solamente en el modo TV. Para más detalles de esta función, lea la página 9.
11
Manual de Instrucciones
GUÍA PARA LA ELIMINACIÓN DE FALLAS
Síntomas
No potencia
No imagen
No sonido
No señal de TV
Rayas
o
Interferencia
purpúrea aparecen
en la pantalla
Cuadro puesto
Nevoso
Cuadro
con
imágenes
múltiples
Canal del TV no
recibido
Aparece la caja
negra
en
la
pantalla
El control remoto
no funciona
No sonido estéreo
o no lengua
extranjera
Corrección
Verifique si la clavija del cable de potencia ha entrado en el enchufe.
Verifique si está segura la conexión de la salida del video DVD/VCR con la entrada de video de
TV.
Verifique si el cable de antena está bien conectado con la RF en el conjuntor.
Conecte bien los cables de audio en los terminales.
Verifique si está segura la conexión de la salida de audio de DVD/VCR con la entrada de audio
del TV. Y cambie al modo apropiado en el receptor. Consulte el manual de instrucciones de su
amplificador de audio.
Verifique si el volumen está en un nivel apropiado y la función de mute no está encendida.
Asegúrese de que la función de MTS está correctamente instalada.
Verifique si el TV está instalado en el modo de Antena.
Asegúrese de que la antena está bien conectada con la RF en el conjuntor.
Desconecte el TV de la pared por 30 segundos, enchufe otra vez y pruebe.
Desconecte la conexión de antena del panel trasero del TV, desconecte el TV de la pared,
espere 30 segundos y pruebe otra vez.
Verifique si los altoparlantes en rededor del TV están tapados.
Verifique si el alambre de entrada de la antena está en condición de trabajo.
Verifique si la antena está bien conectada con la RF en el conjuntor.
Mueva la antena alrededor para minimizar estas imágenes.
La frecuencra de video radiada de la astación de TV tuede ser reflejada por las edificios altos,
torres altas, etc.
Asegúrese de que la instalación de Air/Cable es correcta.
El canal puede estar cerrado con la función del canal de bloqueo, por el ejemplo el Parental
Control.
Examine la función de Add/Erase, porque el canal puede ser omitido durante la instalación.
Verifique si la función de Caption (subtítulo) cerrada está apagada.
Las pilas pueden ser débiles. Cámbielas por favor.
Asegúrese de que nada está en medio del control remoto y el sensor remoto.
Asegúrese de si la función de MTS está correctamente instalada.
12
Instruction ManualManual
WARNING
To reduce the risk of fire or electric shock, do not expose this product to rain or moisture.
The apparatus shall not be exposed to dripping or splashing and that no objects filled with liquids, such as
vases, shall be placed on the apparatus.
CAUTION
RISK OF ELECTRIC SHOCK
DO NOT OPEN
This symbol indicates "dangerous voltage"
inside the product that presents a risk of
electric shock or personal injury.
Caution: To reduce the risk of electric shock, do not
remove cover (or back). No user serviceable parts
inside. Refer servicing to qualified service personnel.
This symbol indicates important
instructions accompanying the product.
Caution: To prevent electric shock, match wide blade of plug to wide slot, fully insert.
Refer to the identification/rating label located on the back panel of your product for its proper operating
voltage.
Caution: Using video games or any external accessory with fixed images for extended periods of
time can cause them to be permanently imprinted on the picture tube (or projection TV picture
tubes). ALSO, some network/program logos, phone numbers, etc. may cause similar damage. This
damage is not covered by your warranty.
Cable TV Installer: This reminder is provided to call your attention to Article 820-40 of the National
Electrical Code (Section 54 of the Canadian Electrical Code, Part 1) which provides guidelines for proper
grounding and, in particular, specifies that the cable ground shall be connected to the grounding system of
the building as close to the point of cable entry as practical.
Customer Record
You will find the model number and serial number of your TV on the back of your TV set. Record these
numbers in the spaces provided below. Refer to them whenever you call customer service or your dealer
regarding this product.
Model Number:
Serial Number:
Instruction Manual
IMPORTANT SAFETY INSTRUCTIONS
1. Read these instructions.
2. Keep these instructions.
3. Heed all warnings.
4. Follow all instructions.
5. Do not use this apparatus near water.
6. Clean only with dry cloth.
7. Do not block any ventilation openings. Install in accordance with the manufacturer's instructions.
8. Do not install near any heat sources such as radiators, heat registers, stoves, or other apparatus (including amplifiers)
that produce heat.
9. Do not defeat the safety purpose of the polarized or grounding-type plug. A polarized plug has two blades with one
wider than the other. A grounding type plug has two blades and a third grounding prong. The wide blade or third prong
is provided for your safety. If the provided plug does not fit into your outlet, consult an electrician for replacement of
the obsolete outlet.
10. Protect the power cord from being walked on or pinched particularly at plugs, convenience receptacles, and the point
where they exit from the apparatus.
11. Only use attachments/accessories specified by the manufacturer.
12. Use only the cart, stand, tripod, bracket, or table specified by the manufacturer, or sold with the
apparatus. When a cart is used, use caution when moving the cart/apparatus combination to avoid
injury from tip-over.
13. Unplug this apparatus during lightning storms or when unused for long periods of time.
14. Refer all servicing to qualified service personnel. Servicing is required when the apparatus has been damaged in any
way, such as power-supply cord or plug is damaged, liquid has been spilled or objects have fallen into the apparatus,
the apparatus has been exposed to rain or moisture, does not operate normally, or has been dropped.
15. Warning - This TV should only be serviced by an authorized and properly trained technician. Opening the
cover or other attempts by the user to service this TV may result in serious injury or death from electrical
shock, and may increase the risk of fire.
FCC Warning
Class B Computing Device
Information to User
This equipment has been tested and found to comply with the limits for a Class B Digital Device pursuant to part 15 of
FCC Rules. These limits are designed to provide reasonable protection against harmful interference in a residential
installation. This equipment generates, uses, and can radiate radio frequency energy and, if not installed and used in
accordance with the instructions, may cause harmful interference to radio communications. However, there is no
guarantee that interference will not occur in a particular installation. lf this equipment receives interference while off and on,
the user is encouraged to try to correct the interference by one or more of the following measures:
1) Reorient or relocate the receiving antenna.
2) lncrease the separation between the equipment and TV.
3) Connect the equipment into an outlet on a circuit different from that to which the TV is connected.
4) Consult the dealer or an experienced radio/TV technician for help and for additional suggestions.
The user may find the following booklet prepared by the Federal Communications Commission helpful: "How to Identify
and Resolve Radio - TV Interference Problems". This booklet is available from the US Government Printing Office.
Washington, D.C. 20402, Stock No. 004-000-00345-4.
FCC Warning
The user is cautioned that changes or modifications not expressly approved by the manufacturer could void
the user's authority to operate the equipment.
NOTE: In order for an installation of the product to maintain compliance with the limits for a Class B Device, shielded
cables must be used.
II
Instruction Manual
TABLE OF CONTENTS
INTRODUCTION
Specifications ····································································································································· 1
Feature Descriptions ··························································································································2
Front and Rear Unit Profiles ···············································································································3
Remote Control Features ···················································································································4
INSTALLATION
Connecting the Antenna ·····················································································································5
Installing the Remote Control Batteries ···························································································· 5
Connecting A/V Equipment ················································································································6
Input from Device to TV ··················································································································6
Output from TV to Device ···············································································································6
FUNCTIONS & FEATURES
Turn On/Off········································································································································· 7
Basic Functions ·································································································································· 7
Function Selection Menus ·················································································································· 7
Useful Remote Control Features ······································································································ 10
TROUBLESHOOTING GUIDE ··········································································································12
SPECIFICATIONS
EMTV21785
MODEL
Television System
PAL-M, PAL-N, NTSC
Channel Coverage
VHF 2-13, UHF 14~69
Cable TV Coverage
Mid Band (A-8~A-1, A~I)/Super Band (J~W)
Hyper Band (AA~ZZ, AAA, BBB)/Ultra Band (65~94,100~125)
Channels Preset
181
Antenna Input
75 ohm (unbalanced)
Screen Dimensions (Approx.)
406x305 mm
Audio Output
2W+2W (THD≤7%)
Power Source
110-240V ~
Unit Weight (Approx.)
50/60Hz
23kg
Unit Dimensions (Approx.)
595x461x484mm
Power
100W
Consumption
1
Instruction Manual
INTRODUCTION
Feature Descriptions
181 Channel Tuner - total number of channels the TV can receive: 2-69 in Air mode, or 1-125 in Cable mode
AV Input (Rear) - standard composite input designed for use with A/V devices, such as a VCR or DVD player
AV Input (Side) - input designed for infrequent use, such as with a camcorder or video game unit
AV Output (Rear) -output signals from TV to devices such as a VCR
S-Video Input - input designed for greater clarity and sharpness; also known as S-VHS
DVD Input (Rear) - standard input designed for use with DVD player
RF IN Jack - standard coaxial antenna jack
Channel Recall - instant return to the last channel viewed
Closed Caption Display - feature that displays the closed captions or text of a TV broadcast
Parental Control - feature that all parents to block out selected type of programming
Screen Size - the diagonal size of the TV screen
Selectable Picture Modes - preset standards for TV display: User, Normal, Movie, and Sports
Selectable Sound Modes - preset standards for TV sound: User, Normal, Speech, Music and Movie
Multilingual On Screen Display (OSD) - TV's on screen display, can be either English, French, Portuguess or
Spanish
MTS Stereo/Video Stereo- stereo sound for superior TV viewing experience
Favorite Channel -used to set favorite channels
Channel Label -used to label channels
On/Off Timer - feature that allows the user to set a timer to turn on/off the TV and tune the TV to a preset channel
at preset time
FEATURES
181 Channel Tuner
AV Input (Rear)
AV Input (Side)
S-Video Input
DVD Input (Rear)
AV Output (Rear)
Screen Size
Auto Program
Channel Recall
Closed Caption
Parental Control
Picture Modes
Multilingual OSD
Sound Modes
MTS Stereo/AV Stereo
Favorite Channel
Channel Label
On/Off Timer
Sleep Off/Auto Off without Signal in TV Mode
AVC (Automatic Volume Control)
Color Temp Control
X-Ray Protection
Digital Geometric Correction
Child Lock
Black Level Stretch
Automatic White Balance Adjustment
2
EMTV21785
·
2
1
1
1
1
21”
·
·
·
·
·
·
·
·
·
·
·
·
·
·
·
·
·
·
·
Instruction Manual
INTRODUCTION(continued)
Front and Rear Unit Profiles
Front panel
CHANNEL UP/DOWN
VOLUME UP/DOWN
MENU SELECT
TV/AV SELECT
POWER INDICATOR
MAIN POWER SWITCH
INFRARED SENSOR
Rear panel
AV IN(1)
VIDEO
L/MONO
AUDIO
R
ANTENNA IN
AV IN(1) on the side panel
3
Instruction Manual
INTRODUCTION (continued)
Remote Control Features
STANDBY
Turns on/off the TV
KEYPAD
Used to select channels by number
CH + / -
Used to change the current channel
P.MODE
Selects the various Picture Modes
RECALL
Returns to the last channel viewed
DISPLAY
Brings up the TV/Video display
LABEL
Used to label channels
SCAN
Scans all active channels
FAVORITE
Sets favorite channels
FUNCTION
Used for child lock
VIDEO
Cycles through the Video/TV modes
MENU
Accesses the main menu
ARROWS
Used to navigate the TV menus
ENTER
Confirms selections or accesses sub
menus
VOL + / -
Used to adjust the volume level
S.MODE
Selects the various Sound modes
MTS/SAP
Selects the MTS Stereo modes among Mono,
Stereo and SAP
MUTE
Mutes or restores the TV volume
CC
Activates Closed Captioning
SLEEP
Activates/Deactivates the sleep timer
(Not use)
4
Instruction Manual
INSTALLATION
- Please read the safety instructions in this manual completely before installation.
- Install your TV in an area where direct sunlight will not fall upon the screen.
- Soft, indirect light is best for television viewing.
- Allow enough space (at least 4 in.) between the TV and any walls or enclosures for proper ventilation.
- Optimum television viewing distance is 3-5 times the screen's size.
Auto-Degaussing
Color television can be easily affected by magnetism, which shows as color distortion on the screen. If your TV is affected
by nearby magnetic components or appliances, turn it off for a few minutes. The built-in auto-degaussing circuit will
eliminate the magnetic interference.
Connecting the Antenna
VHF
UHF
or Cable
75-ohm coaxial cable (not supplied)
300-ohm twin-lead cable (not supplied)
Antenna adapter
(not supplied)
RF Input
(back of TV unit)
VHF
U/V mixer
(not supplied)
UHF
Notes:
1. It is recommended that a 75 ohm coaxial cable be used in order to eliminate interference and noise which may occur
due to nearby radio transmissions.
2. The antenna cable should not be tied together with other wiring.
3. Set up a lightning rod and check it regularly when an outdoor antenna is used.
Installing the Remote Control Batteries
1. Remove the battery compartment lid.
2. Insert two AAA batteries (included). Make sure the positive (+) and negative (-) polarities are correctly aligned.
3. Reattach the battery lid.
Notes:
1. Alkaline batteries are recommended for longer life.
2. Always replace both batteries at the same time.
3. Do not expose batteries to fire or break them open.
4. To avoid battery leakage, remove batteries from the remote control when it is not being used for a long period of time.
5
Instruction Manual
INSTALLATION (continued)
Connecting A/V Equipment
The following are diagrams showing basic instructions for attaching external equipment, like a VCR or DVD player, to your
TV set. Please refer to operation manuals of external audio/video equipment that will be connected to your set for
additional instructions. PLEASE TURN OFF ALL POWER BEFORE CONNECTING DEVICES TOGETHER.
Connect VCR's RF OUT terminal to the RF IN jack located on the real panel of the TV.
Coaxial Cable
RF IN
VCR
Input from Device to TV
AUDIO/VIDEO IN
DO NOT use the DVD IN terminals and AV IN (2) terminals at the same time.
DO NOT connect side AV IN (1), rear AV IN(1) and S-Video terminals at the same time.
Use only one of the three.
With DVD signal input, there is no DVD video output. Also, remember to connect the
audio cables when using S-Video and DVD terminals.
DVD Player
With S - VIDEO Terminal
VIDEO
Camcorder
AUDIO
AV IN(1)
VIDEO
YCbCr
L/MONO
VCR
AUDIO
Output from TV to Device
AUDIO/VIDEO OUT
R
VIDEO
AUDIO
VCR
The side terminals may be easier to use with a camcorder. The connections are identical.
6
Instruction Manual
FUNCTIONS & FEATURES
Turn On/Off
1. Turn On
Plug in the supply cord, and press the MAIN POWER SWITCH on the TV. The TV will enter the STANDBY mode, and the
power indicator light will turn on. Pressing the STANDBY or CH+/- on the remote control or – CH + on the TV can turn on
the TV. Also, the power indicator light on the TV will turn off.
2. Standby (Soft Off)
While the TV is on, press the STANDBY key. This will put the TV in Standby or soft off mode. The power indicator light
on the TV set will turn on.
3. Auto off when no signal received
The TV set will automatically enter into Standby mode when the following conditions are met.
1) TV is in antenna mode.
2) Current channel has no signal.
3) No key is pressed within 15 minutes.
Basic Functions
Changing the Channel
While in TV mode, press the CH +/ - keys to change the channel, or use the numeric keypad to enter a new channel.
Adjusting the Volume
To increase or decrease the volume, press the VOL +/ - keys. The volume adjustment ranges from 0 to 100.
Muting the Volume
To mute the volume, press the MUTE key. To restore the volume, press MUTE again.
Function Selection Menus
Main menu can be accessed by pressing the MENU key on the remote control or the TV . Navigation of the menus be done with the
arrows and ENTER keys on the remote or - CH + and - VOL + keys on the TV. Exit with the MENU key.
Video Setting Menu
This menu allows you to adjust the various picture settings.
Access
From the Main menu screen, press the left or right arrow key until
Video Setting is highlighted. Then the Video Setting menu is displayed.
Picture Control: Press the up or down arrow key to select Picture
Control and right arrow key or ENTER key to access the sub menu.
Use the up or down arrow key to move between the various settings,
and the left or right arrow key to adjust them.
CONTRAST: 0 (minimum contrast) to 100 (maximum contrast)
BRIGHTNESS: 0 (dimmest) to 100 (brightest)
COLOR: 0 (minimum color) to 100 (maximum color)
SHARPNESS: 0 (minimum sharpness) to 100 (maximum sharpness)
TINT: -50 (more purplish) to +50 (more greenish)
COLOR TEMP: Cool, Standard or Warm
Picture Mode: Use the left or right arrow key to select among
User, Normal, Movie and Sports.
Auto Black Lvl: This feature improves gradation of picture. Press
the left or right arrow key to set it On or Off after Auto Black Lvl is
highlighted.
7
Video Setting
Picture Mode
Picture Control
Auto Black Lvl
Move:← → Enter: ENTER
Picture Control
Contrast
Brightness
Color
Sharpness
Tint
→Color Temp
Move:↑
↓ ADJ: ←→
Normal
On
Exit: MENU
50
50
50
50
10
Warm
Exit: MENU
Instruction Manual
FUNCTIONS & FEATURES (continued)
Function Selection Menus (continued)
Audio Setting Menu
This menu allows you to adjust the various audio settings.
Access
From the Main menu screen, press the left or right arrow key until
Audio Setting is highlighted. Then the Audio Setting menu is
displayed.
Sound Control: Press the up or down arrow key to select Sound
Control and right arrow key or ENTER key to access the sub menu.
Use the up or down arrow key to move between the various settings,
and the left or right arrow key to adjust them.
BASS: 0 (less Bass) to 100 (more Bass)
TREBLE: 0 (less Treble) to 100 (more Treble)
BALANCE: -50 (Left Dominance) to +50 (Right Dominance)
Sound Mode: Use the left or right arrow key to select among
User, Normal, Movie, Speech and Music.
Audio Setting
Sound Mode
Sound Control
Surround
AVC
Move: ← →
Enter: ENTER
User
Off
Off
Exit: MENU
Sound Control
Bass
Treble
→Balance
40
60
0
Move: ↑
↓ ADJ:←→
Exit: MENU
Surround: This feature offers dynamic acoustic effect. Highlight
Surround and use the left or right arrow key to set it On or Off.
AVC: This feature will automatically control volume. Highlight
AVC and use the left or right arrow key to set it On or Off.
Channel Setting Menu
Access
From the Main menu screen, press the left or right arrow key until
Channel Setting is highlighted. Then the Channel Setting menu is
displayed. Use the up or down arrow key to move between the
various settings, and the left or right arrow key to adjust them.
Favorite Channel: This feature allows you to set favorite
channels. Use the up or down arrow key to highlight Favorite
Channel, and the right arrow or ENTER key to call up the sub
menu.
1. When Mode is set to Auto, use the numeric keypad to directly
enter the favorite channel numbers. The TV only stores the last
five effective channels.
2. When Mode is set to Manual, The TV stores favorite channels
respectively in Air and Cable mode. Use the up or down arrow
key to move between the various selections, and the left or right
arrow key or numeric keypad to select the favorite channel
numbers. Press the ENTER key to shift the TV to the selected
channel.
Channel Setting
Favorite Channel
Add/Erase
Antenna
Color
Auto Program
Channel Label
Move:← → Enter: ENTER
Add
Cable
AUTO
Start
Exit: MENU
Add/Erase: This feature allows you to add or remove the channel currently displayed on screen from the "active
channel list." Active channel list is the list of channel that is available by pressing the CH+/- keys. Use the left or
right arrow key to select Add or Erase.
Antenna: This feature sets the TV tuner to an Air antenna or a Cable antenna. Please use Air mode when using
an over-the-air antenna; use Cable mode for a cable hookup. Use the left or right arrow key to select between the
two options.
Color: In case the color of a channel that you are watching is abnormal, please change the color system.
You can select a suitable system from the following systems, which are displayed in a circular way.
Color: AUTO, PAL-M, PAL-N, NTSC
Auto Program: This feature will setup the Active channel list for the user. The list will include only the channels
with a signal detected. Press the right arrow key to begin and the left arrow key to stop the process.
8
Instruction Manual
FUNCTIONS & FEATURES (continued)
Function Selection Menus (continued)
Channel Label: This feature allows you to label channels in up to 5
characters. Use the up or down arrow key to highlight Channel Label,
and the right arrow key to call up the sub menu.
1. Use the up or down arrow key to choose Channel, and the left or
right arrow key to select the channel (the current channel is
default).
2. Choose Name in the same way as above. Use the left or right
arrow key to select one of the characters (including 0-9, &, /, - and
A-Z) cyclically, and the up or down arrow key to move the cursor.
Channel Label
121
→Channel
Name:
(
)
Move: ↑
↓ ADJ:← → Exit: MENU
Notes:
1. If a channel has been labeled, the TV will display the
corresponding channel name when shifted to the channel.
2. In the Video mode,only “Color” is available in the Channel
Setting menu.
Timer Setting Menu
This menu allows you to set a time for the TV to turn on or off and
tune the TV to a specific channel at preset time.
Access: From the Main menu screen, press the left or right arrow
key until Timer Setting is highlighted. Then the Timer Setting menu is
displayed. Use the up or down arrow key to move between the
various settings, and the left or right arrow key to adjust them.
Notes:
1. Only after you set the current time, can you set On Time, On
Channel and Off Time.
2. On/off time can be set to one of the three modes: Off, Once and
Always.
Timer Setting
Current Time
01:00AM
Time Channel
1: 07:30PM 121
Once
2: 04:00PM 80
Always
3: 09:45AM 40
Off
4: - - : - --Off
5: - - : - --Off
Off Time
- - : - - Always
Move: ↑
↓
ADJ:←→
Exit: MENU
Parental Guide Setting Menu
This feature allows parents to block certain programs from being
viewed, based on the programs' rating.
Access: From the Main menu screen, press the left or right arrow
key until Parental Guide Setting is highlighted. In order to access this
menu, you must first enter a pass code. The factory default is 1225.
Parental Guide Setting
→Password
----
Enter Password
Parental Guide: Only with Rate Setting On, are TV-Rating and MPAA-Rating displayed. Press the up or down
key to move between the two items and right arrow key to access the TV-Rating or MPAA-Rating grid.
TV-Rating: Using the up or down arrow key to navigate between the ratings, press the left or right arrow key to
select U or B. A U indicates a rating which is unblocked and a B indicates a rating which is blocked.
Parental Guide
→Rate Setting
TV-Rating
MPAA-Rating
Password Setting
Move: ↑
↓ ADJ: ←→
TV-Rating
Rating
TV-Y →
TV-Y7
TV-G
TV-PG
TV-14
TV-MA
On
Exit: MENU
Move: ↑
↓
9
FV D L S V
U
U U
U
U
U U U U
B
B B B B
B
B B B
ADJ: ←→
Exit: MENU
Instruction Manual
FUNCTIONS & FEATURES (continued)
Function Selection Menus (continued)
MPAA-Rating: Use the up or down arrow key to navigate between
the ratings. Pressing the MENU key with a rating highlighted will
block that particular rating from being shown on this TV. A U
indicates a rating which is unblocked and a B indicates a rating which
is blocked. Please note that blocking a lower rating (for example, PG)
will block all higher ratings (PG-13, R, NC-17, X.)
Age
TV - Y
TV - Y7
TV - G
TV – PG
TV - 14
TV - MA
Defined as
All Children
Directed to Older Children (over 7)
General Audience
Parental Guidance Suggested
Parents Strongly Cautioned
Mature Audience Only
Contents
FV
D
L
S
V
Defined as
Fantasy Violence
Sexual Dialogue
Adult Language
Sexual Situations
Violence
Password Setting Guide: This feature allows you to change the
access code for the Parental menu. Press the right arrow or ENTER
key to access the sub menu. Then enter the new password using the
numeric keypad. If the right number was entered, “New Password
OK!” are displayed on the screen. If not, "Invalid! Enter again!" are
displayed.
MPAA-Rating
→G
PG
PG-13
R
NC-17
X
U
U
U
U
B
B
Move:↑
↓ ADJ:← →
Password Setting
→New Password
Confirm
Exit: MENU
-------
Enter Password
Setup Menu
From the Main menu screen, press the left or right arrow key until Setup is
highlighted. Then the Setup menu is displayed. Use the up or down arrow
key to move between the various selections in this menu.
Language: This feature allows you to pick a language used for the on
screen display (OSD). Use the left or right arrow key to select the
language of your choice – English, French, Portuguese or Spanish.
Setup
→ Language
Closed Caption
English
CC1
Closed Caption: Closed caption is a feature that allows your TV set
to display closed caption signal on screen. It also allows you to display
teletext signal. There is nine different setting for closed caption. You can
set it to one of the 4 Closed Caption settings (CC1-4), one of the 4 Text
settings (T1-4), or set this feature to off (CCD/Text off).
Move:↑
↓
ADJ:← →
Exit: MENU
Useful Remote Control Features
Display
This key allows you to display the current information of the TV screen (channel, antenna mode, time, video, etc.).
Display disappears in about 6 seconds.
0-9
Press the 0-9 keys to enter channel numbers directly (2-69 in the Air mode or 1-125 in the Cable mode).
1.To choose a one-digit channel number, press the corresponding numeric key directly to switch to the desired
channel number in about 3 seconds.
2.To choose a two-digit channel number, enter a first-digit and then a second digit within 3 seconds.
3.To choose a three-digit channel number, enter a first-digit, second-digit and third-digit respectively in the way
mentioned above.
Scan
Press the SCAN key to display the current channel No. and Scan mode (Scan On or Scan Off). Press the key firstly
to display Scan Off on the screen. Press the key secondly to display Scan On on the screen. And the TV begins to
scan through all active channels. Upon completion, the TV automatically returns to the current channel and shifts to
the Scan Off mode. Pressing any key can interrupt scanning.
10
Instruction Manual
FUNCTIONS & FEATURES (continued)
Useful Remote Control Features (continued)
P.mode
Your TV has factory preset picture modes that allow you to optimize your TV viewing. To activate these picture
modes, press the P. MODE key, and you can choose among User, Normal, Movie and Sports.
S.mode
Press the S. MODE key repeatedly, and you can choose among User, Normal, Movie, Speech and Music.
Recall
This key will allow you to return to the last channel you were viewing. Pressing it again will return you to the channel
you just left.
Favorite
This key will display the favorite channel if a favorite channel is set.
CC
Pressing the CC key will activate the currently selected Closed Caption or Text. Press the key repeatedly to select
another mode in turn.
OFF → CC1 → CC2 → CC3 → CC4 → T1 → T2 → T3 → T4
Video
This key allows you to toggle between antenna mode and different video modes cyclically.
Child Lock
The Child Lock feature prevents unauthorized viewing of the TV. To activate, press and hold the F key, and then
press MUTE. This will lock out all remote functions (except for Standby) and Child Lock On will be displayed for 6
sec. You can see only the current channel with normal picture and sound. With Child Lock set before turn-off, no
picture and no sound are available from the TV if the TV is turned on again, but only Child Lock On displayed. To
unlock the TV, press and hold the F key and press MUTE. This will unlock the TV. Please note that the only way to
activate or deactivate the Child lock feature is via remote control - please insure that it is stored securely.
Sleep
Press the SLEEP key repeatedly to switch the TV to one of the following modes cyclically: Off→15→30→45→60→
90→120→150→180 (Unit: Minute). With Sleep Off set, press the SLEEP key firstly to display the remaining time
and press it secondly to re-set the Sleep Off time.
"TV will turn off soon! " will be displayed on the screen one minute before the Sleep timer runs out.
MTS/SAP
In the TV mode, the TV can automatically identify MTS stereo modes to one of Mono, Stereo, Stereo/SAP and
Mono/SAP. Under no signal condition, the audio mode does not appear on the screen.
When receiving signals from external equipment in the Video mode, Stereo is defined as default. Press the
MTS/SAP key repeatedly to set Input to Stereo, L or R.
Press the key firstly after OSD disappears to display the auto-identified MTS mode. Press it again before the OSD
disappears to compulsorily set another MTS mode.
Signal Received
Press MTS/SAP key
STEREO
STEREO, MONO
MONO/SAP
SAP, MONO
STEREO/SAP
STEREO, SAP, MONO
MONO
MONO
Label
This key functions only in the TV mode. For an explanation of this feature, please see page 9.
11
Instruction Manual
TROUBLESHOOTING GUIDE
Check the following guide for a possible correction to a problem before contacting customer service.
Symptoms
Correction
No power
・Verify the power cable to plug into an outlet with power.
No picture
・Verify the connection from the DVD/VCR video output to the TV video input is secure.
Then switch TV to the appropriate Video mode.
・Verify an antenna cable is securely connected to the RF in jack.
No sound
・Connect the audio cables into the terminals securely.
・Verify the connection from the DVD/VCR audio output to the TV audio input. Then
switch to the appropriate mode on the receiver. Refer to your audio amplifier owner's
manual.
・Verify the volume is at an appropriate level and the mute feature is not on.
・Make sure MTS feature is properly set.
No TV signal
・Verify the TV is set to Antenna mode.
・Make sure the antenna is securely connected to the RF in jack.
・Unplug the TV from the wall for 30 seconds, then plug in and try again.
・Unplug the antenna connection from the back of the TV, unplug the TV from the wall,
wait 30 seconds, then try again.
Stripe or purple interference appears in the
screen.
・Verify the speakers around the TV set are shielded.
Picture becomes
snowy.
・Verify the antenna lead wire is in working condition.
・Verify the antenna is connected securely to the RF in jack.
Picture with multi-image
・Move the antenna around to minimize multi-images.
・The video frequency radiated from TV station can be reflected by tall buildings, high
tower, etc.
TV channel not received
・Make sure the Air/Cable setting is correct.
・Channel may be locked with the block channel feature, such as Parental Control.
・Check Add/Erase feature, as channel may have been erased during set up.
Black box appears on
screen.
・Verify Closed Caption feature is off.
Remote control
doesn't operate.
・Batteries may be weak. Replace batteries.
・Make sure nothing is located between the remote and the remote sensor.
No stereo or foreign
language received.
・Verify MTS feature is properly set.
12
Instruction Manual
Packing list
No.
Parts
1
Color TV Receiver
1
2
Remote Control
1
3
Instruction Manual
1
4
AAA Alkaline Batteries
2
5
Warranty Card
1
QTY