1
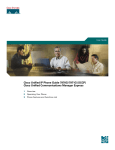
Cisco Unified IP Phone 8941 and 8945 User Guide for Cisco Unified
Communications Manager Express Version 9.0 (SIP)
First Published: November 11, 2011
Last Modified: December 08, 2011
Americas Headquarters
Cisco Systems, Inc.
170 West Tasman Drive
San Jose, CA 95134-1706
USA
http://www.cisco.com
Tel: 408 526-4000
800 553-NETS (6387)
Fax: 408 527-0883
Text Part Number: OL-25525-01
Cisco and the Cisco logo are trademarks or registered trademarks of Cisco and/or its affiliates in the U.S. and other countries. To view a list of Cisco trademarks, go to this URL: http://
www.cisco.com/go/trademarks. Third-party trademarks mentioned are the property of their respective owners. The use of the word partner does not imply a partnership
relationship between Cisco and any other company. (1110R)
© 2011
Cisco Systems, Inc. All rights reserved.
CONTENTS
Overview 1
Physical Description of Cisco Unified IP Phone 8941 and 8945 1
Phone Screen 4
Phone with a Single Line 5
Phone with Multiple Lines 6
Power-Save Mode 7
Phone Connections 7
Footstand 8
Adjusting the Handset Rest 10
Operating Your Phone 11
Soft Key Descriptions 12
Ad-hoc Conference 13
Answer a Call 14
Auto Answer 14
Busy Lamp Field 14
cBarge 14
Call History 15
Clear Call History 15
Delete a Call Record From Call History 16
Edit Number From Call History 16
Filter Call History 16
Place a Call from Call History 17
View Call History 17
View Call Record Details 18
Call Forward 18
Call Forward All (Forward calls, Missed calls, and Voicemail) 18
Call Park 19
Park and Retrieve a Call Using Call Park 19
Park and Retrieve a Call using Assisted Direct Call Park 20
Cisco Unified IP Phone 8941 and 8945 User Guide for Cisco Unified Communications Manager Express Version 9.0
(SIP)
OL-25525-01
iii
Contents
Park and Retrieve a Call Using Manual Directed Call Park 20
Call Pickup 21
Directed Call Pickup 21
Group Pickup 21
Call Waiting 21
Conference 22
Conflist 22
Distinctive Ring 23
Do Not Disturb 23
Turn DND On and OFF 23
End a Call 23
Extension Mobility 24
Enable Extension Mobility 24
Hold/Resume a Call 24
Hold Reversion 24
Hunt Group 25
Sign In and Out of a Hunt Group 25
Immediate Divert 25
Immediate Divert Enhanced 25
Intercom 25
Missed Call 26
Mobility 26
Mute a Call 26
My Phone Apps 27
On-hook Predialing 27
Phone Applications 27
Phone Contact 28
Corporate Directory 28
Search for and Dial a Contact 28
Search for and Dial a Contact While on a Call 29
Personal Directory 29
Add a Personal Directory Entry 29
Dial a Number from Personal Directory 30
Delete a Personal Directory Entry 30
Edit a Personal Directory Entry 31
Cisco Unified IP Phone 8941 and 8945 User Guide for Cisco Unified Communications Manager Express Version
9.0 (SIP)
iv
OL-25525-01
Contents
Search for an Entry in Personal Directory 31
Sign In and Out of Personal Directory 32
Place a Call 32
Place a MeetMe Conference Call 33
Privacy 33
Preferences 33
Redial a Number 33
Ring Setting 33
Shared Lines 34
Speed Dial 35
Place a Call with a Speed-Dial Button 35
Switching Between Calls on Different Lines 35
Transfer a Call 35
Video Calls 35
Voicemail 36
Cisco Unified IP Phone 8941 and 8945 User Guide for Cisco Unified Communications Manager Express Version 9.0
(SIP)
OL-25525-01
v
Contents
Cisco Unified IP Phone 8941 and 8945 User Guide for Cisco Unified Communications Manager Express Version
9.0 (SIP)
vi
OL-25525-01
CHAPTER
1
Overview
This guide provides phone operating instructions and feature descriptions for the Cisco IP Phone multiline
models 8941 and 8945. The Cisco Unified IP Phone 8941 has two lines and the 8945 has four lines.
• Physical Description of Cisco Unified IP Phone 8941 and 8945, page 1
Physical Description of Cisco Unified IP Phone 8941 and 8945
Your phone provides quick access to your phone lines, features, and call sessions. The Programmable Feature
buttons (Line buttons) are used to view calls on a line or access features such as speed dial or All Calls.
Cisco Unified IP Phone 8941 and 8945 User Guide for Cisco Unified Communications Manager Express Version 9.0
(SIP)
OL-25525-01
1
Overview
Physical Description of Cisco Unified IP Phone 8941 and 8945
Name
Description
1
Phone screen
Displays information such as incoming/outgoing call status, directories,
line status, phone configuration options, and soft key tabs. Also, shows
dedicated phone line label.
2
Video Camera
Connects to your Cisco Unified IP Phone and allows you to make a
point-to-point video call with another Cisco Unified IP Phone.
3
Lens Cover button
Integrated lens cover protects the camera lens.
4
Soft key buttons
Depending on how your system administrator sets up the phone, enabled
soft key options are displayed on your phone screen.
5
Navigation pad and Select The navigation pad allows you to scroll up and down on the phone screen.
button
Allows you to scroll through menus, highlight items, and display speed
dials list if you press down when the phone is on-hook. Display phone
numbers from your Placed Calls if you press up when the phone is on-hook.
The Select button on the center of the Navigation pad allows you to select
a highlighted item.
The Select button is lit (white) when the phone is in power-save mode.
Cisco Unified IP Phone 8941 and 8945 User Guide for Cisco Unified Communications Manager Express Version
9.0 (SIP)
2
OL-25525-01
Overview
Physical Description of Cisco Unified IP Phone 8941 and 8945
Name
Description
6
Conference button
Initiates the conference call.
7
Hold button
Places the call on hold.
8
Transfer button
Transfers active calls to another extension.
9
Redial button
Redials a call.
10 Dial pad
Functions as traditional telephone keypad and allows you to enter letters,
and choose menu items (by entering the item number).
11 Speaker button
Toggles speaker on and off. When the speakerphone is on, the button is lit.
The speakerphone audio path does not change until a new default audio
path is selected (for example, by picking up the handset).
If external speakers are connected, the Speakerphone button selects them
as the default audio path.
12 Hide Video button
Hides a video from the phone screen during a video call.
13 Mute button
Toggles mute on and off. When the microphone is muted, the button is lit
red.
14 Headset button
Toggles headset on and off. When the headset is on, the button is lit.
15 Volume button
Increases or decreases handset, headset, ringer, or speakerphone volume
(on hook).
16 Messages button
Provides access to message (voice mail) system.
17 Application button
Provides access to phone settings such as call history, user preferences,
phone configuration (including administration settings, device configuration,
network configuration, and other common configurations), and phone model
information.
18 Contacts button
Provides access to phone directories such as personal directory, corporate
directory, or call history.
19 Phone Speaker
Speaker for the phone.
Cisco Unified IP Phone 8941 and 8945 User Guide for Cisco Unified Communications Manager Express Version 9.0
(SIP)
OL-25525-01
3
Overview
Phone Screen
Name
20 Line buttons
Description
Depending on configuration, programmable buttons provide access to:
• Phone lines and intercom lines (line buttons)
• Speed-dial numbers (speed-dial buttons, including the BLF speed-dial
features)
• Call features (for example, a Privacy button)
Buttons light to indicate status:
•
•
•
21 Handset rest
Amber
Green
Red
—Privacy in use, one-way intercom call, or DND active
—Active call, answering call or held call on this line
—Remote line in use or parked
Phone handset rest.
Phone Screen
The way that your system administrator sets up your phone determines what is displayed on your phone screen.
Cisco Unified IP Phone 8941 and 8945 User Guide for Cisco Unified Communications Manager Express Version
9.0 (SIP)
4
OL-25525-01
Overview
Phone Screen
Phone with a Single Line
1
Line label
Displays the line phone information.
2
Header
Displays the date, time, and information (such as phone number) about the
selected line.
(If you are on a call and highlight the header instead of a call, the soft keys that
display are the same as those that display when the phone is idle. This is useful,
for example, if you want to access the Forward All or NewCall soft keys while
you are on a call.)
3
Session button label
(for connected call)
Displays information (such as phone number and duration) about a connected
call on the line.
The timer counts the call duration in minutes and seconds (MM:SS) until the
call exceeds 60 minutes. Then the timer counts hours and minutes (HH:MM).
4
Session button label
(for held call)
Displays information (such as phone number and duration) about a held call on
the line.
Pressing the corresponding session button resumes the held call.
The timer counts the call duration in minutes and seconds (MM:SS) until the
call exceeds 60 minutes. Then the timer counts hours and minutes (HH:MM).
Cisco Unified IP Phone 8941 and 8945 User Guide for Cisco Unified Communications Manager Express Version 9.0
(SIP)
OL-25525-01
5
Overview
Phone Screen
5
Soft keys
Soft key options for the selected (highlighted) call only.
If you select a different call (by pressing a feature button or the Navigation pad,
or by answering a ringing call), the soft key options may change.
Phone with Multiple Lines
If you have multiple lines, it is recommended that you use the All Calls button to view all calls on all lines.
If you handle many calls at one time, it is recommended that you use the Answer button to answer the oldest
incoming call without having to scroll down the call list and select the call. Consult your system administrator
for more information.
1
Primary line label
Displays information about the primary phone line.
Look for the blue icon on the line label to see which line is selected. In this
case, the primary line is selected and the information displayed is for the
primary line only.
2
Header
Displays the date, time, and information (such as phone number) about the
selected line.
(If you are on a call and highlight the header instead of a call, the soft keys
that display are the same as those that display when the phone is idle. This
is useful, for example, if you want to access the Forward All or NewCall
soft keys while you are on a call.)
Cisco Unified IP Phone 8941 and 8945 User Guide for Cisco Unified Communications Manager Express Version
9.0 (SIP)
6
OL-25525-01
Overview
Power-Save Mode
3
Session label (with
Connected Call icon)
Displays information (such as call status and duration) about a connected
call associated with the selected line.
4
Session labels (with Held Display information (such as call status and duration) about held calls
Call icons)
associated with the selected line.
Calls are displayed on the right side of the phone screen from the oldest (at
the top) to the newest.
Pressing the Session button next to a Held Call icon resumes the held call
for that session.
5
Soft keys
Soft key options for the selected call only.
If you select a different call (by pressing a feature button or the Navigation
pad, or by answering a ringing call), the soft key options may change.
Power-Save Mode
Depending on how your system administrator sets up your phone, the phone display may go into a power-save
mode (the phone screen appears blank and the Select button is lit white).
To turn on the phone display, press any button or pick up the handset.
Phone Connections
This section shows and describes the connectors on your Cisco Unified IP Phone.
Cisco Unified IP Phone 8941 and 8945 User Guide for Cisco Unified Communications Manager Express Version 9.0
(SIP)
OL-25525-01
7
Overview
Footstand
1
DC adapter port (DC48V)
5
Access port (10/100/1000 PC) for connecting your
phone to your computer
2
AC-to-DC power supply (optional)
6
Handset port
3
AC power wall plug (optional)
7
Analog headset port (headset optional)
4
Network port (10/100/1000 SW) with IEEE 802.3af and 802.3at power enabled
Footstand
If your phone is placed on a table or desk, the footstand can be connected to the back of the phone for a higher
or lower viewing angle, depending on your preference.
Cisco Unified IP Phone 8941 and 8945 User Guide for Cisco Unified Communications Manager Express Version
9.0 (SIP)
8
OL-25525-01
Overview
Footstand
1
Note
Insert the curved connectors into the lower slots. 2
Lift the footstand until the connectors snap into
the upper slots.
Connecting and disconnecting the footstand may require a little more force than you expect.
Cisco Unified IP Phone 8941 and 8945 User Guide for Cisco Unified Communications Manager Express Version 9.0
(SIP)
OL-25525-01
9
Overview
Adjusting the Handset Rest
Adjusting the Handset Rest
You can adjust the handset rest of a wall-mounted phone so that the receiver does not slip out of the cradle.
Procedure
Step 1
Step 2
Step 3
Step 4
Step 5
Set the handset aside and pull the square plastic tab from the handset rest.
Rotate the tab halfway (180 degrees).
Hold the tab between two fingers, with the small notches (in the corners) facing you.
Make sure the tab lines up evenly with the slot in the cradle.
Slide the tab back into the handset rest. An extension protrudes from the top of the rotated tab. Return the
handset to the handset rest.
Cisco Unified IP Phone 8941 and 8945 User Guide for Cisco Unified Communications Manager Express Version
9.0 (SIP)
10
OL-25525-01
CHAPTER
2
Operating Your Phone
This section describes how to operate your Cisco IP Phone and includes information on soft keys and phone
features.
Note
Because there are differences in phone and site configurations, not all features described here might apply
to your phone. Consult your system administrator for more information.
• Soft Key Descriptions, page 12
• Ad-hoc Conference, page 13
• Answer a Call, page 14
• Busy Lamp Field, page 14
• cBarge, page 14
• Call History, page 15
• Call Forward, page 18
• Call Park, page 19
• Call Pickup, page 21
• Call Waiting, page 21
• Conference, page 22
• Distinctive Ring, page 23
• Do Not Disturb, page 23
• End a Call, page 23
• Extension Mobility, page 24
• Hold/Resume a Call, page 24
• Hold Reversion, page 24
• Hunt Group, page 25
Cisco Unified IP Phone 8941 and 8945 User Guide for Cisco Unified Communications Manager Express Version 9.0
(SIP)
OL-25525-01
11
Operating Your Phone
Soft Key Descriptions
• Immediate Divert, page 25
• Intercom, page 25
• Missed Call, page 26
• Mobility, page 26
• Mute a Call, page 26
• My Phone Apps, page 27
• On-hook Predialing, page 27
• Phone Applications, page 27
• Phone Contact, page 28
• Place a Call, page 32
• Place a MeetMe Conference Call, page 33
• Privacy, page 33
• Preferences, page 33
• Redial a Number, page 33
• Ring Setting, page 33
• Shared Lines, page 34
• Speed Dial, page 35
• Switching Between Calls on Different Lines, page 35
• Transfer a Call, page 35
• Video Calls, page 35
• Voicemail, page 36
Soft Key Descriptions
Your Cisco IP Phone is equipped with soft keys for call features and options. Soft keys are displayed along
the bottom of the LCD screen and activated using the corresponding buttons. Soft keys can change according
to the state of the phone.
Note
Soft key availability depends on the system configuration and this is not the complete list of the soft keys.
Soft Key
Function
Answer
Answers an incoming call.
CFwdAll
Forwards all calls.
Park
Stores an active call temporarily to a parking number.
Cisco Unified IP Phone 8941 and 8945 User Guide for Cisco Unified Communications Manager Express Version
9.0 (SIP)
12
OL-25525-01
Operating Your Phone
Ad-hoc Conference
Soft Key
Function
Cancel
Cancels the last selection.
Clear List
Clears the entire call history on the phone.
Confrn
Connects callers to a conference call.
Delete
Deletes call records from call history.
Dial
Dials the displayed number.
DND
Enables and disables the audio and visual indication of an incoming
call.
Edit
Edits an entry.
Exit
Exits from the current selection.
GPickup
Allows you to answer a call on a phone that is outside your call pickup
group.
I-Divert
Transfers a ringing, connected, or held call directly to a voice messaging
system.
Join
Joins a call established on a different line into a conference.
Missed Calls
Lists all the missed calls.
More
Scrolls through additional options (for example, use the More soft key
to locate the DND soft key).
NewCall
Opens a new line on the speakerphone to place a call.
Return
Returns to the previous screen.
Resume
Resumes a call.
Pickup
Allows answering a phone that is ringing on a co-worker’s phone.
Transfer
Transfers an active call.
ViewDetails
Shows call details.
Ad-hoc Conference
An Ad-hoc conference is unscheduled and it happens when the conference creator adds a third party into the
call.
Cisco Unified IP Phone 8941 and 8945 User Guide for Cisco Unified Communications Manager Express Version 9.0
(SIP)
OL-25525-01
13
Operating Your Phone
Answer a Call
There are three types of Ad-hoc conference:
1 Consultative conference—The conference creator commits after consultative party has been connected.
2 Early conference—The conference creator commits while consultative party is ringing.
3 Connected conference—The conference creator joins two pre-existing active calls.
If there are only two parties remaining in an ad-hoc conference, and if the conference is configured to stay,
it will fall back to a point-to-point call and the conference bridge resource will be released.
Note
Consultative conference is the only one supported in this release.
Answer a Call
Procedure
Step 1
Step 2
Lift the handset.
If you are using a headset, press the Headset button.
Step 3
If you are using the speakerphone, press the Answer soft key or the Speaker button.
Step 4
If necessary, press the line button to select between incoming calls.
Auto Answer
Auto Answer connects incoming calls automatically after a default timeout and works with either the
speakerphone or headset.
Busy Lamp Field
Busy Lamp Field (BLF) allows configuring a directory number that a user can monitor for incoming calls.
When the directory number receives an incoming call, the system alerts the monitoring user, who can then
pick up the call.
cBarge
The cBarge feature allows you to create a standard (ad hoc) conference by adding yourself to a call on a shared
line.
Cisco Unified IP Phone 8941 and 8945 User Guide for Cisco Unified Communications Manager Express Version
9.0 (SIP)
14
OL-25525-01
Operating Your Phone
Call History
Call History
Call History allows you to view information about the last 150 calls on your phone. Individual calls and call
groups are listed chronologically from the most recent call to the oldest one. (If your phone has multiple lines,
calls on all lines are added together. The oldest calls over the 150-call limit are dropped from the history.)
In the Call History screen, the line information, such as “Line: 5623,” is shown in the upper right corner to
indicate the line name or number for which the call history is displayed.
For each call record or call group, an icon to the left of the caller ID shows the call type:
•
•
•
Received—
Placed—
Missed—
If the caller ID is unavailable, “Unknown” is displayed, and the phone number is listed.
Calls for the same caller ID and phone number are grouped together only if they occur in chronological order
and do not have calls associated . For each group, the time of the latest call and the number of calls, such as
“(3),” are displayed:
• Incoming (Received) and outgoing (Placed) calls are grouped together.
• Missed calls are grouped together in a separate group.
For each individual card record or call group, the phone number is listed in blue and is contact sensitive for
touch dialing.
Hunt group and multiparty calls show an icon to the right of the caller ID that differentiates the call from a
normal call, and these calls are not grouped even when they are next to each other in the list.
A (plus) + symbol on entries in call history, redial, or call directory indicates that your phone is set up to list
international calls. For more information, see your system administrator.
Clear Call History
Procedure
Step 1
Press the Applications button
Step 2
Select Call History. (Use the Navigation bar and button to scroll and select.)
Step 3
Select All Lines or the line that you want to view.
Step 4
Press the Clear soft key. (You may need to press the More soft key first.)
Step 5
Press the Delete soft key to delete the Call History screen or press the Cancel soft key to go back to the Call
History screen.
.
Cisco Unified IP Phone 8941 and 8945 User Guide for Cisco Unified Communications Manager Express Version 9.0
(SIP)
OL-25525-01
15
Operating Your Phone
Delete a Call Record From Call History
Delete a Call Record From Call History
Procedure
Step 1
Press the Applications button
Step 2
Select Call History. (Use the Navigation bar and button to scroll and select.)
Step 3
Select All Lines or the line that you want to view.
Step 4
Step 5
Highlight the call you want to delete.
Press the Del Call soft key. (You may need to press the More soft key first.)
Step 6
Press the Delete soft key to delete the call or press the Cancel soft key to go back to the Call History screen.
.
Edit Number From Call History
Procedure
Step 1
Press the Applications button
Step 2
Select Call History. (Use the Navigation bar and button to scroll and select.)
Step 3
Select All Lines or the line that you want to view.
Step 4
Step 5
Highlight the call you want to edit.
Press the EditDial soft key. (You may need to press the More soft key first.)
Step 6
Step 7
Press the Forward Arrow soft key to move the cursor to the right and press the Backward Arrow soft key
to move the cursor to the left.
Press the Back Delete soft key to delete numbers.
Step 8
Press the Dial soft key to dial the edited number.
Step 9
Press the Back soft key
.
to return to the Call History screen.
Filter Call History
Procedure
Step 1
Press the Applications button
Step 2
Select Call History. (Use the Navigation bar and button to scroll and select.)
Step 3
To sort calls for a specific phone line, select All Lines or the line that you want to view.
Step 4
To sort by missed calls for the selected line, select the Missed soft key.
The Call History screen displays only the missed calls on the selected line.
.
Cisco Unified IP Phone 8941 and 8945 User Guide for Cisco Unified Communications Manager Express Version
9.0 (SIP)
16
OL-25525-01
Operating Your Phone
Place a Call from Call History
Step 5
To view all calls in the Call History screen, press the All Calls soft key.
Step 6
Press the Exit soft key to return to the Call History screen.
Place a Call from Call History
Procedure
Step 1
Press the Applications button
Step 2
Select Call History. (Use the Navigation bar and button to scroll and select.)
Step 3
Select All Lines or the line that you want to view.
Step 4
From the Call History screen, highlight the call you want to dial and perform one of the following:
.
• Press the New Call soft key.
• Press the line key.
• Pick up the handset.
• Press the Speaker or Headset button.
View Call History
Procedure
Step 1
Press the Applications button
Step 2
Select Call History. (Use the Navigation bar and button to scroll and select.)
Step 3
Select All Lines or the line that you want to view.
Step 4
Press the Exit soft key to return to the Call History screen.
.
Cisco Unified IP Phone 8941 and 8945 User Guide for Cisco Unified Communications Manager Express Version 9.0
(SIP)
OL-25525-01
17
Operating Your Phone
View Call Record Details
View Call Record Details
Procedure
Step 1
Press the Applications button.
Step 2
Select Call History (use the Navigation pad and Select button to scroll and select).
Step 3
Select a call record or group and press the ViewDetails soft key (you may need to press the More soft key first).
• For each individual call, the Details screen displays the line information in the upper right corner, such
as “Line: 5782,” and the call name, call number, alternate number (if available), call disposition (call
type), call duration, and time of the call.
• For each call group, the details shown are the same as for an individual call. The only difference is that
the multiple call-related information is shown, such as call disposition (call type), call duration, and time
of call, because this is a group of calls (Placed/Received or Missed). (In a group of Missed calls, individual
records show no call duration.)
• For each multiparty or hunt group call, the Details screen displays the line information in the upper right
corner. For the caller ID and number listed at the top of the screen, the call name, call number, alternate
number, and as applicable, the hunt group information, if available.
Step 4
Press the Return soft key to return to the Call History screen.
Step 5
Press the Exit soft key to return to the Applications screen.
Step 6
While on a connected call, press the ViewDetails soft key to show the Call Details screen. This screen displays
single call information and call duration and is updated each second.
Call Forward
Call Forward feature allows redirecting incoming calls to another directory number. Call forward options
include the following:
• Call Forward All
• Call Forward Busy
• Call Forward No Answer
• Call Forward No Coverage
Call Forward is available as a soft key. See your system administrator for additional information.
Call Forward All (Forward calls, Missed calls, and Voicemail)
Call Forward allows you to forward calls.
Cisco Unified IP Phone 8941 and 8945 User Guide for Cisco Unified Communications Manager Express Version
9.0 (SIP)
18
OL-25525-01
Operating Your Phone
Call Park
Procedure
Step 1
Press the Forward All soft key.
Step 2
Enter the number to forward.
Note
If forward is turned on and there are unheard voicemails, the white “call forward” icon with a red
background is shown.
Call Park
Call Park allows you to park (temporarily store) a call you receive on your phone, which you can then retrieve
from another phone (for example, a phone at a co-worker’s desk or in a conference room).
There are two ways you can park a call:
1 Park—Allows you to park an active call that you answered on your phone, and retrieve it using another
phone in the Cisco Unified Communications Manager Express system.
2 Directed Call Park—Allows you to park and retrieve an active call in two different ways:
a Assisted Directed Call Park—Allows you to park an active call by pressing a line button, which your
system administrator sets up as a speed dial line.
With this type of directed call, you can monitor the status of the line (in-use, idle, or in Do Not Disturb
state) using Line Status indicators.
b Manual Directed Call Park—Allows you to park an active call by transferring it to a Directed Call
number, which your system administrator sets up.
You retrieve the call at another phone by dialing a park retrieval prefix number (provided by your
system administrator), then dialing the Directed Call number you used to park the call.
Your system administrator sets up either the Directed Call Park or Park feature on your phone, but not both.
Park and Retrieve a Call Using Call Park
Call park allows you to place a call on hold at a designated parking slot from which the call can be retrieved
by anyone on the system.
Note
Contact your system administrator for your call park slot number.
Procedure
Step 1
During a call, press the Park soft key, then hang up.
For the duration of the call, your phone displays the call park number where the system stored the call.
Cisco Unified IP Phone 8941 and 8945 User Guide for Cisco Unified Communications Manager Express Version 9.0
(SIP)
OL-25525-01
19
Operating Your Phone
Park and Retrieve a Call using Assisted Direct Call Park
Step 2
Retrieve the call from any other Cisco Unified IP Phone in your network by entering the call park number.
If you do not retrieve the call within a certain amount of time (set by your system administrator), a reminder
tone will sound on your phone, at which time you can resume the call by pressing the Resume soft key or by
retrieving it from another phone.
If you do not retrieve or resume the call within a specified amount of time (set by your system administrator)
after the reminder tone, the call will be directed to another destination (set up by your system administrator),
such as voicemail.
Park and Retrieve a Call using Assisted Direct Call Park
Procedure
Step 1
During a call, press the Transfer button
Step 2
Press the Directed Call Park line button.
Step 3
Press the Transfer button .
You have a limited time to retrieve the parked call before it reverts to ringing at the original number.
Step 4
Retrieve the call as follows:
.
• Dial the retrieval park-slot extension.
• Dial the Directed Call number.
Example:
If the park retrieval prefix is "77" and the Directed Call number is "6789", enter 776789.
Park and Retrieve a Call Using Manual Directed Call Park
Procedure
Step 1
During a call, press the Transfer button
Step 2
Step 3
Enter the Directed Call number where you will park the call.
Press Transfer to finish parking the call, then hang up.
You have a limited time to retrieve a parked call before it reverts to ringing at the original number.
Step 4
Retrieve the call from any other Cisco Unified IP Phone in your network as follows:
.
• Dial the retrieval park-slot extension.
• Dial the Directed Call number.
Cisco Unified IP Phone 8941 and 8945 User Guide for Cisco Unified Communications Manager Express Version
9.0 (SIP)
20
OL-25525-01
Operating Your Phone
Call Pickup
Example:
If the park retrieval prefix is "77" and the Directed Call number is "6789", enter 776789.
Call Pickup
Call Pickup allows you to answer a call that is ringing on a co-worker’s phone by redirecting the call to your
phone.
There are three ways you can pick up a call:
1 Pickup—Allows you to answer a call that is ringing on another phone within your call pickup group.
If multiple calls are available for pick up, your phone picks up the oldest call first (the call that has been
ringing for the longest time).
2 Group Pickup—Allows you to answer a call on a phone that is outside your call pickup group by:
• Using a group pickup number (provided by your system administrator)
• Dialing the ringing phone’s number.
3 Other Pickup—Allows you to answer a call that is ringing on another phone within in your call pickup
group or in an associated call pickup group.
Note
Your system administrator sets up the call pickup group you are in and the Pickup soft keys depending
on your call-handling needs and work environment.
Your system administrator may also change the function of the Pickup key to operate as Directed Pickup
of a specific extension instead of local group pickup. In this configuration, the calls from you local group
can be picked up by pressing the GPickUp key followed by the Star key.
Directed Call Pickup
Allows answering a call that is ringing on a particular directory number.
Group Pickup
Allows you to answer a call that is ringing on a directory number in another group.
Call Waiting
If you are on a call when a second call comes in, Call Waiting provides cues to notify you that a new call is
ringing on your phone when you are talking on another call, including:
Cisco Unified IP Phone 8941 and 8945 User Guide for Cisco Unified Communications Manager Express Version 9.0
(SIP)
OL-25525-01
21
Operating Your Phone
Conference
• Call waiting tone (single beep)
• An amber flashing line button
Note
If the two calls were placed on hold, when you press the line key, the call that is highlighted will be
resumed. This is the only time that the line key function maps to the highlighted session.
Use one of the following methods to receive the call:
• Press the line key LED.
• Press the Answer soft key.
• Press the Select hard key.
To swap between the two calls, you can use one of the following methods:
• Press the line key LED.
• Press the Resume soft key.
• Press the Select hard key.
Conference
Conference allows you to talk simultaneously with multiple parties. When you are talking on a call, use
Conference to dial another party and add them to the call. You can remove individual participants from the
conference if your phone supports the feature.
• To conference a second person into an existing call, press the Conference soft key or hard key. This
opens up a space below the existing call on the same line, so you can enter the new number of the person
to conference in.
• To dial the consult party, while ringing or once connected, you can press the Conference soft key or
hard key to conference the two calls together.
Conflist
This feature allows displaying a conference list on participating phones when the ConfList soft key is pressed
during a conference call. As participants join the conference, they get added to the top of the conference list.
The conference list provides the conference status, as well as the security status for each participant to identify
participants that are not encrypted.
The conference list displays the following security icons:
• nonsecure
• authenticated
• encrypted
• held
Cisco Unified IP Phone 8941 and 8945 User Guide for Cisco Unified Communications Manager Express Version
9.0 (SIP)
22
OL-25525-01
Operating Your Phone
Distinctive Ring
The conference initiator can use the conference list to eject participants with a low security status.
Distinctive Ring
You can also monitor and pick up ringing calls using Line Status indicators if your system administrator has
set up Line Status indicators on speed-dial buttons for you. Line Status indicators allow you to see if a line
associated with a speed-dial button is idle, in-use, in a Do Not Disturb state, or ringing.
Do Not Disturb
The Do Not Disturb (DND) feature enables and disables the audio and visual indication of an incoming call
or directly redirects the call to the voice messaging system.
DND allows you to:
• Alert—If a call comes in, the ringer is turned off, but the user can set an alerting message to appear in
the LCD display or use the default incoming call indication used for all calls. Also, the Line LED alerts
accordingly.
• Reject—If a call comes in, ringer and display alerting are both turned off and the call is sent directly to
the voicemail.
Turn DND On and OFF
Procedure
Step 1
Press the DND button to turn on DND.
Visual confirmation displays briefly.
Step 2
Press the button again to turn off DND.
Visual confirmation displays briefly.
End a Call
• Hang up the handset.
• If you are using a headset, press the Headset button or the EndCall soft key.
• If you are using a speakerphone, press the Speaker button or the EndCall soft key.
Cisco Unified IP Phone 8941 and 8945 User Guide for Cisco Unified Communications Manager Express Version 9.0
(SIP)
OL-25525-01
23
Operating Your Phone
Extension Mobility
Extension Mobility
Cisco Extension Mobility (EM) allows you to temporarily configure a Cisco Unified IP Phone as your own.
After you sign in to EM, the phone adopts your user profile, including your phone lines, features, established
services, and web-based settings. Your system administrator sets up EM for you.
Enable Extension Mobility
Procedure
Step 1
Press the Applications button
Step 2
Select My Phone App. (Use the Navigation bar and button to scroll and select.)
Step 3
Select EM Service (name will vary).
Step 4
Step 5
Step 6
Enter your user ID and PIN (provided by your system administrator).
If prompted, select a device profile.
To sign out, press the Applications button.
Step 7
Select My Phone App.
Step 8
Select EM Service (name will vary).
Step 9
When prompted to sign out, press the Yes soft key.
.
Hold/Resume a Call
Procedure
Step 1
Press the Hold button.
Step 2
Press the Resume soft key or the flashing green line button to resume the call.
Step 3
If your phone supports multiple lines, you can use line buttons to swap between holding and active calls.
Example:
If you have a holding call on Line 1 and an active call on Line 2, pressing the Line 1 button makes the Line
1 call active (resumes it from hold) and automatically puts the Line 2 call on hold.
Hold Reversion
Hold Reversion limits the amount of time that a call can be on hold before reverting back to the phone that
put the call on hold and alerting the user by informative tones periodically if not resumed yet.
Cisco Unified IP Phone 8941 and 8945 User Guide for Cisco Unified Communications Manager Express Version
9.0 (SIP)
24
OL-25525-01
Operating Your Phone
Hunt Group
Hunt Group
Hunt groups are used to share the call load in organizations that receive a large number of incoming calls.
Your system administrator sets up a hunt group with a series of directory numbers. When the first directory
number in the hunt group is busy, the system hunts for the next available directory number in the group, then
directs the call to that phone. If you are a member of a hunt group, you can sign in to a hunt group when you
want to receive calls, and you can sign out of the group when you want to prevent calls from ringing on your
phone.
Sign In and Out of a Hunt Group
Procedure
Step 1
Press the Hunt Group line button to sign in.
Visual confirmation displays briefly.
Step 2
Press the button again to sign out.
Signing out of a hunt group does not prevent non-hunt group calls from ringing your phone.
Immediate Divert
Immediate Divert allows transferring a ringing, connected, or held call directly to a voice messaging system.
When a call is diverted, the line becomes available to make or receive new call.
Immediate Divert Enhanced
Immediate Divert Enhanced allows transferring of incoming calls directly to their voice messaging system or
to the voice messaging system of the original called party.
Intercom
Intercom allows you to place a call to a predefined recipient. The recipient auto-answers the call in speakerphone
mode with mute activated. This sets up a one-way voice path between you and the recipient so you can deliver
a short message, regardless of whether the recipient is busy or idle.
Cisco Unified IP Phone 8941 and 8945 User Guide for Cisco Unified Communications Manager Express Version 9.0
(SIP)
OL-25525-01
25
Operating Your Phone
Missed Call
Missed Call
When there are missed calls on the phone, an indicator for missed call info will appear next to the line info.
Upon viewing Call history > Missed calls, the indicator icon should disappear. The missed call indicator is
always shown as long as the focus is not on that line.
Mobility
Mobility allows you to transfer a call from an IP Phone to your mobile phone.
Note
Contact your system administrator to enable/disable the mobility feature on your IP Phone.
Procedure
Step 1
Select Mobility soft key while on an active call.
Step 2
Select Send call to mobile.
The call will be transferred to your mobile phone.
Mute a Call
Mute allows you to block audio input for your handset, headset, and speakerphone, so that you can hear other
parties on the call but they cannot hear you. Video Mute allows you to block video for your camera so that
you can see other parties on the video call, but they cannot see you.
To mute a call:
• While on a call, press the Mute button
hear you.
. The Mute button lights, indicating that the other party cannot
To deactivate the mute function, do one of the following:
1 Press the Mute button again.
2 Lift the handset if you are using mute with your speaker phone.
Note
The Mute feature does not generate music or a tone.
Cisco Unified IP Phone 8941 and 8945 User Guide for Cisco Unified Communications Manager Express Version
9.0 (SIP)
26
OL-25525-01
Operating Your Phone
My Phone Apps
My Phone Apps
My Phone Apps provides an interface for users to do the following tasks right on the phone:
• Add, Delete, and Modify speed dials
• Add, Delete, and Modify fast dials
• Add, Delete, and Modify BLF speed dials
• Set SNR number
Procedure
Step 1
Access Phone Services.
Step 2
Select My Phone Apps.
Step 3
Select a service from the My Phone Apps submenu and follow the instructions.
On-hook Predialing
This feature allows dialing a number without going off hook first.
Procedure
Step 1
Enter or speed-dial a phone number.
The On-Hook Dialing screen displays.
Step 2
Press Call. If you are specifying an Abbreviated Dial, enter the abbreviated number.
Step 3
Press Speed Dial.
Step 4
Lift the handset or press the Speaker or Headset button.
Phone Applications
Phone applications allow you to access the following:
1 Accessories
2 Administrator Settings (for system administrators only)
3 Address Book
4 Call History
5 Phone Information
Cisco Unified IP Phone 8941 and 8945 User Guide for Cisco Unified Communications Manager Express Version 9.0
(SIP)
OL-25525-01
27
Operating Your Phone
Phone Contact
6 Preferences
7 Services
8 Upgrade Screen
Phone Contact
The Cisco Unified IP Phone 8941 and 8945 provide you with access to corporate and personal contacts.
You may see other directories listed in Contacts. For more information, see your system administrator.
Corporate Directory
The corporate directory contains corporate contacts that you can access on your phone. Your system
administrator sets up and maintains the directory.
You can dial calls from your corporate directory:
• When you are not on another call
• When you are on another call
Search for and Dial a Contact
Procedure
Step 1
Press the Contacts button.
Step 2
Select Corporate Directory. (Use the Navigation pad and Select button to scroll and select.)
Step 3
Select one or both of the following search criteria to search for a co-worker:
• First Name
• Last Name
Step 4
Step 5
Enter the search criteria information.
Press the Submit soft key.
Step 6
Step 7
Select a contact.
To dial, perform any of these actions:
• Press the Dial soft key.
• Press the Select button.
• Press the number that is displayed in the upper right-hand corner of the contact label.
• Press the Speaker button.
• Press the Headset button.
Cisco Unified IP Phone 8941 and 8945 User Guide for Cisco Unified Communications Manager Express Version
9.0 (SIP)
28
OL-25525-01
Operating Your Phone
Personal Directory
• Pick up the handset.
Search for and Dial a Contact While on a Call
Procedure
Step 1
Press the Contacts button.
Step 2
Select Corporate Directory. (Use the Navigation pad and Select button to scroll and select.)
Step 3
Select one or both of these search criteria to search for a co-worker:
• First Name
• Last Name
Step 4
Step 5
Enter the search criteria information.
Press the Dial soft key. The first call gets automatically put on hold while the second call gets dialed.
Personal Directory
The personal directory contains a list of your personal contacts. You can assign fast-dial codes to your personal
directory entries for fast dialing.
There are two ways you can set up and maintain your personal directory:
1 Phone—Using your phone, you can:
a Set up and use Personal Directory
b Assign and use fast-dial codes
2 User Options Web Pages—Using User Options web pages, you can also set up and use your personal
directory.
Add a Personal Directory Entry
Procedure
Step 1
Press the Contacts button.
Step 2
Sign in to Personal Directory.
Step 3
Select Personal Address Book.
The Search for an entry screen displays.
Cisco Unified IP Phone 8941 and 8945 User Guide for Cisco Unified Communications Manager Express Version 9.0
(SIP)
OL-25525-01
29
Operating Your Phone
Personal Directory
Step 4
Press the Submit soft key.
Step 5
Press the Newsoft key (you may need to press the More soft key first).
Step 6
Step 7
Enter the nickname information (you can also enter a name).
Press the Phones soft key and enter the phone numbers.
Include any required access codes such as a 9 or 1.
Step 8
Press the Submit soft key to add the entry to your personal directory.
Dial a Number from Personal Directory
Procedure
Step 1
Press the Contacts button.
Step 2
Sign in to Personal Directory.
Step 3
Select Personal Address Book and search for an entry.
Step 4
Step 5
Select the personal address book entry that you want to dial.
Press the Dial soft key.
Delete a Personal Directory Entry
Procedure
Step 1
Press the Contacts button.
Step 2
Sign in to Personal Directory.
Step 3
Select Personal Address Book and search for an entry.
Step 4
Press the Select soft key.
Step 5
Press the Edit soft key.
Step 6
Press the Delete soft key (you may need to press the More soft key first).
Step 7
Press the OKsoft key to confirm the deletion.
Cisco Unified IP Phone 8941 and 8945 User Guide for Cisco Unified Communications Manager Express Version
9.0 (SIP)
30
OL-25525-01
Operating Your Phone
Personal Directory
Edit a Personal Directory Entry
Procedure
Step 1
Press the Contacts button.
Step 2
Sign in to Personal Directory.
Step 3
Select Personal Address Book and search for an entry.
Step 4
Press the Select soft key.
Step 5
Press the Edit soft key.
Step 6
Step 7
Modify the entry information.
Press the Phones soft key to modify a phone number.
Step 8
Press the Update soft key.
Search for an Entry in Personal Directory
Procedure
Step 1
Press the Contacts button.
Step 2
Sign in to Personal Directory.
Step 3
Select Personal Address Book.
Step 4
Select one or all the following criteria to search for an entry:
• Last Name
• First Name
• Nickname
Step 5
Enter the search criteria information and then press the Submit soft key.
The name displays.
Cisco Unified IP Phone 8941 and 8945 User Guide for Cisco Unified Communications Manager Express Version 9.0
(SIP)
OL-25525-01
31
Operating Your Phone
Place a Call
Sign In and Out of Personal Directory
Procedure
Step 1
Press the Contacts button.
Step 2
Select Personal Directory (use the Navigation pad and Select button to scroll and select).
Step 3
Step 4
Enter your user ID and PIN (provided by your system administrator).
Press the Submit soft key.
Step 5
Select Log Out.
Step 6
Press the Select soft key.
Step 7
Press the OK soft key to sign out.
You are logged out automatically after a certain amount of time. This time limit can vary. For more information,
see your system administrator.
Place a Call
Use one of the following methods to place a call:
• Lift the handset and dial the number.
• Dial the number, and then lift the handset.
• Dial the number, and then press the Dial soft key.
• Dial the number, and then press the Speaker button.
• Press the line button for your extension, and then dial the number.
• Press the Speaker button , and then dial the number.
• Press the New Call soft key, and then dial the number.
• If you are using a headset, press the Headset button
• Dial the number, and then press the Headset button
, and then dial the number.
.
• If you have established speed-dial numbers, press a Speed-dial button.
• If you have selected a number from a directory, press the New Call soft key.
• If you have selected a number from a directory, press the Line / Headset / Speaker button.
Cisco Unified IP Phone 8941 and 8945 User Guide for Cisco Unified Communications Manager Express Version
9.0 (SIP)
32
OL-25525-01
Operating Your Phone
Place a MeetMe Conference Call
Place a MeetMe Conference Call
Procedure
Step 1
Step 2
Step 3
Step 4
Obtain a MeetMe conference number from your system administrator
Distribute the MeetMe conference number to all the participants.
Go off-hook.
Press the MeetMe soft key.
Step 5
Dial the MeetMe conference number.
All other participants can join the meeting by dialing into the MeetMe conference number.
Step 6
To end the MeetMe conference call, all participants must hang up the handset or press the Cancel soft key.
Privacy
Privacy allows you to prevent others who share your line from seeing information about your calls.
Privacy applies to all shared lines on your phone. If you have multiple shared lines and Privacy is enabled,
others cannot view any of your shared lines.
Preferences
1
2
3
4
Ringtone
Brightness
Bluetooth
Camera Settings
Redial a Number
To redial the most recently dialed number:
• Lift the handset and press the Redialsoft key.
• Press the Redial soft key to make a call using a speakerphone or headset.
• To place the call on a particular phone line, get a dial tone on that line, then press the Redial softkey.
Ring Setting
You can change the ring setting per line.
Cisco Unified IP Phone 8941 and 8945 User Guide for Cisco Unified Communications Manager Express Version 9.0
(SIP)
OL-25525-01
33
Operating Your Phone
Shared Lines
Procedure
Step 1
On your User Options web page, choose User Options > Device.
Step 2
Step 3
Select a phone from the Name drop-down menu.
Click Line Settings.
Step 4
If you have more than one directory number (line) assigned to your phone, select a line from the Line drop-down
menu.
In the Ring Settings area, set the option for Ring Setting (Phone Idle) and Ring Setting (Phone Active) from
the drop-down menus. The options are:
Step 5
• Use System Default
• Disable
• Flash Only
• Ring Once
• Ring
• Beep Only [this option is only available for Ring Setting (Phone Active)]
Step 6
Click Save.
Shared Lines
Shared lines allow you to use one phone number for multiple phones.
You might have a shared line if you have multiple phones and want one phone number, share call-handling
tasks with co-workers, or handle calls on behalf of a manager.
You or your co-worker can join a call on the shared line using the Barge feature. Barge converts the call into
a conference. To barge, press the red session button for the remote in-use call on the shared line.
For example, if you share a line with a co-worker,
• When a call comes in on the shared line:
◦ Your phone rings and the line button flashes amber.
◦ Your co-worker’s phone rings and the line button flashes amber and either you or your coworker
can answer the call.
• When your co-worker has a call on the shared line:
◦ The Shared Line button on your phone appears solid red to indicate that the line is in-use remotely.
◦ Your co-worker’s call displays on your screen (unless your co-worker has Privacy enabled).
• If you answer the call:
◦ Your line button turns green.
Cisco Unified IP Phone 8941 and 8945 User Guide for Cisco Unified Communications Manager Express Version
9.0 (SIP)
34
OL-25525-01
Operating Your Phone
Speed Dial
◦ Your co-worker’s line button turns red.
When button is red, that line cannot be used to barge in on the call or used to make another call.
• If you put the call on hold:
◦ Your line button flashes green
◦ Your co-worker’s line button flashes red.
• When the line flashes red, your co-worker can pick up the call.
Speed Dial
Speed dialing allows you to enter an index number, press a button, or select a phone screen item to place a
call. Depending on your setup, your phone can support the following speed-dial features:
• Speed-Dial Buttons—Allows you to quickly dial a phone number from one or more line buttons set up
for speed dialing.
• Speed-Dial Codes—Allows you to dial a phone number from a code (sometimes referred to as abbreviated
dialing).
• Fast Dials—Allows you to enter a Fast Dial code to place a call. Fast Dial codes can be assigned to
phone numbers or Personal Address Book entries.
Place a Call with a Speed-Dial Button
Before you can use the speed-dial buttons on your phone, you must set up speed dial on your User Options
Web pages. To place a call, press the Speed-dial button on the left side of your phone.
Switching Between Calls on Different Lines
If you are active on a call and you want to resume a call on another line, press the line key for that line. If
there was only one call on that line, then the call would be immediately resumed. If there was more than one
call on the line, then you would need to select the call to resume.
Transfer a Call
Transfer allows you to redirect a connected call from your phone to another number.
Video Calls
Whenever you are connected to a call and either of you is transferring video, the video automatically shows
up in your screen. You can see the person in the other end (remote party) and you can also see yourself on
the screen.
Cisco Unified IP Phone 8941 and 8945 User Guide for Cisco Unified Communications Manager Express Version 9.0
(SIP)
OL-25525-01
35
Operating Your Phone
Voicemail
The following are the functionality found within the video calling feature, either in the form of soft keys or
hard keys:
• PIP—The PIP soft key is represented by an icon. The icon has 5 states (Right bottom, Right top, Left
top, Left bottom, and PIP off) and pressing the soft key executes the displayed PIP state and updates the
icon to reflect the next PIP state. The PIP soft key is a sticky setting and the state is remembered across
sessions.
• Swap—Toggles the views in the PIP view. The Swap soft key is grayed out when PIP is off.
• Minimize Video—Takes you to the Call UI Screen. You can view the video again by selecting the Show
Video soft key in the Call UI. When in the Call UI screen and the user is transmitting video, it is indicated
by an icon in the call session.
• Video Mute—Press the Video Mute hard key to mute the video.
• Self-view Video—Press the Self-view Video soft key to preview or self-view the user.
• Video UI and Conference/Transfer Initiation—Press the Conference hard key to initiate a conference.
To access video settings:
Procedure
Step 1
Press the Applications button.
Step 2
Select Preferences > Camera settings.
Voicemail
When there are voicemails, the voicemail icon is shown. When the user listens to the voicemail, the indicator
goes away and is then replaced by the missed call indicator.
The following is the priority between missed call, voicemail, and the forward icon. Only one of the three icons
is shown next to the line at one time.
1 Forward Calls (highest priority)
2 Voicemail
3 Missed Calls (lowest priority)
Cisco Unified IP Phone 8941 and 8945 User Guide for Cisco Unified Communications Manager Express Version
9.0 (SIP)
36
OL-25525-01