1
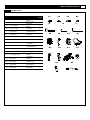
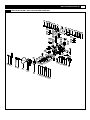
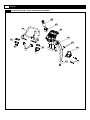
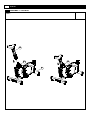
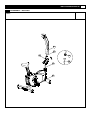
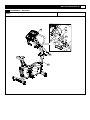
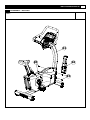
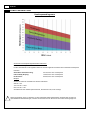
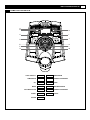
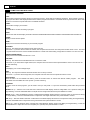
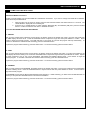
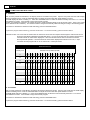
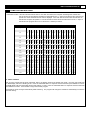
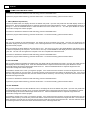
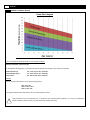
USER’S MANUAL B 9.5e USER WEIGHT LIMITATION: 150kg SERIAL NUMBER (found on frame): User Manual B 9.5-20100722 2 B 9.5e Sehr geehrte Kundin, sehr geehrter Kunde, Dear Customer, wir freuen uns, dass Sie sich für ein Qualitätsprodukt der Marke Reebok entschieden haben. Dieses Qualitätsprodukt ist sowohl für den Heimfitness Einsatz als auch den Semiprofessionellen Einsatz konzipiert und nach der europäischen Norm EN 957-1/5 getestet. Bitte lesen Sie vor dem Aufbau und dem ersten Gebrauch zunächst sorgfältig diese Anleitung und bewahren Sie diese als Referenz und für den richtigen Umgang mit Ihrem Fitnessgerät auf. We are pleased, that you have chosen a Quality Product of Reebok. This quality product has been designed both for in-home use and semi-professional use and has been tested and certified according to the European Norm EN 957-1/5. Please carefully read the instructions prior to assembly and first use and be sure to keep the instructions for reference and maintenance. Um Sie bei der Erreichung Ihrer persönlichen Trainingsziele bestmöglich zu unterstützen haben Trainingsexperten das To best possible support you with the attainment of your personal training-goals, training experts developed the entwickelt. Unter www.reebokfitness.de Service Online-Trainingspläne können Sie sich individuelle Trainingspläne herunterladen. Wir wünschen Ihnen viel Spaß und Erfolg bei Ihrem Training. . You can download your individual training plans at: www.reebokfitness.de Service Online-Trainingspläne (Service only in German) We wish you lots of success and fun while training, Ihr Reebok – Team Your Reebok – Team Kunden Service Customer Service Um Sie im Fall von Problemen mit Ihrem Gerät bestmöglich unterstützen zu können, möchten wir Sie darum bitten, sich den Modelnamen und die Seriennummer Ihres Gerätes zu notieren. Diese Informationen finden Sie auf dem Aufkleber an der Unterseite Ihres Gerätes. To best possible support you in the case of problems with your product, we would ask you to please quote the product Model Name and Serial Number. These can be found on the sticker underside your product. Modelname: Modelname: Seriennummer: Serialnumber: Häufig gestellte Fragen (FAQs): Sollten Sie Fragen zu Ihrem Produkt oder dem Aufbau haben, oder auf Probleme bei der Bedienung stoßen, finden Sie Hilfe unter: www.reebokfitness.de Service FAQs Frequently asked questions (FAQs): If you have any questions about your product or the assembly or meet a problem with the handling, you can find help at: www.reebokfitness.de Service FAQs Ersatzteilbestellung: Auf unserer Homepage können Sie unter Seriennummer Ihres Geräts Ersatzteile bestellen. www.reebokfitness.de Service Spare Part Order: By giving the serial number of your product you can order spare parts on our homepage: www.reebokfitness.de Service Angabe der Entsorgungshinweise Waste Disposal Reebok Geräte sind recyclebar. Bitte führen Sie Ihr Gerät am Ende der Nutzungsdauer einer sachgerechten Entsorgung zu (örtliche Sammelstelle). Reebok products are recyclable. At the end of its useful life please dispose of this article correctly and safely (local refuse sites). Hinweis Advice Diese Gebrauchsanweisung dient nur zur Referenz für den Kunden. Reebok übernimmt keine Haftung für Fehler, die durch Übersetzung oder technische Änderungen des Produkts entstehen. The owner’s manual is only for the customer reference. Reebok can not guarantee for mistakes occurring due to translation or change in technical specification of the product. www.reebokfitness.de 3 Garantie Semiprofessioneller Einsatz: Für dieses Produkt besteht bei semiprofessionellem Einsatz grundsätzlich ein Garantieanspruch von: 1 Jahr auf Rahmen und Magnetbremse, Elektronik sowie Garantiearbeiten. Zusätzlich 10 Jahren auf den Antriebsmotor bei Laufbändern. Diese Garantie gilt nur bei semiprofessionellem Einsatz, z.B. in Hotels, Rehabilitationskliniken und Schulen. Voraussetzung hierfür ist eine maximale Nutzung von 3 Stunden pro Tag. Die Garantie umfasst nicht den gewerblichen Einsatz der Geräte in Fitnessstudios. Heimfitness Einsatz: Für dieses Produkt besteht bei Heimfitness Einsatz grundsätzlich ein Garantieanspruch von: 2 Jahren auf Material- und Verarbeitungsfehler. Wenn Sie Ihr Gerät bei Heimfitness Einsatz unter www.reebokfitness.de innerhalb eines Monats nach Kaufdatum registrieren, wird Ihre Garantie auf 4 Jahre verdoppelt, die Garantie für den Motor des Laufbandes auf 10 Jahre. Garantiebedingungen: Die Garantie – Laufzeit beginnt ab dem Kaufdatum laut Quittung (bitte bewahren sie diese sorgfältig auf) Die Garantie gilt nur für Erstkäufer und ist nicht übertragbar. Zunächst sind Ihre Garantieansprüche auf Nacherfüllung beschränkt. Alle Garantieansprüche sind auf den Ersatz des tatsächlich aufgetretenen Schadens begrenzt. Der Schaden ist auf den Betrag begrenzt, der beim Kauf des Produktes bezahlt wurde. Garantieleistungen, wie z.B. die Lieferung von Ersatzteilen verlängern nicht die Garantiezeit. Durch Manipulation an dem Produkt und nicht mit dem Hersteller abgestimmte Eingriffe erlischt die Garantie. Die Hinweise in der Montage-/Trainingsanleitung (Aufbau, Aufstellung, Sicherheit, Anwendung, Wartung) sind unbedingt zu beachten. Sollte trotz umfangreichen Qualitäts-Endkontrollen einmal eine Funktionsstörung vorliegen oder Ihr Produkt einen Transportschaden aufweisen, ist eine detaillierte Schadensbeschreibung erforderlich. Im Falle eines berechtigten Garantieanspruches ist dieser an den Fachhändler zu richten bei dem das Produkt erworben wurde. Die Erbringung der Garantieleistungen beschränkt sich auf das jeweilige Land, in welchem Sie Ihr Trainingsgerät erworben haben. Von der Garantie ausgeschlossen sind: Normale Abnutzung durch Gebrauch (Verschleiß), Schäden bei unsachgemäßer und nicht bestimmungsgemäßer Verwendung, Schäden durch selbstverantwortete Änderungen (Umbau) des Produktes zweckentfremdete Nutzung (Missbrauch), nicht ausreichende Wartung, Batterien, Fremdverschulden (Montagefehler, falsche Bedienung/Anwendung, falsche Aufstellung/Standort), Schäden aufgrund von unsachgemäßer Lagerung des Geräts außerhalb des Wohnbereichs, z.B. in der Garage. Vorgehen im Garantiefall: Transportschäden, Garantieansprüche und Probleme müssen unverzüglich nach Feststellen des Fehlers bei Ihrem Fachhändler gemeldet werden, um Folgeschäden zu vermeiden. Reklamationen werden nur mit Vorlage des Kaufbeleges und unter Angabe der vollständigen Seriennummer anerkannt. Diese finden Sie auf dem Aufkleber auf der Unterseite des Geräts (z.B. GM1234567891011). Bei Laufbändern klappen Sie bitte die Lauffläche hoch, da der Aufkleber auf der Unterseite des Laufdecks angebracht ist. Für eine schnelle und korrekte Bearbeitung im Reklamations- und Servicefall sind die vollständigen Angaben notwendig. Bei Schwierigkeiten mit Ihrem Gerät, kontaktieren Sie bitte Ihren Fachhändler. Geräte die ohne Genehmigung von Reebok Fitness zurückgesendet werden, können nicht angenommen werden. Antworten zu häufig gestellten Fragen finden Sie auch auf unsere Homepage: www.reebokfitness.de Nach Rücksprache mit Ihrem Fachhändler, sollte ein defektes Produkt möglichst in der Originalverpackung, zusammen mit den oben genannten vollständigen Angaben, bei Ihrem Fachhändler zur Reparatur abgegeben werden. Transportschäden wegen unzureichender Verpackung (dies trifft für Rücksendungen zu) stehen außerhalb jeder Hersteller- und Lieferantenhaftung Auch nach Ablauf der Garantie können Sie Ihr Reebok-Produkt zu einem günstigen Preis reparieren und warten lassen. Auf Wunsch erhalten Sie vorab einen Kostenvoranschlag. B 9.5e 4 Warranty Semi-Professional Use: Reebok warranty covers the original purchaser if the product is in semi-professional use: 1 year against possible defects of the frame, magnetic brake, electronics and workmanship. Additional 10 years against possible defects of the motor of a treadmill. This warranty applies only if the product is in semi-professional use, for example in hotels, rehabilitation clinics or schools. The recommended operating time is a maximum of 3 hours per day. Warranty and manufacturer’s liability do not extend to any product in commercial use. Home Fitness Use: Reebok warranty covers the original purchaser if the product is in home use: 2 years against defects in material and workmanship. If you register your product at www.reebokfitness.de within one month from the date of purchase, the warranty period is doubled to 4 years; the warranty period for the motor of a treadmill is 10 years. Warranty Terms: The warranty period starts at the date the product was purchased (keep your sales receipt in a safe place) The warranty applies only to the original purchaser. The claim under warranty is limited to rectification. All claims under warranty are limited to the fulfilment of the actual loss incurred. The damage claim is limited to the amount you have paid for the product. Guarantees, e.g. the delivery of replacement parts does not extend the warranty period. The warranty for the product expires if the fitness equipment or components have been modified without the consent of Green Fitness GmbH. The instructions of the user manual concerning assembly, safety, use and maintenance need to be followed. In the case of failure, malfunction or damage in transit, we need a precise description of the fault. In the case of an eligible claim under warranty, please contact the specialist dealer you have purchased the product from. The provision of warranty service is limited to the country where you have purchased your fitness equipment. Excluded from warranty are: Wearing parts, Damages caused by misuse of the product, Damages caused by modifications of the product without the consent of Green Fitness GmbH Defects resulting from abuse, Insufficient maintenance, Batteries, Third party fault (assembly error, misuse, false assembly/position), Defects resulting from improper storage outside the house, e.g. in a garage. Procedure in case of a warranty claim: To avoid subsequent damages, please communicate damages in transit, warranty claims and problems immediately after discovery to your specialist dealer. The sales receipt and the indication of your correct serial number is a precondition to any warranty action. The serial number can be found on the sticker underside your product (e.g. GM1234567891011). Please lift the running deck of your treadmill to find the sticker underside the deck. To guarantee a fast and correct processing in case of a warranty claim, we need a precise description of the defect. In the case of difficulties with your equipment, please contact your specialist dealer. Products sent back without the consent of Reebok Fitness, will not be accepted. Answers to frequently asked questions you can also find on our homepage: www.reebokfitness.de After consultation with your specialist dealer, you should hand over the damaged product as soon as possible in the original packaging along with the complete description of the defect. Damages in transit caused by insufficient packaging (concerning reshipments) are excluded from any warranty and manufacturer´s liability. After expiry of warranty we can repair and maintain your Reebok product. By request we can make an estimate of the costs. www.reebokfitness.de 5 Sicherheitshinweise Bitte lesen Sie diese Anweisung vor der Montage und vor der ersten Benutzung aufmerksam durch. Sie erhalten wichtige Hinweise für Ihre Sicherheit sowie den Gebrauch und die Wartung des Gerätes. Bewahren Sie diese Anleitung zur Information bzw. für Wartungsarbeiten oder Ersatzteilbestellungen sorgfältig auf. Produkt-Gültigkeitsbereich: Dieser Ergometer ist sowohl für den Heimfitness Einsatz als auch den Semiprofessionellen Einsatz konzipiert und für ein maximales Körpergewicht von 150 Kilogramm getestet. Produkt-Leistung: Dieser Ergometer entspricht der europäischen Norm EN 957-1/5 SA und ist für das therapeutische Training geeignet. Produkt-Leistung: Das Bremssystem ist im normalen Modus geschwindigkeitsunabhängig, im Watt-Kontroll-Modus geschwindigkeitsabhängig. Gebrauch-Gültigkeitsbereich: Das Gerät darf nicht von Personen benutzt werden deren Gewicht über 150kg liegt. Produkt-Gültigkeitsbereich: Das Gerät ist für das Körpertraining erwachsener Personen konzipiert. Stellen Sie sicher, dass eine Nutzung des Geräts von Kindern nur unter Aufsicht von Erwachsenen erfolgt. Gebrauch-Umgebung: Weisen Sie anwesende Personen auf Gefährdung, z.B. durch bewegliche Teile, hin. Gebrauch-Umgebung: Stellen Sie sicher, dass ausreichend Platz vorhanden ist, um das Gerät zu benutzen. Gebrauch-Umgebung: Stellen Sie das Gerät auf einem ebenen, rutschfesten Untergrund auf. Gebrauch-Umgebung: Stellen Sie sicher, dass niemals Flüssigkeiten in das Geräteinnere oder in die Elektronik gelangen. Dies gilt auch für Körperschweiß! Gebrauch-Umgebung: Benutzen Sie das Gerät nur innen und schützen Sie es vor Feuchtigkeit und Staub. Stellen Sie das Gerät nicht in eine Garage, auf eine überdachte Veranda, oder in die Nähe von Wasser. Gebrauch-Umgebung: Das Gerät ist für den Heimfitness Einsatz und Semiprofessionellen Einsatz konzipiert. Bei gewerblicher Nutzung besteht kein Garantieanspruch und die Haftung des Herstellers ist ausgeschlossen. Benutzer-Gesundheit: Bei gesundheitlichen Einschränkungen oder für individuelle und persönliche Trainingsparameter konsultieren Sie bitte zunächst vor dem ersten Training Ihren Arzt. Er kann Ihnen sagen, welche Art des Trainings und welche Belastung für Sie geeignet ist. Benutzer-Gesundheit: Falsches oder exzessives Training kann Ihre Gesundheit gefährden. Benutzer-Gesundheit: Falls Sie während des Trainings Übelkeit, Brustschmerzen, Schwindelanfälle oder Atemnot verspüren, beenden Sie Ihr Training sofort und suchen Sie einen Arzt auf. Benutzer-Gesundheit: Beginnen Sie erst mit dem Training, nachdem Sie sichergestellt haben, dass das Gerät korrekt aufgebaut und eingestellt ist. Produkt-Vorbereitung: Gehen Sie beim Aufbau des Geräts exakt nach der Montageanweisung vor. Produkt-Vorbereitung: Verwenden Sie nur geeignetes Werkzeug für die Montage und lassen Sie sich ggf. von einer zweiten Person helfen. Produkt-Vorbereitung: Verwenden Sie nur die der Lieferung beigelegten Reebok Originalteile (siehe Check-Liste). Produkt-Vorbereitung: Schrauben Sie vor dem Training alle verstellbaren Teile gut fest, um eine Lockerung während des Trainings zu vermeiden. Gebrauch-Anleitung: Für ein sicheres und effektives Training folgen Sie bitte den Hinweisen in der Trainingsanleitung. Gebrauch-Anleitung: Verwenden Sie das Gerät nicht ohne Schuhe oder mit losem Schuhwerk. Gebrauch-Sicherheit: Achten Sie während der Montage/Demontage des Geräts auf die richtige Position und die korrekte Befestigung der nicht fixierten oder beweglichen Teile. Gebrauch-Sicherheit: Verwenden Sie die Höhen- Einstellkappen an der hinteren Querstütze, um eine sichere Position des Geräts zu gewährleisten. Gebrauch-Sicherheit: Stellen Sie sicher, dass die vorderen Transportrollen in der richtigen Position angebracht sind. (siehe Aufbauanleitung) Produkt-Wartung: Führen Sie ca. alle 1 bis 2 Monate eine Kontrolle aller Geräteteile, insbesondere der Schrauben und Muttern durch. Dies gilt insbesondere für die Griffbügel-, Sattel- sowie die Lenkerbefestigung. Produkt-Wartung: Durch unsachgemäße Reparaturen und bauliche Veränderungen (Demontage von Originalteilen, Anbau von nicht zulässigen Teilen, usw.) können Gefahren für den Benutzer entstehen. Produkt-Wartung: Beschädigte Bauteile können Ihre Sicherheit und die Lebensdauer des Geräts beeinträchtigen. Tauschen Sie deshalb beschädigte oder verschlissene Bauteile sofort aus und entziehen Sie das Gerät bis zur Instandsetzung der Benutzung. Produkt-Wartung: Verwenden Sie nur Reebok Originalersatzteile. Produkt-Wartung: Nehmen Sie niemals Eingriffe an Ihrem Stromnetz selbst vor, sondern beauftragen Sie ggf. qualifiziertes Fachpersonal. Produkt-Wartung: Ziehen Sie bei allen Reparatur-, Wartungs- und Reinigungsarbeiten unbedingt den Netzstecker. 6 B 9.5e Precautions Before assembling or using the exercise cycle, please read the following instructions carefully. They contain important information for use and maintenance of the equipment as well as for your personal safety. Keep these instructions readly accessible for service and maintenance purposes or for the ordering of replacement parts. Product-Scope: This product is made both for home use and semi-professional use and tested up to a maximum body weight of 150 kilograms. Product-Performance: This ergometer is tested to the European Standard EN 957-1/5 SA. The equipment is suitable for therapeutic training. Product-Performance: The braking system is speed-independent at general mode and speed-dependent at watt control mode. Use-Scope: The exerciser may not be used by persons with a weight of over 150 kg. Use-Scope: This product is designed for the physical exercise by adults. Please ensure that children only use it under adult supervision Use-Environment: Ensure that those present are aware of possible hazards, e.g. movable parts during training. Use-Environment: Ensure that sufficient space is available to use the exerciser. Use-Environment: Place the exerciser on an even, non-slippery surface. Use-Environment: Please ensure that liquids or perspiration never enter the e. Use-Environment: Keep the equipment indoors, away from moisture and dust. Do not put the equipment in a garage, covered patio or near water. Use-Environment: The product is made both for home use and semi-professional use only. Warranty and manufacturer's liability do not extend to any product or damage to the product caused by commercial use. User-Health: Consult your physician before starting with any exercise programs to receive advice on the optimal training technique. User-Health: Incorrect/excessive training can cause health injuries. User-Health: If you feel sickness, chest pain, fits of dizziness or breathlessness during your training, stop training immediately and consult your physician. Product-Preparation: Ensure that training only starts after correct assembly, adjustment and inspection of the exerciser. Product-Preparation: Follow the steps of the assembly instruction carefully. Product-Preparation: Only use suitable tools for assembly and ask for assistance if necessary. Product-Preparation: Only use original Reebok parts as delivered (see checklist). Product-Preparation: Tighten all adjustable parts to prevent sudden movement while training. Use-Instruction: Please follow the advice as per correct training technique as detailed in the instructions. Use-Instruction: Do not use the exerciser without shoes or with loose fitting footwear. Use-Safety: Be aware of the position and proper fixation of adjustable or moving parts while mounting or dismounting the home exerciser. Use-Safety: Use the height adjustment caps on the rear tube to ensure stable footing of the exerciser. Use-Safety: Make sure the front wheels are placed in the correct position: see assembly instructions. Product-Maintenance: If the equipment is in regular use, check all its components thoroughly every 1 – 2 months. Pay particular attention to the tightness of bolts and nuts. This applies especially to the securing bolts for saddle and handlebars. Product-Maintenance: Incorrect repairs and structural modifications (e.g. removal or replacement of original parts) may endanger the safety of the user. Product-Maintenance: Damaged components may endanger your safety or reduce the lifetime of the equipment. For this reason, worn or damaged parts should be replaced immediately and the user should refrain from using the equipment until this has been done. Product-Maintenance: Only use original Reebok replacement parts. Product-Maintenance: Do not under any circumstances carry out electrical repairs or alterations yourself. Always ensure that such work is done by a properly qualified electrician/mechanic. Product-Maintenance: Disconnect the apparatus from the mains before doing repair, maintenance or cleaning work. www.reebokfitness.de CHECK LIST No. Description Beschreibung M 8 x 10 mm Bolzen M 6 x 15 mm Schrauben 4 x 19 mm Bolzen 4 x 9 mm Schraube Qty. / Menge 27 M8 x 10mm Bolt 44 M6 x 15mm Screw 46 4 x 19mm Bolt 85 4 x 9mm Screw A Screw Driver Schraubenzieher 1 B 5mm Wrench 5mm Inbus 1 C 8mm Wrench 8mm Inbus 1 42 Computer Computer 1 43 Console Upright Tube 45 Computer Protect Cover 48 Handlebar Post Handgriffstangen 1 55 Seat Post Sattelrohr 1 62 Front Upright Cover Abdeckung vordere Frontstütze 1 81 Main Frame Rahmen 1 83 Bottle Holder Flaschenhalter 1 84 Water Bottle Wasserflasche 1 96 Power Cord Stromkabel 1 Rohr Obere Frontstütze Computer Schutzabdeckung 27 44 46 85 6 4 A B C 4 4 42 43 45 48 55 62 81 83 1 1 84 96 7 8 B 9.5e PARTS LIST / TEILELISTE Qty. / Menge 1 No. B9.5E-001 Description Beschreibung M6 x 10mm Bolt M6 x 10mm Bolzen B9.5E-002 Schwungrad Stoßdämpfer 2 B9.5E-003 Flywheel Shock Absorber 17 x 22 x T1.5 Plastic Washer 17 x 22 x T1.5 Plastikscheibe 3 B9.5E-004 6003 Bearing 6003 Kugellager 1 B9.5E-005 Flywheel Pulley Schwungradrolle 1 B9.5E-006 20 x 32 x T1.0 Plastic Washer 20 x 32 x T 1.0 Plastikscheibe 4 B9.5E-007 6004ZZ Bearing CAP Bolt 8x15 6004ZZ Kugellager 4 B9.5E-008 Rundkopfschraube 8x15 2 B9.5E-009 Flywheel Schwungrad 1 B9.5E-010 Bearing Bracket Kugellagerklammer 1 B9.5E-011 6201ZZ Kugellager 1 B9.5E-012 6201ZZ Bearing Aluminum disk Aluminiumscheibe 1 B9.5E-013 M3 x 8mm Bolt M3x8mm Bollzen 4 B9.5E-014 Spring washer 8 x 14 x T2.0 Federscheibe 10 B9.5E-015 Electric Magnet Braket Klammer Elektromagnet 1 B9.5E-016 M4 x 12mm Bolt M4x12mm Bolzen 2 B9.5E-017 M6 x 12 Bolt M6x12 Bolzen 6 B9.5E-018 Bearing Bracket for 6004 Kugellagerklammer für 6004 1 B9.5E-019 4 x 15mm Screws 4x15mm Schraube 26 B9.5E-020 Control Board Kontrollboard 1 B9.5E-021 M10 x 95mm Bolt M10x95mm Bolzen 1 B9.5E-022 Power set stable piece Stabilisierungsstück Stromeinheit 1 B9.5E-023 Sensor stable piece 45 x 25 x 16mm Stabilisierungsstück Sensor 1 B9.5E-024 Geschwindigkeitssensor 1 B9.5E-025 Speed Sensor Electric Magnet Elektromagnet 1 B9.5E-026 Power set cover Abdeckung Stromeinheit 1 B9.5E-027 M8 x 10mm Bolt M8x10 mm Bolzen 6 B9.5E-028 Stabilizer Tube Cap Bodenrohrfußkappe 4 B9.5E-029 Crank Cap Kurbelkappe 2 B9.5E-030 3/8" Nut 3/8" Mutter 2 B9.5E-031 Crank - Left Kurbel links 1 B9.5E-032 M6 x 12mm Bolt M6x12mm Bolzen 4 B9.5E-033 Crank Shaft Kurbelwelle 1 B9.5E-034 Drive Belt Antriebsriemen 1 B9.5E-035 Crank Disk Kurbelarm 1 B9.5E-036 20 x 30 x T2.0 Washer 20 x 30 x T2.0 Scheibe 2 B9.5E-037 3/4" Nut 3/4" Mutter 2 B9.5E-038 Crank – Right Kurbel rechts 1 B9.5E-039 Transformer Transformer 1 B9.5E-041 3 x 12mm Screws 3x12 mm Schrauben 4 B9.5E-042 Computer Computer 1 B9.5E-043 Console Upright Tube Frontstütze Konsole 1 B9.5E-044 M6 x 15mm Bolt M6 x 15mm Bolzen 4 www.reebokfitness.de 9 PARTS LIST / TEILELISTE No. B9.5E-045 Description Beschreibung Computer protect Cover Computer Schutzabdeckung Qty. / Menge 1 B9.5E-046 4 x 19mm Screws 4 x 19 mm Schrauben 7 B9.5E-047 Handpulssensor 2 B9.5E-048 Hand Pulse Sensor Handlebar - Left Handgriff-links 1 B9.5E-049 Handlebar Casing Handgriffabdeckung 1 B9.5E-050 Handlebar - Right Handgriff-rechts 1 B9.5E-051 Saddle Sattel 1 B9.5E-052 Saddle Prop Tube Sattelstützrohr 1 B9.5E-053 Saddle Plastic Sleeve Sattel Plastikhülse 1 B9.5E-054 M8 x 15mm Bolt M8x15mm Bolzen 4 B9.5E-055 Seat Post Sattelrohr 1 B9.5E-056 Aluminum Sleeve Aluminiumhülse 1 B9.5E-057 Loop for Seat Post Ring für Sattelrohr 1 B9.5E-058 Pedal - Left Pedal links 1 B9.5E-059 Height Adjustment Knob Höhenverstellknopf 1 B9.5E-060 Chain Cover - Front Left Kettenabdeckung - vorne links 1 B9.5E-061 Vent Cover - Left Lüftungsabdeckung links 1 B9.5E-062 Front Upright Cover Abdeckung vordere Frontstütze 1 B9.5E-063 Iron Plate Nut Mutter 10 B9.5E-064 Chain Cover - Front Right Kettenabdeckung - vorne rechts 1 B9.5E-065 Vent Cover - Right Lüftungsabdeckung rechts 1 B9.5E-066 Chain Cover - Rear Left Kettenabdeckung - hinten links 1 B9.5E-067 Vent Cover - Rear Lüftungsabdeckung hinten 1 B9.5E-068 Pedal - Right Pedal rechts 1 B9.5E-069 Chain Cover - Rear Right Kettenabdeckung - hinten rechts 1 B9.5E-071 Hand Pulse Wire - Upper Left Handpulskabel oben links 2 B9.5E-072 Computer Wire Upper Oberes Computerkabel 1 B9.5E-075 Hand Pulse Wire - Middle Handpulskabel Mitte 2 B9.5E-077 M8 x 25mm Bolt M8 x 25mm Bolzen 9 B9.5E-078 Spring Steel Piece Feder 1 B9.5E-079 Tension Pulley Spannrolle 1 B9.5E-080 Fixing Set for Console Upright Befestigungsset für Konsole 1 B9.5E-081 Main Frame Rahmen 1 B9.5E-082 M5 x 8mm Bolt M 5 x 8 mm Bolzen 2 B9.5E-083 Bottle Holder Flaschenhalter 1 B9.5E-084 Water Bottle Wasserflasche 1 B9.5E-085 4 x 9mm Screw 4 x 9 mm Schraube 12 B9.5E-086 Level Adjusters Höhenverstellrädchen 4 B9.5E-087 Sensor Magnet Sensormagnet 1 B9.5E-088 M 5 x 10 mm Bolzen 2 B9.5E-089 M5 x 10mm Bolt Tube cap Rohrkappe 2 B9.5E-090 M12 x 20 Bolt M12x20 Bolzen 2 B9.5E-091 Nylon nut M10 Nylonmutter M10 1 B9.5E-092 M8 x 50 CAP bolt M8x50 Rundkopfschraube 2 B9.5E-093 Nylon nut M8 Nylonmutter M8 2 10 B 9.5e B9.5E-094 Spring washer 6 x 11 x 1 Federscheibe 8 B9.5E-095 Washer 8 x 22 x 2mm Scheibe 3 B9.5E-096 Power cord Stromkabel 1 B9.5E-097 Power switch Stromschalter 1 B9.5E-098 Power socket Stromansteckdose 1 B9.5E-099 Power set with light Stromeinheit mit Lampe 1 www.reebokfitness.de 11 EXPLODED VIEW / EXPLOSIONSZEICHNUNG 5 17 94 18 77 7 6 9 12 14 8 14 14 2 95 77 3 1 24 23 94 80 79 78 13 28 77 14 70 19 81 28 20 19 39 87 29 88 98 16 13 30 31 32 82 92 16 99 22 97 26 36 35 7 7 36 37 37 38 30 25 86 33 34 86 28 82 2 29 28 90 21 15 90 91 93 4 10 94 17 95 77 12 B 9.5e EXPLODED VIEW / EXPLOSIONSZEICHNUNG 84 83 48 42 75 43 47 44 41 47 27 41 71 72 71 45 44 74 46 www.reebokfitness.de EXPLODED VIEW / EXPLOSIONSZEICHNUNG 51 52 53 54 55 43 85 46 54 46 60 56 85 85 61 57 62 58-L 59 85 64 19 63 65 63 46 85 66 67 85 81 58-R 63 69 19 13 14 B 9.5e ASSEMBLY / AUFBAU STEP 1: 55 59 59 81 www.reebokfitness.de ASSEMBLY / AUFBAU STEP 2: 43 74 45 74 70 70 81 15 16 B 9.5e ASSEMBLY / AUFBAU STEP 3 + 4: 43 8mm Wrench 81 75 27 27 48 43 www.reebokfitness.de ASSEMBLY / AUFBAU STEP 5: 71 42 74 72 75 71 75 44 43 17 18 B 9.5e ASSEMBLY / AUFBAU STEP 6: 42 45 46 www.reebokfitness.de ASSEMBLY / AUFBAU STEP 7: 43 85 62 85 19 20 B 9.5e ASSEMBLY / AUFBAU STEP 7: 83 42 www.reebokfitness.de ASSEMBLY / AUFBAU STEP 9: 55 59 21 22 B 9.5e LEVEL ADJUSTMENT / BODENAUSGLEICH Floor stabilizer Please find 4 adjustable stabilizers and 4 installed casters underneath the base frame www.reebokfitness.de COMPUTER A B H C QUICKSTART 1. Press START. 2. Adjust tension. 3 D PROGRAMMEOPERATION 1. Select program and set up the user weight, height,age and target heart rate. Press ENTER to set each value. 2 I 2. Press START to begin the program. 9 6 5 12 8 J 11 TENSION 1 7 4 STOP E F G START MODE BELASTUNGSANZEIGE 10 K L M ENTER A B GESCHWINDIGKEIT/ U/min C D STANDARD PROGRAMME E F STOP MODE G H DISTANZ/TEMPO KALORIEN/PULS I J STANDARD PROGRAMME PFEILTASTE AB K L START ZEIT/WATT PFEILTASTE AUF ENTER M 23 24 B 9.5e TASTEN und FUNKTIONEN STOP: Drücken Sie STOP, um die Funktionen während des Trainings zu unterbrechen. Alle Daten auf dem Display werden eingefroren. Drücken Sie START um das Programm fortzusetzen. Alle Daten werden weiterlaufen bis das Programm beendet ist. Drücken Sie zweimal die STOP Taste, werden alle Daten auf 0 zurück gesetzt und der Computer wird in den POWER ON Status zurückkehren. START: Drücken Sie START um Ihr Training zu beginnen. ENTER: Drücken Sie ENTER, um die Programmeinstellungen zu bestätigen. MODE: Ändert die Anzeige zwischen GESCHWINDIGKEIT/ZEIT/DISTANZ/KALORIEN und U/min/WATT/TEMPO/PULS. SPEED/GESCHWINDIGKEIT: Anzeige der Geschwindigkeit. LEVEL: Anzeige des Levels der Intensität des Übungsprogramms. CALORIES/KALORIEN: Count up: Hochzählung der Gesamtkalorien, die während des Trainings verbrannt werden. Count down: Wenn Sie eine Zahl an Kalorien eingegeben haben, zählt der Computer die Kalorien bis auf 0 herunter. Diese Anzeige sollte nur als Richtlinie und nicht zur medizinischen Bewertung dienen. Eingabe in 10er Schritten von 0 bis 990. TENSION/SPANNUNG (Resistance/Widerstand): Anzeige des Widerstandslevels von 1 bis 20. DISTANCE/DISTANZ: Count up: Hochzählung der Gesamtstrecke von 0 bis 99,9 km / Meilen. Count down: Wenn Sie eine Zieldistanz eingegeben haben, zählt der Computer herunter bis auf 0. WATT: Anzeige der WATT-Leistung. TIME/ZEIT: Count up: Höchzählung der Gesamttrainingszeit von 16:00 bis 99:00. Count down: Wenn Sie eine Zielzeit eingegeben haben, zählt der Computer herunter auf 0:00. QUICK START/SCHNELLSTART: Wenn sich das Gerät im POWER ON Status befindet, drücken Sie START, um das QUICK START Programm zu aktivieren. Zeit, Distanz und Kalorien werden gemessen. PROGRAM: Für ein Benutzerprogramm müssen Sie ein Benutzerprofil erstellen. Um neue Daten einzugeben, gehen Sie bitte folgendermaßen vor: WEIGHT set up/Eingabe KÖRPERGEWICHT: Nachdem Sie den USER CODE/BENUTZERCODE bestätigt haben, wird das ZEIT Display 68 kg/150lbs oder die vorherige Eingabe anzeigen und blinken. Drücken Sie die UP/DOWN Tasten, um das Gewicht anzupassen. Bestätigen Sie mit ENTER. HEIGHT set up/Eingabe KÖRPERGRÖSSE: Nachdem das Körpergewicht bestätigt wurde, wird das DISTANZ Display 170cm/67 inches oder die vorherige Eingabe anzeigen und blinken. Drücken Sie die UP/DOWN Tasten, um die Grösse anzupassen. Bestätigen Sie mit ENTER. AGE set up/Eingabe ALTER: Nachdem die Körpergrösse bestätigt wurde, wird das CALORIES Display 35 oder die vorherige Eingabe anzeigen und blinken. Drücken Sie die UP/DOWN Tasten, um das Alter anzupassen. Bestätigen Sie mit ENTER. SEX set up/Eingabe GESCHLECHT: Nachdem das Alter bestätigt wurde, wird das Display M (Mann) anzeigen und blinken. Drücken Sie die UP/DOWN Tasten, um das Geschlecht auf M (Mann) oder F (Frau) anzupassen. Bestätigen Sie mit ENTER. www.reebokfitness.de 25 COMPUTERANLEITUNG Umstellung von metrischer auf englische Anzeige Das Computerdisplay kann alle Informationen metrisch und englisch anzeigen. Um die Einstellung zu ändern, gehen Sie folgendermaßen vor: 1. Wenn sich der Computer im POWER ON Status befindet, drücken und halten Sie die ENTER und STOP Taste für 3 Sekunden. Das Display wird ML anzeigen. 2. Drücken Sie die Pfeiltasten, um zwischen ENGLISCH (ML) und METRISCH (KM) zu wählen. Drücken Sie ENTER, um die Eingabe zu bestätigen und in den POWER ON Status zurück zu kehren. Programmeinstellung für P1 bis P12 P1: Manuell Nachdem Sie P1 gewählt haben, wird das Display das voreingestellte Benutzerprofil anzeigen. Geben Sie Ihr Benutzerprofil ein und das ZEIT Display wird 30:00 anzeigen. Drücken Sie die Pfeiltasten, um das Zeitziel anzupassen und bestätigen Sie mit ENTER. Drücken Sie START, um das Training zu beginnen. Die Zeit wird auf 0 herunter gezählt und das Programm wird automatisch beendet. Um den Widerstand während des Trainings zu verändern, drücken Sie die Pfeiltasten. Um das Training zu unterbrechen, drücken Sie die STOP Taste. Um das Training fortzusetzen, drücken Sie START. P2: Ziel Nachdem Sie P2 gewählt haben, wird das Display das voreingestellte Benutzerprofil anzeigen. Geben Sir Ihr Benutzerprofil ein und das ZEIT Display wird 20:00 anzeigen. Drücken Sie die Pfeiltasten, um das Zeitziel anzupassen und bestätigen Sie mit ENTER. Wiederholen Sie diese Schritte, um Ihre Ziele für Distanz, Kalorien und Zielherzfrequenz einzugeben. Drücken Sie START, um das Training zu beginnen. Um den Widerstand während des Trainings zu verändern, drücken Sie die Pfeiltasten. Um das Training zu unterbrechen, drücken Sie die STOP Taste. Um das Training fortzusetzen, drücken Sie START. P3: Random Nachdem Sie P3 gewählt haben, wird das Display das voreingestellte Benutzerprofil anzeigen. Geben Sie Ihr Benutzerprofil ein und das ZEIT Display wird 30:00 anzeigen. Drücken Sie die Pfeiltasten, um die Trainingszeit anzupassen und bestätigen Sie mit ENTER. Drücken Sie START, um das Training zu beginnen. Das Random Programm hat 50 verschiedene widerstandsbasierende Programme. Wenn Sie den Widerstand während des Trainings als zu hoch empfinden, können Sie ihn mit den Pfeiltasten verringern. Um das Training zu unterbrechen, drücken Sie die STOP Taste. Um das Training fortzusetzen, drücken Sie START. 26 B 9.5e COMPUTERANLEITUNG P4: Intervall Nachdem Sie P4 gewählt haben, wird das Display das voreingestellte Benutzerprofil anzeigen. Geben Sie Ihr Benutzerprofil ein und das ZEIT Display wird 30:00 anzeigen. Drücken Sie die Pfeiltasten, um die Trainingszeit anzupassen und bestätigen Sie mit ENTER. Das U/min Display wird ein blinkendes L1 anzeigen. Drücken Sie die Pfeiltasten, um die Trainingsintensität von L1 bis L10 anzupassen und bestätigen Sie mit ENTER. Drücken Sie START, um das Training zu beginnen. Ziel des INTERVAL Programms ist es, für kurze Einheiten auf verschiedenen Levels niedriger und hoher Intensität zu trainieren. Es gibt 1 Profil mit 10 verschiedenen Levels an Intensität. Der Widerstand wird während des Trainings automatisch entsprechend dem folgenden Profil verändert. Um den Widerstand während des Trainings zu verändern, drücken Sie die Pfeiltasten. Um das Training zu unterbrechen, drücken Sie die STOP Taste. Um das Training fortzusetzen, drücken Sie START. INTERVAL Profil: Wenn der Benutzer seine Trainingszeit auf mehr als 20 min einstellt, wird der Computer die Trainingszeit in 20 gleiche Abschnitte, wie die Widerstandstabelle zeigt, einteilen. z.B. werden bei 40 min Trainingszeit die Intervalle jeweils 2 min lang sein. Wenn der Benutzer seine Trainingszeit auf weniger als 20 min einstellt, wird der Computer die Intervalle auf 1 min Länge einstellen. RESISTANCE PROFILE Intensity Level Resistance Level per Section (20 total) L1 25 100 100 25 25 100 100 25 25 100 100 25 25 100 100 25 25 100 100 25 L2 50 125 125 50 50 125 125 50 50 125 125 50 50 125 125 50 50 125 125 50 L3 75 150 150 75 75 150 150 75 75 150 150 75 75 150 150 75 75 150 150 75 L4 100 175 175 100 100 175 175 100 100 175 175 100 100 175 175 100 100 175 175 100 L5 125 200 200 125 125 200 200 125 125 200 200 125 125 200 200 125 125 200 200 125 L6 150 225 225 150 150 225 225 150 150 225 225 150 150 225 225 150 150 225 225 150 L7 175 250 250 175 175 250 250 175 175 250 250 175 175 250 250 175 175 250 250 175 L8 200 300 300 200 200 300 300 200 200 300 300 200 200 300 300 200 200 300 300 200 L9 225 350 350 225 225 350 350 225 225 350 350 225 225 350 350 225 225 350 350 225 L 10 250 400 400 250 250 400 400 250 250 400 400 250 250 400 400 250 250 400 400 250 www.reebokfitness.de 27 COMPUTERANLEITUNG P5: X-COUNTRY Nachdem Sie P5 gewählt haben, wird das Display das voreingestellte Benutzerprofil anzeigen. Geben Sie Ihr Benutzerprofil ein und das ZEIT Display wird 30:00 anzeigen. Drücken Sie die Pfeiltasten, um die Trainingszeit anzupassen und bestätigen Sie mit ENTER. Das U/min Display wird ein blinkendes L1 anzeigen. Drücken Sie die Pfeiltasten, um die Trainingsintensität von L1 bis L18 anzupassen und bestätigen Sie mit ENTER. Drücken Sie START, um das Training zu beginnen. Um den Widerstand während des Trainings zu verändern, drücken Sie die Pfeiltasten. Um das Training zu unterbrechen, drücken Sie die STOP Taste. Um das Training fortzusetzen, drücken Sie START. X-COUNTRY Profil: Wenn der Benutzer seine Trainingszeit auf mehr als 20 min einstellt, wird der Computer die Trainingszeit in 20 gleiche Abschnitte, wie die Widerstandstabelle zeigt, einteilen. z.B. werden bei 40 min Trainingszeit die Intervalle jeweils 2 min lang sein. Wenn der Benutzer seine Trainingszeit auf weniger als 20 min einstellt, wird der Computer die Intervalle auf 1 min Länge einstellen. RESISTANCE PROFILE Intensity Level Resistance Level per Section (20 total) L1 25 65 25 65 25 65 25 65 25 65 25 65 25 65 25 65 25 65 25 65 L2 45 85 45 85 45 85 45 85 45 85 45 85 45 85 45 85 45 85 45 85 L3 65 105 65 105 65 105 65 105 65 105 65 105 65 105 65 105 65 105 65 105 L4 85 125 85 125 85 125 85 125 85 125 85 125 85 125 85 125 85 125 85 125 L5 105 145 105 145 105 145 105 145 105 145 105 145 105 145 105 145 105 145 105 145 L6 125 165 125 165 125 165 125 165 125 165 125 165 125 165 125 165 125 165 125 165 L7 145 185 145 185 145 185 145 185 145 185 145 185 145 185 145 185 145 185 145 185 L8 165 205 165 205 165 205 165 205 165 205 165 205 165 205 165 205 165 205 165 205 L9 185 225 185 225 185 225 185 225 185 225 185 225 185 225 185 225 185 225 185 225 L 10 205 245 205 245 205 245 205 245 205 245 205 245 205 245 205 245 205 245 205 245 L 11 225 265 225 265 225 265 225 265 225 265 225 265 225 265 225 265 225 265 225 265 L 12 245 285 245 285 245 285 245 285 245 285 245 285 245 285 245 285 245 285 245 285 L 13 265 305 265 305 265 305 265 305 265 305 265 305 265 305 265 305 265 305 265 305 L 14 285 325 285 325 285 325 285 325 285 325 285 325 285 325 285 325 285 325 285 325 L 15 305 345 305 345 305 345 305 345 305 345 305 345 305 345 305 345 305 345 305 345 L 16 325 365 325 365 325 365 325 365 325 365 325 365 325 365 325 365 325 365 325 365 L 17 345 385 345 385 345 385 345 385 345 385 345 385 345 385 345 385 345 385 345 385 L 18 365 400 365 400 365 400 365 400 365 400 365 400 365 400 365 400 365 400 365 400 P6: WATT Kontrolle: Nachdem Sie P6 gewählt haben, wird das Display das voreingestellte Benutzerprofil anzeigen. Geben Sie Ihr Benutzerprofil ein und das ZEIT Display wird 30:00 anzeigen. Drücken Sie die Pfeiltasten, um die Trainingszeit anzupassen und bestätigen Sie mit ENTER. Das U/min Display zeigt den voreingestellten WATT Wert 110W an. Drücken Sie die Pfeiltasten, um die gewünschte WATT-Zahl einzustellen und bestätigen Sie mit ENTER. Drücken Sie START, um das Training zu beginnen. Um den Widerstand während des Trainings zu verändern, drücken Sie die Pfeiltasten. Um das Training zu unterbrechen, drücken Sie die STOP Taste. Um das Training fortzusetzen, drücken Sie START. 28 B 9.5e COMPUTERANLEITUNG P 7: METs (Metabolische Werte) Nachdem Sie P7 gewählt haben, wird das Display das voreingestellte Benutzerprofil anzeigen. Geben Sie Ihr Benutzerprofil ein und das ZEIT Display wird 30:00 anzeigen. Drücken Sie die Pfeiltasten, um die Trainingszeit anzupassen und bestätigen Sie mit ENTER. Das U/min Display zeigt 2.0. an. Drücken Sie die Pfeiltasten, um den METs Level des Trainings von 1.0 bis 16.0 auszuwählen und bestätigen Sie mit ENTER. Drücken Sie START, um das Training zu beginnen. Um den Widerstand während des Trainings zu verändern, drücken Sie die Pfeiltasten. Um das Training zu unterbrechen, drücken Sie die STOP Taste. Um das Training fortzusetzen, drücken Sie START. P8: Racing / Rennen Nachdem Sie P8 ausgewählt haben, wird das Display das voreingestellte Benutzerprofil anzeigen. Geben Sie Ihr Benutzerprofil ein und das DISTANZ Display wird 20 km (12,5 Meilen) anzeigen. Dies entspricht der Zieldistanz im RACING Programm. Drücken Sie START, um das Training zu beginnen. Die Zieldistanz wird während des Trainings auf 0 herunter gezählt. Die erste Säule auf dem BELASTUNGSDISPLAY zeigt die vom Computer erzielte Distanz an. Die zweite Säule auf dem BELASTUNGSDISPLAY zeigt die erreichte Distanz des Benutzers an. Der Benutzer kann gegen den Computer ankämpfen, um zu sehen, wer die Gesamtdistanz als erster erreicht. Um den Widerstand während des Trainings zu verändern, drücken Sie die Pfeiltasten. Um das Training zu unterbrechen, drücken Sie die STOP Taste. Um das Training fortzusetzen, drücken Sie START. P 9: HRC FAT BURN / Herzfrequenzkontrolle Fettverbrennung Nachdem Sie P9 gewählt haben, wird das Display das voreingestellte Benutzerprofil anzeigen. Geben Sie Ihr Benutzerprofil ein und das ZEIT Display wird 30:00 anzeigen. Drücken Sie die Pfeiltasten, um die Trainingszeit anzupassen und bestätigen Sie mit ENTER. Das PULS Display zeigt die voreingestellte Herzfrequenz 157 an. Drücken Sie die Pfeiltasten, um die Zielherzfrequenz anzupassen. Drücken Sie START, um das Training zu beginnen. Das Programm wird mit dem Widerstandslevel 1 beginnen. Wenn Ihr tatsächlicher Puls nicht die Zielherzfrequenz erreicht, wird der Widerstand alle 30 Sekunden um je 1 Level erhöht bis Ihr tatsächlicher Puls die Zielherzfrequenz erreicht hat. Wenn Ihr tatsächlicher Puls die Zielherzfrequenz überschreiten sollte, wird der Widerstand alle 30 Sekunden um je 1 Level verringert werden bis Ihr tatsächlicher Puls die Zielherzfrequenz trifft. Um den Widerstand während des Trainings zu verändern, drücken Sie die Pfeiltasten. Um das Training zu unterbrechen, drücken Sie die STOP Taste. Um das Training fortzusetzen, drücken Sie START. P10: HRC INTERVAL / Herzfrequenzkontrolle Intervall Nachdem Sie P9 gewählt haben, wird das Display das voreingestellte Benutzerprofil anzeigen. Geben Sie Ihr Benutzerprofil ein und das ZEIT Display wird 30:00 anzeigen. Drücken Sie die Pfeiltasten, um die Trainingszeit anzupassen und bestätigen Sie mit ENTER. Das PULS Display zeigt die voreingestellte Herzfrequenz 157 an. Drücken Sie die Pfeiltasten, um die Zielherzfrequenz anzupassen. Drücken Sie START, um das Training zu beginnen. Das Programm wird mit dem Widerstandslevel 1 beginnen. Wenn Ihr tatsächlicher Puls nicht die Zielherzfrequenz erreicht, wird der Widerstand alle 30 Sekunden um je 1 Level erhöht bis Ihr tatsächlicher Puls die Zielherzfrequenz erreicht hat. Wenn Ihr tatsächlicher Puls die Zielherzfrequenz erreicht hat, wird der Widerstand alle 30 Sekunden um je 1 Level verringert werden. Der Widerstand wird dann wieder erhöht werden, wenn Ihr tatsächlicher Puls unter 85% der Zielherzfrequenz fällt. Um den Widerstand während des Trainings zu verändern, drücken Sie die Pfeiltasten. Um das Training zu unterbrechen, drücken Sie die STOP Taste. Um das Training fortzusetzen, drücken Sie START. www.reebokfitness.de 29 COMPUTERANLEITUNG P11: HRC ENDURANCE / Herzfrequenzkontrolle Ausdauer Nachdem Sie P11 gewählt haben, wird das Display das voreingestellte Benutzerprofil anzeigen. Geben Sie Ihr Benutzerprofil ein und das ZEIT Display wird 30:00 anzeigen. Drücken Sie die Pfeiltasten, um die Trainingszeit anzupassen und bestätigen Sie mit ENTER. Das PULS Display zeigt die voreingestellte Herzfrequenz 157 an. Bitte beachten Sie, dass die Zielherzfrequenz entsprechend Ihrem Alter nach Fabrikeinstellungen angepasst wird. Die Fabrikeinstellungen basieren auf 85% der maximalen Herzfrequenz. Die maximale Herzfrequenz wird errechnet als 220 minus Benutzeralter. Beispiel: Bei einem 35 Jahre alten Benutzer sollte die maximale Herzfrequenz bei 185 (220-35 =185) liegen. 85% von 185 ergibt eine maximale Herzfrequenz von 157. In diesem Programm kann der Benutzer die Zielherzfrequenz nicht anpassen. Drücken Sie START, um das Training zu beginnen. Das Programm wird mit dem Widerstandslevel 1 beginnen. Wenn Ihr tatsächlicher Puls nicht die Zielherzfrequenz erreicht, wird der Widerstand alle 30 Sekunden um je 1 Level erhöht bis Ihr tatsächlicher Puls die Zielherzfrequenz erreicht hat. Ziel dieses Programmes ist es, den tatsächlichen Puls des Benutzers auf Höhe oder knapp über der Zielherzfrequenz zu halten. Um den Widerstand während des Trainings zu verändern, drücken Sie die Pfeiltasten. Um das Training zu unterbrechen, drücken Sie die STOP Taste. Um das Training fortzusetzen, drücken Sie START. P12: Personal Das Personal Program ermöglicht dem Benutzer, sein eigenes voreingestelltes Trainingsprogramm zu entwickeln und speichern. Die maximale Trainingsdauer beträgt 60 min. Nachdem Sie P12 gewählt haben, wird das Display das voreingestellte Benutzerprofil anzeigen. Geben Sie Ihr Benutzerprofil ein und drücken Sie dann die MODE Taste, um mit der Eingabe des neuen Programms zu beginnen. Die erste Linie der Belastungsanzeige wird aufleuchten und blinken. Drücken Sie die Pfeiltasten, um den Widerstandslevel der ersten Minute einzustellen. Drücken Sie zur Bestätigung die MODE Taste. Die zweite Linie der Belastungsanzeige wird aufleuchten und blinken. Gehen Sie für die Einstellung der weiteren Minuten wie vorher beschrieben vor. Wenn Ihre Einstellungen beendet sind, drücken Sie START, um das Programm auszuführen. Das Programm wird automatisch für Ihre weiteren Benutzungen abgespeichert. Um den Widerstand während des Trainings zu verändern, drücken Sie die Pfeiltasten. Um das Training zu unterbrechen, drücken Sie die STOP Taste. Um das Training fortzusetzen, drücken Sie START. 30 B 9.5e COMPUTERANLEITUNG Herzfrequenzdiagramm Sie können Ihren Zielpuls folgendermaßen bestimmen: Maximale Herzfrequenz = 220 minus Alter Für die verschiedenen Trainingsziele sollten Sie mit den folgenden Prozenten Ihrer maximalen Herzfrequenz trainieren: Gesundheit/ Fettverbrennung: 50-70% Ihrer max. Herzfrequenz Fitness/ Body Shaping: 70-80% Ihrer max. Herzfrequenz Performance: 80-90% Ihrer max. Herzfrequenz Beispiel: Sie sind 25 Jahre alt und wollen Ihre Fitness verbessern: 220-25 = 195 70% von 195 = 136,5 80% von 195 = 156 Sie sollten mit einer Herzfrequenz trainieren, die zwischen 136,5 und 156 liegt. ! Diese Informationen sind nur Hinweise. Um ihre individuelle Trainingsintensität zu ermitteln oder im Falle von gesundheitlichen Einschränkungen, wenden Sie sich bitte an Ihren Arzt bevor Sie mit dem Training beginnen. www.reebokfitness.de COMPUTER OPERATION A B H C QUICKSTART 1. Press START. 2. Adjust tension. 3 D PROGRAMMEOPERATION 1. Select program and set up the user weight, height,age and target heart rate. Press ENTER to set each value. 2 I 2. Press START to begin the program. 9 6 5 12 8 J 11 TENSION 1 7 4 STOP E F G 10 START MODE K L M ENTER LOAD DENSITY A B SPEED/RPM TIME/WATTS C D PRESET PROGRAMS UP E F STOP MODE G H DISTANCE/PACE CALORIES/PULSE I J PRESET PROGRAMS DOWN K L START ENTER M 31 32 B 9.5e COMPUTER INSTRUCTIONS BUTTONS AND FUNCTIONS STOP: Press STOP to pause the functions during your exercise program. All the data on the display will freeze. Press START to resume the program and all the data displayed will continue until the program has finished. If the STOP button is pressed twice, all the data will return to 0 and the computer will return to POWER ON status. START: Press START to begin your exercise. ENTER: Press ENTER to confirm the setting of program. MODE: Switches the LED window display information between SPEED/TIME/DISTANCE/CALORIES and RPM/WATTS/PACE/PULSE. SPEED: Displays current exercise speed. LEVEL: Displays the current level of intensity of your exercise program. CALORIES: Count up: this measures total calories burned during exercise. Count down: if you have set the number of calories, the computer will count down from that preset number down to zero. This data is a guide and should not be used for medical assessment. Please note when setting a target this is in blocks of 10 from 0 to 990. TENSION (RESISTANCE): Displays the current resistance level from 1 to 20. DISTANCE: Count up: this measures the total distance from 0 to 99.9 Km / Mile. Count down: if you have set the target distance, the computer will count down from that preset distance down to zero as soon as you start exercising. WATT: This displays your current wattage output. TIME: Count up: the computer measures total exercise time from 16:00 up to 99:00. Count down: if you have set the target time, the computer will count down from that preset time down to 0:00. QUICK START: When the bike is in the POWER ON status, press the START button to activate the QUICK START program. DISTANCE and CALORIES will count up when you start exercising. The TIME, PROGRAM: To select one of the User programs, you will need to set up a user profile. To input new information, please follow the procedure below: WEIGHT set up – After the User Code has been confirmed the TIME display will show 68kg/150lbs or the previous setting and begin flashing. Press the UP/DOWN button to adjust the user weight information then press ENTER to confirm. HEIGHT set up – After the WEIGHT has been confirmed the DISTANCE display will show 170cm/67 inches or the previous setting and begin flashing. Press the UP/DOWN button to adjust the user height information then press ENTER to confirm. AGE set up – After the HEIGHT has been confirmed the CALORIES display will show 35 or the previous setting and begin flashing. Press the UP/DOWN button to adjust the user age information then press ENTER to confirm. SEX set up – After the AGE has been confirmed the LOAD DENSITY display will show M (Male) and begin flashing. Press the UP/DOWN button to adjust the user sex to M (Male) or F (Female) then press ENTER to confirm. www.reebokfitness.de 33 COMPUTER INSTRUCTIONS ENGLISH to METRIC conversion: The bike computer display can show both ENGLISH and METRIC information. If you want to change from ENGLISH to METRIC, please follow the procedure below: 1. 2. When the bike is in the power on status, press and hold both the ENTER and STOP buttons for 3 seconds. The LOAD DENSITY display will show a blinking ML. Press the UP or DOWN buttons to switch between ENGLISH (ML) and METRIC (KM) then press the ENTER button to confirm the selection and return to POWER ON status. P1 TO P12 PROGRAMS SELECTION PROCEDURE P1: MANUAL After you have pressed the P1 MANUAL program button, the display will show the default user profile. Input the user profile then the TIME display will show 30:00. Press the UP/DOWN button to adjust the target time then press ENTER to confirm. Press START to begin the exercise program. The TIME will start to count down to 0:00 then the program will stop automatically. To increase or decrease the resistance while exercising, press the UP/DOWN button. To pause the program while exercising, press the STOP button. To resume exercising, press the START button. P2: GOAL After you have pressed the P2 GOAL program button, the display will show the default user profile. Input the user profile then the TIME display will show a blinking 0:00. Press the UP/DOWN button to adjust the target time then press ENTER to confirm. Repeat the same procedure to set up your goal on DISTANCE, CALORIES and TARGET HEART RATE. Press START to begin the exercise program. To increase or decrease the resistance while exercising, press the UP/DOWN button. To pause the program while exercising, press the STOP button. To resume exercising, press the START button. P3: RANDOM After you have pressed the P3 RANDOM, the display will show the default user profile. Input the user profile then the TIME display will show a blinking 30:00. Press the UP/DOWN button to adjust workout time then press ENTER to confirm. Press START to begin the exercise program. The RANDOM program has 50 different RESISTANCE based programs. If while exercising, you find the level of RESISTANCE too intense you can press the UP/DOWN button to decrease the resistance. To pause the program while exercising, press the STOP button. To resume exercising, press the START button. 34 B 9.5e COMPUTER INSTRUCTIONS P4: INTERVAL After you have pressed P4 INTERVAL, the display will show the default user profile. Input the user profile then the TIME display will show a blinking 30:00. Press the UP/DOWN button to adjust the workout time then press ENTER to confirm. The RPM display will show a blinking L1. Press the UP/DOWN button to select the workout intensity level from L1 to L10 then press ENTER to confirm. Press START to begin the exercise program. The aim of an INTERVAL program is to exercise at levels of LOW and HIGH intensity for short periods of time. There is one profile with 10 different levels of intensity. The resistance will be changed automatically while exercising according to the following profile. To increase or decrease the resistance while exercising, press the UP/DOWN button. To pause the program while exercising, press the STOP button. To resume exercising, press the START button. INTERVAL Profile: If the user sets the workout time for more than 20 minutes the computer will average the workout time into 20 sections as the following Resistance Profile table shows, i.e. input 40 minutes and the computer will operate in 2 minute intervals for each section displayed. If the user sets the workout time for less than 20 minutes, the computer will operate in 1 minute intervals for each section displayed until the time runs out, i.e. input 12 minutes and the program will run for 12 sections at 1 minute per section. RESISTANCE PROFILE Intensity Level Resistance Level per Section (20 total) L1 25 100 100 25 25 100 100 25 25 100 100 25 25 100 100 25 25 100 100 25 L2 50 125 125 50 50 125 125 50 50 125 125 50 50 125 125 50 50 125 125 50 L3 75 150 150 75 75 150 150 75 75 150 150 75 75 150 150 75 75 150 150 75 L4 100 175 175 100 100 175 175 100 100 175 175 100 100 175 175 100 100 175 175 100 L5 125 200 200 125 125 200 200 125 125 200 200 125 125 200 200 125 125 200 200 125 L6 150 225 225 150 150 225 225 150 150 225 225 150 150 225 225 150 150 225 225 150 L7 175 250 250 175 175 250 250 175 175 250 250 175 175 250 250 175 175 250 250 175 L8 200 300 300 200 200 300 300 200 200 300 300 200 200 300 300 200 200 300 300 200 L9 225 350 350 225 225 350 350 225 225 350 350 225 225 350 350 225 225 350 350 225 L 10 250 400 400 250 250 400 400 250 250 400 400 250 250 400 400 250 250 400 400 250 P5: X-COUNTRY After you have pressed P5 X-COUNTRY, the display will show the default user profile. Input the user profile then the TIME display will show a blinking 30:00. Press the UP/DOWN button to adjust the workout time then press ENTER to confirm. The RPM display will show a blinking L1. Press the UP/DOWN button to select the workout intensity level from L1 to L18 then press ENTER to confirm. Press START to begin the exercise program. To increase or decrease the resistance while exercising, press the UP/DOWN button. To pause the program while exercising, press the STOP button. To resume exercising, press the START button. www.reebokfitness.de 35 COMPUTER INSTRUCTIONS X-COUNTRY Profile: If the user sets the workout time for more than 20 minutes, the computer will average the workout time into 20 sections as the following Resistance Profile table shows, i.e. input 40 minutes and the computer will operate in 2 minute intervals for each section displayed. If the user sets the workout time for less than 20 minutes the computer will operate in 1 minute intervals for each section until the time runs out, i.e. input 12 minutes and the program will run for 12 sections at 1 minute per section. RESISTANCE PROFILE Intensity Level Resistance Level per Section (20 total) L1 25 65 25 65 25 65 25 65 25 65 25 65 25 65 25 65 25 65 25 65 L2 45 85 45 85 45 85 45 85 45 85 45 85 45 85 45 85 45 85 45 85 L3 65 105 65 105 65 105 65 105 65 105 65 105 65 105 65 105 65 105 65 105 L4 85 125 85 125 85 125 85 125 85 125 85 125 85 125 85 125 85 125 85 125 L5 105 145 105 145 105 145 105 145 105 145 105 145 105 145 105 145 105 145 105 145 L6 125 165 125 165 125 165 125 165 125 165 125 165 125 165 125 165 125 165 125 165 L7 145 185 145 185 145 185 145 185 145 185 145 185 145 185 145 185 145 185 145 185 L8 165 205 165 205 165 205 165 205 165 205 165 205 165 205 165 205 165 205 165 205 L9 185 225 185 225 185 225 185 225 185 225 185 225 185 225 185 225 185 225 185 225 L 10 205 245 205 245 205 245 205 245 205 245 205 245 205 245 205 245 205 245 205 245 L 11 225 265 225 265 225 265 225 265 225 265 225 265 225 265 225 265 225 265 225 265 L 12 245 285 245 285 245 285 245 285 245 285 245 285 245 285 245 285 245 285 245 285 L 13 265 305 265 305 265 305 265 305 265 305 265 305 265 305 265 305 265 305 265 305 L 14 285 325 285 325 285 325 285 325 285 325 285 325 285 325 285 325 285 325 285 325 L 15 305 345 305 345 305 345 305 345 305 345 305 345 305 345 305 345 305 345 305 345 L 16 325 365 325 365 325 365 325 365 325 365 325 365 325 365 325 365 325 365 325 365 L 17 345 385 345 385 345 385 345 385 345 385 345 385 345 385 345 385 345 385 345 385 L 18 365 400 365 400 365 400 365 400 365 400 365 400 365 400 365 400 365 400 365 400 P6: WATT CONTROL After you have pressed the P6 WATT CONTROL button, the display will show the default user profile. Input the user profile then the TIME display will show a blinking 30:00. Press the UP/DOWN button to adjust the workout time then press ENTER to confirm. The RPM display will show the default workout watt setting of 110W. Press the UP/DOWN button to adjust the workout watts then press ENTER to confirm. Press START to begin the exercise program. The resistance will be changed automatically while exercising. The program will change the resistance automatically to match the user watts setting. 36 B 9.5e COMPUTER INSTRUCTIONS To increase or decrease the resistance while exercising, press the UP/DOWN button. To pause the program while exercising, press the STOP button. To resume exercising, press the START button. P7: METs (Metabolic Equivalents) Press the P7 METs button, the display will show the default user profile. Input the user profile then the TIME display will show a blinking 30:00. Press the UP/DOWN button to adjust the workout time then press ENTER to confirm. The RPM display will show a blinking 2.0. Press the UP/DOWN button to select the METs level of the workout from 1.0 – 16.0 then press ENTER to confirm. Press START to begin the exercise program. To increase or decrease the resistance while exercising, press the UP/DOWN button. To pause the program while exercising, press the STOP button. To resume exercising, press the START button. P8: RACING After you have pressed the P8 RACING button, the display will show the default user profile. Input the user profile then the DISTANCE display will show 20 Km (12.5 Mile). This is the target distance in the RACING program. Press the START button to begin the exercise program. During the program the target distance will count down to zero. The first row from top of the LOAD DENSITY LED display shows the distance completed by the computer. The second row from top of LOAD DENSITY LED display shows the distance completed by the user. The user can race against the computer to see who completes the total distance first. To increase or decrease the resistance while exercising, press the UP/DOWN button. To pause the program while exercising, press the STOP button. To resume exercising, press the START button. P9: HRC FAT BURN After you have pressed the P9 HRC FAT BURN button, the display will show the default user profile. Input the user profile then the TIME display will show a blinking 30:00. Press the UP/DOWN button to adjust the workout time then press ENTER to confirm. The PULSE display will show the default target heart rate of 157. Press the UP/DOWN button to adjust the target heart rate. Press START to begin the exercise program. The resistance will start from 1 when you begin this program. If the actual user heart rate does not reach the target heart rate, the resistance will increase by one level every 30 seconds until the actual user heart rate reaches the target heart rate. If the actual heart rate is higher than target heart rate, then the resistance will be reduced by one level every 30 seconds until the actual heart rate meets the target heart rate. To increase or decrease the resistance while exercising, press the UP/DOWN button. To pause the program while exercising, press the STOP button. To resume exercising, press the START button. P10: HRC INTERVAL After you have pressed the P10 HRC INTERVAL button, the display will show the default user profile. Input the user profile then the TIME display will show a blinking 30:00. Press the UP/DOWN button to adjust the workout time then press ENTER to confirm. The PULSE display will show the default target heart rate of 157. Press the UP/DOWN button to adjust the target heart rate. Press START to begin the exercise program. The resistance will start from 1 when you begin this program. If the actual user heart rate does not reach the target heart rate, the resistance will increase by one level every 30 seconds until the actual user heart rate reaches the target heart rate. The resistance will be reduced by one level every 30 seconds when actual user heart rate reaches the target heart rate. Then the resistance starts to increase again when the actual user heart rate decreases to 85% of the target heart rate. www.reebokfitness.de 37 COMPUTER INSTRUCTIONS To increase or decrease the resistance while exercising, press the UP/DOWN button. To pause the program while exercising, press the STOP button. To resume exercising, press the START button. P11: HRC ENDURANCE After you have pressed the P11 HRC ENDURANCE button, the display will show the default user profile. Input the user profile then the TIME display will show a blinking 30:00. Press the UP/DOWN button to adjust the workout time then press ENTER to confirm. The PULSE display will show the default target heart rate of 157. Please note the users TARGET HEART RATE will be adjusted with the user AGE according to the factory setting. The factory TARGET HEART RATE setting is based on 85% of the maximum heart rate. The maximum heart rate is calculated as 220 minus the user age. Example: For a 35-year old user the maximum user heart rate should be 185 (220 – 35 = 185) and 85% of the maximum user heart rate is 157. The user cannot adjust the target heart rate in this program. Press START to begin the exercise program. The resistance will start from level 1 when you begin this program. If the actual user heart rate does not reach the target heart rate, the resistance will increase by one level every 30 seconds until the actual user heart rate reaches the target heart rate. If the actual user heart rate is under the target heart rate, the resistance will increase by one more level every 30 seconds. The aim of this program is to keep the actual user heart at or above the target heart rate. To increase or decrease the resistance while exercising, press the UP/DOWN button. To pause the program while exercising, press the STOP button. To resume exercising, press the START button. P12: PERSONAL The PERSONAL program allows users to design and store their own preset workout programs in the computer. The maximum time duration is 60 minutes. After you have pressed the P12 PERSONAL button, the display will show the default user profile. Input the user profile then press the MODE button to start setting up the new program. The first line of the LOAD DENSITY display will light up and blink. Press the UP/DOWN button to set the resistance level in first minute. After completing the set up for the first minute of resistance, press the MODE button. The second line of the LOAD DENSITY display will start blinking. Follow the same procedure to set up the entire program. When the program set up is complete, press the START button to run the program. The program will automatically be saved in the computer for future use. To increase or decrease the resistance while exercising, press the UP/DOWN button. To pause the program while exercising, press the STOP button. To resume exercising, press the START button. B 9.5e 38 TARGET HEART RATE Heart Rate diagram You can calculate the target-heartrate for your training as follows: Maximum heartrate = 220 minus age For the different trainingtargets you should train with the following percentage of your maximum heartrate: Health/Fat Burning: Fitness/Bodyshaping: Performance: 50 – 70% of your max. heartrate 70 – 80% of your max. heartrate 80 - 90% of your max. heartrate Example: You are 25 years old and want to train for the target Fitness: 220 – 25 = 195 70% of 195 = 136,5 80% of 195 = 156 Your target-heartrate should be between 136,5 and 156 beats per minute. ! This information is for your reference only. To determine your individual training intensity or in case you should have health restrictions please consult your physician before starting exercising. www.reebokfitness.de 39 Green Fitness GmbH Am Schlag 5 65549 Limburg a.d.Lahn e-mail: service@green-fitness.de web: www.reebokfitness.de