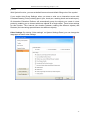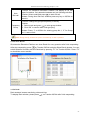
1
IQTouchScreen User Manual (Software Part) Copyright(C) 2003-2013 Returnstar Interactive Technology Group Co., Ltd. Web: www.iqboard.net; www.recoverystar.com Tel: 0086-591-87274373 Fax: 0086-591-87274383 E-mail: master@iqboard.net Returnstar Interactive Technology Group Co., Ltd. Statement This IQTouchScreen User Manual is for IQ Interactive Education Platform V5.1 applied in IQTouchScreen. Use this product strictly according to detailed operation instruction in this manual so as to ensure proper use. Please read this manual carefully before you install this product. The product specification may be subject to change without prior notice. The sample pictures in this User Manual may differ from the real product. Returnstar reserves all rights to charge the fee at anytime for product replacement, revision and update. The information in this manual is subject to regular change without prior notice. Returnstar will make no warranties with respect to this product and disclaims any warranties, whether express or implied, of merchantability and fitness for a particular purpose. Trademark Notice Returnstar, IQ, IQClick and IQBoard are registered trademarks of Returnstar Interactive Technology Group Co., Ltd.. Windows is a registered trademark of Microsoft Corporation. 2 Returnstar Interactive Technology Group Co., Ltd. Contents PART I FOREWORD ....................................................................................... 5 Charpter 1 Product Introduction............................................................................... 5 Charpter 2 Install, Uninstall, Register and Update ................................................. 5 2.1 Install ............................................................................................................................................ 5 2.2 Uninstall ........................................................................................................................................ 6 2.3 Register ......................................................................................................................................... 6 2.4 Update ........................................................................................................................................... 8 PART II .......................................................................................................... 11 IQ INTERACTIVE EDUCATION PLATFORM USER GUIDE ........................ 11 Chapter 1 Start IQ Interactive Education Platform ............................................... 11 Chapter 2 Working Modes ....................................................................................... 12 2.1 Windows Mode ........................................................................................................................... 13 2.2 Board Mode ................................................................................................................................ 15 2.3 Show Mode ................................................................................................................................. 16 2.4 Dual-user Mode .......................................................................................................................... 17 2.5 Multi-user Mode......................................................................................................................... 19 Chapter 3 Use IQ Interactive Education Platform ................................................ 21 3.1 File Management ........................................................................................................................ 21 3.2 Page Management ...................................................................................................................... 24 3.3 Creating Objects ........................................................................................................................ 27 3.4 Manipulate Objects .................................................................................................................... 41 3.5 Operation Review ...................................................................................................................... 45 3.6 Resource Panel ........................................................................................................................... 46 3.7 Assistant Tools ............................................................................................................................ 57 3.8 Video Conference ....................................................................................................................... 69 3.9 System Settings ........................................................................................................................... 71 PART III IQCLICK USER GUIDE .................................................................. 75 Chapter 1 How to Install and Use Hardware ......................................................... 75 1.1 Standard Configuration............................................................................................................. 75 1.2 Specification ............................................................................................................................... 75 Chapter 2 Connect USB Receiver ............................................................................ 80 Chapter 3 IQClick Interactive Response System ................................................... 80 3.1 IQClick Interface ....................................................................................................................... 80 3 Returnstar Interactive Technology Group Co., Ltd. 3.2 Set for IQClick ........................................................................................................................... 81 Chapter 4 IQ Interactive Education Platform (For PPT) ................................... 100 4.1 Start IQ Interactive Education Platform ............................................................................... 100 4.2 Set for IQClick ......................................................................................................................... 101 4.3 Edit Interactive Quiz ............................................................................................................... 101 4.4 Interactive Response (For PowerPoint) ................................................................................. 104 Chapter 5 Query ...................................................................................................... 105 5.1 By Class..................................................................................................................................... 106 5.2 By Student................................................................................................................................. 106 5.3 By Activity ................................................................................................................................ 107 5.4 Operation on Report Forms .................................................................................................... 108 PART IV VERSION & FAQ .......................................................................... 109 Charpter 1 Version Statement ................................................................................ 109 Chapter 2 FAQ......................................................................................................... 109 4 Returnstar Interactive Technology Group Co., Ltd. Part I Foreword Charpter 1 Product Introduction IQ Interactive Education Platform is a next generation software platform for demonstration and teaching. It seamlessly connects with all kinds of interactive teaching equipments, for example, all kinds of interactive whiteboard, touch teaching machine, interactive projection module, interactive projector, document camera, lesson preparing machine and so on. With IQ Interactive Education Platform, various powerful functions, such as freehand writing, annotation, handwriting recognition, charts, screen record, animation, page show, interactive response, interactive exam, vote, video conference, are accessible for teachers and demonstrators. With IQ Interactive Education Platform, it becomes so easy to create a vivi and wonderful class and demonstration. Powerful software: Besides rich options for response mode in interactive response and interactive exam, IQ Interactive Education Platform also provides you with all tools and resource library in IQBoard Software V5.1. Best effect: With IQ Interactive Education Platform, students are not passive listeners as before. Interaction and enthusiasm is increased for both teaching and learning. Easy to use: Lessons and tests can be prepared by both IQ Interactive Education Platform and PowerPoint. After lessons, IQ Interactive Education Platform helps teachers free from time-consuming task with test paper auto checking and marking. Charpter 2 Install, Uninstall, Register and Update 2.1 Install IQ Interactive Education Platform comes with IQTouchScreen. Please skip this charpter if there is no need to reinstall it. 2.1.1 Install IQ Interactive Education Platform Double-click “IQ Interactive Education Platform V5.1” in the installation CD (You can copy this software to an USB drive and plug it into IQTouchScreen for installation), then follow the on-screen instruction to install the software. Note: During installation, the system will prompt a Hardware Installation window. Click “Continue anyway” to finish installation. Video Codec 9 will be also auto-installed by this step. 5 Returnstar Interactive Technology Group Co., Ltd. 2.1.2 Install Resource Library Double-click “IQBoard Software Resource Library V5.0 (Full Version)” in the installation CD, then follow the on-screen instruction to install the Resource Library. 2.2 Uninstall 2.2.1 Uninstall IQ Interactive Education Platform 1. Three ways to start uninstallation of IQ Interactive Education Platform: 1) Click “Start > Programs > IQ Interactive Education Platform V5.1>Uninstall”; 2) Open “Control Panel”, select “Add/Remove Programs”, and in the list of Currently Installed Programs, select “IQ Interactive Education Platform V5.1”, then click “Remove”; 3) Click “IQ Interactive Education Platform V5.1” on the installation CD again. And then follow the on-screen instruction to uninstall the software. Note: You can also choose Repair in Unstallation window to repair errors in the most recent installation. 2.2.2 Uninstall Resource Library 1. Three ways to start uninstallation of IQBoard Software Resource Library: 1) When you uninstall the IQ Interactive Education Platform, the system will prompt you whether to uninstall the Resource Library at the same time; 2) Open “Control Panel”, select “Add/Remove Programs”, and in the list of Currently Installed Programs, select “IQBoard Sofware Resource Library V5.0 (Full Version)”, then click “Remove”; 3) Click “IQBoard Sofware Resource Library V5.0 (Full Version)” on the installation CD again. And then follow the on-screen instruction to uninstall the Resource Library. 2.3 Register 2.3.1 Trial You can download IQ Interactive Education Platform from our website http://www.iqboard.net. After you have finished the downloading and software installation, then you can try it out immediately. IQ Interactive Education Platform has 30 trial times, which are counted by the 6 Returnstar Interactive Technology Group Co., Ltd. times you start the software. After the trial times have run out, please register if you want to continue using the software. 2.3.2 Register We provide four ways to register IQ Interactive Education Platform: Product SN, USB Key, Hardware Verification, and Receiver Verification such as IQClick. Note: Registration way is optional according to customers’ need. 2.3.2.1 Register by Product SN When you start the unregistered IQ Interactive Education Platform, the following Register window will appear. You can also open the Register window by selecting “Register” on the taskbar icon. Note: If what you buy is an authorized version for schools and other education institutions, then after successful registration, the name of the school or institution will be shown on the Start interface, About window, Print Preview window, Print document and output files except for CDF file. Input Product SN (which is acquired when purchasing the software), User Name, Telephone, E-mail, and Country in the Register Window, then click “Register” to finish the registration. 7 Returnstar Interactive Technology Group Co., Ltd. After registration, the software will prompt how many computers you can still register the software on. If you can‟t register the software on computers up to the amount stipulated on the software license, the reasons may be: 1. This SN has been used by other people; 2. The retailers sell illegally, please appeal to consumer organization for compensation. 2.3.2.2 Register by USB Key or Receiver If you want to register by USB Key, please plug the accessory USB Key or Receiver into any free USB port on your computer. If no Register window appears when you start the IQ Interactive Education Platform, the registration is successful. In case your 30 trial times have run out, the computer will prompt you to register every time you start the software, here you can also plug the USB Key or Receiver before starting the IQ Interactive Education Platform for registration. Note: If you remove USB Key or Receiver when using the Platform, prompt will popup as below. 2.3.2.3 Register by Hardware Verification IQ Interactive Education Platform V5.1 can be registered by connecting with any IQBoard, except virtual series. If you want to register by Hardware Verification, please install relevant whiteboard driver and connect whiteboard with your PC. If no Register window appears when you start the IQ Interactive Education Platform, the registration is successful. In case your 30 trial times have run out, the computer will prompt you to register every time you start the software, here you can also connect whiteboard with your PC before starting the IQ Interactive Education Platform for registration. 2.4 Update After starting IQ Interactive Education Platform, the system will automatically check whether the update package is available. If so, it will prompt you to update. Operation is as follow: 1. Click “Yes” to update the software, click “No” if you don‟t want to update now. You can also click the taskbar icon, and select “Update” to enter Update window. If it is the first time you update the software, you may need to enter your user information. 8 Returnstar Interactive Technology Group Co., Ltd. Note: 1. Only the registered IQ Interactive Education Platform can be updated. 2. If the update service has expired, you should pay the update fee to continue updating the software. 3. When updating the software, if the software prompt “You cannot update unregistered software”, please uninstall the software and register again, then update the software. 2. Click “Update” on Update window to download update package. 3. After the downloading is finished, the updating process will automatically begin. If there is no need to update IQ Interactive Education Platform, click “Exit” to exit this window. 9 Returnstar Interactive Technology Group Co., Ltd. 10 Returnstar Interactive Technology Group Co., Ltd. Part II IQ Interactive Education Platform User Guide Chapter 1 Start IQ Interactive Education Platform To start IQ Interactive Education Platform, operation is as follow: 1. Double-click the “IQ Interactive Education Platform” desktop shortcut; 2. Click “Start>Programs> IQ Interactive Education Platform V5.1. IQ Interactive Education Platform provides teachers with a temporary user account for starting temporary activity without setting class information. You can add other user accounts from “Teacher Settings” after login by administrator. Note: Default User Account for administrator is “administrator”, password is “123456”. After first login, please change and keep password in time. 11 Returnstar Interactive Technology Group Co., Ltd. Floating Tools Toolbar The Floating Tools toolbar enables you to quickly access frequently used tools and features. Unlike the traditional toolbar, Floating Tools toolbar is capable of being anywhere on the screen and being moved. Switch Floating Tools toolbar’s position: Wherever the Floating Tools toolbar is, there is a position switching arrow on the contrary side. Click this arrow to move the Floating Tools toolbar from one side to the other. This function allows you to access the Floating Tools toolbar conveniently on large screen. Dock Floating Tools toolbar: Move the Floating Tools toolbar to any edge of the screen and the toolbar will automatically hide itself. To show the toolbar, move the cursor to the edge to which the toolbar is docked, or click button. Chapter 2 Working Modes IQ Interactive Education Platform has 3 main working modes: Windows Mode, Board Mode and Show Mode. In Windows Mode, you can perform normal computer operation, annotate on screen in digital ink, and use some basic tools in Floating Tools toolbar. Board Mode displays whiteboard pages on screen. If your courseware contains animation effects or interactive questions, you can use Show Mode to display it. 12 Returnstar Interactive Technology Group Co., Ltd. 2.1 Windows Mode You can enter Windows Mode by clicking button on the Floating Tools toolbar or minimizing the main window of IQ Interactive Education Platform. Followings are some useful functions in Windows Mode: Annotate on screen: Select any drawing tool on the Floating Tools toolbar to enter annotating mode, an annotating frame will appear around the screen. You can annotate on screen in digital ink. Operate Windows: When you are not in annotating mode, you can perform normal computer operation as you usually do with mouse. In annotating mode, you can also perform normal computer operation by clicking button on the Floating Tools toolbar. Clear annotation: Click button at lower right corner, all annotations created by IQ Interactive Education Platform will be cleared. Auto-clear annotation: All annotations created by IQ Interactive Education Platform will be auto-cleared when you switch or shut down the window. To enable this function, please select “Automatically Clear Desktop Annotation” in “Other Settings” from “System Settings”. This function is selected by default. 13 Returnstar Interactive Technology Group Co., Ltd. Capture Screen: Click button at lower right corner, you can capture the current screen to whiteboard page in Board Mode. All annotations created by IQ Interactive Education Platform can be edited again. Save annotation to Office document: In case you have opened a Word, Excel or PowerPoint document and made your annotation directly on it, you can click lower right corner to save your annotation to this Office document in original form. button at Go to previous or next page in Office file: You can click or button on the Floating Tools toolbar to go to the previous or next page for Office file you are showing. Note: By default, the and buttons are not displayed on the Floating Tools toolbar, you can add them manually through “System Setting > Toolbars”. Exit annotating: Click button at lower right corner to close the annotating frame. 14 Returnstar Interactive Technology Group Co., Ltd. 2.2 Board Mode Click button on the Floating Tools toolbar to enter Board Mode including Full Screen Mode, Window Screen Mode and Frame Screen Mode. In this mode, there‟s a bin in the bottom right corner of the whiteboard page. You can drag an object from the page into the bin to delete it, or select an object then click the bin to clean it. Window Screen Mode Start IQ Interactive Education Platform, and it will automatically enter into Window Screen Mode. You can use tools in main window and Floating Tools toolbar under this mode. Frame Screen Mode You can use tools in main window and Floating Tools toolbar under this mode. To enter Frame Screen Mode, please select “View > Frame Screen”. 15 Returnstar Interactive Technology Group Co., Ltd. Full Screen Mode Click on Common Tools toolbar or Resource Panel, or select “View > Full Screen” to enter into Full Screen Mode. Under this mode, you can use tools in the Floating Tools toolbar. To exit full screen, click at lower left corner of the screen. 2.3 Show Mode If your courseware contains animation effects or interactive questions, you should present the courseware in Show Mode. During showing, you can do annotation with drawing tools on Floating Tools toolbar or do other auxiliary operations, but you cannot manipulate the objects, e.g. copy, paste and move. 16 Returnstar Interactive Technology Group Co., Ltd. To customize Show Mode, please click “Show Mode > Set Up Show” on Menu Bar. Page Settings: You can choose to show all pages or appointed page(s). Loop Show: Courseware will loop continuously until you press “Esc” Key. Auto Scroll: You can set interval time of turning page automatically. Turn Page: Click or at lower left corner to switch to previous or next page. You can select “One-click on Page to Play Animation” to turn page by single clicking on blank part of page. Note: 1. By default, all pages will be shown from beginning to end once without Loop Show and Auto Scroll. 2. Interval time for Auto Scroll is 1-99 seconds. 2.4 Dual-user Mode 1. To enable Dual-user mode, please select “Tools > Dual user” on Menu Bar, or click on Common Tools toolbar. Dual-user Mode Guide 17 Returnstar Interactive Technology Group Co., Ltd. Prompt: Under Dual-user Mode (Full screen), two users can use select, pencil, brush pen, pen, washing brush, board brush, eraser, line, shape and fill simultaneously. Dual-user Mode (Split Screen) Dual-user Mode (Full Screen) 2. In Dual-user Mode, two pens can write on the board simultaneously; however, Teacher Pen and Student Pen can only control its own Floating Tools toolbar respectively. The handwriting will be recognized automatically while Student Pen uses “Handwriting recognition”. The eraser (except “Erase All”) can clean the digital ink of the other when such writing process is paused. When choosing “Erase All”, Teacher Pen can clean all the digital ink of both Teacher Pen and Student Pen, while Student Pen can only clean its own digital ink. In Dual-user Mode, the mouse can only control teacher‟s Floating Tools toolbar. The Student Pen can not control the floating window or other tools, such as timer or screen tools. Left hotkeys which teacher can use in Dual-user Mode: Select, Pens (double-click to change between four colors), Eraser, Application Shortcuts, Tool Shortcuts and Start (show minimized teacher‟s Floating Tools toolbar); Right hotkeys which student can use in 18 Returnstar Interactive Technology Group Co., Ltd. Dual-user Mode: Select, Pens, Eraser and Start (show minimized student‟s Floating Tools toolbar). 3. To exit Dual-user Mode: You have to use Teacher Pen to click on the button at the lower left corner of the board. If Student Pen has been manipulated in Dual-user Mode, when Teacher Pen wants to quit Dual-user Mode, a prompt window will popup like below: 2.5 Multi-user Mode Under the Board Mode, multi-users can write simultaneously, and recognize gestures by IQTouchScreen such as Zoom, Rotate, etc.. Before you use Multi-user Mode, please make sure: 1. Multi-touch is available in the whiteboard or touch screen you are using. 2. The operation system you are using is WIN7 or WIN8. 3. IQ Platform has been registered by a multi-user SN or USB Key. To use Multi-user Mode: 1. Activate Multi-user Mode as means mentioned above, then enter into Board Mode or Full Screen Mode in IQBoard software. 2. Select a Pen from Drawing Tools toolbar, such as Pencil, Brush Pen, Pen, Board Brush, Washing Brush and Creative Pen, then multi-users can write simultaneously. 3. You can Rotate or Zoom one or several objects selected in the whiteboard page by Gesture Recognition in Windows OS. 4. Tick the Inertial Movement under “System Settings > Other Settings”, the object will speed up automatically according to the moving speed when moving the object. 19 Returnstar Interactive Technology Group Co., Ltd. Multi-user Mode Tips: Multi-users should use the same pen tool to write in Multi-user Mode. Gesture Recognition (Zoom and Rotate) Zoom Rotate Inertial Movement Select and pull the object to move it forward automatically. 20 Returnstar Interactive Technology Group Co., Ltd. Chapter 3 Use IQ Interactive Education Platform 3.1 File Management New Open : Create a new file. : You can open .cdf, .cdp, .pdf, .doc, .ppt, .xls, .docx, .pptx and .xlsx files. Note: You can also drag the video files and office documents (.doc, .docx, .ppt, .pptx, .xls, .xlsx) directly into the whiteboard page to open. Close: Click “File > Close” on Menu Bar” to close current file. Save/Save as : You can save current file in many formats, including .bmp, .emf, .wmf, .pdf, .cdp, .jpg, .html, .gif, .png, .tif, .doc, .ppt, .xls, .docx, .xlsx, .p ptx, .cdf. File will be named by current time automatically. 21 Returnstar Interactive Technology Group Co., Ltd. Note: You can only save an existing file as to .bmp, .emf, .wfm, .jpg, .gif, .png and .tif formats. In Windows System, only under Administrator account can you save .doc, .xls, .ppt, .docx, .xlsx and .pptx files. Save as Template: If the layout of current file may be frequently used in future, you can also save it as template, which can be retrieved from Template tab. Click “File > Save as Template” on Menu Bar to save current file as template. Multiple Tabs: You can creat or open several files at the same time in IQBoard Software, and click tabs to swtich among them. 22 Returnstar Interactive Technology Group Co., Ltd. Encrypt a File: You can encrypt .cdf file. The encrypted file cannot be opened without correct password. Click “File > Encrypt” on Menu Bar to encrypt current file. Note: Password can be any character (case sensitive), with length up to 8 characters. Please be sure to remember the password after setting. Our company does not provide any service to crack any encrypted file. Auto-save: Auto-save function can minimize your data loss in case of unexpected problems. Click “File > Auto-save” on Menu Bar to set Auto-save function. 23 Returnstar Interactive Technology Group Co., Ltd. Print: You can print a file in IQ Interactive Education Platform. Click “File > Printer Options” to set printer, then click “Print” or “Print Current Page” to print the pages you need. Send: Click “File > Send Mail” on Menu Bar or “ > Send Mail” on Floating Tools toolbar to send current file as e-mail attachment in .cdf, .pdf, .ppt formats. 3.2 Page Management Insert Delete : Insert a blank page after the current one. : Delete current page. Copy/Cut/Paste: Select the thumbnail of the page you want to copy/cut/paste on Page tab. Clone: Click the menu arrow on page thumbnail and select “Clone Page” or right-click on page thumbnail and select “Clone Page”. The cloned page appears immediately after the current page. 24 Returnstar Interactive Technology Group Co., Ltd. Clear: Clear all content on current page Lock/Unlock a Page: During Dual Page Display, you can select a thumbnail of the page you want to lock, and click its menu arrow to select “Lock Page”. When you switch pages, this page is locked, while the other one can be switched in Dual Page Display mode. To unlock a page, please select “Unlock page” in related thumbnail‟s menu arrow. Insert Page Number: Click “Insert > Page Number” on Menu Bar, then you can set page number position and starting page number in Insert Page Number window appears. 25 Returnstar Interactive Technology Group Co., Ltd. Display: Go to previous or next page. Move : A whiteboard page can be infinitely extended. You can move a page to get more space or to display any part of the page on screen. Return : Return a moved page to its original position. Zoom: By default, whiteboard pages are displayed in their actual dimensions. But you can use the zoom tools to enlarge or reduce the size of whiteboard page. 1) Zoom in/ Zoom out : After the mouse pointer becomes a magnifier, click the page to enlarge or reduce it. When you click , you can also hold and drag a square to zoom in an area. 2) Restore: Restore page to 100%. You can also select from 50% to 200% from drag down menu. 3) Fit Page: Make the entire page fit your display. Background : You can specify a single color, gradient, grid pattern, or an image (.jpg, .jpeg, .wmf, .emf, .png, .bmp) as page background. Save: IQ Interactive Education Platform can save every single whiteboard page in .cdf 26 Returnstar Interactive Technology Group Co., Ltd. and .cdp formats. You can also save whiteboard page in other formats, including document format (.doc, .ppt, .xls), webpage format (.html), and picture format (.bmp, .emf, .wmf, .jpg, .gif, .png, .tif,). Object in .cdf file can be re-edited. Save a Page as Template: If the layout of current whiteboard page may be frequently used in future, you can also save it as template, which can be retrieved in Template tab. IQ Interactive Education Platform will name the file by current time. 3.3 Creating Objects 3.3.1 Freehand Drawing Tools Freehand Drawing Tools are the most frequently used tools, with which you can annotate, write and draw on the interactive screen. Seven Freehand Drawing Tools are provided, including Pencil , Brush Pen , Pen , Washing Pen , Broad Pen , Creative Pen and Magic Pen . You can adjust each property if necessary. Objects drawn by Magic Pen will fade out in 8 seconds. Magic Pen also has tool recognition to open Reveal Screen, Spotlight, Magnifier and even to delete an object by drawing given shapes. 27 Returnstar Interactive Technology Group Co., Ltd. Note: 1. Broad Brush is different from other Freehand Drawing Tools in color settings. There are 6 color buttons in total. By selecting a color for each color button, you will get a combined writing effect of 6 colors. 2. If the background color is the same with pen color, software will turn pen to opposite color. 3. In Windows Mode, transparency of drawing tools is 0%. You can customize the properties of Freehand Drawing Tools as follow. Color, Thickness, Transparency: Double-click any color, thickness or transparency button or click the menu arrow of sections to adjust them. Arrow Effect: Several arrow effects are provided for Pencil tool, Creative Pen tool and Magic Pen tool. Click the menu arrow of Arrow section and then select the arrow effect you want from Arrow Effect list. You can also click to customize your own line styles. Shape Recognition: Pencil tool also has Shape Recognition function. If you enable this function, the stroke drawn by Pencil will be automatically revised to Solid Line, Arc, Circle, Rectangle, Triangle or Polygon, and adjacent Solid Lines will be automatically combined to polygons. To enable this function, click corner point to alter the shape. on Properties toolbar. You can click and drag any 28 Returnstar Interactive Technology Group Co., Ltd. Tool Recognition: Magic Pen tool also has Tool Recognition function. If you enable this function, you can open Spotlight, Magnifier, Reveal Screen and Object Eraser with Magic Pen. Drawing a circle to open Spotlight. Drawing a square to open Magnifier. Drawing a left or right arrow to open Reveal Screen (Left-right). Drawing an up or down arrow to open Reveal Screen (Top-bottom). Drawing an inclined arrow to open Reveal Screen (All-directions). Scribbling on an object to clear it. 3.3.2 Lines Different kinds of straight lines are provided. Properties of lines can also be adjusted. Color, Thickness, Transparency: Double-click any color, thickness or transparency button or click the menu arrow of sections to adjust them. 29 Returnstar Interactive Technology Group Co., Ltd. Line Effect: Click the menu arrow of Line section and then select the line effect you want from list. You can also click to customize your own line styles. Show Length: When you add a line to your whiteboard page, you can display the line length. Please click on Properties toolbar and then select “Show Length”. You can also set the unit and decimal digits of length from “Length Settings”. 3.3.3 Shapes Different kinds of 2D and 3D shapes are provided. You can customize the properties of Shapes tool. 30 Returnstar Interactive Technology Group Co., Ltd. Color, Thickness, Transparency: Double-click any color, thickness or transparency button or click the menu arrow of sections to adjust them. Shape Style: 3 shape buttons are provided on Properties toolbar of Shapes tool, including Rectangle, Triangle and Circle by default. To apply other shapes, please double-click any shape button or click the menu arrow of Shape section to select one. Other Settings: Click on Properties toolbar to do more other settings for your shapes. 31 Returnstar Interactive Technology Group Co., Ltd. 3.3.4 Functions More than 20 kinds of function graphs are provided. Click Function tool to choose one of the available function graphs, then click where you want to place the function graph on screen. You can click on the area of function curve to select only the function curve; you can also click on the area of coordinate system to select the whole function graph. Functions also can be customized. Color, Thickness, Transparency: Double-click any color, thickness or transparency button or click the menu arrow of sections to adjust them. Function Expression: Various function expressions are provided in Function section. To customize your own function expression, please click “Customized” to define the function, domain, scale value and other settings. 32 Returnstar Interactive Technology Group Co., Ltd. Share Coordinate System: You can put all functions together on one coordinate system by clicking at the bottom of the Properties toolbar. If Share Coordinate System is selected already, you can click it again to cancel. 3.3.5 Point to Point This tool allows you to create a polygon or a polyline. You can switch between then from on Properties toolbar. To create a polygon or a polyline, please click Point to Point tool, and click different points to create a polygon or polyline. Double-click the last point to end the polygon or polyline. You can also overlap the last point with the first one to make a shape. All the points can be removed. 33 Returnstar Interactive Technology Group Co., Ltd. Point to Point tool also can be customized. Color, Thickness, Transparency: Double-click any color, thickness or transparency button or click the menu arrow Other Settings: Click of sections to adjust them. on Properties toolbar to do more other settings for it. Note: Show Length is available for polyline only. 3.3.6 Table To create a table, please click , and set frame color, thickness, transparency, row number and column number in second-level menu. Then create a table by pressing where you want to place the table on screen and dragging until the table is in the size you want. 34 Returnstar Interactive Technology Group Co., Ltd. 3.3.6.1 Customize Table Color, Thickness, Transparency: Double-click any color, thickness or transparency button or click the menu arrow of sections to adjust them. Row and Column Number: You can select row and column number from 1 to 20. Please enter numbers you need directly, or adjust the numbers by the arrow buttons. 3.3.6.2 Table Operation After selecting a cell, the following operations can be available: Input Text: You can also double-click the cell to insert text for it. Insert Row/ Insert Column: A new row or column will appear next to the current one. Delete Row/Delete Column: The selected row or column will be deleted. Split: Enter row and column numbers you want to split a cell to and split it. Merge: Select several cells to merge them. Move: Click the square at the upper left corner of the table, and then drag the table to a 35 Returnstar Interactive Technology Group Co., Ltd. different position on the page. New Table: If you select multiple cells and drag them to a different position on the page, you will create a new table consisting of the selected cells and their contents. Add Objects to Cell: Select the target object and drag it to the table cell. Move Object from Cell: Select the target object then drag it from one cell to another, or to the page. 3.3.7 Fill You can fill color, gradient, pattern or image (bmp, jpg, gif, png, emf, wmf, ico) to any closed geometry. Color Pattern Gradient Image 36 Returnstar Interactive Technology Group Co., Ltd. Fill with Color: Six colors are provided by default. To apply other color, please double-click any color fill button, or click the setting button beside, then select the color you want from Color list. Fill with Gradient: Six gradients are provided by default. To apply other gradient, please double-click any gradient fill button, or click the setting button beside, then set the gradient in Gradient Editor. To add a new gradient, please click below the gradient bar to define color stop(s). You can also select a gradient direction. Note: To delete an intermediate color stop, simply right-click the stop. Fill with Pattern: Six patterns are provided by default. To apply other pattern, please double-click any pattern fill button, or click the setting button beside, then set the foreground color and background color. Fill with Image: Double-click the image fill button, or click the setting button beside to select an image file to fill. 37 Returnstar Interactive Technology Group Co., Ltd. Clear the Fill Effect: Click button, then click the geometry to clear the fill effect. 3.3.8 Eraser Five erasing methods are provided, including Normal Erasers, Circle Eraser, Area Eraser, Object Eraser and Erase All. Normal Erasers : Normal Erasers are used for clearing the digital ink created by Freehand Drawing Tools. There are six Normal Erasers in different sizes and shapes. Object Eraser Circle Eraser : Select “Object Eraser” and click an object to clear it. : Select “Circle Eraser” and draw a circle around the object(s) you want to erase. Area Eraser : Select “Area Eraser” and drag a rectangle around the object(s) you want to erase. : Select “Erase All” and click on a page to remove all objects from the page. Erase All 3.3.9 Text Select and click where you want the text to start on the page. Text Box and Font toolbar will appear. 38 Returnstar Interactive Technology Group Co., Ltd. 3.3.9.1 Input Text You can input text through On-screen Keyboard or Handwriting Recognition . You can also import text from .txt file to Text Box IQ Interactive Education Platform can recognize your handwriting as Letter, Number or Symbol. You can click on Handwriting Recognition toolbar, and select the recognition type. 3.3.9.2 Change Text Format Change the text format, including font type, font size, bold, italic, underline, color and others, through Font toolbar if necessary. You can also annotate phonetic symbols for text in English by clicking . Note: If you are teaching Chinese in your class, you need change the interface language to Chinese first. Get Text tool the same way and then you can click to annotate phonetic symbols (Pinyin) for text in Chinese. However, you need to install Microsoft Pinyin IME 2003 to enable this function. 3.3.9.3 Edit Text 39 Returnstar Interactive Technology Group Co., Ltd. Right-click on the selected text to copy, cut, paste, delete, select all or undo the text. 3.3.10 Pie Chart and Bar Chart Select or , then click where you want to put Pie Chart or Bar Chart on screen. In above setting windows, you can set Name, Value and Transparency for the charts You can also set Title, 3D Effect, Background Color, and Style for Pie Chart, and Title, Category (X) Axis, Value (Y) Axis, Background Color, 3D Effect, and Style for Bar Chart. For Bar Chart, you can modify the magnitude of each bar directly; for Pie Chart, you can modify the magnitude of each sector and separate one or more sectors from Pie Chart. You can also use Fill tool to change the color of each bar or sector. 3.3.11 Formula Editor Formula Editor allows you to add complicated math formula or chemistry equation on the whiteboard page. Select and click on the page, then Formula Editor window will appear. 40 Returnstar Interactive Technology Group Co., Ltd. Enter formula in Formula Edit Box. Click on the page, and the formula you edit will appear. Note: In Windows 7 System, you can click in Formula Editor to enable Formula Recognition function, which allows you to enter formula through handwriting. 3.4 Manipulate Objects 3.4.1 Marquee Handles Frequently used edit tools will be provided in Marquee Handles according to the object you select. You can choose from these tools to edit the object. 41 Returnstar Interactive Technology Group Co., Ltd. 3.4.2 Right-Click Menu Copy , Cut , Paste , Clone: You can copy, cut, or clone any object on a page, and paste it on the same or different pages. Infinite Cloner: You can clone one or more objects as many times as you want. Delete: Delete one or more selected objects. Select All: Select all the objects on the page. Rotate Object: When an object is selected, a selection rectangle appears around the object. You can find a Rotation Handle above the rectangle. By default, the object rotates around its central point. You can define another base point by dragging the central point. 42 Returnstar Interactive Technology Group Co., Ltd. Center: You can show or hide center point of object. Resize Object: You can select one or several objects, and drag the Resize Handle to increase or reduce the size(s). Move Object: You can move objects to another position on the same page. You can also move objects to another page. To move the object to another position on the same page, please select one or more objects, and drag the object(s) to a new position on the page. To move objects to another page, please select one or more objects, then drag the object(s) onto the thumbnail of another page on the Page tab. Group Objects: You can group several objects together, and manipulate or edit them as 43 Returnstar Interactive Technology Group Co., Ltd. though they were a single object. Note: You can not group Label Tools, Function Tools, Math Tools, Pie Chart and Bar Chart. Arrange Objects: If objects overlap on a page, you can change the stacking order, including “Bring to Front”, “Send to Back”, “Bring Forward”, or “Send Backward”. Align Objects: You can align selected objects to bottom, top, left, right or center. Layout Objects: Auto Layout and Customized Layout are available. Mirror Object: You can get a mirror object quickly by selecting “Mirror Left”, “Mirror Right”, “Mirror Up” or “Mirror Down”. Show/Hide Object: You can choose to show or hide object(s). Insert Annotation: IQ Interactive Education Platform allows you to add your own notes and annotations to an object. Inserted annotations can be re-edited or removed. Flip Object: You can flip object horizontally or vertically. Insert Object to Background: You can insert one or more selected objects to background. The object(s) inserted to background cannot be manipulated and edited. Save Object: You can save one or more objects as image files in .bmp, .png, .gif, .jpg, .emf, .wmf, or .tif format. Lock Object: You can lock an object to prevent its modification, movement or rotation. You may also unlock it at any time. Add Hyperlink to Object: You can hyperlink any object on the whiteboard page to a web page, or a file on your computer. Right-click the selected object, then select “Hyperlink”, Hyperlink window appears as follow: Then you can hyperlink the object to a file, a web page, a FTP, or a website (for e.g. www.iqboard.net). If you want to add sound effect when launching hyperlink, please browse and select an audio file for Sound Effect section. You can choose to open the link by clicking the corner icon or the object itselft. 44 Returnstar Interactive Technology Group Co., Ltd. Review Operation: When you are creating and manipulating objects, IQ Interactive Education Platform automatically records your operation, and allows you to review them anytime. Review Freehand Drawing: You can review the stroke order for objects created by Freehand Drawing Tools. You can choose “Loop” from settings icon to review the freehand drawing repeatedly. Change Object Properties: You can select an object on the page and change its properties. 3.5 Operation Review When you are creating and manipulating objects, IQ Interactive Education Platform 45 Returnstar Interactive Technology Group Co., Ltd. automatically records your operation, and allows you to review them anytime. Play/Pause: Play or pause your operation record on the whiteboard page. When you pause operation record, you can make annoations on the page. Stop: Stop playing your operation record. Speed: Set the playing speed. Larger the multiplication is, higher the speed will be. Play Current Page Only: Play your operation record on current page only. Play from Current Page: Play your operation record from current page to the last page. Loop: Repeat playing when selected. Toolbar Position: Adjust the position of Operation Review toolbar. 3.6 Resource Panel Resource Panel consists of 7 tabs, including Page, Subject Tools, Template, Resource Library, Search Tool, Local and Courseware Making Panel. 3.6.1 Page Page tab provides 2 preview modes: List Mode and Tile Mode. To rename the page, double-click the title under the page thumbnail, and then enter a new name. 46 Returnstar Interactive Technology Group Co., Ltd. 3.6.2 Subject Tools In Subject Tools tab, you can find numerous useful interactive tools categorized by subject. From right-click menu, you can delete, rename, import file or floder, add a new folder. You can also drag the object directly into a folder to save it. To add a subject tool to the page, you can select a subject tool thumbnail and click on the page, then the subject tool will appear on the page; you can also select a subject tool thumbnail and drag a rectangle on the whiteboard page, then the subject tool will appear on the page. Note: 1. Subject Tools tab is available only after IQBoard or a USB Key is connected to your computer. 2. You can only delete and rename the self-added subject tools or folders. 3.6.3 Template Template tab offers various templates in cdf format. From right-click menu, you can also delete, make a new folder, import file or folder, export folder for the template. 47 Returnstar Interactive Technology Group Co., Ltd. To open a template, please select the template thumbnail you want to insert to the whiteboard in the preview area, and click on the page (you can also drag the template onto the page), then the relevant template will be inserted into next page. Note: Template has user management function. Besides the dafualt templates, each user can only see the templates saved under his or her account. 3.6.4 Resource Library Resource tab provides huge amount of pictures and multimedia resources for you to use in the presentation. You can also save a created object into Resource Library. Three ways to add a picture or multimedia resource to whiteboard page: 1. Select a resource thumbnail and click on the page, then the resource will be inserted into the page; 2. Select a resource thumbnail and drag a rectangle on the whiteboard page, then the resource will be displayed according to the size of the rectangle. When dragging the object, you can press “Shift” key to keep its aspect ratio; 3. Select a resource thumbnail and drag it onto the page, then the resource will be inserted into the page. Note: When you want to use picture resource in .edf format from Favorite folder, only the first and third methods are available. You can take annotations on the flash or video inserted into the page. When you do the annotation, the flash or video will pause to play; the annotation will be moved to next layer when the flash or video starts. To play the audio/video resource in the page: You can set a video clip to play, or capture an image from the video and insert it into page. To set a video clip, please click “Video Clip” button, then a time bar and a list will show. Please drag the time bar to set the beginning and ending points, and click “Clip”, then clipped videos will be added into the list. You can rename or delete these clipped videos from the list. Please select a clipped video and click “Play” to watch it. “Play in Order” is available. 48 Returnstar Interactive Technology Group Co., Ltd. Note: 1. You can only delete and rename the self-added folders. 2. Resource Library has user management function. Besides the dafualt resources, each user can only see the resources saved under his or her account. 3.6.5 Search Tool By Search Tool, you can translate a word or sentence into target language, look it up in dictionary, and search images for it. It also allows you to insert search results into the page. Translation/Dictionary: Enter the word or sentence you want to translate or look up in dictionary, and choose the source language and target language, then click “Search”. You can insert search results into current page by clicking “Insert to Current Page”.The search result inserted into page and be re-edited by double click it. Gallery: Enter the word you want to search and click “Search”. You can select “Open from Webpage” to show search results in a webpage. If you want to insert an image in search results into page, you can click and drag it to any blank part of the page. 49 Returnstar Interactive Technology Group Co., Ltd. 3.6.6 Local Local tab allows you to add EDF, BMP, EMF, WMF, TIF, JPG, GIF, PNG, CDF, SWF, AVI, WMV, ASF, DAT, MPG, MPEG, RM, RMVB, MOV, VOB and FLV files in your computer to the whiteboard page. For a file in other format, you can double-click the thumbnail to open it. To insert a file into the page as an object, please select relevant file in the preview area, then click on the page or drag the file onto the page. Note: For a picture in BMP, JPG, JPEG or TIF format, you can adjust its transparency by changing its properties. 3.6.7 Courseware Making Panel In Courseware Making Panel, you can add animation effects for objects and pages, and can also insert questions into your courseware. 3.6.7.1 Object Effect You can set effects for any object on the page. Add Effect: You can add four kinds of animation types, “Entrance”, “Emphasis”, “Exit” and “Motion Paths”, for the single or several selected objects on the current page. To add an object effect, please select one or several objects, and click “Add Effect”, then select an effect type from the popup menu. 50 Returnstar Interactive Technology Group Co., Ltd. Note: When adding effects, you can preview the added effects if you check “Auto Preview” beforehand. After adding effects, the effects will be displayed in Effects list according to the order. Set Effect: You can customize the current selected effects. You can customize the way of playing the effects. The system offers you three ways: “On Click” (default), “With Preview” and “After Preview”. You can customize the playing speed of the effects from the drop-down menu. You can also 51 Returnstar Interactive Technology Group Co., Ltd. adjust the playing speed by increasing or decreasing the length of timeline for an effect. The system offers many different kinds of repeat times The system offers you more than 20 kinds of sound effects The drop-down menu of property may vary according to different animation effects. You can adjust the property value to change the playing effect. Edit Effect: You may change animation effects and adjust their playing order. To change an effect, please select the object that you want to change, and click “Change”, then select appropriate animation effects from the drop-down menu. 52 Returnstar Interactive Technology Group Co., Ltd. To change the playing order, please select the object from Animation Object list, then click “Move up” or “Move down” . Remove Effect: You can remove the object effects that you don‟t need from Animation Object list. Select the animation object that you want to remove, then click “Remove”. Note: 1. When the object is removed, all the effects added on it will be deleted automatically. 2. You can remove several animation objects at the same time by pressing “Shift” key. Auto Preview: You can preview the selected object effects. Select the object that you want to preview, then click “Current Preview”. After the effect preview is over, the software will stop preview automatically. Playing Preview: This function enables you to preview all of the object effects from the current page. 3.6.7.2 Page Effect Add Page Effect: To add effects to a page, please click “Page”, and select relevant effect from the drop-down menu. 53 Returnstar Interactive Technology Group Co., Ltd. After adding effects, the effects will be displayed in Effects list according to the order, and a small icon will appear in the top left corner of page thumbnail. Click “Apply to All Pages”, then all other pages will share the same effects with the current one. Customize Page Effect: You can customize the page effects, including playing speed and sound. Please select the page effect you want to customize, then select the desired speed from Speed list. You can also adjust the playing speed by increasing or decreasing the length of timeline for an effect. You can select the desired sound effect from Sound list. 54 Returnstar Interactive Technology Group Co., Ltd. Change Page Effect: You can change page effects upon actual needs. Please click “Change”, and select the page effect you want to change, then choose a desired page effect. Delete Page Effect: You can delete any page effect as you want. Please select the page effect you want to delete, then click “Remove”. Note: You can also remove page effects by deleting the page. To delete several animation effects at the same time, press “Shift” key and select them one after another. 3.6.7.3 Add Interactive Quiz IQ Interactive Education Platform provides you with common question types, including Monomial Choice, Multiple Choice, True or False, Gap Filling and Vote, which can help to engage your students to greater extent. Click the icon of question type you want to insert on Question Setting Panel and click “Insert”, then the question type you select will be shown on current page. Edit Question: You can edit the interactive questions you insert. To activate Title or Option text box, you can double-click text box, or click “Insert Text” and text box in consequence, or select the text box and click on Marquee Handles. 55 Returnstar Interactive Technology Group Co., Ltd. Edit the question in the text box. To exit the text box, simply click any blank part of the page. You can drag the title or option text box to change its position. Customize Question: You can change the properties of your question. Note: In Gap Filling, you can set one or more correct answers to a question. Each line is one correct answer (For e.g., _+_=2, the answer can be 1,1; 0,2; 2,0.). Please see sample image above. Response Settings: You can add link and sound for correct and wrong responses. 56 Returnstar Interactive Technology Group Co., Ltd. Courseware Information: You can check total questions, total points, total times and the quantity of questions without answers here. 3.7 Assistant Tools 3.7.1 Screen Tools IQ Interactive Education Platform provides you with kinds of screen tools, including Spotlight, Reveal Screen, Screen Arrow, Highlight and Black Screen. You can get these tools from “Tools” Menu Bar, Assistant Tools toolbar or Floating Tools toolbar. Spotlight : You can drag the rim to zoom and move the Spotlight. The lower layer of highlighted area can be operated. You can click on the screen bottom right to adjust the properties of Spotlight. Reveal Screen: Three revealing methods are provided: top-bottom, left-right, all directions. 57 Returnstar Interactive Technology Group Co., Ltd. The uncovered area can be operated. You can click on the screen bottom right to adjust the properties of Reveal Screen function. Screen Arrow: You can place a large arrow on the interactive screen to draw attention to a screen area. Right-click the arrow, you can change the background color, direction and transparency of the arrow. Black Screen: You can display a black screen background, such as color, picture, prompt message, to draw attention or prompt the next teaching step. You can also set time for black screen. To close Black Screen before time is up, please press “Ctrl+Alt+E”. Highlight: You can click in the bottom right of screen to adjust the properties of Highlight, such as background color and transparency. And you can select Single Spotlight or Multi Spotlights to highlight one or multi areas for attention. 58 Returnstar Interactive Technology Group Co., Ltd. 3.7.2 Label Tools IQ Interactive Education Platform provides you with kinds of Label Tools, including Dimension Label, Angle Label, Dividers, Ruler, Protractor, Isosceles Right Triangle and 30°Right Triangle. You can get Lable Tools by selecting from “Tools” Menu Bar, Assistant Tools toolbar or Floating Tools toolbar. Dimension Label: Make a Dimension Label for annotating distance between two points. To add a Dimension Label on page, please move the cursor onto the page, determine the start point of the dimension and click, then move the cursor to another point on the page and click. These two points will be linked automatically, and the length will be displayed. Angle Label: You can use Angle Label tool to measure an angle, and modify the magnitude of the angle again. To add an Angle Label on page, please move the cursor onto the page and click to determine the vertex, click again to determine one side of the angle, then move the cursor, relevant angle will be displayed on the page. 59 Returnstar Interactive Technology Group Co., Ltd. Note: The displayed degree of Angle Label is the degree created by the second side rotating from the first side counterclockwise. Dividers: You can use Dividers tool to draw an arc or a sector. Displaying radius length Left foot Top Right foot Drawing tool To move dividers, please click top or left foot of the dividers, and hold to move the dividers to change its position; To change radius, please click right foot of the dividers, and hold to move to left or right horizontally, then the length of radius will change and get displayed on the dividers; To drawing an arc or a sector, please click and hold the drawing tool on the dividers, then rotate it for drawing. You can change properties from right-click menu, such as color, transparency, decimal digits, units (There‟re cm, mm, pix, inch in drop-down list; you can also type a unit you need by manual.) , Ruler: You can use Ruler to measure objects and to draw a line in any particular size (10cm by default; able to be extended infinitely). To add a Ruler on page, please move the cursor onto the page, determine the position of the ruler and click, then the ruler will be displayed on the whiteboard page. You can also use Freehand Drawing tools or Line tool to draw a straight line with a particular length along the scales of the ruler. When rotating the ruler, the current angle of rotation is displayed in the center of the ruler. Protractor: You can add a protractor on the whiteboard page. You can also use the protractor to measure angle and draw arcs with a particular angle. To add a Protractor on page, please move the cursor onto the page, determine the position of the protractor and click, then the protractor will be displayed on the page. 60 Returnstar Interactive Technology Group Co., Ltd. You can also select Arc, Solid Sector or Hollow Sector from right-click menu, and then use Freehand Drawing Tools or Line tool to draw the selected shape along protractor scales. Right Triangle: Two Right Triangle tools are provided, Isosceles Right Triangle and 30°Right Triangle. To add a Right Triangle on page, please move the cursor onto the page, determine the position of the right triangle and click, then the right triangle will be displayed on the page. Isosceles Right Triangle 30°Right Triangle You can use Freehand Drawing Tools and Line tool to draw a straight line along the scales of the right triangle. When you rotate the right triangle, the current rotation angle will be displayed in the center of the right triangle. 3.7.3 Screen Capture To get Screen Capture function, you can click “Tools” on Menu Bar, or click Tools toolbar, or click on Floating Tools toolbar. on Assistant 61 Returnstar Interactive Technology Group Co., Ltd. To capture a full screen: click “Full Screen Capture ” to capture the whole screen. To capture a window on screen: click “Window Capture ” button on the toolbar, select the window you want to capture, and click the window. To capture a rectangle screen area: click “Area Capture ”, then press and drag the cursor to define the rectangle area you want to capture; To capture a freehand area: click “Freehand Capture ”, then press and drag the cursor to freely define the area you want to capture. You can also click to select the inserting method of the captured screen. “Insert to current page” and “Insert to new page” are available. 3.7.4 Screen Record and Playing To get Screen Record function, you can click “Tools” on Menu Bar, or click Tools toolbar, or click on Assistant on Floating Tools toolbar. Screen Record: To make a screen record, please select the recording style you want from “Options”. Video quanlity can also be adjusted. Click , a Prompt window appears, click “OK”, then a file saving window appears. Determine the file name and path, then click “Save” to start recording. 62 Returnstar Interactive Technology Group Co., Ltd. Note:You can default video saving path from “Options > Save Path > Default Path”. During recording, you can click to pause your recording; and you can click to finish the recording. Video Player : Convertor: You can convert the recorded AVI file to SWF, WMV and EXE format. 3.7.5 Special Tools IQ Interactive Education Platform also provides some useful tools, including Dice, Calculator, Magnifier, Tickertape Scrolling, Clock and On–Screen Keyboard, Layer Perspective, Video 63 Returnstar Interactive Technology Group Co., Ltd. Capture. To get Special Tools, you can click “Tools” on Menu Bar, or click Tools toolbar, or click Dice on Assistant on Floating Tools toolbar. : You can use Dice to generate 1-7 random numbers. And you can click “Parameter settings” to set the maximum value and the number quantity. Calculator : IQ Interactive Education Platform can call calculator from your operating system. Magnifier : Magnifier can easily magnify areas of the screen. From right-click menu you can change the Magnifier Properties, such as magnifying shape, scale, window size, and etc. Tickertape : You can create tickertape scrolling on screen to prompt message. Tickertape Settings window appears as follow, you can change the properties if necessary: Clock and Timer : The Clock tool allows you to display a clock or a counter on the screen. You can customize the Clock by clicking icon. 64 Returnstar Interactive Technology Group Co., Ltd. On-screen Keyboard : IQ Interactive Education Platform can call On-screen Keyboard from your operating system. Layer Perspective : With Layer Perspective, perspective of multiple objects layers and display of the below object or image can be achieved. To use Layer Perspective, please move it onto the superimposed layers. By default, the perspective layer(s) number is one layer; but you can right-click the tool or click at top right to set the shape, transparency, and perspective layers. Video Capture: With Video Capture, the connecting camera or DV video can be displayed. And you can capture the video onto the board page. To use Video Capture, please click on the Video Capture window, the connecting camera or DV video will be displayed on the software. And you can click to set the resolution of the video. 65 Returnstar Interactive Technology Group Co., Ltd. Note:If there are several cameras and DV videos connecting to the computer at the same time, you can change the video source. You can also click click to set to insert the captured video to current page or new page, then to start the capture. 3.7.6 One-key Wizard Click Click on the Floating Tools toolbar to close current window. on the Floating Tools toolbar to minimize current window. Note: By default, these two icons are not on the Floating Tools Toolbar, you can customize the Floating Tools Toolbar in System Settings>Toolbar on Menu Bar. 3.7.7 Quick Access to Frequently Used Applications With Frequently Used Applications, you can get quick access to any external program and file. To get Frenquently Used Applications, please click “Frequently Used Applications” on Menu Bar, or click on Assistant Tools toolbar, or click on Floating Tools toolbar, then the Application toolbar appears (displaying IE Program by default). Then click a shortcut icon on the toolbar to directly open the external program or file. Meantime, you can click to add and delete any application. 3.7.8 Embedded Window With Embedded Window , you can embed office documents (doc, xls, ppt, docx, xlsx, and pptx)to board page and can edit them as well. To add an Embedded Window on page, please select “Embedded Window” on Menu Bar, or click on Assistant Tools toolbar, or click on Floating Tools toolbar; then move the 66 Returnstar Interactive Technology Group Co., Ltd. cursor to the position you want to embed and single click it. Open window appears as follow: You can select a file or webpage you want to open, and then click “OK”, your selected file or webpage will be embedded into the board page. Click the icons at the bottom for corresponding operation: Open To reopen the file or webpage you want to embed. Read To read the file or webpage you have opened. Play To play the opened file. Pause To pause current playing. Stop To Stop current playing. Save To save word and excel revised by current user. Zoom in To zoom in the opened office document or webpage. Zoom out To zoom out the opened office document or webpage. Maximize To Maximize the window. Restore To restore the maximized window to original. 67 Returnstar Interactive Technology Group Co., Ltd. Close To close the embedded window and it will display on the board page as an object Note: For windows XP, you need update to IE7 for zooming in/out the webpage. 3.7.9 Shade Tool With Shade Tool, you can shade some content on the board page. Sometimes it‟s useful in teaching or demo. To add a Shade Tool on page, please select “Shade Tool” on Menu Bar, or click Assistant Tools toolbar, or click on on Floating Tools toolbar. To drag a rectangle to shade the content on the board page, you can change the shading size by clicking the rectangle and holding on to move it or clicking the drag button right corner and holding to move it. at lower Right-click the Shade Tool, you can set its display effect by selecting “Reveal” or “Fill” or “Full Screen”. You can also do annotation on the Shade Tool background area by clicking “Annotation”. Click “Clean Annotation” to clean your annotation. If you close Shade Tool without selecting “Clean Annotation” or “Reset to Default”, your annotation will be shown next time when you use Shade Tool. 68 Returnstar Interactive Technology Group Co., Ltd. To close the Shade Tool, you can double click it or select “Close” at the right-click menu. Note:The shading tool cannot shade floating windows including video, flash, embedded window and gif dynamic image. 3.7.10 Text to Speech With Text to Speech tool, the text on the board page can be read with voice. To use Text to Speech tool, please select “Text to Speech” on Menu Bar, or click Assistant Tools toolbar, or click on on Floating Tools toolbar. Move the cursor to the text you want voice reading and click the text, voice reading of the text begins. By default, the text is read in Chinese. You can click on the above setting bar to change from Chinese to English. And you can adjust the reading speed and volume . Note:User can download and install other TTS speech database from internet. After installation, the installed language will be added into Setting list. 3.8 Video Conference Video Conference can bring people at different sites together for a meeting. With this function, all kinds of real-time interactive features such as video conversation, screen sharing, voice intercom, and text chat can be achieved. Note : This function is available only when an IQBoard whiteboard or USB dongle is connected. 3.8.1 Create a Conference To create a conference, please Select “Video Conference > Create Conference” on Menu Bar, then create a Conference window appears. You can change the name if necessary, and if you have several IPs, you can select an IP by dropping down at the IP address inputting box. Click “OK”. The video conference is created. 69 Returnstar Interactive Technology Group Co., Ltd. 3.8.2 Join a Conference To Join a created conference, please select “Video Conference > Join Conference” on Menu Bar, then the Join Conference window appears. Click “Options” button on the Join Conference window, and set the local IP, audio input device and video device. Click “OK”, now you can enter the conference window to join it. 3.8.3 During a Conference Hide/Show The Video Window of Any Participant: After joining the conference, local video window and the conference presenter‟s video window are displayed automatically on the desktop. You can hide and show any participant‟s video window by clicking beside the participant's name. Share Desktops of Participants: The participants can share desktops with each other by 70 Returnstar Interactive Technology Group Co., Ltd. doing clicking . Participants can use this function only after presenter‟s confirmation. Enable/Disable Microphone and Speaker: You can tick and or not to enable or disable your microphone and speaker. You can also use the sliders beside to adjust the volume of microphone and speaker. In addition, you can enable and disable the microphone and speaker by clicking beside the participant‟s name in the User Tab. Send Message to Other Participants: Any participant can send message to others. Please select “Chat” tab or click button, and input your message in the text box, then click to send the message. 3.8.4 Leave a Conference Any participant can click on the top right of the Video Conference window to quit the conference; Presenter of a conference can force a participant to leave the conference by clicking beside the participant's name in the User Tab. 3.9 System Settings System Settings Panel allows you to change the default properties of Drawing Tools, Toolbars, Quick access, Operating setting and Other Settings. To open System Settings Panel, you can click “System Settings” on Menu Bar; or click the IQ Interactive Education Platform taskbar icon at the right lower corner, and then select “System Settings” . Reset to Dafault: Restore all the system settings to factory settings. Export Configuration: After you finish all the setting, you can export the setting and save it as a configuration file for later use. Import Configuration: You can import the configuration file which was saved before. 71 Returnstar Interactive Technology Group Co., Ltd. Freehand Drawing Tool Properties: You can change the default properties of Drawing Tools, such as color, thickness, transparency. Toolbar Settings: You can customize the icons on Drawing Tools toolbar, Common Tools toolbar, Assistant Tools toolbar, Floating Tools toolbar, Resources Panel, and Subject Tools. Quick Access Settings: You can add at most 20 applications in your operating system into Application Shortcuts. Tool Shortcut is for the Tool Shortcut hotkeys on IQBoard interactive whiteboard. At most 8 tools can be added into Tool Shortcut. 72 Returnstar Interactive Technology Group Co., Ltd. Operating Settings: By clicking “Operating Setting” on System Settings Panel, you can do Save Setting, Page Background Setting, Symbol Setting and Auto Group Setting. To save settings, if you choose “Save Inserted File as Duplicate”, the inserted file such as video, Flash, and files opened in embedded window will be saved as duplicate into cdf or cdp resources list; If you choose “Save Inserted File as Shortcut”, the inserted file such as video, Flash, and files opened in embedded window will be saved by memorizing the files‟ location. With Set Default function, you can also set default background color and default background 73 Returnstar Interactive Technology Group Co., Ltd. picture. With Symbol function, you can set default frame color and default filling color of the symbol. If you enable Auto Group Settings, when you draw or write on an interactive screen with Freehand Drawing Tools (including pencil, pen, brush pen, washing brush and creative pen), IQ Interactive Education Platform will automatically group the objects you create in close proximity, enabling you to interact with these objects as a single object. There‟re two settings for this function: Time Interval (the duration between creating two different objects) and Distance (the intervening space between two different objects). Other Settings: By clicking “Other settings” on System Settings Panel, you can change the languages do some other settings. 74 Returnstar Interactive Technology Group Co., Ltd. Part III IQClick User Guide Chapter 1 How to Install and Use Hardware 1.1 Standard Configuration 1 Receiver; 1 Teacher IQClick; 24/32/64 Student IQClicks (support customized); 1 Installation CD (including IQ Interactive Education Platform and User Guide). 1.2 Specification IQClick Series A Receiver Feature Description Receive signal from IQClicks and transfer it to PC. Demension (mm) 732614 Working Temperature 0-40 °C Working Humidity 0-90% Power Supply USB (5V) Effective Angle 360°(100m without obstacle) Indicator Indicator lights when receiving signal. Teacher IQClick Feature Description Teacher IQClick is used to control the teaching process, start interactive response and exam, and get feedback and report of activity. Demension (mm) 1305122 Working Temperature 0-40°C Working Humidity 0-90% Power Supply 2 AAA batteries Effective Angle 360° Distance 100m without obstacle 75 Returnstar Interactive Technology Group Co., Ltd. LCD : “ID” on lower right corner indicates IQClick is under Interactive Response Mode. “888” shows IQClick ID. : „‟NO.‟‟ on lower right corner indicates IQClick is under Interactive Exam Mode. “888” shows question No.. : It indicates IQClick is in digital input mode, under which ( 0~9 - / . ) can be entered. When “123” disappears, that means IQClick is in option input mode, under which A~F, Y and N can be entered. Also, Result, Rank, F1, F2 and Black Screen Tool can be actived in this mode. : It indicates signal is emitting. : It indicates signal has been sent successfully. : It indicates IQClick is in low battery. (Please replace new batteries in time to ensure normal use. ) Keys Up Key: Switch questions and select response modes. Down Key: Switch questions and select response modes. Start/Pause: Start or pause activity in Interactive Response and Interactive Exam modes. Stop: During Interactive Response or Interactive Exam, press once to stop activity, press and hold for 3 seconds to exit activity. OK: Confirm a selection in software; submit answers in LCD to Receiver. ( 0~9 - / . ): Enter 0~9 - / . under digital input mode. ( A~F, Y/N ): Enter A~F, Y/N under option input mode. Result: Open/close Result window. Rank: Open/close Rank window. F1: Switch display modes in ID Panel. F2: During activity, press F2 to show correct answer of current question in LCD; After activity, press F2 to show correct answer of current question in both software and LCD. Black Screen: Display/close Black Screen tool. Mode: Display/close Mode Panel under Interactive Response mode. Power: Press once to turn on IQClick or delete answer in LCD; press and hold for 3 seconds to turn off IQClick. (IQClick will turn off automatically without any operation for 20 minutes. ) Key Combination Mode+1: Manually switch between Interactive Response mode and Interactive Exam mode. In normal condition, IQClick can switch mode automatically according to current activity mode in IQ Interactive Education Platform. Mode+2: Under Interactive Exam mode, press this key combination once, then enter question number you want to skip to, and press OK to skip question. Mode+3: Show/hide IQClick hardware ID. Mode+OK: Same functions with F2. Mode+Up: Switch to digital input mode. Mode+Down: Switch to option input mode. 76 Returnstar Interactive Technology Group Co., Ltd. Student IQClick Feature Description Student IQClick is for students to take part in the Interactive Response and Interactive Exam. Demension (mm) 1305122 Working Temperature 0-40°C Working Humidity 0-90% Power Supply 2 AAA batteries Effective Angle 360° Distance 100m without obstacle LCD : “ID” on lower right corner indicates IQClick is under Interactive Response Mode. “888” shows IQClick ID. : „‟NO.‟‟ on lower right corner indicates IQClick is under Interactive Exam Mode. “888” shows question No.. : It indicates IQClick is in digital input mode, under which ( 0~9 - / . ) can be entered. When “123” disappears, that means IQClick is in option input mode, under which A~F, Y and N can be entered. Also, Result, Rank, F1, F2 and Black Screen Tool can be actived in this mode. : It indicates signal is emitting. : It indicates signal has been sent successfully. : Answer of current question is correct. : Answer of current question is wrong. : It indicates IQClick is in low battery. (Please replace new batteries in time to ensure normal use. ) Keys 1. Up Key: Switch to previous question. 2. Down Key: Switch to next question. 3. Fn: Shift key in key combination. 4. Hand-up: Use to take part in preemptive response in Interactive Response. 5. Send: Submit answers in LCD to Receiver. 6. ( 0~9 - / . ): Enter 0~9 - / . under digital input mode. 7. ( A~F, Y/N ): Enter A~F, Y/N under option input mode. 8. Del: Delete answer in LCD. 77 Returnstar Interactive Technology Group Co., Ltd. 9. Power: Press once to turn on IQClick or delete answer in LCD; press and hold for 3 seconds to turn off IQClick. (IQClick will turn off automatically without any operation for 20 minutes. ) Key Combination Fn+1: Manually switch between Interactive Response mode and Interactive Exam mode. In normal condition, IQClick can switch mode automatically according to current activity mode in IQ Interactive Education Platform. Fn+2: Under Interactive Exam mode, press this key combination once, then enter question number you want to skip to, and press OK to skip question. Fn+3: Show/hide IQClick hardware ID. Mode+Up: Switch to digital input mode. Mode+Down: Switch to option input mode. Fn+Send: After activity, press this key combination to show result of current question in LCD. IQClick Series B Receiver Feature Description Receive signal from IQClicks and transfer it to PC. Demension (mm) 732614 Working Temperature 0-40°C Working Humidity 0-90% Power Supply USB (5V) Effective Angle 360°(100m without obstacle) Indicator Indicator lights when receiving signal. Teacher IQClick Feature Description Teacher IQClick is used to control the teaching process, start interactive response and exam, and get feedback and report of activity. Demension (mm) 1004922 Working Temperature 0-40°C Working Humidity 0-90% Power Supply 2 AAA batteries Effective Angle 360° Distance 100m without obstacle 78 Returnstar Interactive Technology Group Co., Ltd. Keys Up Key: Switch questions and select response modes. Down Key: Switch questions and select response modes. Start/Pause: Start or pause activity in Interactive Response and Interactive Exam modes. Stop: During Interactive Response or Interactive Exam, press once to stop activity, press and hold for 3 seconds to exit activity. OK: Confirm a selection in software; submit answers to Receiver. 0~9: Input Student ID, give mark, skip question, enter standard answer for black filling and so on. A~F: Enter standard answer for multi-choice question. Y/N: Enter standard answer for True or False question. Result: Open/close Result window. Rank: Open/close Rank window. F1: Switch display modes in ID Panel. F2: After activity, press F2 to show correct answer of current question. Mode: Display/close Mode Panel under Interactive Response mode. Del: Delete option or digit sent to Receiver. (For e.g., when giving mark for Oral Reponse, teacher enters 10 points, then he/she can press Del to delete it and re-enter.) Student IQClick Feature Description Student IQClick is for students to take part in the Interactive Response and Interactive Exam. Demension (mm) 1004922 Working Temperature 0-40°C Working Humidity 0-90% Power Supply 2 AAA batteries Effective Angle 360° Distance 100m without obstacle Keys Up Key: Switch to previous question. Down Key: Switch to next question. Hand-up: Use to take part in preemptive response in Interactive Response. 0~9: Enter answer for Blank Filling question; switch question. A-F: Enter answer for multi-choice question. Y/N: Enter answer for True or False question. Fn: Shift key in key combination. Del: Delete option or digit sent to Receiver. Fn+Hand-up: Ask a question during activity. 79 Returnstar Interactive Technology Group Co., Ltd. Chapter 2 Connect USB Receiver Please plug USB Receiver into a free USB port of PC before start IQ Interactive Education Platform. USB Receiver is used to receive signal emitted from IQClicks and register IQ Interactive Education Platform by Hardware Verification. Note: IQClick Software will prompt an error message “Hardware isn’t connected!” if no USB Receiver is connected. Chapter 3 IQClick Interactive Response System 3.1 IQClick Interface Two ways to enter each function in Interactive Response: 1) Click icon on Common Tools toolbar and select each function from pop up second-level toolbar; 2) Select each function in second-level menu from Menu Bar. Interactive Response: provide more than10 different response modes, such as Preemptive Response, Elimination and so on. Interactive Exam: Take an exam for class, and auto check and mark test papers. Response Setting: Set up Interactive Response and Interactive Exam. Hardware Setting: Log on Teacher IQClick and Student IQClick to system and test buttons. 80 Returnstar Interactive Technology Group Co., Ltd. Class Setting: Set up database for class, subject and teacher. Query: Create and export activity reports by calss, student or activity. 3.2 Set for IQClick 3.2.1 IQClick Settings Every IQClick has a No. by factory settings. You can also change or reset No. for both Teacher IQClick and Student IQClick. You can reset IQClick No. as follow: Series A Teacher IQClick: 1. Press “Mode+Up” to switch to digital input mode; 2. Enter the Teacher No. you need; 3. Click “OK”; then corresponding Teacher No. square in Teacher Setting area will turn green, meanwhile, this Teacher No. will be shown in the top-left corner of LCD. Student IQClick: 1. Press “Fn+Up” to switch to digital input mode; 2. Enter the Seat No. you need; 3. Press “Send”, then this Seat No. will be shown in Student Setting area. 4. Press “Hand-up” to confirm, then corresponding Seat No. square in Student Setting area will turn green, meanwhile, this Seat No. will be shown in the top-left corner of LCD. Series B Teacher IQClick: Press the Teacher No. you need, then corresponding Teacher No. square in Teacher Setting area will turn green. Student IQClick: 1. Press the Seat No. you need, then this Seat No. will be shown in Student Setting area. 2. Press “Hand-up” to confirm, then corresponding Seat No. square in Student Setting area will turn green. Note: 1. Before setting IQClick, please make sure the Connection Status indicator is in green which means connection between Receiver and IQClick is successful. Otherwise, please re-plug Receiver. 2. During Student IQClick setting, you can click to clear content No. Student Setting area and re-enter. 81 Returnstar Interactive Technology Group Co., Ltd. Export: to export your IQClick Settings and save it as a cdh format file in computer for later use. Import: to import the cdh format file which was saved before. Delete: to delete a seleted Teacher No. or Seat No.. Clean: to clear all settings of Teacher IQClick and Student IQClick. 3.2.2 IQClick Testing You can test each button on IQClick when Connection Status indicator is in green and IQClick Setting has been finished. Pleasd do as follow: 1. If you use Series A, please press a button on IQClick, then press “OK” or “Send”. If you use Series B, please press a button on IQClick. 2. IQClick Name, No. ID, and button name will be shown on Testing area. 3. Check if the information in IQClick Testing area can be corresponded to the button you pressed. 82 Returnstar Interactive Technology Group Co., Ltd. 3.2.3 Class Management You can find Class Settings, Subject Settings and Teacher Settings in Class Management. 3.2.3.1 Class Settings In Class Settings, you can add, delete, edit, import or export class datebase, and add, delete, edit or group student information. 83 Returnstar Interactive Technology Group Co., Ltd. 3.2.3.2 Subject Settings In Subject Settings, you can add, delete, edit, import or export subject datebase. 3.2.3.3 Teacher Settings In Teacher Settings, you can add, delete, edit, import, or export teacher datebase. Furthermore, teacher can also be related to class and subject he/she takes charge of. Note: Only administrator of IQClick Software can enter IQClick Settings and Class Management. 84 Returnstar Interactive Technology Group Co., Ltd. 3.2.4 Edit Interactive Quiz 3.2.4.1 Insert Question You can add one or more questions to your pages. Operation is as follow: 1. Click the icon of question type you want to insert on Question Setting Panel. 2. Click “Insert”. 3. The question type you select will be shown on current page. Note: 1. You can only insert one interactive question per page. 2. To change the question type, simply select another question icon and click “Insert”. 3. You can delete the inserted question by clicking “Delete”. 4. Vote is not accessed under Interactive Exam mode. 85 Returnstar Interactive Technology Group Co., Ltd. 3.2.4.2 Edit Question You can edit the interactive questions you insert. Operation is as follow: 1. Activate Title or Option text box. Do one of the followings: 1) Double-click Title or Option text box; 2) Click “Insert Text” and Title or Option text box in consequence. 3) Select the Title or Option text box, and click on Marquee Handles. 2. Edit the question in the text box. 3. To exit the text box, simply click any blank part of the page. Note: 1. You can drag the title or option text box to change its position. 2. You can not input text in the gap when you insert a Gap Filling Question. 3. You can double-click “OK” to customize properties of the button, such as name and background. 86 Returnstar Interactive Technology Group Co., Ltd. 3.2.4.3 Save Paper After finish editing questions, click ”Save” to save your paper as a cdf format file. 3.2.5 Interactive Response Mode 3.2.5.1 Open Paper Click on Common Tools toolbar and select a prepared cdf file to open. 3.2.5.2 Response Settings You can customerize response effect for Interactive Response mode. Response Settings: 1. Two ways to get Response Settings window: 1) Click on Interactive Response toolbar; 2) Click “Page Show > Response Settings” on Menu Bar. 2. The following settings are available in Interactive Response tab: Response By: Individual response and group response are available. Feedback Settings: Show correct answer after response: when answering process is stopped or finished, correct answers will be displayed on question page and Result. Allow student to get result (Only support IQClick Series A): when answering process is stopped or finshed, pressing “Fn+Send” on Student IQClick to display response result and correct answer on LCD. 87 Returnstar Interactive Technology Group Co., Ltd. For e.g One question which correct answer is option B, but student responsed option A. When answering process is stopped or finished: “Show response result” is selected. “Show response result and correct By pressing “Fn+Send” on Student answer” is selected. IQClick: By pressing “Fn+Send” on Student IQClick: LCD LCD Sound Effect Settings: You can add sound effect when starting response, stopping response and so on. The supported audio file format is wav. 3.2.5.3 Enter Interactive Response mode 1. Two ways to enter Interactive Response mode: 1) Click on Interactive Response toolbar; 2) Click “Page Show > Interactive Response” on Menu Bar. After entering Interactive Response mode, you can see the question page, ID panel, response mode area, timer, floating tools toolbar and tool plate. Question Page: display interactive questions and correct answers. Annotation and other operations can also be done in Question Page. ID Panel: all the students‟ Seat No. will be shown in this area. Background color of Seat No. indicates student‟s response status. 88 Returnstar Interactive Technology Group Co., Ltd. 1. Background color of Seat No. Color Description Black background indicates all Seat No.1,2 and 3 haven‟t responsed. Blue background indicates Seat No.1 has responded. If Seat No.1 changes answer during response, background will turn to light blue. After stop answering process and displaying correct answer, red background indicates Seat No.1 gave a wrong answer. After stop answering process and displaying correct answer, green background indicates Seat No.1 gave a correct answer. 2. Two ways to switch between Student ID and Response Status: 1) Click icon next to ID Panel; 2) Click “F1” on Teacher IQClick. Student ID Response Status 3. Go to previous/next part of Student ID: Click icons in ID Panel to go to previous or next part of Student ID. You can also set automatical transition by clicking icon in ID Panel. Timer: You can set response time for each question. After response starting, timer will count down automatically. Green background means start response, yellow means pause, and red means stop. 89 Returnstar Interactive Technology Group Co., Ltd. 3.2.5.4 Start Interactive Response By using IQClick, you can start various response modes. 1. Select response mode: IQ Interactive Education Platform automatically selects a suitable response mode for question in current page. Selected response mode will be shown on the top right corner of page. You can also press on Teacher IQClick to select other response modes. 2. Start response: After starting answering process, students can give response by Student IQClick. Teacher IQClick is for pause response, Response Mode on for end. Description Function: All students can join response. Testing Response Preemptive Response Teacher: Select mode, then press to start response. Student: After sending answers to Receiver, background color of related Seat No. will turn blue. Function: Allow the first student who grabs answer right to give response. Teacher: Select mode, then press Student: 1) Press to start grabbing answer right. to grab answer right. 2) Seat No. which gets answer right will be displayed in ID Panel and the middle part of Tool Plate, then this student can start giving response. Function: Allow at most 10 students to grabs answer rights. Teacher: Multiple 1) Select mode, then press to pop up Student Numbers Settings Preemptive window. Response 2) Press and to increase or decrease student numbers, then press to start response. 90 Returnstar Interactive Technology Group Co., Ltd. Student: 1) Press to grab answer rights. 2) Students who get answer right will be displayed in ID Panel and the middle part of Tool Plate. 3) IQ Interactive Education Platform will stop grabbing process when students reach the set number. 4) These students can start giving responses. Function: Those students who give correct answer will enter the next response, while the loser will be eliminated. Elimination Teacher: Select mode, then press to start response. Student: Send answers to Receiver. When answering process stops, background color of related Seat No. will turn blue if the answer is correct. If the background color is grey, that means that student has been eliminated. Funtion: Only the student appointed by teacher can give response. Teahcer: 1) Select mode, then press . 2) Choose a student from window appeared by pressing buttons on IQClick, then press and . 3) Press to start response. Background color of unappointed Seat No. is grey. Appointed Response Random Response Student: The apponited student can start responding. Function: IQ Interactive Education Platform random asks a student to answer question. Teacher: Select mode, then press , then system will pick up a Seat No. and show it in the middle of Tool Plate. 91 Returnstar Interactive Technology Group Co., Ltd. Vote Transient Quiz Student: Give response. Function: Only work with Vote activity. Voting result will be displayed in question page by bar chart or pie chart realtimely. Teacher: Select mode, then press to start voting. Student: Start voting. Function: Teacher can insert a extra question (including MCQ, Blank Filling, and True or False) into current page. Teacher: 1) Teacher can set a question by oral or writing it directly in current page. 2) Select mode and press , then selection window should appear. 3) Select a question type, then press to start response. 4) Teacher can send a correct answer to Receiver by IQClick during student responding, or it can be entered from correct answer window after response finishes. Student: Give response. Background color of Seat No. which has given answer is blue. Function: Teacher can set a question by oral or writing it directly in current page. Students grab answer right and give answer by oral. Teacher: 1) Set a question; Oral Response 2) Select mode and press to let students start grabing answer right. 3) After student finishes response, a mark window will appear. Press and on Teacher IQClick to select a score. Student: 1) Press on IQClick to grab answer right. 2) Student who gets answer right will be displayed in ID Panel and the middle part of Tool Plate. 3) This student can start giving response. 92 Returnstar Interactive Technology Group Co., Ltd. Auto Roll-call Temporary Group Function: IQ Interactive Education Platform can display a roll call report for teacher. Only attended students can join following activities. Teacher: Select mode and press to start roll-call. Student: During Auto Roll-call, students press any key on IQClick to check in. Function: Change the groups temporarily in activity. Teacher: 1) Select mode and press to enter group window. 2) Click “OK” to confirm after finish grouping. Student: Press “1” on IQClick for entering group No.1, “2” for Group No. 2, and so forth. Note: During activity, student can press “Fn+Hand-up” to ask a question. 3.2.5.5 Show Result IQ Interactive Education Platform can show Result for every question after finish responding. After stop responding, press on Teacher IQClick to display Show Result window. You can switch between Summary tab and Detail tab by pressing “F1” on Teacher IQClick. Press “F2” to show/hide correct answer. 3.2.5.6 Rank Rank students‟ answer results by points and time. To display Rank window, please press on Teacher IQClick after finish responding. 93 Returnstar Interactive Technology Group Co., Ltd. 3.2.5.7 Peek at Correct Answer IQ Interactive Education Platform allows teacher to check correct answers before or during responding. To peek at correct answer, operation is as follow: 1. Go to the question which you want to peek at the correct answer for by pressing or on Teacher IQClick. 2. Press “F2” or “Mode+OK” on Teacher IQClick, then the correct answer will be displayed in LCD. 3. To check correct answer for other questions, please repeat steps above. 3.2.6 Interactive Exam Mode Teacher can edit test paper in IQ Interactive Education Platform, then print and deliver them to every student. Then the students select the answers by Student IQClick. IQ Interactive Education Platform will collect the answers and mark the test paper automatically, then display the result immediately and generate the report form in common format. 3.2.6.1 Print Test Paper IQ Interactive Education Platform will automatically lay out test paper for printing. Two ways to print test paper: 1) Open a cdf format test paper, and select “File > Print Paper” to print. 2) Open a cdf format test paper, and preview it firstly from “File > Preview Paper”, Then click “Print” in Preview window to print. 94 Returnstar Interactive Technology Group Co., Ltd. 3.2.6.2 Response Settings You can customerize response effect for Interactive Exam mode. Response Settings: 1. Two ways to get Response Settings window: 1) Click on Interactive Response toolbar; 2) Click “Page Show > Response Settings” on Menu Bar. 2. The following settings are available in Interactive Exam tab: 95 Returnstar Interactive Technology Group Co., Ltd. Exam Time: 1.5 hours by default. Feedback Settings: Show correct answer after response: when answering process is stopped or finished, students‟ answering result (correct or wrong) will be displayed on IQ Interactive Education Platform and also Student IQClick LCD. Allow student to get result (Only support IQClick Series A): when answering process is stopped or finshed, pressing “Fn+Send” on Student IQClick to display response result and correct answer on LCD. For e.g. Question No. 8‟s correct answer is B, but student responsed option A. When answering process is stopped or finished: “Show response result” is selected. “Show response result and correct By pressing “Fn+Send” on Student answer” is selected. IQClick: By pressing “Fn+Send” on Student IQClick: LCD LCD Sound Effect Settings: You can add sound effect when starting response, stopping response and so on. The supported audio file format is wav. 3.2.6.3 Enter Interactive Exam mode 1. Two ways to enter Interactive Exam mode: 1) Click on Interactive Response toolbar; 2) Click “Page Show > Interactive Exam” on Menu Bar. 96 Returnstar Interactive Technology Group Co., Ltd. After entering Interactive Exam mode, you can see the test paper information area, ID panel, timer, floating tools toolbar and tool plate. Test Paper Information Area: Class, subject, questions and total points information will be shown in this area. ID Panel: The first line is Seat No., the second shows question No.. For e.g. student of Seat No. 1 is in question No. 1 currently. Background color of Seat No. and question No.: Color means Description Black background color indicates all of Seat No.1, 2 and 3 haven‟t done any response yet. During process of exam, yellow background of Seat No.1 means this student started but not finish responding; blue background of question No. indicates question No.1 has been answered. During process of exam, blue background of Seat No. means all of questions have been given answers. After finish exam and show correct answer, red background of question No. means this question got a wrong answer. After finish exam and show correct answer, green background of question No. means answer for this question is correct. 97 Returnstar Interactive Technology Group Co., Ltd. Timer: You can set time for exam. After exam starting, timer will count down automatically. Green background means start, yellow means pause, and red means stop. 3.2.6.4 Start Interactive Exam Start: Press on Teacher IQClick to start exam. Time will count down automatically. Students can give answers by Student IQClick. Pause: Press on Teacher IQClick to have a pause during exam. Students can not give responses when exam is paused. Stop: Press to end exam. When time‟s used out, the exam will also be ended automatically. 3.2.6.5 Take Interactive Exam Two ways to change question No.: 1. Press or on Student IQClick to go to previous or next question. Question No. will be shown in the top-left corner of LCD. 2. Press “Fn+2” on Student IQClick and enter a question No. to skip to the question you need. Send answers to Receiver: Enter answers into IQClick according to different question types in printed test paper, and send it to Receiver. IQClick series A, it can support entering answers for all of questions and then sending them to Receiver together by pressing “Send”. If you use IQClick Serie B, you need to send answers for questions one by one. 3.2.6.6 Show Result in ID Panel After exam, you can press “F2” or “Mode+OK” to show response result in question in ID Panel. Students can check their answer results by or on IQClick. 3.2.6.7 Show Response Result of Class After exam, teacher can check the whole class‟s exam result in summary or details. To show response result: 1. Press on Teacher IQClick to open Show Response Result window. 2. Press “F1” on Teacher IQClick to switch between Sumarry and Detail tabs. Press “F2” to show/hide correct answers. 98 Returnstar Interactive Technology Group Co., Ltd. 3.2.6.8 Rank Once exam finishes, IQ Interactive Education Platform will automatically rank students‟ exam results by points and time. To display Rank window, please press on Teacher IQClick after exam ending. 3.2.6.9 Peek at Correct Answer IQ Interactive Education Platform allows teacher to check correct answers before or during 99 Returnstar Interactive Technology Group Co., Ltd. exam. To peek at correct answer, operation is as follow: 1. Go to the question which you want to peek at the correct answer for by pressing or on Teacher IQClick. 2. Press “F2” or “Mode+OK” on Teacher IQClick, then the correct answer will be displayed in LCD. 3. To check correct answer for other questions, please repeat steps above. Chapter 4 IQ Interactive Education Platform (For PPT) 4.1 Start IQ Interactive Education Platform Run Microsoft Office PowerPoint, you can see IQClick Menu and IQClick Toolbar added in PowerPoint window. Click “User Login” in IQClick Menu, then login window will appear as below 100 Returnstar Interactive Technology Group Co., Ltd. IQ Interactive Education Platform provides teachers with a temporary user account for starting temporary activity without setting class information. You can add other user accounts from “Teacher Settings” after login by administrator. Note: Defualt User Account for administrator is “administrator”, password is “123456”. After first login, please change and keep password in time. User Login: Before start activity by IQClick for Powerpoint, please login firstly. Hardware Settings: Open Hardware Setting window to log on Teacher IQClick and Student IQClick into system and test buttons. Class Settings: Open Class Setting window to set up database for class, subject and teacher. Question Settings: Open Question Settins window to set type and answer for question in current page. Interactive Response: Provide 10 different response modes, such as Preemptive Response, Elimination and so on. Response Settings: Open Response Setting window to Set up Interactive Response and Interactive Exam. Query: Create and export activity reports by calss, student or activity. 4.2 Set for IQClick For IQClick Settings, IQClick Testings, Subject Settings and Teacher Settings, please refer to Chapter 5 IQ Interactive Education Platform (For IQBoard).in this user manual. 4.3 Edit Interactive Quiz You can add interactive questions into PowerPoint pages by IQ Interactive Education Platform. 4.3.1 Insert Question 1. Click “Question Settings” in IQClick Toolbar, then Quiz Settings window will appear. 101 Returnstar Interactive Technology Group Co., Ltd. 2. Select question type, option number, correct answer, time and points for your question. 3. Click “Insert”. The question you selected will be inserted into current page of PowerPoint. 4.3.2 Edit Question You can edit the interactive questions you insert. Operation is as follow: 1. Activate Title or Option text box. 2. Edit the question in the text box. 3. To exit the text box, simply click any blank part of the page. 102 Returnstar Interactive Technology Group Co., Ltd. Note: One page in PowerPoint can only be inserted one interactive question. 4.3.3 Modify Question To change qustion type for a inserted question, please click “Modify” in Quiz Settings window. 4.3.4 Delete Question Two ways to delete a inserted quesiton: 1. Click “Delete Current Question” in Quiz Settings window. 2. Delete current page in PowerPoint directly. 103 Returnstar Interactive Technology Group Co., Ltd. 4.3.5 Question Information You can click “Information” in Quiz Settings window to view the information of the whole test paper, including the total number and mark of questios, total answering time and so on. 4.4 Interactive Response (For PowerPoint) After finish the above settings, you can start activity by IQClick Interactive Response module embedded in PowerPoint. To start interactive response: 1. Open a prepared PowerPoint interactive exma file. 2. Click “Question Settings” on IQClick Toolbar to customize activity. You can skip this step 104 Returnstar Interactive Technology Group Co., Ltd. and use default settings. 3. Click “Interactive Response” on IQClick Toolbar to enter Interactive Response mode. 4. Select a responding mode to start your activity. Note: The way to set for question and respoding is the same with settings for IQClick Software (For IQBoard), please refer to Chapter 5 IQClick Software (For IQBoard) Chapter 5 Query Two ways to enter Query window: 1. Click icon on Interactive Response toolbar. 2. Select By Student, By Class, or By Activity from Query on Common Menu. 105 Returnstar Interactive Technology Group Co., Ltd. 5.1 By Class Score Rank List: Show the score of previous activities, including student number, student name, group number, mark, answering time and rank, class mark pass rate and full mark rate, etc. Response Details: Show each students responding result (including mark, time and so on) for each question in previous activities. Answer Details: Show correct answer and time of each question in previous activities. Roll-call: Show attendance details for a class in a single activity, including checking time, present and absent status of each student, and total present and absent number. 5.2 By Student 106 Returnstar Interactive Technology Group Co., Ltd. Statistical Table of Score: Show activity result of a single student in a period of time, including activity information, individual mark and position, class average mark, etc. You can press and hold “Ctrl” to select several activities. Response Details: Show a single activity details of a single student Roll-call Details: Show attendance details for a student in a period of time, including roll call time, present and absent times, etc. You can press and hold “Ctrl” to select several activities 5.3 By Activity Calculate score weighted: Calculate the weighted mean of one class‟s several activity scores, and report final scores. To calculate socre weighted: 1. Press and hold “Ctrl” to select two or more activities. Then press “Report” to enter Statistic window. 107 Returnstar Interactive Technology Group Co., Ltd. 2. Select a activity and enter Proportion for it. Then click “Calculate”. IQ Interactive Education Platform will calculate weight of each activity for you. For e.g., acitivity A with proportion of 7, activity B with proportion of 3. Weights of them are calculated as follow: Weight A=Proportion A / (Proportion A+ Proportion B) Weight B=Proprotion B/ (Proportion A + Proportion B) So the Weight A=7/(7+3)=7/10; Weight B=3/(7+3)=3/10. 3. Click “Report”, then IQ Interactive Education Platform will give you a report about students‟ scores, ranks and so on according to the weights you set. 5.4 Operation on Report Forms After you click “Query” button, the report form window will popup, different query option generates different report form. As follows: Export: convert report form to HTML, txt, xls format files and save to HDD. Send E-mail: send report as a attachment to E-mail. Print: print the report forms. 108 Returnstar Interactive Technology Group Co., Ltd. Part IV Version & FAQ Charpter 1 Version Statement IQ Interactive Education Platform is a set of software that will be constantly updated. In addition to the update of Symbol Library and Resource Library, we will continually increase its functions and make some improvement. So we strongly recommend the clients to update the software regularly. Chapter 2 FAQ 1. While installing the software, the installation interface window is stretched; and meantime, when I start the software, it prompts unwonted error message. What can I do? This problem will not occur if your computer is in normal use. If it occurs, the main reason is DPI of display is too high. Please right click windows desktop blank and get the “Properties” menu, choose “Settings” and then “Advanced”, change DPI into “Normal size (96dpi)” at DIP Setting. Then restart the computer. 2. After using the function of Screen Record, I cannot see some windows in the saved recorded video, such as floating toolbar, the annotating window in Windows Mode. How can I do? It is because the system only records the operating area by default in order to control the size of video files. If you want to record all windows and the floating toolbar, then before recording please click Screen Record, and then click Options on the secondary toolbar of Screen Record, select “Record all areas”. 3. When operating and writing on the whiteboard with the software, the system response is slow, or the stroke is intermittent. What’s up? The computer is not under normal running or the memory is occupied too much. Please close some applications or restart the computer. Or the operating or writing force is uneven. Sometimes the force is too light to be sensed. 4. When inserting a video file into the whiteboard page and playing it, the video images cannot be displayed, but a black screen there. How to handle it? 1) The video file doesn‟t exist at all, please select and insert again. 2) The video file has been damaged already, please repair and reinsert it. 3) Hardware acceleration is not enough, please do as follow: right click windows desktop blank, “properties>Settings>Advanced>Troubleshoot”, and set “Hardware acceleration” from “None” to 3rd rank. 5. While using the “Spotlight” tool, the concentrated area cannot be highlighted, what’s up? 109 Returnstar Interactive Technology Group Co., Ltd. The reason is the color quality in system is not enough to support this software function, please right click windows desktop blank, get the “ Properties” menu, select “Settings” and then change “Color quality” to “Highest (32bit)”. Other questions, please consult our service center or local dealer. 110