1
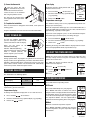
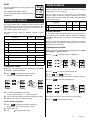
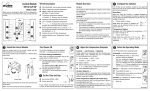
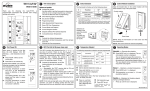
TH1 04
Installation Instructions and Owner s Guide
To set the day
To set the
time
FAN: displayed when
conventional temperature
control is selected
Current time
and day
SETPOINT:
displayed when
viewing or
setting the
temperature
To set the
minutes
To access
programming mode
and view programs
To exit a function
MODE: to select the
desired operating mode
RESET:
To reset the
thermostat
Temperature
adjustment
buttons
INSTALLATION
This thermostat has been designed to control a RESISTIVE load
not exceeding 3500 W @ 240 VAC or 1750 W @ 120 VAC, such as
electric baseboards, convectors, radiant ceilings, floor heating systems, etc.
Heating
indicators
TIME: displayed
when time needs
to be adjusted
Room
temperature
LP: displayed
during a power
failure
Current program
number when the
Automatic mode
is active
Automatic
mode
Current program
number when
Econo schedule
is active
Manual
mode
Econo
mode
1 ) Connect the thermostat
Connect the rear wires to the power and load using solderless connectors for copper wires.
2 WIRES
It is not compatible with a low voltage controller used by a central heating system or systems using a contactor or a relay
whose current is under 2 A.
TURN OFF POWER TO THE HEATING SYSTEM AT THE
MAIN POWER PANEL TO AVOID ELECTRICAL SHOCK.
Installation should be carried out by an electrician.
This thermostat is designed to be used with a self-protected heating system equipped with linear limit control
and circuit breaker.
For a new installation, choose a location about 5 ft. (1.5 m)
above the floor, facing the heating system and on an inside
wall.
Avoid locations where there are air drafts (top of staircase, air
outlet), dead air spots (behind a door), direct sunlight or concealed chimneys or stove pipes.
All cables and connections must conform to the local electrical
code.
Special CO/ALR solderless connectors must be used when
connecting with aluminum conductors.
The wires are not polarized, therefore the connections can be
made on either terminal.
4 WIRES
PROVIDED PARTS
!
"
#
One (1) TH104 thermostat
Two (2) 6-32 mounting screws
Two (2) solderless connectors
1/4
400-104-000-A
2) Secure the thermostat
Time display
Push the excess wire into
the electrical box to prevent
interference with the thermostat.
To change the time display format from 12 to
24 hours and vice-versa:
Secure the base to the electrical
box using the provided screws.
The base can be secured on the
left or right hand side of the electrical box.
Press and hold
; do not release.
Reset the thermostat using a pointed object
(e.g. paperclip).
Release the
button.
TO RESET
THE
THERMOSTAT
Temperature control type
3) Complete the installation
Once the thermostat is configured and installed, return power to
heating system.
Keep the thermostat's air vents clean and free from obstructions.
The TH104 is factory-set to use the proportional temperature control type (15-second cycles).
Since this temperature control type uses a fast commutation rate, it
is not compatible with fan-equipped systems. Also, it can also cause
light flickering, especially in rural regions.
If you have a fan-equipped system, use the conventional temperature control type (15-minute cycles). To change the type:
FIRST POWER ON
To view the ambient temperature,
peel the lower-right section of the
sticker and remove it from the display.
Press and maintain
, do not release.
Reset the thermostat using a pointed object (e.g. paperclip).
Release the
button.
When you first power on the
thermostat, the display
indicates: 0:00, MO (Monday),
the
ambient temperature and the MANual
mode is selected (framed). The
default setpoint is preset to 20°C.
Following the change, the FAN indicator is displayed on the screen.
To revert to proportional control, repeat above steps.
Protected memory
NOTE: You should select the options before you adjust the clock
and day settings because using the reset button when selecting
options will reset the clock.
ADJUST THE TIME AND DAY
During a power failure, all programs are protected. The thermostat
display remains on for approximately 15 minutes after which the LP
indicator is displayed (low power). Only the time must be reset if the
power failure exceeds 6 hours. The thermostat will automatically
return to the previous mode when power returns.
OPTIONS SELECTION
The TH104 offers the following options:
Temperature display
Time display
Temperature control
°C
°F
24 h
12 h
Proportional
Conventional
Highlighted options are factory pre-set. If these options fit your
requirements, go to the next menu.
Temperature display
To change the temperature display from °C to °F and vice-versa:
Press and hold
, do not release.
Reset the thermostat using a pointed object (e.g. paperclip).
Release the
button.
The TIME icon flashes to indicate that the
clock needs to be adjusted.
!
"
Press
#
Press
Use the
set the clock.
to set the day.
and
buttons to
to exit.
OPERATING MODES
The TH104 has three operating modes:
AUTOmatic
This mode automatically runs your programs.
Press MODE until AUTO is outlined. The current
program number is displayed above the AUTO icon.
To temporarily bypass the current program, simply
select the desired temperature using the temperature adjustment buttons. The new setpoint will be
maintained until the beginning of the next program.
MANual
Maintains a constant temperature setpoint.
Press MODE until MAN is outlined and select the
desired temperature using the temperature adjustment buttons.
2/4
400-104-000-A
ECONO
ECONO SCHEDULE
This mode automatically runs the programs of the
Econo schedule.
Ideal for cottages, chalets or weekend residences, this schedule
enables the user to enter 2 settings.
Press MODE until ECONO is outlined.
The current program number is displayed above the
ECONO icon.
The first setting lets the user enter a time (i.e. shortly before
expected arrival) at which the thermostat commands the heating
system to warm to comfort setpoint. The second setting commands
a temperature decrease.
AUTOMATIC SCHEDULE
Programs
The TH104 schedule offers 4 programs per day for the weekdays
and 4 programs per day for the weekend. There are no preset programs. The schedule maintains the setpoint associated to a program until the beginning of the next one.
For maximum energy savings, the following schedule is recommended:
Programs
Time
Setpoint
Monday to Friday (same programs for all days of the week)
Day
Time
Setpoint
1
Arrival (start heating)
Friday
3:00 p.m.
21°C
2
End of heating period
Friday
8:00 p.m.
15°C
Using the Econo Mode
At your arrival, switch to Automatic mode. The thermostat will run
your programs of the automatic schedule, keeping a comfortable
temperature during the day and decrease the temperature during
the night.
1
Morning
6:00
21°C
2
Day
8:00
17°C
When you leave, switch to Econo mode. The thermostat will automatically maintain the setpoint of the last program (e.g. 2) until the
beginning of the next program.
3
Evening
17:00
21°C
Programming the Econo Mode
4
Night
23:00
17°C
Saturday and Sunday (same programs for the weekend)
1
Morning
6:00
21°C
2
Day
8:00
17°C
3
Evening
17:00
21°C
4
Night
23:00
17°C
Before you start programming your thermostat, press MODE
until ECONO is selected (outlined).
!
Press
"
#
$
%
Press
&
'
Repeat steps 2 to 4 to select the day, time and setpoint.
. The program number is displayed (1).
To program this schedule
Before you start programming your thermostat, press MODE
until AUTO is selected (outlined).
!
Press
. The program number is displayed.
Weekdays are displayed (MOTUWETHFR).
"
Use HOUR and MINUTE to set the time.
To skip a program (inactive --:--), do not set the time.
#
$
Use the temperature adjustment buttons to define the setpoint.
Repeat steps 1 to 3 for remaining programs.
Use
to select the expected arrival day.
and
to set the time.
Use the temperature adjustment buttons to define the setpoint.
Press
Press
to select the next program (2).
to exit programming mode.
For the weekend programs:
%
Press
. The program number is displayed (1).
Weekend days are also displayed (SU and SA).
&
'
Repeat steps 2 to 4.
Press
to exit programming mode.
3/4
400-104-000-A
TECHNICAL SPECIFICATIONS
TECHNICAL SUPPORT
Model: TH104
Supply: 120/240 VAC, 50/60 Hz
Power consumption (off): 860 mW
Load: 14.6 A maximum (resistive only), 2 A minimum
Power: 1750 W @ 120 VCA / 3500 W @ 240 VCA
Temperature display range: 0°C to 99°C (0°F to 99°F)
Temperature setting range: 5°C to 27 °C (40°F to 80°F)
Display resolution: 1°
Storage temperature: -20°C to 50°C (-4°F to 120°F)
Accuracy: proportional: ± 0.15°C (0.27°F) from the setpoint
conventional: ± 0.5°C (0.9°F) from the setpoint
Approval: CSA / UL
Dimensions: 120 x 115 x 26 mm (4.8 x 4.5 x 1 inch)
If you have any questions concerning the installation of the TH104
thermostat, contact our technical support team at:
Tel.:
1-800-831-AUBE (2823)
Fax:
(450) 358-4650
Email:
service@aubetech.com
Monday to Friday from 8:30 AM to 5:00 PM EST
For more information on our products, visit us at
www.aubetech.com
WARRANTY
ABOUT TEMPERATURE CONTROL
The TH104 works differently than conventional electromechanical
thermostats which can have a temperature differential up to 4°C
and 5°C. The TH104 has a temperature differential of ± 0.15°C from
the setpoint. This slight oscillation eliminates the discomfort often
found with conventional electromechanic thermostats.
For each cycle, the proportional controller determines the “On”
operating time required by the heating system to maintain the setpoint temperature. The following table displays the percentage of
the “On” operating time for the heating cycle:
1 to 25%
26 to 50%
51 to 75%
76 to 100%
If you are using the conventional control (fan-forced heater), the
screen will show the FAN indicator as well as all flame icons ( )
when the system is activated. In this case, the thermostat differential is ± 0.5°C from the setpoint.
NOTE: The temperature display resolution is 1°C, but the temperature is internally controlled at 0.01°C.
PROBLEM
(450) 358-4600
AUBE TECHNOLOGIES INC. ONE (1) YEAR LIMITED WARRANTY
This product is guaranteed against workmanship defects for a one
year period following the initial date of purchase. During this period,
AUBE Technologies Inc. will repair or replace, at our option and
without charge, any defective product which has been used under
normal conditions. The warranty does not cover delivery costs and
does not apply to products poorly installed or randomly damaged
following installation. This warranty cancels and replaces any other
manufacturer's express or implied warranty as well as any other
company commitment. AUBE Technologies Inc. cannot be held liable for related or random damages following the installation of this
product. The defective product as well as the purchase invoice must
be returned to the place of purchase or mailed, prepaid and insured,
to the following address:
Aube Technologies Inc.
705 Montrichard
Saint-Jean-sur-Richelieu, Quebec, Canada J2X 5K8
POSSIBLE CAUSE
SOLUTION
No display
Circuit breaker is open
Power failure
Verify voltage presence at the thermostat
Thermostat is hot
In normal use, at full capacity (3000 W), the thermostat
housing may reach a temperature of 35°C to 40°C
This state is normal and does not affect temperature
control
Displayed temperature is
wrong
• A draft is near the thermostat
• The sticker is still on the thermostat display
• Eliminate the draft
• Remove the sticker
The lights are flickering
Fast current switching in the baseboards, mainly in rural
regions
• Use conventional control mode
See Options selection section
System is always on
Bad installation
• Verify installation
• Reset the thermostat: press PROGRAM while
resetting the unit, release PROGRAM (see Options
selection section)
Screen shows the heating icon,
but the system is not heating
• Bad installation
• Power failure (LP indicator is displayed)
• Verify installation
03/06/2004
4/4
400-104-000-A
LOCKED IN AUTO MODE
1- Press the MODE button to place the thermostat in AUTO
mode.
TH104-SW PROCEDURE
LOCKED KEYBOARD
2- Press on the PGM button and enter the desired
programming (see the Suggested Typical Programming
section in the instruction sheets).
3- Press on the RET button to end the programming. Wait a
minimum of 30 seconds for the program to be saved.
MAINTAINING THE TEMPERATURE AROUND THE CLOCK
To prevent access to the thermostat keyboard:
1- Press the MODE button to place the thermostat in
ECONOMY mode.
1- Start by turning off the heating system to avoid electrical
shocks.
2- Press the PGM button to select ECONO 1 or ECONO 2.
2- Remove the thermostat from the electrical box and set the
appropriate switches as follows:
3- Choose the desired temperature. It is not necessary to
specify a time or day.
4- Press on the RET button to end the programming. Wait a
minimum of 30 seconds for the program to be saved.
5- To prevent access to the thermostat keyboard, start by
turning off the heating system to avoid electrical shocks.
6- Remove the thermostat from the electrical box and set the
appropriate switches as follows:
AUTO MODE: Switches #1 ON and #2 OFF
3- Put the thermostat back on the electrical box and turn the
heating system back on.
The word REMOTE as well as the program number will
show on the screen. The buttons are now disabled.
4- If you wish to modify your programming, turn the heating
system off again to avoid electrical shocks.
ECONO 1:
Switches #1 and #2 ON
ECONO 2:
Switches #1 OFF and #2 ON
5- Next, set all switches to OFF and repeat the above steps.
7- Put the thermostat back on the electrical box and turn the
heating system back on.
The word REMOTE as well as the program number will
show on the screen. The buttons are now disabled.
8- If you wish to change the programmed temperature, turn the
heating system off again to avoid electrical shocks.
9- Next, set all switches to OFF and repeat the above steps.
04/12/00
720-104001