1
CRESTRON
e-control™ Vote
(SW-VOTE)
version 1.5
© 1999, 2000 Crestron Electronics, Inc.
Crestron e-control Vote
SW-VOTE
Contents
How to Use This Manual
4
A Note on Printing This Document ................................................................................................... 4
Quick Start ........................................................................................................................................ 4
A word on licensing .......................................................................................................................... 4
Quick Start Guide 1: Request-to-Speak (demo1)
6
Quick Start Guide 2: Voting (demo2)
7
Introduction
8
What is Crestron e-control™ Vote? .................................................................................................. 8
Leading Specifications ...................................................................................................................... 9
Requirements..................................................................................................................................... 9
What is the Crestron Software Server?............................................................................................ 10
System Terminology and Topology ................................................................................................ 11
Feature Summary ............................................................................................................................ 13
Installation....................................................................................................................................... 17
Licensing ......................................................................................................................................... 17
Basic Server Setup
20
Communications Setup.................................................................................................................... 21
Test Communications...................................................................................................................... 24
Additional Server Side Setup .......................................................................................................... 24
Server Configuration In Depth
26
Specifying a Configuration File ...................................................................................................... 26
Creating a New Configuration File.................................................................................................. 26
Transporting a Configuration .......................................................................................................... 26
Password Access ............................................................................................................................. 27
COM Settings Configuration........................................................................................................... 28
Signal Block Configuration and Definition ..................................................................................... 30
Software Server Windows and Menus ............................................................................................ 45
Database
52
Database Tables............................................................................................................................... 52
The Queries table............................................................................................................................. 54
Queue scroller tables ....................................................................................................................... 55
Agenda scroller tables ..................................................................................................................... 55
Operations
57
Vote Console operations.................................................................................................................. 57
Request-to-Speak Console operations ............................................................................................. 61
Demos
66
Demo 1: Voting............................................................................................................................... 66
Demo 2 Request-to-Speak ............................................................................................................... 66
Appendix A: Theory of Operation
68
Server Protocol................................................................................................................................ 68
Signal Block Definition / Activation ............................................................................................... 68
Signal Block Enable / Disable ......................................................................................................... 68
Signal Block Error Reporting .......................................................................................................... 68
Appendix B: Intersystem Communications and Signal Space Considerations
70
System Connections ........................................................................................................................ 70
ii • Table of Contents
Installation & Reference Guide — DOC. 5822
Crestron e-control Vote
SW-VOTE
Appendix C: Signal Reference
74
Definition of Terms ......................................................................................................................... 74
String Proxies .................................................................................................................................. 74
Bit Patterns ...................................................................................................................................... 74
Error Reporting ............................................................................................................................... 75
Signal Summary .............................................................................................................................. 75
Signal Reference.............................................................................................................................. 78
Appendix D: Error Conditions
132
Appendix E: System limitations
134
Serial Transmissions...................................................................................................................... 134
Signal Definitions.......................................................................................................................... 134
Appendix F: Standard Scrollers vs. Custom Scrollers
iii • Table of Contents
135
Installation & Reference Guide — DOC. 5822
Crestron e-control Vote
SW-VOTE
Crestron
e-control Vote
How to Use This Manual
A Note on Printing This Document
Adobe and Acrobat are
trademarks of Adobe Systems
Incorporated.
This Portable Document File (PDF) can be printed with Adobe Acrobat Reader.
Printing from a Windows 95 platform, version 4.0 or later, is strongly recommended
because the figures print poorly with earlier versions. The latest version is freely
available from Adobe at http://www.adobe.com/acrobat/.
Quick Start
To see an “out-of-the-box” demonstration of Crestron e-control™ Vote as quickly as
possible, turn to one of the Quick Start Guides on the next page.
You will need:
•
•
•
•
•
A PC running Windows 95/98/NT
A Crestron CNMSX-PRO control system
A touchpanel (LC-3000, CT-3000, CT-3500, or VT-3500); and
A programming cable (CNSP-? or equivalent)
A null-modem cable with hardware handshaking (CNSP-532)
Follow the instructions in the guide precisely in the order given and you should be up
and running in a matter of minutes.
NOTE: The demos included with this package are all compiled to two versions, a COM version for
use with an RS-232 serial connection, and a TCP version for use with an Ethernet connection (the
latter case requiring the CNX Gateway). The Quick Start Guides refer only to the COM versions of
these programs because setting up a serial connection is far simpler. We strongly recommend getting
at least one demo to work first using a serial connection. Once that works, try the TCP versions.
Instructions for setting up TCP/IP communications are provided below (see “Communications
Setup, Control System Side, TCP/IP,” page 22).
A word on licensing
This is a licensed software product. A license “key,” obtainable from Crestron, is
required to run it. However, built into the licensing mechanism is a 15-day free trial.
4 • How to Use This Manual
Installation & Reference Guide — DOC. 5822
Crestron e-control Vote
SW-VOTE
You do not need to license the software to try the demos provided you are still within
the 15-day free trial period — which starts from the moment you install the product
on your computer.
NOTE: The trial period of all Crestron Software Server products (SW-EMAIL, SW-DBM,
SW-VOTE, etc.) all share the same trial period. That is, if you previously installed one of these
products on the same computer more than 15 days ago, your free trial period for all three products
has already expired, regardless of the fact that a new product has been installed. If this is the case,
you can still get a free trial by installing the new product onto a different computer which has not
previously had any of these products installed on it.
5 • How to Use This Manual
Installation & Reference Guide — DOC. 5822
Crestron e-control Vote
SW-VOTE
Quick Start Guide 1: Request-to-Speak (demo1)
1
Install this package on your PC
Presumably, since you are reading this PDF file, you have already done this.
2
Connect a CNMSX-PRO (with touchpanel)
Connect a programming cable (CNSP or equivalent) from any COM port on your
PC to the COMPUTER port on the front or back of the CNMSX-PRO control
system. Connect a touchpanel to the control system set up for CRESNET ID 03.
3
The demo files can be found in the
demos folder (also accessible
through the Start Menu shortcut
e-control Vote Demos)
4
Make sure pins 4, 5, and 6
are not connected.
Upload all control system software
Open the Crestron Viewport and establish communications with your control system.
If you have not already done so, use the FileTransfer | Send Touchpanel…
command to upload demovote.hex to the touchpanel at ID 03. Use the
FileTransfer | Send Program… command to upload the compiled SIMPL windows
file demo1COM.bin to the CNMSX-PRO. You may now close the Viewport.
Connect the null modem cable
Connect a CNSP-532 null-modem cable from COM1 on the PC to COM A on the
CNMSX-PRO. (The programming cable may now be removed.)
5
The installer sets the server to
use config file
demovote.ini.
Run the “server” application
Select shortcut e-control Vote Server from the Crestron folder in the Windows Start
Menu. If the title bar of the window does not read “e-control Vote (SW-VOTE)
Demos,” use the File | Configuration file… command to navigate to the demos
folder and select the file demovote.ini.
6
Start the “server protocol”
Give the command Server | Start Server w/Signal Analyzer. (The Signal Analyzer
is good for demos because it shows you the various signals going back and forth.)
7
Start the demo
On the touchpanel, touch the Start Demo button. You will see a PLEASE WAIT
screen until the signal block becomes fully enabled.
8
Enter a few requests
Touch a few 1 and 2 buttons from the seven “seats.”
9
Recognize a seat!
Recognize a seat by touching a name in a queue. Recognize another seat by touching
another name; force a seat to yield by touching the Yield button.
10
Options
Back out by touching Load or Save; and then Main Menu; and then Shut Down.
Reconfigure the server by selecting different options in the Request button behavior
frame of the Request-to-Speak Console Signal Block Definition window. These
options add functionality to the seats’ request buttons. (Return to step 6.)
6 • Quick Start Guide 1: Request-to-Speak (demo1)
Installation & Reference Guide — DOC. 5822
Crestron e-control Vote
SW-VOTE
Quick Start Guide 2: Voting (demo2)
1
Install this package on your PC
Presumably, since you are reading this PDF file, you have already done this.
2
Connect a CNMSX-PRO (with touchpanel)
Connect a programming cable (CNSP or equivalent) from any COM port on your
PC to the COMPUTER port on the front or back of the CNMSX-PRO control
system. Connect a touchpanel to the control system set up for CRESNET ID 03.
3
The demo files can be found in the
demos folder (also accessible
through the Start Menu shortcut
e-control Vote Demos)
4
Make sure pins 4, 5, and 6
are not connected.
Upload all control system software
Open the Crestron Viewport and establish communications with your control system.
If you have not already done so, use the FileTransfer | Send Touchpanel…
command to upload demovote.hex to the touchpanel at ID 03. Use the
FileTransfer | Send Program… command to upload the compiled SIMPL windows
file demo2COM.bin to the CNMSX-PRO. You may now close the Viewport.
Connect the null modem cable
Connect a CNSP-532 null-modem cable from COM1 on the PC to COM A on the
CNMSX-PRO. (The programming cable may now be removed.)
5
The installer sets the server to
use config file
demovote.ini.
Run the “server” application
Select shortcut e-control Vote Server from the Crestron folder in the Windows Start
Menu. If the title bar of the window does not read “e-control Vote (SW-VOTE)
Demos,” use the File | Configuration file… command to navigate to the demos
folder and select the file demovote.ini.
6
Start the “server protocol”
Give the command Server | Start Server w/Signal Analyzer. (The Signal Analyzer
is good for demos because it shows you the various signals going back and forth.)
7
Start the demo
Do one of the following to enable the the Voting Console:
(1) From the touchpanel, touch the Start Demo button. You will see a PLEASE
WAIT screen until the signal block becomes fully enabled.
(2) From the Voting Computer, open the Vote Proctor window by selecting the
Voting | Start Voting command from the main window.
8
Set Agenda
Select an item to vote on by touching Set Agenda on touchpanel, or by selecting an
item from the combo-box in the Vote Proctor window.
9
Take a vote!
Select* Start Vote. Go to the Simulated Voting Stations Page and enter a few votes.
10
Close the floor; make a change; display results
Select End Vote. Select seat icons to adjust their votes. Select Display Results. Etc.
*
Touch button on touchpanel or click button in Vote Proctor window.
7 • Quick Start Guide 2: Voting (demo2)
Installation & Reference Guide — DOC. 5822
Crestron e-control Vote
SW-VOTE
Introduction
Below, you will find introductory material on several aspects of the Crestron
e-control Software Server product family, including the following specific subsections:
Sub-section
Description
Page
What is Crestron econtrol™ Vote?
An abstract describing the Crestron e-control Vote
component of the Crestron Software Server,
including a table of practical limitations.
follows
directly
Leading
Specifications
A table summarizing Crestron products required to
build an application using e-control Vote.
page 9
Requirements
A section detailing minimum system requirements.
page 9
What is the Crestron
Software Server?
Another abstract, describing the Crestron Software
Server itself.
page 10
System Terminology
and Topology
This illustrated section includes system block
diagrams.
Feature Summary
An in-depth summary of all features of the e-control
Vote server component.
page 13
Installation
Brief instructions on installing the package.
page 17
Licensing
An explanation of the licensing requirements and
interface.
page 17
page Error!
Bookmark
not defined.
What is Crestron e-control™ Vote?
Crestron e-control Vote (SW-VOTE) uses a Crestron control system and a PC to
perform both voting and request-to-speak functions. It is licensable software which
runs on the PC and communicates with Crestron control system(s) to serve the voting
and request-to-speak needs of a legislative body.
NOTE: In the following table, the term “unlimited” should be read as “practically unlimited”
meaning “limited only by system resources,” such as number of available control system signals,
number of available indirect text fields, etc.
Table of practical limitations
8 • Introduction
Specification
Range
Window sizes (pixels)
Vote Proctor window: 1024x768, 1152x870, or 1280x1024
Vote Results window: 1024x768 (only)
Voting Consoles
One (1). The present release requires the use of the Voting
Computer interface for voting, which limits operations to a
single room.
Request-to-Speak
Consoles
Unlimited; however in the present release, all utilize the same
list of seat names, again limiting operations to a single room.
Seats
Unlimited; however the Vote Results window will only display
the first 80 names.
Attendance*
Seat signals: PRESENT, ABSENT
Clerk control: PRESENT, ABSENT
Votes
Seat signals: YES, NO, ABSTAIN*, EXCUSE* (conflict-ofinterest)
Clerk control: YES, NO, ABSTAIN*, EXCUSE*, nullify a vote
Agenda item list* size
Unlimited number of items
Request-to-speak queues
Unlimited number of queues; note however that there is only
Installation & Reference Guide — DOC. 5822
Crestron e-control Vote
SW-VOTE
Specification
Range
room for five (5) columns (queues) across a regular 8.5”-wide
paper printout.
Order in which names are
recognized from queues
No particular order enforced.
Times a seat can request
to speak on an item
Seats may be recognized to speak on an item up to ten (10)
times before the queue(s) are cleared; may be set to once (1).
Varies as per configuration. Make estimates using the
formulae in the following table:
Control system signals
Item
Digital
Analog
Serial
Typical Request-toSpeak Console with
q queues, f files, and
s seats
10 + q +
2qs + 2f
2
1+f+q
Voting console with
s seats each having
b vote buttons
21 + s +
bs
6+s
2+s
15
1
17
Standard Scroller
(one per queue or
agenda list)
Items in the table above that are marked with an asterisk (*) are configuration
options which may be excluded from the finished application. (Exception: The
agenda item list is optional on a touchpanel interface but not an option on the Voting
Computer interface.)
Leading Specifications
The following table lists the Crestron products required to build an application using
e-control Vote.
Specifications
Details
Version
SWSERVER.EXE
(included with this
package)
Required. Contains all the latest components
although only those actually licensed will be available
for use. (All components available during 15-day free
trial period.)
1.5
CNMS/RACK
Operating System
Required for older generation racks.
3.18.12
CNMSX/RACKX
Operating System,
Monitor, and
Stack
Required. The version number at right refers to the
UPZ packages which contain all three components.
Use the 51011x.upz package for CNMSX-PRO or
-AV; and 51011z.upz for CNRACKX.
5.10.11
CNX Gateway
Required for TCP/IP server-control system connections only; not required when all connections are
serial.
2.08.04
SIMPL™ Windows®
Required for programming control systems.
1.4
VisionTools™ Pro-e
Required only when designing touchpanels (if any),
2.1
Microsoft® Access
Required only when implementing more than sixteen
(16) active request-to-speak queues (among all RTS
Consoles).
Access 97
Requirements
The server should meet these minimum system requirements.
Windows 95/98/NT Operating System hardware requirements
32 MB RAM
9 • Introduction
Installation & Reference Guide — DOC. 5822
Crestron e-control Vote
SW-VOTE
100 MB hard drive space
133 MHz or faster Pentium processor
A faster processor is recommended for serving multiple connections
simultaneously
COM ports
Required to make serial (RS-232) connections to control systems (one
port per control system). (See Cable requirements below.)
Network Interface Card
Required to make TCP/IP connections to control systems.
TCP/IP sockets
(These are software constructs provided by your operating system. The
maximum number of sockets is operating system dependent.)
Server requires one socket per server–control system connection
Required for EtherNet control system connections only. The maximum
number of sockets is operating system dependent.
CNX Gateway (see below) requires one socket + one additional socket per
server–control system connection
Cables
Precise CNSP-532 specs are
available in the Crestron Cable
Database.
Null modem cable, Crestron model CNSP-532 or equivalent
Required for serial control system connections only.
Warning: Do not use a generic null modem cable.
Auxiliary software
CNX Gateway
Required for TCP/IP (EtherNet) connections between the server and
the control systems. Not required for serial connections.
What is the Crestron Software Server?
The term “server” should not be
taken to imply a need for specialized hardware. Any PC meeting
the minimum requirements (page
9) will suffice to run the server
application.
The actual logic involved in the functions described in the previous section is not
carried out by the control systems themselves, but by the freely distributed Crestron
e-control Software Server. This “server” is a software-only product which is hosted
on a standard PC running Windows® 95/98 or Windows NT®. The server performs
various tasks which are beyond the scope of a control system. These tasks usually
involve access to and processing of large amounts of data (“large” relative to what a
control system is capable of dealing with), such as:
• Exchanging data with large databases (which may be local to the server’s PC or remotely
accessed across a LAN).
• Exchanging data with other computers via the Internet (such as e-mail; and mining data
off of World Wide Web pages; etc.).
• Performing translation and report functions — and other complex logical functions — on
such data in support of specific application requirements.
The server consists of several licensable components which translate data in
application-specific ways and funnel the data to and from the connected control
systems. The bulk of this manual covers the specific functions provided by the SWVOTE component.
The data from the server appears to the connected control systems as “blocks” of
digital, analog, and serial signals. Separate “signal blocks” are defined in the server
for each function, each of which is reflected in a control system using Intersystem
Communications symbols. There are several standard types of signal blocks, all
10 • Introduction
Installation & Reference Guide — DOC. 5822
Crestron e-control Vote
SW-VOTE
customizable to some extent. See “Signal Block Configuration and Definition,” page
30, for specifics.
The server is connected to each control system via either a serial cable through an
RS-232 port or an Ethernet network through a LAN port. To effect the latter type of
connection, the control system relies on an intermediary, the Crestron CNX Gateway,
to translate communications protocols. To aid in making this clear, the following
illustrated discussion of system terminology and topology should prove useful at this
point.
System Terminology and Topology
The server is connected to the control system via either a serial cable through an
RS-232 port or an Ethernet network through a LAN port. To effect the latter type of
connection, the control system relies on an intermediary, the Crestron CNX Gateway,
to translate communications protocols.
This manual simultaneously discusses several different inter-connected computer
systems. To reduce confusion, throughout the manual, these systems are referred to
using the terms in the following table. (Also refer to the diagrams on the next page.)
Term
Explanation
The system
or the control system
One of a number of Crestron control system(s), which may
include any combination of the following models: CNMS,
CNRACK, CNMSX-PRO, CNMSX-AV, and CNRACKX.
The server
or the software server
or the Voting Computer
The Crestron Software Server, swserver.exe, which runs
on a PC under Microsoft® Windows® 95 or Windows NT®.
The gateway
or the CNX Gateway
A communications conduit that sits between the server and
the control system(s).
The control system(s) are connected to the server via direct RS-232 serial connection
or via TCP/IP to the gateway and thence via TCP/IP to the server.
NOTE: “Connected via TCP/IP” means any node (computer) visible on the Local Area Network
(LAN). If the LAN is connected to the Internet, this could include any node visible anywhere on the
Internet. Since a node can also see itself, this implies that multiple services can run on the same
machine. For example, the gateway and the server can be “self-hosted” in this way.
In the illustration that follows, the communication pathways are represented by the
arrows. The physical network is not represented, however.
11 • Introduction
Installation & Reference Guide — DOC. 5822
Crestron e-control Vote
SW-VOTE
System block diagram, showing communication pathways (all connections using TCP/IP):
Crestron
control
system
VT-3500
VT-3500
Crestron
CNX
Gateway
VT-3500
Crestron
Software
Server
Crestron
control
system
VT-3500
VT-3500
VT-3500
Database
System block diagram, showing communication pathways
(curved arrows are RS-232 serial connections; straight arrows are TCP/IP):
Crestron
control
system
VT-3500
VT-3500
Crestron
control
system
VT-3500
Crestron
Software
Server
VT-3500
VT-3500
VT-3500
Database
NOTE: The CNX Gateway is not necessary when using RS-232 serial communications.
TCP/IP connections between the server and the control systems require that each
side of the connection be provided with the IP address of the other. This kind of
connection also requires the use of the CNX Gateway which is separately licensed
software that facilitates communication between the server and the control system.
The CNX Gateway is typically installed on the server (when sufficient TCP/IP
sockets are available) or it can be installed on any computer visible (i.e., pingable) on
the TCP/IP network. There only needs to be one Gateway running on one computer
to service the needs of all the computers and CNX control systems on the network.
However, multiple Gateways are perfectly permissible as long as they are run on
different computers.
12 • Introduction
Installation & Reference Guide — DOC. 5822
Crestron e-control Vote
SW-VOTE
Feature Summary
Licensing the SW-VOTE component permits the creation and activation of the
following types of signal blocks (see “Signal Block Configuration and Definition,”
page 30, for more information on signal blocks):
• Voting Console signal blocks provide Operators with the ability to control, monitor,
adjust, display, and record votes.
• Request-to-Speak (RTS) Console signal blocks provide Operators with the ability to view
request-to-speak queue sets and recognize speakers.
Although the Voting Computer can simultaneously support multiple active Requestto-speak Consoles signal blocks, the present release only supports a single active
Voting Console signal block. Furthermore, inasmuch as all these signal blocks use
the same database table for seat names (the Members table), they are only useful
when serving the needs of a single body (i.e., within a single room).
To serve the needs of multiple bodies meeting at different times, prepare alternate
server configurations (each with its own database file) and switch configurations
before each meeting. Switching configurations is simple, consisting of pointing to a
new file with a standard file “Browse” window. You can name these files after the
bodies they represent. However, it should be noted that the present release only
supports switching configurations when the server is halted; and this operation must
be carried out from the Voting Computer interface and is not available from a
touchpanel.
In addition to — or as an alternative to — a voting console (human interface) on the
control system (button panel and/or touchscreen), a full interface is also supported on
the Voting Computer. Note however that this is not the case for Request-to-Speak
consoles.
Voting Console signal blocks
Voting Console signal blocks accept and respond to signals from both the Operator
and the individual seats in the voting chamber.
Summary of Operator functions
A Operator controls a vote from one or more of the following user interfaces, all of
which may be active simultaneously:
• the PC screen using a mouse, and/or
• a Crestron touchpanel, and/or
• a hardwired control panel of buttons and tally lights (i.e., simple digital i/o)
All above user interfaces provide the following functions:
General:
• Send names
Sends the name of each seat from the Members database table
Before floor is “opened” (for a vote):
• Take attendance (all seats are assumed to be present if this step is omitted)
• Open floor to a vote (activate seats’ voting buttons)
While floor is opened:
• Close floor to further voting (deactivate voting buttons)
After floor is closed:
• Display (or redisplay) results of vote to assembly
• Abort vote before it is recorded
• Report results
13 • Introduction
Installation & Reference Guide — DOC. 5822
Crestron e-control Vote
SW-VOTE
The following additional functions are only available to the PC screen or Crestron
touchpanel interfaces (not available through a control panel-only interface):
Before floor is opened:
• Operator selection of a chairperson from among assembled membership (there is a
default if this step is omitted)
• Operator selection of an agenda item from a database table, or, in the case of an
impromptu vote, entered directly from the PC’s keyboard or the touchpanel’s simulated
“keyboard.”
While floor is opened:
• Visual feedback of vote progress (which seats have voted, as opposed to which have not
yet voted, optionally showing how each vote has been cast)
• Provide a live tally of vote results (Yeses, Nos, Abstentions, Total votes cast, plus
number of Absentees, and number of seats excused from the present vote)
After floor is closed:
• Adjust votes (which at this point are displayed to Operator as they were actually cast),
and redisplay the results; this operation may be repeated indefinitely
Vote reporting modalities include:
•
•
•
•
as a record added to a database table
in a textfile
as a print-out (optional)
via high-resolution video display.
Summary of Seat functions
Each member’s seat has buttons for each kind of ballot they can cast, which normally
would include at least
• Yes (also doubles for “present” during taking of attendance)
• No
Seats might also have the following additional buttons:
• Abstain
• Conflict (actually a Request-to-Speak button; see next section)
All vote buttons (Yes, No, and Abstain) are momentary contacts which transmit a
pulse to the server. It is not necessary to worry about de-bouncing these buttons;
additional pulses are ignored. Nevertheless, buttons typically display feedback to
allay user anxiety about whether the system has “heard” their button press.
Feedback is not however controlled by the Voting Computer, but rather locally (by
the control system). Depending on the rules of the voting body, your control system
program should provide feedback to either the last vote button pressed, or to all vote
buttons whenever one is pressed. In the latter case, a single Vote has been cast
feedback might suffice (rather than lighting up all buttons), although after the floor
has been closed, it may be desirable to go ahead and display each seat’s actual vote
using the individual button feedbacks. (See the Statuss signals in the Signal
Reference.)
Request-to-Speak Console signal blocks
Like the Voting Console signal block, Request-to-Speak Console signal blocks also
accept and respond to signals from both the Operator and the individual seats in the
voting chamber. The Request-to-Speak Console signal block automatically maintains
a number of request-to-speak queues, each of which displays the order in which
members have pressed their various RTS buttons to enter the queue.
14 • Introduction
Installation & Reference Guide — DOC. 5822
Crestron e-control Vote
SW-VOTE
Queue sets
Each RTS signal block can support an arbitrary number of queues (called a queue
set), all of which can be active simultaneously. Typically a queue set will contain at
least one queue for members to use to request time to speak on an item.
Additional queues might be set up to question the speaker, to question counsel, to
raise points of order, etc. Any or all of these additional queues may be set up as
dependent queues. Dependent queues are automatically cleared whenever a seat is
recognized from the first queue. This feature would typically be used for a “request
to question speaker” queue.
The precise state of the currently displayed queue set is implicitly saved to the
database whenever a change is effected — whether by action of the Operator or any
individual seat. This information, the last known state of the queue set, is
automatically redisplayed upon re-enabling the signal block.
In addition, the current state of the queue set may be frozen (“put on hold”) by
saving it to any of nine save files. The display might then be cleared (i.e, to open
debate on a new item); or any of the save files might then be reloaded into the
display (overwriting the current state — which presumably is no longer of interest or
has been saved).
The information that is saved in the database includes the names in each queue in the
order in which they were added to the queue and the specific states of each name.
Whenever a queue set is reloaded, individual seat button feedbacks are inferred from
this information and tallied back to the seats.
Note that all the queues in a queue set are saved and reloaded together. If you need to
save queues separately, define separate Request-to-Speak Console signal blocks for
each such queue (or sub-set of queues).
Seat marks
Before discussing specific operator and seat functions, familiarize yourself with the
various possible “marks” (states) each seat can take on with regard to the Request-toSpeak functions:
Mark (state)
Definition
(not in queue)
Seat not in queue (button feedback dark)
WAITING
(see note)
Seat has requested to speak; but
does not yet have the floor
WAITING-n
(see note)
Seat has already spoken n – 1 times;
has requested to speak for the nth time;
does not yet have the floor
RECOGNIZED
DONE
(see note)
Seat remains in queue after speaking
(either seat yielded his time voluntarily; or was forced to yield
either by Operator or by running out of time)
DONE-n
(see note)
Seat remains in queue after speaking for the nth time
HOLD
15 • Introduction
Seat has the floor
Seat had the floor but has temporarily yielded it
EXHAUSTED
Seat has requested to speak for the nth time where n = one
more than the maximum times permitted by the configuration
(cannot be recognized again)
INSISTENT
Seat has requested to speak for the nth time where n > one
more than the maximum times permitted by the configuration
(cannot be recognized again)
Installation & Reference Guide — DOC. 5822
Crestron e-control Vote
SW-VOTE
NOTE: WAITING and DONE appear only on consoles configured for single use queues; WAITING-n and
DONE-n appear on consoles configured for re-entrant queues.
Summary of Operator functions
Through a touchpanel interface, working through the control system, the Operator
has complete flexibility in recognizing seats in queues. Operator functions include:
• Send names
Sends the name of each seat from the Members database table.
• Load queue set
Reloads all queues from a previously saved file;
sets feedback states of all seats’ RTS buttons.
• Recognize (a seat from a queue)
Forces previously recognized seat, if any, to yield its remaining time, if any, and killing
its mic;
marks selected seat as recognized; asserts its mic.
• Put a seat “on hold”
Places recognized seat “on hold”;
kills its mic.
• Take a seat “off hold”
Forces recognized seat, if any, to yield its remaining time, killing its mic;
asserts mic for newly recognized seat.
• Yield
Forces recognized seat to yield its remaining time;
kills its mic.
• Print
Prints current state of all queues.
• Clear a queue
If queue contained recognized speaker, kills his mic;
automatically clears any dependent queues as well.
• Clear all queues
Kills mic (if any active)
automatically clears any dependent queues as well.
• Save queue set
Saves current state of all queues for reloading at some future date.
Speaker timer functions are not implemented in the server but are left to the control
system. (See the Yield signal in the Signal Reference.)
Another popular function, printing queues whenever a queue is saved, or whenever
the touchpanel leaves the RTS Console page, is also left to the control system. (See
the PrintReport signal in the Signal Reference.)
Summary of Seat functions
Members have a single button for each queue. Each such button has feedback
indicating the seat’s presence in the queue. Unlike the seat’s voting buttons, all
request-to-speak buttons’ feedback are controlled automatically by the Voting
Computer through the Request-to-Speak Console signal block.
For each queue, the functions described below are all available to each seat by
momentary contact of that seat’s Request-to-Speak (RTS) button (there being one
such button per queue, per seat). Functions included:
Before entering queue (button feedback is dark; mic is dead):
• Request to speak
feedback asserted; seat added to bottom of queue, marked as WAITING
In queue but not yet recognized (button feedback is hot; mic is dead):
• Cancel request to speak
seat removed from queue (loses place in queue)
16 • Introduction
Installation & Reference Guide — DOC. 5822
Crestron e-control Vote
SW-VOTE
In queue and recognized (button feedback is hot; mic is hot):
• Yield remaining time
feedback goes dark; mic goes dead; seat remains in queue, marked as DONE
If the signal block is configured to allow seats to speak more than once, the
following functions are also available to each seat. (In this case, the queue status
symbols shown above, WAITING and DONE, would instead appear as WAITING-1 and
DONE-1.)
Done speaking (button feedback is dark; mic is dead; still in queue, marked as FINSIHED-1):
• Request to speak again
Feedback re-asserted;
seat remains in queue, now marked as WAITING –2.
In queue but not yet recognized (button feedback is hot; mic is dead):
• Cancel request to speak again
Seat remains in queue, marked again as FINSIHED-1.
In queue and recognized again (button feedback is hot; mic is hot):
• Yield remaining time
Feedback goes dark;
mic goes dead;
seat remains in queue, now marked as DONE-2.
The specific function implied by a particular button press depends on the state of the
seat vis-à-vis the queue. This state can be inferred from the following two pieces of
information:
• Button feedback
Button feedbacks come from the Voting Computer;
Feedbacks indicate whether or not a seat is currently in the queue.
• Has the floor (is recognized to speak)
Reflected in mic status.
Therefore, either the mic status should have a tally light of its own (at each seat), or
some other display plainly visible to all seats can be used to indicate who has the
floor. (Such as a large seat number display, or a public video display of the
Operator’s Request-to-Speak Console screen.)
Installation
As of this writing, the Crestron
Downloads page can be found at:
http://ftp.crestron.com/library/
To install the Software Server, first download the installer package from the
Crestron FTP site. To do this, first go to the Crestron website and select the
Downloads page. New users must register. Proceed to the ECONTROL Library.
Simply click on SW-VOTE.EXE to start the download.
Once the install package arrives on your PC, double-click the icon to initiate the
install. Directions for the install are provided. The package is typically installed in
C:\Crestron\econtrol. During the install, the package reminds the user that a CNX
Gateway is required. (This is actually only true for TCP/IP connections. Direct
RS-232 connections do not require the CNX Gateway.)
Licensing
A 15-day free trial follows initial
installation. If you are still within
the 15-day period, you have the
option to postpone licensing and
skip to the next section.
17 • Introduction
Both the Software Server and the CNX Gateway are a licensed products, which
means that although both software packages may be freely downloaded from the
Crestron FTP site, use of the software requires purchase of licenses from Crestron.
Each server running the Software Server must be individually licensed. In addition,
to use Ethernet, you must acquire a CNX Gateway license with sufficient
connections to accommodate all servers and control systems on your network.
Installation & Reference Guide — DOC. 5822
Crestron e-control Vote
Server components are separately
licensed. An SW-VOTE license
must be obtained from Crestron
even if other components are
already in use.
SW-VOTE
Each package, once installed, generates a “Site Code” specific to the server on which
it is running. Upon being provided with these Site Codes, Crestron can issue the
appropriate “Site Keys,” which, once entered into each package’s licensing window,
enables the full functionality of the software.
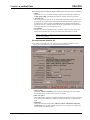
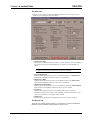
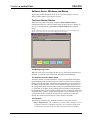
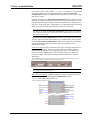
Obtaining a License
e-control Software Server – Upgrade/Transfer License window
showing “unlimited” database license — shown activated (checked)
You must use the Copy button to
copy the SITE CODE to the
clipboard. (Copying with Ctrl+C
does not work from this field.)
Open the server application. Select Server | License to open the e-control Software
Server – Upgrade/Transfer License window, shown above. The license can be
obtained over the phone or via e-mail. Call Crestron Customer Support with the
“Site Code” shown in the Site Code field. However, it is easier and far more reliable
to copy the “Site Code” into an e-mail message addressed to license@crestron.com.
Once received, Crestron Customer Support issues a “Site Key” which must either by
typed or pasted into the Site Key field of the window. Once entered, click on the
Update License button. If the key is valid, the licensed components appear in the list
above. Before closing the License Window, be sure to activate the components you
plan to use. In the above example, the user has checked the box next to SW-VOTE.
It is permissible to exit the program while waiting for a “Site Key” to be issued. The
application can be restarted and the “Site Key” entered at a later time. The “Site
Key” issued is only valid on the same computer. It does not work on a different
computer.
The License Window of the CNX Gateway is almost identical to the above. See the
documentation that comes with the Gateway package for specific instructions.
Transferring an Existing License to Another Computer
As mentioned, a license is only valid on the computer for which it was obtained.
However, a license can be transferred from one computer to another without the need
to contact Crestron first. There are several reasons to transfer a license. The
application developer may set up the system off-site, then transfer the license to the
actual computer on-site when ready. Alternatively, if the hardware or operating
system on the computer where the server is licensed is upgraded, the license may
18 • Introduction
Installation & Reference Guide — DOC. 5822
Crestron e-control Vote
SW-VOTE
cease to be valid, but could be transferred to another computer before the upgrade
and then back to the original machine after the upgrade.
On both the source computer (where the license is currently valid) and the
destination computer (where the license is to be transferred), open the server
application. Select Server | License to open the e-control Software Server –
Upgrade/Transfer License window (shown above). Make sure this window is active
on both computers.
Step 1. On the destination computer, create a preparation file on a diskette in the A:
drive by inserting a blank, formatted diskette and selecting Prepare Diskette. This
creates a file on the diskette which indicates who is receiving the license. A second,
backup copy of the file is also created. Alternatively, these files can be created on
another portable media (e.g. Zip disc) or a network drive by simply browsing for a
new file location in the save file window. If you plan to transfer via a network drive,
first make sure that both computers have the appropriate read/write access to the
drive and folder being used.
Step 2. After the above step has completed, remove the diskette from the drive and
insert it into the source computer’s floppy drive. Do not flip the write-protect tab; the
diskette must remain write-enabled. Click on the Transfer License button. The
source computer reads the preparation file to see which computer wants the license.
It encodes the license for the destination and writes it back to the same file on the
floppy diskette (or network drive). The source computer has now passed the license
to the file. Only the designated computer can use the license, so the server is no
longer licensed on the source computer.
NOTE: At this point in the transfer procedure the server license resides on a file on the diskette or
network drive, and not on the computer. If this file should become lost or damaged, the license is
lost as well. Because of this, please use the utmost care while performing this transfer.
Step 3. Bring the diskette back to the destination computer. Click on the Transfer
License button. The computer reads the license information off the diskette and
transfers the license to itself. The server is now licensed on this machine.
19 • Introduction
Installation & Reference Guide — DOC. 5822
Crestron e-control Vote
SW-VOTE
Basic Server Setup
This product requires a proper physical connection between both “sides” of the
system — the server and the control system. Furthermore, the software on both sides
must be properly configured. As previously discussed, the connection can be either
serial via RS-232 cable or Ethernet via Local Area Network (LAN). Choose your
mode of communication and refer to the following sections to make the proper
physical connections and to configure the software.
The following sections include specific notes in italics for setting up the server and
the control system to run the two included demo programs. Although the focus is
therefore on the demos, the same basic procedures would be followed to ready the
system for any other programming as well.
The files for both demos are in a folder called demos which can be located
through the following Start Menu shortcut:
Start Menu
| Programs
| Crestron
| e-control Vote
| e-control Vote Demos
Inside this folder there are two individual demo folders and support files:
demo1
demo2
demovote.vtp
demovote.hex
demovote.ini
demovote.mdb
Request-to-Speak demo
Voting demo
VisionTools touchpanel project file
compiled VisionTools file
Server’s Configuration Settings file which accommodates both demos
Sample database file for use with all three demos
The installer registers demovote.ini as the currently selected Configuration
Settings file. (If the server’s title bar does not read “e-control Vote (SW-VOTE)
Demos,” use the File | Configuration file… command to reset it.) This file
configures the server for both demos.
Each demo folder contains the following files:
Demo?COM.smw
Demo?TCP.smw
demo?COM.bin
demo?TCP.bin
RS-232 is featured in the Quick
Setup Guide because it is easy to
set up. Because we anticipate
strong interest in TCP/IP, we have
pre-built both versions for your
convenience.
SIMPL Windows project file (RS-232 version)
SIMPL Windows project file (TCP/IP version)
compiled SIMPL program code (RS-232 version)
compiled SIMPL program code (TCP/IP version)
In the above, ? stands for the demo number. The two versions of the SIMPL
program for each demo, (COM and TCP) are almost identical, both being
configured for a CNMSX-PRO, using the front panel device and a touchpanel with
CRESNET ID = 03. Both versions have ports defined for both serial (RS-232)
communications via the CNMSX-PRO’s built-in COM A port (slot 4, port A), and
EtherNet (TCP/IP) communications via the LAN port on a CNXENET card installed
in the CNMSX-PRO’s DPA slot. In the COM versions, the TCP/IP port is
commented off while in the TCP versions, the RS-232 port is commented off. This
is the only difference between the two versions.
The following sections separately describe the setup procedures for connecting
multiple control systems via either RS-232 or TCP/IP connections. Actually, a
mixture of connections is permitted. For example, two control system might be
connected via RS-232 (using the COM1 and COM2 ports) while two more might be
simultaneously connected via the TCP/IP network connection.
20 • Basic Server Setup
Installation & Reference Guide — DOC. 5822
Crestron e-control Vote
SW-VOTE
In the following, the indented, italicized paragraphs contain advice on setting up the
server and a control system specifically to run the supplied demo files. You will find that
most of the steps have already been accomplished because they are specified by the
supplied demo configurations.
Communications Setup
Server Side
1.
Run server application by selecting Database Manager from the Crestron
folder of your Start menu.
2.
Select config file. Specify a Configuration Settings file (.ini file) by selecting
File | Configuration File…. Refer to “Specifying a Configuration File,” page
26.
The server is installed with a demomail.ini pre-selected as the default
configuration file. (This is intended to simplify the Quick Start Guide.)
3.
Set communications mode. Select Server | Configure and enter a password to
open the Configuration Options window. (Refer to “Password Access” on
page 27). Select the COM Settings tab. The settings for each connection to a
control system must match those on the other end (the control system side) of
the actual connections. Click on each connection in turn, click the Modify…
button, and choose either RS-232 (and select the port and speed) or TCP/IP
(and set the IP address and IP ID). Click OK to make the changes for each
connection.
The demos are pre-configured to use RS-232.
Control System Side, RS-232
Serial communication requires wiring the server directly to the control system.
NOTE: Serial communications requires neither the CNX Gateway software nor the use of an
Ethernet network.
1.
Connect PC for programming purposes. For each control system to be
connected to the server, temporarily connect the PC containing the control
system and touchpanel project files to the control system via a serial cable
between any available COM port of the server and the COMPUTER port of
the CNX control system. (This could be — but need not be — the same
physical machine that runs the Software Server.) Refer to the CNMSX manual
(latest revision of Doc. 8118) for instructions. This connection can be
removed once the control system is programmed.
2.
Install control system program. Upload the compiled SIMPL Windows
program file (.bin file) to each control system.
As supplied, the demo programs are configured for a CNMSX-PRO control system.
For other models, using SIMPL Windows, convert the program as described below
and recompile.
3.
Install touchpanel pages. Upload the compiled VT Pro-e project file (.hex
file) to each control system.
As supplied, the demo touchpanel file, which contains pages for all the demos, is
configured for a LC-3000 touchpanel; and the accompanying .hex file is compiled
for same. This file however also works fine with an CT-3000, CT-3500, and a
VT-3500. If you have one of these models, go ahead and upload the .hex file as is.
If you are working with another panel, convert the file to your target panel and
recompile.
21 • Basic Server Setup
Installation & Reference Guide — DOC. 5822
Crestron e-control Vote
SW-VOTE
4.
Connect to server. Connect null-modem cables (Crestron model CNSP-532)
from each control system to the server. Each connection requires its own
COM port on the server side. The port to use on the control system depends
on the specific model:
CNMSX-PRO. Use one of the built-in COM ports.
The demo files are all configured for a CNMSX-PRO using COM A (slot 4, port A).
CNMSX-AV. Use one of the built-in COM ports.
Use SIMPL Windows to convert the demo files. In the Configuration Manager, drag &
drop a CNMSX-AV system onto the CNMSX-PRO. The converted system does not have a
front panel, so compile “notices” appear — which can be ignored.
CNRACKX. Install a CNXCOM-2.
Use SIMPL Windows to convert the demo files. In the Configuration Manager, drag &
drop a CNRACKX system onto the CNMSX-PRO. The converted system has a
CNXCOM-2 card in slot 4; use Port A. The converted system does not have a front panel,
so compile “notices” appear — which can be ignored.
CNMS. Install a CNCOMH-2 card. Use of the built-in COM ports for the present
purpose is not recommended.
Use SIMPL Windows to convert the demo files. In the Configuration Manager, drag &
drop a CNMS system onto the CNMSX-PRO. The converted system has a CNCOMH-2
card in slot 5; use Port A. The converted system does not have a front panel, so compile
“notices” appear — which can be ignored.
CNRACK. Install a CNCOMH-2.
Use SIMPL Windows to convert the demo files. In the Configuration Manager, drag &
drop a CNRACK system onto the CNMSX-PRO. The converted system has a CNCOMH-2
card in slot 4; use Port A. The converted system does not have a front panel, so compile
“notices” appear — which can be ignored.
Control System Side, TCP/IP
For more information on control
system TCP/IP setup, consult the
e-control Overview document,
overview.pdf, installed with
the CNX Gateway software; or the
SIMPL Windows release notes,
installed with SIMPL Windows.
TCP/IP communications requires a control system with a LAN/Internet port.
Therefore, a CNX generation control system is required (CNMSX-AV,
CNMSX-PRO, CNRACKX, or CNRACKX-DP). The CNX control system and the
server are both connected to the same network. This connection, once properly
configured, can then be used both for system communications (uploading, Test
Manager support, Viewport functions) and run-time server/client (server/control
system) communications as well. (The latter function however requires the addition
of the CNX Gateway software.)
1.
Install Ethernet card. Install the CNXENET card into the Direct Processor
Access (DPA) slot of each CNMSX. Refer to the CNXENET manual (latest
revision of Doc. 8129) for instructions.
2.
Connect server. Connect the CNX control system(s) to the server using one of
the following two methods:
(1)
Connect the control system into the same LAN as the server. Use a
commercially available Ethernet hub to expand the number of connections
available by plugging in the LAN, the server, and the control system into the
same hub.
(2)
Alternatively, make a two-device private network by connecting an
Ethernet “crossover” cable between the Ethernet port of the server’s Network
Interface Card and the LAN port of the CNX control system’s CNXENET card.
Do not attempt this with a regular Ethernet cable.
3.
22 • Basic Server Setup
Connect PC for programming purposes. For each control system to be
connected to the server, temporarily connect the PC containing the control
system and touchpanel project files to the control system via a serial cable
between any available COM port of the server and the COMPUTER port of
the CNX control system. (This need not be the same machine that will run the
Software Server.) Refer to the CNMSX manual (latest revision of Doc. 8118)
Installation & Reference Guide — DOC. 5822
Crestron e-control Vote
SW-VOTE
for instructions. This connection can be removed once the control system is
programmed. Open the Viewport and issue the Setup | Communications
Settings… command to reconfigure communications for RS-232.
4.
Check firmware versions. Before proceeding, however, verify that the CNX
control system has been loaded with the proper versions of firmware. Still in
the Viewport, select File Transfer | Update control system to bring up a
window box containing the current versions of monitor, operating system, and
TCP/IP stack. Verify the versions per the
5.
Leading Specifications (page 9).
In early versions of the CNMSX, it
may be necessary to upgrade to
an intermediate version of the
monitor first and then to the
required version of the monitor.
(The Viewport issues a notice if
this is necessary.)
To upgrade any of these files, retrieve a copy of the latest upgrade package
from the Crestron website (OPSYS Library). These files have an extension of
.upz which contains all three system components in one compacted file.
Once downloaded, browse for the appropriate file in the Update control
system window. Click Send to upload the files to the control system. (When
upgrading the system in this manner, always send all three components to
avoid incompatibilities.)
6.
Define control system IP address. Still in the Viewport, select Functions | Set
control system IP Information. The Set control system IP Address window
opens. Assign an IP address for the CNX control system. The address should
be obtained from the MIS department. The IP address has four fields
separated by periods (e.g. 192.168.2.3) and must be unique. Click OK.
7.
Enter gateway address. Still in the Viewport, select Functions | Setup IP
Table to open the IP Table window. Click on the Retrieve Current IP Table
from control system button to display the current listing. Verify that the IP
address for the PC running the CNX Gateway (often but not necessarily the
server itself) appears with an IP ID of 03. If it does not appear, use the Add…
button to add an entry for IP ID 03. Then click the Send IP Table to control
system button.
8.
Switch to TCP/IP. Now that TCP/IP is properly configured, the Ethernet
connection can be used for all subsequent system communications (from
SIMPL Windows, Test Manager, Vision Tools Pro-e, and all Viewport
functions). See the section 24 titled “Test Communications.” Open the
Viewport and issue the Setup | Communications Settings… command to
reconfigure communications for TCP/IP. The serial cable can now be
removed.
9.
Install control system program. Upload the compiled SIMPL Windows
program file (.bin file) to each control system.
As supplied, the demo programs are configured for a single CNMSX-PRO control
system. For other models, use SIMPL Windows to convert the program as follows
and recompile:
CNMSX-AV.
In the Configuration Manager, drag & drop a CNMSX-AV system onto the CNMSX-PRO.
The converted system does not have a front panel, so compile “notices” appear — which
can be ignored.
CNRACKX. Install a CNXCOM-2 card in slot 4 and use Port A.
In the Configuration Manager, drag & drop a CNRACKX system onto the CNMSX-PRO.
The converted system has a CNXCOM-2 card in slot 4; use Port A. The converted system
does not have a front panel, so compile “notices” appear — which can be ignored.
10. Install touchpanel pages. Upload the compiled VT Pro project file (.hex
file) to each control system.
As supplied, the demo touchpanel file, which contains pages for all the demos, is
configured for a LC-3000 touchpanel; and the accompanying .hex file is compiled
23 • Basic Server Setup
Installation & Reference Guide — DOC. 5822
Crestron e-control Vote
SW-VOTE
for same. This file however also works fine with an CT-3000, CT-3500, and a
VT-3500. If you have one of these models, go ahead and upload the .hex file as is.
If you are working with another panel, convert the file to your target panel and
recompile.
Test Communications
At this point, test your connections.
RS-232 control systems
Use the Viewport to verify communications between the server and the CNX control
system. Select Diagnostics | Establish Communications. If properly connected, the
PC responds with the COM port and baud rate.
TCP/IP control systems
First test the IP address of the CNX control system by “pinging” it. From a
networked PC bring up an MS-DOS prompt (Windows 95/98) or “Command
Prompt” (Windows NT) and type “ping <IP ADDRESS>”, as shown below. The
control system responds with several lines “Reply from address < IP ADDRESS >…”.
If no response is received from the “ping” to the IP address of the CNX control
system, repeat the procedure in “Control System Side, TCP/IP,” page 22.
C:\WINDOWS>ping 111.112.113.114
Pinging 111.112.113.114 with 32 bytes of data:
Reply
Reply
Reply
Reply
from
from
from
from
11.112.113.114:
11.112.113.114:
11.112.113.114:
11.112.113.114:
bytes=32
bytes=32
bytes=32
bytes=32
time=8ms
time=5ms
time=5ms
time=5ms
TTL=60
TTL=60
TTL=60
TTL=60
Once a reliable connection is established, test that the CNX control system is
listening and responding properly. Reconfigure Viewport communications to use
TCP/IP by selecting Setup | Communications Settings. Once the Port Settings
window opens, select TCP/IP as the Connection Type. For IP Address, Click on
Fixed and enter the CNX control system IP address in the active field. Test the new
connection by issuing the Diagnostics | Check Operating System Version
command.
Additional Server Side Setup
In addition to properly setting up and testing communications with each connected
system, the following steps are also required to make the server operational:
1.
Select database file. Supply the full pathname to the database under the
COM Settings tab. This file is the sole source of all database tables accessed
by all signal blocks. See “Database,” page 52, for additional information.
The demos are pre-configured to point to the file demovote.mdb in the demos
folder.
2.
24 • Basic Server Setup
Indicate control system connection. Point each active signal block to a COM
Settings definition. (If you have not yet defined the connection through which
this signal block will communicate, you can leave this blank for the now.
However, the signal block cannot be activated until it references a COM
Settings definition.) See “COM Settings,” page 33, for a description of how to
point a signal block to a COM Settings definition.
Installation & Reference Guide — DOC. 5822
Crestron e-control Vote
SW-VOTE
All the signal blocks in the demo configuration already point to a COM Settings
definition.
25 • Basic Server Setup
Installation & Reference Guide — DOC. 5822
Crestron e-control Vote
SW-VOTE
Server Configuration In Depth
This section is a reference to all the options available in the Configuration Options
window. Changes to options in this window are saved to the current Configuration
Settings file when the OK or Apply buttons are actuated. Therefore, it is important to
make sure you are operating on the appropriate Configuration Settings file before
opening the window.
Specifying a Configuration File
The installer registers the file demovote.ini as the current Configuration
Settings file. This file pre-configures the server for all three demos, and particularly
for use with the Quick Start Guide — which instructs you to load demo1.
You can use the File | Configuration file… command to select a Configuration
Settings file of your choice. The file pathname so specified is stored in the Windows
registry on your machine. In addition to specifying the configuration filename, this
command also instantly reconfigures the server based on the named file. This is a
very useful feature for the developer working on multiple projects.
NOTE: If the server cannot open a specified configuration file, it uses default values for all options, a
null configuration with no connections and no signal blocks. If any changes are made, a new config
file is created using the specified pathname when the OK or the Apply buttons are actuated
Creating a New Configuration File
We recommend duplicating the demo configuration file and modifying the copy, as
follows:
• Locate the file and copy and paste it, renaming it appropriately.
• Point the server to the new config file using the procedure described above in
“Specifying a Configuration File.”
• Proceed to modify the duplicated configuration
An alternative approach is to use the File | Configuration file… command to enter
the pathname of a non-existing config file. As per the NOTE, above, you will start out
with default values. As soon as you modify this null configuration, the config file
you named above is created.
Transporting a Configuration
To prepare a configuration on one machine (a development machine) and transport it
to another (a target machine):
• Craft the configuration to your liking on the development machine.
• Copy the config file along with the database file it points to the target machine.
• Point the server on the target machine to the new config file using the procedure
described above in “Specifying a Configuration File.”
NOTE: If the database file was in the same folder (or a folder subordinate to) the config file’s folder,
the database filename is stored as a partially qualified pathname, relative to that folder. This is
useful, because if you keep that relationship between the files on the target machine, it can use the
relative pathname to locate the file. If, however, you copy the database to a different folder on the
target machine, or the database filename was a fully qualified pathname (beginning with a volume
designator) on the development machine, you may have to reset the pathnames (for each COM
Settings definition) on the target machine.
26 • Server Configuration In Depth
Installation & Reference Guide — DOC. 5822
Crestron e-control Vote
SW-VOTE
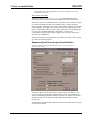
Password Access
Access to the server’s Configuration Options window is password-protected. This is
to prevent end-user meddling with the configuration options, which can very
possibly disable the server’s proper operation.
Select Server | Configure. The server prompts the user for a password. Enter
crestron2 which displays all tabs. Entering anything else displays the General
tab only.
The configuration password dialog — controls access to the Configuration Options window
The Configuration options window, General tab, showing all tabs (correct password entered).
The password may be changed from the General tab. Click on the Change Password
button to open the Change Password window. Enter the old password and the new
password twice. Click OK to complete the change.
Resetting the Configuration Password
In the event the password is misplaced, be aware that it is not stored in readable
form. Rather, values derived from the password is stored in the configuration files.
The password can effectively be reset by locating the configuration file and then
either deleting or editing it.
Use the File | Configuration file... command to note the pathname of the currently
selected configuration file. Exit the server.
27 • Server Configuration In Depth
Installation & Reference Guide — DOC. 5822
Crestron e-control Vote
SW-VOTE
Deleting the file means that all configuration variables revert to their default values
the next time the server is run. The problem with this approach, of course, is that you
lose any settings already made.
To reset the password only (without affecting the rest of the configuration), edit the
.ini file using the Notepad application (Start | Programs | Accessories |
Notepad). Locate and delete the following key in the [GENERAL] section (the
value may differ):
privilegeLevel_2=180350152
Exit the Notepad application, saving the file.
The password is now reset to its default — which is “crestron2.”
Run the server again. Issue the Server | Options... command. Enter the default
password. You can now change the password to whatever you want by clicking the
Change Password button.
COM Settings Configuration
A “COM Settings” data structure (also called a “[system] connection”) must be
created and configured for each connection you intend to make to your control
systems.
All active signal blocks (Signal Blocks tab) must reference such a structure. See
“COM Settings,” page 33, for instructions on defining such a reference for your
signal blocks.
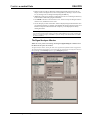
The COM Settings tab
The COM Settings tab of the Configuration Options window contains a list of data
structures called “COM settings definitions” which represent connections to control
systems. From this tab, you can activate and deactivate such definitions, and define
additional ones.
NOTE: Connections may be defined before or after signal blocks are defined. However, signal
blocks cannot be activated until they reference a defined connection.
Refer to the figure below.
To remove a COM settings definition, select it and click the Remove button.
To duplicate an existing definition, select it and click the Duplicate button. The new
definition differs from the original in that it is given a unique name which is derived
from the name of the original, incremented by one. (If the original did not end in a
number, the name of the duplicate is the name of the original with a “1” suffixed to
it.)
Click the Add… button to define an new connection; or select one of the definitions
already listed and click Modify… to modify it. The COM Settings window opens:
28 • Server Configuration In Depth
Installation & Reference Guide — DOC. 5822
Crestron e-control Vote
SW-VOTE
The Configuration Options window, COM Settings tab, showing the only connection defined in the demo
configuration (selected).
COM Settings definitions (connections) can be active or inactive. A check in the box
next to the definition name indicates that the connection is activated. If not activated,
it is ignored when the server protocol is started.
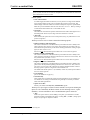
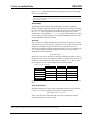
The COM Settings window
The COM Settings window for the connection defined in the configuration for demo 1, showing RS-232
communications selected …
29 • Server Configuration In Depth
Installation & Reference Guide — DOC. 5822
Crestron e-control Vote
SW-VOTE
… and if TCP/IP communications were selected, it would look like this (fictitious IP address shown):
Definition name
Each COM Settings definition requires a unique name. A field for this data can be
found at the top left of the COM Settings window. We recommend choosing a name
that reflects either the location of the control system (such as “SUITE3”) or its
function (such as “PHONEBOOK”).
This name is used in the server’s user interface to identify the system data structure.
It is also sent along with error messages to the actual control system to identify the
source of an error resulting from processing one of the system-level signals defined
herein.
Control system generation
Here you specify the type of control system. The server uses this information to take
into account minor differences in the way the older generation of Crestron control
systems functioned in terms of timing and data capacity.
Communications mode
In this frame you choose RS-232 or TCP/IP connections. If you choose RS-232, note
that hardware handshaking is strongly recommended. The details are described in the
Server Side configuration sections for RS-232 (page 21) and TCP/IP (page 22).
System-level signal definitions
In this window you can also define optional system-level signals by checking the
appropriate boxes. Doing so defines a special signal block which communicates with
its own Intersystem Communications symbol in your SIMPL Windows program.
In this case, you should also fill in the Signals field, as follows:
Signals
This is the offset of the Intersystem Communications symbol in your SIMPL
Windows program. The connection’s signal block must not overlap any other signal
block (channel 1 of) these COM settings or else the server protocol will not be able
to be started.
Refer to the “Signal Reference” section, which begins on page 78, for more
information on each of the signals listed in the window.
Signal Block Configuration and Definition
Data structures called a “signal blocks” are created on the server, each
communicating with its own Intersystem Communications symbol on a control
system.
A signal block’s configuration includes behavior options as well as optional signal
definitions. The signal block’s definition refers to its list of input and output signals,
including fixed as well as optional signals.
Each active signal block must reference a “COM Settings” data structure which
defines a connection to a control system. See “COM Settings ,” above.
30 • Server Configuration In Depth
Installation & Reference Guide — DOC. 5822
Crestron e-control Vote
A “signal block” is a software
construct defined in the server
which communicates with special
symbols in the SIMPL program
running in your control system.
Internally, the DBM Scroller
logic module is simply an
Intersystem Communications
symbol paired with an Interlock
symbol for touchpanel button
feedback.
SW-VOTE
The Signal Blocks tab (see below) displays a list of defined signal blocks. Three
types of signal blocks are available with an SW-VOTE license:
Voting Console
control, monitor, adjust, display, and record votes
Request-to-Speak Console
view request-to-speak queue sets and recognize
speakers.
Standard Scroller
for interactive display of database tables in support
of the above.
The Standard Scroller signal block has a static configuration designed to interface
with the included DBM Scroller Crestron logic module, found in the SIMPL
Windows interface’s Program view, in the System Modules pane, Crestron Modules
folder, e-control Software sub-folder. (If you use a Custom Scroller, you cannot use
the logic module.)
The Standard Scroller signal block is a constrained form of the more robust
Custom Scroller signal block, only available when also licensed for e-control
Database Manager, SW-DBM. Without an SW-DBM license, Standard Scroller
signal blocks cannot be directly enabled via a signal from a control system. In that
case, they are only useful when attached to another type of signal block designed to
control scrollers.
Voting Console and Request-toSpeak Console signal blocks
communicate with Intersystem
Communications (XSIG) symbol.
Both the Voting Console and Request-to-Speak Console signal blocks use scrollers
(either type) in support of their primary functions, as follows:
• A Voting Console signal block can use a scroller to display a list of agenda items from
which the operator can select prior to starting a vote.
• A Request-to-Speak Console signal block uses scrollers to display its queues.
When attached to a controlling signal block, a scroller is enabled automatically when
the controller is enabled. When not attached to a controlling signal block, Standard
Scrollers can only be enabled directly with an SW-DBM license. (Standard Scrollers
can, however, always be enabled manually — for testing purposes — from the
Signal Analyzer window.)
Specific differences between the two types of scroller signal blocks are summarized
in “Appendix D: ” on page 132.
The Signal Blocks tab
The signal blocks tab contains a list of the currently defined signal blocks. Refer to
the figure below.
To remove a signal block definition, select it and click the Remove button.
To duplicate an existing definition, select it and click the Duplicate button. The new
definition differs from the original in that it is given a unique name which is derived
from the name of the original, incremented by one. (If the original did not end in a
number, the name of the duplicate is the name of the original with a “1” suffixed to
it.)
New signal blocks can be added by selecting a signal block type from the New signal
block type list box and clicking the Add… button. Existing signal blocks can be
modified by highlighting the signal block in the Defined signal blocks list and
clicking the Modify… button.
31 • Server Configuration In Depth
Installation & Reference Guide — DOC. 5822
Crestron e-control Vote
SW-VOTE
The Configuration Options window, Signal Blocks tab, showing all the signal blocks defined in the demo
configuration (in alphabetical order). As shown, all five signal blocks are active (checked); and the Voting
Console signal block for demo2, VOTE, is selected.
Signal Blocks, once defined, can be active or inactive. A check in the box next to the
signal block name indicates that the signal block is activated. If a signal block
definition is not checked, it is ignored when the server protocol is started, neither
accepting nor responding to incoming signals in its range. Inactive signal blocks are
not considered for signal space conflicts with other signal blocks when the server
protocol is started.
NOTE: Signal Blocks may be defined before or after the COM Settings to which they need to refer
are defined. If the signal block is defined first, you will not be able to specify the COM Settings yet.
This is permitted. However, such signal blocks cannot be activated until they reference defined
COM Settings.
The server can have any number of signal blocks defined and active simultaneously.
Selecting a signal block from the list in the Signal Blocks tab and clicking the
Modify… button — or defining a new signal block with the Add… button — opens a
signal block definition window.
Such a window shows a particular signal block definition. The definition includes:
• Interface definition. The options across the top of the Signal Block Definition window are
common to all types of signal blocks and include the signal block’s name, system
connection, and signal offset. (The term interface refers to the server-signal block
interface; i.e., information that all signal blocks must have to be handled by the server as
signal blocks.)
• Optional signal definitions. Words shown in the Signal Block Definition window in bold
case are names of optional signals implemented by the signal block. These are included
in the signal block definition (they are "defined") either by checking the adjacent
checkbox, or (in the case of a set of enumerated signals) by supplying a non-zero number
in the adjacent text field. Undefined signals do not appear in the signal list and must not
appear in the matching Intersystem Communications symbol on the control system
side. Be aware that there may also be a number of non-optional signals which are not
shown in the window.
32 • Server Configuration In Depth
Installation & Reference Guide — DOC. 5822
Crestron e-control Vote
SW-VOTE
• Behavior options. These have specific effects on signal block behavior when the server
protocol is running.
The highest numbered signal in the signal block’s input or output signal lists is
shown in the box in the upper-right corner. This is based on the signal offset entered
in the adjacent box and the current signal block definition. This value is updated
synchronously as the user interacts with the window. This box turns red when the
highest analog or serial signal number on either the input or the output lists exceed
1023; or should the highest digital signal number exceed 4095.
Interface Definition
All signal blocks require the following basic information. Fields for these data are
shown across the top of all Signal Block Definition windows.
Name
A unique signal block name is required here. This name is used in the server’s user
interface to identify the signal block. It is also sent along with error messages to the
control system to identify the source of the error. We recommend choosing a name
that reflects either the location of the control system (such as BOOTH3) or its
function (such as PHONEBOOK).
COM Settings
The COM Settings list box contains the names of all the COM Settings definitions
from the COM Settings tab. Point the signal block to a particular COM Settings
definition by selecting it from the list.
Each signal block must be associated with a control system. Control systems are
defined separately under the COM Settings tab. You may define the signal blocks
first if you like, then define the systems, and come back and make the associations
later. Note, however, that signal blocks cannot be activated without first associating a
system, through its COM Settings connection, with the signal block.
Channel
For systems with multiple Virtual COM Port channels defined, select a channel here.
Signal Offset
When a signal block shares a signal space (a channel) with another signal block, they
both cannot begin numbering their signals at 0. In such a case, supply values space
the signal blocks’ signals properly — such that they do not overlap with each other.
If any signal blocks’ signal spaces overlap, attempting to start the server protocol
results in an error.
Auto-enable
If this box is checked, the signal block is automatically enabled when the server
protocol is started.
When checked for a Voting Console signal block, and if that signal block has its
“Voting Computer Interface” enabled, the Vote Proctor window will automatically
be displayed when the server starts.
Voting Console signal block definition
There are a lot of options for voting in three tabs in the Voting Console Signal Block
Definition window, reflecting the great diversity of traditions among voting bodies.
However, the first step in configuring voting is to indicate the total number of seats
in the chamber. You do this by editing the graphical layout of the seats in the Vote
33 • Server Configuration In Depth
Installation & Reference Guide — DOC. 5822
Crestron e-control Vote
SW-VOTE
Proctor window to reflect the actual chamber layout (from the Operator-operator's
perspective). All such edits are saved along with other options in the configuration
file.
NOTE: Even if you do not intend to use the Voting Computer during voting, you must still edit it at
least insofar as the number of seats is concerned.
Editing the “Vote Proctor” window
The Vote chamber layout window (shown below) is displayed along with the Vote
Proctor window by clicking the Edit Vote Proctor Window button from the Voting
Console Signal Block Definition window (see figure, p. 35). The latter window is too
large to show here, so we suggest that before proceeding, you run the app and open
that window using the afore-mentioned command button.
The Vote chamber layout window aids in editing the Vote Proctor window
If the Vote chamber layout window becomes obscured during editing, you can bring
it to the front by depressing the F2 key.
Closing the Vote chamber layout window with the OK button saves all edits and
closes the Vote Proctor window as well. The Cancel button closes both windows,
discarding all edits.
The acronym WYSIWYG ("wizzy-wig")
stands for "What You See Is What
You Get."
Editing is WYSIWYG. Most edits are made right in the Vote Proctor window itself by
using the mouse to select items by clicking and to move items by dragging &
dropping them. Some special keyboard keys are available and essential. The Help
and keyboard shortcuts button provides the following handy tips:
•
•
•
•
Use the mouse to select an item.
Use [Arrow] keys to nudge.
Use Shift-[Arrow] keys to size all seats at once or individual seat labels.
Note that above adjustments are all in 4-pixel increments unless Ctrl key is also applied
in which case adjustments are in 1-pixel increments.
• Use Alt-[Arrow] keys to increase or decrease seat border thickness.
• Use the Delete or Backspace keys (or the Delete button [in this window]) to remove
selected seat and label, and renumber remaining seats.
• Use + key (or the Add button [in this window]) to add a new seat (along with its label).
Notice that selecting an object with the mouse also selects one of the options in the
Vote chamber layout window. The layout window adds the following functions in
addition to the WYSIWYG capability:
• Load picture from file
34 • Server Configuration In Depth
Installation & Reference Guide — DOC. 5822
Crestron e-control Vote
SW-VOTE
•
•
•
•
•
Loads a picture into the background. The picture will always be positioned in the upperleft corner of the window.
Clear picture
Unloads picture.
Set border color...
This button changes the color of the border around the ovals representing all seats.
Discard changes and close windows
Closes both the "Vote chamber layout" and the Vote Proctor window, discarding all
edits.
Window size
Select a size for the Vote Proctor window here. Although the window size can be
adjusted down to 800 x 600, note that the "Vote Results" window is not adjustable in this
version and will always display at 1024 x 768.
Add Seat and Delete Seat
These buttons parallel the functions of the + key and the Delete key shortcuts,
respectively.
The Body Tab
The Body tab of the Voting Console Signal Block Definition window, showing part of the
definition of the VOTE signal block from demo2. (As shipped, however, the VOTE signal
block from demo2 has No Chairperson selected.)
NOTE: The reader is urged to refer to the Signal Reference for more information about the signals
discussed in these sections.
• Body name
The text entered here appears in the title bar of the Vote Proctor Screen, as well as in vote
results (textfiles and printouts).
• “Take Attendance” Button
Displays the Take Attendance button in the Vote Proctor window.
• Force before voting
35 • Server Configuration In Depth
Installation & Reference Guide — DOC. 5822
Crestron e-control Vote
SW-VOTE
•
•
•
•
•
Disables the Open Vote button in the Vote Proctor window until attendance has been
taken. If you close and re-open the Vote Proctor window, you will have to take
attendance again before being allowed to take a vote.
No Chairperson
All the seats are occupied and fully functional. This is the normal setting.
[Chairperson] Promoted from floor
When this option is checked, the seat indicated under Chair seat number is initially
vacant and will be swapped with another seat in the chamber before voting or taking
attendance. Once the swap is made, the selected seat becomes vacant. Subsequent voting
signals received from the vacant seat will be interpretted and displayed as if they had
came from the chair seat. The following subordinate options are available:
• Manual chair seat selection required
The operator must explicitly indicate which seat to swap with the vacant chair seat
prior to taking attendance or a vote.
• Automatically select seat
When no explicit chair seat selection has yet been made, this option tells the server
to implicitly select the indicated seat to swap with the vacant chair seat upon the first
attempt to take attendance or a vote.
Send [Names] automatically when “Vote Proctor" window is opened
Seat names are normally only sent in response to SendNames signal from control system.
Truncate [Names] to
Maximum number of characters to send for each name. The purpose of this is when
names are to be routed to a display device which has a limited amount of space for
display.
Pad [Names] with spaces
Names that are shorter than the maximum are padded with spaces. The purpose of this is
when names are to be routed to a panel display which might contain old data to be
overwritten by the new name.
The Voting Computer Interface Tab
The Voting Computer Interface tab of the Voting Console Signal Block Definition window,
showing part of the definition of the VOTE signal block from demo2.
36 • Server Configuration In Depth
Installation & Reference Guide — DOC. 5822
Crestron e-control Vote
SW-VOTE
The following options control the display and behavior of the Vote Proctor window:
• Enable
Displays the Vote Proctor window when the signal block is enabled. Also enables the
Voting | Start Voting command. If unchecked, the window cannot be opened at all.
• Auto-name vote
The server generates a name for the vote based on the current date and time, in the form
yymmdd_hhmmss. Applies only to an otherwise unnamed vote; and only when the vote is
started from Vote Proctor window. The Start Vote button, normally disabled until an
agenda has been set, is enabled. Note that this option is independent of the option of the
same name under the Control System Interface tab
• Secret Ballot
During a vote, seat icons displayed in the Vote Proctor window turn grey as they vote.
Actual votes are tallied to the Vote Proctor window only after the floor is closed.
NOTE: A “secret ballot” is actually only secret while the floor is opened. Once the floor is
closed, the vote is published.
The Control System Interface Tab
The Control System Interface tab of the Voting Console Signal Block Definition window,
showing part of the definition of the VOTE signal block from demo2.
• Remote enable
Defines the, Enable and Enabled signals which permit the signal block to be enabled
and disabled from the control system. Normally not needed.
• Basic vote control
Defines all the basic signals for controlling and tallying the status of a vote. These signals
are all that need to be defined for a simple vote control console such as a lighted button
panel.
• Ballot sums
Defines the ballot tally analog signals, TallyYes, TallyNo, TallyAbstain, TallyTotal,
TallyExcused. These are analog signals used by the server to transmit vote status to the
control system "live" (during a vote).
37 • Server Configuration In Depth
Installation & Reference Guide — DOC. 5822
Crestron e-control Vote
SW-VOTE
• Additional vote signals
In addition to the always defined Yess and Nos signal sets, defines the Abstains and/or
Excuses signal sets. These are intended to be tied to additional seat vote buttons.
• Quorum & passage lights
Defines the passage digital signals, TallyQuorum, TallyCarried, Tally23Majority.
These are digital signals used by the server to transmit vote status to the control system
"live" (during a vote).
• Seat Status Adjust
Defines the Changes signal set (one per seat), used by the control system after a vote to
change how a seat is voted. Each pulse of Changei adjusts the seat’s status to the next
possible value. This value will be echoed by the StatusI signal (when defined). (See
below.)
• Seat Status Feedback
Defines the Statuss signal set (one per seat), used by the control system during a vote to
transmit to the control system how each seat is voting. Intended to select a frame of a
touchpanel animated object. See "Operations" section, below, for a list of possible signal
values.
• Tally actual ballots to control system only after floor is closed
Checking this box prevents the actual votes from being tallied to the control system.
• Agenda item setting
Defines the SetAgenda signal. Creates a new record in the Agenda table and sets its
description field. The number and name fields will not be set. Value is immediately
echoed back by the AgendaEcho signal (when defined). This signal is accepted before a
vote only (ignored thereafter).
• Agenda item description
Defines the AgendaEcho signal. Selected/entered vote description is echoed to control
system via this signal. The description may originate from either the control system or the
Voting Computer.
• Local feedback
Check this option to define the three error signals (ErrString, ErrNumber, and
ErrTrigger) in the signal block. These signals are routinely used by the server to report
errors to the control system. See the “Signal Reference” beginning on page 78 for more
information. If these signals are not defined here, errors are reported to the control system
through the COM Settings signal block. If that signal block does not have its error signals
defined, the errors are not reported to the control system at all, although they are still
added to the server’s error log.
• Agenda Item Scroller
Select a scroller here. This scroller will display all records from the Agenda table
which have not yet been voted upon. A record picked from this scroller is used to display
the vote description and to properly record the vote once it has concluded. Such a Pick
signal is only accepted before a vote; it is ignored thereafter. (You cannot change the
agenda after the vote has begun.) Select (None) if agenda items will not be set from
the control system.
• Auto-name vote
The server generates a name for the vote based on the current date and time, in the form
yymmdd_hhmmss. Applies only to an otherwise unnamed vote; and only when the vote is
started from control system (via the Start signal). Note that this option is independent of
the option of the same name under the Voting Computer Interface tab. This option is
disabled if the Start signal is undefined (Basic vote control checkbox is unchecked), or if
both Agenda item setting is unchecked and Agenda item scroller is set to (None). In
the first case, a vote cannot be started from the control system so the issue is moot; in the
second case, votes started from the control system will always auto-name unnamed votes.
38 • Server Configuration In Depth
Installation & Reference Guide — DOC. 5822
Crestron e-control Vote
SW-VOTE
The Rules Tab
The Rules tab of the Voting Console Signal Block Definition window, showing part of the
definition of the VOTE signal block from demo2.
• Optional vote values
The operator normally has the ability to alter a vote after the floor is closed. In addition to
YES and NO, the options in this frame add ABSTAIN and EXCUSE to the possible vote
values.
NOTE: These options are indepent of the Additional vote signals options under the Control
System Interface tab and may be checked even if the latter are not checked.
• Legal Voting Quorum
Options in this frame affects how the server calculates the value of the TallyQuorum
signal and the "QUORUM" indicator in the Vote Proctor window.
• Required to CARRY
Options in this frame affects how the server calculates the value of the TallyCarried
signal and the "CARRIED" indicator in the Vote Proctor window.
• Required for 2/3 MAJORITY
Options in this frame affects how the server calculates the value of the Tally23Majority
signal and the "2/3 MAJORITY" indicator in the Vote Proctor window.
• Opposition
Options in this frame affects how the server defines what counts as a NO vote.
abstentions, excused voters, absentees, and “refuseniks” (members who refuse to cast a
vote) are not counted as a “vote against" unless checked.
• Default votes
Options in this frame affects how all ballots start out when a vote is first opened.
The Reports Tab
There are four reporting modes: Print[er], VGA [Display], Textfiles, and Database.
Database is always enabled, and does not show up here at all.
39 • Server Configuration In Depth
Installation & Reference Guide — DOC. 5822
Crestron e-control Vote
SW-VOTE
The Reports tab of the Voting Console Signal Block Definition window, showing part of the
definition of the VOTE signal block from demo2. (As shipped, however, the Print Reporting
Mode is not enabled.)
• Reporting Modes
Save mode refers to the textfile dumps listed to the right. Fill in the number of copies for
Print mode. Display mode is always enabled when the vote is proctored from the Voting
Computer; it is optional when and only when the vote is proctored from the control
system side. The column of checkboxes under each of these modes is meant to tailor the
information shown in each report. Note however that for the Display reporting mode,
these data, although stored in the configuration, are not utilized by the present release of
the server software. That is, all the information is displayed regardless of these settings.
NOTE: A summary of each vote’s results is recorded in the database file’s Agenda table.
However, this is only a summary. (See “Database tables windows,” page 47 for an illustration
of this table; and “Agenda scroller tables,” page 55, for additional information.) Only the Print
and Save reporting modes will list individual seats by name along with their votes as cast.
• Textfiles dumps
Textfiles are dumped to the indicated folders. At least one folder must be indicated. Any
number of folders may be defined to facilitate distribution of the results. We recommend
sending a copy to a folder on separate computer (a networked drive). (Note that in the
current implementation, in order to specify the drive, it must be mapped.)
• New
Creates a new folder, which you then need to specify.
• Remove
Removes selected folder from dump list, leaving its contents intact. (You cannot remove
the last folder.)
• Sub-folders
If Year is checked, a folder named for the current year is created inside each defined
dump folder, and textfiles are dumped to that folder. Similarly, if Month is checked, a
folder for the current month is created inside each defined dump folder. If both are
checked, a folder for the current year is created, and a folder for the current month is
created inside of that, and textfiles are dumped to that folder. The point of all this is to
40 • Server Configuration In Depth
Installation & Reference Guide — DOC. 5822
Crestron e-control Vote
SW-VOTE
keep the folder contents to a manageable size. (Note that thousands of votes could
accumulate is just one year.)
Some notes on the textfiles:
The files are named yymmddhhnnss.TXT (year-month-day-hour-minutesecond). This forces the files to list in chronological order when sorted by name.
Data in files consists of an identification line, a summary line, and a series of simple
two-column (tab-delimited) tables. For attendance taking, a single such table is
output, each line containing the name of the present member, a tab character, and the
word "PRESENT." For regular votes, there is a table for all YES ballots (name, tab,
"YES"), all NO ballots (name, tab, "NO"), and a single table for all remaining types
of votes (if any), including abstentions ("ABSTAIN"), excused voters
("EXCUSED"), and voters who refused or neglected to vote before the Operator
closed the vote ("MISSING").
The files are designed to be importable to a spreadsheet where they can be re-sorted,
or "mined" for statistical purposes.
Request-to-Speak Console signal block definition
The Request-to-Speak Console Signal Block Definition window, showing the defintiion of
the RTS console from demo1.
A Request-to-Speak Console signal block (an “RTS Console”) maintains a set of
queues of speakers. The queues are implemented as scrollers. The contents of the
scrollers is maintained by the RTS Console in response to (a) signals from the seats
themselves and (b) scroller signals and other signals implemented by the RTS
Console itself.
A separate RTS Console should be defined for each room in which request-to-speak
services will be required.
41 • Server Configuration In Depth
Installation & Reference Guide — DOC. 5822
Crestron e-control Vote
SW-VOTE
NOTE: The queue set defined in a single RTS Console is saved and reloaded as a unit; to set up
queues (or queue sets) that will save and load independently, even if used within the same room,
define additional RTS Consoles as needed.
General options:
• Seats w/ RTS buttons
You must supply the number of seats here, even if you have a Voting Console defined
with a specific number of seats. The two numbers do not have to be the same. This
number simply reflects the number of seats that actually have request-to-speak buttons.
Make sure you have defined a name for each seat in the Members table by creating a
records with ID field values from 1 to the number of seats.
• Invert font
Check this box if touchscreen's speaker status indirect text fields contain light text on a
dark background. In this case, the usage of the font characters is reversed.
• Auto-yield
When checked, this option forces the current speaker (if any) to yield whenever a new
speaker recognized.*
The Request button behavior frame contains the following options:
• Removes member's name from queue
This refers to the behavior of the RTS button if pressed when the seat is already in the
queue (when the seat is in the WAITING state). If the seat has not yet spoken at all, it is
removed from the queue entirely. If the seat has already spoken and is waiting to speak
again, his state reverts to DONE.
If this box is not checked, button presses while in the WAITING state are ignored.
• Member yields his remaining time
This refers to the behavior of the RTS button if pressed when the seat is already in the
queue and in fact currently has the floor (when the seat is in the RECOGNIZED state). The
seat yields the floor (new state = DONE).
If this box is not checked, button presses while in the RECOGNIZED state are ignored.
• Registers a request to rebut the item
This refers to the behavior of the RTS button if pressed when the seat is already in the
queue but has already finished speaking (when the seat is in the DONE state). The seat
goes into a WAITING-n state. Fill in this text box with the maximum number of times a
seat may request to speak on a single item. The maximum is 10.
The default value for this option is 1 (no rebuttals). In this case, button presses while in
the DONE state are ignored.
• Local feedback
[See “Local feedback” on page 38.]
• Seat name tally
These signals, also provided in the Voting Console signal blocks, are provided here in
case the there is no Voting Console defined. It is generally not necessary to send the
names from both signal blocks.
• Queue set save files
Defines f, the number of Loadf, Savef, and DateTimef signals.
The Request-to-Speak Queue Definition frame contains a list of queues defining the
queue set to be controlled by the RTS Console. See the following section , “Queue
definition,” for more information. Five command buttons operate on this list:
• Add…
Adds a new queue. However, before adding a new queue, you must define a scroller
signal block which will implement the queue. Clicking Add… (or Mod…) brings up the
Request-to-Speak Queue Definition window:
* “Yield” means to yield the floor; to yield his remaining time.
42 • Server Configuration In Depth
Installation & Reference Guide — DOC. 5822
Crestron e-control Vote
SW-VOTE
The Request-to-Speak Queue Definition window,
as it appears when adding a new queue.
•
•
•
•
This window prompts you to choose from a list of currently defined scrollers (excluding
those already in the list of queues for this RTS console). The new queue is added to the
bottom of the list. In addition to naming a scroller, if the queue should clear automatically
when a seat is recognized from the first (top) queue, check the Auto-clear box.
Mod…
Also displays the Request-to-Speak Queue Definition window. Here you can change the
scroller to be used by the queue; and the state of the auto-clear option (see “Add…,”
above).
Del
Removes the selected queue from the list of queues.
é [Move queue up]
Moves selected queue up the list one position. The significance of the position of the
queue in the list is explained in the next section, “Queue definition.”
ê [Move queue down]
Moves selected queue down the list one position. The significance of the position of the
queue in the list is explained in the next section, “Queue definition.”
Queue definition
Queues are implemented as Scroller signal blocks. These can be either Standard
Scrollers or Custom Scrollers. If you do not need to show more than eight lines at a
time, Standard Scrollers can be used. (Demo1 shows only four lines at a time and
uses Standard Scrollers.) Otherwise, you will need to use Custom Scrollers (which
require the installation to be licensed for SW-DBM).
Once defined, such scroller(s) are associated with the RTS Console using the Add…
command button described in the preceding section. Once added, the scroller(s)
serve as queues for the RTS Console. Each queue thus added adds a set of n Req
(incoming) signals to the RTS Console definition, where n is the number of seats
(see “Seats w/ RTS buttons,” above). These signals are connected to each seat’s RTS
button; there is one such set of signals per queue; the number of RTS buttons at each
seat and the number of queues defined should match.
The order of the sets of Req signals is defined by the order of the queues in the
queue set. This order can be modified with the é [Move queue up] and ê [Move
queue down] command buttons (described above). Specifically, the first queue in the
list is associated with the first n signals, Reqs (where s = 1 to n). If there is more than
one queue defined in the RTS Console, each additional queue is associated with each
succeeding set of n signals, Reqq,s (where q = the ordinal position of each queue).
See the entry in the Signal Reference for more information about the Req signal
(page 108).
43 • Server Configuration In Depth
Installation & Reference Guide — DOC. 5822
Crestron e-control Vote
SW-VOTE
Each RTS queue should be defined as either a Standard Scrollers or a Custom
Scrollers, similar to the one pictured below:
A Standard Scroller Signal Block Definition window,
showing the defintiion of the QUEUE1 scroller from demo1.
Set the (enabled) options as follows.
• Default query number
This value needs to point to a query (i.e., have the same value as the ID field of a record
in the Queries table) which describes access to an RTS table. See the “Database”
section below for the specifics on how to create these queue query records and their
associated RTS tables.
NOTE: For your convenience, five (5) such records and tables are supplied in the sample
database file. There are also nine (9) “save files” (tables, actually) for each. The ID numbers
of these supplied records are 1 through 5. (Note that demo2 uses the first two.)
• List rows (r) [In Use]
Enter here the number of rows to be displayed on the touchpanel. Value must not exceed
the value of List rows (r) [Defined].
• List columns (c) [n Use]
RTS queue scrollers require a minimum of 2 columns. The first column is used for the
seat’s screenname; the second for the seat’s state mark. You are free to define additional
columns if you like. For example, you might want to display seat number, district, and/or
party affiliation along with the other information.
• Sort
This option should be by ID field for scrollers to be used as RTS queues. This makes the
names in each queue display in chronological order (in the order they entered the queue).
NOTE: It is not critical to set this yourself. For RTS queue scrollers, this option is forced to
by ID field when applying the settings (i.e., when leaving the Configuration Settings
window).
For more information on defining scrollers, see the SW-DBM manual, Doc. 5823.
44 • Server Configuration In Depth
Installation & Reference Guide — DOC. 5822
Crestron e-control Vote
SW-VOTE
Software Server Windows and Menus
This section contains descriptions of the server’s two main windows, the Server
Monitor window and the Signal Analyzer window.
The Server Monitor Window
While the server protocol is running, the Server | Start w/Signal Analyzer
command from the Server Monitor window opens the Signal Analyzer window. (If
the server is already running, toggling Server | Signal Analyzer does the same
thing.)
The Server Monitor window. The server protocol has been started with a single system connected via
RS-232. Note the name of the currently loaded configuration in the title bar.
The Message Log Frame
When the server protocol is running, the Message Log frame shows status and error
messages; for example, it lists each time the protocol is started and halted.
The System Connection Status Frame
This frame contains a colorful legend above a series of small numbered rectangles,
representing each of the defined systems. The color of a control system’s rectangle
indicates its connection status, according to the legend. When the server protocol is
not running, all systems show a status of “Not Connected” (gray). In figure above,
the server protocol has been started. There is only one system defined and its status
is “[connected via] TCP/IP” (green) meaning that a successful TCP/IP connection
has been made to that system. The other possible states are “Waiting [for connection
or disconnection]” (yellow), “[connected via] RS-232” (blue), and “Fault” (red). If a
system cannot connect, it turns red and stays that way until the next connection
attempt. The protocol runs if at least one system connects successfully.
The File Menu
The following command is only available when the server protocol is halted:
• File | Configuration file… This command can be used to instantly reconfigure the server
by indicating an alternate configuration settings file. Any configuration changes made
henceforth are saved to this new file. The name of this file is stored in the Windows
45 • Server Configuration In Depth
Installation & Reference Guide — DOC. 5822
Crestron e-control Vote
SW-VOTE
registry and becomes the default configuration. Use this command to select the
appropriate configuration file for each demo before running it.
The following command is always available:
• File | Exit terminates the server application. If the server protocol is running, a warning
message appears.
The Server Menu
Before the server protocol is started, the following commands are available:
• Server | License… opens the e-control Software Server – Upgrade/Transfer License
window for licensing and activating the various server components.
• Server | Configure… opens the Configuration Options window (described beginning on
page 26).
To start the server protocol, use one of the following commands:
• Server | Start connects to the control systems and starts the server protocol. If no
successful connections are made, the protocol remains halted.
• Server | Start w/Signal Analyzer connects to the control systems, starts the server
protocol, and opens the Signal Analyzer window (see below).
• Server | Start without connecting opens the Signal Analyzer window and starts the
server protocol but without connecting to the control systems. This is useful for testing
server behavior simulating incoming signals and watching the signals generated in
response (which are not actually sent).
The above commands all become disabled (dimmed) when the server protocol starts,
whereupon the following signals, normally disabled, become enabled:
• Server | Stop halts the server protocol.
• Server | Signal Analyzer opens or closes the Signal Analyzer window. When this item is
checked, the window is opened. When it is unchecked, the window is closed.
The remaining commands are always available:
• Server | Log | Timestamps. Selecting this option puts a checkmark next to it and
henceforth all log items will contain a timestamp of the form hh:mm:ss (24-hour clock)
at the beginning of each line. Selecting the command again removes the checkmark and
timestamps will no longer be included in the log.
NOTES:
1. This option affects the server log and the signal log in the Signal Analyzer window as well.
2.
•
This option is “sticky” — meaning that its most recently set state is saved in the Windows
Registry and is automatically applied to the option the next time the window is opened.
Server | Log | Clear clears the message log.
The Database Menu
This menu contains a single command, Database | Queries Table, which opens the
Queries Table window. This window provides display and edit access to this
essential table in the database file named in the Configuration Options window. See
“Database tables windows” below for instructions on how to edit the table. See also
“The Queries Table” in the SW-DBM manual (Doc. 5823) for more information.
The Voting Menu
The following command is always available:
• Voting | Tables. Opens the Voting Tables window which provides display and edit
access to the Members table and the Agenda table. The first table lists seat numbers
and the real names and display names of members occupying those seats. This table
would only be changed when the membership changes, or members seats are changed.
The second table lists agenda item numbers and descriptions, as well as the outcome of
the vote on the item. New agenda items can be appended to this table and will show up in
46 • Server Configuration In Depth
Installation & Reference Guide — DOC. 5822
Crestron e-control Vote
SW-VOTE
the agenda item scroller at run-time. See “Database tables windows” below for
instructions on how to edit the tables.
The following command is only available after the server protocol has been started:
• Open Vote Proctor Window. Opens the Vote Proctor window. If the Voting Console
signal block was not already enabled, enables it. Once opened, the window cannot be
closed while a vote is in progress.
Database tables windows
It is not necessary to have Microsoft Access to edit the Queries, Members, or
Agenda tables; they can be edited directly from within the server application. Open
the server and select Voting | Tables The Voting Table window opens to display the
contents of the Members and Agenda tables found in the database file named in
the COM Settings tab of the Configuration Options window.
The Voting Tables window. The Queries Table window is similar, containing however only the one table.
The “data grid” controls in this window feature the following interactivity for editing
the tables:
• For viewing purposes (only), tables can be sorted by clicking on the head of each column
(field).
• Resize the window by clicking and dragging on the lower right corner. Note that column
widths adjust proportionately.
• A column’s width may be adjusted manually by clicking on the far right of its header and
dragging left (to reduce its width) or right (to augment its width).
• Row height can also be adjusted (for all rows at once) by similarly clicking between rows
in the row’s left margin and dragging up or down. (This is useful to know when a cell’s
contents wraps onto additional lines.)
• Records can be deleted by selecting the entire row (by clicking in the row margin), and
depressing the DEL key.
• New records can be added simply by typing into the bottom row. To see the default
values for fields in a new record, you must (temporarily) leave the record (row).
• The information in each cell can be replaced by simply highlighting the cell and typing
over its contents; or you may click once to highlight the cell and again to precisely place
the cursor for editing purposes.
47 • Server Configuration In Depth
Installation & Reference Guide — DOC. 5822
Crestron e-control Vote
SW-VOTE
• Fields (or entire records) so changed (as evidenced by the little pencil icon in the row
margin, visible in the figure above) can be changed back by selecting a cell (or an entire
row, by clicking in the row margin) and depressing the ESC key.
• Additional records can be entered by scrolling down to the row containing an asterisk (*)
in the left-most column and typing the information.
• Use ENTER to advance to the next cell in a row. The arrow keys also navigate between
cells in a rows, and between rows as well.
• Use the “Requery to show remote edits” button to display changes made elsewhere since
you opened the window. For example, if the database file has been placed on a file server
and has recently been edited from another computer, you can display those edits by
clicking this button.
NOTE: Changes are not actually made until you leave the row (or close the window). When leaving
a row in which you have made a change, you will be asked whether or not to keep (“commit”) the
changes. To accept the changes, click YES; to reject the changes, click NO and then use the ESC
key as described above.
The Signal Analyzer Window
While the server protocol is running, checking the Signal Analyzer command from
the Server menu opens this window.
The Signal Analyzer window, showing the all the active signal blocks defined in the demo configuration.
The VOTE signal block (from demo2) is selected. Therefore the VOTE signals are displayed in the lists to
the left and right. (The Timestamps option is off; the Debug Info option on.)
48 • Server Configuration In Depth
Installation & Reference Guide — DOC. 5822
Crestron e-control Vote
SW-VOTE
Signal Simulator
The top part of the window is for simulating receipt of incoming signals and
transmission of outgoing signals.
Signal Blocks & Connections
This list contains all active signal blocks as well as all active connections that have
signals defined (and hence can behave as signal blocks too).
To simulate an incoming or outgoing signal, you must first select an item from this
list.
Signal lists
There are two lists which are displayed for all signal blocks (including system signal
blocks for systems with signals defined), an incoming list on the left labeled CS to
PC signals which contains all of the signals that go from the control system (CS) to
the server (PC); and an outgoing list on the right labeled PC to CS signals which
contains all the signals that go from the server to the control system.
The letters A for “analog”, S for “serial” (or “string”), or D for “decimal” preceding
each signal in the lists indicate the type of signal expected (incoming) or to be sent
(outgoing).
NOTE: A special feature of the server converts an analog signal to a string when that signal is
received with a signal number that expects a serial signal.
To simulate a signal, after selecting your signal block, select an item from one of the
signal lists. You are now ready to send the signal. To do so, give the
Simulate | Incoming or Simulate | Outgoing command (see below).
The value frames
Values for simulated signals are entered here. (See Incoming and Outgoing
commands, below.)
Signal Log
The bottom part of the window logs all signals going back and forth from all signal
blocks to and from all control systems.
Each signal logged consists of the following:
•
•
•
•
An optional timestamp (see below); followed by
an incoming signifier ( <- ) or an outgoing signifier ( -> ); followed by
one of the letters A (“analog”), S (“serial” or “string”), or D (“decimal”); followed by
the name of the signal block the signal is a part of (based on its signal number and the
connection through which it has come or will go); followed by
• the name of the signal; followed by
• the signal number (relative to the start of the signal block) ; and, finally,
• the value of the signal.
There are two special signal values, “[Blank]” which indicates a null string and
“Pulse” which indicates a true/false sequence for outgoing digital signals. (Pulse is
never shown for incoming signals.)
NOTES:
1. The capacity of the log is limited to the 32,767 youngest (most recent) signals.
2.
49 • Server Configuration In Depth
The present release does not dump the log to a disk file.
Installation & Reference Guide — DOC. 5822
Crestron e-control Vote
SW-VOTE
3.
Signals are only logged when the Signal Analyzer window is opened. However, in general,
do not keep the window opened unnecessarily as the logging routines can cause a noticeable
degradation of server responsiveness when the server is running on a slower PC.
The File Menu
The only currently implemented commands in this menu print the input and output
signal lists for the currently selected signal block (File | Print Signal
List | Selected), or for all active signal blocks (File | Print Signal List | All). This
printout can be used to create matching Intersystem Communication symbols in
SIMPL Windows. To this end, the lists contain signal labels identical to the labels
used in that symbol.
The Simulate Menu
This menu contains the following commands for simulating signals. Simulated
signals are added to the Signal Log on the bottom portion of the window, just like
real signals.
•
•
Simulate | Incoming simulates receipt of the signal currently selected in the incoming
(“CS-to-PC”) signal list. Before issuing the command, set the value to be “received”
with the signal by entering data into one of the three value frames. The frame to use is
based on the signal selected. This function is also available by clicking the rx button
under the incoming signal list.
Simulate | Outgoing simulates receipt of the signal currently selected in the outgoing
(“PC-to-CS”) signal list. Before issuing the command, set the value to be transmitted
with the signal by entering data into one of the three value frames. The frame to use is
based on the signal selected. Note that simulating an outgoing signal when the system
associated with the signal block is not connected has no practical effect. This function
is also available by clicking the tx button under the incoming signal list.
The Log Menu
This menu contains the following commands that affect the Signal Log display:
•
•
•
•
Log | PINGs and PONGs. Uncheck this item to suppress logging of the Ping and
Pong signals available in the system signal blocks. The intent would be to keep the log
uncluttered when a control system has been programmed to ping to server on a
periodic basis.
Log | Clear clears the signal log.
Log | Timestamps. Selecting this option puts a checkmark next to it and henceforth all
log items will contain a timestamp of the form hh:mm:ss (24-hour clock) at the
beginning of each line. Selecting the command again removes the checkmark and
timestamps will no longer be included in the log.
Log | Debug Info. Selecting this option puts a checkmark next to it and henceforth all
logged signals as well as the rx and tx buttons will contain additional signal
information.
The log items normally contain an element of the form [n] where n is the
signal number relative to the start of the signal block. When Debug Info is
checked, this element takes on the form [com(ch):m=n] where com is the
COM Settings name; (ch) is the Virtual COM Port channel number (included
only when > 1); m is the absolute signal number (n + the signal block’s offset)
(included only when different from n — i.e., only when the offset is nonzero); and n is the relative signal number (as above);
The rx and tx buttons each normally contain a number, n, the relative signal
number of the currently selected signal from the respective signal list. When
Debug Info is checked, the buttons each contain additional information of the
form m=n where m is the absolute signal number (included only when
different from n).
Selecting the command again removes the checkmark and the additional
information is excluded.
50 • Server Configuration In Depth
Installation & Reference Guide — DOC. 5822
Crestron e-control Vote
SW-VOTE
This option is also “sticky” like the Timestamps command.
•
Log | Find… brings up the following modal window which helps locate a specific
signal.
Signal log search window.
Searches can be performed with and without case sensitivity by checking the
Match Case option. When the window opens this option is unchecked —
meaning that the search algorithm disregards the upper- and lower-case status
of the characters in the search key.
Also when the window opens, the search direction is set to Forward to end
meaning that the search will begin with the signal on the highlighted line and
will continue to the end of the log. The other options are Forward from top
which searches the entire log; Backward to top which searches beginning with
the signal on the highlighted line and continuing back to the beginning of the
log; and Forward to end then wrap around from top which also searches the
entire log starting with the signal on the highlighted line.
51 • Server Configuration In Depth
Installation & Reference Guide — DOC. 5822
Crestron e-control Vote
SW-VOTE
Database
In the present release, a single database file is named in the COM Settings tab of the
Configuration Options window. This one file is used as the sole source of all
database tables for all the signal blocks in the configuration.
Database Tables
This section discusses the database tables accessed by the various signal blocks of
the SW-VOTE component of the Crestron Software Server.
In the following table, for a given RTS Console:
Let q = the size of the queue set (i.e., the number of queues defined)
Let f = the number of “save files” defined.
Database tables used by SW-VOTE component
Signal
Block
Tables used
Queries
Each scroller references a record from this
table (using the ID field as a key); the record
is used to form a query to be “bound” to the
scroller
Each scroller’s query
references (an) arbitrary
table(s)
As the data source of the query bound to
scroller
Members
Sent to control system upon receipt of the
SendNames signal
Scroller
Voting
Console
How used
Agenda
By data-bound control in Vote Proctor window;
used to select an agenda item prior to a vote
By scroller from control system; used to select
an agenda item prior to a vote
Sent to control system upon receipt of the
SendNames signal
Requestto-Speak
Console
Members
As the data source for seat names (and
possibly other information) when adding
records to the queue tables
A set of q scroller tables
As “queue tables” (to implement queues)
q sets of f additional scroller
tables
As “save files” (to implement saving and
reloading of queue sets)
The Queries table can be viewed and edited with the Database | Table command;
the Members and Agenda tables can be viewed with the Voting | Tables command.
The remaining tables (which are the request-to-speak queue scroller tables and the
timetable) are not routinely viewed or edited. To create the tables, you will need
Microsoft Access. Or, you can repurpose a copy of the supplied sample database file
which contains three queues x 9 save files.
Naming of tables
The names of the Queries, Members, and Agenda tables are fixed in the
present release.* The other table names are derived from queries formed from records
* Having fixed members and agenda table names effectively precludes using a single server configuration for more than one “room” (or body) at the
same time. A future release may remove this limitation. In the mean time, different bodies meeting at different times can be served by pointing to
52 • Database
Installation & Reference Guide — DOC. 5822
Crestron e-control Vote
SW-VOTE
in the Queries table, and from the naming of Request-to-Speak Console signal
blocks, as described below.
NOTE: The agenda scroller record in the Queries table must name Agenda in its table field.
The reason this name must be used is that the table is also referenced by the combo-box (or list-box)
in the Vote Proctor window.
Queue tables
The naming of the queue tables (and scroller tables in general) is completely
arbitrary. All that is required to provide the Software Server with access to the table
is to place the chosen name into the table field of the scroller’s referenced record in
the Queries table. Typical names for scrollers used as queues (see “Queue
scroller tables,” below) might be Q1, Q2, etc., as in the sample database (see figure
in next section). To reduce confusion, we recommend naming them the same as the
scroller signal blocks that reference them.
Save files
The “save files” are actually implemented as sets of tables, one table for each queue
in the queue set, one set for each “file.” Sufficient “save file” tables must exist in the
database for each queue; the present version does not create them on its own.
Specifically, if an RTS Console has three queues and five save files, you must create
3 x 5 =15 additional (empty) tables congruent in structure to your queue tables.
These tables are named as follows:
queue-table-name _ i
where queue-table-name is the name of each table comprising the queue set; and i is
the number of the save file. The underscore character is required (sans spaces). If, for
example, the three queue tables in this example are called QA, QB, and QC, then
the 15 required “save file” tables would need to be named as follows:
Example “save file” table names
Queue A
Queue B
Queue C
Save file #1
QA_1
QB_1
QC_1
Save file #2
QA_1
QB_1
QC_1
Save file #3
QA_1
QB_1
QC_1
Save file #4
QA_1
QB_1
QC_1
Save file #5
QA_1
QB_1
QC_1
See the next section, “Queue scroller tables,” for instructions on how to create these
tables.
Save file directories
Each RTS Console also accesses a table of timestamps which is used as a directory
to select a “save file” for reloading. These tables are named as follows:
signal-block-name_TimeTable
where signal-block-name is the name that was given to each Request-to-Speak
Console signal block when it was created.
different configuration files and/or different database files before the meeting begins. Another strategy for serving multiple rooms simultaneously
might be to provide a separate PC for each, or, at least, a separate instance of the Software Server app.
53 • Database
Installation & Reference Guide — DOC. 5822
Crestron e-control Vote
SW-VOTE
The Queries table
Complete specifications for the Queries table can be found in the SW-DBM
manual, Doc. 5823. For the present purposes it is sufficient to show how to specify
queries for queue scrollers and agenda scrollers. Consider the example provided in
the supplied sample database file.
Contents of the Queries table in the sample database file, demovote.mdb.
The following tables contain all the information you need to set up queue and agenda
scrollers.
Field contents of Queries table records for RTS queue scrollers
Field
Contents
ID
The number in the ID field is the query number given in the Scroller
Definition window for the scroller implementing this queue.
description
The description field contains the string sent via the QueryDescription
signal when the scroller is enabled. Typically this serial signal would feed an
indirect text field positioned above each queue and might contain phrases
such as “Request to speak,” “Request to Question,” “Conflict of interest,” etc.
table
As previously noted, naming of the referenced tables in the table field is
arbitrary. We suggest keeping the names the same as those given to the
scroller signal blocks implementing the queues.
condition
Null.
listFields
The listFields field must contain the names of at least the two fields shown
from the referenced table, Speaker and State. Other fields can be included
as well and will be filled automatically with data from the Members table if
fields with matching names are found there.
DataFields
The dataFields field must contain the field names seat, rank, and ID, as
shown. These are additional fields from the referenced table to which the
RTS Console signal block needs access.
SQL
Null
Field contents of Queries table records for agemda item scrollers
Field
54 • Database
Contents
ID
The number in the ID field is the query number given in the agenda scroller’s
Scroller Definition window.
Description
The description field contains the string sent via the QueryDescription
signal when the scroller is enabled. Typically this serial signal would feed an
indirect text field positioned above the agenda scroller and might contain a
phrase such as “2nd Session Agenda.”
Table
As previously noted, naming of the referenced tables in the table field is
arbitrary. We suggest keeping the agenda table name the same as the name
given to the agenda scroller signal block.
Installation & Reference Guide — DOC. 5822
Crestron e-control Vote
SW-VOTE
Field
Condition
Contents
The condition field should contain the following string, precisely, for agenda
scrollers:
not (number=NULL and name=NULL) and (closed=NULL)
This “filter” causes the query to include only non-empty, open items in the
resulting agenda item list. If you are not using the number field in your
agenda table, eliminate it from the above, as follows:
not (number=NULL) and (closed=NULL)
ListFields
The listFields field must contain the the field names number and name, as
shown.
DataFields
The dataFields field must contain the the field name description, as shown.
SQL
Null
Queue scroller tables
The request-to-speak queues are implemented as scrollers bound to tables with a
structure as shown in the table below. The “list fields” are screenname and mark
which means that these are the fields which are displayed in each row of the scroller.
You can add additional fields such as “district,” “party,” etc.
Structure of a queue scroller table, showing all required fields
Field Name
Data Type
Data Size
Indexed
ID
AutoNumber
Long Integer
Yes (No Duplicates)
Seat
Number
Integer
No
Screenname
Text
16
Yes (No Duplicates)
State
Text
1
No
Rank
Number
Byte
No
Field names are fixed and must appear exactly as shown above (case however is not
significant). Set ID to be the primary key. Any additional fields listed in the
listFields field of the Queries table record that refers to this table must also be
included in the new table’s structure. These additional fields’ type and size must
match their sister fields in the Members table exactly. Do not index these
additional fields.
Rather than creating the tables from scratch, we recommend copying one from the
supplied sample database file. Then edit its structure to suit your needs and copy the
result for each queue, and for each “save file,” naming them as described above.
Agenda scroller tables
The agenda scroller “list field” is the Description field. When entering new agenda
items into such a table, fill in only the first four fields; the other fields should remain
blank.
Structure of an agenda scroller table, showing all required fields
Field Name
55 • Database
Data Type
Data Size
Indexed
ID
AutoNumber
Long Integer
Yes (No Duplicates)
Number
Text
16
Yes (Duplicates OK)
Name
Text
32
Yes (No Duplicates)
Description
Text
64
No
Opened
Date/Time
—
No
Closed
Date/Time
—
No
Installation & Reference Guide — DOC. 5822
Crestron e-control Vote
SW-VOTE
Field Name
Data Type
Data Size
Indexed
YesVotes
Number
Integer
No
NoVotes
Number
Integer
No
Abstentions
Number
Integer
No
TotalVoting
Number
Integer
No
Excuses
Number
Integer
No
Absentees
Number
Integer
No
Field names are fixed and must appear exactly as shown above (case however is not
significant). Set ID to be the primary key.
Rather than creating an agenda table from scratch, we recommend copying the
Agenda table from the supplied sample database file. Then edit its structure to suit
your needs.
56 • Database
Installation & Reference Guide — DOC. 5822
Crestron e-control Vote
SW-VOTE
Operations
This section describes the operation of the Vote Console and Request-to-Speak
Console signal blocks as they process signals from the control system. All signals
have names and are shown set in bold type as conjoined words with initial caps.
Refer to the “Signal Reference” section (beginning on page 78) for in-depth
information on these signals.
Vote Console operations
When the server protocol is started (Server | Start), if the Voting Console signal
block is auto-enabled (see “Auto-enable,” page 33), the Vote Proctor window will be
displayed automatically. Otherwise, it will be displayed when the signal block is
eventually enabled. This can be effected by asserting the signal block’s Enable
signal from the control system, or manually by issuing the Voting | Start Voting
command. If the vote is to be proctored from the control system side only, the Vote
Proctor window should be disabled (uncheck the Enable box under the Voting
Computer tab of the Voting Console Signal Block Definition window).
In both cases, the display consists of a series of seat icons arrayed in a pattern that
typically reflects the actual chamber floorplan. The seats icons are
clickable/touchable.
1
Excusing Voters
Operator adjustments to non-absentee seats are now accepted by:
• clicking a seat in the Voting Computer; or
• receipt of a Changei signal.
The Voting Computer responds to such actions by issuing a Statusi signal to toggle
between the BALLOT_PRESENT and BALLOT_EXCUSED values (see table,
below). Also issued is the TallyExcused signal to update the total number of
excused voters.
2
Agenda
If proctoring a vote from the Voting Computer, before opening the floor to the vote,
you must either:
This checkbox is found under the
Voting Computer Interface tab of the
Voting Console Signal Block
Definition window.
57 • Operations
• Select one of the agenda item descriptions previously stored in the Agenda table from
the combo-box list; or
• Enter a new agenda item description directly into the combo-box. When you type in a
new description, you can start with one of the existing descriptions and edit it. In fact,
descriptions that end in a colon are intended for this purpose. (Such entries cannot be
used alone (i.e., without editing them) because descriptions that end in a colon are not
valid.)
This is only a requirement if the Auto-name an unnamed vote when started from
Voting Computer checkbox is not checked.
Installation & Reference Guide — DOC. 5822
Crestron e-control Vote
SW-VOTE
If proctoring a vote from a touchpanel, before opening the floor to the vote, you
must either:
This checkbox is found under the
Control System Interface tab of the
Voting Console Signal Block
Definition window.
• Pick one of the agenda item descriptions previously stored in the Agenda table from
the agenda scroller; or
• Send a new agenda item description to the server using the SetAgenda signal.
This is only a requirement if the Auto-name an unnamed vote upon receipt of Start
signal checkbox is not checked.
NOTE: The only items that will appear in the combo-box list or the agenda scroller are those that
have not yet been voted upon.
3
Open Vote
The floor can be opened for a vote by:
• clicking the Take a Vote button in the Voting Computer; or
• pulsing the Start digital signal.
Successful open vote results in server transmitting the following signals to control
system:
•
•
•
•
4
Transmission of Agenda Item Description string via AgendaEcho serial signal.
Assert of StateStart (see “,” )
Clearing of all Tally signals (see below) (i.e., analogs set to 0; digitals cleared); and
Clearing of all seats (i.e., all Balloti signals set to 0); an
Balloting
Ballot signals are now accepted by server from control system (where i represents
the seat number):
• Yesi
• Noi
• Abstaini
digital pulse
digital pulse
digital pulse
On every ballot signal thus received, tally signals may be transmitted from the server
back to the control system. These signals represent the vote received, sums of
different kinds of votes, as well as total votes and passage information:
•
•
•
•
•
•
•
Statusi
analog
TallyNo
analog
TallyAbstain
analog
TallyTotal
analog
TallyQuorum
digital assert or de-assert
TallyCarried
digital assert or de-assert
Tally23Majoritydigital assert or de-assert
The Statusi signals are set to one of the following values :
Value
58 • Operations
Internal Symbol
0
BALLOT_ABSENT
1
BALLOT_PRESENT
2
BALLOT_YES
3
BALLOT_NO
Typical Display Symbol
X
•
˜
˜
Blank or circle-slash
Empty circle
Solid green circle
Solid red circle
Installation & Reference Guide — DOC. 5822
Crestron e-control Vote
SW-VOTE
Value
Internal Symbol
4
BALLOT_ABSTAIN
5
BALLOT_EXCUSED
6
BALLOT_HIDDEN
Typical Display Symbol
˜
˜
˜
Solid yellow circle
Solid grey circle
Solid grey circle
The BALLOT_HIDDEN value is used in place of BALLOT_YES, BALLOT_NO,
and BALLOT_ABSTAIN only during a secret ballot. (Votes are typically hidden
from the control system when the Operator’s touchpanel is visible to the assembly
until the floor is closed. This feature is controlled by the Tally actual ballots to
control system only after floor is closed checkbox, found under the Control System
Interface tab of the Voting Console Singal Block Definition window.)
5
Close Vote
The floor is closed by:
• clicking the Close Vote button in the Voting Computer; or
• receipt of the End digital signal.
Successful close vote results in the server transmitting the following signals to
control system:
• De-assert of StateStart; and
• assert of StateEnd signal.
6
Ballot Adjustments
Operator adjustments to ballots are now accepted by:
• clicking a seat in the Voting Computer; or
• receipt of a Changei signal.
The Voting Computer responds to such actions by issuing a Statusi signal to iterate
through the set of allowable values (see table, above). Also issued are the various
“tally” signals.
7
Display Results
Vote results can be displayed by:
• clicking the Display Results button in the Voting Computer; or
• pulse of one of either the Display or DisplayAnyway digital signals (control system
transmits to server).
Successful vote display results in the server transmitting the following signals to
control system:
• De-assert of StateEnd; and
• assert of StateDisplay signal.
This action results in display of the Vote Results window on the Voting Computer.
Once displayed, the Display Results button is renamed Re-display Results.
The rising edge of the StateDisplay signal can be utilized by the control system to
route the Voting Computer’s VGA output to a public video display.
8
Close Display
Display is removed by:
• closing (or otherwise obscuring) Vote Results window; or
59 • Operations
Installation & Reference Guide — DOC. 5822
Crestron e-control Vote
SW-VOTE
• receipt of PrintSave signal. (see 8, below)
This action results in the server transmitting the following signals to the control
system:
• de-assert of StateDisplay signal
• If secret ballot: All the StatusI signals are sent again with their actual vote values.
9
Record Vote
Recording of vote is initiated by:
• clicking the Print & Save Vote button in the Voting Computer; or
• receipt of PrintSave signal.
This action results in the server transmitting the following signals to the control
system:
• If Vote Results window still opened: Closing of Vote Results window and de-assert of
StateDisplay signal ();
• transmission of string "[Vote concluded]" via AgendaEcho serial signal;
• assert of StatePrintSave signal;
• de-assert of StatePrintSave signal (when printing and saving are completed); and
• pulse of Done signal.
At this point the vote is concluded and the server is waiting for:
• a new vote (1, above);
• more adjusts (4, above); or
• re-display of results (5, above).
10
Abort Vote
This operation may be initiated at any time after Open Vote and before Display
Results by:
• clicking the Abort Vote button in the Voting Computer; or
• pulse of the Abort digital signal (control system transmits to server).
This action results in the server transmitting the following signals to the control
system:
• Transmission of string "[Vote aborted]" via AgendaEcho serial signal;
• de-assert of StateStart, StateEnd, StateDisplay, and StatePrintSave signals.
11
Attendance Taking
The floor can be opened for taking attendance by:
• clicking the Take Attendance button in the Voting Computer; or
• pulse the Attendance digital signal.
The remainder of the sequence is identical to voting, with the following exceptions:
• Agenda Item Description string is generated by server ("Attendance on [date and time]").
• Only YESi and NOi signals are accepted, in reponse to which 0 (BALLOT_ABSENT)
and 1 (BALLOT_PRESENT) are sent back (via the StatusI signal).
• The attendance results (absentees) are used to accurately record subsequent votes. That
is, ballots are not accepted from absentee seats, said seats are noted as "ABSENT" in the
reports. Also, absentee seats may or may not be counted when figuring majority (depends
on configuration).
60 • Operations
Installation & Reference Guide — DOC. 5822
Crestron e-control Vote
SW-VOTE
State Coordination
Several digital signals sent from the Voting Computer to the control system are used
either for button feedback; or to coordinate the logical state of the control system
with that of the Voting Computer; or both (as in demo2). The nature of these signals
are summarized below:
Operator Action
Idle (between votes)
NewVote
AgendaTrigger
StateStart
StateEnd
StateDisplay
StatePrintSave
Pulse
Agenda selected/entered
Pulse
Floor opened to voting
Goes HI
Floor closed to voting
Goes LO
Goes HI
Goes LO
Results display preparation
Results display ready
Goes HI
Print/Save begins
Goes LO
Goes HI
Force LO
Force LO
Goes LO
Print/Save done
Abort
Pulse
Force LO
Force LO
Demo 2 drives NewVote, AgendaTrigger, StateStart, StateEnd, and StateDisplay
through an Interlock symbol which ensures that one of five state signals is always
held high. These states are used to enable/disable various screen buttons. The
Interlock also ensures that the state transitions occur in the control system within a
single logic wave. This makes hiding one sub-page and showing another sub-pages
cleaner (closer together in time).
StateStart, StateEnd, StateDisplay, and StatePrintSave can also simply be used
“raw” to highlight state buttons. This is of particular interest when these buttons are
lighted control panel buttons (i.e., physical buttons).
Request-to-Speak Console operations
Unlike the Voting Console signal block — which has both a Voting Computer
window interface and a control system interface — the Request-to-Speak Console
signal block has only a control system interface for viewing and maintaining the
request-to-speak queues.
This interface usually consists of the following three pages which the operator
generally would see in this order.
• Load Page
• Console Page
• Save Page
Note: The signal block should be enabled before the operator can reach any of these pages.
These three pages are described in the following three sections.
Note: Unless otherwise indicated, all interface elements described therein are “joined” directly to the
indicated signals.
Load page
The Load page serves as an “entrance” to the RTS console page. From this page, the
operator can select from the following options:
• Clear the queue set and flip to the Console Page.
61 • Operations
Installation & Reference Guide — DOC. 5822
Crestron e-control Vote
SW-VOTE
• Reload the queue set from a “save file” and flip to the console page.
• Flip directly to the console page without clearing or reloading the queue set.
• Disable the signal block and leave RTS pages entirely.
Typical Request-to-Speak Load Page interface elements
Interface Element
“Save file” directory
a set of f Load buttons,
one for each “save file”
a New button
a Continue button
an Exit button
Signal(s)
Notes
DateTimef
Typically, indirect text fields inside the
Load buttons
Loadf
(where f = the number of “save files”)
Page flip. Proceeds to Console Page
and loads saved queue set.
ClearQueueSet
Page flip. Clears current queue set and
then flips to Console Page.
None
Page flip. Proceeds to Console Page
which is already displaying the “current”
queue set.
Resets a toggle which
de-asserts Enable
Exits out of the RTS sub-system,
disabling the signal block which
darkens all seat request button
feedbacks and will not respond to
further Req signals from these buttons.
Console Page
The Console Page consists of the following elements. Note that only the scrollers are
absolute requirements.
Typical Request-to-Speak Console Page interface elements
Interface Element
Signal(s)
a scroller for each queue
Per row (r ): List1,r and
List2,r and Pickr.
Also required: Prev
and Next.
Optional: First, Last,
Scrollbar, and
QueryDescription.
a Hold button
a Yield button
a set of q Clear Queue
buttons, one for each
queue
a Clear All button
a Print button
Notes
These signals belong to the individual
scroller signal blocks.
Hold
Optional. Puts current speaker on hold.
This function can also be invoked by
touching name of speaker in scroller.
Yield
Optional. Forces current speaker to
yield. If you implement a speaker timer,
this signal would also be triggered by
timer exhaustion.
ClearQueueq
(where q = number of queues in queue
set)
Optional.
ClearQueueSet
PrintReport
Optional.
Optional.
a Load button
None
Optional page flip.
Backs out to Load Page.
a Save button
None
Optional page flip.
Exits out to Save Page.
Save Page
The Save page is the normal egress from the RTS console page. On his way out, this
page prompts the operator to select from the following options:
• Reload the queue set from a “save file” and flip to the console page.
• Flip directly to the console page without clearing or reloading the queue set.
62 • Operations
Installation & Reference Guide — DOC. 5822
Crestron e-control Vote
SW-VOTE
• Disable the signal block and leave RTS pages entirely.
Typical Request-to-Speak Save Page interface elements
Interface Element
Signal(s)
Notes
DateTimef
Typically, indirect text fields inside the
Save buttons
a set of f Save buttons,
one for each “save file”
Savef
(where f = the number of “save files”)
a Return button
None
Page flip. Returns to Console Page
which is still displaying the “current”
queue set.
“Save file” directory
ClearFiles
Empties all the save files. Rather than
joining this button directly to this signal,
we recommend an “Are you sure?”
dialog (as implemented in demo1).
Resets a toggle which
de-asserts Enable
Exits out of the RTS sub-system,
disabling the signal block which
darkens all seat request button
feedbacks and will not respond to
further Req signals from these buttons.
a Clear FIles button
an Exit button
NOTE: In demo1, note that the “Main Menu” (a.k.a. Exit) buttons on the Load and Save pages are
simple page flips; they do not disable the signal block. This is a viable alternative. However, note
that the seat request buttons will remain active even though the touchpanel is no longer displaying
the Console Page.
1
Enable
Re-establishes the last known states of all queues, seat button feedbacks, and mic
selection. Queues and seat request buttons are now active.
Because the queues are database table-bound scrollers, the actual state of the queues
is always instantly preserved in the tables. When the signal block is re-enabled, the
tables are re-opened, and the queues reappear intact. Also at this time, the seat button
feedbacks and the mic selection setting is re-sent to the control system.
2
Start new queue set
Operator would normally get a button tied directly to the ClearQueueSet. This
operation may be initiated at any time. It is usually presented to the operator in two
places:
• As an option on the Load Page, on his way in to the Console Page; and
• As an option on the Console Page itself.
3
Reload old queue set
Operator can (optionally) choose to reload a “snapshot” of the queue set from any of
a set of f “save files” (the value of f being determined by the signal block’s
configuration). The save files are identified by their timestamps which are displayed
in the Load buttons’ indirect text fields. The Load buttons pulse the Load signals. If
a button says “[EMPTY],” then there is no data in (any of the tables comprising) the
“save file” and pulsing the signal raises Err_NO_SUCH_RECORD.
NOTE: Since no “successful load trigger” signal is provided, an “[EMPTY]” Load button will
typically flip to the Console Page anyway. In such a case, the current queue set will remain loaded
but the “No such record(s)” error message will appear on the screen.
63 • Operations
Installation & Reference Guide — DOC. 5822
Crestron e-control Vote
4
SW-VOTE
Seat request
To enter a request to speak: Seat pulses Req signal. Seat’s screenname enters queue.
(If seat already in the queue because already had the floor at least once, seat’s
WAITING state mark is incremented.)
To cancel the request: Seat pulses Req signal again. Seat’s screenname removed
from queue. (If seat already had the floor, seat remains in queue but WAITING state
mark is decremented.)
To yield the floor: Once recognized to speak, seat can yield by pulsing Req signal
again. Seat’s state mark is changed to symbol for DONE state, incremented to indicate
number of times seat has spoken.
NOTE: There is a distinct Req signal for each queue at each seat.
5
Recognize a seat
To recognize a seat, “pick” his name from a queue. (That is, pulse a queue scroller
Pick signal.)
Any seat currently recognized to speak is forced to yield; and the new seat gets the
floor. (State marks are adjusted in the scrollers and the mic at the old seat is switched
off and the mic at the new seat is switched on.)
6
Put a seat on hold
If a seat is recognized in error, or if the recognized seat wishes to yield temporarily,
operator can put him “on hold” by either of the following two actions:
• By “picking” his name from the queue again; or
• by pulsing the Hold signal (typically joined to a Hold or Correct button).
In either case, the seat’s state mark will change to the symbol for ON HOLD and his
mic will be switched off.
NOTE: More than one speaker can be “on hold” at a given time.
7
Take a seat off hold
To re-recognize a seat, again “pick” his name from the queue. See “Recognize a
seat,” above.
8
Force recognized seat to yield
To force a seat to yield without having to recognize a new seat, pulse the Yield
signal. This signal is typically tied to a Force Yield button.
NOTE: This signal can also be used to automatically force the recognzied seat to yield when his
timer is exhausted.
9
Print queue set
To print a report, pulse the PrintReport signal. This signal is typically joined to a
Print Queue Set button. Some installations automatically pulse this signal to produce
a report whenever the operator leaves the Console Page.
64 • Operations
Installation & Reference Guide — DOC. 5822
Crestron e-control Vote
10
SW-VOTE
Clear a queue
To clear an individual queue, pulse one of the ClearQueueq signals (typically joined
to a Clear This Queue button positioned near each queue).
Note that queues can be configured to automatically clear whenever a seat in the first
queue is recognized to speak. (See “Auto-clear,” page 43.)
11
Clear queue set
To clear all the queues in the queue set at once, pulse the ClearQueueSet signal
(typcially tied, through an “Are you sure?” dialog, to a Clear All Queues button).
12
Save queue set
To save the queue set, proceed to the Save Page and pulse one of the Save signals.
13
Clear all “save files”
The Save Page also features a Clear ALL Queue Sets button which is joined directly
to the ClearFiles signal.
14
Disable
The signal block is typically disabled upon exiting out of the Load or Save pages.
This is not mandatory. However, be aware that if the signal block is not disabled,
seats can continue to “buzz in.” With the signal block disabled, all seat request
button feedbacks go dark and will remain unresponsive until the signal block is again
enabled.
65 • Operations
Installation & Reference Guide — DOC. 5822
Crestron e-control Vote
SW-VOTE
Demos
Two demonstrations on the use of the Voting Computer are included with the
package. Each demo is described along with an accompanying “bird’s eye view”
diagram of its SIMPL program. All demos use the following three files:
• A VT Pro-e source file (demovote.vtp file), containing pages for all three demos,
ready to be compiled LC-3000 touchpanel.
• A compiled touchpanel file (demovote.hex file); dervied from the above; ready to
upload to an LC-3000, CT-3000, CT-3500, or VT-3500.
• A Configuration file (demovote.ini) configures the server for all three demos.
In addition, each individual demo has a folder containing the following files:
• A SIMPL Windows source file (demo?.smw file), ready to be compiled for a
CNMSX-PRO control system (“PRO” = front panel with LCD display) with a
CNXENET (Ethernet) card in the DPA slot.
• A compiled control system program file which uses serial RS-232 communications
(demo?COM.bin file); derived from the above by commenting off the Virtual COM
port; ready to upload to such a control system.
• A compiled control system program file which uses EtherNet communications
(demo?TCP.bin file); derived from the above by commenting off the serial COM
port; ready to upload to such a control system.
The supplied SIMPL and VT Pro-e files may require conversion prior to compiling
and uploading if your target touchpanel is not one of those mentioned above.
Conversion is a simple matter using VT Pro-e.
Before attempting to run the demos, use the File | Configuration File… command
to make sure the server is using the configuration file named above.
Demo 1: Voting
[section incomplete]
Demo 1 SIMPL Windows Program
[section incomplete]
Demo 1 VT Pro-e Program
[section incomplete]
NOTE: Before proceeding to the actual demo page, start the server protocol by issuing the
Server | Start command.
[section incomplete]
Demo 2 Request-to-Speak
[section incomplete]
Demo 2 SIMPL Windows Program
[section incomplete]
66 • Demos
Installation & Reference Guide — DOC. 5822
Crestron e-control Vote
SW-VOTE
Demo 2 VT Pro-e Program
[section incomplete]
NOTE: Before proceeding to the actual demo page, start the server protocol by issuing the
Server | Start command.
[section incomplete]
67 • Demos
Installation & Reference Guide — DOC. 5822
Crestron e-control Vote
SW-VOTE
Appendix A: Theory of Operation
This section describes the operation of the e-mailer signal block as it processes
signals from the control system. Signal names are shown as conjoined words with
initial caps set in bold type, such as SendNow. Refer to the “Signal Reference”
beginning on page 78 for in-depth information on these signals.
Server Protocol
Run the Crestron Software Server application, swserver.exe, to license
(Server | License…) and configure (Server | Configure…) server operation.
Although the server application is now running, the server protocol must be
manually started (Server | Start) t o establish the communications link. Once
started, licensing and configuration options are off limits. To change a configuration
option, the server protocol must be halted (Server | Stop).
Signal Block Definition / Activation
Definition / activation of signal
blocks is performed in the Signal
Blocks tab of the Configuration
Options window — which can
only be accessed while the server
protocol is halted.
Signal Blocks (in general) are “defined” (created) in the “Configure options”
window, Signal Blocks tab. Once defined, they are saved in the Configuration
Settings file.
Signal Blocks are not “active” (listening for signals) unless activated in the list under
the Signal Blocks tab by checking the box next to the signal block name. The number
of active signal blocks of each type cannot exceed the respective limits of your
license. Should this happen, a warning appears on the Signal Blocks tab and the
server protocol does not start.
There is no theoretical limit to the total number of signal blocks which may be
defined in a given configuration. (A practical limit has yet to be determined.)
Signal Block Enable / Disable
Whereas most digital signals are
pulsed, the Enable signal is
unusual in that it is state-sensitive.
Once the signal block has been defined and activated, and the server protocol is
running, the signal block still has very limited functionality until it is enabled with
an assertion of the Enable signal by the control system. Most other signals require
the signal block to be enabled first; otherwise they produce an “Object not loaded”
error. Once enabled, system resources are loaded and the signal block to respond to
signals from the control system to send or receive e-mail.
De-asserting the Enable signal causes the signal block to unload those system
resources, making it dormant once again.
The following signals are exceptions to this rule. They can be processed without first
enabling the signal block:
• Enable (assert) of course
• All the e-mailbox’s Set____ signals
• The e-mailer’s Shortcut signals. When received by a disabled e-mailer, the e-mailer is
“auto-enabled” — but only for the duration of the signal.
Signal Block Error Reporting
All signal blocks have a Local error signals option to define a set of signals for the
purpose of reporting of errors “locally.” Otherwise, errors are reported “globally” to
68 • Appendices
Installation & Reference Guide — DOC. 5822
Crestron e-control Vote
SW-VOTE
the control system through the optional signal block that can be associated with a
COM Settings definition which contains a similar set of error reporting signals..
These signals include ErrNumber, ErrString, and ErrTrigger. See the “Signal
Reference,” beginning on page 78, for details.
69 • Appendices
Installation & Reference Guide — DOC. 5822
Crestron e-control Vote
SW-VOTE
Appendix B: Intersystem Communications and Signal
Space Considerations
The Send e-Mail SIMPL Windows
symbol is available from the
Crestron FTP site. Under
SIMPLWIN, look for “Library
update” (version equal to or
greater than that specified in
“Leading Specifications” on page
9).
The DBM Scroller SIMPL logic
module is installed with SIMPL
Windows 1.4.
The Intersystem
Communications symbol is
commonly known by its speedkey
name, XSIG.
The following discussion applies in general to all Crestron Software Server
components. Keep in mind while reading this section that use of the Intersystem
Communications SIMPL symbol is the most general approach for setting up
communications with the signal blocks defined in the server. To simplify the
control system side programming, be aware of the following alternatives to the
Intersystem Communications symbol:
• For e-mailer signal blocks, we recommend the more specific Send e-Mail symbol.
Checking Using “Send e-Mail” SIMPL symbol in the signal block definition constrains
the definition to ensure compatibility with this symbol.
• Likewise, Standard Scroller signal blocks can use the DBM Scroller SIMPL Windows
logic module.
Each active signal block exchanges data with a particular running in a control
system connected to the server. Typically, several signal blocks communicate with
the same control system, using several Intersystem Communications symbols. This
section discusses how to properly connect signal blocks to their target Intersystem
Communications symbols.
System Connections
Signal Blocks are connected to XSIGs through a physical connection (a hardware
communications port). The control system accesses the port through a driver. There
are different drivers for each kind of port:
System
Protocol
Hardware
Port
Serial Driver
CNRACK
or
CNMS
RS-232
CNCOMH-2
plug in control card
A or B
CNCOMH-2
Two-way serial
driver
TCP/IP
N o t
a v a i l a b l e
RS-232
Built-in serial port
A
through
F
CNXCOM
Two-way serial
driver
TCP/IP
CNXENET
direct processor access
(DPA) card
NET
Virtual
Communication
Port
RS-232
Built-in COM ports
or
3rd-party serial cards
COM1
through
COM8
Network Interface
(NIC) card
NET
CNRACKX
or
CNMSX
PC
TCP/IP
Manufacturerspecific
In all cases, the control system receives data as a serial data stream from the driver
and transmits data by sending a serial data stream to the driver. This is precisely the
kind of data the XSIG symbols use.
70 • Appendices
Installation & Reference Guide — DOC. 5822
Crestron e-control Vote
SW-VOTE
Encoding and Decoding the Serial Data Stream
Analog, serial, and digital signals to be sent from the control to the server are fed
into the input (left) side of an Intersystem Communications symbol which encodes
the signals into a serial data stream, available as an output labeled tx$ (for
transmitter). This data stream is connected to the input side of the serial driver
symbol, also labeled tx$, and is sent out the COM port to the server.
Convenience feature: You can
connect an analog signal to a
serial signal input of a signal
block’s symbol. Upon receipt, the
server automatically converts the
analog value to a decimal (base
10) numeric string.
The server receives the data on a certain connection, via a certain channel number
(if TCP/IP). It searches through its active signal blocks for one with a signal range
that can accommodate the incoming signal. It also knows the signal type (analog,
serial, or digital) and sends the signal to the appropriate method implemented by the
signal block. A useful exception to this general paradigm is that when the server
receives an analog signal when it expected a serial signal (i.e., the signal number
matched that of a serial signal, the server as a courtesy, automatically converts the
analog value to a decimal (base 10) numeric string.
Data from the server received at the COM port is available on the output (right) side
of the serial driver symbol, labeled rx$ (for receiver). This data must then be
decoded by the control system into system signals it can use. To do this, the rx$
stream is connected to the input side of an Intersystem Communications symbol, also
labeled rx$. The outputs of this symbol are analog, serial, and digital signals.
The Intersystem Communications Symbol Signal Space
The term “signal space” refers to the number of signals available to the Intersystem
Communications symbol connected to a given i/o stream. Specifically, there are a
total of 4096 signals available. However, while the first 1024 signals may be of any
type (Analog, serial, or digital), the remaining 3072 signals can only be used for
digital signals. An additional constraint imposed by the SIMPL Windows compiler is
that each symbol (and therefore each signal block on the server side) must list all its
digital signals after all its analog/serial signals (which may be intermixed).
Since each signal block’s signals are numbered consecutively within this space, and
since the non-digital signals of all signal blocks must be positioned below 1024, only
that portion of the space is normally of practical use.
NOTE: The various signal block definition windows all provide a dynamic display of the highest
signal number currently defined. This value changes as the user selects options and enters values for
the size of enumerated signal sets. This value is also affected when the user changes the value of the
symbol’s offset. If any of these actions would place the highest digital signal above 4095 or the
highest non-digital signal above 1023, the text box containing the highest signal number turns red to
alert the user. The user must bring the signals within range before attempting to activate the signal
block or an error is added to the server log. Also note that when attempting to start the server
protocol, an error is reported if any Intersystem Communication symbols sharing the same
connection have signal ranges that overlap.
Large configurations are often not able to fit all their signal blocks within this space.
TCP/IP connections use a Virtual COM port which offers 128 discrete channels. For
such connections, each channel supports a separate i/o stream, and hence a separate
signal space. The solution is to apportion your signal blocks among a number of
channels. For RS-232 connections, there is only the one channel with which to work.
In such cases, a second physical connection is needed.
The following sections discuss different connection models in detail.
One Connection, Many Signal Blocks
Signal Blocks configured in the server for a particular control system can “talk” to
their respective Intersystem Communications symbols through a single connection
71 • Appendices
Installation & Reference Guide — DOC. 5822
Crestron e-control Vote
SW-VOTE
to the control system. All the symbols’ rx$ and tx$ streams are tied to the same
serial driver symbol. The set of signals intended for a particular Intersystem
Communications symbol are distinguished from the other sets by their offset and/or
their channel number.
Normally, the signals in an Intersystem Communication symbol’s input list and its
output list are internally enumerated starting at the top of each list with zero (0). The
next signal down the input list and the next down the output list are numbered 1; the
next pair, 2; and so forth. These “signal numbers” are transmitted along with the data
and are used at the receiving end to determine what to do with the data.
NOTE: The signal numbers under discussion here are for communications purposes only and are not
utilized in any way outside the Intersystem Communications symbol context. The numbering
scheme displayed on the Intersystem Communication symbols in SIMPL Windows has nothing to do
with the actual signal numbering.
Additional Intersystem Communications symbols using the same connection must
specify a value to offset their signal numbers by a constant amount. The top signals
in such an Intersystem Communications symbol do not begin with zero, but rather
with the supplied offset. This offset must be specified on both sides of the
connection, as follows.
On the server side, the offset is entered into the textbox in the upper right corner of
the signal block definition window. Note in the figure below that the textbox in
question is not labeled Offset as one might expect, but Signals. The adjacent box
labeled to shows the signal number of the last signal in the input or output lists
(whichever is higher). This information helps to determine the offset of the next
signal block.
The Signal Block Interface frame from a typical signal block definition window, showing the signal
block’s COM Settings, Vcom channel assignment, and signal offset.
NOTE: In the above example, Vcom channel is dimmed because “SYS” specifies a serial connection.
(Only TCP/IP connections have channels.)
On the control system side, in SIMPL Windows the offset is entered into the offset
textbox at the bottom of the Intersystem Communications symbol.
A portion of an Intersystem Communications symbol.
showing the Offset and Option textboxes.
72 • Appendices
Installation & Reference Guide — DOC. 5822
Crestron e-control Vote
SW-VOTE
NOTES:
1.
Always suffix a d (for decimal) to values typed into the Offset textbox.
2.
Always enter 1d into the Option textbox for all Intersystem Communications symbols.
Multiple channels
Multiple channels apply to connections made through Virtual COM Ports only (i.e.,
TCP/IP connections only). Each Virtual COM Port can have up to 128 channels,
where each channel can be thought of as a separate COM port. If a separate channel
is used for each Intersystem Communications symbol, then all Intersystem
Communications symbols can use an offset of zero (i.e., no offset). The advantage
is simplicity; each channel has its own signal space. In this case, the programmer
never needs to worry about offsets on either side.
NOTE: Only systems connected to a Virtual COM Port (via TCP/IP) have multiple channels. The
channel list is disabled (dimmed) in the signal block definition window for systems connected via
RS-232. RS-232 connections are single-channel connections. Do not use multiple channels if there is
any possibility of needing to revert to an RS-232 connection.
Multiple Connections
Usually all Intersystem Communications symbols from a single control system
“talk” to the server through one physical connection, although it is possible to install
multiple connections, such as any combination of RS-232 connections (each with its
own cable) and/or or a TCP/IP connections (all referencing the same IP address, but
each with its own IP ID).
NOTE: Multiple connections between a single control system and a single server delivers better
response because of the additional buffers involved. However, keep in mind that multiple TCP/IP
connections do need to be individually licensed.
The COM Settings Signal Block
An Intersystem Communications symbol to service the COM Settings signal block
need only be present if at least one signal is defined in the System Definition
window. However, it need not be at signal offset 0 but could be positioned anywhere
within the signal space subject to the constrains discussed above. If present, the
COM Settings signal block’s Intersystem Communications symbol is always
connected to channel #1 in a Virtual COM port.
73 • Appendices
Installation & Reference Guide — DOC. 5822
Crestron e-control Vote
SW-VOTE
Appendix C: Signal Reference
Definition of Terms
Data fields
The indirect text fields which receive the data that is echoed
when a record is opened (“picked”).
Connection
A connection to a system which can be either serial
(RS-232) or EtherNet (TCP/IP).
List fields
The indirect text fields in scrollers. There can be more than
one field (column) per row in the scroller.
Scroller
(1) Scrolling lists as displayed on touchpanels, made up of
(a) a column of buttons containing indirect text fields, along
with (b) transport buttons, and (c) an optional analog gauge
object serving as a scrollbar. Also (2) the signal block which
services such a construct.
Server
The Crestron Software Server. That is, swserver.exe
running on a Windows PC.
Signal Block
Active component within the Server, which listens for and
responds to signals from connected control systems. For
example, each scroller requires its own signal block. If not
specified explicitly as some other type of signal block,
refers to a standard scroller signal block.
System
A Crestron control processor along with appropriate
programming.
String Proxies
The various Echo signals keep a server-side “proxy” of the data last sent to the
system. Before sending, the new value is compared with the proxy and is only
actually sent if it differs. The proxy is then updated to match the new value. In this
way, identical string data are not continually resent.
Bit Patterns
For those unfamiliar with bit patterns, here is a primer.
Base 2 Basics
A quantity is represented in computer memory as a binary (base 2) number (i.e., a
string of 1s and 0s). As you know, in base 10, the least significant (low-order)
“digits” are on the right, and the most significant (high-order) are on the left. This is
also true of base 2: The lowest order “bit,” (binary digit), on the far right, and are
numbered starting from 0. Thus, when sixteen bits are available, they are numbered 0
to 15 from right to left — because each bit on its own represents the quantities 20
through 215.
Bit patterns as used here do not represent quantities. Rather, the values of the
individual bits (0 or 1) turn features off and on (respectively). Thus, when the
documentation refers to Bit 5 as controlling feature X, this means that feature X is
“enabled” when Bit 5 is set to 1.
74 • Appendices
Installation & Reference Guide — DOC. 5822
Crestron e-control Vote
SW-VOTE
Base 16 used for notational purposes
Straight base 2 notation (a long string of 0s and 1s) is considered to be too unwieldy
to be useful to the human eye as it is too easily prone to misrepresentation and
misinterpretation. Hexadecimal (base 16) notation is used to conveniently specify the
bit patterns for the signals that use them (i.e., the Config and SignalAn signals).
Hexadecimal groups all sixteen bits into four sets of four bits each, assigning the
base 10 digits 0 to 9 plus the first six letters of the alphabet A to F to the sixteen
possible combinations of the four bits.
For example, the sixteen-bit (base 2) pattern
0000000111010101
can be broken into the four four-bit sets
0000
0001
1101
0101
which get assigned to them the four hexadecimal “hex digits”
0
1
D
5
Note that D stands for the quantity we normally express in base 10 as thirteen (13).
Therefore, the above bit pattern is referred to conveniently as $01D5, or since
leading zeros are optional in any base, $1D5. The missing (high-order) bits are
assumed to be 0000. Although $1D5 represents a quantity — which happens to be
four hundred sixty-nine (469) in base 10 — again, we are only interested in bit
patterns here, not the quantities they may represent.
Error Reporting
At this time error handling is a little haphazard, with some errors being tallied back
to the control system, while others are logged in the Server Monitor window.
Tallied Errors
A descriptive string is sent with all errors (via ErrString). However, while some are
accompanied with error numbers (via ErrNumber + ErrTrigger), some are not.
Log Items
The log is intended for after-the-fact analysis of important events. The log is an inmemory FIFO list (first in, first out). When the log approaches capacity, log items
are removed, one by one, starting with the oldest items first, until there is enough
room for the new item.
All logged items are preceded with either a per-cent sign (%) or a dollar sign ($).
Items preceded with % are informational. Items preceded with $ are errors, reflecting
unanticipated situations.
Signal Summary
The “Signal Reference,” below, is an alphabetical list of all signals from
COM Settings, Request-to-Speak Console, and Voting Console signal blocks.
(Signals from Scroller signal blocks are not listed in this document. See the
SW-DBM document, Doc. 5823.)
Each signal block is configured separately and may exclude certain optional signals.
To properly construct an Intersystem Communications symbol in your SIMPL
Windows program, you can always check the Signal Analyzer window for a concise
75 • Appendices
Installation & Reference Guide — DOC. 5822
Crestron e-control Vote
SW-VOTE
listing of all the inputs and outputs. To do this, start the server using the
Server | Start w/o connecting command and select the signal block you are
interested in from the Signal Blocks & Connections listbox.
Certain signal names are used in more than one type of signal block. However, only
one entry for each signal type appears in the reference. Among these are the Done
signal; the Enable and Enabled signals; and the three error signals, ErrNumber,
ErrString, and ErrTrigger. This identical naming reflects the fact that these signals
function similarly regardless of where they appear.
COM Settings Signal Block Summary
The system block contains two Ping and two Pong signals. One pair consists of a
send (Ping) and receive (Pong) from the Server’s point of view; and the other, a
send (Ping) and receive (Pong) from the Systems’ point of view. This
accommodates pinging from either (a) Systems to the Server or (b) vice versa.
Signal Name
Direction
Type
Done
server-to-system
D
ErrNumber
server-to-system
A
ErrString
server-to-system
S
ErrTrigger
server-to-system
D
PingSvr
system-to-server
D
PingSys
server-to-system
D
PongSvr
server-to-system
D
PongSys
system-to-server
D
Request-to-Speak Console Signal Block Summary
The following signals comprise a Voting Console signal block. The number and
precise selection of signals varies based on the specific signal block definition.
Signal Name
76 • Appendices
Direction
Type
ClearFiles
system-to-server
D
ClearQueueq
system-to-server
D
ClearQueueSet
system-to-server
D
DateTimef
server-to-system
S
Done
server-to-system
D
Enable
system-to-server
D
Enabled
system-to-server
D
ErrNumber
server-to-system
A
ErrString
server-to-system
S
ErrTrigger
server-to-system
D
Hold
system-to-server
D
Loadf
system-to-server
D
MicSelect
server-to-system
A
Names
server-to-system
S
PrintReport
system-to-server
D
Reqs
system-to-server
D
Req-fbs
server-to-system
D
Savef
system-to-server
D
Installation & Reference Guide — DOC. 5822
Crestron e-control Vote
SW-VOTE
Signal Name
Direction
Type
SendNames
system-to-server
D
Yield
system-to-server
D
Voting Console Signal Block Summary
The following signals comprise a Voting Console signal block. The number and
precise selection of signals varies based on the specific signal block definition.
Signal Name
77 • Appendices
Direction
Type
Abort
system-to-server
D
Abstains
system-to-server
D
AgendaTrigger
server-to-system
D
AgendaEcho
server-to-system
S
Attendance
system-to-server
D
Changes
system-to-server
D
Display
system-to-server
D
Done
server-to-system
D
Enable
system-to-server
D
Enabled
server-to-system
D
End
system-to-server
D
ErrNumber
server-to-system
A
ErrString
server-to-system
S
ErrTrigger
server-to-system
D
Names
server-to-system
S
NewVote
server-to-system
D
Nos
system-to-server
D
PrintSave
system-to-server
D
SelectChair
system-to-server
D
SendNames
system-to-server
D
SetAgenda
system-to-server
S
Start
system-to-server
D
StateDisplay
server-to-system
D
StateEnd
server-to-system
D
StatePrintSave
server-to-system
D
StateStart
server-to-system
D
Statuss
server-to-system
A
Tally23Majority
server-to-system
D
TallyAbstain
server-to-system
A
TallyCarried
server-to-system
D
TallyExcused
server-to-system
A
TallyNo
server-to-system
A
TallyQuorum
server-to-system
D
TallyTotal
server-to-system
A
TallyYes
server-to-system
A
Installation & Reference Guide — DOC. 5822
Crestron e-control Vote
SW-VOTE
Signal Name
Yess
Direction
Type
system-to-server
D
Signal Reference
The alphabetical reference proper begins on the next page.
Regarding references herein to a signal raising an error condition, see “Appendix D:
Error ,” page 132.
78 • Appendices
Installation & Reference Guide — DOC. 5822
Crestron e-control Vote
SW-VOTE
Abort
Description
Direction
Abort voting sequence
Voting Computer to control system
Type
Digital
Value
Assert:
De-assert:
Expected Reply
Comments
Voting Console
Results now being recorded on Voting Computer
([Print &] Save Results button feedback ON)
Results have been recorded
([Print &] Save Results button feedback OFF)
AgendaEcho, NewVote,
This signal is accepted by the Voting Computer while the floor is opened and after
the floor is closed but before the vote is recorded. When accepted, voting computer
responds as follows (in the order given):
§
§
§
§
All “state” signals are de-asserted
NewVote pulse
All digital “tally” signals are de-asserted and analog “tally” signals are reset to 0
All Changes signals are reset to 1 (present) if aborting attendance taking or either 0
(absent) or 1 (present) if aborting a vote
§ AgendaEcho with the value “[Vote aborted]”
Used in conjunction with the other “state” signals, StateStart, StateEnd, and
StateDisplay; and the pulsed signals, NewVote and AgendaTrigger. These
signals provide feedback to the control system about the voting sequence. They
can be used to highlight the sequence control buttons, or to enable/disable
touchpanel choices. (See “State Coordination,” page 61, for a “score sheet”
illustrating the sequence.)
This signal is only valid during a vote (when StateStart, StateEnd, or
StateDisplay is high). If issued at the wrong time, the following descriptive error
message is sent through the ErrString signal:
To start, press TAKE ATTENDANCE or START VOTE
See Also
79 • Appendices
PrintSave, AgendaEcho, NewVote
Installation & Reference Guide — DOC. 5822
Crestron e-control Vote
SW-VOTE
Abstains
Description
Direction
Seat abstains
control system to Voting Computer
Type
Digital
Value
Pulse
Expected Reply
None
Comments
Voting Console
This signal is accepted by the Voting Computer while the floor is opened for voting
only. Even when the floor is opened, it will be ignored
§ when the signal block is not configured to allow abstentions (Abstain checkbox,
Additional vote buttons frame, Rules tab, Voting Console Signal Block Definition
window);
§ when the seat has been excused from the vote, either by the operator prior to
opening the floor, or by the seat itself via a pulse of its Excuse signal; or
§ when taking attendance (voting sequence started by Attendance signal rather than
Start signal).
The seat may pulse its Yes, No, and Abstain signals at will while the floor is
opened. The most recently pulsed signal is considered definitive at the moment the
floor is closed. However, if the seat pulses its Excuse signal, further pulses of any
of these signals are be ignored. (The operator can however adjust the seat’s vote
after the floor is closed.)
The definition of the Abstains signal set is optional. Note however that even when
not defined, the signal block may still be configured to allow abstentions. In such a
case, while the seat would not be able to abstain, his vote could still count as an
abstention under the following two circumstances:
§ The default vote is set to Abstain (ABSTAIN checkbox, Default votes frame, Rules
tab, Voting Console Signal Block Definition window).
§ After the floor is closed , the Operator adjusts the seat’s vote from the touchpanel
or from the Vote Proctor window.
See Also
80 • Appendices
Yes, No, Start, Attendance
Installation & Reference Guide — DOC. 5822
Crestron e-control Vote
SW-VOTE
AgendaEcho
Description
Direction
Type
Value
Expected Reply
Comments
Voting Console
Agenda item description
Voting Computer to control system
Serial
New agenda item description; may be partial
Start or Abort
This signal is sent when the agenda item description has changed either from the
Voting Computer interface by selecting a pre-entered agenda item from the combobox, or typing a character into same; or from the Control System Interface via the
SetAgenda signal.
The signal is sent anew for every character typed or every SetAgenda signal
received.
The AgendaTrigger signal is sent after the AgendaEcho signal whenever that
signal’s value contains a valid agenda item description.
See Also
81 • Appendices
AgendaEcho, AgendaTrigger, SetAgenda
Installation & Reference Guide — DOC. 5822
Crestron e-control Vote
SW-VOTE
AgendaTrigger
Description
Direction
Agenda item has been set
Voting Computer to control system
Type
Digital
Value
Pulse
Expected Reply
Comments
Voting Console
Start or Abort
This signal is pulsed when a valid agenda item has been selected or entered either
from the Voting Computer interface or from the Control System Interface. It is
utilized by the control system to indicate the state of the voting sequence through
screen button feedback or by enabling/disabling certain screen buttons. An
example of the use of this signal is provided in demo2.
Used in conjunction with the “state” signals, StateStart, SateEnd, StateDisplay,
and StatePrintSave; and the other pulsed signal, NewVote. These signals provide
feedback to the control system about the voting sequence. They can be used to
highlight the sequence control buttons, or to enable/disable specific touchpanel
choices. (See “State Coordination,” page 61, for a “score sheet” illustrating the
sequence.)
See Also
82 • Appendices
SetAgenda, Start, Abort
Installation & Reference Guide — DOC. 5822
Crestron e-control Vote
SW-VOTE
Attendance
Description
Direction
Open floor to special attendance-taking “vote”
Voting Computer to control system
Type
Digital
Value
Pulse
Expected Reply
Success:
Failure:
Comments
See Also
83 • Appendices
Voting Console
StateStart assert; followed by
Done pulse
ErrString
See comments at Start.
Start, End, Abort
Installation & Reference Guide — DOC. 5822
Crestron e-control Vote
SW-VOTE
Changes
Description
Direction
Change a vote
control system to Voting Computer
Type
Digital
Value
Pulse
Expected Reply
Success:
Failure:
Comments
Voting Console
Status signal with new value for this seat
Done pulse
ErrString
These signals are generally tied directly to touchpanel buttons positioned over
each seat. (The seat is usually represented with an animation object; see Status
signal.)
Each time this signal is pulsed, the vote cycles through the allowable values in the
following order:
Before a vote:
PRESENT → EXCUSED …
Attendance-taking:
PRESENT → ABSENT …
Regular vote:
PRESENT → YES → NO → ABSTAIN → EXCUSED …
After making all changes, pulse the Display signal to redisplay the vote results on
the Voting Computer. Additional changes may then be made and the display
updated again. When satisfied, pulse the PrintSave signal.
These Change signals are only valid before a vote (all “state” signals low) for the
purpose of excusing voters; or after a vote when the floor is closed, including after
displaying the vote results (while either StateEnd or StateDisplay is high). If
issued at the wrong time, one of the following descriptive error messages is sent
through the ErrString signal:
To start, press TAKE ATTENDANCE or START VOTE
VOTE IN PROGRESS, FLOOR OPENED:
Press END VOTE or ABORT VOTE.
See Also
84 • Appendices
Abort, Display, PrintSave
Installation & Reference Guide — DOC. 5822
Crestron e-control Vote
ClearFiles
Description
Direction
Value
Pulse
See Also
85 • Appendices
Control system to Voting Computer
Digital
Comments
Request-to-Speak Console
Clears all “save files”
Type
Expected Reply
SW-VOTE
Done pulse
Deletes all records from all q x f “save file” tables where q is the number of queues
in the queue set and f is the number of save file sets configured for this signal
block.
Obviously, this is a dangerous signal. We recommend constructing some sort of
safeguard (like an “are you sure”) into your touchpanel interface before allowing a
human operator to issue this signal.
Load for table names.
Installation & Reference Guide — DOC. 5822
Crestron e-control Vote
SW-VOTE
ClearQueueq
Description
Direction
Clears a specific queue
Control system to Voting Computer
Type
Digital
Value
Pulse
Expected Reply
Done
Comments
See Also
86 • Appendices
Request-to-Speak Console
th
Clears the scroller which implements the q queue defined in the signal block. The
table bound to the scroller is cleared, and signals are sent to the control system to
clear the scroller display.
If any seats were in the queue, their feedback signals are lowered.
If any seat in the queue had the floor, it is forced to yield (i.e., MicSelect signal is
set to 0).
Note that the scroller remains enabled; and the queue remains ready to accept
new entrants.
ClearQueueSet
Installation & Reference Guide — DOC. 5822
Crestron e-control Vote
SW-VOTE
ClearQueueSet
Description
Direction
Clears all queues at once
Control system to Voting Computer
Type
Digital
Value
Pulse
Expected Reply
Done
Comments
Voting Console
Clears all the the signal block’s queue scrollers. The tablesbound to the scrollers
are cleared; and signals are sent to the control system to clear the scroller
displays.
All seats’ feedback signals are lowered.
If any seat had the floor, it is forced to yield (i.e., MicSelect signal is set to 0).
Note that the scrollers remain enabled; and the queues remains ready to accept
new entrants.
See Also
87 • Appendices
ClearQueueq
Installation & Reference Guide — DOC. 5822
Crestron e-control Vote
SW-VOTE
DateTimef
Description
Direction
Type
Value
Expected Reply
Comments
See Also
88 • Appendices
Request-to-Speak Console
Sends timestamps of each “save file”
Voting computer to control system
Serial
Timestamps for the last modification of each “save file” defined in the signal block.
Format is short date, medium time, typically: month/day/year hour:minute AM-or-PM
None
The values are sent automatically when the signal block is enabled.
If the scroller is improperly defined, or it is not enabled, or the “save file” table is
inaccessible or non-existent, the string “[N/A]” is sent.
For empty “save file” tables, the string “[EMPTY]” is sent instead of the table’s
modification timestamp.
Enable
Installation & Reference Guide — DOC. 5822
Crestron e-control Vote
SW-VOTE
Display
Description
Direction
Display vote results on Voting Computer
control system to Voting Computer
Type
Digital
Value
Pulse
Expected Reply
Success:
StateEnd de-assert; followed by
StateDisplay assert; followed by
Done pulse
ErrString
Failure:
Comments
Voting Console
This signal may be issued repeatedly to update the results display on the Voting
Computer if already displayed (StateDisplay is high) or to redisplay the results if
no longer displayed (StateDisplay is low). Updating/redisplaying is only really
necessary when the vote results have been edited by the operator using either the
Voting Computer interface (via mouse-clicks or contextual menu selections on seat
icons); or from the control system (by issuing Change signals).
This signal is only valid after a vote when the floor is closed (while StateEnd is
high). If issued at the wrong time, one of the following descriptive error messages
is sent through the ErrString signal:
To start, press TAKE ATTENDANCE or START VOTE
VOTE IN PROGRESS, FLOOR OPENED:
Press END VOTE or ABORT VOTE.
See Also
89 • Appendices
Abort, PrintSave
Installation & Reference Guide — DOC. 5822
Crestron e-control Vote
Done
Description
Direction
Request-to-Speak Console
Voting Console
Server operation complete
Voting Computer to control system
Type
Digital
Value
Pulse
Expected Reply
None
Comments
SW-VOTE
Issued after processing most “command” signals (signals which initiate a
procedure as opposed to those that simply transmit states) except for those signals
which have custom response signals defined along with them.
See Also
90 • Appendices
Installation & Reference Guide — DOC. 5822
Crestron e-control Vote
SW-VOTE
Request-to-Speak Console
Voting Console
Enable
Description
Direction
Type
Value
Expected Reply
Comments
This signal enables/disables the signal block.
control system to Voting Computer
Digital
Assert to enable the signal block
De-assert to disable the signal block
Success: Assertion of the signal block’s Enabled signal
Failure: An error condition is raised, typically Err_ENABLE
Assert this signal to enable the signal block. (The signal block must be enabled
prior to use. If not, receipt by the server of most any of the signal block’s other
signals will raise the Err_OBJECT_NOT_LOADED error.)
A signal block which fails to enable properly raises an error condition. This may be
a specific error such as Err_FILE_NOT_FOUND. In the absence of a specific
error, the error will be Err_ENABLE. The signal block remains disabled. To try to
assert the Enable signal again, it will of course first be necessary to de-assert it. If
the server receives this de-assert, it will not consider it an error (even though the
signal block was not enabled) and simply ignores it.
Voting Console enable:
RTS Console enable:
§ All attached scrollers are
§ The agenda scroller, if defined, is
automatically enabled as well.
automatically enabled as well.
§ Optional. Each seat name is sent
§ Optional. Each seat name is sent
through each Names signal.
through each Names signal.
§ Each “save file” table modification
timestamp is sent through each
DateTimef signal.
§ The Enabled signal is asserted
§ The last known state of the queue
set is re-established, using the
appropriate signals to adjust the
console display, set all the seat
button feedbacks, and set the value
of the MicSelect signal.
§ The Enabled signal is asserted
Note that on an unsuccessful enable, the error raised may result from any of the
enable operations. In such a case, any successfully enabled scrollers are
immeidately disabled again, and the signal block remains disabled.
RTS Console disable:
Voting Console disable:
§ The agenda scroller, if defined, is
§ All attached scrollers are
automatically disabled
automatically disabled
§ The string “[N/A]” is sent through
each DateTimef signal.
§ The MicSelect signal is reset (i.e.,
set to 0).
§ Enabled signal is de-asserted
§ Enabled signal is de-asserted
When an RTS Console signal block is enabled, all request-to-speak buttons at all
seats are active. It is recommended therefore that RTS Console signal blocks only
be enabled when the floor is opened to debate, and disabled thereafter.
By contrast, the Voting Console signal block will not respond to seat buttons until
the floor is opened for a vote by operator action. Therefore, Voting Console signal
blocks are typically enabled for the duration of the session, usually by by autoenabling them (see the “Auto-enable” configuration option, page 33).
91 • Appendices
Installation & Reference Guide — DOC. 5822
Crestron e-control Vote
See Also
92 • Appendices
SW-VOTE
Enabled, SendNames, Name, DateTime, MicSelect
Installation & Reference Guide — DOC. 5822
Crestron e-control Vote
SW-VOTE
Request-to-Speak Console
Voting Console
Enabled
Description
Direction
Type
Value
Expected Reply
Comments
See Also
93 • Appendices
“Handshake” response to the Enable signal.
Server to System
Digital
Asserted in response to assert of Enable signal.
De-asserted in response to de-assertion of Enable signal.
None
Although this signal is often ignored, in a proper implementation, when enabling
the signal block (usually upon arrival to a certain touchpanel page), the System
should:
(1) Wait for assertion of Enabled before issuing any other Voting Consoles.
(2) Indicate an error condition if assertion of Enabled does not occur after a
certain amount of time (typically 30 seconds).
When disabling the signal block (usually upon arrival to a certain touchpanel page),
the System should:
(3) Wait for de-assertion of Enabled before leaving touchpanel page.
(4) Indicate an error condition if de-assertion of Enabled does not occur after a
certain amount of time (typically 30 seconds).
The demos implement (1) and (3) but not (2) and (4).
Enable signal
Installation & Reference Guide — DOC. 5822
Crestron e-control Vote
SW-VOTE
End
Description
Direction
Close floor to further voting
control system to Voting Computer
Type
Digital
Value
Pulse
Expected Reply
Success:
Failure:
Comments
Voting Console
StateStart de-assert; followed by
StateEnd assert; followed by
Done pulse
ErrString
This signal is only valid during a vote when the floor is opened for voting (while
StateStart is high). If issued at the wrong time, one of the following descriptive
error messages is sent through the ErrString signal:
To start, press TAKE ATTENDANCE or START VOTE
VOTE IN PROGRESS, FLOOR CLOSED:
Press seats to change votes; DISPLAY; or ABORT.
VOTE DISPLAYED:
Press DISPLAY again to redisplay; SAVE RESULTS; or ABORT VOTE.
See Also
94 • Appendices
Attendance, Start, Display, PrintSave, Abort
Installation & Reference Guide — DOC. 5822
Crestron e-control Vote
ErrNumber
Description
Direction
Type
Value
Expected Reply
Comments
See Also
95 • Appendices
SW-VOTE
COM Settings
Request-to-Speak Console
Voting Console
When the server encounters an error processing a request from the System, it
uses this signal to send an error number.
Server to System
Analog
New error number
None
This signal works in conjunction with the ErrString and ErrTrigger signals which
always follow immediately.
For an e-mail scroller, this and the other Err signals are always defined. For a
standard scroller, they are optionally defined in the Standard Scroller Definition
window (Local Errors checkbox). When not defined, the server attempts to use the
SYSTEM error signals, unless they too are not defined.
This signal can be safely ignored.
This signal cannot be defined in an emailer scroller.
ErrTrigger, ErrString signals
Installation & Reference Guide — DOC. 5822
Crestron e-control Vote
ErrString
Description
Direction
Type
Value
Expected Reply
Comments
See Also
96 • Appendices
SW-VOTE
COM Settings
Request-to-Speak Console
Voting Console
Description of error
Server to System
Serial
Error message for display
None
Although this signal can be safely ignored, it is easily hooked to indirect text fields
on a touchpanel and/or on the CNMSX-PRO front panel, etc.
This signal is used by the server in two ways:
(1) Used in conjunction with the ErrNumber and ErrTrigger signals, the latter
following immediately.
(2) Used alone for informational messages. Sometimes these messages
represent error conditions and sometimes they are purely informational.
For an e-mail scroller, this and the other Err signals are always defined. For a
standard scroller, they are optionally defined in the Standard Scroller Definition
window (Local Errors checkbox). When not defined, the server attempts to use the
SYSTEM error signals, unless they too are not defined.
This signal cannot be defined in an emailer scroller.
ErrNumber, ErrTrigger signals
Installation & Reference Guide — DOC. 5822
Crestron e-control Vote
SW-VOTE
COM Settings
Request-to-Speak Console
Voting Console
ErrTrigger
Description
Direction
Trigger for ErrNumber and ErrString
Server to System
Type
Digital
Value
Pulse
Expected Reply
None
Comments
See Also
97 • Appendices
This signal is sent after the ErrNumber and ErrString to indicate that an error
condition has occurred.
For an e-mail scroller, this and the other Err signals are always defined. For a
standard scroller, they are optionally defined in the Standard Scroller Definition
window (Local Errors checkbox). When not defined, the server attempts to use the
SYSTEM error signals, unless they too are not defined.
This signal can be safely ignored.
This signal cannot be defined in an emailer scroller.
ErrNumber, ErrString signals
Installation & Reference Guide — DOC. 5822
Crestron e-control Vote
SW-VOTE
Excuses
Description
Direction
Seat excuses itself
control system to Voting Computer
Type
Digital
Value
Pulse
Expected Reply
None
Comments
Voting Console
This signal is accepted by the Voting Computer only while the floor is opened for
voting only. Even when the floor is opened, it will be ignored
§ when the signal block is not configured to allow excuses [Excuse (conflict-ofinterest) checkbox, Additional vote buttons frame, Rules tab, Voting Console Signal
Block Definition window];
§ when the seat has been excused from the vote, either by the operator prior to
opening the floor, or by the seat itself via a prior pulse of its Excuse signal; or
§ when taking attendance (voting sequence started by Attendance signal rather than
Start signal).
The seat may pulse its Yes, No, and Abstain signals at will while the floor is
opened. The most recently pulsed signal is considered definitive at the moment the
floor is closed. However, if the seat pulses its Excuse signal, further pulses of any
of these signals are be ignored. (The operator can however adjust the seat’s vote
after the floor is closed.)
The definition of the Abstains signal set is optional. Note however that even when
not defined, the signal block may still be configured to allow abstentions. In such a
case, while the seat would not be able to abstain, his vote could still count as an
abstention under the following two circumstances:
§ The default vote is set to Abstain (ABSTAIN checkbox, Default votes frame, Rules
tab, Voting Console Signal Block Definition window).
§ After the floor is closed , the Operator adjusts the seat’s vote from the touchpanel
or from the Vote Proctor window.
See Also
98 • Appendices
Yes, No, Start, Attendance
Installation & Reference Guide — DOC. 5822
Crestron e-control Vote
Hold
Description
Direction
control system to Voting Computer
Digital
Value
Pulse
Comments
Request-to-Speak Console
Puts the recognized seat on hold
Type
Expected Reply
SW-VOTE
Done pulse
This signal is an automatic way for the control system to suspend debate.
This function can also be provided to the Operator as a touchpanel button.
However, note that the Operator already has the ability to put the current speaker
on hold — by scrolling to and touching his name in his queue scroller. See
“Operations” on page 57 for more details.
This signal has no effect if there is no recognized seat.
See Also
99 • Appendices
Installation & Reference Guide — DOC. 5822
Crestron e-control Vote
SW-VOTE
Loadf
Description
Direction
Load “save file” f into the queue-set
control system to Voting Computer
Type
Digital
Value
Pulse
Expected Reply
Comments
Request-to-Speak Console
Success: Done pulse
Failure: The Err_TABLE_NOT_FOUND error condition is raised
Loads all the queues in the queue set. There must be a “save file” table for each
queue. Each of these tables has the same structure as the queue scroller’s bound
table. The names of these table, for a given signal f, for each queue, are (sans
spaces):
queue-scroller’s-bound-table _ f
For example, if there are three queues defined, and their bound tables are named
QA, QB, and QC, then the “save file” tables for “file” 7 would be named:
QA_7
QB_7
QC_7
These tables must pre-exist in the database. The server will not create them.
See Also
100 • Appendices
Save
Installation & Reference Guide — DOC. 5822
Crestron e-control Vote
SW-VOTE
MicSelect
Description
Direction
Type
Value
Expected Reply
Comments
Request-to-Speak Console
Currently recognized seat
Voting Computer to control system
Analog
Reset (set to 0): no seat recognized
Other values: seat number of recognized speaker
None
This signal is sent out every time a seat is recognized to speak, or when the
currently recognized seat becomes otherwise unrecognized (either by being put on
hold; or by yielding — or being forced to yield — its remaining time).
Also, when the signal block is enabled, the last known state of the queues is reestablished. At that time, this signal is set to either 0 if no seat was recognized in
the last known state; or to the seat number of the seat that was recognized in the
last known state.
Also, reset (i.e., set to 0) when the signal block disabled.
See Also
101 • Appendices
Installation & Reference Guide — DOC. 5822
Crestron e-control Vote
Names
Description
Direction
Type
Value
Expected Reply
Comments
SW-VOTE
Request-to-Speak Console
Voting Console
Seat names
Voting Computer to control system
Serial
Screennames strings
None
Screennames from records in the Members table are sent (or resent) in response
to receipt of a SendNames signal.
Screennames may also be sent when either type of signal block is enabled (if so
configured).
The strings sent will be from the Screenname field of records with ID fields
matching the seat numbers 1 through the number of seats defined in the signal
block. Seats with missing records will cause the string “[unknown]” to be sent.
Strings sent through a Voting Console signal block’s Name signals (only) are
subject to (optional) truncation and (optional) padding.
See Also
102 • Appendices
SendNames
Installation & Reference Guide — DOC. 5822
Crestron e-control Vote
SW-VOTE
NewVote
Description
Direction
Vote sequence has been reset
Voting Computer to control system
Type
Digital
Value
Pulse
Expected Reply
Comments
Voting Console
SetAgenda, Start, or Attendance
This signal is pulsed when:
§
§
§
§
The signal block is first enabled;
a vote has concluded successfully (with print/save);
a vote has been aborted; or
an invalid agenda item description has been set.
An invalid agenda item description consists of:
§
§
§
§
A null string;
a string consisting entirely of space characters;
a string whose last non-space character is a colon (:);
a string whose last non-space character is a right square bracket (]).
Used in conjunction with the “state” signals, StateStart, SateEnd, StateDisplay,
and StatePrintSave; and the other pulsed signal, AgendaTrigger. These signals
provide feedback to the control system about the voting sequence. They can be
used to highlight the sequence control buttons, or to enable/disable specific
touchpanel choices. (See “State Coordination,” page 61, for a “score sheet”
illustrating the sequence.)
See Also
103 • Appendices
Installation & Reference Guide — DOC. 5822
Crestron e-control Vote
Nos
Description
Direction
control system to Voting Computer
Digital
Value
Pulse
Expected Reply
None
See Also
104 • Appendices
Voting Console
Seat votes NO
Type
Comments
SW-VOTE
This signal is accepted by the Voting Computer while the floor is opened for voting
only. Even when the floor is opened, it will be ignored when the seat has been
excused from the vote, either by the operator prior to opening the floor, or by the
seat itself via a prior pulse of its Excuse signal.
During a regular vote, a seat may pulse its Yes, No, and Abstain signals at will
while the floor is opened. The most recently pulsed signal is considered definitive
at the moment the floor is closed. However, if the seat pulses its Excuse signal,
further pulses of any of these signals are be ignored. (The operator can however
adjust the seat’s vote after the floor is closed.)
During attendance-taking, a seat may pulse its Yes (for PRESENT)and No (for
ABSENT) signals at will while the floor is opened. Again, the most recently pulsed
signal is considered definitive at the moment the floor is closed.
Only PRESENT is really germane since the default vote is ABSENT. The reason the
No signal is accepted here is just in case a member of the body hits the Yes button
for the wrong seat, realizes his mistake, and wishes to undo it by hitting the No
button.
Yes, Abstain, Start, End
Installation & Reference Guide — DOC. 5822
Crestron e-control Vote
SW-VOTE
PingSvr, PingSys,
PongSvr, PongSys
Description
Direction
Request for acknowledgement
PingSvr: System to Server
PingSys: Server to System
Type
Digital
Value
Pulse
Expected Reply
Comments
COM Settingss
PongSvr: Server to System to Server
PongSys: System
PongSvror PongSys
When the Server receives a PingSvr signal, it immediately responds with a
PongSvr signal pulse. This is useful during System installation to test
communications with the Server. A very rudimentary SIMPL program is required.
This is actually more useful for testing RS-232 connections which are not formally
opened the way TCP/IP connections are. Assuming a reliable connection has been
established, a secondary reason to ping the Server (using either communications
mode) is to test the communications protocol and Server operation in general.
For the Server to PingSys the Systems and get a PongSys in response also
requires one of the PingPong programs to be loaded into the control systems.
If you wish to keep this capability in your done SIMPL program, include explicit
programming.
One general use of the signals might be to have the Systems check for the
connection every few minutes or so by sending a Ping. If a Pong is not returned
within a certain window of time, the control system should repeat the Ping
transmission a couple of times. If still no reply, the control system should then
report an error in some way (to the front panel or to a touchpanel).
See Also
105 • Appendices
Installation & Reference Guide — DOC. 5822
Crestron e-control Vote
SW-VOTE
PrintReport
Description
Direction
Print displayed queue set
control system to Voting Computer
Type
Digital
Value
Pulse
Expected Reply
Comments
Voting Console
Done pulse
The printout is formatted for letter size paper (8.5” x 11”) to print up to five (5)
queues, each in its own column, containing up to about 80 names each.
A title is printed on the first line:
Snapshot of REQUEST TO SPEAK QUEUES at current-timestamp
Each queue prints as a column, with a header taken from the description field of
the queue scroller’s query (i.e., a record in the Queries table).
The mark is printed as one of four 4-character strings (shown below along with
their meanings), followed by the rank when greater than 1 (how many times in the
queue), followed by the screenname truncated to 12 characters.
WAIT
RCGN
DONE
HOLD
Waiting to speak
Recognized (seat has the floor)
Finished speaking
On hold (previously recognized; recognition may be resumed in the future)
The PrintReport signal is typically sent when the operator indicates they are
leaving the request-to-speak console, either temporarily (signal block not disabled),
or finally (signal block disabled):
The Done signal is pulsed after the print operations are complete.
See Also
106 • Appendices
Installation & Reference Guide — DOC. 5822
Crestron e-control Vote
SW-VOTE
PrintSave
Description
Direction
Record vote; conclude voting sequence
control system to Voting Computer
Type
Digital
Value
Pulse
Expected Reply
Success:
Failure:
Comments
Voting Console
StateEnd de-assert; followed by
StatePrintSave assert
ErrString
Recording the vote makes the vote official; after issuing this signal, the vote can no
longer be cancelled.
This signal is only valid after a vote when the floor is closed (while StateEnd is
high). If issued at the wrong time, one of the following descriptive error messages
is sent through the ErrString signal:
To start, press TAKE ATTENDANCE or START VOTE
VOTE IN PROGRESS, FLOOR OPENED:
Press END VOTE or ABORT VOTE.
See Also
107 • Appendices
StatePrintSave for additional signals sent after recording complete
Installation & Reference Guide — DOC. 5822
Crestron e-control Vote
SW-VOTE
Reqq,s
Description
Direction
Type
Value
Expected Reply
Comments
Request-to-Speak Console
Tied directly to the request-to-speak button for queue q at seat s
control system to Voting Computer
Digital
Pulse (the Voting Computer responds to the trailing edge of the signal)
Req-fb assert or de-assert; or nothing, depending on the circumstances
The interpretation of this signal by the Voting Computer depends on the states
listed in the following table. Given a certain Current State, a pulse of this signal
will transition to the next state. The FB column refers to the seat’s button
feedback (the Req-fb signal, see below); the Mark column refers to the mark
shown on the console touchpanel page. Some of these state transitions (actions)
are optional, as per the configuration of the signal block. (See “Request-to-Speak
Console signal blocks: Summary of Seat functions,” page 16.)
Current State
Not yet in queue
FB
Mark
Next State
FB
Mark
O
—
Placed into queue
P
WAITING
In queue but not
yet recognized
P
Has the floor
P
Has finished
speaking
™ (j)
WAITING
ã
SPEAKING
˜ (u)
Has the floor again
O
P
SPEAKING
Not yet recognized
(for the 2nd time)
P
WAITING-2
DONE
ã
k
Removed from
queue
O
Yields the floor
O
Waiting to speak
again
Yields the floor
P
O
Returned to
previous state
O
™ (j)
—
˜ (u)
DONE
k
WAITING-2
v
DONE-2
u
DONE
The s index varies more frequently. That is, all the Req signals are contiguous
within the signal block definition, with all the seats for the first queue appearing
first, followed by all the seats for the second queue, etc. For example, with a
console defined with 2 queues and 3 seats, the Req signals would appear in the
following order:
Req1,1
Req1,2
Req1,3
Req2,1
Req2,2
Req2,3
Click the signal block in the Signal Analyzer window for a visual reference.
See Also
108 • Appendices
Req-fb
Installation & Reference Guide — DOC. 5822
Crestron e-control Vote
SW-VOTE
Req-fbq,s
Description
Direction
Type
Value
Expected Reply
Comments
See Also
109 • Appendices
Request-to-Speak Console
Tied directly to the request-to-speak button feedback for queue q at seat s
Voting Computer to control system
Digital
On: In queue and waiting to speak or speaking
Off: Not in queue; or in queue and done speaking
None
If feedback is not responsive enough (which can be due to a large number of seats
all “buzzing in” at the same time, or to EtherNet propagation delays), people often
will hit the button again. This is not a good thing since the request button is multifunctional. Therefore, if you experience such delays, we recommend “debouncing”
each button with a long delay, such as 2 to 4 seconds, to ignore additional button
presses.
Another strategy would be to flash the button quickly until the feedback signal
comes in. This flashing generally statisfies people and they will usually wait. The
downside to this scheme is that the feedback may never arrive if the seat is not
welcome into the queue at that moment, such as when the floor is not opened for
debate (signal block disabled); or if the seat has already spoken the maximum
number of times.
Req
Installation & Reference Guide — DOC. 5822
Crestron e-control Vote
Savef
Description
Direction
Value
Pulse
See Also
110 • Appendices
control system to Voting Computer
Digital
Comments
Request-to-Speak Console
Save the queue set into “save file” f
Type
Expected Reply
SW-VOTE
Success: Done pulse
Failure: The Err_TABLE_NOT_FOUND error condition is raised
Saves all the queues in the queue set. There must be a “save file” table for each
queue. See Load for the names of these tables.
Load
Installation & Reference Guide — DOC. 5822
Crestron e-control Vote
SelectChair
Description
Direction
SW-VOTE
Voting Console
Promote a seat to the chair
control system to Voting Computer
Type
Value
Expected Reply
Comments
Accept voting signals from the Chair position as if coming from the selected seat
position.
This signal is untested and should be considered not fully implemetned in
this release.
See Also
111 • Appendices
Installation & Reference Guide — DOC. 5822
Crestron e-control Vote
SendNames
Description
Direction
Value
Pulse
See Also
112 • Appendices
control system to Voting Computer
Digital
Comments
Request-to-Speak Console
Voting Console
Request names be sent
Type
Expected Reply
SW-VOTE
All Names serial signals; followed by
Done signal pulse.
(See notes at Name.)
Name
Installation & Reference Guide — DOC. 5822
Crestron e-control Vote
SW-VOTE
SetAgenda
Description
Direction
Set agenda item description.
control system to Voting Computer
Type
Digital
Value
Pulse
Expected Reply
Voting Console
AgendaEcho followed by one of:
§ AgendaTrigger pulse; or
§ NewVote pulse
• Required before starting a vote from the
control system with the Start signal unless
the Auto-name an unnamed vote when
started from Voting Computer box is
checked. (See “Voting Console signal block
definition: Enable
Displays the Vote Proctor window when the
signal block is enabled. Also enables the
Voting | Start Voting command. If
unchecked, the window cannot be opened at
all.
• Auto-name vote
The server generates a name for the vote based
on the current date and time, in the form
yymmdd_hhmmss. Applies only to an
otherwise unnamed vote; and only when the
vote is started from Vote Proctor window. The
Start Vote button, normally disabled until an
agenda has been set, is enabled. Note that this
option is independent of the option of the
same name under the Control System Interface
tab
• Secret Ballot
During a vote, seat icons displayed in the Vote
Proctor window turn grey as they vote. Actual
votes are tallied to the Vote Proctor window
only after the floor is closed.
Comments
NOTE: A “secret ballot” is actually only secret
while the floor is opened. Once the floor is
closed, the vote is published.
The Control System Interface Tab” page 37.) If this option is not checked, a name
will be generated for the vote comprised of the current date and time.
This is a serial signal. The demo shows how to provide a typewriter keyboard-like
interface on the touchpanel for entering an agenda description.
If your design utilizes the Vote Proctor window for running a vote, it will almost
certainly be easier to type in vote from that interface (using the real keyboard).
The user can select a pre-entered agenda item from the touchpanel using the
(optional) agenda scroller. (See page 37 for instructions on how to attach an
agenda scroller using the Agenda Item Scroller combo-box; also see “Agenda
scroller tables,” page 55 for more information about how to pre-enter agenda
items.)
See Also
113 • Appendices
Start, AgendaEcho, AgendaTrigger
Installation & Reference Guide — DOC. 5822
Crestron e-control Vote
114 • Appendices
SW-VOTE
Installation & Reference Guide — DOC. 5822
Crestron e-control Vote
SW-VOTE
Start
Description
Direction
Open floor to voting
control system to Voting Computer
Type
Digital
Value
Pulse
Expected Reply
Success:
Failure:
Comments
Voting Console
StateStart assert; followed by
Done pulse
ErrString
This is one of two signals that can be used to start the voting sequence; the other
is the Attendance signal.
In either case, if an agenda item is required and one has not been selected or
entered, the following string is sent through the ErrString signal:
Please select or enter an agenda item description.
• An agenda item is only required however if
the Auto-name an unnamed vote when
started from Voting Computer box is
unchecked (See “Voting Console signal
block definition: Enable
Displays the Vote Proctor window when the
signal block is enabled. Also enables the
Voting | Start Voting command. If
unchecked, the window cannot be opened at
all.
• Auto-name vote
The server generates a name for the vote based
on the current date and time, in the form
yymmdd_hhmmss. Applies only to an
otherwise unnamed vote; and only when the
vote is started from Vote Proctor window. The
Start Vote button, normally disabled until an
agenda has been set, is enabled. Note that this
option is independent of the option of the
same name under the Control System Interface
tab
• Secret Ballot
During a vote, seat icons displayed in the Vote
Proctor window turn grey as they vote. Actual
votes are tallied to the Vote Proctor window
only after the floor is closed.
NOTE: A “secret ballot” is actually only secret
while the floor is opened. Once the floor is
closed, the vote is published.
The Control System Interface Tab” page 37.)
Otherwise, either signal is only valid between votes (after NewVote pulse and
before assertion of any of the “state” signals). If issued at the wrong time, one of
the following descriptive error messages is sent through the ErrString signal:
VOTE IN PROGRESS, FLOOR OPENED:
Press END VOTE or ABORT VOTE.
VOTE IN PROGRESS, FLOOR CLOSED:
Press seats to change votes; DISPLAY; or ABORT.
115 • Appendices
Installation & Reference Guide — DOC. 5822
Crestron e-control Vote
SW-VOTE
VOTE DISPLAYED:
Press DISPLAY again to redisplay; SAVE RESULTS; or ABORT VOTE.
See Also
116 • Appendices
Attendance, End, Abort
Installation & Reference Guide — DOC. 5822
Crestron e-control Vote
SW-VOTE
StateDisplay
Description
Direction
Voting Console
Results on display
Voting Computer to control system
Type
Digital
Value
Assert:
Results now displayed on Voting Computer and/or need to be
displayed on some device connected to control system
(Display Results button feedback ON)
De-assert:
Results display down
(Display Results button feedback OFF)
To an assert:
Display (again), PrintSave, or Abort
To a de-assert:
None
Expected Reply
Comments
Results can be displayed either
§ by user interaction with the Vote Proctor window on the Voting Computer:
Display Results button (which is only enabled after a vote); or
§ when control system issues the Display signal after a vote.
The signal is de-asserted when:
§ the Voting Computer’s Vote Results window looses the focus (is closed or partially
or totally obscured by some other window):
§ user interaction with the Vote Proctor window on the Voting Computer: Abort
button (only enabled during and after a vote); or
§ control system issues the Display signal (again, presumably after the vote has
been edited by the operator);
§ control system issues the PrintSave signal; or
§ control system issues the Abort signal; or
Even though the Display Results button feedback remains high, the button may
be used to update the display when, for example, the operator has edited a vote
using either the Voting Computer interface (via mouse-clicks or contextual menu
selections on seat icons); or from the control system (by issuing Change signals).
Used in conjunction with the other “state” signals, StateStart, StateEnd, and
StatePrintSave; and the pulsed signals, NewVote and AgendaTrigger. These
signals provide feedback to the control system about the voting sequence. They
can be used to highlight the sequence control buttons, or to enable/disable
touchpanel choices. (See “State Coordination,” page 61, for a “score sheet”
illustrating the sequence.)
See Also
117 • Appendices
Installation & Reference Guide — DOC. 5822
Crestron e-control Vote
SW-VOTE
StateEnd
Description
Direction
Voting concluded
Voting Computer to control system
Type
Digital
Value
Assert:
De-assert:
Expected Reply
Comments
Voting Console
To an assert:
To a de-assert:
Voting concluded, console ready to display or print/save
(End Vote button feedback ON)
Results displayed or printed/saved
(End Vote button feedback OFF)
Display, PrintSave, or Abort
None
Voting can be concluded either
§ by user interaction with the Vote Proctor window on the Voting Computer: End Vote
button (only enabled while the floor is opened); or
§ when control system issues the End signal when the floor is opened.
End vote feedback goes dark when:
§ User interaction with the Vote Proctor window on the Voting Computer: Display
Results or [Print &] Save Results button (both of which are only enabled after a
vote); or the Abort button (enabled during and after a vote);
§ control system issues the Display signal; or
§ control system issues the PrintSave signal.
Used in conjunction with the other “state” signals, StateStart, StateDisplay, and
StatePrintSave; and the pulsed signals, NewVote and AgendaTrigger. These
signals provide feedback to the control system about the voting sequence. They
can be used to highlight the sequence control buttons, or to enable/disable
touchpanel choices. (See “State Coordination,” page 61, for a “score sheet”
illustrating the sequence.)
See Also
118 • Appendices
End, Display, PrintSave, Abort
Installation & Reference Guide — DOC. 5822
Crestron e-control Vote
SW-VOTE
StatePrintSave
Description
Direction
Vote is being recorded
Voting Computer to control system
Type
Digital
Value
Assert:
De-assert:
Expected Reply
Comments
Voting Console
To an assert:
To a de-assert:
Results now being recorded on Voting Computer
([Print &] Save Results button feedback ON)
Results have been recorded
([Print &] Save Results button feedback OFF)
None
None
Results are saved either
§ by user interaction with the Vote Proctor window on the Voting Computer:
[Print &] Save Results button (which is only enabled after a vote); or
§ when control system issues the PrintSave signal after a vote.
The signal is de-asserted when the Voting Computer finishes recording the vote
The de-assert is always followed by the following (in the order given):
§
§
§
§
§
All “state” signals are de-asserted
NewVote pulse
All digital “tally” signals are de-asserted and analog “tally” signals are reset to 0
All Changes signals are reset to either 0 (absent) or 1 (present)
Agenda scroller (if there is one) is requeried to eliminate the just-voted-upon item
(which may or may not cause signals to be sent to alter the display)
§ AgendaEcho with the value “[Vote concluded]”
Used in conjunction with the other “state” signals, StateStart, StateEnd, and
StateDisplay; and the pulsed signals, NewVote and AgendaTrigger. These
signals provide feedback to the control system about the voting sequence. They
can be used to highlight the sequence control buttons, or to enable/disable
touchpanel choices. (See “State Coordination,” page 61, for a “score sheet”
illustrating the sequence.)
See Also
119 • Appendices
PrintSave, AgendaEcho, NewVote
Installation & Reference Guide — DOC. 5822
Crestron e-control Vote
SW-VOTE
StateStart
Description
Direction
Floor is opened to voting (i.e., a vote is in progress)
Voting Computer to control system
Type
Digital
Value
Assert:
De-assert:
Expected Reply
Comments
Voting Console
To an assert:
To a de-assert:
Floor is opened
(Start Vote button feedback ON)
Floor is closed
(Start Vote button feedback OFF)
Yess, Nos, Abstains, End, Abort
None
An assert is sent when the floor is opened, either
§ by user interaction with the Vote Proctor window on the Voting Computer; or
§ when control system issues the Start signal after a valid agenda item has been set
(if required by configuration).
A de-assert is sent when:
§ the signal block is first enabled; or
§ control system issues the End signal is received while the floor is opened.
Used in conjunction with the other “state” signals, SateEnd, StateDisplay, and
StatePrintSave; and the pulsed signals, NewVote and AgendaTrigger. These
signals provide feedback to the control system about the voting sequence. They
can be used to highlight the sequence control buttons, or to enable/disable specific
touchpanel choices. (See “State Coordination,” page 61, for a “score sheet”
illustrating the sequence.)
See Also
120 • Appendices
Start, End, Abort
Installation & Reference Guide — DOC. 5822
Crestron e-control Vote
SW-VOTE
Statuss
Description
Direction
Type
Value
Expected Reply
Comments
Voting Console
Individual seat status
Voting Computer to control system
Analog
0 ....... ABSENT
1 ....... PRESENT
2 ....... YES
3 ....... NO
4 ....... ABSTAIN
5 ....... EXCUSED
6 ....... HIDDEN
(while floor is opened during a “secret” ballot)
None
These signals issued when
§ signal block first enabled (all set to PRESENT);
§ attendance aborted or vote aborted or concluded (set to ABSENT or PRESENT as
determined by last attendance);
§ seat’s status changes during a vote in response to its Yes, No, and Abstain
signals; or
§ seat’s status changes after a vote in response to Operator editing the vote either by
using the Voting Computer interface (via mouse-clicks or contextual menu
selections on seat icons), or from the control system (by issuing a Change signal).
These signals are generally tield directly to an touchpanel animated object.
These signals are only valid after a vote when the floor is closed, including after
displaying the vote results (while either StateEnd or StateDisplay is high). Ignored
if issued at the wrong time.
See Also
121 • Appendices
Change
Installation & Reference Guide — DOC. 5822
Crestron e-control Vote
SW-VOTE
Tally23Majority
Description
Motion has achieved a 2/3 majority
Direction
Voting Computer to control system
Type
Value
Expected Reply
Comments
Voting Console
Digital
Assert:
De-assert:
Motion currently has sufficient votes to qualify for “2/3 majority”
Motion currently has insufficient votes to qualify for “2/3 majority”
None
The definition of “2/3 majority” is based on the signal block’s configuration. (See
“The Rules Tab,” page 39.)
Updated on any change to any seat at any time:
§ Reset on a new vote (following a NewVote pulse)
§ Updated in concert with all other “tally” signals
§ Sent in response to any Yes, No, Abstain, or Change signal
See Also
122 • Appendices
TallyQuorum, TallyCarried
Installation & Reference Guide — DOC. 5822
Crestron e-control Vote
SW-VOTE
TallyAbstain
Description
Direction
Type
Value
Expected Reply
Comments
Voting Console
Total number of current abstentions
Voting Computer to control system
Analog
0 to s (where s = number of seats defined in signal block configuration)
None
Updated on any change to any seat at any time:
§ Reset to 0 on a new vote (following a NewVote pulse)
§ Updated in concert with all other “tally” signals
§ Sent in response to any Abstain signal, and (possibly) any Change signal
See Also
123 • Appendices
Installation & Reference Guide — DOC. 5822
Crestron e-control Vote
SW-VOTE
TallyCarried
Description
Direction
Type
Value
Expected Reply
Comments
Voting Console
Motion carries
Voting Computer to control system
Digital
Assert:
De-assert:
Motion currently has sufficient votes to carry
Motion currently has insufficient votes to carrry
None
The definition of “carries” is based on the signal block’s configuration. (See “The
Rules Tab,” page 39.)
Updated on any change to any seat at any time:
§ Reset on a new vote (following a NewVote pulse)
§ Updated in concert with all other “tally” signals
§ Sent in response to any Yes, No, Abstain, or Change signal
See Also
124 • Appendices
TallyQuorum, Tally23Majority
Installation & Reference Guide — DOC. 5822
Crestron e-control Vote
SW-VOTE
TallyExcused
Description
Direction
Type
Value
Expected Reply
Comments
Voting Console
Total number of excused voters
Voting Computer to control system
Analog
0 to s (where s = number of seats defined in signal block configuration)
None
Updated on any change to any seat at any time:
§ Reset to 0 on a new vote (following a NewVote pulse)
§ Updated in concert with all other “tally” signals
§ Sent in response to any Yes signal, and (possibly) any Change signal
See Also
125 • Appendices
Installation & Reference Guide — DOC. 5822
Crestron e-control Vote
SW-VOTE
TallyNo
Description
Direction
Type
Value
Expected Reply
Comments
Voting Console
Total number of current NO votes
Voting Computer to control system
Analog
0 to s (where s = number of seats defined in signal block configuration)
None
Updated on any change to any seat at any time:
§ Reset to 0 on a new vote (following a NewVote pulse)
§ Updated in concert with all other “tally” signals
§ Sent in response to any No signal, and (possibly) any Change signal
See Also
126 • Appendices
Installation & Reference Guide — DOC. 5822
Crestron e-control Vote
SW-VOTE
TallyQuorum
Description
Direction
Type
Value
Expected Reply
Comments
Voting Console
Motion is subject to a voting quorum
Voting Computer to control system
Digital
Assert:
De-assert:
Motion currently has sufficient votes to meet quorum requirements
Motion currently has insufficient votes to meet quorum requirements
None
The definition of “voting quorum” is based on the signal block’s configuration. (See
“The Rules Tab,” page 39.)
Updated on any change to any seat at any time:
§ Reset on a new vote (following a NewVote pulse)
§ Updated in concert with all other “tally” signals
§ Sent in response to any Yes, No, Abstain, or Change signal
See Also
127 • Appendices
TallyCarried, Tally23Majority
Installation & Reference Guide — DOC. 5822
Crestron e-control Vote
SW-VOTE
TallyTotal
Description
Direction
Type
Value
Expected Reply
Comments
Voting Console
Total number of current votes
Voting Computer to control system
Analog
0 to s (where s = number of seats defined in signal block configuration)
None
The total number of votes includes the sum of all YES votes + all NO votes + all
abstentions. Excluded from this sum are all absentees, non-voters, and excused
voters.
Updated on any change to any seat at any time:
§ Reset to 0 on a new vote (following a NewVote pulse)
§ Updated in concert with all other “tally” signals
§ Sent in response to any Yes, No, or Abstain signal, and (possibly) any Change
signal
See Also
128 • Appendices
Installation & Reference Guide — DOC. 5822
Crestron e-control Vote
SW-VOTE
TallyYes
Description
Direction
Type
Value
Expected Reply
Comments
Voting Console
Total number of current YES votes
Voting Computer to control system
Analog
0 to s (where s = number of seats defined in signal block configuration)
None
Updated on any change to any seat at any time:
§ Reset to 0 on a new vote (following a NewVote pulse)
§ Updated in concert with all other “tally” signals
§ Sent in response to any Yes signal, and (possibly) any Change signal
See Also
129 • Appendices
Installation & Reference Guide — DOC. 5822
Crestron e-control Vote
Yess
Description
Direction
control system to Voting Computer
Digital
Value
Pulse
Expected Reply
None
See Also
130 • Appendices
Voting Console
Seat votes YES
Type
Comments
SW-VOTE
This signal is accepted by the Voting Computer while the floor is opened for voting
only. Even when the floor is opened, it will be ignored when the seat has been
excused from the vote, either by the operator prior to opening the floor, or by the
seat itself via a prior pulse of its Excuse signal.
During a regular vote, a seat may pulse its Yes, No, and Abstain signals at will
while the floor is opened. The most recently pulsed signal is considered definitive
at the moment the floor is closed. However, if the seat pulses its Excuse signal,
further pulses of any of these signals are be ignored. (The operator can however
adjust the seat’s vote after the floor is closed.)
During attendance-taking, a seat may pulse its Yes (for PRESENT)and No (for
ABSENT) signals at will while the floor is opened. Again, the most recently pulsed
signal is considered definitive at the moment the floor is closed.
Only PRESENT is really germane since the default vote is ABSENT. The reason the
No signal is accepted here is just in case a member of the body hits the Yes button
for the wrong seat, realizes his mistake, and wishes to undo it by hitting the No
button.
No, Abstain, Start, End
Installation & Reference Guide — DOC. 5822
Crestron e-control Vote
SW-VOTE
Yield
Description
Direction
Forces the recognized seat to yield the floor
control system to Voting Computer
Type
Digital
Value
Pulse
Expected Reply
Comments
Voting Console
Done pulse
This signal is an automatic way for the contorl system to force the current speaker
to yield. It is typically tied to the alarm of a count-down timer.
This function can also be provided to the Operator as a touchpanel button to give
him the ability to force a speaker to yield. However, note that the Operator already
has this ability when needed most: The current speaker is automatically cut off
when the Operator selects the next speaker.
Note also that the seats can be configured to be able to yield their remaining time
themselves simply by pressing their request-to-speak buttons again. (Caveat: They
must of course press the right button, that is, the button for the queue in which they
are currently recognized.)
This signal causes the MicSelect signal to be reset (set to 0).
This signal has no effect if there is no recognized seat.
See Also
131 • Appendices
Installation & Reference Guide — DOC. 5822
Crestron e-control Vote
SW-VOTE
Appendix D: Error Conditions
When an error condition arises, the error number is sent via the ErrNumber analog
signal through the signal block that raised the error to the control system. The error
string is sent via the accompanying ErrString serial signal. Finally, the ErrTrigger
digital signal is pulsed.
ErrNumber is intended for use by error-handling SIMPL code. Typically,
ErrString is used for display to the user who prompted the error. The ErrString
value has the following format:
signal-block-name.signal-name: error-string.
For example:
QUEUE1.Pick3: Object not loaded.
If the signal block that raised the error does not define the Err____ signals, the
information is sent instead through the controlling signal block, if any, instead. For
example, if a scroller representing a request-to-speak queue raises an error, and it
does not define its Err____ signals (as is typical), the error is sent through the
controlling Request-to-Speak Console signal block.
If the controlling signal block (if any) too does not define its Err____ signals, the
error is sent instead through the COM Settings signal block to which the signal block
that originally raised the error is attached.
Finally, if that COM Settings signal block does not define its Err____ signals as
well, the error information will never reach the control system.
In any case, the error string is always also sent to the server log in the Server
Monitor window (the main window), prefixed with the error alert character (which is
a question mark: ? ).
Server error conditions
ErrNumber
Value
132 • Appendices
Internal Symbol
ErrString Value
32001
Err_UNKNOWN_SIGNAL
Unrecognized signal
32002
Err_INSUFFICIENT_LICENSE
Insufficient license
32003
Err_FILE_NOT_FOUND
File not found
32004
Err_TABLE_NOT_FOUND
Database table could not be opened
32005
Err_DATABASE_ALREADY_OPENED
Query already opened
32006
Err_DATABASE_NOT_OPENED
Query not opened
32007
Err_OBJECT_ALREADY_LOADED
Object already loaded
32008
Err_OBJECT_NOT_LOADED
Object not loaded
32009
Err_ENABLE
SignalBlock could not be enabled (see server log)
32010
Err_NO_RECORD_CHOSEN
You must choose a record first
Installation & Reference Guide — DOC. 5822
Crestron e-control Vote
133 • Appendices
SW-VOTE
32011
Err_FIELD_NOT_WRITTEN
No such record(s)
32012
Err_CANNOT_ADD_RECORD
Syntax error in query
32013
Err_CANNOT_DELETE_RECORD
Field could not be written
32014
Err_NO_SUCH_RECORD
A new record could not be added
32015
Err_QUERY_SYNTAX
The opened record could not be deleted
32016
Err_UNIMPLEMENTED_FUNCTION
Unimplemented function
32017
Err_MAIL_NOT_SENT
Mail not sent
32018
Err_NEW_MAIL
New mail received at time
32019
Err_NO_NEW_MAIL
Mail last checked at time
32020
Err_POP3
Mail server error
32021
Err_MAILBOX_IN_USE
Mail box in use
32022
Err_NOT_SUCCESSIVE
Successive Query not in effect
32023
Err_NULL_SIGNAL_BLOCK_REFERENCE
No signalBlock specified
32024
Err_REFERENCED_SIGNAL_BLOCK_DISABLED
Referenced signalBlock not enabled
32025
Err_NULL_MSG_SCROLLER_REFERENCE
No signal blocks specified.
32026
Err_CANNOT_CHANGE_AGENDA_ITEM
Cannot change agenda item during vote
Installation & Reference Guide — DOC. 5822
Crestron e-control Vote
SW-VOTE
Appendix E: System limitations
Serial Transmissions
The length of the value of all serial signals (all the Set— signals) is limited to 83
characters. Furthermore, the total length of all signals (including header bytes) to be
transmitted in a single logic “wave” must not exceed 255 characters. Another
limitation is that the current generation of touchpanels do not correctly handle strings
sent to indirect text fields when such strings exceed 80 characters.
Signal Definitions
The XSIG format limits the number of signals to 4096, only the first 1024 of which
may be analog or serial signals. Furthermore, the older generation of Crestron
control systems has a limit of 512 analog/serial signals. (This is not an issue with the
newer CNMSX and CNRACKX systems which allow a full 4096 analog/serial
signals.)
134 • Appendices
Installation & Reference Guide — DOC. 5822
Crestron e-control Vote
SW-VOTE
Appendix F: Standard Scrollers vs. Custom Scrollers
Inspection of any standard scroller signal block, or its SIMPL Windows counterpart,
the DBM Scroller logic module, shows that it defines only the most essentail
scroller signals.
Standard scroller options
Custom scroller options
no license required
135 • Appendices
SW-DBM license required
Enable signal non-functional except in
simulation (from Signal Analyzer window).
Enabled signal sent by server as usual (but
not available through the DBM Scroller
logic module).
Fully functional Enable and Enabled signals
Maximum of 8 rows x 2 columns
Any number of rows/columns in displayed list
“Picked” agenda item description (i.e., the
description field of a particular record in the
Agenda table) is echoed back to the control
system through the Voting Console signal
block’s AgendaEcho signal only
Any arbitrary selection of fields from “picked”
records may be “echoed” through the Data
signals
Same
Specify list fields, data fields, and SQL
queries
Same
Sort by list fields or ID field
N/A
Modify any field(s) through Write signals
N/A
Add new records
N/A
Delete “picked” record
N/A
Local error reporting signals
N/A
Successive query signals
N/A
Auto-pick feature
Installation & Reference Guide — DOC. 5822