1
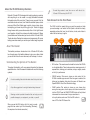
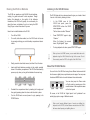
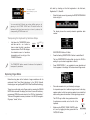
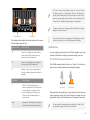
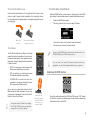
® ®ÂØÒňΠV-Combo VR-09 Workshop The Performer’s Solution © 2013 Roland Corporation U.S. All rights reserved. No part of this publication may be reproduced in any form without the written permission of Roland Corporation U.S. VR09WS01 1 About the VR-09 Workshop Booklets Roland’s V-Combo VR-09 is designed for today’s performing musician, with everything he or she needs in a single, affordable instrument that weighs just a little more than 12 easy-to-carry pounds. All of the must-have sounds are here, from Roland’s acclaimed piano, electric piano, and Virtual Tone Wheel organ to synths, horns, strings, drums, and anything you’d want to pull off a gig in style. There’s no digging through menus while your audience waits, either—it’s all right there at your fingertips. And with the six always-live effect knobs and D Beam, your audience won’t believe what you can do with the V-Combo VR-09. There’s also a free iPad app for serious sound programming. Of course, battery power also means you can take your musical magic anywhere. To make things easier to read, from now on we’ll refer to the V-Combo VR-09 as simply the “VR-09.” Fast Access from the Front Panel The VR-09 is built for speed, letting you grab the sounds and tools you need onstage in an instant. Its front panel is divided into clearly separated sections that have lots of buttons, knobs, and sliders to make it all fast and easy to get to. EFX section ORGAN section PIANO section SYNTH section DRUM section About This Booklet This booklet provides an introduction to the V-Combo VR-09, with a tour through some of its headline features to give you an idea of what you can do with this all-in-one instrument, and how easy it is to use. Understanding the Symbols in This Booklet • EFX section—This area houses the knobs that control the VR-09’s six live global effects. These knobs provide an amazing amount of expressive fun, allowing you to enhance, and yes, mangle, sounds on the fly in performance. • ORGAN section—This area is where you take control of the VR-09’s incredible organ sounds. When an organ is selected, the sliders act as drawbars that unlock the power of Roland’s new SuperNATURAL Virtual Tone Wheel technology. • PIANO section—This section is where you can choose from among the many piano, electric piano, and clavinet sounds built into the VR-09. Press the PIANO OTHERS button to find pitched instruments from harmonicas to harps, accordions to rich synth patches, and more. Click the URL button to view a PDF of the VR-09 sound list. Throughout this booklet, you’ll come across information that deserves special attention—that’s the reason it’s labeled with one of the following symbols. A note is something that adds information about the topic at hand. A tip offers suggestions for using the feature being discussed. Warnings contain important information that can help you avoid possible damage to your equipment, your data, or yourself. When you see this URL button, click it to jump to a web page that has content you’ll find interesting. (Obviously, this requires a live internet connection.) 2 • SYNTH section—True to its name, this area’s where you’ll find synth sounds, as well as related acoustic sounds via the SYNTH OTHERS button that reveals pitched percussion sounds and key orchestral sounds. Here’s the link to the sound-list PDF again if you didn’t click it earlier. • DRUM section—In the DRUM section you can select drum kits for playing on the keyboard, and also select and play built-in rhythms. It also provides playback controls for songs stored on an installed USB thumb drive, including songs you’ve recorded on the VR-09. Finally, the DRUM section’s looper can be handy to have on hand in performance. Getting Ready Before we can start exploring the VR-09, we’ve got to decide on a way to listen to it, and then power it up. We strongly recommend setting up your VR-09 listening system before connecting and turning on the VR-09 to avoid damage to your speakers, headphones, or ears. You can also use a mono amp—and the VR-09’s L/MONO output only—though listening in stereo’s the best way to fully appreciate its sound. • Powering the VR-09 As a truly mobile instrument, the VR-09 can run on AC power using the included AC adapter, or on battery power. Connecting the VR-09 to AC Power The VR-09 comes with a two-piece AC power adapter you’ll need to put together for use. 1 Listening to the VR-09 You can listen to the VR-09 in a variety of ways. Here are the most common: • • You can connect stereo headphones—to its rear-panel PHONES jack. This is the fastest way to get going, and a great way to listen to the VR-09. You can connect the VR-09 to a stereo amp—with the VR-09’s OUTPUT L/ MONO and R jacks connected to the amp’s left and right input channels. You can connect the VR-09 to a mixer—with the VR-09’s OUTPUT L/MONO and R jacks connected to two mixer channels panned left and right. Assemble the VR-09’s two-piece power adapter. Of course, the AC cable’s longer than we’re showing in this illustration. 2 Plug the AC end into a grounded power outlet—the adapter’s indicator lights green as shown above. 3 Plug the other end into the VR-09’s rear-panel DC IN jack. 4 Power on the VR-09 by pressing in its POWER button. 3 Running the VR-09 on Batteries The VR-09 can operate on eight Ni-MH AA-size batteries, making it a great instrument to take anywhere. Though battery life depends on the quality of the batteries themselves, the VR-09 will typically run continuously for about five hours on batteries if you’re not using the USB Song Player, or about three hours if you are. Listening to the VR-09 Demos The VR-09 ships with two demos onboard to give you a taste of what it can do. Let’s start by listening to them. 1 Here’s how to install batteries in the VR-09. 1 Turn off the VR-09. 2 On a soft, static-free surface, turn the VR-09 onto its face so its rear edge is facing you and its battery compartment door is visible. In the DRUM area of the VR-09 front panel, press the START/STOP button—the DEMO screen appears. The first demo is called “Greenie.” 2 Press START/STOP again to play “Greenie.” When it’s finished, the second demo, “NightLightsB,” plays. 3 To stop playback of a demo, press START/STOP again. When you’re on the DEMO screen, you can select either demo for playback using the VALUE dial to the right of the screen. To exit Demo mode, press the EXIT to the right of the VALUE dial. 3 Gently press the door’s tabs inward, and then lift out the door. 4 Insert eight fresh batteries according to the polarity symbols shown in the battery compartment. The VR-09 will successfully power up only when you’ve got the batteries the correct way. 5 Re-attach the compartment door by inserting its far edge, and then gently pressing down the door so its tabs lock in place. 6 Turn the VR-09 back over and power it up by pressing in its POWER button. About the VR-09’s Modes You can think of the VR-09 as having three different instruments built into its case: a digital piano, a synthesizer, and an organ. You can press the desired MODE button to switch between these instruments. You can also jump into Piano mode or Synth mode by pressing one of the sound buttons in their respective areas on the front panel. Of course, in the VR-09 the “digital piano” and “synthesizer” can actually play quite a range of different sounds. When you’re layering different types of sounds or splitting the keyboard on the VR-09, the line between modes blurs a bit. We’ll talk more about layering and splitting later on. 4 Exploring Piano Mode If you don’t already see the screen below, press the PIANO button in the PIANO section. The display shows the GrandPianoV piano sound. Play the keyboard to try out this beautiful piano. GrandPianoV is automatically selected when you first power up. If you’ve been selecting other sounds in Piano mode, the lastselected sound is re-selected when you re-enter the mode. Press the E. PIANO—for “electric piano”—button. Take a moment to try out Vintage EP, a famous Rhodes sound. In a few moments, you’ll be returned to the main Piano mode screen, where you can see that Vintage EP has a tremolo MFX, or “multi-effect,” as electric pianos like this often do. But, wait...where is it? Here’s your first taste of the VR-09’s EFX section. Try turning the MFX knob and listen—ah, all the tremolo a player could want, and you can choose just the amount you want. Every sound in the VR-09 has an MFX, and the MFX knob is ready and waiting for you to do with it what you will. We’ll talk a bit more later about the EFX knobs later on. While we’re here, try adding some more grit to Vintage EP by turning the EFX OVERDRIVE knob, and feel free to play with the other EFX knobs. They’re always there for you to try out with any sound you’ve got selected in the VR-09. In Piano mode, the buttons in the PIANO section allow you choose sounds and adjust the current sound’s level. Press the section’s PIANO button to display a list of piano sounds. Let’s try out some more electric pianos. Press E. PIANO to return to the electric piano list. Here’s a couple you don’t want to miss: To scroll through the list, press the and buttons or turn the VALUE dial. When you highlight a sound, you can play it on the keyboard. A few moments after you finish selecting sounds, the VR-09 returns you to the main Piano mode screen. (You can also select sounds from the main Piano mode screen by turning the VALUE dial.) Some of the screens on the VR-09 appear only for a limited amount of time. This is because we’ve given a lot of thought to what you’ll want to see as you perform, and the VR-09 keeps the important stuff in front of you when you need it. In this case, to return to the list of pianos, press PIANO in the PIANO area again. • ‘60s E. Piano—a Wurlitzer electric piano. • FM EP2—that classic FM-based electric piano sound. Transposing the VR-09 Keyboard The VR-09’s Transpose features allow you to easily shift the notes the keyboard plays to any key or octave so you can play in a key using the fingerings you find most comfortable. To Shift the Keyboard by Octaves 1 Press the OCTAVE DOWN or UP button to lower or raise the keyboard’s pitch as desired. The VR-09 displays the amount of octave shift. 5 This piano sound’s been shifted up by one octave. Let’s start by checking out the third registration in the first bank, Registration 3-1, Blues B3. 1 You can quickly tell if there’s any octave shifting going on by glancing at the OCTAVE DOWN and UP buttons—when the keyboard’s pitch has been moved up or down by octaves, the corresponding OCTAVE button is lit. Select the bank we want by pressing the REGISTRATION BANK button to light it. The display shows the currently selected registration bank number. Transposing the Keyboard by Semitone Steps 1 Hold down the TRANSPOSE button and then use the - or + button to lower or raise the pitch in semitone steps as desired. The VR-09 displays the selected amount of semitone transposition until you let go of the TRANSPOSE button. The TRANSPOSE button remains lit whenever the keyboard is transposed by semitones. REGISTRATION Buttons 2-4 flash. 2 Press the flashing REGISTRATION 3 button to select Bank 3. The four REGISTRATION buttons flash to show the VR-09 is waiting for you to select a registration in Bank 3. 3 Press REGISTRATION 1—our registration’s now selected and its info appears in the display. We’ve also entered Organ mode. 4 Take a few moments to try out this beefy rock organ. Exploring Organ Mode Roland has long been at the forefront of organ emulations with its acclaimed Virtual Tone Wheel technology. In the VR-09, Roland’s introducing our next-gen SuperNATURAL Virtual Tone Wheel technology. Though you could simply enter Organ mode by pressing the ORGAN MODE button beneath the display, let’s listen to some of the factoryprogrammed ORGAN sounds stored in the VR-09 as “registrations.” There are 100 registration memory locations in the VR-09, arranged in 25 groups, “banks,” of four. An important aspect of a traditional organ’s sound is its rotary speaker cabinet, which has spinning speaker horns inside that add a swirling sense of animation to the original organ sound. The VR-09’s got a killer rotary speaker emulator. Its performance controls are to the left of the keyboard. 5 Make sure the ROTARY SOUND ON/OFF button is lit, and try toggling the rotary speed with the FAST/SLOW button. 6 As with the rest of its organ features, the VR-09’s rotary speaker is highly customizable. You’ll find the details starting on page 43 of the V-Combo VR-09 Owner’s Manual. When you’re done with Blues B3, let’s listen to another one, Registration 1-3, Bay Area B3. 6 Press BANK button again. This time, all of the registration buttons flash except for REGISTRATION 3—that’s because Bank 3 is the currently selected bank. 7 Press REGISTRATION 1 to select the first registration bank. You can instantly get to registrations in the first four banks with the REGISTRATION buttons, so these banks are great for the sounds you need on a gig. Reach the remaining registration banks by turning the VALUE dial after you press the REGISTRATION BANK button. 8 Press REGISTRATION 3 to select the third registration in this bank. You’ve now selected Bay Area B3—try it out. 9 Try changing the positions of the first nine sliders in the ORGAN section to see how their positions affect the organ sound. Roland’s SuperNATURAL Tone Wheel Technology About Tone Wheel Organs Every pitched sound in nature is made up of multiple pitches playing together. In musical notes, that’s typically the note you hear, or the “fundamental,” accompanied by other, much-lower-volume pitches that you don’t notice as separate notes—rather, they merely change the fundamental’s tone. These quieter notes are members of the fundamental note’s harmonic series. Some are harmonics of the fundamental; some are octaves. Together, they constitute the note’s “overtones.” In a traditional tonewheel organ, nine harmonic bars, or “drawbars,” control the overtones of each note. Each drawbar sets the volume of a specific harmonic or octave pitch. Pulling a drawbar all the way out sets its pitch to the maximum volume; pushing it all the way in turns it off. The art in using drawbars is in learning how to quickly position them to get the sounds you want on-the-fly, shaping your organ sounds as you play, for maximum expression and to make them something uniquely your own. The VR-09’s ORGAN sliders behave just drawbars on a traditional organ. As you move them, the sound responds to your changes just as a traditional organ’s drawbars do. You’re now playing with the flexible power of Roland’s SuperNATURAL Virtual Tone Wheel technology. It’s worth taking a moment to explain how it works. 7 About Harmonic-Bar Names and More About Their Pitches Tonewheel organs were themselves a simulation of still-older organs that used pipes. As a result, harmonic bars are named for the pipes that had been previously used to generate each of their pitches. Each pipe on those still-older organs was a different length. Here are the lengths, and pitches, associated with each drawbar: Lengths 16 ’ 5 1/3’ 8 ’ 4 ’ 2 2/3’ 2 ’ 1 3/5’ 1 1/3’ 1 ’ Surface Scratched... This is just an introduction to the VR-09’s organ features. SuperNATURAL Tone Wheel technology provides lots of settings you can use for sculpting absolutely awesome organ sounds. The V-Combo VR-09 Owner’s Manual has much more about this, including diagrams on page 18 showing how to achieve popular organ sounds with the drawbars. Later, we’ll talk about setting up ORGAN sounds from an iPad. Exploring Synth Mode One 5th Root 8th 12th 15th 17th 19th 22nd octave lower Pitches In the VR-09, Synth mode is about a lot more than just its killer synth sounds—it’s also where you’ll find killer acoustic instruments. 1 Press the BRASS button in the SYNTH section—this pulls you into Synth mode and shows you the first brass synth sound, JP8 Brass. 2 Take a moment to play enjoy the vintage sound of JP8 Brass. The VR-09’s 10th drawbar on the right adjusts the overall level of the ORGAN sound—push it forward to lower its volume. About the VR-09’s Organ Models The VR-09 contains three models on which you can base your ORGAN sounds: • Rock Organ—a rich, full rock organ • Jazz Organ—an organ jazz players crave • Electronic Organ—the sound of a 60s transistor-based organ To change organ models, press the ORGAN section’s TYPE button and select the kind of organ you want. When a SYNTH or PIANO sound is selected, you can use the ORGAN sliders for shaping the sound in realtime—they adjust certain critical settings programmed into the sound. You can learn more about a synth sound’s settings on page 22 of the Owner’s Manual. 8 The sound waves that together make up a sound vibrate at different speeds, or “frequencies.” Slower, “low-frequency,” sounds produce lower pitches—they’re the bass in a sound. Highfrequency waves produce higher pitches in the treble range of a sound. We refer to different speed ranges as “frequencies.” To restore a sound you’ve changed with the sliders to its original settings, re-select the sound. Envelope sliders Filter sliders The envelope sliders adjust the volume behavior of the sound. The filter sliders adjust its tone. Envelope Slider What It Adjusts 16’ Attack—This adjusts the speed at which a note reaches its full volume after you press its key on the keyboard. 51/2’ Decay—This adjusts the time it takes for the note to get to its Sustain level. 8’ Release—This sets how long it takes for the note to fade to silence when its key is released. Filter Slider What It Adjusts 1’ Cutoff—This adjust the frequency above or below which the sound’s filter removes frequency content from the sound. Sweeping the Cutoff up and down is a classic realtime effect for synth sounds. Level Resonance—This adjusts the volume of the sound around the cutoff frequency. If you’ve got an iPad, you can program all of the settings in a synth sound or create your own—we’ll talk more about this later. Realtime Fun As you’re playing synth sounds on the VR-09, remember you’ve got more than just sliders for making your sounds uniquely your own. The VR-09’s Responsive Keyboard The VR-09’s keyboard detects the force, or “velocity,” with which you play, and the currently selected sound changes accordingly. Low velocity High velocity Getting louder and/or brighter as you play harder is the most common velocity response, though, really, lots of things can change with your playing force. Play a sound and seeing how it responds to your touch. You can change the keyboard’s touch sensitivity, or “Initial Touch,” as described on page 45 of the Owner’s Manual. 9 The Other Side of Synth Mode The Pitch Bend/Mod Lever Push the pitch bend/mod lever to the right and left to lower or raise notes, or push it forward to add modulation—this is typically vibrato, but can really be anything depending on the programming of the sound you’re playing. Bend note pitches While the BRASS button—as we’ve seen—does get you to the VR-09’s synth brass, it also provides access to great acoustic brass sounds. 1 Press the BRASS button again. 2 This time, go down the list until you reach FS Brass. Push to add modulation, release to remove it From here on down, it’s all acoustic brass instruments. 3 Take some time to check out these sounds. The D Beam It’s not just the BRASS button that leads to natural sounds. The STRINGS, BASS, and CHOIR buttons also do. The VR-09 also features a D Beam, an infrared sensor that tracks the position of your hand as it moves above the sensor. It can operate in any of three ways. Press the desired button beneath the D Beam to select : • PITCH—so moving up or down above the D Beam makes the pitch go up or down. • SFX—so pushing your hand down toward the D Beam produces a sound effect. • CONTROLLER—to control the value of a parameter in the current sound that’s been set to respond to D Beam control. As you move your hand down closer to the D Beam sensor, its effect increases. As you move up and away, it decreases. Press the currently lit button to turn off the D Beam. You can also use the D Beam for controlling the VR-09’s ORGAN sounds as described on page 24 of the Owner’s Manual. You can store your favorite Synth-mode acoustic sounds as registrations so they’ll be instantly available when you perform. Exploring the EFX Section Viewed from the side, this is the area above the D Beam in which you can move your hand. One of the cooler features of the VR-09 is its EFX section. “EFX” stands for “effects,” and we’re not kidding when we say these six knobs add a whole other side to the VR-09. 10 Technically, what’s going on here is that each of the EFX knobs controls one of six always-on effect processors: Creating a VR-09 Layer or Split • Overdrive • Tone control • Compressor Here’s how to layer sounds in the VR-09 and split the keyboard. • MFX • Delay • Reverb 1 The sound passes through one of these effects after another. To layer or split the keyboard using: • PIANO and SYNTH sounds—press the PIANO and SYNTH buttons that select the sounds you want to use. 1 Press the SYNTH section’s SYNTH LEAD button to select the Saw Lead 1 sound. • ORGAN and PIANO sounds—press the ORGAN button and the desired PIANO button. 2 As you play Saw Lead 1, play with the EFX knobs. Of course, there are ways you can modify how effects behave, but just playing around can provide too much fun. • ORGAN and SYNTH sounds—press the ORGAN button and the desired SYNTH button. Here’s a great video that’ll give you an idea of the possibilities. The timing of your button-presses is important when you’re creating a split: While holding down the button for the sound you want for your right hand, press the other sound’s button. Here’s another thing registrations on the VR-09 are great for. You can lock down any sound you create using the EFX knobs by simply saving it as a registration. You can layer two PIANO or two SYNTH sounds by pressing two PIANO or SYNTH buttons, respectively. The display changes to the DUAL screen that shows your two sounds layered together. If you’re the type of musician who enjoys mangling sounds, you may wish you had a looper on hand that would let you build up complex soundscapes. No problem: The VR-09 contains a looper perfect for this purpose. To learn more about it, see page 37 of the Owner’s Manual. Layering Sounds and Splitting the VR-09 Keyboard Layering and Splitting In the VR-09’s Dual mode, it’s easy to stack two sounds on top of each other to create rich timbres—any notes you play use both of the stacked sounds. It’s often handy to have different sounds available in different areas of the keyboard. This type of configuration’s called a “split.” This is easy to do in the VR-09 using its Split mode. The two sounds in a layer are numbered 1 and 2. 2 To map these two sounds to different parts of the keyboard in a split, press the SPLIT button in the SYNTH section of the keyboard. The SPLIT screen appears, and the keyboard is now divided into two zones, with the top sound shown onscreen mapped to Middle C and above, and the other sound played by the keys below Middle C. 11 Perfecting a Layer or Split Changing Layer or Split Sounds The two sounds in a split are labeled as Upper, or “U,” and Lower, or “L.” You can create a split with two ORGAN sounds in Organ mode by pressing the ORGAN section’s SPLIT button. You can choose different sounds for a layer or split even after you’ve begun setting it up. Here’s how. 1 In the display, press the CURSOR sound you want to change. 2 To change You can also split the keyboard using the VR-09’s drum kit sounds—we’ll talk about this when we explore the DRUM section later on. Changing the Split Point or button to highlight the • an ORGAN sound—With the sound selected onscreen, you can use the drawbar sliders to alter it as desired. • a PIANO or SYNTH sound—With the PIANO or SYNTH sound selected onscreen, press the sound’s PIANO- or SYNTH-section button to display a list of sounds from which you can choose what you want. After a few moments, the DUAL or SPLIT screen reappears with your new sound in place. To change the split point in a split: 1 Press and HOLD down the SPLIT button. 2 While continuing to hold SPLIT, touch the key you want to have as the lowest key for the right-hand, or Upper, sound—the key’s name appears in the display. When changing an ORGAN sound, use only the drawbars, and when changing a PIANO or SYNTH sound, press only an alreadylit button in its section of the front panel. Attempting to change organ types or selecting completely different types of PIANO or SYNTH sounds will turn off the layer or split and exit Dual or Split mode. Tweaking a Layer or Split 3 Release the SPLIT key. When you’ve split the keyboard so there’s an ORGAN sound under your left hand, you can add a second one beneath the PIANO or SYNTH sound played by your right. Press the ORGAN UPPER button so it lights, and then move one of the drawbar sliders: You’ve now got an organ under your right hand along with the original sound. Changing the Volume of Layered or Split Sounds The fastest, easiest way to change the volume of a sound in a layer, is to use its LEVEL control. To adjust the volume of • an ORGAN sound—move the ORGAN LEVEL slider. • a PIANO sound—use the LEVEL buttons in the PIANO section. • a SYNTH sound—use the LEVEL buttons in the SYNTH section. 12 Shaping a Layered or Split Sound 1 Highlight the sound you want to modify on the display and use the sliders to make the changes you want. By moving from one to the other layered or split sound on the display, you can use the sliders for realtime control of either sound. Saving Your Layers and Splits You can store any layer or split as a registration, as described on page 15 of the Owner’s Manual. (For much more on registrations, see the VR-09 Workshop booklet Using Registrations.) Leaving Dual or Split Mode The simplest way to return to normal operating mode is to simply go to the desired mode by pressing its MODE button. The Factory Registrations So far, we’ve had occasion to mention the usefulness of registrations a few times. You can save your own registrations in any of the 100 registration memory locations. When the VR-09 ships, the first 32 registrations contain factory-programmed registrations. You can replace any of these with your own, of course, but here’s a list of the registrations that come in your VR-09. Bank and Number Registration Name Type 2-3 BrassnOrgan Brass 2-4 DoomsDayBrs Brass 3-1 Blues B3 Organ 3-2 Progger B3 Organ 3-3 Jazzer B3 Organ 3-4 Voxy Organ 4-1 PnoBsSplit Split 4-2 EpBsSplit Split 4-3 Delay Piano Split 4-4 TrpPadSplit Split 5-1 EP Pad Piano 5-2 Comp Piano Piano 5-3 1HandSalsaPiano Piano 5-4 Follow You Piano 6-1 DirtSawLd Syn Lead 6-2 XtremeDLead Syn Lead 6-3 Native Lead Syn Lead 6-4 Fugue n Lead Syn Lead 7-1 VoxStrings Pad Bank and Number Registration Name Type 7-2 ThickVoxStr Pad 1-1 LongDivision Brass 7-3 PreJMP84 Pad 1-2 80sPwrLuvP Piano 7-4 Euro String Pad 1-3 Bay Area B3 Organ 8-1 StingBubBs Bass 1-4 DirtSawLd Syn Lead 8-2 LstNBasSpace Bass 2-1 TheWrldIsUrs Brass 8-3 Dist Drum Drum 2-2 Sweet Dream Brass 8-4 Comp Drum Drum 13 Exploring DRUM Mode 2 Press the CURSOR / buttons or turn the VALUE dial to select any kit you’d like to play from the keyboard. After a few moments, you’re returned to the DRUM screen. Sounds in the kit you selected can be played from the entire VR-09 keyboard. As a complete solution for the performer, the VR-09 contains a collection of high-quality drum/percussion/sound-effect kits you can play from the keyboard, as well as a comprehensive library of beats you can play along with. We’ve given careful thought to providing you all of the sounds and rhythms you might need, regardless of the type of music you play. The DRUMS section also contains a looper, and a recorder with which you can record your VR-09 performances when you’ve got a USB stick installed in your VR-09. The looper is described on page 37 of the Owner’s Manual. See page 33 in the Owner’s Manual to learn how to record on the VR-09. Playing the VR-09’s Drum Kits You select drum kits on the VR-09 in much the same way you select a PIANO or SYNTH sound. 1 Assigning a Drum Kit To Your Left Hand You can assign the main sounds from a drum kit to the Lower part of a split. This lets you play them together with another sound in the Upper part of the keyboard. Here’s how to do this: 1 Select the drum kit you want to use as described above. 2 Set up a split using steps in “Creating a VR-09 Layer or Split” on Page 11. 3 Press the DRUM button in the DRUMS section of the front panel—the primary sounds from the kit are now playable from the Lower keyboard zone. Playing Rhythms on the VR-09 To play one of the VR-09’s rhythms: 1 Press the SONG/RHYTHM button in the DRUM section twice to show the RHYTHM screen. Press the DRUM button in the DRUM section to display a list of kits. 14 The first press of the SONG/RHYTHM button displays the SONG list, which shows you any songs currently stored on your installed USB stick. 2 Select a rhythm you’d like to use, and press the START/ STOP button to hear it. You can select different rhythms as they continue playing—the VR-09 seamlessly switches between them. As a rhythm plays, you can have fun playing along on the keyboard using an ORGAN, PIANO, SYNTH, or DRUM sound. 3 To change the volume of the rhythm, use the DRUM section’s LEVEL buttons. 4 If you’d like to change the tempo, tap the desired tempo on the TAP TEMPO button. Playing Songs on the VR-09 The VR-09 can play back songs stored on an installed USB stick. It’s a great way to incorporate backing tracks into a gig. The VR-09 can play • songs you’ve recorded on the VR-09 • MP3 files—at a 44.1 kHz sample rate. The VR-09 plays MP3s with a range of bit rates, as listed on page 36 of the Owner’s Manual. • audio files—in .WAV or AIFF format with a 44.1 kHz sample rate. The VR-09 can play 8-, 16-, and 24-bit audio files. • Standard MIDI Files (SMFs)—that are Type 0 (all tracks combined into one track) or Type 1 (multiple separate tracks) SMFs. SMF songs play the VR-09’s internal General MIDI sounds according to MIDI Bank-Select and Program-Change messages embedded in the file. An SMF can be no larger than roughly 240 kb in size, and if an SMF contains System Exclusive (“SysEx”) data, that data must have a packet size of 512 or less. At the first touch of the TAP TEMPO button, the current tempo is displayed in BPM, or “Beats Per Minute.” To learn more about MIDI, SMFs, and SysEx data, see Roland’s An Introduction to MIDI InFocus booklet, which you can download by clicking the URL button at the right. To play songs from a USB stick: 5 If you prefer to enter a specific tempo by its BPM value, turn the VALUE dial to do so. 6 Press EXIT to leave the TEMPO screen. 7 To stop the rhythm, press START/STOP again. 1 Insert the stick into the VR-09’s front-panel USB MEMORY compartment’s jack. 2 Press the SONG/RHYTHM button in the DRUM section once or twice to see the SONG screen on which the USB stick’s songs are listed. Lift here. Insert the USB stick into the jack inside. 15 3 Select the song you want to play from the list. This app has two sides to it. You can: 4 Press the START/STOP button in the DRUM section to begin playback of the song. • program VR-09 ORGAN sounds—graphically on the iPad screen. • dig down deep into the VR-09’s SYNTH sounds—with every underthe-hood setting easily editable on the iPad screen. Navigating Songs Two additional buttons in the DRUM section let you get around within songs and in the song list. To • rewind to the top of the current song—press the Rewind button. • to jump to the previous song in the list—press Rewind once to return to the top of the current song, and then once more to move to the beginning of the previous song. Press multiple times to move backward in the song list. • fast-forward through the current song—hold down the Fast-Forward button. • jump to the next song in the song list—press and release the Fast-Forward button. Do this multiple times to travel forward through the song list. Rewind button Fast-Forward button The VR-09 iPad Editor Connecting to Your iPad You can connect your VR-09 to your iPad in two ways—you can pick whichever one’s more convenient for you. Go Wireless The sliders, D Beam and other realtime controllers give you everything you need to shape your VR-09 sounds in exciting ways onstage. If, though, you’re the type of musician who likes to dig deeper into soundprogramming—and if you own an iPad—we’ve got another way to go that you’ll love: the VR-09 Editor app you can download for free from the Apple App Store. For the simplest type of hook-up, you can utilize Roland Wireless Connect technology by purchasing a Roland WNA1100-RL Wireless USB Adapter for your VR-09. This allows the VR-09 to communicate wirelessly with your iPad. 16 Connect Via USB You can also connect your iPad to the VR-09’s USB COMPUTER jack via USB if you’ve purchased the required connector(s) for your iPad. • If you have an iPad 3 or earlier—you’ll need the Apple iPad Camera Connection Kit. • For iPad 4 or iPad mini—you’ll need an Apple Lightning to USB Camera Adapter. The End We hope you’ve found this Workshop booklet helpful. If you’re interested in learning more, we’ve got some great VR-09 video articles in our Knowledge Base. And be sure to keep an eye out for other VR-09 downloads at www.RolandUS.com. 17