1
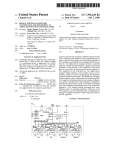
CERN LHC Project Document No. CH-1211 Geneva 23 Switzerland LHC-QBBI-TP-0004 ver 0.2 CERN Div./Group or Supplier/Contractor Document No. TE/MSC the EDMS Document No. Large Hadron Collider 1228943 project Date: 2012-10-31 Test Procedure QUALITY CONTROL OF THE LHC MAIN INTERCONNECTION SPLICES PRODUCED DURING LS1 (BEFORE APPLICATION OF SHUNTS) Abstract This document defines the procedure and acceptance criteria that will be used to control the quality of the 13 kA LHC main interconnection splices to be produced during the first long LHC shut down LS1. The splice QC will be performed on the splices before applying shunts. Prepared by : Checked by : Approved by : Simon Heck Christian Scheuerlein Amalia Ballarino Francesco Bertinelli Luca Bottura Nicolas Bourcey Ranko Ostojic Thomas Otto Jose Pereira Lopes Roberto Lopez Hervé Prin Rosario Principe Frederic Savary Matteo Solfaroli Pierre Thonet Jean-Philippe Tock Frederick Bordry LHC Project Document No. LHC-QBBI-TP-0004 ver 0.2 Page 2 of 25 History of Changes Rev. No. Date Pages Description of Changes 0.1 2012-06-29 All First version submitted 0.2 2012-11-02 All Second version submitted for Approval LHC Project Document No. LHC-QBBI-TP-0004 ver 0.2 Page 3 of 25 Table of Contents 1. SAFETY ................................................................................................... 4 2. INTRODUCTION ...................................................................................... 5 3. NOMENCLATURE ..................................................................................... 6 4. EQUIPMENT ............................................................................................ 8 5. TEST REPORT .......................................................................................... 9 6. VISUAL INSPECTION, GEOMETRICAL TEST AND PHOTOS ...................... 10 6.1 CU WEDGE POSITIONING ......................................................................... 10 6.2 PRESENCE OF SOLDER AT THE CU-PROFILE INTERFACES .............................. 10 6.3 ABSENCE OF MACROSCOPIC (VISIBLE) GAPS .............................................. 11 6.4 SPLICE WIDTH, HEIGHT AND ABSENCE OF STEPS >1.5 MM AT THE SHUNT LOCATIONS .................................................................................................... 11 6.5 GLOBAL SPLICE GEOMETRY AND ALIGNMENT TEST ........................................ 12 6.6 SPLICE CLEANLINESS ............................................................................... 13 6.7 PHOTOS ................................................................................................. 13 7. 7.1 7.2 7.3 7.4 7.5 7.6 7.7 7.8 7.9 ELCTRICAL RESISTANCE TEST (R-8/R-16)............................................ 13 R-8/R-16 INTRODUCTION ......................................................................... 13 LABEL R-8/R-16 MEASUREMENT POSITIONS ON SPLICES .............................. 15 CONNECT MEASUREMENT EQUIPMENT ........................................................ 15 LAUNCH SOFTWARE APPLICATIONS ON LAPTOP........................................... 15 SPECIFY SPLICE AND TEST INFORMATION IN EXCEL SPREADSHEET ............... 16 SWITCH ON THE DLRO10X ........................................................................ 17 CARRY OUT R-8/R-16 MEASUREMENTS ....................................................... 17 RESULT INTERPRETATION ......................................................................... 18 INDICATIONS FOR POSSIBLE R-8/R-16 MEASUREMENT ERRORS .................... 19 7.9.1 R-8 OR R-16 STANDARD DEVIATION TOO HIGH ................................................... 19 7.9.2 SUM OF R-8 RIGHT + R-8 LEFT (Σ R-8) IS NOT COMPATIBLE WITH THE CORRESPONDING R-16 RESULT .................................................................................... 19 8. TEST EQUIPMENT MAINTENANCE AND CALIBRATION ........................... 20 8.1 DLRO10X MICROOHMMETER ..................................................................... 20 8.1.1 DELETE DLRO10X MEMORY AT LEAST TWICE A DAY .............................................. 20 8.1.2 RECHARGE AND CHANGE DLRO10X BATTERY MODULE .......................................... 20 8.1.3 DLRO10X CALIBRATION TEST ............................................................................ 21 8.2 ALL ELECTRONIC EQUIPMENT .................................................................... 22 8.3 SAFE EXCEL SPREADSHEET REGULARLY IN DFS VIA 3G. ............................... 22 9. REFERENCE DOCUMENTS ...................................................................... 22 APPENDIX I: TEST REPORT .......................................................................... 23 APPENDIX II: DRAWING U-PIECE AND WEDGE ............................................ 25 APPENDIX III: LOCAL GEOMETRICAL TEST GAUGES ..................................... 25 APPENDIX IV: GLOBAL GEOMETRICAL TEST GAUGES ................................... 25 LHC Project Document No. LHC-QBBI-TP-0004 ver 0.2 Page 4 of 25 1. SAFETY All personnel working on the CERN site have to follow the safety rules as outlied in the TE Departemental Safety Plan (http://safety-commission.web.cern.ch/safetycommission/SafetyPlan/te/f_index.htm) All personnel working in the LHC tunnel have to follow the following self training modules safety courses on SIR ( https://sir.cern.ch ): – – – – Basic safety (levels 1 et 2) Specific risks (level 3) LHC machine (level 4) Electrical Safety Awareness In addition, all personnel working in the LHC tunnel have to follow specific training. – Self Rescue Mask Training – Radiological Protection Inscription for the safety courses in classes is via the CERN training catalogue. https://cta.cern.ch/cta2/f?p=110:9:4052417624575506::::X_STATUS,XS_COURSE_NA ME,XS_PROGRAMME,XS_SUBCATEGORY,X_COURSE_ID,XS_LANGUAGE,XS_SESSION:R, ,181,,,B, Access requests for the LHC tunnel are made via EDH (https://edh.cern.ch/Document/General/ACRQ). All personnel working in the LHC tunnel needs to be equipped with: – – – – CERN access card Personal dosimeter Safety helmet with head lamp and safety shoes Biocell LHC Project Document No. LHC-QBBI-TP-0004 ver 0.2 Page 5 of 25 2. INTRODUCTION This standard procedure describes the QC of the LHC main quadrupole (M1 and M2) and dipole (M3) interconnection splices that are newly assembled during LS1, and before application of shunts. It is estimated that about 1500 existing LHC main splices have to be desoldered and reconnected during LS1. c hart diagram showing the in sequence local QC steps for LHC 13 kA and The sequence of local splice QCFlow steps integrated the of splice production Flow c hart diagram showing the sequence of local QC steps for LHC 13 kA main i nterconnection splices, l ine N and M US welds for m agnets to be consolidation work flow is shown in Figure 1. main i nterconnection splices installed during L S1 Splice insulation has been removed 13 kA cables have been pre-‐tinned QC of existing 13 kA splices QC of 13 kA cables Splice assembly No Redo splice? Yes Splice de-‐soldering QC of 13 kA newly produced splices Cable pre-‐tinning Shunt soldering QC of 13 kA cables QC of 13 kA splices after consolidation (with shunts) Splice assembly Shunt soldering Local splice Q C accomplished QC of lines M1 and M2 US welds QC of 13 kA splices after consolidation (with shunts) Application of splice insulation Application of splice insulation QC of splice insulation QC of splice insulation Local splice Q C accomplished QC of line N US welds US-‐welding of auxiliary busbars QC of newly p roduced 13 kA splices a) line N splices were produced b) Local splice Q C accomplished Figure 1: Flow chart diagrams showing the sequence of local QC steps for LHC 13 kA main interconnection splices for (a) standard consolidation sequence (b) after magnet replacement. The QC shall assure that all splices produced during LS1 are made according the best praxis and are of comparable quality as those produced during 2009. It must be guaranteed that shunts and the new insulation boxes can be installed on all 13 kA busbar splices. The application of shunts requires that a flat and smooth surface can be machined on the busbars, such that the solder can wet and spread the entire shunt to busbar interface by capilary action. The acceptable tolerances for the assembly of the insulation box are outlined in [1] and [2]. This QC procedure includes the description of the visual inspection of the splices, the geometrical splice test with dedicated gauges, the room temperature (RT) electrical resistance tests, and the documentation of the QC results. The regular maintenance of the test equipment is described as well. The state of the QC (either “pending”, “OK” or “not OK”) is communicated to the splice production teams via the WISH tool. This procedure is to be distinguished from the QC procedure LHC-QBBI-TP-0006 for the already existing splices that were produced during LHC installation or during the 2008/2009 shutdown [3]. The QC described in this procedure is preceded by the visual inspection of the stabilized cables before splice assembly, which is described in the test procedure LHC-QBBI-TP0005 [4]. The QC of the consolidated splices with shunts is described in the procedure LHC-QBBITP-0007 [5]. LHC Project Document No. LHC-QBBI-TP-0004 ver 0.2 Page 6 of 25 3. NOMENCLATURE Throughout this note the splice location within the LHC interconnection is described as follows [6]: – M1, M2, M3 see Figure 2 Figure 2: Sketch of LHC interconnection showing the location of M1 and M2 (quadrupole) and M3 (dipole) busbars. – External –splice furthest to the ring center (previously referred to as cryo/QRL side, see Figure 3). The abbreviation is E. – Internal – splice closest to the LHC ring center (previously referred to as corridor side). The abbreviation is I. – Left side: left splice side when looking from the center of the LHC ring (previously referred to as lyra side). The abbreviation is L. – Right side: right splice side when looking from the center of the LHC ring (previously referred to as connection or diode side). The abbreviation is R. External-QRL Left-Lyra M2 M1 Right-Connection LHC ring center Internal-Corridor Figure 3: Location of internal/external and left/right side of an LHC main magnet interconnection. LHC Project Document No. LHC-QBBI-TP-0004 ver 0.2 Page 7 of 25 The LHC main splice components “U-piece”, “wedge”, “busbar stabiliser” and “busbar tongue” are shown in groove Figure 4. groove Figure 4. (a) Main busbar interconnection splices in the LHC tunnel. The splice in the background is finished and in the foreground the two Rutherford type cables extending from the opposing busbar stabilizers are prepared for interconnection. (b) Cross section through a LHC dipole busbar. LHC Project Document No. LHC-QBBI-TP-0004 ver 0.2 Page 8 of 25 4. EQUIPMENT The following equipment is needed to perform the QC tests on the LHC main splice interconnections. – – – – – – Megger DLRO10X with one spare battery DH5 duplex handspikes with 2.5 m long cable RS-232 cable Notebook with one spare battery. Digital Camera Gauges for local splice deformation test Figure 5: Gauges for local splice deformation test in the area where shunts will be applied. – Gauge for global splice alignment and deformation test (a) (b) Figure 6: Gauges for the global splice alignment and deformation test for dipole (a) and quadrupole (b) splices [2]. – – – – Ruler Pen (Black Stabilo OHPen universal permanent marker (EAN 4006381118989) Mirror Torch (SCEM 01.28.10.120.8) LHC Project Document No. LHC-QBBI-TP-0004 ver 0.2 Page 9 of 25 The QC test station including the Megger and DH5 handspikes is presented in Figure 7. (a) (b) Figure 7: (a) Test station for resistance tests with automatic data acquisition and (b) RS-232 cable. 5. TEST REPORT Before starting the splice QC enter all general test information in the test report: – Name of operators – Date and time of test – Interconnection ID During the QC enter test results in the test report and give additional comments if needed. – Correct splice assembly? Ok/not Ok – – – – – Ok/not Ok/not Ok/not Ok/not Ok/not Presence of solder alloy at splice interfaces? Absence of macroscopic gaps? Local and global geometrical test passed? Is the splice clean and without sharp edges? R-8/R-16 test passed? Ok Ok Ok Ok Ok The test report template is shown in the Appendix I of this procedure. LHC Project Document No. LHC-QBBI-TP-0004 ver 0.2 Page 10 of 25 6. VISUAL INSPECTION, GEOMETRICAL TEST AND PHOTOS The goal of the visual splice inspection is to: – verify that all splice components are correctly assembled – verify the presence of solder at the interfaces between the Cu-profiles (U-piece, wedge and busbar stabiliser) – – – – – verify the absence of macroscopic gaps between the splice Cu-profiles verify the absence of steps >1.5 mm between the splice profiles verify that the splices are well alligned verify the splice cleanliness document the splice state by photos 6.1 CU WEDGE POSITIONING Verify that the groove (see Figure 4) on the splice wedge is facing the internal side of the splice. Verify that the correct wedge has been used (6.4 mm-thick and 3.4 mm-thick for dipole and quadrupole splices, respectively). In case that quadrupole and dipole profiles have been mixed up this is easily seen by a 3 mm step between U-piece and wedge. If the splice is not correctly assembled it is declared non-conform. Document the defect by detailed photos and describe the defect in the test report. 6.2 PRESENCE OF SOLDER AT THE CU-PROFILE INTERFACES Verify that solder is present along the interfaces between U-profile, wedge and busbar stabiliser tongue as shown in Figure 8. solder Figure 8: Well aligned splices without macroscopic gaps. Solder is present between U-piece, wedge and busbar tongues. If there is no solder visible at the splice interfaces the splice is declared non-conform. In this case add detailed splice photos either from the top (dipole) or from the bottom (quadrupole) of the splice. LHC Project Document No. LHC-QBBI-TP-0004 ver 0.2 Page 11 of 25 6.3 ABSENCE OF MACROSCOPIC (VISIBLE) GAPS Verify that there are no visible gaps between U-profile, wedge and busbar stabiliser as shown in Figure 9 and Figure 10. Figure 9: Transverse gaps between busbar stabiliser and U-piece. a) b) Figure 10: (a) Longitudinal gaps between busbar stabiliser tongue and U-piece and (b) between U-piece and wedge. If there are visible gaps the splice is declared non-conform. Document the defect by detailed photos and describe the defect in the test report. 6.4 SPLICE WIDTH, HEIGHT AND ABSENCE OF STEPS >1.5 MM AT THE SHUNT LOCATIONS The splice geometry is tested at the splice region where shunts are applied later on, using 60 mm-long gauges. Verify that the splice width does not exceed 21.5 mm, and the height does not exceed 11.5 mm (quadrupole) or 17.5 mm (dipole), and/or that there are no steps >1.5 mm between U-profile, wedge and busbar stabiliser (see Figure 11). Figure 11: Step between U-piece and busbar stabiliser. For the geometrical test use the dedicated gauges as shown in Figure 12 (gauge width is 21.5 mm, gauge height is 11.5 mm for quadrupole and 17.5 mm for dipole splices). LHC Project Document No. LHC-QBBI-TP-0004 ver 0.2 Page 12 of 25 (a) (b) Figure 12: Geometrical test with dedicated gauges: (a) height test and (b) width test. If one gauge does not fit over the splice this is declared non-conform. Document the defect by detailed photos and describe the defect in the test report. 6.5 GLOBAL SPLICE GEOMETRY AND ALIGNMENT TEST In order to make sure that the splice insulation can be mounted later on, a 200 mm long gauge as shown in Figure 13 is used to check the splice alignment. The gauge width is 23 mm, and the gauge height is 21 mm and 15 mm for dipole and quadrupole splices, respectively. If the gauge is not mountable on both parallel aligned splices both splices are declared non-conform. A drawing of the gauge is shown in Figure 36 in the Appendix IV. (a) (b) Figure 13: Geometrical splice test (a) before application of the cover and (b) after application of the cover. LHC Project Document No. LHC-QBBI-TP-0004 ver 0.2 Page 13 of 25 6.6 SPLICE CLEANLINESS Verify that the splice has been cleaned after the soldering process and that there are no sharp edges (see Figure 14). Verify that there are no thick solder droplets on the splice that could prevent mounting the splice insulation. Figure 14: Appearance of properly cleaned splices. An uncleaned and heavily oxidized busbar pair is shown in Figure 15. Figure 15: Appearance of unclean splices with remaining oxide scale. 6.7 PHOTOS For all newly produced splices take a photo in the sequence M2, M1 and M3. Take photos of the splice pairs from the top, as shown for instance in Figure 14. In case of non-conform splices document the non-conformity and add detailed photos of the defect. 7. ELCTRICAL RESISTANCE TEST (R-8/R-16) 7.1 R-8/R-16 INTRODUCTION Room temperature (RT) splice resistance measurements can detect splices with an excessive resistance in the normal conducting state. It has been shown that the low temperature stabiliser resistance can be estimated from the RT resistance results [7]. Four-point resistance measurements are performed with a Digital Low Resistance Ohmmeter (DLRO10X) either with a voltage tap distance of 8 cm or 16 cm (referred to as R-8 and R-16, respectively). The R-16 result includes the resistance of both busbar to splice contacts, while the R-8 result is influenced by one contact only. R-16 values are measured as a cross check of the R-8 results. The test current of 10 A is injected in a distance of 5 mm from the voltage taps. The accuracy of the R-8 inhomogeneous current distribution due to the point like current injection close to the voltage taps causes a systematic error in the R-8 and R-16 results of approximately 1 µΩ. LHC Project Document No. LHC-QBBI-TP-0004 ver 0.2 Page 14 of 25 The precision of the R-8 measurements following the procedure applied in 2009 is about ±0.30 µΩ (± σ). The influence of the splice temperature on R-8 is neglected. The estimated temperature variation in the LHC tunnel is between 14 °C to 20 °C. This causes a maximum uncertainty in the R-8 results of 0.21 uΩ and 0.12 uΩ for quadrupole and dipole splices, respectively. The following R-8 acceptance threshold values for “new” splices that will be produced during LS1 have been defined for quadrupole and dipole splices [8]: R-8dipole 7.6 µΩ R-8quad 12.3 µΩ Figure 16: Probability density function f(x) of dipole splices produced during 2009 (R-8 fitted with 3P Burr function) and acceptance threshold value for dipole splices produced during LS1 [9]. Figure 17: 3 Probability density function f(x) of quadrupole splices produced during 2009 (R-8 fitted with 3P Burr function) and acceptance threshold value for quadrupole splices produced during LS1. LHC Project Document No. LHC-QBBI-TP-0004 ver 0.2 Page 15 of 25 The fitted R-8 data for 2009 production dipole and quadrupole splices is presented in Figure 16 and Figure 17, respectively, together with the corresponding acceptance threshold values. If the R-8 result exceeds these threshold values the splice is declared non-conform. Proceed with the R-8/R-16 test in the following sequence: 7.2 LABEL R-8/R-16 MEASUREMENT POSITIONS ON SPLICES Label the R-8/R-16 measurement positions on the side of the splices, in the splice center and in 8 cm distance of the splice center in either direction by using a ruler and a U-profile edge U-profile edge U-profile length = 15 cm permanent marker. Figure 18: Position of label on splice for R-8/R-16 measurements. 7.3 CONNECT MEASUREMENT EQUIPMENT Connect the DLRO10X with the laptop via RS-232 interface (see Figure 19). Figure 19: RS-232 interface of the laptop. 7.4 LAUNCH SOFTWARE APPLICATIONS ON LAPTOP – Open WinWedge application by double clicking on the icon “DLRO10X-dataacquisition” on the desktop of your laptop for automatic data acquisition of resistance results (see Figure 20). – Open the Excel workbook on the desktop of your laptop by double clicking on the icon “R-8, R-16-new splices” to save the resistance results. LHC Project Document No. LHC-QBBI-TP-0004 ver 0.2 Page 16 of 25 Figure 20: WinWedge and Excel application icons as seen on the desktop of the laptop for automatic data acquisition. 7.5 SPECIFY SPLICE AND TEST INFORMATION IN EXCEL SPREADSHEET Fill in the following QC information in the Excel spreadsheet as shown in Figure 21 to identify the splice: (use scroll down menu). – Date – Operator – Interconnection – Line (M1, M2 or M3) – Side (Internal or External) Do so for all newly produced splices of the interconnection (cell content can also be filled in by copy & paste). The corresponding threshold values are automatically selected. Figure 21: R-8, R-16 results Excel spreadsheet. LHC Project Document No. LHC-QBBI-TP-0004 ver 0.2 Page 17 of 25 7.6 SWITCH ON THE DLRO10X Always when the DLRO10X is switched on, the first measurement is used to record the test current in the Excel spreadsheet. After launching the DLRO10X position the cursor in the cell D6 next to “Current check” of the Excel spreadsheet (see Figure 22). Figure 22: Positioning of the cursor in D6 cell next to the “Current check” cell of the Excel spreadsheet for automatic data acquisition. Perform one resistance measurement on a splice with a voltage tap distance of about 8 cm. The automatically selected test current is recorded. If the recorded test current is 10 A continue with step 7.7. Otherwise the cell D6 appears in red and the step 7.6 needs to be repeated from the beginning. When the test is done erase the cell content of D6. 7.7 CARRY OUT R-8/R-16 MEASUREMENTS For each R-8 and R-16 test three resistance measurements are performed. From these results an average value and the standard deviation are automatically calculated. – Mark the cell “R-8 right #1” in the data acquisition Excel spreadsheet by a single mouse click (see Figure 23). Figure 23: Positioning of the cursor in the “R-8 right #1” cell of the Excel spreadsheet for automatic data acquisition. LHC Project Document No. LHC-QBBI-TP-0004 ver 0.2 Page 18 of 25 – Position the handspikes in the center of the U-piece and on the right side of the splice to be tested (see Figure 24). The voltage tap pins (P) (not the current injector pins) must be placed onto the position markers of the splice such that they are in a distance of 8 cm to each other. (a) (b) Figure 24: Positioning of the handspikes for (a) R-8 measurement on the left side of the splice and (b) for R16 measurements. – The resistance measurement automatically starts when the spring loaded pins are in good contact with the splice. One resistance measurement takes about three seconds. During this time it is important not to move the handspikes in order to keep a good electrical contact to the splice. – The resistance result is automatically recorded in the Excel spreadsheet, and the cursor jumps to the next cell for the 2nd resistance measurement #2. The transfer via RS-232 interface of one value takes again about 2 seconds. – Perform the 2nd and 3rd resistance measurement by removing one of the two handspikes from the splice and reposition it afterwards at the same position. – When R-8 Right is completed the cursor in the Excel spreadsheet jumps automatically in the “R-8 left #1” cell. – Perform three R-8 measurements on the Left side, as described above. – When all three R-8 Left measurements are completed the cursor in the Excel spreadsheet jumps automatically in the “R-16 #1” cell. – Position the handspike voltage taps on the busbar stabiliser in 5 mm distance from the U-piece. – Perform three R-16 measurements. 7.8 RESULT INTERPRETATION Average R-8 resistance (Ø R-8), average R-16 resistance (Ø R-16) and standard deviation (stdev) are automatically calculated by Excel and the results are compared with the corresponding acceptance threshold values. If the standard deviation of the three resistance results and the comparison of Σ R-8 and R-16 are within the specified limits (see chapter 7.9), the R-8 result is compared with the acceptance threshold values for quadrupole and dipole splices. If none of the R-8 exceeds the acceptance threshold values, the corresponding cell is dyed green and a check appears. This means that the R-8 splice test is passed. If one R-8 result exceeds the acceptance threshold value, the corresponding cell is dyed red and a black cross appears (see Figure 25). This means the splice is declared nonconform. LHC Project Document No. LHC-QBBI-TP-0004 ver 0.2 Page 19 of 25 Figure 25: Example for too high R-8 resistance on the right splice side. 7.9 INDICATIONS FOR POSSIBLE R-8/R-16 MEASUREMENT ERRORS 7.9.1 R-8 OR R-16 STANDARD DEVIATION TOO HIGH If the standard deviation of the three measurement values is larger than 0.8 µΩ this can indicate a measurement error. In this case the stdev cell occurs in orange (see Figure 26), and the resistance measurement needs to be repeated. Keep the values and repeat the R-8 measurements by using the next row in the excel spreadsheet. Make a comment to the second measured values ”splice measured twice, stdev too high” in column AB of the excel spreadsheet and in the test report. Before the second measurement make sure the DLRO10X battery is still at least 20% charged and check if splice components are moving while measuring. Figure 26: Example for a too high stdev of R-8 results on right splice side. If after the second resistance measurement the stdev of the three resistance results still exceeds the standard deviation threshold value the splice is declared non-conform. In case splice components are loose the splice needs to be declared non-conform and needs to be repaired. Comment in column AB of the excel spreadsheet and in the test report “splice components loose”. 7.9.2 SUM OF R-8 RIGHT + R-8 LEFT (Σ R-8) IS NOT COMPATIBLE WITH THE CORRESPONDING R-16 RESULT The R-16 measurement is performed as a cross check of the R-8 results. The Excel program automatically compares the sum of R-8 right and R-8 left (Σ R-8) results with the corresponding R-16 result (always average values). Due to the systematic error in the resistance measurements, the R-16 value is typically 1 µΩ lower than the sum of the corresponding R-8 values. If the sum of R-8 right and R-8 left is in agreement with R-16 the cell background appears in green. If the R-16 result is larger than Σ R-8, or Σ R-8 exceeds R-16 by more than 2 µΩ the Σ R-8 cell background appears in red (see Figure 27), and the R-8 and R-16 measurements need to be repeated. Keep the “old” values, repeat the measurements and record the values into the following row in the excel spreadsheet. If after the second resistance measurement Σ R-8 is still not in agreement with the corresponding R-16 result, save the results and comment in column AB: “measured two times, Σ R-8 does not match with R-16”. LHC Project Document No. LHC-QBBI-TP-0004 ver 0.2 Page 20 of 25 Figure 27: Example for R-16 +2 µΩ < sum R-8. 8. TEST EQUIPMENT MAINTENANCE AND CALIBRATION 8.1 DLRO10X MICROOHMMETER 8.1.1 DELETE DLRO10X MEMORY AT LEAST TWICE A DAY The DLRO10X can save up to 700 resistance values. If the memory is full, the data transfer to the Excel spreadsheet is not reliable anymore. Therefore, the memory of the DLRO10X needs to be erased regularly, at least twice per working day. To delete stored data from the DLRO10X memory push on the right side of the yellow coordination button in order to navigate to the OPTIONS menu (see Figure 28). In OPTIONS submenu select DELETE DATA and push ENTER. Select YES. As a result all data is erased from the DLRO10X memory. Figure 28: Display of OPTIONS submenu of the DLRO10X. 8.1.2 RECHARGE AND CHANGE DLRO10X BATTERY MODULE Battery status can be checked anytime without seperating DLRO10X from the battery module either on the DLRO10X display or on the backside of the battery (see Figure 29). Replace battery if the battery charge level is less than 20%. LHC Project Document No. LHC-QBBI-TP-0004 ver 0.2 Page 21 of 25 Figure 29: Check of the battery status. 4 bars out of 10 indicate that the battery has still 40% of its maximum capacity. At the end of each working day the DLRO10X batteries need to be recharged. The battery module is attached to the bottom of the DLRO10X. In order to charge the battery open the locks on the side of the DLRO10X (see Figure 30). Afterwards, lift the DLRO10X to access the battery plug. The battery can be recharged now. Connect DLRO10X with fully charged battery on the next day. Fully recharging the battery takes between 2-4 hours. (a) (b) Figure 30: (a) Removing and (b) charging the DLRO10X battery. 8.1.3 DLRO10X CALIBRATION TEST At the beginning of each working day the well functioning of the DLRO10X test station is verified. To do so, switch on the DLRO10X and open the Excel workbook “DLRO10X calibration test”. Position the cursor in the cell “Current” in column C (see Figure 31). Figure 31: Excel spreadsheet for automatic data acquisition of the resistance of calibration standard. The first measurement will check the automatically selected test current and record the value into the corresponding cell. Subsequently the cursor jumps automatically into the next column labeled with “Calibration resistance R=10.0 mΩ #1”. Perform three resistance measurements with the 10.0 mΩ calibration resistance sample. The three results are recorded and the average resistance value and the standard deviation are automatically calculated. If the average resistance value is not within defined limits, the corresponding cell in column G is dyed red. If the resistance result is 10.0 mΩ±?? µΩ proceed with the R-8/R-16 test. LHC Project Document No. LHC-QBBI-TP-0004 ver 0.2 Page 22 of 25 Figure 32: Resistance measurements on DLRO10X calibration standard with a voltage tap distance (P to P) of 5 cm. 8.2 ALL ELECTRONIC EQUIPMENT The batteries of all electronic equipment, i.e. DLRO10X, digital camera and laptop, need to be recharged at the end of a working day. If spare batteries are available do check their batterie status in regular intervals (e.g. 2 weeks) and recharge them if necessary. If needed use the corresponding user’s manual to change batteries. 8.3 SAFE EXCEL SPREADSHEET REGULARLY IN DFS VIA 3G. 9. REFERENCE DOCUMENTS 1 P. Fessia, “Specification for the Consolidation of the LHC 13 kA Interconnections in the Continuous Cryostat”, CERN, EDMS Nr: 1171853 2 J.-M. Demolis, L. Favier, S. Triquet, R. Principe“Criteres de controle qualite interconnections 13 kA”, EDMS Nr. 1171359 3 S. Heck, Test Procedure LHC-QBBI-TP-0006, “Quality control of the LHC main interconnection splices produced before LS1 (before application of shunts)”, EDMS No. 1240298 4 C. Scheuerlein, S. Heck, Test Procedure LHC-QBBI-TP-0005, “Quality Control of the Stabilised LHC Main Busbar Cables before Splice Assembly”, EDMS No. 1228962. 5 S. Heck, Test Procedure LHC-QBBI-TP-0007, “Quality Control of the LHC main interconnection splices after consolidation by application of shunts”, EDMS No. 1240301 6 M. Pojer, H. Prin, “Naming convention for the splice consolidation”, EDMS No 1234436 7 F. Bertinelli, L. Bottura, J.-M. Dalin, P. Fessia, R.H. Flora, S. Heck, H. Pfeffer, H. Prin, C. Scheuerlein, P. Thonet, J.-P. Tock, L. Williams, “Production and Quality Assurance of Main Busbar Interconnection Splices during the LHC 2008-2009 Shutdown”, IEEE Trans. Appl. Supercond., 22(3), (2011), 1786-1790 8 C. Scheuerlein, “Quality control of the main interconnection splices before and after consolidation”, presentation at the 2nd LHC splice review, 28.11.2011 9 S. Heck, C. Scheuerlein, “Statistical analysis of LHC main interconnection splices room temperature resistance (R-8) results”, (2012) LHC Project Document No. LHC-QBBI-TP-0004 ver 0.2 Page 23 of 25 APPENDIX I: TEST REPORT Test report for quality control of LHC main busbar splices produced during LS1 and before applying shunts Operators: Date: Time: Interconnection ID: Correct splice assembly? Comments: Presence of solder alloy at splice interfaces? Comments: Are there macroscopic gaps between splice Cu-profiles? Comments: Local and global geometrical test passed? Comments: Is the splice clean and without sharp edges? Comments: Splice M1-I M1-E M2-I M2-E M3-I M3-E Splice M1-I M1-E M2-I M2-E M3-I M3-E Splice M1-I M1-E M2-I M2-E M3-I M3-E Splice M1-I M1-E M2-I M2-E M3-I M3-E Splice M1-I M1-E M2-I M2-E M3-I M3-E Ok Not Ok Ok Not Ok Ok Not Ok Ok Not Ok Ok Not Ok LHC Project Document No. LHC-QBBI-TP-0004 ver 0.2 Page 24 of 25 R-8/R-16 test passed? Comments: Splice M1-I M1-E M2-I M2-E M3-I M3-E Ok Not Ok Comments: Signatures: Figure 33: QC test report for LHC main interconnection splices produced during LS1 and before application of shunts. LHC Project Document No. LHC-QBBI-TP-0004 ver 0.2 Page 25 of 25 APPENDIX II: DRAWING U-PIECE AND WEDGE Profilé en U Plat de fermeture M1&M2 M3 Sketch o f gauge for geometrical height test o f LHC m ain interconnection quadrupole splices before shunt application. Figure 34: Drawings of splice Cu profiles. U-‐pieces on the left and wedges on the right. Sketch o f gauge for geometrical height test o f LHC m ain interconnection dipole splices before shunt application. APPENDIX III: LOCAL GEOMETRICAL TEST GAUGES R2 Front view Side view R1 R2 Front view R2 23.5 17.5 a) b) 3 10 Side view R1 R2 17.5 11.5 3 10 60 60 30 30 Figure 35: Sketch of gauges for geometrical splice Quantity: 7xtest for dipole (a) quadrupole (b) splices. Material: STAINLESS STEEL surface roughness Ra 6.3 APPENDIX IV: GLOBAL GEOMETRICAL TEST GAUGES Applicant: Simon Heck Budget Code: 99117 Applicant: Simon Heck Budget Code: 99117 Quantity: 7x Material: STAINLESS STEEL surface roughness R a 6.3 Figure 36: Drawing of gauge for global splice alignment and deformation test for quadrupole (left) and dipole (right) splices.