1
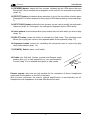
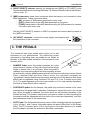
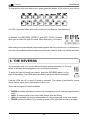
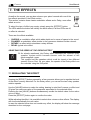
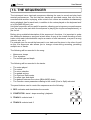
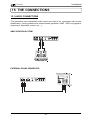
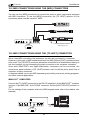
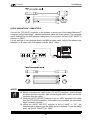
Concerto
User Manual - English
Ver. 1.0
Concerto
User Manual
CONTENTS
1. IMPORTANT NOTES ..................................................................................................... 3
1.1 Looking after the product ......................................................................................... 3
1.2 Notes about the manual ........................................................................................... 3
2. CONTROLS AND CONNECTIONS ............................................................................... 4
2.1 The front panel ......................................................................................................... 4
2.2 The connections panel ............................................................................................. 6
3. THE PEDALS ................................................................................................................ 7
4. DEMO SONGS .............................................................................................................. 8
4.1 Demonstration timbre of piano acoustic effects ....................................................... 8
5. PLAYING THE PIANO’S VOICES .................................................................................. 9
5.1 Switching on the instrument ...................................................................................... 9
5.2 Selecting the voices ................................................................................................. 9
6. THE REVERBS ........................................................................................................... 10
6.1 Regulating the reverb depth ................................................................................... 11
7. THE EFFECTS ............................................................................................................ 12
7.1 Regulating the effect .............................................................................................. 12
8. REGULATING THE KEYBOARD TOUCH .................................................................... 13
8.1 Setting the fixed touch level .................................................................................... 14
9. TRANSPOSE FUNCTION ........................................................................................... 14
10. THE DUAL MODE ..................................................................................................... 15
11. THE SPLIT MODE ..................................................................................................... 16
11.1 Setting the split point ............................................................................................ 17
12. THE METRONOME ................................................................................................... 18
12.1 Setting the time signature .................................................................................... 18
13. THE SEQUENCER ................................................................................................... 19
13.1 Recording ............................................................................................................ 20
13.2 Playback .............................................................................................................. 21
13.3 Deleting a track .................................................................................................... 22
14. THE FUNCTION MENU ............................................................................................. 23
14.1 Selecting a function .............................................................................................. 24
14.2 Tuning - F1 ........................................................................................................... 26
14.3 Scale - F2 ............................................................................................................ 26
1
Concerto
User Manual
14.4 Dual mode functions - F3 ..................................................................................... 27
14.5 Split mode functions - F4...................................................................................... 29
14.6 Pedal functions - F5 ............................................................................................. 32
14.7 MIDI functions - F6 ............................................................................................... 33
14.8 Firmware version ................................................................................................. 40
15. THE CONNECTIONS ................................................................................................ 43
15.1 Audio connections................................................................................................ 43
15.2 MIDI connections using the [MIDI] connectors ....................................................... 44
15.3 MIDI connections using the [TO HOST] connectors .............................................. 44
16. FACTORY SETTINGS ............................................................................................... 46
17. FIRMWARE, VOICES AND DEMO UPDATING ......................................................... 47
18. ASSEMBLING THE PIANO ....................................................................................... 48
2
Concerto
User Manual
1. IMPORTANT NOTES
1.1 LOOKING AFTER THE PRODUCT
•
Do not apply excessive force to the instrument’s structures or controls.
•
When possible, do not place the instrument close to units which generate strong interference, such as
radios, TVs, computer videos, etc.
•
Do not place the piano close to heat sources, in damp or dusty places or in the vicinity of strong magnetic
fields.
•
Do not expose the instrument to direct sunlight.
•
Never insert foreign bodies inside the instrument or pour liquids of any kind into it.
•
For cleaning, use only a soft brush or compressed air; never use detergents, solvents or alcohol.
•
Always use good quality screened cables for connection to amplification or diffusion systems. When
disconnecting cables from sockets, always take hold of the connector and not the cable itself; when
winding cables, do not knot or twist them.
•
Before making the connections ensure that the other units (especially amplification systems) you are
about to connect are switched off. This will prevent noisy or even dangerous signal peaks.
•
If the piano is to be out of use for lengthy periods, disconnect the plug from the power socket.
1.2 NOTES ABOUT THE MANUAL
•
Take good care of this manual.
•
This manual constitutes an integral part of the instrument. The descriptions and illustrations in this
publication are not binding.
•
While the instrument’s essential characteristics remain the same, the manufacturer reserves the right to
make any modifications to parts, details or accessories considered appropriate to improve the product or
for requirements of a construction or commercial nature, at any time and without undertaking to update
this publication immediately.
•
All rights reserved; the reproduction of any part of this manual, in any form, without the manufacturer’s
specific written permission is forbidden.
•
Read all the information described carefully. You will avoid wasting time and will obtain the best performance from your instrument.
•
The codes or numbers in square brackets ([]) indicate the names of the buttons, sliders, trimmers and
connectors on the instrument.
For example, [VOLUME] refers to the VOLUME slider.
•
All the trademarks referred to in this manual are the property of the respective manufacturers.
3
Concerto
User Manual
2. CONTROLS AND CONNECTIONS
2.1 THE FRONT PANEL
1 2 3
4 5 6
7
8
9
10 11 12 13
14
15
16
17
1. [VOLUME] slider: regulates the instrument’s general volume. In MIN position the
volume is shut down, while the MAX setting will provide the highest audio level.
2. [BALANCE] slider: sets the balance between the volumes of the two voices present
when Dual and Split keyboard modes are in use. When the slider is set on 1ST only
the first voice will sound, while the 2ND setting provides only the second voice.
The intermediate settings will provide different levels of balance between the first and
second voices.
3. [BRILLIANCE] slider: regulates the brilliance of the sound generated by the instrument.
The MELLOW setting provides a darker, more muffled sound, while the BRIGHT setting
gives a brilliant sound with lots of treble. Intermediate slider settings will provide
intermediate timbre levels.
4. [DEMO/ENTER] button: this button is used to select the demonstration songs (chap.
4) or internal functions of the Function menu (chap. 14).
5. [TRANSPOSE] button: activates / deactivates the transposition function; keep it
pressed for a few moments to regulate the function (chap. 9).
6. [FUNCTION] button: recalls the Function menu, used to set all the instrument’s internal
functions (chap. 14).
7. [TEMPO/FUNCTION] buttons: these two buttons are used to set the metronome
tempo (when the display is showing its value, see chap. 12) or to select the functions
of the Function menu (chap. 14).
8. [METRONOME] button: stops and starts the metronome. Keep it pressed for a few
moments to select the time signature (point 12.1).
9. [VALUE] button: buttons used to regulate the values shown on the display.
The [] key decreases the value by one unit, [] increases it by one unit. Press them
simultaneously to restore the default setting of the selected parameter.
10. Display: this display will show all the video pages used to set up the piano.
4
Concerto
User Manual
11. [REVERB] button: selects the four reverbs, indicated by the LEDs above the keys
themselves, which simulate the propagation of the sound in an enclosed environment
(chap. 6).
12. [EFFECT] button: this button allows selection of one of the four effects of which piano
is equipped. The effect selected is shown by the LEDs above the key concerned (chap.
7).
13. [KEY TOUCH] button: selects the four dynamic curves used to modify the keyboard’s
response (chap. 8). Once again, the settings are displayed by the LEDs above.
14. Voice buttons: these buttons allow you to select the voice with which you wish to play
(chap. 5).
15. [SPLIT] button: press this button to activate the Split mode. This operating mode
allows you to play two voices in two separate parts of the keyboard (chap. 11).
16. Sequencer button: buttons for controlling the sequencer used to record and play
back performances (chap. 13).
17. [POWER ] Switch: piano on/off switch.
18. Pedals: the Soft (left), Sustain (central) and Damper (right)
pedals allow you to add expression to your performances.
Consult chap. 3 for a detailed description of each pedal.
18
Phones outputs: there are two jack sockets for the connection of stereo headphones
underneath the keyboard, on the left of the piano.
With the jack connected, the piano’s internal amplification is automatically cut off.
Headphones with impedance of at least 50Ω should be used.
5
Concerto
User Manual
2.2 THE CONNECTION PANEL
1
2
3
4
5
NOTES
For further information about possible connections to the piano, refer to
chap. 15.
1. [AUX IN] jacks: you can use these jacks to connect the unamplified audio outputs of
sound generation modules, allowing you to use the piano’s internal amplification. If
you are using a mono source, connect only the [L(+R)] jack:
NOTES
The [AUX IN] jacks retransmit the signal to the auxiliary outputs [AUX
OUT].
It is not possible to regulate the volume and brilliance of the [AUX IN] jack
input signal using the [VOLUME] and [BRILLIANCE] controls on the front
panel. In addition, the reverb and effects sections have no effect on the
input signal.
2. [AUX OUT] jacks: unamplified audio outputs for connecting the piano to a mixer, an
amplification, recording system, etc. If you are using a mono system, connect only the
[L(+R)] jack: the right-hand and left-hand signals will now be added together and will
both be transmitted by this connector.
NOTES
To prevent internal damage to the instrument, the [AUX OUT] jacks must
never be reconnected to the [AUX IN] jacks, either directly or by means of
other devices.
The level of the output signal from the jacks [AUX OUT] is not controlled
by the [VOLUME] slider on the front panel. To regulate the signal volume,
use the controls provided in the connected audio system.
3. [TO HOST] connector: after setting the [HOST SELECT] selector on “MAC” or “PC”,
you can use this connector to connect your piano to a computer without having to use
a MIDI interface. For further information, refer to point 15.2.
6
Concerto
User Manual
4. [HOST SELECT] selector: selector for setting the port ([MIDI] or [TO HOST]) to be
used for transmitting and receiving MIDI data. For further information about this function,
refer to chap. 15.
5. [MIDI] connectors: these three connectors allow the piano to be connected to other
MIDI instruments. These connectors allow:
- [IN]: reception of MIDI data transmitted by other units.
- [OUT]: transmission of the MIDI data generated by the piano.
- [THRU]: transmission of the MIDI data received by the [IN] connector for cascade
connection with other units.
Set the [HOST SELECT] selector on “MIDI” to transmit and receive data by means of
the [MIDI] connectors.
6. [AC INPUT] connector: connect the power supply lead supplied with
the instrument to this connector.
6
3. THE PEDALS
The instrument has three pedals which allow you to add
expression to your performances. The effects and noises
generated by operating these as pedals are as lifelike as
possible, to provide optimal simulation of the sounds of a real
acoustic piano.
•
DAMPER Pedal: when this pedal is pressed, the notes
played have no release, so they will sound until the strings
cease to vibrate, like in a real piano. When the pedal is
released, the notes being played will stop sounding at once.
As well as this, with the pedal pressed and with the three acoustic piano voices (Grand
Piano, Classical Piano and Rock Piano) active, the instrument simulates the
“sympathetic” strings vibration and resonance, and the noise of the damper. Both these
effects can be regulated using functions F5.2 and F5.3 in the Function menu (point
14.6). The pedal operates as a continuous cotroller, so if it is only partially depressed,
the level of these effects will be reduced.
•
SOSTENUTO pedal: like the Damper, this pedal only annuls the release of the notes
pressed when the pedal itself is operated. Subsequent notes will sound in the normal
way. When the pedal is released, the notes which are still sounding because of the
Sustain will stop. This pedal is useful when you wish to sustain a chord (meaning that
the pedal should be depressed with the notes of the chord also depressed), and then
play subsequent notes in the normal way.
•
SOFT Pedal: The Soft pedal reduces the volume of the notes played when it is pressed.
In the J.Organ 1 and 2 voices, this pedal selects the speed (Slow-Fast) of the Rotary
effect. The F5.1 function (point 14.6) in the Function menu also allows you to enable
the Soft pedal to provide the sequencer Start-Stop commands.
7
Concerto
User Manual
4. DEMO SONGS
The piano has some demonstration tracks created in our studios to allow you to fully
appreciate the quality of your piano’s voices and sound.
NOTES
The sequencer cannot be activated while the demos are being played.
Performance of the demos does not trigger transmission of the relative
MIDI messages on the [MIDI OUT] and [TO HOST] ports.
Press the DEMO button in order to recall the demonstration pieces. The Led of the voices
will start flashing.
By pushing the button of the choosen voice the Led will stop flashing and will light.
The instrument will start to execute the musical piece.
During the execution of the demonstration piece, fl you press the button of another voice,
the musical piece will be interrupted and it will be executed the demonstration piece of the
last voice you have choosen. In order to stop the execution of the demonstration piece,
press button Start/Stop or the button of the voice. The led will start flashing again and you
have to push button Demo in order to stop this function.
To exit from the Demo mode definitively, press the [DEMO] button.
4.1 DEMONSTRATION TIMBRE OF PIANO ACOUSTIC EFFECTS
Pushing the button Grand Piano and at the same time the Demo button, it will be
possibile to listen to the typical noise of a Grand Piano included in the sounds of Grand
Piano, Classical and Rock Piano sothat they will be as much as possibile realistic.
To listen to these effects, press:
•
•
•
Keyboard keys A0 to B3: sympathetic vibration of the strings
Keyboard keys C4 to C8: hammer noise
DAMPER Pedal: noise of the string damper
To return to the normal operating mode, press any voice button except [GRAND PIANO].
8
Concerto
User Manual
5. PLAYING THE PIANO’S VOICES
5.1 SWITCHING ON THE INSTRUMENT
After connecting the [AC INPUT] connector to a power socket, switch the piano on using
the [POWER] switch on the right-hand side of the front panel.
When the instrument is switched on, the setup present before its last switch-off will be
recalled.
When the instrument is switched on for the first time or a Factory Reset has been performed,
the Grand Piano voice will be activated.
As well as this, the display will show:
showing the current metronome tempo, in this case 120 bpm (Beats Per Minute). To start
the metronome, press the [METRONOME] button.
Further information about the metronome is provided in chap. 12.
5.2 SELECTING THE VOICES
The instrument is now ready to be played. The keyboard features a dynamic response
allowing you to control the volume and timbre of the voice you are playing.
You can also adjust this dynamic response using the [KEY TOUCH] buttons (for more
information, see chap. 8).
NOTE
As well as being regulated by the dynamic curve selected using the [KEY
TOUCH] buttons, the keyboard’s dynamic response also depends on the
type of voice selected.
In addition, the Harpsichord, Jazz Organ 1 and 2 and Church Organ voices
have fixed touch, reflecting the characteristics of the original instrument.
The [VOLUME] and [BRILLIANCE] sliders on the left of the panel
allow you to control the piano’s general volume and the brilliance
of its sound.
9
Concerto
User Manual
To change the voice you wish to use, simply press the button of the voice of your choice:
The LED of the new voice will come on and you can play the new instrument.
In addition, the [REVERB], [EFFECT] and [KEY TOUCH] buttons
allow you to select the type of reverb, effect and touch you require.
New settings are automatically memorised together with the current voice, so whenever a
new voice is recalled the effects and touch previously used for that voice will be activated.
6. THE REVERBS
The instrument has four reverb effects allowing optimal simulation of the way
sound is diffused and propagated in an enclosed environment.
To select the type of reverb you require, press the [REVERB] button on the
right of the display. The LEDs above the button will show that it is activated.
If all the LEDs are off, no type of reverb is selected. This option is provided for rooms
which already have good reverberation of their own.
These are the types of reverb available:
•
•
•
•
ROOM: this effect simulates a reverb of an average-size room, such as a performance
room.
HALL 1: reverb typical of a concert hall, deeper than the Room.
HALL 2: simulates the strong reverberation of a big concert hall, such as a theatre.
STAGE: select this effect if you require a reverb of the type that occurs on a stage.
10
Concerto
User Manual
6.1 REGULATING THE REVERB DEPTH
To regulate the reverb depth, meaning the time for which the sound reverberates in the
room, select your chosen effect and keep the [REVERB] button pressed for a few moments.
The display will show the value currently set:
Use the [VALUE] buttons to set the value, bearing in mind that 0 means no reverb and 20
gives the maximum reverb depth.
Pressing the two [VALUE] buttons simultaneously recalls the default value for the active
voice or effect.
Press the [REVERB] button again to confirm the value.
Whilst adjusting the reverb depth, it is possibile to select other voices or other reverbs.
The display will show automatically the new value. In case the selected voice does not
contain any reverb effect, the display will show:
meaning “No Reverb”.
NOTES
The reverb depth may be set with different values depending on the mode
(Single, Dual or Split) selected. Therefore, Room can be set with depth 8
when playing in Single mode, or at 12 with the Dual mode active.
When setting the reverb, always remember that the value is memorised
for the effect and voice currently active. This means that a reverb depth of
15 can be set for the Room effect when applied to Grand Piano, with 7 set
for the same effect when used with E.Piano 1.
11
Concerto
User Manual
7. THE EFFECTS
As well as the reverb, you can also enhance your piano’s sound with one of the
four effects provided in the Effect section.
This section contains three classic modulation effects and a Delay, more often
called an echo.
To select the type of effect you require, simply press the [EFFECT] button.
The LEDs above the button will identify the active effect; if all four LEDs are off,
no effect is selected.
These are the effects available:
•
•
•
•
CHORUS: a modulation effect which adds depth and a sense of space to the sound.
FLANGER: a modulation effect similar to the resonance obtained inside a tunnel.
ROTARY: an effect which simulates a rotary diffuser.
DELAY: typical echo effect
SELECTING THE SPEED OF THE ROTARY EFFECT
As already mentioned, the Rotary effect simulates the classical rotary
speaker system which became famous with the advent of the
electromagnetic organ.
This system had two speakers which could be turned at two different
speeds, Slow or Fast. On your piano, the speeds of the Rotary effect can
be controlled using the Soft pedal.
7.1 REGULATING THE EFFECT
Keeping the [EFFECT] button pressed for a few moments allows you to regulate the level
of the effect currently selected. For the Rotary effect, you can set the two rotary speaker
rotation speeds.
Use the [VALUE] buttons to make the setting, bearing in mind that 0 means no effect and
20 gives the maximum value of the parameter associated to the selected effect.
Pressing the two [VALUE] buttons simultaneously recalls the default value for the active
voice or effect.
Press the [EFFECT] button again to confirm the value.
Whilst adjusting the effect, it is possibile to select other voices or other effects. The display
will show automatically the new value.
In case the selected voice does not contain any effect, the display will show the message
described on the next page.
12
Concerto
User Manual
meaning “No Effect”.
NOTES
The effects may be set with different values depending on the mode (Single,
Dual or Split) selected. Therefore, Chorus can be set with depth 8 when
playing in Single mode, or at 12 with the Dual mode active.
When setting the reverb, always remember that the value is memorised
for the effect and voice currently active. This means that an Effect Depth
of 10 can be set when the Chorus is applied to the Rock Piano, with 16 set
for the same effect when used with E.Piano 2.
As already explained, for the Rotary effect you can set the rotation speeds
of the simulated rotary speaker system. There is a single setting which
modifies both speeds (fast and slow).
8. REGULATING THE KEYBOARD TOUCH
The [KEY TOUCH] buttons allow you to select three different dynamic curves or
a fixed dynamic response, whose level can be regulated, in order to adapt the
keyboard effectively to the different styles of music and your own personal taste.
These are the types of dynamic provided:
•
•
•
•
FIXED: fixed adjustable dynamic (see point 8.1) meaning that the volume
and character of the sound remain unchanged, regardless of the pressure applied to
the keys.
SOFT: “light” curve with which it is easy to reach high dynamic values.
MEDIUM: a medium or straight curve; the dynamic levels are proportional to the pressure
applied to the keys.
HARD: a hard curve, requiring a lot of effort to obtain the highest sound levels.
NOTES
The level of the “Fixed” touch can be set independently for each voice.
In the sounds with fixed dynamic like Harpsichord, Jazz Organ 1 and 2,
Church Organ, the adjustment of this value does not affect the sound
character.
13
Concerto
User Manual
8.1 SETTING THE FIXED TOUCH LEVEL
To regulate the sound output level when the “Fixed” mode is selected, keep the [KEY
TOUCH] button pressed for a few moments, after which the display will show the latest
value set.
To make the setting, use the VALUE buttons. The range of values is from 1 to 127 (MIDI
dynamic). Pressing the two [VALUE] buttons simultaneously recalls the default value (64).
Press the [EFFECT] button again to confirm the value.
Whilst adjusting the fixed dynamic, it is possibile to select other voices or other dynamic
type. The display will show automatically the new value. In case the selected voice does
not contain the fixed dynamic, the display will show:
meaning “No Fixed”.
9. TRANSPOSE FUNCTION
The transposition function allows you to change the keyboard’s pitch in intervals of one
semitone to make it easier to play pieces in the most difficult keys and/or to adapt to the
preferred key of a singer or another musician.
To check any transposition set, keep the [TRANSPOSE] button pressed for a few moments:
Use the [VALUE] buttons if you wish to change the value. Transposition can be set in a
range of +/- 12 semitones (+/- one octave). Here again, pressing the two [VALUE] buttons
simultaneously restores the default value (+1 semitone). Press the [TRANSPOSE] button
again to confirm the new value.
After setting the transposition required, press [TRANSPOSE] to activate it: the LED of the
button will illuminate, informing you that the pitch of the keyboard has been changed.
NOTES
With transposition active, notes below A0 and above C8 will sound one
octave higher and one octave lower respectively.
The notes transmitted on the [MIDI OUT] port will be unaffected by the
transposition.
14
Concerto
User Manual
10. THE DUAL MODE
The Dual mode allows you to play two voices simultaneously throughout the extension of
the keyboard.
To activate the Dual mode, press the buttons of the two voices you wish to play,
simultaneously. When the LEDs of the two buttons are on, both the voices are enabled.
To return to playing just one voice, press the button of the voice of your choice:
The [BALANCE] slider allows you to regulate the volume balance between the two voices;
the 1ST voice is the one with the lower number, following the numbering provided in the
chart. The voice with the higher number will be set as the 2ND voice.
EXAMPLE OF 1ST AND 2ND VOICES
If the Rock Piano and Acoustic Guitar voices are played in Dual mode,
Rock Piano will be the 1ST voice and Acoustic Guitar the 2ND. If the
Acoustic Guitar voice is played together with Strings 1, A.Guitar will be the
1ST voice, and Strings 1 the 2ND.
In Dual mode the reverb set for the 1ST voice will also be assigned to the 2ND, while the
effects and types of keyboard touch are unchanged (so the voices can be played with two
different effects and dynamics).
The [REVERB], [EFFECT] and [KEY TOUCH] LEDs indicate the reverb, effect and touch
set for the 1ST voice, as do the Depth and fixed dynamic values which can be displayed
by pressing these buttons.
However, you can also adjust the Effect Depth of the 2ND voice by recalling the function
F3.5 in the function menu (point 14.4).
You can also use the Functions menu (chap. 14) to adjust the pitch in one hundredths of
a semitone of the 1ST voice in relation to the 2ND voice (function F3.1), the transposition
of the two voices in octaves (F3.2 and F3.3), and the effects Depth (F3.4 and F3.5) when
the Dual mode is active.
15
Concerto
User Manual
11. THE SPLIT MODE
Another of the instrument’s operating modes is the Split mode. In this mode, two voices
can be played in two separate areas of the keyboard, divided by a key called the “split
point”.
The voice on the right of the split point is the 1ST voice and the voice on the left (including
the split point itself) is the 2ND.
To activate the Split mode simply press the [SPLIT] key. The first time the instrument is
switched on or after a Factory Reset, the Grand Piano voice will be the 1ST voice, while
the C.Bass voice will become the 2ND.
Subsequent voice settings are automatically memorised, so whenever the Split voice is
recalled the voices set previously will be activated.
To make the status clear at once, the LED of the 1ST voice is constantly on while the LED
of the 2ND voice flashes.
You can use the [BALANCE] slider to adjust the balance between the volumes of the two
voices.
If you wish to change instrument, just pressing a voice button sets this voice as
the 1ST voice. Keep the [SPLIT] key pressed and select a voice to set this as the
2ND voice.
As in Dual mode, in Split mode the reverb set for the 1ST voice will also be assigned to the
2ND, while the effects and types of keyboard touch are unchanged (so the voices can be
played with two different effects and dynamics).
The [REVERB], [EFFECT] and [KEY TOUCH] LEDs indicate the reverb, effect and touch
set for the 1ST voice, as do the Depth and fixed dynamic values which can be displayed
by keeping these buttons pressed.
However, you can also adjust the Effect Depth of the 2ND voice by recalling the function
F4.5 in the function menu (point 14.5).
You can also use the Functions menu (chap. 14) to set the split point (function F4.1), the
transposition of the two voices in octaves (F4.2 and F4.3) and the effects Depth (F4.4 and
F4.5) when the Split mode is active.
16
Concerto
User Manual
11.1 SETTING THE SPLIT POINT
As described in the introductory notes to this section, the split point is a keyboard key
which separates the 1ST voice zone from the 2ND voice zone.
The split point is always included in the 2ND voice, and key F#2 is always set as default
(i.e. after each Master Reset).
To change it, keep the [SPLIT] button pressed for a few moments; the display will show
the keyboard key which is now acting as split point:
To set a new split point, simply press the keyboard key of your choice.
The [VALUE] buttons can also be used.
NOTE ON DISPLAY OF THE SPLIT POINT
“Diesis” and “bemolle” notes are displayed as follows:
F#2
Bb1
17
Concerto
User Manual
12. THE METRONOME
The metronome can provide you with excellent assistance in keeping the beat during
performances, and can also be used for recordings with the sequencer (described in
chap. 13).
To start the metronome, press the [METRONOME] button on the left of the display.
The metronome will start to sound, and an indicator on the display will move in synchrony
with the metronome tempo and the time signature set.
Press the [METRONOME] button again to stop the metronome.
To modify the tempo, simply press the [TEMPO/FUNCTION] buttons. The possible values
range from 32 to 280 bpm (Beats Per Minute). Pressing the two buttons simultaneously
recalls the default value (120).
12.1 SETTING THE TIME SIGNATURE
To set the time signature you wish the metronome to use, keep the [METRONOME] button
pressed for a few minutes: the display will show its current value.
Use the [VALUE] buttons to select the time signature of your choice.
The possible selections are: 2/4, 3/4, 4/4, 5/4, 6/4, 7/4, 3/8, 6/8, 7/8, 9/8, 12/8.
Press the [VALUE] buttons simultaneously again to set the default value (4/4).
Otherwise, press [METRONOME] to save the new time signature and return to display of
the tempo.
18
Concerto
User Manual
13. THE SEQUENCER
The instrument has a two-track sequencer allowing the user to record and play back
musical performances. The fact that two tracks are provided means that one can be
recorded while another is playing, while a total of six voices are available simultaneously
during playback (two for each track, in addition to the voices played on the keyboard and/
or by the [MIDI IN] port), etc.
Using the sequencer can be useful for practice, allowing you to improve your performance
(you can play a solo part while the sequence is playing the rhythm accompaniment), or
just for fun.
Before giving a detailed description of the sequencer’s functions, it is important to make
the differences between a song and a track clear. A song is the overall recording of both
tracks, while each individual track may be a session of one instrument, or a part in a song
(chorus, solo, etc.).
For example you can record the bass part in one track and the piano in the other. As well
as this, the sequencer also allows you to change voices during recording, permitting
multiple use of tracks.
The following will be recorded in the song:
•
•
•
Metronome tempo
Time signature
The reverb type and depth
The following will be recorded in the tracks:
•
•
•
•
•
•
•
•
The
The
The
The
The
The
The
The
notes played
voices
voice selection
pedals actions
Dual and Split modes
effect type and depth
balance between the voices ([BALANCE] slider)
Function menu parameters relating to the mode (Dual or Split) activated
The panel buttons used to control the sequencer are the following:
3
4
1
2
1. REC: activates and deactivates the recorder
2. START/STOP: starts / stops recording / playback
3. TRACK 1: selects track 1
4. TRACK 2: selects track 2
19
Concerto
User Manual
13.1 RECORDING
To start a recording session, press the [REC] button to activate the sequencer’s Record
mode. The LEDs of the [TRACK 1] and [TRACK 2] keys will indicate the status of the
tracks, as follows:
•
•
•
•
LED off: track not active for recording
Red LED flashing: track contains data, ready for recording
Red LED constantly on: track empty, ready for recording
Green LED: track contains data, ready for playback
You can use the [TRACK 1] and/or [TRACK 2] buttons to set the mode of your choice.
If one track (e.g. track 1) already contains data, it will be possible to record track 2 while
track 1 is playing. In this case, set the green LED of track 1 and the red LED of track 2 on.
However, it is possible not to play one track while another is being recorded, by setting the
relative LED off.
It is also possible to just delete all the data contained in a track (see point 13.3).
NOTE
If a recording is made on a track which contains data (red LED flashing),
the original data will be irretrievably lost.
If you wish to use the metronome, press the [METRONOME] button; you can also modify
the relative settings (Tempo and Time Signature) as described in chap. 12.
However, bear in mind that these data are saved in the song and not in the track, so if the
values are modified the new settings will be applied even to a track recorded earlier with a
different Tempo and Time Signature.
Now set the panel (voices, effects, mode and Balance) to your requirements and set the
track status following the rules explained above.
The instrument is now ready to record. To recording, press the [START / STOP] button or
any keyboard key. The display will show the number of the bar reached and the beat,
synchronised with the metronome tempo and time signature.
NOTE
The downbeat is always displayed, even with the metronome switched off.
20
Concerto
User Manual
During recording, it will be possible to change the voices and the mode (Single, Dual or
Split) and control the [BALANCE] slider. All the information will be recorded in the track.
To stop the recording, press the [START / STOP] or [REC] button: the system will
automatically save the data in its internal memory, displaying the following video page on
the display for the time needed to complete the operation:
13.2 PLAYBACK
When a recording is completed, the sequencer will switch out of Record mode and the
LED of the recorded track will change to green, indicating that it now contains data.
To play back the recording, press the [START / STOP]. The display will show the number
of the bar reached and the downbeat, synchronised with the metronome tempo and time
signature.
Pressing the same button again will stop the playback; the LED of the track(s) remains on,
indicating that the sequencer is still in Playback mode.
To exclude a track from the playback, press the relative [TRACK] button; press the same
button again to reactivate playback of the track.
If the LEDs of both tracks are off, this means that the sequencer has been deactivated
and pressing the [START / STOP] button will not have any effect.
To regulate the playback volume, use the [VOLUME] slider. You can use the [METRONOME]
button to turn the metronome on and off.
Use the [TEMPO/FUNCTION] buttons to regulate the metronome tempo to be used to
play the tracks.
During playback of one or two tracks, the instrument’s keyboard can be played with the
settings (voices, effects, mode, etc.) currently on the panel. In fact, playing back tracks
does not affect the panel settings. This means that you can play with a setup different
from that featured in the tracks.
21
Concerto
User Manual
Any changes made on the panel will not affect the playback; except of [BRILLIANCE]
slider, [REVERB] button and the speed selections of Rotary effect.
Note that MIDI data can also be received during playback.
NOTES
If you wish to record tracks on a remote MIDI recording system connected
to the [MIDI OUT] port, use the Song Data Dump function described in
point 14.7.
The track data are not transmitted on the [MIDI OUT] port during playback.
The Reverb and Brilliance setted on the front panel have effect also on the
playback of the tracks.
You can use the Soft pedal to give the Start – Stop commands to the
sequencer by setting the Soft Pedal Mode function described in point 14.6.
The sequencer cannot be activated from the Demo mode or the Function
menu.
Carrying out a Master Reset does not delete the sequencer data.
SYNCHRONIZED START OF PLAYBACK
Pushing the button of the track you wish to reproduce together with the Start/Stop button,
you can start the playback when pushing a key. In this way the track will be exectuted as
soon as you start playing on the keyboard (not pushing Start/Stop) granting a perfect
synchronization between your playing and the track.
NOTA
In order to set a synchronized start of a track it is necessary that the
concerning button is off.
13.3 DELETING A TRACK
To delete the data from a track, recall Record mode by pressing [REC], select the track
you wish to wipe using the [TRACK 1] and [TRACK 2] buttons (the relative red LED must
flash) and press the [START – STOP] button twice.
22
Concerto
User Manual
14. THE FUNCTION MENU
Pressing the [FUNCTION] button allows you to set a series of the piano’s internal functions
to suit your own needs.
The functions are shown on the display as a series of numbers. However, an acronym is
always available to inform you which function is currently selected: to display the acronym,
press the [DEMO / ENTER] button for a few moments while the function’s number is on
the screen. The following is the list of the functions available:
F1
F2
F3
F3.1
F3.2
F3.3
F3.4
F3.5
F3.6
F4
F4.1
F4.2
F4.3
F4.4
F4.5
F4.6
F5
F5.1
F5.2
F5.3
F6
F6.1
F6.2
F6.3
F6.4
F6.5
F6.6
F6.7
F6.8
F6.9
F7
Tuning
Scale
Dual Mode functions (only in Dual mode)
Detune
1ST Voice Octave Shift
2ND Voice Octave Shift
1ST Voice Effect Depth
2ND Voice Effect Depth
Dual functions reset
Split Mode functions (only in Split mode)
Split Point
1ST Voice Octave Shift
2ND Voice Octave Shift
1ST Voice Effect Depth
2ND Voice Effect Depth
Split functions reset
Pedal functions
Soft pedal Mode
Strings Resonance Level
Damper Effect Amount
MIDI functions
Transmit Channel
Receive Channel
Local Control On/Off
Program Change On/Off
Control Change On/Off
MIDI Transmit Transpose
Song Data Dump
Panel Data Dump
MIDI functions reset
Firmware release
NOTE
It is not possible to recall the Function menu from the Demo mode or from
the metronome, transposition and effects setting video pages.
23
Concerto
User Manual
14.1 SELECTING A FUNCTION
After the [FUNCTION] button is pressed, the LED will come on to confirm activation of the
menu, and the display will show the last function selected:
To check its contents, press [DEMO/ENTER]:
to select other functions (F2, F3, F4, F5, F6 and F7) use the [TEMPO/FUNCTION]
buttons.
If a group of functions has been selected (F3, F4, F5 and F6), after [DEMO/ENTER] is
pressed the first subfunction will be displayed, for example:
Now, to select the other subfunctions (in this case F3.2, F3.3, F3.4, F3.5 and F3.6) use the
[VALUE] buttons.
Press [DEMO/ENTER] to display the contents of the selected subfunction and the [VALUE]
buttons to set its value.
Use [DEMO/ENTER] again to save the change and return to display of the previous video
page (in this example, F3.1), or press [FUNCTION] to exit the Function menu.
24
Concerto
User Manual
NOTE
The subfunctions of the Dual and Split modes (F3 and F4) can only be
selected if their respective modes are active. In Split mode, for example,
the subfunctions of the Dual mode cannot be recalled. In this case, if
function F3 is selected the display will show:
If the functions are accessible (i.e. Dual mode is active), the display will
show:
FUNCTION SELECTION EXAMPLE
The operator wishes to set the Dual mode 1st Voice Octave Shift (F3.2) at -1.
25
Concerto
User Manual
14.2 TUNING - F1
The F1 function in the Function menu allows you to adjust the instrument’s overall tuning.
Press [DEMO/ENTER] after locating the F1 video page:
As well all know, the standard tuning is A=440 Hz. Each adjustment step changes this
value by 0.2 Hz, covering a range of values from 427 Hz to 453 Hz.
To return to the standard tuning, press the [VALUE] buttons simultaneously.
Then press [DEMO/ENTER] to save the new value and return to display of the previous
video page.
14.3 SCALE - F2
The F2 function allows you to select a temperament different from the standard equal
temperament, when playing pieces from different specific historical periods.
The temperaments available are:
Use the [VALUE] buttons to make the selection and then press [DEMO/ENTER] to save
the new setting and return to display of the previous video page.
During display of the temperaments, pressing the two [VALUE] buttons simultaneously
restores the default condition (Equal temperament).
26
Concerto
User Manual
14.4 DUAL MODE FUNCTIONS - F3
The Function menu contains a series of settings which allow you to customise the instrument
when playing two voices simultaneously.
As explained in point 14.1, these functions can only be selected if the Dual mode is active.
After displaying the video page:
using the [TEMPO/FUNCTION] buttons, press [DEMO/ENTER]; the display will show the
first function of the Dual mode. Use the [VALUE] buttons to select the function you require
and [DEMO/ENTER] to display its contents.
NOTE
The settings made in the functions described below are only effective when
the voices are played in Dual mode. For example, if the tuning of the first
voice is changed, it will only play with the new pitch in Dual mode; when it
is played on its own the original tuning will be used, and in Split mode the
pitch will depend on the settings of the Split functions.
During display of the Dual mode values or functions, you can change the active voices
without exiting the Function menu. However, in this case the display will return to message
“F3E” and the Effect Depth values (F3.4 and F3.5) will be updated in accordance with the
active voices and effects.
DETUNE – F3.1
The Detune value allows you to modify the pitch of the first voice in relation to the second,
to give the sound more space and body. The pitch can be modified in a range from –10 to
+10 hundredths of a semitone; to do this, use the [VALUE] buttons.
To restore the default value (0), press the [VALUE] buttons simultaneously.
27
Concerto
User Manual
1ST VOICE OCTAVE SHIFT – F3.2
2ND VOICE OCTAVE SHIFT – F3.3
The F3.2 and F3.3 functions allow you to lower or raise the notes of the first and second
voices respectively by one octave, when the voices are played in Dual mode.
Use the [VALUE] buttons to set the value required.
To restore the default value (0), press the [VALUE] buttons simultaneously.
NOTE
These parameters doesn’t modify the MIDI notes transmitted to the [MIDI
OUT].
1ST VOICE EFFECT DEPTH – F3.4
2ND VOICE EFFECT DEPTH – F3.5
The Effect Depth functions allow you to regulate the depth of the effect ([EFFECT] LED)
currently active. The value which can be set is not fixed; it varies depending on the voice
and effect selected.
This means that an Effect Depth of 10 can be set when the Chorus is applied to the Grand
Piano, with 14 set for the same effect when used with E.Piano 1.
To adjust the values, use the [VALUE] buttons. Press the same values simultaneously to
restore the default values (which vary depending on the voice and effect selected).
NOTA
If the Effect Depth function is recalled with no effect currently active for the
voice selected, the display will show:
i.e. “no Effect”
28
Concerto
User Manual
RESET – F3.6
Recalling the F3.6 function will allow restoration of the default (reset) values of all the Dual
mode functions, as follows:
Detune: 0
1st Voice Octave Shift: 0
2nd Voice Octave Shift: 0
1st Voice Effect Depth: depends on the voice and the effect
2nd Voice Effect Depth: depends on the voice and the effect
After you press [DEMO/ENTER] from video page “F3.6” the display will show:
To perform the reset, select “Yes” using the [VALUE ] button and press [DEMO/ENTER].
14.5 SPLIT MODE FUNCTIONS - F4
As for the Dual mode, the Function menu allows you to set a number of parameters
dedicated to the Split mode. As explained in point 14.1, these functions can only be selected
if the Split mode is active.
After displaying the video page:
press [DEMO / ENTER]; the display will show the first function of the Split mode. Use the
[VALUE] buttons to select the function you require and [DEMO/ENTER] to display its
contents.
NOTE
The settings made in the functions described below are only effective when
the voices are played in Split mode. For example, if the tuning of the first
voice is changed, it will only play with the new pitch in Split mode; when it
is played on its own the original tuning will be used, and in Dual mode the
pitch will depend on the settings of the Dual functions.
29
Concerto
User Manual
During display of the Split mode values or functions, you can change the active voices
without exiting the Function menu. In this case the Effect Depth values (F4.4 and F4.5) will
be updated in accordance with the active voices and effects.
SPLIT POINT – F4.1
Function F4.1 allows you to set the split point to be used to divide the 1ST voice section of
the keyboard from the 2ND voice section.
The setting is exactly the same as the one which can be made by pressing the [SPLIT]
button (see point 11.1).
Press [DEMO/ENTER] after selecting “F4.1” on the display to show the key which is currently
the split point:
You can use the [VALUE] buttons or the keyboard key itself to set a new split point.
Press the same buttons simultaneously to restore the default split point (F#2).
1ST VOICE OCTAVE SHIFT – F4.2
2ND VOICE OCTAVE SHIFT – F4.3
The F4.2 and F4.3 functions allow you to lower or raise the notes of the first and second
voices respectively by one octave, when the voices are played in Split mode.
Use the [VALUE] buttons to set the value required.
To restore the default value (0), press the [VALUE] buttons simultaneously.
NOTA
These parameters doesn’t modify the MIDI notes transmitted to the [MIDI
OUT].
30
Concerto
User Manual
1ST VOICE EFFECT DEPTH – F4.4
2ND VOICE EFFECT DEPTH – F4.5
The Effect Depth functions allow you to regulate the depth of the effect ([EFFECT] LED)
currently active. The value which can be set is not fixed; it varies depending on the voice
and effect selected.
This means that an Effect Depth of 10 can be set when the Chorus is applied to the Grand
Piano, with 14 set for the same effect when used with E.Piano 1. To adjust the values, use
the [VALUE] buttons.
Press the same values simultaneously to restore the default values (which vary depending
on the voice and effect selected).
NOTA
If the Effect Depth function is recalled with no effect currently active for the
voice selected, the display will show:
i.e. “no Effect”.
RESET – F4.6
Recalling the F4.6 function will allow restoration of the default (reset) values of all the Split
mode functions, as follows:
Split Key: F#2
1st Voice Octave Shift: 0
2nd Voice Octave Shift: 0
1st Voice Effect Depth: depends on the voice and the effect
2nd Voice Effect Depth: depends on the voice and the effect
After you press [DEMO/ENTER] from video page “F4.6” the display will show:
To perform the reset, select “Yes” using the [VALUE ] button and press [DEMO/ENTER].
31
Concerto
User Manual
14.6 PEDAL FUNCTIONS - F5
The F5 group of functions contains the settings for the Soft pedal mode and the Damper
pedal effects. As for the other functions, use the [TEMPO / FUNCTION] buttons to display:
Then press [DEMO/ENTER] and the [VALUE] buttons to select the function you require.
Press [DEMO/ENTER] again to display its contents.
SOFT PEDAL MODE – F5.1
Using this function, you can decide whether you wish to use the Soft pedal with its main
function (slight reduction in volume) or to simulate the [START-STOP] key on the front
panel – sequencer section.
To make the setting, use the VALUE buttons. Press the same buttons simultaneously to
restore the default condition (Soft).
STRINGS RESONANCE LEVEL – F5.2
As described in chap. 4 which discusses the pedals, the piano is able to simulate the
sympathetic vibration of the strings when the Damper pedal is pressed, just as in a real
acoustic piano.
You can use function F5.2 to regulate the amount of this effect.
The possible values range from 0 (no effect) to 20 (maximum effect volume).
Pressing the [VALUE] buttons simultaneously restores the default value (11).
DAMPER EFFECT AMOUNT – F5.3
Another effect which is simulated when the Damper pedal is pressed is the typical sound
of the damper being raised.
Function F5.3 allows you to set the level of this sound in a range of values from 0 (no
effect) to 20 (maximum effect volume).
To restore the default value (11), press the [VALUE] buttons simultaneously.
32
Concerto
User Manual
14.7 MIDI FUNCTIONS - F6
The F6 functions allow you to set up the instrument’s MIDI interface to your requirements.
For a detailed description of the connections and the MIDI messages transmitted and
received by the piano, consult chap. 15 and the “MIDI Implementation Chart”.
The end of this section provides a brief description of the MIDI protocol.
To set the MIDI functions, use the [TEMPO / FUNCTION] buttons to bring the following
video page onto the display:
Now press [DEMO/ENTER] and the [VALUE] buttons to select the functions described
below.
TRANSMIT CHANNEL – F6.1
RECEIVE CHANNEL – F6.2
The first two MIDI functions allow you to set the transmission and reception channels.
To access setting of the channels, press [DEMO/ENTER] after bringing “F6.1” (transmission
channel) or “F6.2” (reception channel) onto the display. Using the [VALUE] buttons, you
can select:
•
•
1/16: channel for transmitting and receiving MIDI data.
OFF: MIDI messages are not transmitted / received.
Press the [VALUE] keys simultaneously to restore the default condition (channel 1 for
both functions).
INFORMATION ABOUT THE USE OF MIDI CHANNELS
The number of channels on which the instrument is able to transmit MIDI
data depends on the mode (Single, Dual or Split) selected.
In Single mode the instrument only transmits on the channel set in function
F6.1.
In Dual and Split mode, the instrument controls two channels
simultaneously. The 1ST voice transmits on the channel set with function
F6.1, while the 2ND voice transmits on the channel immediately after it
(transmission channel +1).
For example, if F6.1 is set on 1, in Dual and Split mode the 2ND voice
transmits on channel 2.
With regard to reception, the instrument always controls 2 channels
simultaneously, regardless of the mode selected.
The channels are the one set in function F6.2 and the one immediately
after it (reception channel + 1).
33
Concerto
User Manual
LOCAL CONTROL ON/OFF – F6.3
The Local Control function allows you to select whether notes played on the piano keyboard
are to be played using its own sound generation (Local On) or whether the data are only to
be transmitted on the [MIDI OUT] or [TO HOST] port (Local Off). In Local Off mode, the
instrument still receives the data reaching the [MIDI IN] port.
To set up this function, select “F6.3” on the display and press [DEMO/ENTER]. The current
condition will be displayed, as follows:
•
•
ON: Local On, the instrument plays using its own sound generation system.
OFF: Local Off, the instrument only transmits the data on the [MIDI OUT] or [TO HOST]
port.
To select the mode required use the [VALUE] buttons. Press the same buttons
simultaneously to restore the default condition (Local On).
PROGRAM CHANGE ON/OFF – F6.4
This function allows you to enable or disable the transmission / reception of Program
Change messages.
When you select a voice on the channel, the instrument automatically transmits a Program
Change in order to set the same type of voice on any connected instrument.
Similarly, when a Program Change is received on the [MIDI IN] or [TO HOST] ports, the
instrument will automatically activate the voice associated to the PG received.
If this function is not necessary, it can simply be deactivated. To do this, select “F6.4” on
the display and press [DEMO/ENTER].
The display will show the condition currently active. Use the [VALUE] buttons to make the
selection. The default condition ([VALUE] buttons pressed simultaneously) is On.
NOTE
For information about the association between Program Changes and
voices on the panel, consult the “MIDI Implementation Chart” at the back
of the manual.
34
Concerto
User Manual
CONTROL CHANGE ON/OFF – F6.5
This function allows you to enable or disable the transmission and reception of Control
Change messages.
When you modify the panel controls, such as the pedals or the [BALANCE] slider, the
instrument automatically transmits the relative Control Change to set the receiver instrument
in the same way. In reception mode, the instrument also modifies its parameters when it
receives CC messages.
To set up this function, select “F6.5” on the display and press [DEMO/ENTER].
Use the [VALUE] buttons to make the setting. The default condition ([VALUE] buttons
pressed simultaneously) is On.
NOTA
For information about the association between Control Changes and
controls on the panel, consult the “MIDI Implementation Chart” at the back
of the manual.
MIDI TRANSMIT TRANSPOSE – F6.6
This function allows you to transpose the MIDI note data in relation to the notes played on
the piano keyboard, within a range of +/- 12 semitones (+/- one octave). Using this setting
you can therefore play the piano and the instrument connected by MIDI in two different
keys, obtaining a complete range of pitch intervals.
After selecting “F6.6” on the display, press [DEMO/ENTER]. The system will display the
current MIDI transposition value; use the [VALUE] buttons to vary it, bearing in mind that
settings are made in steps of one semitone.
To restore the default value (0), press the [VALUE] buttons simultaneously.
NOTE
If a MIDI Transmit Transpose value different from 0 is set, this does not
change the pitch of the piano itself.
35
Concerto
User Manual
SONG DATA DUMP – F6.7
The Song Data Dump function allows you to transmit all the data contained in the
instrument’s internal sequencer to the [MIDI OUT] or [TO HOST] port. After connecting a
sequencer to [MIDI OUT] or a computer to [TO HOST], you can make back-up copies of
the songs on the internal sequencer, preventing accidental deletions.
To start the Data Dump select function F6.7 and press [DEMO/ENTER]. Using the [VALUE]
buttons, you can select:
•
•
•
•
NO: The sequencer Data Dump is not transmitted.
TR1: only the data relating to track 1 are transmitted.
TR2: only the data relating to track 2 are transmitted.
ALL: the data of both tracks are transmitted.
After selecting the option you require, press [DEMO/ENTER] to start the transmission of
data; the display will show:
and, once the operation is complete:
PANEL DATA DUMP – F6.8
The Panel Data Dump function allows you to transmit the current panel setup on the [MIDI
OUT] or [TO HOST] port.
This function is particularly useful when you are saving your performances on a remote
sequencer. If you set the panel Data Dump at the start of the track (on the remote
sequencer), when you retransmit the whole track to the piano the instrument will be set up
exactly as it was when you performed the song.
To start the transmission of data, recall function F6.7 onto the display and press [DEMO/
ENTER].
Then select “Yes” using the [VALUE ] button and press [DEMO/ENTER] again; the
display will show the message illustred on the next page.
36
Concerto
User Manual
and, at the end of the Data Dump,
NOTES
Consult chap. 15 for the connections to be made for Song Data Dump and
Panel Data dump.
The data stored using the Song Data dump and Panel Data dump functions
can only be reloaded into instrument.
LOADING SONG AND/OR PANEL DATA DUMPS INTO THE PIANO
To reload the MIDI data recorded on a remote sequencer / computer using the Data Dump
procedures described earlier into the piano, first make the connections as described in
chap. 15. After this, simply transmit the data using the sequencer / computer (normally, a
PLAY key is provided on both hardware and software sequencers).
On receipt of the data, the piano will automatically recall the loading procedure, showing
the percentage of the data received on the display. Once the operation is complete, the
display will show “End” for a moment.
NOTE
During reception of MIDI data, it is best not to switch off the instrument or
the sequencer/computer, or interrupt the operation, until it has been
completed.
RESET – F6.9
Function F6.9 allows you to reset all the MIDI parameters with the default values, which
are as follows:
Transmit Channel:1
Receive Channel:1
Local Control ON
Program Change ON
Control Change ON
MIDI Transmit Transpose: 0
37
Concerto
User Manual
A SHORT INTRODUCTION TO MIDI
The MIDI interface (Musical Instrument Digital Interface) allows instruments of different
makes and kinds to communicate with each other, using this very specific protocol of
codes.
This allows the creation of systems of MIDI instruments, offering much greater versatility
and control than is possible with single instruments.
To make this communication possible, all MIDI instruments have two or three 5-pin DIN
connectors called:
- MIDI IN:
- MIDI OUT:
- MIDI THRU:
The connector through which the instrument receives the MIDI data
transmitted by other units.
The connector through which the instrument sends the MIDI data it
has generated to other units.
This connector, used for connecting several units in series, transmits
the MIDI data exactly as they are received by the respective MIDI IN
port.
Most instruments equipped with MIDI interface transmit MIDI messages which specify
which note has been played and with what dynamic by means of the MIDI OUT connector.
If this connector is connected to the MIDI IN connector of another MIDI instrument, such
as an expander, the second instrument will respond exactly to the notes played on the
transmitter instrument. This effectively enables you to play two instruments at once,
obtaining special multi-instrument sounds.
The same type of information transfer is used for recording MIDI sequences. A computer
or a sequencer can be used to record the MIDI data generated by the transmitter instrument.
If these recorded data are sent back to the instrument, it automatically repeats the recorded
performance.
NOTA
Always use top-quality cables for MIDI connections. In addition, we
recommend the use of cables no more than 5 metres long.
MIDI Channels
MIDI is able to transmit a multitude of digital data by means of just one cable, and thus just
one connector; this is thanks to the MIDI channels. There are 16 MIDI channels; therefore,
MIDI messages are processed when the channels of the receiver and transmitter devices
are the same.
The “Concerto” are able to transmit information on one or two MIDI channels simultaneously,
depending by the mode (Single, Dual or Split) selected.
In reception, the instrument can receive MIDI data on two MIDI channels simultaneously,
indipendently by the selected mode.
38
Concerto
User Manual
Main MIDI messages which the piano transmits and receives
MIDI includes various types of messages, used to communicate different types of data.
MIDI messages can be subdivided into message handled separately on each channel
and messages dedicated to the whole system.
The channel messages include:
•
Note On: this message is transmitted when a note is played, i.e. when a keyboard key
is struck. Each Note On message includes the following codes:
Note On: when a key has been struck;
Note Number: the key which has been pressed, and therefore the relative note played;
Velocity: note dynamic (i.e. the force applied when the key was struck).
Note messages are expressed as a number from 0 to 127, with middle C represented
by number 60.
•
Note Off: this message is transmitted when a key struck previously is released.
When it is received, the sound of the note relating to the key is stopped.
Each Note Off message includes the following codes:
Note Off: a key has been released;
Note Number: which key has been released;
Velocity: dynamic (i.e. how fast the note was released).
N.B.: a Note On message with Velocity=0 is considered equivalent to a Note Off
message.
•
Pitch Bend: this message indicates the position in which the [PITCH] wheel is set.
N.B.: in the piano, this message can only be received.
•
Program Change: this message is mainly used for selecting voice or programs.
Once you know the correspondence between the voice and the Program change
number, you can select the type of sound you require.
N.B.: consult the Detailed MIDI Implementation at the back of the manual for information
about the association between Program Change and type of voice.
•
Control Change: these are control messages (often associated to sliders or pedals)
used to add expression to the performance, allowing you to set (and control in real
time if necessary) timbre parameters such as volume (CC n.7) or activation of the
Damper pedal (CC n.64), etc.
The system messages, on the other hand, are subdivided into three categories: System
Common Messages, System Real Time Messages and System Exclusive Messages.
Of these categories, the piano does not process System Common Messages.
The System Real Time Messages include:
•
Clock: this is a MIDI message used to synchronise MIDI instruments connected
together. This message is sent 24 times for each crotchet (quarter note).
39
Concerto
User Manual
•
Start: message used to start playback or recording of a performance.
•
Stop: this message stops playback/recording.
These messages allow synchronisation of the piano’s internal sequencer with remote
instruments capable of transmitting this type of message.
•
Continue: this message allows playback/recording to be restarted from the bar after
the last Stop to take place.
N.B.: The piano does not process the Continue message.
•
Active Sensing: this message is transmitted to keep the dialogue between connected
MIDI device active and is sent every 300 msec. if no other MIDI messages are
transmitted. If a MIDI instrument does not receive messages or a new Active Sensing,
after 300 msec. it resets the internal MIDI IN parameters, assuming that the connection
has been interrupted or the connected device has been switched off.
Finally, System Exclusive Messages are those instructions that can only be interpreted by
a device identical to the one which generated them. In the piano, system exclusive
messages are used for coding of:
-
Reverb Type
Effect Type
Song Data Dump
Panel Data Dump
14.8 FIRMWARE VERSION - F7
Pushing [DEMO/ENTER] after having seen on the display “F7” it is possibile to be informed
about the firmware version installed in the instrument:
Push again [DEMO/ENTER] to go back to the previous display or [FUNCTION] in order to
leave the Function menu.
40
Concerto
User Manual
GENERAL VIEW OF THE FUNCTION MENU
41
Concerto
User Manual
THE FUNCTION ACRONYMS
42
Concerto
User Manual
15. THE CONNECTIONS
15.1 AUDIO CONNECTIONS
The instrument has unamplified audio inputs and outputs for connection with remote
amplification / mixing systems and remote sound generators (SMF / MP3 song players,
sequencers, keyboards, pianos, etc…).
AMPLIFICATION SYSTEM
EXTERNAL SOUND GENERATOR
43
Concerto
User Manual
15.2 MIDI CONNECTIONS USING THE [MIDI] CONNECTORS
You can use the [MIDI] connectors to connect the piano to other instruments equipped
with MIDI interfaces. To use the [MIDI] connectors, the [TO HOST] selector on the
connection panel must be turned to “MIDI”.
MIDI IN
MIDI IN
AUX IN
L(+R)
AUX OUT
R
L(+R)
TO HOST
R
HOST SELECT
MAC PC MIDI
THRU
MIDI
OUT
Expander, sequencer, etc..
Expander, sequencer,etc.
MIDI OUT
IN
Master keyboard, sequencer,
MIDI file player, etc.
HOST SELECT
MAC PC MIDI
15.2 MIDI CONNECTIONS USING THE [TO HOST] CONNECTOR
Since it has MIDI connectors, the instrument can also be connected to a computer.
However, in this case, a MIDI interface and both the MIDI [IN] and [OUT] connectors have
to be used. The [TO HOST] connector allows this connection to be made without having to
use this interface, by just connecting the piano connector to the computer connector.
Since both IBM-PC/AT® and Apple Macintosh ® computers can be connected, the
connections panel includes a [TO HOST] selector used to tell the piano what kind of
computer is being connected.
A computer allows you to use MIDI sequencing and editing and score printing programs,
and other musical applications.
IBM-PC/AT® COMPUTERS
Connect the [TO HOST] connector to the RS-232 serial port of the IBM-PC/AT® computer
using an “8 pin MIDI DIN “ 9 pin D-SUB” connector. Set the [HOST SELECT] selector on
“PC”.
For the settings of the computer and/or the MIDI program used, refer to the relative user
manuals.
AUX IN
L(+R)
R
AUX OUT
L(+R)
R
TO HOST
HOST SELECT
MAC PC MIDI
THRU
MIDI
OUT
IN
Serial port
(Com 1 - 2)
HOST SELECT
MAC PC MIDI
44
Personal Computer
Concerto
User Manual
APPLE MACINTOSH® COMPUTERS
Connect the [TO HOST] connector to the modem or printer port of the Apple Macintosh®
computer using a Macintosh® standard peripheral cable with 8-pin system. The computer
port is selected by the MIDI program being used. On the piano, set the [HOST SELECT]
selector on “MAC”.
For the settings of the computer and/or the MIDI program used, refer to the relative user
manuals. In all cases, the clock speed must be set at 1 MHz.
AUX IN
L(+R)
R
AUX OUT
L(+R)
R
TO HOST
HOST SELECT
MAC PC MIDI
THRU
MIDI
OUT
IN
Serial port
(Modem)
HOST SELECT
Macintosh
MAC PC MIDI
NOTES
Before connecting the cable to the [TO HOST] connector, switch off both
the piano and the computer. After connecting the cable, switch on first the
computer then the piano.
When the [HOST SELECT] selector is set on “MIDI” disconnect the cable
from the [TO HOST] connector. If the cable is let connected, the instrument
might not work correctly.
When the [HOST SELECT] selector is set on “MAC” or “PC”, the
transmission of data through the [MIDI] ports is disabled. To use the [MIDI]
ports, set [HOST SELECT] on “MIDI”.
45
Concerto
User Manual
16. MASTER RESET
The Master Reset procedure allows you to restore the factory settings, deleting all the
changes made by the user to the instrument’s internal parameters.
To perform the Master Reset procedure, switch the piano on with the [REVERB], [EFFECT]
and [KEY TOUCH] buttons pressed; the display will show:
when the buttons are released, the instrument will complete the operation.
All the settings present after a Factory Settings procedure are listed below.
PARAMETERS
Voice
Dual Mode
Split Mode
Split Mode Voices
Reverb
Effect
Key Touch
Reverb Depth
Effect Depth
Fixed Key Touch
Metronome
Tempo
Time Signature
Transpose
F1
F2
F3.1
F3.2
F3.3
F3.4
F3.5
F4.1
F4.2
F4.3
F4.4
F4.5
F5.1
F5.2
F5.3
F6.1
F6.2
F6.3
F6.4
F6.5
F6.6
FUNCTION
VALUE
Grand Piano
Off
Off
1st: Grand Piano, 2nd: C.Bass
setted for each voice
setted for each voice
setted for each voice
setted for each voice
setted for each voice
64
Off
120
4/4
+1
Tuning
0 (A=440Hz)
Scale
Equal
Detune
0
1st Voice Octave Shift
0
2nd Voice Octave Shift
0
1st Voice Effect Depth
setted for each voice
2nd Voice Effect Depth
setted for each voice
Split Point
F#2
1st Voice Octave Shift
0
2nd Voice Octave Shift
0
1st Voice Effect Depth
setted for each voice
2nd Voice Effect Depth
setted for each voice
Soft Pedal Mode
Soft
Strings Resonance Level
11
Pedal Effect Amount
11
Transmit MIDI Channel
1
Receive MIDI Channel
1
Local Control
On
Program Change
On
Control Change
On
MIDI Transmit Transpose
0
NOTE
The Factory Settings procedure does not delete the recordings made with
the instrument’s internal sequencer.
46
Concerto
User Manual
17. FIRMWARE, VOICES AND DEMO
UPDATING
The piano foresees the possibility of updating the firmware, the voices and the demo through
a Midi file released by Galileo in order to ameliorate the product.
For loading these files in the internal memory of the instrument you have to connect an
external sequencer or a computer to the Midi In or To Host input as described in par. 15.2
and 15.3
If you use an external sequencer you simply have to start the playback of the updating
files.
In case you use a computer you have to use a Midi program that will unable you to transmit
Midi datas and to execute the file play back
The updating files will be:
-
ARIESRxx.mid: Firmware update
ARIESTxx.mid: Voices update
ARIESDxx.mid: Demo update
xx will be replaced by the file version.
After having made all connections and having started the transmission of the datas, the
display will indicate the datas percentage
When the updating is concluded, the display will show:
NOTE
During reception of data, it is best not to switch off the instrument or the
sequencer/computer, or interrupt the operation, until it has been completed.
47
Concerto
User Manual
18. ASSEMBLING THE PIANO
C
C
C
C
B
B
B
A
B
A
A
A
#4 hexagonal key (furnished)
#6 hexagonal key (furnished)
A
A
Adjustable foot
A Screws (6x) - #6 hexagon socket head cap M8x70 (with washers)
B Screws (4x) - #4 hexagon socket flat head cap M6x20 (burnished)
C Screws (4x) - #4 hexagon scoket flat head cap M6x40 (brass)
N.B.: Unscrew screws A fixed in the packing frame and use them for fixing the legs.
48
Concerto
User Manual
MIDI IMPLEMENTATION CHART
Galileo Concerto
Digital Piano
Date: 18/03/03
Version: 1.0
FUNCTION
DEFAULT
CHANGED
Default
Messages
Altered
BASIC
CHANNEL
MODE
NOTE
NUMBER
VELOCITY
AFTERTOUCH
PITCH BENDER
CONTROL
CHANGE
0
7
TRANSMITTED
1-16
1-16
Mode 3
X
******
9-120
21-108
O
O
X
X
X
O
O
RECOGNIZED
1-16
1-16
Mode 3
X
******
0-127
21-108
O
O
X
X
O
O
O
8
O
O
Balance *1
11
O
O
Expression
30
O
O
Slow-Fast Rotary Speed
32
O
O
Bank Select LSB
64
O
O
Damper pedal
66
O
O
Sostenuto pedal
67
O
O
Soft pedal
74
O
O
Brightness
91
O
O
Reverb level
93
O
O
Modulation level
120
O
O
All sound off
121
O
O
Reset all controllers
O
O
O
X
X
X
O
O
O
O
O
O
All note off
*2
True Voice
Note ON
Note OFF
Key's
Ch's
O
123
O
PROGRAM CHANGE
O
SYSTEM EXCLUSIVE
X
SYSTEM
Song Pos
X
COMMON
Song Sel
X
Tune
O
SYSTEM
Clock
X
REAL TIME
Commands
O
AUX
Local On-Off
O
MESSAGES
All note off
O
Active Sense
O
Reset
*1: not transmitted / received in Single mode
NOTE:
*2: see the sounds list on the next page
Mode 1: OMNI ON, POLY
Mode 3: OMNI OFF, POLY
REMARKS
Bank Select MSB
Volume
Mode 2: OMNI ON, MONO
Mode 4: OMNI OFF, MONO
49
Concerto
User Manual
SOUNDS LIST
CC0: Bank Select MSB
CC32: Bank Select LSB
VOICE
GRAND PIANO
CLASSICAL PIANO
ROCK PIANO
E.PIANO 1
E.PIANO 2
VIBRAPHONE
HARPSICHORD
ACOUSTIC GUITAR
STRINGS 1
STRINGS 2
JAZZ ORGAN 1
JAZZ ORGAN 2
CHURCH ORGAN
BASS & RIDE
E.BASS
C.BASS
PG
1
2
1
5
6
12
7
25
49
50
17
17
20
33
34
33
CC0
0
0
8
0
0
0
0
0
0
0
0
16
0
8
0
0
50
CC32
0
0
0
0
0
0
0
0
0
0
0
0
0
0
0
0
NOTE: This equipment has been tested and found to comply with the limits for a Class B
digital Device, persuant to Part 15 if the FCC Rules. These limits are designed to provide
reasonable protection against harmful interference in a residential installation. This equipment
generates, uses and can radiate radio frequency energy and, if not installed and used in
accordance with the instruction, may cause harmful interference to radio comunications.
However, there is no guarantee that the interference will not occur in a particular installation. If
this equipment does cause harmful interference to radio or television reception, which can be
determinated by turning the equipment off and on, the user is encuraged to try to correct the
interference by one or more of the following measures:
-
Reorient or relocate the receiving antenna.
Increase the separation between the equipment and receiver.
Connect the equipment into an outlet on a circuit different from that to which the receiver
is connected.
Consult the dealer or an experienced Radio/Tv technician for help.
The user is cautioned that any changes or modification not expressly approved by the party
responsable for compliance could void the user’s authority opearate the equipment.