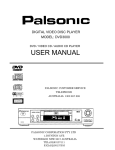
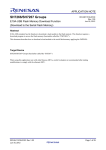
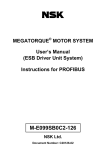
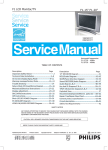
1
NOM8371NOM8371-A-3NA
COLOUR TELEVISION
USER’S
USER S MANUAL
CONTENTS
1. Introduction ………………….….………………….….………………….….………………….…1
2. Warnings and Cautions ………….….………………….….………………….….…………… 2
3. Control location….……………….….…………………….….………………… 4
4 . In p u t a n d Ou tp u t… . … … … … … … … … . … . … … … … … … … . … . … … … … … … … 5
5. Remote control hand unit……………………………………………………………………………6
6. Control Your TV …………………………………………………………………………………… 7
7. Tuning Procedure ………………………………………………………………………………… 11
8. Menu Operation …………………………………………………………………………………… 14
9. Television Installation………………….….………………….….………………….….……….. 16
10. Trouble Shooting ……………………………………………………………………………… 17
11. Specifications ………………….….………………….….………………….….………………….18
1 Introduction
Thank you very much for your purchase of this product-the most natural Colour Television Receiver.
To enjoy your set to the full from the very beginning, read this manual carefully and keep it handy for
ready reference.
INSTALLATION
Locate the receiver in the room where direct light does not strike the screen.
Total darkness or a reflection on the picture screen can cause eyestrain.
Soft and indirect lighting is recommended for comfortable viewing.
Allow enough space between the receiver and the wall to permit ventilation.
Avoid excessively warm locations to prevent possible damage to the cabinet or premature
component failure.
This TV receiver can be connected to AC 220 Volts. 50/60 Hz. Never connect to DC supply or any
other power supply.
Do not install the receiver in a location near heat sources such as radiator, air ducts, direct sunlight,
or in a place somewhere like close compartment and close area.
Do not cover the ventilation openings when using the set.
CAUTION
Never tamper with any components inside your set, or any other adjustment controls not mentioned in
this manual. All television receivers are high voltage instruments. Your PICTURE TUBE is highly
evacuation. If broken, glass fragments will be violently expelled. Scratching, chipping or undue pressure
is dangerous and should be avoided. When you clean up dust or stick of a water drop on the PICTURE
TUBE FACE or CABINET, the power cord should be pulled out from the plug receptacle, then wipe the
receiver with dried soft cloth. During thunder and lighting, unplug the power cord and antenna cord to
prevent your TV set from damage. All "inside work" on your receiver should be performed only by the TV
service personnel.
1
2 Warnings and Cautions
Warming
High voltages are used in the operation of
This television receiver. Do not remote the
Cabinet back from your set. Refer servicing
To qualified service personnel.
Warming
To prevent fire or electrical shock hazard,
Do not expose the television receiver to rain
Or moisture.
Warming
Do not drop or push objects into the television cabinet slots or openings.
Never spill any kind of liquid on the televiSion receiver.
Minimum distances
10cm
10cm
!
5cm
Caution
If the television is to be built into a
Compartment or similarly enclosed
The minimum distances must be
Maintained.
Heat build-up can reduce the
Service life of your television, and
Can also be dangerous.
20cm
2
!
Caution
Never stand on, lean on push suddenly the
Television or its stand. You should pay special
attention to children to children.
!
Caution
Do not place your television on an unstable cart
stand, shelf or table. Serious injury to an
individual, and damage to the television, may
result if it should fall.
!
Caution
When the television receiver is not used for an
Extended period of time, it is advisable to
Disconnect the AC power cord from the AC
Outlet.
!
Caution
Avoid exposing the television receiver to direct
Sunlight and other source of the heat.
Do not stand the television receiver directly on
Other produces which give off heat. E. g. video
Cassette players. Audio amplifiers.
Do not block the ventilation holes in the back
Cover. Ventilation is essential to
Prevent failure of electrical component.
Do not squash power supply cord under the
Television receiver.
3
3 Control location
1. Main SWITCH
2. Remote Sensor
3. Power indicator
4. Front AV in
5. Menu button
6. AV / TV button
7. Volume down / up button
8.Program down / up button
9.Antenna input socket (75 Ω)
10. AV OUT
11. YUV IN
12. AV IN 1
13 S-VIDEO IN
14. AC Power cord
3
4
5
14
6
7
8
13
9
12
4
1
2
11
10
4 Input and Output Terminals
AV-IN
V
YUV
AV-OUT
Y
V
S-Video L
Input
Cb
L
R
Cr
R
ANT
It can be connected to the following appliances:
video-tape recorder, video camera, tape recorder and audio amplifier, etc.....
*Please keep AC cord unplugged when connecting TV system.
5
5 Remote Control Hand Unit
Please refer indicated pages.
Mute
(Ref.P8.)
Power/Standby
(Ref; P7.)
Direct Access Numeric
Keys
(Ref.P7.)
Quick View
(Ref.P8)
1
2
3
4
5
6
7
8
9
-/--
0
TV/AV
TV/AV Select
(Ref; P8.)
?
Call
(Ref.P8.)
Child Lock
(Ref.P9)
CANCEL
TIMER SOUND
PICTURE
REVEAL HOLD
Picture Effect
(Ref.P8.)
S
Sound Effect
(Ref.P8.)
P+
V-
MENU
P-
Sound Volume
Up/Down
(Ref; P7.)
V+
Program Up/Down
(Ref.P7.)
MENU
(Ref.P13.)
6
6 CONTROL YOUR TV
6-1
Power/Stand-By ON/OFF
With Mains status On, you can also turn off using Remote Control Hand Set.
This status is called Stand-By mode. In this mode; You can also turn ON
the TV by pushing the Channel Up/Down keys on the front controls.
※ The TV has an Automatic Power OFF function. With No Signal condition, the TV will automatically
turn OFF after 10 min.
3
6-2
V-
2
Program Up/Down
P+
V+
MENU
1
Push [P+] key, to change Program Up
Push [P-] key, to change Program Down.
P-
6-3
Direct Access Tuning
1
2
3
4
5
6
7
8
9
-/--
0
Using the numeric keys on Remote Control Hand
Piece, Channels can be selected directly, for
0 to 199 channels.
Or repeatedly press the “-/--” button, to select
the desired mode then press numeric buttons.
“-”
1 digit mode
“—”
2 digit mode
“---”
3 digit mode (Max Ch. 199)
1
6-4
Volume Control
Push [V+] key, for Volume Up
P+
V-
MENU
Push [V-] key, for Volume Down
V+
P-
6-5
ZOOM
Push [ZOOM] key, to change as follows:
4:3
16:9
.
7
Volume
0
50
100
6-6
TV/AV Selection
YUV
SVHS
You can select your video
source by the [TV/AV] key.
TV/AV
AV2
AV1
3
Note: AV2 / SVHS / YUV is option.
6-7
MUTE
By pushing this key, sound output will be muted.
Push [MUTE] again, or Volume Up/Down, and
sound Volume will return.
Mute
6-8 Quick View
QV
10
2
TV Mode: Program will quick back to the
previous Program being watched.
2
AV
AV Mode: Back to TV channel
CALL(
(DISP)
)
6-9
Program No.
Colour system
Sound system
·TV / AV MODE
?
This key will call the On screen display.
Push again, to remove the on screen display.
·Menu MODE
Sleep
Pressing the [ ? ] key, current menu will exit directly.
6-10
P
1
PAL
B/G
Sleep
120
Picture EFFECT
By repeatedly pushing this key, picture effects will change as follows.
Dynamic
Mild
User
Standard
Standard
Note: Tint setting is not included user is the last setting made by you.
6-11
S
Sound Effect
By repeatedly pushing this key,
User
Speech
Theater
sound effects will change as follows:
Music
theater
Note: This item is option.
8
6-12
Lock
Lock
By pushing the [ ] key, “ ----”will
Lock
.
Program
Appears on the screen.
Parental lock
Hotel mode
pressing the password the digits that you defined
Vol Limit
Change Pin
yourself correctly, the lock menu may be effective.
Select each function using the [P+] [P-] keys.
Each value can be changed by the [V+] [V-] keys.
child lock will be locked or unlocked for current Program.
Change Pin
AV Lock will be locked or unlocked for AV function.
New Pin
Vol Limit SW will be switched on or off.
Confirm
When you will change the password, you may be
Selected “New Password” item. and push
[V+] [V-] key, the “Change Password” menu will appear.
·New Password : input 4 digits you like.
·Confirm : again input above new password 4 digits correctly.
A.
B.
C.
D.
E.
F.
Off
0
Off
Off
0
0000
LLLL
Press the [ ] key or [?] key, lock menu will disappear.
G.
Note :·the tune menu will not appear when any program would be locked.
·the general lock is on tuning menu, only the general lock put on, the function of lock may be effective.
·after new password was set, the basic password “4100” still is available.
Picture (Non telttext mode)
6-13
PICTURE
By repeatedly pushing this key, picture effects will change as follows.
Brightness
Contrast
Colour
Sharpness
Tint
Contrast
0
50
100
Note: Tint setting is not included user is the last setting made by you.
Sound mode (Non telttext mode)
6-14
CANCEL
By repeatedly pushing this key, sound effects will change as follows:
A2 mode:
FM
STEREO
FM or DUAL I
DUAL II
DUAL I
NICAM mode:
FM
STEREO
FM or FM
DUAL I
DUAL II
FM
Note: This item is option.
Calendar (Non teletext mode)
6-15
MIX
pushing this key, calendar will be appeared.
Using the [P+] / [P-] key, change the year.
Using the [V+] / [V-] key, change the month.
9
Calendar
2003 7
Sun Mon Tue Wed Thu Fri Sat
1
2
3 4
5
6
7
8
9
10 11 12
13 14
15 16
17 18 19
20 21
22
6-16
Game (Non teletext mode)
HOLD
In TV mode, press the [HOLD] key, game may be appeared.
Repeated the [HOLD] key, game will change as follows:
SNAKE:
Push [P+] / [P-] key, the snake may be turn on to up or down.
Push [V+] / [V-] key, the snake may be turn on to right or left.
Push [MENU] key, the game may be again.
Push [?] key, to exit game.
7 Tuning procedure
7-1 Auto Search Function: Automatic Search and Memory (ASM) is available for program installation from
Antenna input.
.Using [MENU] key on the front or [MENU] key
Tuning
on the Remote for ASM.
A. Push [MENU] key repeatedly to select “Tuning”
B. Push [P+] or [P-] key,to select “Auto Search”
C. Push [V+] or [V-] key, to start ASM .
and memorize into program list (0~199).
D. Wait until function has finished.
7-2 Search
Program
Color syetem
Soundsystem
Skip
Band
Auto Search
Search
Fine Tune
0
Auto
B/G
Off
VHF-L
Function: Manual Search for Antenna input.
A. Push [MENU] key repeatedly to select “Tuning”.
B. Using [P+] or [P-] key, select “Program”. Using [V+] or [V-] or numeric keys to change Program Number.
C. Push [P+] or [P-] key to select “Band”. Push [V+] or [V-] key to change Band.
D. Push [P+] or [P-] key to select “Search”.
E. Push [V+] or [V-] key to start search.
F. Wait until function has finished.
G. Push [P+] or [P-] key to select “STORE”. Push [V+] or [V-] key to store.
7-3 Fine TuningFunction: Fine Tuning for current setting.
A. Push [MENU] key repeatedly to select “Tune”.
B. Using [P+] or [P-] key, select “Program”. Using [V+] or [V-] change Program Number.
C. Using [P+] or [P-] key, select “Fine Tuning”.
D. Using [V+] or [V-] key, adjust for best tuning.
E. Push [P+] or [P-] key to select “Store”. Push [V+] or [V-] key to store.
7-4 Skip Function: Use to “Skip” Channels. After setting to “ON”, the channel will not be selected by Channel
Up/Down keys.
10
A. Push [MENU] key repeatedly to select “Fine Tune”
B. Using [P+] or [P-] key, select “Program”. Using [V+] or [V-] key, change Program No.
C. Using [P+] or [P-] key, select “Skip”. Using [V+] or [V-] key, select “On” or “Off”.
7-5 Exchange Function: number and channel exchange.
A. Push [MENU] key repeatedly to select “Exchange”
B. Using [P+] or [P-] key, select “Program No.”.
Using [V+] or [V-] key, change Program No. number.
C. Using [P+] or [P-] key, select “Swap to”.
Exchange
Program No.
Swap to
Exchange
4
0
Using [V+] or [V-] key, change Swap to number.
D. Using [P+] or [P-] key, select “Exchange”.
Using [V+] or [V-] key, exchange is over.
7-6 Lock Function: this is general lock, if this lock put on, “Lock” menu may be effective.
8 Menu Operation
8-1 [MENU] key
Push [MENU] key continuously, to scroll through the MENU selection, as follows.
Picture
Sound
Setup
Tuning
Time
Normal
8-2 Picture MENU Function: Brightness, Contrast, Colour, Sharpness, Tint
A. Select each function using the [P+]/[P-] keys.
Picture
B. Each value can be controlled by the [V+]/[V-] keys.
Brightness
Constrast
Colour
Sharpness
Tint
C. Repeat any functions if required.
0
.
48
48
32
32
15
100
NOTE: Tint control will be appeared only if a NTSC signal is being received.
8-3 Sound MENU
Function: Volume.
Sound
A. Select each function using the [P+]/[P-] keys.
B. Each value can be controlled by the [V+] or [V-] keys.
C. Repeat any functions if required.
Note: AVL, Bass, Treble, Balance, is option.
11
Volume
AVL
Bass
Treble
Balance
0
20
Off
32
32
0
100
8-4 Time MENU Function: Time and Timer setting.
A.
B.
C.
D.
E.
Select “Time” with the [MENU] key.
Using the [P+]/[P-] key, select the every item.
Using the [P+]/[P-] key, select “Clock”, “On-Time” or
“Off-Time”.
Using the [V+]/ [V-] key, minutes will change from “00” to “59”.
Using the [V+] / [V-] key, hours will change as follows;
“0,1…23,--:--”
Using the [P+]/[P-] key, select “On Program”,
Using [V+]/[V-] keys, change On-Program number.
Using [P+]/[P-] keys, select “RTC”(Realtime clock),
Timer
Clock
Off Time
On Time
On progrma
RTC
.
.
--:---:---:-0
0
Each time while choosing the appointed programme of RTC, if this programme has TXT broadcasting,
then CPU will automatically search the time from that programme. If get, it will automatically
adjust the current time in TV. Then each time while changing channel, CPU will work like searching
time (it takes around 5 seconds); Or in TXT condition, CPU will keep on the process of time
searching and adjusting.
8-5 Setup
Function: other functions setting.
Settings
Language
Colour System
Sound System
Blue screen
Black Stretch
A. Using the [P+]/[P-] key, select the item.
Using the [V+]/[V-] key, change the item.
B.
Using the [P+]/ [P-] key, select the “Language”.
Using the [V+] / [V-] key, Language will change as follows;
English
French
Russian
Turkish
Arabic
Persian
C.
Using the [P+]/ [P-] key, select the “Colour System”.
Using the [V+] / [V-] key, Colour System will change as follows;
AUTO
PAL
SECAM
NTSC4.43
NTSC
D.
Using the [P+]/ [P-] key, select the “Sound System”.
Using the [V+] / [V-] key, Sound System will change as follows;
BG
DK
I
M
BG
E.
Using the [P+]/ [P-] key, select the “Tone”.
Using the [V+] / [V-] key, Tone will change as follows;
Normal Warm Cool
12
English
Auto
BG
On
On
9 Television Installation
Connect antenna or video facility
1.
Use 75Ω coaxial cable plug or 300-75Ω impedance converter to plug in antenna input terminal on the
2.
rear of the cabinet.
Connect the video facility to the audio, video in jack on the rear of the cabinet.
VHF antenna
UHF antenna
Input terminal of antenna
75
Co-axis cable
Co-axis antenna plug
Mixer
Antenna in jack
75
Co-axis cable
Battery installation and replacement for remote control unit
The remote control uses two 1.5V AA batteries. For battery installation and replacement are as following:
1
Turn the remote control unit upside down. Press
down the grip of battery compartment and slide
the color in the direction of the arrow.
1
Install two new batteries, make sure that
battery polarity matches with the “+”, “–”
marks inside the battery. Or not it could
damage the unit.
1
Close the battery compartment covers
13
Connecting other external devices
Connection of AV input /output terminal
1 In AV mode, connect the external signal line of back panel board according to the following figure.
Vi
Y IN
Vo
ALi
Cb IN
ALo
ARi
Cr IN
(Back panel)
LD OR VCR
LASER DISC
(MONO)
A
A
VCR
ARo
Audio right input(LD/VCR)
Audio left input(LD/VCR)
Video input(LD/VCR)
Audio right output(LD/VCR)
Audio left output(LD/VCR)
Video output(LD/VCR)
2 In AV mode, connect the external signal line of back panel board or side video frequency according
to the following figure.
Video IN
ARi
Audio
IN
LD OR VCR
ALi
LASER DISC
VCR
Audio left output
Audio right output
Video output
As for this model, when you use the rear AV audio terminals, the sound is stereo, when you use the front AV
terminals, you should connect the rear AV audio terminals at the same time, unless the sound is mono.
3 In YUV mode, connect the external signal line of the back control panel.
Vi
Vo
Y IN
(Back panel)
(MONO)
DVD or VCR
ALi
Cb IN
ARi
Cr IN
ALo
DVD
A
ARo
A
Y output(DVD/VCR)
B-Y output(DVD/VCR)
R-Y output(DVD/VCR)
Audio left output(DVD/VCR)
Audio right output(DVD/VCR)
14
VCR
11 Trouble Shooting
Before arranging for service, firstly know the status and then check simply as follows:
Problems
Check
No picture or sound.
Check if the power supply is plugged in.
Check if the power switch is in “on’” position.
Picture is OK, no sound.
Check if the volume control is set to the minimum or mute position.
Remote control doesn’t work. Check if the power switch is in “on” position.
Check if the batteries are out of use or not connected well.
Make sure that there is no strong light striking the sensor window
of remote control unit.
Check there are no obstacles between the sensor window and
remote control unit.
No TV signal.
Check if the TV/AV button is not set to TV status.
Check if the antenna is well connected.
Check if you installed the TV correctly.
No external video signal.
Check if you installed the TV correctly.
Check if the TV/AV button is set to AV position.
Picture lacks colour or picture Check colour, brightness and contrast controls are correctly
too dark.
adjusted.
All channels lose colour
intermittently.
Check if the antenna is broken.
Check if the antenna is disconnected.
Check if the antenna is damaged.
Poor reception, loss of colour Check if channels are correctly tuned (see “Fine tuning”).
with certain channels.
Diagonal stripes appear on The receiver may be affected by interference (e.g. from nearby
picture.
radio broadcasting transmitter or from another TV receiver).
Picture has “snow”.
Check if the antenna is broken.
Check if the antenna is disconnected.
Check if the antenna is damaged.
Ghost images appear.
Check if the antenna direction has been changed by a storm or
strong wind, etc. (because ghost images are caused by the arrival at
the antenna of both the signal which has traveled directly from the
transmitter and the signal which has been reflected from a hill or a
large building. The direction of the antenna should be chosen for
minimized ghosting.)
15
11 Specifications
Television RF system
Video Color System
Channel and frequencies
PAL B/G
PAL, NTSC 3.58/4.43,
VHF Low channel (VL)=46.25 to 168.25 MHz
VHF high channel (VH)=175.25 to 463.25 MHz
UHF channel (UHF)=471.25 to 863.25 MHz
Television Channel: 250-Position Program Memory
Power input
Power consumption
Screen size
Audio output
AC 240V, 50/60 Hz
Maximum 14 inch 60W
21 inch 70W
25 inch 110W
29 inch 150W
34 inch 180W
Visible Size: 14 inch 37 cm measured diagonally
21 inch 54cm measured diagonally
25 inch 64 cm measured diagonally
29 inch 74cm measured diagonally
34 inch 84 cm measured diagonally
4W(mono) or 4W + 4 W (Stereo)
Note:
All specifications are subject to change without notice.
Different country marketed item, it is the few function
with use manual content maybe is differential.
All quality and size are approximate value.
16