1
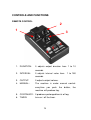
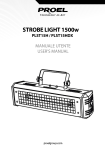
MANUALE UTENTE – USER’S MANUAL
DRAGO ICE
PLFDICE
Rev. 09/2006
INDICE
CARATTERISTICHE GENERALI ............................................ 4
CARATTERISTICHE TECNICHE ............................................ 5
ISTRUZIONI GENERALI ...................................................... 5
UTILIZZO SICURO ED EFFICIENTE ................................... 5
AVVERTENZE ........................................................................ 6
CONTROLLO E FUNZIONI ..................................................... 7
Comando a filo..................................................................... 7
Controllo DMX...................................................................... 8
GUIDA AL FUNZIONAMENTO................................................ 8
RISOLUZIONE GUASTI.......................................................... 9
MANUTENZIONE E PULIZIA ................................................ 10
AVVERTENZE ...................................................................... 10
2
TABLE OF CONTENTS
GENERAL FEATURES ......................................................... 11
TECHNICAL SPECIFICATIONS............................................ 12
GENERAL INSTRUCTIONS............................................... 12
SAFE AND EFFICIENT USE .............................................. 12
WARNING ............................................................................ 13
CONTROLS AND FUNCTIONS ............................................ 14
Remote Control .................................................................. 14
DMX CONTROL................................................................. 15
OPERATION GUIDE............................................................. 15
TROUBLE SHOOTING ......................................................... 16
MAINTENANCE AND SERVING ........................................... 17
WARNING ............................................................................ 17
3
CARATTERISTICHE GENERALI
Grazie per l’acquisto della macchina del fumo basso PLFDICE.
Questa unità ha un canale di controllo DMX ma può essere
controllata anche da un comando a distanza dedicato.
È stato impiegato il massimo sforzo per far convergere affidabilità e
solidità in ciascuna unità. I nuovi prodotti vengono costantemente
aggiornati per soddisfare le esigenze del mondo dello spettacolo e
dell’industria lighting. I Vostri commenti riguardo i nostri prodotti e
servizi sono molto graditi.
È un piacere e un privilegio essere al vostro servizio.
4
CARATTERISTICHE TECNICHE
Alimentazione:
AC 230V ~ 50Hz – 120V ~ 60Hz
Fusibile:
5 A / 250V – 10 A / 125V
Resistenza:
1000W
Capacità serbatoio:
1,5 l
Dimensioni (mm):
350×675×370
Peso:
22 Kg
ISTRUZIONI GENERALI
Leggere attentamente le istruzioni contenute in questo manuale
prima di installare od utilizzare il prodotto. Successivamente,
conservare il manuale in un luogo sicuro allo scopo di poterlo
consultare in futuro.
UTILIZZO SICURO ED EFFICIENTE
•
La
macchina
del
fumo
basso
deve
essere
installata
possibilmente su posizione orizzontale a terra (non superare
l’angolo di inclinazione massimo di 15°).
•
Assicurarsi che il getto di fumo non sia indirizzato direttamente
su persone.
•
Non ostruire la bocchetta di emissione del fumo e permettere la
ventilazione al fine di evitare pericoli di incendio.
•
Questo prodotto deve essere collegato a terra.
•
Evitare che liquidi infiammabili, acqua od oggetti metallici
penetrino nell’apparecchio.
5
•
Evitare di danneggiare il cavo di alimentazione.
•
Al fine di evitare danni permanenti, controllare il livello del liquido
nel serbatoio affinché non rimanga a secco.
•
Non aprire l’apparecchio, nessun componente può essere
riparato dall’utente. Per la riparazione consultare sempre
personale autorizzato.
•
In caso di problemi di funzionamento cessare immediatamente
l’utilizzo, disconnettere la presa dell’alimentazione e rivolgersi al
proprio
rivenditore
per
un
controllo
oppure
contattare
direttamente la PROEL Spa.
•
Per prevenire rischi di incendio o di shock elettrico, non esporre
il prodotto alla pioggia o all’umidità.
•
Evitare di eseguire la riparazione. Eventuali interventi da parte di
personale
non
qualificato
ne
provocherebbe
danni
o
il
funzionamento difettoso.
AVVERTENZE
•
Questo prodotto è destinato all’esclusivo utilizzo interno.
•
Provvedere a non precludere la ventilazione durante l’utilizzo.
•
Disconnettere la presa di alimentazione quando l’unità non viene
utilizzata per lunghi periodi.
•
Non utilizzare l’unità in luoghi esposti ad eccessiva umidità,
vibrazioni o urti.
•
Porre l’unità in una posizione stabile.
•
Non smontare o apportare modifiche all’apparecchio.
6
CONTROLLO E FUNZIONI
COMANDO A FILO
2
1
3
4
5
6
1.
DURATION:
Regola la durata di emissione da 1
a 10 secondi.
2.
INTERVAL:
Regola la frequenza di emissione da
1 a 180 secondi.
3.
OUTPUT:
Regola il volume di emissione.
4.
MANUAL:
Ogni pressione produce l’emissione
di fumo.
5.
CONTINUOS:
Emissione prolungata di fumo.
6.
TIMER:
Attiva / disattiva il temporizzatore.
7
CONTROLLO DMX
La macchina del fumo basso può essere controllata da un canale di
una centralina esterna DMX. Perché la macchina del fumo PLFDICE
possa essere comandata da una centralina esterna, va eseguito
l’indirizzamento della macchina del fumo. Questa procedura va
eseguita spostando gli interruttori posti sull’unità PLFDICE.
La tabella seguente mostra il valore dei singoli interruttori.
Combinare le posizioni per dei singoli interruttori in funzione del
codice indirizzo.
Dipswitches
Valore
1
2
3
4
5
6
7
8
9
ON
ON
ON
ON
ON
ON
ON
ON
ON
1
2
4
8
16
32
64
128
256
GUIDA AL FUNZIONAMENTO
Svitare il tappo del serbatoio e riempirlo con l’apposito liquido per il
fumo PROEL, facendo attenzione a non far uscire o far cadere del
liquido fuori dal serbatoio.
Svitare le due manopole poste sul coperchio superiore e riempire il
raccoglitore
con
del
ghiaccio
comune.
Durante
il
normale
funzionamento il ghiaccio si scioglie e la sua raccolta avviene in un
serbatoio posto sul fondo il cui svuotamento deve essere effettuato o
tramite il rubinetto a caduta posto sulla parte anteriore o tramite lo
scarico posto nella parte posteriore con il quale, attraverso una
pompa interna attivabile con un interruttore posto accanto al
rubinetto, è possibile effettuare lo svuotamento forzato.
Connettere l’unità all’appropriata presa di corrente.
8
Collegare l’apposito comando a filo e accendere la macchina del
fumo basso tramite l’interruttore principale posto sulla parte
posteriore.
Aspettare qualche minuto che la macchina si scaldi. Quando il LED
verde posizionato sul comando si accende, significa che essa è
pronta all’utilizzo.
RISOLUZIONE GUASTI
•
Un’interruzione improvvisa del funzionamento è dovuta molto
probabilmente dalla rottura del fusibile.
Prima di procedere alla sua sostituzione del fusibile
disconnettere l’apparecchio dalla rete.
Una volta tolta la tensione di alimentazione, svitare il lo sportello
del portafusibile e sostituire il fusibile con uno avente le stesse
caratteristiche (riportate anche su questo manuale).
Richiudere il portafusibile e ricollegare l’apparecchio alla rete.
Se l’unità non si accende ancora, contattare il proprio rivenditore
o il centro assistenza PROEL.
•
Se durante il funzionamento si avverte l’insorgere di rumore,
spegnere immediatamente la macchina e controllare il livello del
liquido nel serbatoio. Riempire il serbatoio e riaccendere la
macchina. Se invece nel serbatoio risulta ancora presenza di
liquido, controllare che il tubo di aspirazione che va nel serbatoio
peschi in modo corretto il liquido.
9
MANUTENZIONE E PULIZIA
Apparecchi di questo tipo possono facilmente intasarsi a causa
dell’alta densità del liquido del fumo. Per questo motivo è bene
pulire la macchina del fumo con regolarità. Così facendo si aiuta
a mantenere alta l’affidabilità della stessa.
Dopo ogni 40 ore di lavoro o dopo un lungo periodo di inutilizzo,
procedere alla pulizia delle singoli parti costituenti l’apparecchio
con un panno morbido ed una soluzione liquida composta da
80% di acqua e 20% di aceto bianco.
Quando l’apparecchio è fermo e freddo, pulire la bocchetta da
eventuali detriti che possano ostruire la fuoriuscita di fumo.
Svuotare il serbatoio contenente il liquido per il fumo e riempirlo
con una soluzione liquida per la pulizia. Far funzionare
l’apparecchio in una zona ventilata fino a far svuotare il
serbatoio.
Coprire la macchina del fumo basso con un apposito telo e
conservare in un posto asciutto.
AVVERTENZE
La manutenzione e riparazione di componenti interni deve
essere eseguita esclusivamente da personale qualificato.
Ogni manomissione dell’apparecchio ne causa il decadimento
della sua garanzia.
10
GENERAL FEATURES
Thank you for your purchase. This unit is characterized by one
control channel DMX but it can to be controlled by its remote
controller. features include:
Every effort has been made to design dependability, reliability and
comfort into each unit. New products are being designed constantly
to meet the needs of both entertainment and the lighting industry.
We welcome your comments about our product and services.
It is both a privilege and pleasure serving you.
11
TECHNICAL SPECIFICATIONS
Power Input:
AC 230V ~ 50Hz – 120V ~ 60Hz
Fuse:
5 A / 250V – 10 A / 125V
Power:
1000W
Tank capacity:
1,5 l
Dimensions (mm)
350×675×370
Weight
22 Kg
GENERAL INSTRUCTIONS
Please read through this operating instructions before installing or
using your new product. After you have finished reading the
instructions, put it in a safe place for future reference.
SAFE AND EFFICIENT USE
• This product must be earthed
• Place the machine on a horizontal surface sitting on a level
surface. The machine must not have more than a 15 degree
angle of inclination.
• Ensuring that the fog is not shooting directly at anyone’s face.
• Do not touch or place anything in proximity to the nozzle during
operation or preheat as there is a danger of burns.
• Do not obstruct the air vents.
• Do not make any inflammable liquids, water or metal objects
enter the unit.
• Take care not to damage the power cord.
12
• No user serviceable parts inside, always consult authorized
personnel for repairs.
• In the event of malfunction (burning smell, etc…) immediately
stop operation, disconnect the power supply plug and consult
authorized service personnel.
• To prevent fire or shock hazard, do not expose this product to
rain or moisture.
WARNING
• This product is intended for indoor use only.
• Do not touch or place anything in proximity to the nozzle during
operation or preheat as there is a danger of burns.
• Do not obstruct the air vents.
• Do not make any inflammable liquids, water or metal objects
enter the unit.
• Provide occasional ventilation during use.
• Unplug the power plug from the sockets when not using the unit
for extended period.
• Do not use the unit in places subject to excessive humidity,
vibration or bumps.
• Place this unit in a stable location.
• Do not dismantle or modify the unit.
13
CONTROLS AND FUNCTIONS
REMOTE CONTROL
2
1
3
4
5
6
1. DURATION:
It adjusts output duration from 1 to 10
seconds.
2. INTERVAL:
It adjusts interval value from
1 to 180
seconds.
3. OUTPUT:
It adjusts output volume.
4. MANUAL:
The machine is under manual control:
everytime you
push the button,
machine will produce fog.
5. CONTINUOS: It produces prolonged bursts of fog.
6. TIMER:
turn on / off the timer.
14
the
DMX CONTROL
The fog machine can be to controlled by an external DMX controller.
Therefore you must to set the address code by the dipswitches
positioned on the fog machine. The following tab shows the values of
each dipswitch. Set the position of each switch in function of address
code:
Dipswitches
Value
1
2
3
4
5
6
7
8
9
ON
ON
ON
ON
ON
ON
ON
ON
ON
1
2
4
8
16
32
64
128
256
OPERATION GUIDE
Place the fog machine on a level surface and loosen the cap of the
fluid tank to fill with PROEL fog fluid. Be careful to don’t overflow the
liquid out of the tank.
Unscrew the two knobs sited on the top housing and fill in with some
ice. During the normal use, the ice melts and it is gathered in the
dedicated tank on the bottom of the machine. The tank can be
emptied through the drain-pipe sited on the front side of the machine,
or through the automatic drain-pipe on the back side which can be
started up by the switch placed near it.
Connect the machine to main power supply.
Plug the remote control into the sock and turn on the switch placed
on the rear panel of the machine.
15
Wait some minute to allow the preheat. When the red LED is lit, the
machine is heating while when the green LED is lit, the machine can
spray.
TROUBLE SHOOTING
If the unit does not function when connected to the main power
supply, it means probably that the fuse has blown.
Disconnect from main power supply before attempting to
replace either unit fuse.
Once disconnected the power supply, unscrew the fuse-holder cover
to reveal the fuse. The unit has label attached which indicates the
correct fuse rating and you will also find this information in this guide.
It is more important that replacement fuses are of correct rating.
Failure to use the correct fuse could damage the lighting effect
beyond economic repair.
The fuse should simply be placed inside the holder and the screw
cap replaces, when this is done connect to the main power supply to
check. If the unit is still not working then contact your dealer or
directly PROEL service.
If you experience low output noise or no output at all, unplug
immediately and check fluid level. Fill the tank and turn on the unit
again. If the fog does not come out after holding the remote control
button for 30 seconds, check the hose attached to the tank to make
sure there is fluid going through the hose. You are unable to
determinate the cause of the problem, do not simply continue to
push the remote control button as this may damage the unit.
16
MAINTENANCE AND SERVING
All fog machines are prone to clogging due to the consistency of fog
fluid and the high temperature at which it vaporize. Therefore
cleaning the fog machine regularly will help reduce costly parts
replacement and repair charge. After 40 hours of continuous
operation or when the machine will be idle for a long time it is
recommended to run a cleaning solution composed of 80% distilled
water and 20% white vinegar through the system to prevent the
accumulation of particles in the heating element.
1. While unit is unplugged and cool, clean out debris with white
vinegar and a pipe cleaner, making sure that the hole is free
and unobstructed.
2. Empty all fog fluid from the machine and replace with
cleaning solution in the tank. Plug unit in and allow to warm
as usual.
3. Run unit in a well ventilated area until tank is empty.
4. Cleaning is now complete. Unplug and refill with a quality
water based fog fluid once cool.
WARNING
The maintenance of internal parts should be carried out by a
qualified personnel.
Removal of covers other than the front to effect dish or the fuseholder is considered a breach of warranty and will not be covered
under any such agreement unless authorized first by the company.
17
PROEL S.p.A.
(World Headquarters – Factory)
Via alla Ruenia 37/43
64027 Sant’Omero (TE) – Italy
Tel. +39 0861 81241
Fax. +39 0861 887862
e-mail: info@proelgroup.com
www.proelgroup.com