1
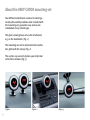
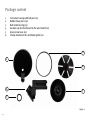
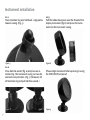
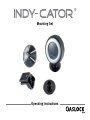
Mounting Set
Operating Instructions
Table of Contents
2
Page 3 ....................................................
About the INDY-CATOR mounting set
Page 4 ....................................................
Package content
Page 5 ....................................................
Instrument installation
About the INDY-CATOR mounting set
Four different attachment versions for which generally all assembly modules were included with
the mounting set, guarantee easy and secure
installation in any vehicle type.
The glue/screwing base serves for attachment,
e.g. on the dashboard. (Fig. 1)
The mounting set can be attached to the ventilation grille with the clamp. (Fig. 2)
The suction cup securely fastens your IndyCator
to the front window. (Fig. 3)
Figure 1
3
Figure 2
Figure 3
Package content
1
2
3
4
5
6
Instrument casing with ball join (1x)
Rubber hose piece (1x)
Ball retention ring (1x)
Suction cup for attachment to the wind shield (1x)
Glue/screw base (1x)
Clamp attachment for ventilation grille (1x)
2
1
4
6
5
3
Figure 4
4
Instrument installation
1.1.1
Place retention ring over ball head - edge points
towards casing. (Fig. 5)
1.1.3
Pull the rubber hose piece over the thread of the
display instrument (fig. 8) and press the instrument into the instrument casing.
Figure 5
Figure 8
1.1.2
Press ball into socket (fig. 6) and press on retention ring. The instrument casing can now be
oriented in any direction. (fig. 7) (To loosen, lift
off retention ring and pull ball from socket.)
Figure 6
5
Figure 7
(Please align instrument before pressing in using
the INDY-CATOR scripture!)
Figure 9
Fig. 4