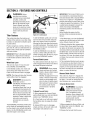
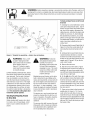
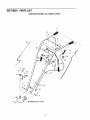
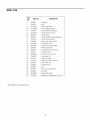
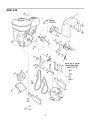
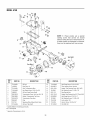
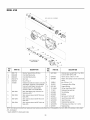
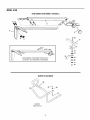
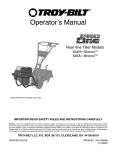
1
r®
Operator's Manual
Rear-tine Tiller
Model 675B
Model 675B Shown (bumper styles vary)
IMPORTANT:
WARNING:
READ SAFETY RULES AND INSTRUCTIONS
CAREFULLY
This unit is equipped with an internal combustion engine and should not be used on or near any unimproved forest-covered, brush-covered or
grass-covered land unless the engine's exhaust system is equipped with a spark arrester meeting applicable local or state laws (if any). If a spark arrester is used, it
should be maintained in effective working order by the operator. In the State of California the above is required by law (Section 4442 of the California Public
ResourcesCode). Other states may have similar laws. Federallaws apply on federal lands. A spark arrester for the muffler is available through your nearest engine
authorized service dealer or contact the service department P.O. Box 361131 Cleveland, Ohio 44136-0019.
TROY-BILT
PRINTEDIN U.S.A.
LLC, P.O. BOX 361131 CLEVELAND,
OHIO 44136-0019
FORMNO. 769-00586B
9/13/04
TABLEOFCONTENTS
Content
Customer Support
Safety
Assembly
Features and Controls
Operation
Page
2
3
6
9
11
Content
Maintenance
Troubleshooting
Parts List
Warranty
Page
16
23
24
Back Cover
FINDINGMODELNUMBER
This Operator's Manual is an important part of your new lawn tractor. It will help you assemble, prepare and maintain the
unit for best performance. Please read and understand what it says.
Before you start assembling your new equipment, please locate the model plate on the equipment and
copy the information from it in the space provided below. A sample model plate is also given below. You can
locate the model plate by looking at the rear of the tine shield. This information will be necessary to use the
manufacturer's web site and/or help from the Customer Support Department or an authorized service dealer.
Copy the model number here:
OTRDV-BILT
Copy the serial number here:
T,OV-BmLT
LLC
361131
P. O. BOX
www.troybilt.com
CLEVELAND,
OH44136
330-558-7220
,.
1-800-520-552_
CUSTOMER
SUPPORT
Please do NOTreh/m the l/nit to theretailer withoutfirst contactingCustomerSupport.
If you have difficulty assembling this product or have any questions regarding the controls, operation or maintenance of
this unit, you can seek help from the experts. Choose from the options below:
Visit troy-bilt.com for many useful suggestions. Click on Customer Support button and you
will get the four options reproduced here. Click on the appropriate button and help is
immediately available.
/;/
,>
.....
j;_
?" #'s
;'V
}/ )
f
;
F_
* ;,, #FOX }_
" 4t,
'
@;
i/!s
t
,
j,"
;D
,,,
>,,
_ 7>,,,,,v
yO,
rL;,"
ft,
'_,-.
,
¢j
,_ <#
*x J
,_;7
f'_;:'
,7;; _
_tf';_'iv
c ,l
If you prefer to reach a Customer Support Representative, please call 1(800) 520-5520.
The engine manufacturer is responsible for all engine-related issues with regard to
performance, power-rating, specifications, warranty and service. Please refer to the engine
manufacturer's Owner's/Operator's Manual, packed separately with your unit, for more
information.
SECTION1: SAFETY
Wheel GearLever
This machine meets voluntary safety standard B71.8-1996, which is sponsored by the
Outdoor Power Equipment Institute, Inc.,
and is published by the American National
Standards Institute.
WARNING
The engine exhaust from this productcontains
chemicals known to the State of California to
Reverse Clutch Control_
ForwardClutch Lever
I
/
Recoil
Rope
Starter
ForwardClutchLever
Depth
Regulator
Lever
cause cancer, birth defects or other reproductive harm.
SafetyAlert Symbol
,_
in
thisis manual
the unit Ittoisalert
This
a safetyand
alertonsymbol.
used
you to potential hazards. When you see
this symbol, read and obey the
message that follows it. Failure to obey
safety messages could result in
personal injury or property damage.
1. Carefully read this OwnTraining
er's Manual, the separate
Engine Owner's Manual,
and any other literature you may receive.Be
thoroughly familiar with the controls and
the proper use of the tiller and its engine.
Know how to stop the unit and disengage
the controls quickly.
2. Neverallow children to operatethe tiller.
Never allow adults to operatethe tiller without proper instruction.
3. Keepthe area of operation clear of all
persons, particularly children and pets.
4. Keepin mind that the operator or user is
responsible for accidents or hazardsoccurring to other people,their property, and
themselves.
Preparation
1. Thoroughly inspect the area where the
tiller is to be usedand remove all foreign
objects.
2. Be sure all control levers are released
and the Wheel GearLever is in ENGAGEposition before starting the engine.
3. Do not operatethe tiller without wearing
adequateouter garments. Avoid loose garments or jewelry that could get caught in
moving parts.
4. Do not operatethetiller whenbarefootor
wearingsandals,sneakers,or light footwear.
Wearprotectivefootwearthat will improve
footing on slipperysurfaces.
5. Donot till nearundergroundelectriccables,
telephonelines,pipesor hoses.If in doubt,
contactyour telephoneor utilitycompany.
6. Warning: Handlefuelwith care;it is highly
flammableand its vaporsareexplosive.Take
thefollowingprecautions:
a. Store fuel in containers specifically
designed for this purpose.
b. Thegas capshall neverbe removed or
fuel added while the engine is running. Allow the engine to cool for several minutes before adding fuel.
c. Keepmatches, cigarettes, cigars,
pipes, open flames, and sparks away
from the fuel tank and fuel container.
d. Fill fuel tank outdoors with extreme
care. Neverfill fuel tank indoors. Use
a funnel or spout to prevent spillage.
CounterRotatingTines
Figl/re 1-1
e. Replaceall fuel tank and container
caps securely.
f. If fuel is spilled, do not attempt to start
the engine, but move the machine
away from the area of spillage and
avoid creating any source of ignition
until fuel vapors have dissipated.
7. Nevermake adjustments when engine is
running (unless recommended by manufacturer).
Operation
1. Do not put hands or feet near or under
rotating parts.
2. Exerciseextreme caution when on or
crossing gravel drives, walks, or roads.
Stay alert for hidden hazards or traffic. Do
not carry passengers.
3. After striking a foreign object, stop the
engine, remove the wire from the spark
plug wire and prevent it from touching the
spark plug, thoroughly inspectthe machine
for any damage, and repair the damagebefore restarting and operating the machine.
4. Exercisecaution to avoid slipping or falling.
5.Iftheunitshould
starttovibrate
abnormally, a. Walk behind and to one side of the
stoptheengine,
disconnect
thespark
plug
tiller, usingone handon the hanwireandprevent
itfromtouching
thespark
dlebars. Relax yourarm, but use a
plug,
andcheck
immediately
forthecause.
Visecure handgrip.
bration
isgenerally
awarning
oftrouble.
b. Use slower engine speeds.
6.Stoptheengine,
disconnect
thespark
c. Clear the tilling area of all large
stones,rootsand other debris.
plugwireandprevent
itfromtouching
the
sparkplugwhenever
youleave
theoperat- d. Avoid usingdownwardpressureon
ingposition,
before
unclogging
thetines,
handlebars.If need be, use slight
orwhenmaking
anyrepairs,
adjustments
upwardpressureto keepthe tines
orinspections.
from diggingtoo deeply.
7.Take
allpossible
precautions
whenleav- e. Beforecontacting hard packedsoil
at the end of a row, reduce engine
ingthemachine
unattended.
Stoptheenspeed and lift handlebarsto raise
gine.Disconnect
sparkplugwireandmove
tines out of the soil.
itawayfromthesparkplug.Move
Wheel
GearLever
toENGAGE.
f. In an emergency, stop tines and
wheels by releasingwhichever
8.Before
cleaning,
repairing,
orinspectClutchLever is engaged. Do not ating,stoptheengine
andmake
certain
all
tempt to restrain the tiller.
moving
partshave
stopped.
Disconnect
15. Do not overloadthe tiller's capacity by
thesparkplugwireandprevent
itfrom
touching
thesparkplugtoprevent
acci- attempting to till too deeply at too fast a
rate.
dental
starting.
9.Always
keep
thetillertinehoodflap
16. Never operate the tiller at high transdown.
port speeds on slippery surfaces. Look behind and use care when backing up.
10.Never
usethetillerunless
proper
guards,
plates,
orother
safety
protective
de- 17. Donot operatethe tiller on a slope that
vices
areinplace.
is too steep for safety. When on slopes,
11.Donotrunengine
inanenclosed
area. slow down and make sure you have good
Engine
exhaust
contains
carbon
monoxide footing. Neverpermit thetiller to freewheel
gas,adeadly
poison
thatisodorless,
col- down slopes.
orless,
andtasteless.
18. Never allow bystanders near the unit.
12.Keep
children
andpetsaway.
19. Onlyuse attachments and accessories
13. Neveroperate the tiller underengine
power if the Wheel Gear Lever is in DISENGAGE(FREEWHEEL).In this position,
the wheels will not hold the tiller back
and the revolvingtines could propel the
tiller rapidlybackward,possiblycausing
loss of control. Always move the Wheel
Gear Leverto ENGAGEbefore starting the
engine or engaging the tines4Nheelswith
the Forward Clutch or the ReverseClutch.
14. Be aware that the tiller may unexpectedly bounce upward or jump backward if
the tines should strike extremely hard
packed soil, frozen ground, or buried obstacles like large stones, roots, or stumps.
If in doubt about the tilling conditions, always usethe following operating precautions to assist you in maintaining control
of the tiller:
that are approved by GardenWay Inc.
20. Usetiller attachments and accessories
when recommended.
21. Neveroperatethetiller without good visibility or light.
22. Neveroperatethetiller if youaretired, or
underthe influenceof alcohol,drugsor medication.
23. Operatorsshallnottamperwith theenginegovernorsettingsonthemachine;thegovernor
controlsthemaximumsafeoperatingspeedto
protectthe engineandall movingpartsfrom
damagecausedby overspeed.Authorizedserviceshallbesoughtif a problemexists.
24. Donottouchenginepartswhich maybe
hot from operation.Letpartscooldown
25. Pleaseremember:Youcanalwaysstopthe
tinesandwheelsby releasingtheForward
ClutchLeveror theReverseClutchControl
(whicheverleveryou haveengaged)or bymoving theThrottleControlLeverto STOP.
26. Toloador unloadthetiller,seethe instructions in Section4 ofthis Manual.
27. Useextremecautionwhenreversingor
pullingthe machinetowardsyou.
28. Starttheenginecarefullyaccordingto instructionsand with feetwellawayfrom the
tines.
29. Neverpick upor carrya machinewhilethe
engineis running.
MaintenanceandStorage
1. Keepthe tiller, attachments and accessories in safe working condition.
2. Checkall nuts, bolts, and screws at frequent intervals for proper tightness to be
sure the equipment is in safe working condition.
3. Neverstorethetillerwith fuelin thefueltank
insidea buildingwhereignitionsourcesare
presentsuch ashot waterandspaceheaters,
furnaces,clothesdryers,stoves,electricmotors,etc.).Allowengineto coolbeforestoringin
anyenclosure.
4. Toreducethechancesof a firehazard,keep
theenginefreeof grass,leaves,or excessive
grease.
5. Storegasoline in a cool, well-ventilated
area,safelyaway from any spark- or flameproducing equipment. Store gasolinein an
approvedcontainer,safelyaway from the
reachof children.
6. Referto the storage instructions in the
Maintenancesection of this Manualand the
separateEngineOwner's Manualfor instructions if the tiller is to be stored for an
extendedperiod.
7. Neverperform maintenancewhile the engine is running orthe spark plug wire is
connected,exceptwhen specifically instructed to do so.
8. If the fuel tank hasto be drained,do this
outdoors.
SafetyDecals
ControlDescription
(on ControlPanel)
For your safety and the safety of others,
various safety and operational decals are
located on your unit (seeFigure 1-2 be-
low).
Keepthe decals clean and legible at all
times. Contactyour local service dealer or
the factory for replacements if any decals
are damagedor missing.
Refer to the Parts List in this manual for
TineWarning
StartingStabilization
Message(on engine)
decallocations, part numbers and ordering
instructions.
WarningMessages
(onlinehood)
HotSurfacesMovingBelts
Warning(onbeltcover)
Figure 1-2: Locationof Safety and OperatingDecals
OperatingSymbols
Various
symbds(shownhere,
withworddescriptions)
mayheusedon'dle'dllerand
engine.
NOTE:
Yourunitmaynothaveallof_esymbds.
I-.-I I,I
CHOKE
ON
CHOKE
OFF
R
REVERSE
<-FAST
SLOW
STOP
TILLERDIRECTION
LEVERDIRECTION
TO AVOID SERIOUS INJURY:
READTHE OPERATOR'SMANUAL.
KNOWLOCATIONSAND FUNCTIONSOF ALLCONTROLS.
KEEPALLSAFETYDEVICESANDSHIELDSIN PLACEAND WORKING.
NEVERALLOWCHILDRENOR UNINSTRUCTEDADULTSTO OPERATETILLER.
SHUTOFF ENGINEAND DISCONNECTSPARKPLUGWIRE BEFOREMANUALLYUNCLOGGINGTINES OR MAKINGREPAIRS.
. KEEPBYSTANDERSAWAYFROM MACHINE.
. KEEPAWAYFROM ROTATINGPARTS.
° USEEXTREMECAUTIONWHEN REVERSINGOR PULLINGTHE MACHINETOWARDS
YOU.
*
*
*
.
°
ROTATING
TINES
SECTION2: ASSEMBLY
WARNING:
HardwareBag PartsList
To prevent
personal injury or property
damage,do not start the engine
until all assembly steps are
complete and you have read
and understand the safety and
operating instructions in this
Manual.
Introduction
Carefully follow these assembly steps to
correctly prepare your tiller for use. It is
recommendedthat you readthis Section in
its entirety before beginning assembly.
Ref.
Qty.
1
2
3
4
2
1
1
1
5
6
7
8
9
18
11
2
2
2
2
2
1
4
Unpacking and Assembly
Instructions
STEP1:UNPACKINGINSTRUCTIONS
1. Removeany card-board inserts and
packaging material from the carton. Remove any staples from the bottom of the
carton and remove the carton.
2. Cut the large,plastic tie strap that securesthe transmissiontube to the shipping
pallet. Leavethe handlebarson top of the
tiller to avoid damagingany cables.
3. A bag with loose hardware is inside the
literature envelope. Checkthe contents
against the following list and Figure 2-1.
Contact your local dealer or the factory if
any items are missing or damaged.
NOTE:For electric start units, a second
hardware bag is located near the battery.
4. The tiller is heavy.You should not attempt to remove it from the shipping platform until instructed to do so in these
"Assembly" steps.
3/8-16 x 1" Hex Hd. Screw
KeyedWasher
Wheel Gear Lever Knob
Height Adjustment Flange
(See Figure 2-2)
3/8" Flat Washer
#10 Lockwasher
3/8"-16 Nylock Lock Nut
#10-32 x 1/2" Rnd Hd Screw
#10-32 Nut
Cotter Pin (not used)
Plastic Tie Strap (2 not used)
O@
7
4
8
10
11
Figure2-1: Loosehardware(shownin reducedsize).
Tools/ MaterialsNeeded
Inspect unit
Inspect the unit and carton for damageimmediatelyafter delivery.Contactthe carrier
(trucking company) if you find or suspect
damage. Inform them of the damageand
request instructions for filing a claim. To
protect your rights, put your claim in writing and mail a copy to the carrier within 15
days after the unit has been delivered.
Contact us at the factory if you need assistance in this matter.
Description
for Assembly
(1)
(2)
(1)
(1)
(1)
(1)
3/8" open-end wrench*
9/16" open-end wrench*
7/8" open-end wrench"
Scissors (to trim plastic ties)
Ruler
Small board (to tap plastic knob on
lever)
(1) Tire pressure gauge
(1) Cleanoil funnel
(1) Clean,high-quality motor oil. Referto
the separate Engine Owner's Manual
for motor oil specifications and quantity required.
* Adjustable wrenches may be used.
IMPORTANT: Motor oil must be added to
the engine crankcase before the engine is
started. Follow the instructions in this
"Assembly" Section and in the separate
Engine Owner's Manual.
Figure2-2: Handlebar heightadjustmentuses
the flange head screw.
Figure2-3: Forwardclutchcontrolcablenot
shownforclarity.
3. With the forward clutchcable (N, Figure 2-4) on the inside of handlebar,position the handlebar ends on the outside of
NOTE: LEFT and RIGHT sides of the
tiller are as viewed
from
the
the two mounting tabs (M, Figure 2-3) on
the transmission top cover.
operator's
handlebars.
NOTE:The curved handlebar height adjustment bracket appearsas shown in C, Figure 2-3 for non-electric start units. For
position
behind
the
STEP2: ATTACHHANDLEBARS
1. Cut the large, plastic cableties that secure the handlebarends to the handlebar
mounting tabs on the transmission top
cover.
2. Gently lift handlebar (do not overstretch
attachedcable) and placehandlebar crossbrace (B, Figure 2-3) in front of curved
height adjustment bracket (C).
electric start units, the bracket is loosened
and moved to one side.
4. Loosely attach the handlebarsto the
mounting tabs with two 3/8-16 x 1"screws
(headsof screws go to inside of tabs), 3/8"
flat washers and 3/8"-16 lock nuts (O, Figure 2-4).
IMPORTANT: Usethe DISENGAGE
position only when the engine is not
running. Before starting the engine,the
WheelGear Levermust be placedin the
ENGAGEposition (see Section 3 for
details).
STEP3: ATTACHREVERSECLUTCH
CONTROLCABLE
Figure2-4: Attach handlebars.
5. Move the handlebars up or down to
align the threaded hole in the cross-brace
with one of the four slots in the curved
height adjustment bracket. Placethe keyed
washer (E, Figure 2-3) on the flange head
height adjustment screw (F) with the
raised keys (edges) of the washer facing
down.
6. Threadthe height adjustment screw (F,
Figure 2-3) into the hole in the handlebar
cross-brace, making sure that the raised
keys on the washer fit into the slot on the
height adjustment bracket. Tighten the
height adjustment screw securely. Next,
securely tighten the two screws and nuts
in the ends of the handlebar (M, Figure 2-
3).
7. To remove the tiller from its shipping
platform, first carefully unwrap the wheel
gear cable (with attached lever- see Figure
2-5) from around the chassis. Move the
Wheel Gear Lever (G) to the DISENGAGE
position--this allows the wheels to rotate
freely. Usethe handlebarsto roll the tiller
off the platform.
1. Carefully unwrap the reverse clutch
control cable (H, Figure 2-6) from its shipping position and route it up along the inside edge of the left side handlebar.A knob
and large hex nut (I) is installed on the cable.
Left Side
Handlebar
Reverse Clutch
Control Knob
Figure2-7: Forward ClutchControllevers (J).
Forwarddutch control linkage (K).
2. The forward clutch control cable (with
attached spring) is hanging loosely near
the right-side wheel. Being careful not to
kink or stretch the cable, insert the z-connector (L, Figure 2-8 - end of the spring)
into the hole at the end of the forward
clutch control linkage (K, Figure 2-7).
Slot in ControlPanel
'1
Figure2-6:Attachreverseclutchcontrolassemblytodotted holein handlebarpanel.
2. Insert the cable into the slot in the control panel and fit the threaded assembly
into the hole in the slot (seeFigure2-6). Be
sure that the flat side of the threaded assembly is aligned with the flat side of the
hole. Slide the hex nut (I) up the cable and
tighten it securely.
3. Testthe function of the reverse clutch
control cable by pulling the knob out and
releasing it. The knob should return to its
neutral position against the tapered bushing. If it doesn't, contact your local dealer
or the factory for technical.
Figure2-8
3. Attach the cable adjuster (A, Figure2-9)
to the bracket on the right-side handlebar.
Use two 1/2"wrenches to loosen the two
jam nuts (B)just enough to slide the cable
adjuster onto the bracket. Then hand tighten the jam nuts.
STEP4: ATTACHFORWARDCLUTCH
CONTROLCABLE
1. Removeany fasteners (rubber bands,
tape, etc.) that may secure the Forward
Clutch Control levers (J, Figure 2-7) to the
handlebar.
Figure2-5: CarefullyunwrapWheelGearLeverand moveleverto DISENGAGE.
NOTE: The Wheel Gear Lever will be
installed later in this procedure.
Figure2-9
CAUTION:
Incorrect cable
adjustment could cause the
wheels and tines to rotate
unexpectedly.Follow
adjustment procedures
carefully. Failureto do so could
result in personal injury or
property damage.
4. Checkfor correct spring/caNe tension
as instructed in Section 5, Checkingand
Adjusting Forward Clutch Belt Tension.
5. Whentension is correct, tighten the two
jam nuts (B) securely.
STEP5: CHECKTRANSMISSIONGEAR
OIL LEVEL
Thetransmission was filled with gear oil at
the factory. However,be sure to check the
oil level at this time to make certain it is
correct.
IMPORTANT: Do not operatethe tiller if
the gear oil level is low. Doingso will result
in severe damageto the transmission
components.
1. With the tiller on level ground, pull the
Depth Regulator Lever (R, Figure 2-13)
back and then slide it to the second notch
from the top. NOTE:If the lever does not
move, lift the tine hood flap and look for a
plastic tie securing the lever in place. Cut
and remove the tie.
2. Removethe oil level check plug (M, Figure 2-10) on the left-side of the transmission. (Due to dried paint on the plug
threads, it may require some force to remove the plug the first time.) Thegear oil
level is correct if oil starts to flow out ofthe
hole as the plug is removed. If so, securely
reinstall the plug.
Figure 2-10: Gear oil level checkplug.
Figure2-11:Addinggearoil.
NOTE:
Do not use automatic
transmission fluid or motor oil in the
transmission.
(a) Cleanarea around the fill hole (N, Figure 2-11) and unscrew gear oil fill plug.
(b) If adding only a few ounces of gear oil,
use API rated GL-4 or GL-5 gear oil having
a viscosity of SAE 140, SAE85W-140 or
SAE 80W-90. If refilling an empty transmission, useonly GL-4 gear oil having a
viscosity of SAE 85W-140 or SAE140.
(c) Using a clean funnel, slowly add gear
oil until it flows from the gear oil level
check hole (N, Figure 2-11).
(d) Reinstall and tighten securely the gear
oil fill plug (M, Figure 2-10).
STEP6: ATTACHWHEELGEARLEVER
1. Insert the WheelGear Lever (P,Figure 212) upthrough the slot in the control panel
that is labeled "WHEELGEAR."
2. Insert two #10-32 x 1/2" round head
screws downthrough the'%" marks on the
control panel decaland securely attachthe
wheel gear mounting bracket using two
#10 lock washers and #10-32 nuts.
3. Use a small board or rubber mallet to
tap the Wheel Gear Lever knob securely
onto the lever (R, Figure 2-13).
4. Securethe wheel gear cable and the reverse clutch control cable to the left-side
handlebar with two plastic ties (S, Figure
2-13) locatedabout two feet apart. Snip off
any excess tie length.
STEP7: CHECKAIR
Use a tire pressure gauge to check the air
pressure in both tires. Deflateor inflate
both tires equally to between 15 PSi and
20 PSI. Besure that both tires are inflated
equally or the unit will pull to one side.
3. If oil does not flow from the check hole,
add oil as follows:
Figure2-12: Attach Wheel Gear Lever.
Figure2-13:Attachwheelgearcableand reverseclutchcablewithcableties(S).
STEP8: CHECKHARDWARE
Inspectthe hardware on the unit and tighten any loose screws, bolts and nuts.
SECTION3: FEATURES
ANDCONTROLS
_
IMPORTANT:The Forward Clutch Levers
are connectedto a mechanical interlock
operating
your machine,
ARNING:
Before
carefully readand understand
all safety, controls and
operating instructions in this
Manual, the separateEngine
Owner's Manual,and on the
decals on the machine. Failure
to follow these instructions can
result in serious personal
injury.
Tiller Features
Figure3-1: Controlpanel.
This section describes the location and
function of the controls on your tiller. Refer
to Section 4: Operationfor detailed operating instructions.
To shift to ENGAGE,gently (do not force)
move the lever forward while rolling the
tiller a few inches forward or backward.
Practice using these controls, with the engine shut off, until you understand the operation of the controls and feel confident
with each of them.
IMPORTANT:Referto the separateengine
manufacturer's EngineOwner's Manual
for information about the controls on the
(Moving the tiller helps align the transmission shift mechanism). Thewheels will not
freewheel when the lever is properly set in
the ENGAGEposition.
To shift to DISENGAGE,move the lever
rearward, without rolling the tiller. The
wheels roll freely when the lever is properly set in the DISENGAGEposition.
engine.
ForwardClutchLevers
Wheel Gear Lever
Two interconnected levers (B, Figure3-1)
control engagementof the forward driveto
the wheels and powerto the tines.
This lever (A, Figure 3-1) hastwo positions: ENGAGEand DISENGAGE.
In the ENGAGEposition, the wheels will
start turning when either the Forward
Clutch or the ReverseClutch is engaged.
NOTE: The tines will also start turning
when either clutch is engaged.
,_
Wheel
GearLever
in
DANGER:
Neverplacethe
DISENGAGE(Freewheel)when
the engine is running.
Having the Wheel Gear Leverin
engaging the tines_vheelswith
either the Forward Clutchorthe
ReverseClutch could allow the
tines to propel the tiller rapidly
backward. Failureto follow this
instruction could result in
personal injury or property
damage.
The DISENGAGE(freewheel) position places the wheels in freewheeling mode to allow the wheels to turn without starting the
engine. Use the DISENGAGEposition only
when the engine is not running.
,_
wheels
and tines Never
with Forward
WARNING:
engage
Clutch or ReverseClutch unless
Wheel GearLever is in
ENGAGE.Engagingthe Forward
Clutch or ReverseClutch when
wheels are not engaged could
allow the tines to rapidly propel
tiller backward. Failureto follow
this warning could result in
personal injury or property
damage.
To OperateForwardClutch:
1. Before engaging the Forward Clutch,
put the Wheel Gear Leverinto the ENGAGE
position (see "WARNING"above).
2. Lift and hold one or both levers against
the handlebar grips to engagethe wheels
and tines.
3. ReleaseBOTHlevers to disengage
wheels and tines. All forward motion will
stop (engine will continue to run).
that automatically shifts a separateWheel
Gear Lever (A, Figure3-1) into ENGAGE
position when either Forward Clutch Lever
is pulled up against the handlebars. This is
a safety feature designedto prevent the
wheels from being in DISENGAGE
(freewheel) position when the tines are
rotating.
Beforestarting the engine, test the
function of the mechanicalinterlock as
follows:
1. Put Wheel Gear Lever into DISENGAGE
position and roll tiller back and forth a few
inches. Wheels should roll freely.
2. Without rolling the tiller, squeezeeither
Forward Clutch Leveragainst the handlebar grips. As the levers move upward, the
mechanical interlock automatically moves
the Wheel GearLever forward into the ENGAGEposition (roll tiller back and forth a
few inches). If it does, the wheels will not
roll freely when you push and pull on the
handlebars.
3. The mechanicalinterlock works properly if it functions as described in Step 2. If
the mechanical interlock does not function
properly, do not operatethe tiller until it
has been corrected (seeyour authorized
dealer or contact the factory).
Reverse Clutch Control
This control (C, Figure 3-1) engagesthe
reversedrive to the wheels and power to
the tines. It is usedfor moving the tiller
short distances in a reverse direction.
ToOperateReverseClutch:
_
caution
when reversing
or
ARNING:
Useextreme
pulling the machine towards
you. Look behind to avoid
obstacles. Never attempt to till
in reverse.Failureto follow this
warning could result in
personal injury or property
damage.
1. Beforeengaging the ReverseClutch, put
the Wheel Gear Lever into ENGAGE.(see
"WARNING" at left).
2. Releasethe Forward Clutch Levers.
3.Tomove
thetillerinreverse,
firststopall Handlebar HeightAdjustment
forward
motion.
Liftupthehandlebars
un- Handlebar height is adjustable to four diftil thetinescleartheground
andpullthe ferent settings. When setting the height,
Reverse
Clutch
leverout.
keep in mind that the handlebars will be
Thewheels
willrotate
inareverse
direction lower when the tines are engaged in the
aslongastheleverisheldinREVERSE.
To soil.
stopthewheels
andtines,release
thelever
WARNING: Whenever the
anditwillreturn
toNEUTRAL.
Neverattempt to till while movingin reverse direction.
handlebar height is changed,
the Forward Clutchshift
mechanism must be
DepthRegulatorLever
readjusted. Beforeadjusting or
checking the Forward Clutch
mechanism, shut engine off,
disconnect spark plug wire and
prevent it from touching spark
plug. Failureto follow this
warning could cause the
Forward Clutch mechanism to
operateimproperly which could
result in personal injury or
property damage.
This lever (E, Figure 3-2) controls the tilling depth of the tines. Pull the lever
straight back and slide it up or down to engage the notched height settings.
EngineControls
IMPORTANT:The engine is equipped with
either a choke control or a primer bulb.
Refer to the Engine Owner's Manual (included in tiller literature package)to identify which device is on your engine.
Recoil Starter
The recoil starter (H, Figure3-4) is usedto
"pull-start" the engine. SeeEngine Starting
and Stopping in Section 4 for detailed engine starting instructions.
H
To AdjustHandlebarHeight:
Figure3-2: DepthRegulatorLever.
The highest notch (lever all the way down)
raisesthe tines approximately 1-1/2 inches
off the ground. This "travel" position allows the tiller to be moved without the
tines digging into the ground.
1. Stop engine, wait for all parts to stop
moving and then disconnect spark plug
wire.
2. Loosenthe two screws at lower ends of
handlebar.
3. Loosenheight adjustment screw (F,Figure 3-3) and pull keyedwasher (G) free
from slots in curved height adjustment
bracket.
Moving the lever up increasesthe tilling
depth. The lowest notch allows a tilling
depth of approximately six to eight inches,
depending on soil conditions.
For best results, always begin tilling at a
very shallow depth setting and gradually
increase tilling depth.
Regulator
Leverin
"travel"
WARNING:
PlaceDepth
position before starting engine.
This position preventsthe tines
from touching the ground until
you are readyto begin tilling .Do
not attempt to till too deeplytoo
quickly. Graduallywork down
to deepertilling depths. Failure
to follow this warning could result in
personal injury or property damage.
,_
Figure3-3: Handlebar height adjustment.
4. Move handlebarsto a new slot setting
and insert the raised key on the keyed
washer into the slot. Tighten the height adjustment screw securely.
5. Retighten the two screws at ends of
handlebar.
lO
Figure 3-4: Recoil starter handle.
EngineThrottle Lever
Thethrottle lever (D, Figure3-1 ) is usedto
adjust engine speedas well as stop the engine. Use the STARTposition when starting the engine. Pull the lever all way back
to the STOPposition to shut the engine off.
SECTION3: OPERATION
WARNING:
Before
Reverse ClutchControl
operating your machine,
carefully readand understand
all safety (Section 1), controls
(Section 3) and operating
instructions (Section 4) in this
Manual, in the separate Engine
Owner's Manual,and on the
decals on the machine. Failure
to follow these instructions can
result in serious personal
injury.
Break-In Operation
Perform the following maintenanceduring
the first hours of new operation (see Section 5: Maintenanceand the maintenance
section of the Engine Owner's Manual).
1. Changemotor oil after first 2 hours of
new engine operation.
2. Checkfor loose or missing hardware on
unit. Tighten or replaceas needed.
3. Checktension on forward drive belt after first 2 hours of operation.
4. Checktransmission gear oil level after
first 2 hours of operation.
STARTING AND STOPPING ENGINE
The following steps describe how to start
and stop the engine. Do not engage the
tines or wheels until you have read all of
theoperatinginstructionsin thisSection.
Alsoreview the safety rules in Section1:
Safetyand the tiller and engine controls
informationin Section3: Featuresand
Controls.
Pre-StartChecklist
Do the following before starting the engine.
1. Checkunit for looseor missing hardware. Service as required.
/
ForwardClutchLever
\
ForwardClutchLever
Recoil Rope Starter
Depth
Regulator
Lever
Introduction
Readthis Section of the manual thoroughly beforeyou start the engine. Then, take
time to familiarize yourself with the basic
operation of the tiller before using it. Find
an open, levelarea and practice using the
tiller controls without engaging the tines in
the soil (put tines in "travel" setting). Only
after you've become completely familiar
with the tiller should you begin using it in
the garden.
WheelGearLever
CounterRotatingTines
Figure4-1
2. Checkmotor oil level. See Engine Owner's Manual.
3. Checkthat all safety guards and covers
are in place.
4. Checkair cleanerand engine cooling
system. See Engine Owner's Manual.
5. Select a forward belt speed range (see
ChangingBelt SpeedRanges in this Section).
6. Fill the fuel tank with gasoline according
to the directions in the separate Engine
Owner's Manual. Follow all instructions
and safety rules carefully.
_k
HIGHLYFLAMMABLEAND
ANGER: GASOLINEISITS
VAPORSAREEXPLOSIVE.
Follow gasoline safety rules in
this manual (seeSection 1) and
in the separate Engine Owner's
Manual. Failureto follow
gasolinesafety instructions can
result in serious personal injury
and property damage.
_,
serious
personal
injury
AUTION:
To
helpor
prevent
damageto equipment:
• Beforestarting engine,put WheelGear
Leverinto ENGAGE
position.
• Beforestarting engine,put Forward
ClutchLeversand ReverseClutchControl
intoneutral (disengaged)positions by
releasingcontrols.
• Neverrun engineindoorsor in an
enclosed,poorlyventilatedarea.Engine
exhaustcontainscarbonmonoxide,an
odorlessand deadlygas.
• Avoid enginemufflerand nearbyareas.
Temperaturesin theseareasmay exceed
150oF.
3. Put the Depth Regulator Lever into the
"travel" position (lever all the way down)
so that the tines are clear of the ground.
4. Releaseall controls on the tiller.
5. If the engine is equipped with a fuel
shutoff valve, turn the valve to the open
position, as instructed in the separate Engine Owner's Manual.
7. Attach spark plug wire to spark plug.
Startingthe Engine
_
1. Completethe Pre-Start Check/isL
2. Put the Wheel Gear Lever(Figure 4-1 )
into the ENGAGEposition.
11
from
rotating tines.
Rotating
WARNING:
Keep
away
tines will cause injury.
6. Move the EngineThrottle Leverinto the
STARTposition.
7. Choke or prime the engineas instructed
in the separate Engine Owner's Manual.
4. For forward motion of the wheels and
power to the tines:
8. Checkbehind you to avoid contacting
(a) Pull up and hold the Forward Clutch
levers againstthe handlebars.Tostop
the wheels and tines, releaseboth leve rs.
WARNING:
any obstacles when pulling the starter
rope. Placeone hand on the fuel tank to
stabilize the unit and usethe recoil starter
to start the engine as instructed in the Engine Owner's Manual. Whenthe engine
starts, gradually move the choke lever (on
enginesso equipped)to the NO CHOKE,
CHOKEOFFor RUNposition, whicheverapplies.
9. Use the FASTthrottle speed setting
when tilling.
StoppingtheEngine
1. Tostop the wheels and tines, releasethe
Forward Clutch levers or the Reverse
Clutch Control (whichever control is in
use).
2. Tostop the engine, move the Engine
Throttle Lever into the STOPposition.
OperatingTiller
_
contact
your telephone
and
ARNING:
Beforetilling,
utilities company to inquire if
underground lines are on your
property.
Thefollowing pages provide guidelines to
using your tiller effectively and safely in
various gardening applications. Be sure to
read Tilling Tips & Techniquesin this Section beforeyou actually put the tines into
the soil.
1. Follow the Pre-Start Checkl/ston the
previous page.Besure that the Wheel Gear
Lever is in the ENGAGEposition.
2. Movethe Depth Regulator Leverintothe
"travel" position (leverall the way down)
so that the tines clearthe ground. Usethis
position when practicing with or transporting the tiller. When you are readyto begin
tilling, move the Depth Regulator Lever
into the desired depth setting (see Tilting
Tips & Techniques).
3. Start the engine and allow itto warm up.
Whenwarm, move the throttle control into
the FASTspeed setting.
Donot push
down on the handlebarsto try
to make the tiller till more
deeply. This preventsthe
wheels from holding the tiller
back and can allow the tines to
rapidly propel the tiller
backwardtoward the operator,
which could result in loss of
control, property damage, or
personal injury.
(b) Asthe tiller movesforward, relaxand
let the wheels pull the unit along while
the tines dig. Walk behind and a little
to one side of the tiller. Use a light but
secure grip with one hand on the handlebars, but keepyour arm loose. See
Figure 4-2. Letthe tiller move ahead
at its own pace. Do not push down on
the handlebarsto try and force the
tiller to dig deeper- this takes weight
off the wheels, reduces traction, and
causesthe tines to try and propel the
tiller.
5. For reverse motion of the wheels and
tines:
Figure4-2: Useonehandtoguide tiller when
movingforward.
Figure4-3: Raisetinesoffgroundandlookbehindwhenmovinginreverse.
(a) Look behind and exercisecaution
when operating in reverse.Do not till
while in reverse.
(b) Stop all forward motion before reversing. Lift the handlebars with one
hand until the tines are off the ground
and then pull the ReverseClutch control out (seeFigure 4-3). Tostop reverse motion, let go of the Reverse
Clutch Control.
6. Toturn the tiller around:
(a) Practice turning in a level, open area.
Be very careful to keepyour feet and
legs away from the tines.
(b) To start a turn, reduce the engine
speedand then lift the handlebars until the engine and tines are balanced
over the wheels (Figure 4-4).
(c) With the tiller balanced, push sideways on the handlebar to move the
tiller in the direction of the turn (Figure 4-5). After completing the turn,
slowly lower the tines into the soil
and increase the engine speed.
12
Figure 4-4: Find balancepoint before turning.
Figure 4-5
StoppingtheTiller andEngine
6. Checkthat the belt is within the forward
1. Tostop the wheels and tines, releasethe
Forward Clutch levers or the Reverse
Clutch Control (whichever is engaged).
beltguide (E, Figures4-10 and 4-11) on the
right-side of the unit and is within the forward idler (F,Figure 4-11) on the left-side.
Besure that the belt is situated in the center
grooves (C and D, Figure 4-10) of the engine (upper) and transmission (lower) pulleys.
2. Tostop the engine, move the Engine
Throttle Lever to STOR
3. If the engine is equipped with a fuel shutoff valve,close the valve as instructed in the
Engine Owner's Manual.
_k
changing belt speeds,stop
WARNING:
Before
engine,wait for all parts to stop
moving, let engine cool and
disconnect spark plug wire.
Failureto follow these
instructions could result in
personal injury.
ChangingBelt RangeSpeeds
Thetiller hastwo forward belt rangespeeds
for the wheels and tines: Low and High. The
two rangesare obtained by moving the forward drive belt between two sets of
grooves on the forward drive pulley and the
transmission drive pulley.
NOTE:The High speed belt range is recommended for all tilling purposes. The Low
speed belt range will operate the tines and
wheels at a slower forward speed, which
may be suitable in some conditions (such
as tilling in very hard ground).
ToChangefrom Lowto HighSpeed:
1. Stopthe engine, allow it to cool, and disconnect the spark plug wire.
2. Move the Wheel Gear Lever into the DISENGAGEposition.
3. Removethe two nuts from the plastic
belt cover on top of the transmission and
remove the belt cover.
4. From beneaththe tiller, move the forward drive belt out of the transmission low
speed groove (B, Figure 4-10) and into the
high speed groove (D).
5. Pull upward on the belt to remove any
slack and slip the belt out of the engine
drive pulley low speed groove (A, Figure410) and into the high speedgroove (C).
,c l
(Low)
(High)
everse
Belt
7. Reinstallthe plastic belt cover and secure it with the two nuts.
8. Put Wheel Gear Leverin ENGAGEand reconnect spark plug wire before attempting
to start the engine.
To Changefrom Highto LowSpeed:
1. Stop the engine,allow it to cool, and disconnect the spark plug wire.
2. Put Wheel Gear Lever in DISENGAGE.
3. Removethe two nuts from the plastic
belt cover on top of the transmission and
remove the belt cover.
4. From beneaththe tiller, move the forward drive belt out of the transmission pulley high speed groove (D, Figure 4-10) and
into the low speed groove (B).
(Low)
(High)
Figure4-10:Right-sideview ofengineand
transmission
pulleys (engineisatright-side of
view).
5. Pull upward on the belt to remove any
slack and slip the belt out of the engine
drive pulley high speed groove (C, Figure41O)and into the low speed groove (A).
NOTE:If the belt is difficult to move, pull on
the engine start rope while pushing the belt
with your finger (engine drive pulley will
turn as start rope is pulled).
6. Checkthat the belt is within the forward
belt guide (E,Figures4-10 and 4-11) on the
right-side of the unit and is within the forward idler (F,Figure 4-11) on the left-side.
Be sure that the belt is situated in the rear
grooves (A and B, Figure4-10) of the engine (upper) and transmission (lower) pulleys.
7. Reinstallthe plastic belt cover and secure it with the two nuts.
8. Put the Wheel Gear Lever in ENGAGE
and reconnect the spark plug wire before
attempting to start the engine.
NOTE:If the belt is difficult to move,pull on
the engine start rope while pushing the belt
with your finger (engine drive pulley will
turn as start rope is pulled).
13
Figure4-11: Topview offorwarddrivepulley
system(engineis at left-sideof view).
TILLINGTIPS& TECHNIQUES
Tilling Depths
WAHNING:
This is a CRT(counter-rotatingtine) tiller. As the wheels pull forward, the tines rotate backward. This createsan "uppercut" tine action which digs deeply,uprooting soil and weeds.
Don't overloadthe engine,but dig as deeplyas possible on eachpass. On later passes,the
wheelsmaytendto spinin thesoft dirt. Helpthem along by lifting up slightly on thehandlebar
(one hand,palm up,works most easily).
Before
tilling, contact your
telephone or utilities
company and inquire if
underground equipment or
lines are usedon your
property. Do not till near
buried electric cables,
telephone lines, pipes or
hoses.
Avoidthe temptation to pushdown on the handlebarsin an attemptto force thetiller to dig
deeper.Doingso takesthe weight off the poweredwheels,causingthem to lose traction.
Withoutthe wheelsto hold the tiller back,the tineswill attempt to propelthe tiller backward,
towardsthe operator.(Sometimes,slightdownward pressureon the handlebarswill help get
througha particularlytough sectionof sod or unbrokenground, but in most casesthis won't
be necessary.)
• Whencultivating (breakingup surfacesoil around plants to destroyweeds,seeFig.4-9), a just the tines to dig only 1"to 2" deep.Using
shallow tilling depths helps prevent injury to plants whose roots often grow close to the surface. If needed,lift up on the handlebars
slightly to preventthetines from diggingtoo deeply.(Cultivatingon a regularbasisnot only eliminatesweeds,it alsoloosensand aerates
thesoil for better moistureabsorptionandfaster plantgrowth.) Wateringthegardenareaa few days prior to tilling will maketilling easier,
aswill letting the newly worked soil set for a dayor two beforemakinga final, deeptilling pass.
ChoosingCorrectWheel & Tine Speeds With experience,you will find the "just right" tilling depth and tilling speedcombination
that is best for your garden.
Setthe enginethrottle leverat a speedto givethe engineadequatepowerand yet allow it to operateat the slowest possiblespeed...atleast
until you haveachievedthe maximum tilling depth you desire. Fasterenginespeeds may be desirablewhen makingfinal passesthrough
the seedbedor whencultivating. Selectionof the correct enginespeed,in relationto the tilling depth, will ensurea sufficientpower levelto
do the job without causingthe engine to labor.
Let the Tiller Dothe Work
AvoidMaking Footprints
Whiletilling, relaxand letthe wheelspull the
tiller along while the tines do the digging.
Walk on the side that is not yet finished (to
avoid makingfootprints in the freshly tilled
soil) and lightly, but securelygrip the handlebarwith just one hand.
AvoidTilling Soggy,Wet Soil
Whenever possible, walk on the untilled Tilling wet soil often results in large,hard
sideof the unit to avoid makingfootprints in clumps of soil that can interfere with plantyour freshly tilled or cultivated soil. Foot- ing. If time permits, wait a day or two after
prints causesoil compaction that can ham- heavy rains to allow the soil to dry before
per root penetration and contribute to soil tilling. Testsoil by squeezingit into a ball. If
erosion. They can also "plant" unwanted it compressestoo easily,it is too wet to till.
weed seeds back into the freshly tilled
ground.
Preparing Seedbeds
• Whenpreparinga seedbed,go overthe samepathtwice in thefirst row,then overlap one-halfthetiller width on the rest of the passes(seeFig. 6). Whenfinished in
one direction,make a second pass at a right angle,as shown in Fig.4-7. Overlap
eachpassfor best results (in very hardground, it may takethree or four passesto
thoroughly pulverizethe soil.)
Fig. 4-6
Fig.4-7
Cultivating
• If the gardensize will not permit lengthwiseand thencrosswisetilling, then overlapthefirst passesby one-halfa tiller
With planning, you can ==.._vp. ==_._
v_
allow enoughroom
_"
_
(_
width,followed by successivepasses
at one-quarterwidth (seeFig.4-8).
between rows to cultivate _
_
(seeFig.4-9). Leaveroom _
for the hood width,
plus enough extra _
_
....................
v
.................................
_ _
Fig. 4-8
room for future plant
growth.
14
_'
Fig. 4-9
TILLINGTIPS & TECHNIQUES
(CON'T)
Tilling On Slopes
Read the followingrecommendationsbeforetilling on slopes:
WAHNING:
If you must gardenon a moderateslope,pleasefollow two very importantguidelines:
1. Till only on moderateslopes,neveron steepground wherefooting is difficult (review safety rulesin Section 1: Safetyof this manual).
2. We recommendtilling up and down slopes ratherthan terracing. Tilling vertically on a
slopeallows maximum plantingarea and also leavesroomfor cultivating.
IMPORTANT:
Whentilling on slopes, be surethe correct oil levelis maintainedin the engine
(checkevery one-half hour of operation).The inclineof the slopewill causethe oil to slant
awayfrom its normalleveland this can starveengineparts of requiredlubrication. Keepthe
motor oil levelat the full point at all times!
Do not
operatetiller on a slope too
steep for safe operation. Till
slowly and be sure you have
good footing. Neverpermit
tiller to freewheel down
slopes. Failureto follow this
warning could result in
personal injury.
Tilling Up and DownSlopes(Vertical Tilling)
• To keepsoil erosionto a minimum, be sureto add enough organicmatterto the soil sothat it has good moisture-holdingtexture and try
to avoid leavingfootprints or wheelmarks.
• Whentilling vertically,try to makethe first passuphill as thetiller digs moredeeplygoing uphillthan it doesdownhill. In soft soil or weeds,
you may haveto lift the handlebarsslightly while going uphill. Whengoing downhill, overlapthe first passby aboutone-halfthe width of
the tiller.
Clearingthe Tines
Thetines havea self-clearingactionwhicheliminatesmosttanglingof debrisin the
tines.However,occasionallydrygrass,stringystalksor toughvinesmaybecometangled.Followthese proceduresto helpavoidtanglingandto cleanthe tines,if necessary.
•Toreducetangling,setthedepthregulatordeepenoughto getmaximum"chopping"
actionas thetines chopthe materialagainstthe ground.Also,try to till undercrop
residuesor covercropswhilethey aregreen,moistandtender.
• Whiletilling, try swayingthe handlebarsfrom sideto side (about6"to 12").This
"fishtailing"actionoften clearsthe tinesof debris.
• If tanglingoccurs,lift thetines out of the soiland run thetiller in reverse(if unit is
equippedwith poweredreverse)for a few feet.Thisreversingactionshouldunwinda
gooddealof debris.
Loading and UnloadingtheTiller
,_
unloadingthetiller Loading
intoavehicleis
WARNING:
and
potentiallyhazardousandwedon't
recommenddoingso unless
absolutelynecessary,
asthiscould
resultin personalinjuryor
propertydamage.
However,if you mustloador
unloadthetiller, followthe
guidelinesgivennext.
• Beforeloadingor unloading,stopthe engine,
waitfor all partsto stop moving,
disconnectthe sparkplugwireand letthe engineand mufflercool.
• Thetiller is too heavyandbulkyto lift safely
by oneperson.Twoor morepeopleshould
sharethe load.
• It may be necessaryto remove the debris by hand (a
pocket knife will help you to cut awaythe material). Be
sure to stop the engine and disconnect the spark plug
wire before clearing the tines by hand.
tines
by hand, stopBeforeclearing
the engine,allow
WARNING:
theall
moving parts to stop and disconnect the
spark plug wire. Removethe ignition key
on electric start models.
Failureto follow this warning could result
in personal injury.
• Use sturdy ramps and manually (engine shut
off) roll the tiller into and out of the
vehicle. Two or more people are neededto do
this.
• When going up ramps, stand in the
normal operating position and push the tiller
ahead of you. Havea person at each side to
turn the wheels.
• The ramps must be strong enoughto support
the combined weight of the tiller and any handlers. The ramps should provide good traction
to prevent slipping; they should have side rails
to guide the tiller along the ramps; and they
should havea locking device to secure them to
the
vehicle.
• When going down ramps, walk backward
with the tiller following you. Keepalert for any
obstacles behind you. Position a person at
eachwheel to control the speed of the tiller.
Nevergo down ramps tiller-first, as the tiller
could tip forward.
• Placewooden blocks on the downhill side of
• The handlersshould wearsturdy footwearthat
will helpto preventslipping.
• Position the loading vehicle so that the ramp
angle is as flat as possible (the less incline to
the ramp, the better). Turn the
vehicle's engine off and apply its parking brake.
15
the wheels if you needto stop the tiller from
rolling down the ramp. Also, use the blocks to
temporarily keep the tiller in place on the
ramps (if necessary),and to chock the wheels
in place after the tiller is in the vehicle.
• After loading the tiller, prevent it from rolling
by engaging the wheels in the WHEELDRIVE
position. Chock the wheels with blocks and securely tie the tiller down.
SECTION5: MAINTENANCE
D
,_
serious personal injury or
property damage.
MAINTENANCESCHEDULE
PROCEDURE
NOTES
Chock motor oil level
2, 3
Clean engine
Check drive belt tension
Check nuts and bolts
Change motor oil
Lubricate tiller
2, 7
1,4
1,4
1,4, 6
4
Service foam pre-cleaner air filter
Service paper air filter
Check gear oil level in transmission
Check tines for wear
7
7
1, 5
5
Check air pressure in tires
Service spark plug
5
7
NOTES
12 -
After first 2 hours of break-in operation.
Before each use.
3 -
Every5 operating hours.
4 5 -
Every 10 operating hours.
Every30 operating hours.
6 -
Changemore frequently in dusty or dirty
conditions.
7-
See Engine Owner's Manual forservice
recommendations.
Whichever time interval occurs first.
8 -
lation either on the unit or on the floor
L
E
inspecting,
cleaning
or
WARNING:
Before
servicing the machine, shut off
engine, wait for all moving
parts to come to a complete
stop, disconnect spark plug
wire and move wire away from
spark plug. Removeignition
key on electric start models.
Failureto follow these
instructions can result in
where it has been parked.
A little seepagearound a cover or oil seal
is usually not a cause for alarm. However,
if the oil drips overnight, then immediate
attention is needed--ignoring a leak can
result in severe transmission damage.
Figure5-1
• Removetines and clean tine shafts (C,
Figure 5-1). Inspect for rust, rough
spots or burrs (especiallyaround holes).
File or sand smooth and coat ends of
shaft with grease.
• Oil the threads on the handlebar height
adjustment handle (D, Figure 5-1).
• Oil the outer casings of the engine throttle cable and the wheel gear cable (E,
Figure5-1). Allow oil to soak in and then
wipe off any excess.
• Oil the various pivot points (F, Figure 52) on the shifting mechanism, the handlebar,and the idler arms (do not allow
oil on the belts or pulleys).
If a cover leaks, try tightening any loose
screws or bolts. If the fasteners are tight, a
new gasket or oil seal may be required. If
the leak is from around a shaft and oil seal,
the oil seal probably needsto be replaced.
Seeyour authorized dealer or contact the
factory for service or advice.
IMPORTANT:Never operatethe tiller if the
transmission is low on oil. Checkthe oil
level after every 30 hours of operation and
whenever there is any oil leakage.
CheckHardware
Checkthe unit for loose or missing hardwareafter every 10 operatinghours. Loose
or missing hardwarecan lead to equipment failure, poor performance, or oil
leaks.
Besure to check the three end cap mounting screws located at the rear of the transmission (Figure 5-3). Lift the tine flap to
service those screws.
Tiller Lubrication
Proper lubrication of the tiller is an essential part of your maintenanceprogram. After every 10 operating hours, oil or grease
the lubrication points shown in Figures 51 and 5-2 and described below.
Use general purpose lubricating oil (#30
weight motor oil is suitable) and a general
purpose grease (metal lubricant is preferred, if available).
• Removewheels and cleanwheelshaft (A,
Figure 5-1). Apply a thin coating of
greaseto shaft before reinstalling
wheels.
• Greaseback, front and sides of depth
regulator lever (B, Figure 5-1).
EndCap
Figure5-2
Check Tire Air Pressure
Checkthe air pressure in both tires. Deflate
or inflate both tires evenly to between 15
and 20 PSi (pounds per square inch). Be
sure that both tires haveequal air pressure
or the unit will pull to one side.
Check For Oil Leaks
Beforeeach use, checkyour tiller for signs
of an oil leak--usually a dirty, oily accumu16
Figure5-3
Transmission Gear Oil Service
Checkthe transmission gear oil level after
every 30 hours of operation or whenever
you notice any oil leak. Operatingthe tiller
when the transmission is low on oil can result in severe damage.
moving
parts to come
to a completecleaning
stop, disconnect
spark
wire and move
wire away
WARNING:
Beforeinspecting,
or servicing
theplug
machine,shut
off engine,
waitfrom
for all
spark plug. Failureto follow these instructions can result in serious personal injury or property
damage.
A. ToCheckTransmission
1. Checkthe gear oil level when the transmission is cool. Gear oil expands in warm
operating temperatures and will result in
an incorrect oil level reading.
2. Tocheck the gear oil level (and to add
oil, if necessary), refer to STEP5."Check
GearOil Level in Transmissionin Section 2
of this manual.
D.To Drainand Refillthe Transmission:
Thetransmission gear oil does not need to
be changedunless it has been contaminated with dirt, sand or metal particles.
1. Prop upthe left side of the unit securely.
Removethe left-side wheel by removing
the wheel mounting hardware.
2. Unscrew the plastic gear oil fill plug
from the top of the transmission
3. Placea clean pan below the transmission drain plug (Figure5-4) and remove
the drain plug. Theoil will start flowing out
of the drain hole (it may flow slowly, especially in cold temperatures).
7. Use a clean funnel to slowly add SAE
140 or SAE85W-140 weight gear oil (with
an API rating of GL-4 only) to the transmission. Thetransmission holds approximately 3-1/4 pints (52-54 ounces). Tilt the
tiller slightly backwards to make sure the
gear oil reachesthe rear (tine) end of the
transmission. Stop adding gear oil when it
begins to flow from the oil levelcheck hole
on the side of the
ion.
8. Securely reinstall the oil level check
plug.
9. Securely reinstall the gear oil fill plug on
top of the transmission.
10. Reinstall the wheel and remove the
prop.
Engine Oil Service
Checkthe motor oil level before starting
the engine eachday and after each5 hours
of continuous operation. Running the engine when the oil level is low will quickly
ruin the engine.
Air CleanerService
The engine air cleaner filters dirt and dust
out of the air before it enters the carburetor. Operatingthe engine with a dirty,
clogged air filter can cause poor performance and damageto the engine. Never
operatethe engine without the air cleaner
installed. Inspect and service the air cleaner more often if operating in very dusty or
dirty conditions.
Service the air cleaner as instructed in the
separate Engine Owner's Manual.
inspectand cleanor replacethe spark plug
after every 100 operating hours or annually. Cleanthe plug and set the gap as described in the separate Engine Owner's
Manual.
It is recommendedthat you changethe
motor oil after every 10 hours of operation
and even sooner when operating in extremely dirty or dusty conditions.
In some areas, local law requires using resistor spark plugs to suppress ignition signals. If the engine was originally equipped
with a resistor spark plug, use the same
type for replacement.
A. To Checkthe Motor0il Level:
SparkArrester Screen Service
1. Move the tiller to a level area and stop
the engine.
If the engine muffler is equipped with a
spark arrester screen, remove and clean it
according to the time intervals and instructions in the separate Engine Owner's Manual.
Figure 5-4: Remove drain plug to drain transmissiongear oil (also remove oil fill plug and
oil level checkplug).
3. Cleanthe area around the oil dipstick or
oil fill tube (whichever applies) to prevent
dirt from falling into the crankcase.
4. Removethe transmission gear oil level
check plug that is located a few inches
abovethe left-side wheel shaft (N, Figure
2-11).
4. On engines with an oil fill tube, remove
the filler cap and add oil (if required) until
it reachesthe top of the tube. Reinstallthe
filler cap.
5. On engines with a dipstick, remove it,
wipe it clean, and reinstall it finger4ight.
Removethe dipstick again and check the
reading. Add oil (if required) to bring the
level to the FULL mark. Do not overfill.
6. After draining the oil, clean the threads
of the drain plug, apply a non-hardening,
removable gasket sealant to the threads,
and securely reinstall the drain plug.
Changethe motor oil as instructed in the
separate Engine Owner's Manual.
Spark Plug Service
2. Levelthe engine by moving the Depth
Regulator Lever into the second notch
from the top.
5. When the oil stops flowing, tilt the
transmission forward to drain oil from the
rear of the transmission.
B. To Changethe Motor Oil:
17
EngineCleaning
The engine must be kept clean to assure
smooth operation and to prevent damage
from overheating. Refer to the separate
Engine Owner's Manualfor specific repair
and cleaning instructions. All inspections
and services must be done with the engine
shut off and cool to the touch.
moving
parts to come
to a completecleaning
stop, disconnect
spark
wire and move
wire away
WARNING:
Beforeinspecting,
or servicing
theplug
machine,shut
off engine,
waitfrom
for all
spark plug. Failureto follow these instructions can result in serious personal injury or property
damage.
NOTE:
Carburetor / Governor Adjustment
The
tiller
hood
must
be
removed to take off either a single tine
holder or individual tines. The hood is
,_
shall
not tamper with
the engine
WARNING:
Operators
governor settings; the governor
controls the maximum safe
operating speedto protect the
engine and all moving parts
from damagecaused by
overspeed.Authorized service
shall be sought if a problem
exists.
Thecarburetor was adjusted at the factory
for best operating speed. Referto the separate Engine Owner's Manualfor any adjustment information or seeyour
authorized engine service dealer.
The governor controls the maximum safe
operating speed and protects the engine
and all moving parts from damagecaused
by overspeeding. Do not tamper with the
engine governor settings. Seekauthorized
service if a problem exists.
Throttle Control Adjustment
If the engine does not respond to various
throttle lever settings, referto the separate
Engine Owner's Manualfor service information or contact your local authorized engine service dealer.
Wheel Gear Cable Adjustment
When the Wheel Gear Lever is in DISENGAGE,the wheels will roll freely (freewheel). The wheels should not roll freely
when the lever is in ENGAGE.If the wheels
roll freely when the Wheel Gear Lever is in
ENGAGE,the wheel gear cable needsto be
adjusted as described below.
1. With the engine shut off and the spark
plug wire disconnected, put the Wheel
Gear Lever in ENGAGE.
2. Loosen the top adjustment nut
the wheelgear cable bracketlocated on the
left side rear of the transmission.
3. Push wheelgear cable (B) down and roll
tiller slightly forward or backward until eccentric lever (C) engages (locks) wheels.
Hold cable in that position and tighten top
(A) and bottom (D) adjustment nuts.
secured to the transmission housing
with two rear bolts and two front bolts.
Tine Inspection
Figure5-5: Wheel gear cable assembly.
4. MoveWheel Gear Leverto ENGAGEand
DISENGAGEseveral times to check adjustment. The wheels should not roll when the
lever is in ENGAGE,but they should roll
when the leveris in DISENGAGE.Readjust
the cable as required.
With use, the tines (Figure 5-6) will become shorter, narrower and pointed. Badly
worn tines will result in a loss of tilling
depth and reducedeffectiveness when
chopping up and turning under organic
matter.
Removing
andInstalling
Off SeasonStorage
Whenthe tiller won't be used for extended
periods, prepare it for storage as follows:
1. Cleanthe tiller and engine.
2. Do routine tiller lubrication (see Tiller
Lubrication) and check for loose parts and
hardware (see CheckHardware).
3. Protect the engine by performing the
engine storage instructions in the separate
Engine Owner's Manual.
NOTE:Besure to protect the fuel lines, carburetor and fuel tank from gum deposits
by removing fuel or by treating fuel with a
fuel stabilizer (follow engine manufacturer's recommendations).
4. Store unit in a clean, dry area.
5. Neverstore the tiller with fuel in the fuel
tank in an enclosed area where gas fumes
could reach an open flame or spark, or
where ignition sources are present (space
heaters, hot water heaters, furnaces, etc.).
Tines
Thetines will wear with use and should be
inspected at the beginning of eachtilling
seasonand after every 30 operating hours.
Tines can be replacedindividually or as a
complete set. Neverinspect or servicethe
tines unless the engine is stopped and the
spark plug wire is disconnected.
18
Figure5-6: Fourfine gangs:two per side.
1. Use a 9/16" socket, 6" extension, a
ratchet, and a 9/16" box wrench to loosen
the nut (A, Figure5-7) and bolt (B) that secure the tine holder to the tine shaft.
2. Use a rubber mallet to tap the tine holder loose.
3. Slide the tine assembly off the tine shaft.
4. Repeat Steps 1-through-3 above to remove the other tine assembly.
5. Installing the tine assembly is simply
the reverse of its removal. Besure the cutting edges face so they will enter the soil
first whenthe tiller is moving forward- this
meansthe cuttingedgesface towardthe
operator position.
First be sure to remove any rust, uneven
spots or burrs from the tine shaft, using
fine sandpaper.Then greasethe tine shaft
before reinstalling the tine assemblies.
Tighten the hardware very securely.
moving
parts to come
to a completecleaning
stop, disconnect
spark
wire and move
wire away
WARNING:
Beforeinspecting,
or servicing
theplug
machine,shut
off engine,
waitfrom
for all
spark plug. Failureto follow these instructions can result in serious personal injury or property
damage.
,_
ToCheckandAdjustTension
onthe Forward
DriveBelt:
1. Checkingfor correct belttension is the
same as that described in item 5, Step 4:
Attach Forward ClutchRod. Beforecheck-
C
D
SHAFT
ENGINE
I_
OFENOTES
TINE
CUTTING
EDGE
2. Disconnectthe Forward Clutch Rod (A,
Figure 5-9) from the swivel plate (B) by
removing the innermost hairpin cotter
(C).
I
Figure5-7: Completetineassemblies--holders, tinesand hardware.
_b
(counter-rotating
tine)istiller
ARNING: This
a CRT
and its tines must be mounted
in the direction shown in
Figure5-7. Failureto comply
could result in personal injury
or property damage.
2. When installing individual tines, install
them in the reverseorder from which they
were removed.The two sets of inboard
tines are installed so one fine faces toward the transmission housing and the
other fine faces away from it. The single
outboard tine on each side facestoward
the transmission housing. Also be sure
the cutting edges face so they will enter
the soil first when the tiller is moving forward-this meansthe cuttingedgesface
toward the operator position.
CheckingAndAdjustingTension
On DriveBelts
While checking belt tension, also check
for cracks, cuts or frayed edges. A belt
that is in poor condition should be replaced.
ing, shut off the engine, disconnect the
spark plug wire, and allow the engine and
muffler to cool down. If, after following
the adjustment procedures, you cannot
get the correct gap on the forward clutch
rod adjustment bracket, you will needto
make a secondary adjustment as described next.
_
beltARNING:
adjustment instructions
Follow the
carefully. An incorrect
adjustment could result in the
Forward Clutch mechanism
engaging too soon. This could
cause loss of tiller control and
result in personal injury or
property damage.
Maintaining correct tension on the drive
belts is important to good tilling performance and long belt life. A loose belt will
slip on the engine and transmission pulleys and cause the tines and wheels to
slow down - or stop completely - even
though the engine is running at full speed.
A loose belt will also result in premature
wear to the belt.
Thetension on a new forward drive belt
should be checkedafter the first two (2)
hours of operation. Thereafter, check the
tension after every ten (10) hours of
operation.
The reverse drive belt, becauseit is used
infrequently, will not require an initial tension adjustment until a significant number of operating hours has passed.
19
3. Unthreadthe Forward Clutch Rod (in a
counterclockwise direction as viewed
from the front of the unit) until one or two
threads on the rod extend abovethe rectangular nut (D, Figure5-10) on the forward clutch bracket.
4. Removethe belt cover.
5. Slip the forward drive belt (E, Figure
he engine-driven forward drive pulley by
pushing it off (away from engine) with
your left hand while pulling engine starter
rope with your right hand.
6. On the left side of the unit (from operator's position) removethe hairpin cotter
from the clevis pin (F,Figure 5-11) that
connects the forward idler arm (G) to the
forward adjustable link (H). Push inward
on the forward idler arm (G) and remove
the clevis pin (F).
7. Thereare two holes in the forward adjustable link (H, Figure5-11). Push inward on the forward idler arm (G) and
install the clevis pin (F)through the inner
hole in the forward adjustable link (H) and
out through the single hole in the forward
idler arm (G). Securethe clevis pin with
the hairpin cotter.
,_
C
moving
parts to come
to a completecleaning
stop, disconnect
spark
wire and move
wire away
WARNING:
Beforeinspecting,
or servicing
theplug
machine,shut
off engine,
waitfrom
for all
spark plug. Failureto follow these instructions can result in serious personal injury or property
damage.
(E) Removebelt
NOTE: While pushing inward on the
forward idler arm, be sure that the
forward drive belt is moved off to the
right side of the tiller. This creates
more room to install the clevis pin
when the forward idler arm is 3ushed
inward.
IMPORTANT:When the clevis pin Is
installed in the inner hole of the forward
Figure 5-9: Disconnect ForwardClutch Rod
and move forward drive belt out of groove in
engine forward drive pulley.
adjustable link, the number of additional
belt tension adjustments are limited. If,
with future tension adjustments, you find
that you cannot screw the forward clutch
rod any farther into the rectangular nut on
the forward clutch bracket, it means that
the forward drive belt must be replaced.
Beforedoing so, the clevis pin must be
returnedto the OUTSIDEhole in the
forward adjustable link.
8. Replacethe forward drive belt in the
High speed groove (groove closest to engine) or the Low speed groove (rearmost)
groove of the engine drive pulley and in the
matching groove of the transmission pulley. Be sure the belt is to the inside of the
wire formed belt guide (I, Figure5-12) and
to the inside of the forward drive idler pulley (J).
Figure 5-10: One or two threads on Forward
Clutch Rod should he exposed above rectangular nut.
Figure5-13
To Checkand AdjustTensionon the Reverse Drive Belt:
1. Removethe belt cover after first shutting off the engine, disconnecting the
spark plug wire, and allowing the engine
and muffler to cool down.
2. Stand at the front of the tiller and use
your left hand to push the reverse idler
arm (K, Figure 5-13) inward as far as possible (the reverse idler pulley [L] is attached to the reverse idler arm).
Hold the idler arm in this position and look
at the position of the belt tension guide
mark (M, Figure5-14) that is stamped into
the face of the reverseadjustable link (N,
Figure 5-14).
• The tension is correct if the guide mark
(M, Figure5-14) is anywhere to the left of
the guide pin (0), as viewed from the
Figure 5-12: Topview of belts and pulleys.
9. Reinstallthe belt cover and secure it
with the two nuts.
Figure5-11: Remove clevispin from outer
hole in forwardadjustable link and move to inner hole in link.
10. Readjustthe forward drive belt tension
by following the instructions in Section 3:
HandlebarHeight Adjustment.
2O
Figure5-14: While pushing reverse idler arm #lward, standat engineendandcheckpositionof
guidemark (M) andguidepin (0).
moving
parts to come
to a completecleaning
stop, disconnect
spark
wire and move
wire away
WARNING:
Beforeinspecting,
or servicing
theplug
machine,shut
off engine,
waitfrom
for all
spark plug. Failureto follow these instructions can result in serious personal injury or property
damage.
front of the unit (not the operator's position). If the belttension is correct, reinstall
the belt cover and secure it with the two
nuts.
the belt is located to the inside of the re9. Reinstallthe belt cover and secure it
with the two nuts.
A. Removing
the ForwardDriveBelt:
• If the guide mark is aligned with the
guide pin, or movesto the right side of the
guide pin,then the belt is too loose and the
tension must be readjusted as described
next.
IMPORTANT: If, in future tests for
reverse belttension, the guide mark
should again align with or move to the
right side of the guide pin, it means that
the reverse belt is worn beyond
adjustment. Beforeinstalling a new belt,
you must return the clevis pin to the
OUTSIDEhole in the reverseadjustable
link.
following the Removing the ReverseDrive
Beltinstructions in this section.
3. The reverseidler pulley (L, Figure5-13)
regulatesthe tension that is applied to the
reverse drive belt (P). The following adjustment will allow the reverseidler pulley
to apply more tension to a loose belt.
4. Removethe belt cover.
5. Slip the reverse belt (P,Figure5-13) off
the engine-driven reverse (upper) pulley.
6. On the right side of the unit (asviewed
from operator's position), removethe hairpin cotter from the clevis pin (R, Figure 513) that connects the reverse idler arm (K)
to the reverseadjustable link. Push inward
on the reverse idler arm (K) and remove
the clevis pin (R).
7. There are two holes in the reverse ad-
verse idler pulley (L, Figure 5-13).
Forward Drive Belt Removal
and Installation
This model has two forward speeds (High
FRONT.-II_
D
B
belt range; the rearmost groove is for the
Low speedforward belt range.
1. Stop the engine,allow it to cool and disconnect the spark plug wire before working near the belts.
2. Removethe reverse drive belt
3. Move the forward drive belt (B, Figure
5-16) completely off the engine forward
drive pulley (D).
4. Slip the forward drive belt completely
off the transmission drive pulley (C, Figure
5-16) by moving it to the front of the pulley.
5. Pull the forward drive belt up and off the
pulleys by feeding the bottom half of the
belt in betweenthe engine and transmission pulleys.
B. Installingthe ForwardDriveBelt:
1. The reversedrive belt must be removed
before installing the forward drive belt.
2. Slip the forward drive beltdown between
the rear of the engine forward drive pulley
(D, Figure5-16) and feedthe bottom half in
betweenthe engine and transmission pulleys (see Figure5-17). Besure that the belt
is to the inside of the forward idler pulley
and forward belt guide (seeJ and I, Figure
5-12).
justable link (S, Figure5-15). Push inward
on the reverse idler arm (K) and install the
clevis pin (R)through the inner hole in the
reverseadjustable link (S) and out through
the single hole in the reverseidler arm (K).
Securethe clevis pin with the hairpin cotter.
8. Reinstallthe reversebelt (P,Figure5-13)
on the reverse (upper) pulley, making sure
Figure5-16: Belt drivesystem.
Figure5-15:Installing
clevispin ininsidehole
ofreverseadjustable
link.
and Low) and one reverse speed. The forward engine pulley (D, Figure 5-16) has
two grooves for the two forward speeds.
The reverse engine pulley (A, Figure5-16)
has one groove for the one reverse speed.
The transmission pulley (C, Figure 5-16)
has three grooves. The groove closest to
the engine is for the reverse belt. The middle groove is for the High speed forward
Figure5-17: Install forwarddrive belt over
rear of engine forwardpulley and bring lower
haft of belt down and in frontof transmission
pulley.
21
moving
parts to come
to a completecleaning
stop, disconnect
spark
wire and move
wire away
WARNING:
Beforeinspecting,
or servicing
theplug
machine,shut
off engine,
waitfrom
for all
spark plug. Failureto follow these instructions can result in serious personal injury or property
damage.
3. Slip the forward drive belt down and
over the front of the transmission pulley
(C, Figure 5-16). NOTE:For additional
working room, loosen the reverse belt
guide (V, Figure 5-12) and twist it out of
the way.
4. Put the lower half of the belt into the
C
FRONT-IP
4. Push the upper half of the reverse belt
downward to create slack in the belt. Then
reachunderneath the transmission and
High speed groove (middle groove) or the
Low speed groove (rearmost groove) of
the transmission pulley (C, Figure 5-16).
slip the belt off the front of the transmission pulley (B, Figure 5-18).
5. Putthe upper half of the belt in the High
speedgroove (groove closest to engine) or
the Low speedgroove (rearmost groove)
of the engine forward drive pulley (D, Figure 5-16).
IMPORTANT: Makesure that the forward
drive belt is to the inside of the wire belt
guide (I, Figure5-12) and the forward idler
pulley (J).
6. If you loosenedthe belt guide, wait until
the reversedrive belt is installed before securing the belt guide.
7. install the reverse drive belt.
8. Install the belt cover and secure it with
the two nuts.
9. If you installed a new belt, check the tension after two hours of operation
r).
Reverse Drive Belt Removal
and Installation
NOTE:The forward drive belt must be in-
3. Slip the reverse belt off the engine reverse pulley (A, Figure5-18). If necessary,
work the belt off the pulley with your left
hand while pulling the engine recoil starter
rope with your right hand.
5. Pull the belt up and past the engine reverse pulley (A, Figure 5-18).
B. Installingthe ReverseDriveBelt:
1. Slip the reverse belt down between the
engine reverse pulley (A, Figure5-1 B) and
the engine forward drive pulley (O).
Figure5-18: Removingandinstalling
reverse
belt.
A. Removing
the ReverseDriveBelt:
1. Stop the engine and allow it to cool before working near the belts. Be sure the
spark plug wire is disconnected and on
electric start models the ignition key is removed.
2. Removethe belt cover by removing the
two nuts. For easier access to the transmission (lower) pulley, remove the transmission cover located below the transmission pulley.
stalled before installing the reverse drive
belt.
22
2. Loop the bottom half of the belt overthe
front of the transmission pulley (B, Figure
5-18) and seat the belt in the front groove
of the pulley.
3. Placethe belt to the inside of the reverse
idler pulley (D, Figure 5-18) and the reverse belt guide (V,Figure5-12). Then slip
the upper end into the groove of the engine
reversepulley (A, Figure 5-18).
4. If the reversebelt guide (V,Figure5-12)
was loosened previously, center the belt
guide on the belt and tighten the mounting
screw securely.
5. Install the belt cover and secure it with
the two nuts. If the lower transmission
cover was removed, reinstall it with the
four self-tapping screws.
moving
parts to come
to a completecleaning
stop, disconnect
spark
wire and move
wire away
WARNING:
Beforeinspecting,
or servicing
theplug
machine,shut
off engine,
waitfrom
for all
spark plug. Failureto follow these instructions can result in serious personal injury or property
damage.
TROUBLESHOOTING
PROBLEM
Enginedoes not start
POSSIBLECAUSE
CORRECTION
Reconnectwire.
1.
Spark plug wire disconnected
2.
Engine Throttle Control Lever incorrectly set.
2.
Put lever in STARTposition.
3.
Fuel tank empty.
3.
Add fuel.
4.
Choke control (if so equipped) in incorrect position.
4.
See Engine Owner's Manual.
5.
Stale gasoline.
5.
Drain fuel and add fresh fuel.
6.
Dirty air filter.
6.
Clean or replace filter.
7.
Defective or incorrectly gapped spark plug.
7.
Inspect spark plug.
8.
Carburetor out of adjustment.
8.
See Engine Service Dealer.
9.
Misadjusted throttle control.
9.
See Engine Service Dealer
10. Dirt or water in fuel tank.
Enginerunspoorly.
Engineoverheats.
Enginedoesnotshutoff
1.
Defective or incorrectly gapped spark plug.
2.
Dirty air filter(s).
2.
Clean or replace (see Engine Owner's Manual).
3.
Carburetor out of adjustment.
3.
See Engine Service Dealer.
4.
Stale gasoline.
4.
Replacewith fresh gasoline.
5.
Dirt or water in fuel tank.
5.
See Engine Service Dealer.
6.
Engine cooling system clogged.
6.
Clean air cooling system (see Engine Owner's Manual).
1.
Engine cooling system clogged.
2.
Carburetor out of adjustment.
2.
See Engine Service Dealer.
3.
Oil level is low.
3.
Check oil level (see Engine Owner's Manual).
1.
Misadjusted throttle control or ignition switch.
1.
See Engine Owner's Manual or Engine Service Dealer.
Improper use of controls.
1.
Review Sections 3 and 4.
2.
Forward Drive: Misadjusted forward clutch rod.
2.
See "Handlebar Height Adjustment," Section 3.
3.
Reverse Drive. Broken or misadjusted belt.
3.
Replacebelt or adjust belt tension. Section 5.
4.
Worn Broken or misadjusted Drive Belt(s).
4.
See "Checking Drive Belt Tension," Section 5.
5.
Internal transmission wear or damage.
5.
Contact local dealer or the factory.
6.
Bolt and key loose in transmission pulley.
6.
Tighten bolt. Check that key is in place.
1.
Wheel Drive Pins not in WHEEL DRIVE.
1.
See "Wheel Drive Pins" in Section 3.
2.
Bolt loose in transmission pulley.
2.
Tighten bolt.
3.
Internal transmission wear or damage.
3.
Contact local Dealer or the Factory.
1.
Tine holder mounting hardware missing.
1.
Replacehardware.
2.
Internal transmission wear or damage.
2.
Contact local Dealer or the Factory.
1.
Worn tines.
1.
See "Tines" (Section 5).
2.
Improper Depth Regulator setting.
2.
See "Tilling Tips & Techniques," Section 4.
3.
Incorrect throttle setting or belt range speed.
3.
See Section 4.
4.
Belt(s) slipping.
4.
See "Checking Forward Drive Belt Tension," Section 5.
WheelsandTineswill notturn 1.
Tinesturn,butwheelsdon't,
WheelsTurn,butTinesDon't,
Poortillingperformance.
10. See Engine Service Dealer.
Inspect spark plug (see Engine Owner's Manual).
Clean air cooling area (see Engine Owner's Manual).
23
SECTION6: PARTSLIST
HANDLEBAR ASSEMBLY and CONTROL LEVERS
2
/
21
21
10
?
':f
35
16
/
TOP COVER
24
/
MODEL675B
REF
NO.
PARTNO.
DESCRIPTION
1
1918801
Handlebars
2
GW-9126
Grip
3
777122217
Decal, Control Panel
3A
777D07888
Decal, Model Name/Logo
4
1916784
ReverseClutch Control Cable
5
710-04042
HexFlangeScrew, 3/8-16
5A
GW-9955
Washer, Keyed
6
1900475
Bracket, Handlebar Height Adjustment
7
710-0514
HexHd. Screw, 3/8-16 x 1"
8
736-3050
Washer, Plain (flat) 3/8, S.A.E
9
712-3000
HexLocknut, 3/8-16
10
746-04027
Forward Clutch Control Cable
13
1916639
Wheel Clutch Control
14
GW-9057
Knob, Wheel GearControl Lever
15
1186211
HexNut, 5/16-24
16
GW-90064
HexHd. Screw, 3/8-16 x 3/4"
17
736-0169
Lock washer, 3/8
19
725-0157
Cable Ties, Plastic
21
1114748
Round Hd. Screw,#10-32 x 1/2
22
1100240
Lock washer, #10
23
1186206
HexNut, #10-32
24
GW-9390
Grip
25
1918802
Bail, Forward Clutch Control
35
GW-9853
Sems Nut
36
GW-20806
Bracket, Bail Support
42
710-0599
FlangeScrew, Self-tapping, 1/4-20 x 1/2"
* Specify GRADE5 if ordering part locally.
25
MODEL675B
36
5
6
...,_Reve
_
rse
I CluichCable
I
7
9
4
14
16
15
17
16
52
1
4o
39 _
42
46
45
3
44
5O
38
22
8
(Screw, Ref. 47, secures
ForwardClutchCablepage 25, Ref. 10)
53
54
24
25
41
23
26
19¢
28
29
26
MODEL675B
REF
NO.
1
710-0395
2
1917326
3
736-0119
4
710-0107
5
777S30651
6
1916659
7
712-3004A
8
1108841
9
GW-1138-1
10
1916520
11
GW-9944
12
GW-9572
13
710-3103
14
1918731
15
1916535
16
736-0159
17
1916725
18
710-0117
19
726-0201
20
736-3078
21
1916728
22
1916522
23
GW-1440
24
1918812
25
1909404
REF
NO.
DESCRIPTION
PART NO.
PART NO.
DESCRIPTION
HexHd.Screw,546-18 x 2-1/4
Bracket,ClutchCable
Lockwasher-546
26
1900396
Self-tapping Screw, #10-32 x 1/2
27
GW-20339
Guard, Belts/Pulleys
28
712-04063
FlangeLock Nut, 546-18
HexHd.Screw,546-24 x 1/2
Decal,HotSurfaces/ BeltWarning
Cover
29
1186329
HexFlangeScrew, 54 6-18 x 3/4"
30
1916797
EngineSupport Bracket,left side
31
1916796
FlangeLockNut,546-18
Key,34 6 x 1-1/2
Shim,1.0x.7656x.062
Pulley,EngineDrive
Washer,.827x.331x.098
HexHd.Screw,546-24 x 1-1/8
HexHd.Screw,546-18 x 2
ReverseIdlerArm
35
710-0395
EngineSupport Bracket,right side
HexHd. Screw, 546-18 x 2-1/4
36
777120942
Decal,Stabilization
37
1918774
Mounting Bar
38
710-1260A
39
710-0805
Hex FlangeScrew, 5/16-18 x.75
Hex Hd. Screw, 5/16-18 x 1-1/2"
40
736-0275
FlatWasher, 54 6'
41
1918846
Belt Guide, Pony
42
GW-55088
Pulley,ReverseIdler
FlatWasher,546
BeltGuide,WireFormed
HexHeadScrew,546-24 x 1
SpeedNut
Washer,Flat,1-1/8
44
712-3010
Pivot Bushing
Hex Nut, 546-18
45
1917746
Washer, Shoulder
46
1918744
Idler Arm, ForwardTiller Direction
47
1767754
Screw, selftapping, #10-24
48
1916727
49
712-3000
Spring
HexLocknut, 546-18
Spring,ReverseReturn
TransmissionPulley
SupportWasher
ReverseClutchBelt
ForwardClutchBelt
5O
GW-9090
51
710-0347
52
712-0158
HexLock Nut, 546-18
53
1754128
Screw, 1/4-20x 3/4
54
736-0463
FlatWasher, 1/4
* Specify GRADE5 if ordering part locally.
** Seeyour local authorized engine service dealer for engine parts or
service. Referto engine nameplatefor engine type and code
27
Idler Pulley, Forward
Screw, 3/8-16 x 1-3/4
MODEL675B
t
I
21
22
22
NOTE 1: These screws are a special
sealing screw that cannot be reused
without risking the loss of transmission oil.
If these screws are loosened or removed,
they must be replaced with new screws,
See Note I
See Note 1
14
\
REF
NO.
1
2
3
4
5
6
7
8
9
10
11
PARTNO.
721-04031
1105620
721-04001
710-04043
1983632
GW-20910
GW-20694
619-04010
GW-9467
1917101
721-04035
REF
NO.
DESCRIPTION
12
13
14
15
16
17
18
19
21
22
Oil Seal
Pipe Plug, 1/4
Seal,Transmission Bore
Hex FlangeScrew, 5/16-18 x 3/4"
Oil Seal,Input Pinion Shaft1
Transmission Cover (Incl. four Ref. 18)
Gasket,Transmission Top Cover
Transmission CaseAssy.
Plug
Mounting Plate, Wheel Clutch Cable
Oil Seal,Tiller Shaft
PARTNO.
710-04049
GW-20873
GW-1129-1
1915069
GW-1115
GW-1124-2
GW-90063
1915068
736-0169
710-0216
737-03531-
* SpecifyGRADE5 if orderingpart locally.
/_R-As Required
* Capacity of transmission is 53 oz.
28
DESCRIPTION
HexFlangeScrew,5/16-18x 5/8"
TillerHousingCover,leftside
Gasket,TillerHousingCover,.010"(A/R)
Self-SealingScrews,1/4-20x 7/8
RearBearingCap
Gasket,RearBearingCap,.010"
Thick(A/R)
RexFlangeScrew,5/16-18x 1*
Self-SealingScrews,1/4-20x 5/8
Lockwasher,3/8
HexHd.Screw,3/8-16x 3/4"
Oil,85W-149
MODEL675B
MAIN DRIVE SHAF I ASSEMBLY
REF
NO.
1
la
lb
2
3
4
PARTNO.
GW-1714
GW-9400
GW-9401
GW-20718
GW-9301
1916597
REF
NO.
DESCRIPTION
PARTNO.
GW-1325C
Bearing,Tapered Roller with Race
Drive Shaft Bearing Cup
Drive Shaft Bearing Cone
Spur Gear
6
7
GW-9572
GW-9944
8
1108841
Key, 34 6 sq. x 1
Rolled Drive Shaft (Drive shaft is one-piece
with integral, single-lead, work-hardened
front worm, and integral, six-lead workhardenedrear worm. Also includes
pressed-on GW-1714 and GW-9301)
9
1916522
10
GW-1440
11
721-04044
12
1113527
5
GW-1224-1
Shim, Rear BearingCap,.OlO"thick, see
Note below (A/R)
13
GW-9953
5
GW-1224-2
14
GW-9428
Shim, same asabove, but.030" thick, see
Note (A/R)
15
GW-9677
16
GW-20791
17
GW-20792
DESCRIPTION
ShimSet(Incl.two GW-1224q;two 12242 andone GW-1224-3(A!R)
HexHd.Screw,546-24x 1-1/8"1
Washer,DiscSpring(concavesurfacefaces
pulley)
Key,346 sq. x 1-1/2
TransmissionDrivePulley
SupportWasher
Oil Seal,Input PinionShaft
RetainingRing(external)
ThrustWasher
Bushing
SetScrew,546-18 x 3'8*
InputPinion(steelshaft)
InputPinionGear
18
GW-9093
RetainingRing(external)
5
GW-1224-4
Shim, same as above, but.062" thick, see
19
GW-20799
Note (A/R)
PinionAssy.(Incl.Refs.16,17 & 18)
20
GW-9517
RetainingRing
NOTE:Shimbetweendriveshaftrear bearingandrear bearingcapto achieve54o-15 thousandthsof an inch(.005-.015)end playon driveshaft.
A/R - As Required
5
GW-1224-3
Shim, same asabove, but.O05"thick, see
Note (A/R)
* Specify GRADE5 if ordering part locally.
29
MODEL675B
16
\
\
1
7
2
3
\
\
4
\
6
WHEEL
Assembled
_'_J
SHAFT ASSEMBLY
Internally
5
[]
Wheel Shaft Parts
SHAFT ASSEMBLY
2
1
REF
NO.
1
2
3
PARTNO.
721-04031
Oil Seal
1909950
RetainingRing(heavy-duty,external)
Shim,1-1J64I.D.,.O62"thick
(A/R)
Shim,asabove,but.030"thick (A/R)
Shim,asabove,but.015"thick (A/R)
Shim,asabove,but.OlO"thick(A/R)
Bushing
WheelShaft(Incl.Ref.6)
Hi-ProKey,1/4x 1-546
WheelDriveWormGear(cast-iron)
Shim,6 I.D.x 1.468O.D.x.062
GW-1166-1
GW-1166-2
GW-1166-3
GW-1166-4
4
GW-1086
5
6
711-04091
7
8
GW-20914
GW-9373
GW-9935
REF
NO.
DESCRIPTION
9
10
11
12
13
14
15
16
17
18
19
* SpecifyGRADE5 if orderingpart locally.
A/R- As Required
30
PARTNO.
GW-20712
611-04002
GW-1442
GW-9055
721-04034
786-04001
710-3013
741-3037
711-04130
GW-1104
1904279
DESCRIPTION
WheelDriveClutch(cast-iron)
EccentricShaft
Pin,EccentricShaft
Spring
Oil Seal
EccentricShaftLever
HexHd.Screw,1/4-20x 1/2"
BallBearing
TillerShaft(incl. Ref.18)
WoodruffKey,1/4x 1-1/4
TillerDriveWormGear(bronze)
MODEL675B
MountTinesSoTheCuttingEdgeAtThe
To_Of EachTineFacesTheOperator
OFDENOTEST,
NECUTT,NG
EDGE
I
7
2
4A
LEF1--HAND
TINEj(BOTT_:Ii:_RIGHT'HANDTINE
TINE
SHAFT
5
7
1
ENGINE
8
6
FRONT/
FORWARD
5
I1 WHEEL
SHAFT
3
IMPORTANT:LEFTand RIGHT sides of tiller
are determined by standing in
the operator position (BEHIND
THE HOOD)and facing the direction of forward travel.
10
REF
NO.
PART NO.
1
2
3
4
4A
1100068
1985101
5
710-3096
REF
NO.
DESCRIPTION
HexHd. Screw, 3/8-16 x 3/4"
6
1110108
Tine - right-hand
Hex Lock Nut, 3/8-161
7
8
1916693
Tine Holder, left-side
1916694
Tine Holder, right-side
Hex Hd. Screw, 3/8-16 x 2, Grade8
31
PART NO.
DESCRIPTION
GW-9338
1985100
Hitch Pin
Tine -left-hand
GW-9380
Clevis Pin,.312 x 1-3/4 long
9
634-04033
Wheel & Tire Assy., left-side
10
634-04032
Wheel & Tire Assy., right-side
MODEL675B
22
22
12
21
19
11
23
,23
22
20
23
I
9
6
Transmission
(618-04002)
13
_J
16
4
13
32
MODEL675B
REF
NO.
PARTNO.
1
686-04021
2
736-0169
3
GW-2525
4
710-04049
5
712-0291
6
710-0597
7
GW-9384
8
GW-9534
9
1185469
10
1916186
11
GW-9120
12
GW-9119
13
710-3005
14
GW-1113-1
15
712-3017
16
GW-20775
18
710-0759
19
710-0599
20
1916700
21
1916701
22
1186328
23
1186391
DESCRIPTION
Hood,Tine
Lockwasher,3/8
Bracket,Hood& DepthRegulator
HexHd.Fig.Screw,546-18 x 5_8"
HexLockNut,1/4-20
HexHd.Screw,1/4-20x 1*
Spring,DepthRegulatorPlunger
Spacer
RollPin(spiral),1/4x 1
BarAssembly,DepthAdjustment
RetainingRing(ToleranceRing)
Knob,DepthRegulator(Incl.Ref.11)
HexHd.Screw,3/8-16x 1-1/4"
Bushing(spacer)
HexNut,3/8-16
DragBar,DepthRegulator
HexHd.Screw,self-tapping,16-18
x 1/2"
FlangeScrew,self-tapping,I/4-20x 1/2"
SupportBracket,Left-Side
SupportBracket,Right-Side
HexHd.Screw,54 6-18x 5/8
HexNut,546-18
* Specify GRADE5 if ordering part locally.
33
MODEL675B
ROW MARKER ATTACHMENT (OPTIONAL)
\
_
_
6
3
6
2_
_10
11
12
17
18
BUMPERATTACHMENT
2O
19
21
BUMPER
0EM-290-254
34
MODEL675B
REF
NO.
PARTNO.
2
GW-1594
3
GW-1600
4
GW-1595
5
GW-9347
6
GW-9786
7
GW-1596
8
GW-9828
9
1100135
GW-1837
10
1186349
11
GW-1593
12
GW-1592
13
GW-1591
14
GW-1590
15
GW-1588
16
GW-1589
17
GW-9925
18
712-0798
19
749-04193
20
777S30653
21
710-3073
22
726-0201
23
712-04063
1918781
DESCRIPTION
MarkerBlade-bladeonly
MarkerArm-mainarm
MarkerArm-extensionarmwith pin
HitchPin
Thumbscrew-I/4-20x 1/2
NutBar
Nut-hex,10-24w/attachedstarwashers
Screw-roundhd.,10-24x
HardwarePackage-includes:
oneGW-9347
hitchpin,two GW-9786thumbscrews,
two GW-9828hexnutsandtwo 1100135
screws
Screw-hexflangedlocking,3/8-16x 1-1/2"
StopBar
Yoke
TubeKey-square
Washer-friction
MainSupport
Washer-squarehole
Washer-discspring
Nut-hex38-16
Bumper
Decal- Caution
Screw-hexhd.,546-18 x 2-1/4"
SpeedNut
Nut-FlangeLock,546-18*
HardwareKit:
Incl.foureachof Refs.21,22 and23
Note: Most common hardware listed above as can be found at most hardware stores.
* Specify GRADE5 if ordering part locally.
35
TROY-BILT
TILLER
LIFETIME
LIMITED
WARRANTY
WHAT PRODUCT
IS COVERED
All Troy-Bilt branded rear tine walk-behind tillers with gear drive transmissions.
This warranty begins on the date of purchase and is warranted by Troy-Bilt LLC for the life of the
tiller, to the original purchaser only.
WHAT IS COVERED
BY THIS WARRANTY
Troy-Bilt LLC will, at its option, repair or replace any part found to be defective in material or
workmanship without charge for parts and labor
This limited lifetime warranty also applies to non-powered attachments and accessories.
Powered attachments and accessories are warranted separately by their manufacturers.
to the applicable manufacturer's warranty on these items for terms and conditions.
WHAT IS NOT
COVERED BY THIS
WARRANTY
Refer
This warranty does not apply to parts that have been damaged by accident, alteration, misuse,
abuse, neglect, improper maintenance, vandalism, theft, fire, water, or damage because of peril
or other natural disaster.
The following items are not covered after the first year of this residential use limited warranty:
belts, batteries, bushings, seals, tines, tires, wheels, paint, appearance items, and similar items
that are normally replaced through periodic maintenance.
Charges for pick-up, delivery, and service calls are not covered by this warranty.
Service completed by someone other than an authorized service dealer is not covered by this
warranty.
Parts that are not genuine Troy-Bilt LLC service parts are not covered by this warranty.
The engine is warranted separately by the engine manufacturer.
manufacturer's warranty for terms and conditions.
LIMITED
COMMERCIAL
USE WARRANTY
Refer to the engine
If used for commercial, institutional, industrial, rental, or demonstrator purposes, the warranty
on the tiller is limited in duration to 90 days from the date of purchase.
This warranty does not apply to parts that have been damaged by accident, alteration, misuse,
abuse, neglect, improper maintenance, vandalism, theft, fire, water, or damage because of
peril or other natural disaster.
HOW TO OBTAIN
SERVICE
Warranty service is available, with proof of purchase, through your local authorized service
dealer. To locate a dealer in your area, consult your Yellow Pages, or contact Troy-Bilt LLC at
P.O. Box 361131, Cleveland, Ohio 44136-0019, 1-866-840-6483, or log on to our Web site at
www.troybilt.com.
The provisions
set forth in this warranty provide the sole and exclusive remedy arising from the sale. Troy-Bilt
LLC shall
not be liable for any incidental
or consequential
damage or expense of any kind, including
but not limited to cost of
equipment
rental, loss of profits, or costs of hiring services to perform tasks normally
performed
by the equipment.
Any implied warranties, including any implied warranty of merchantability or fitness for a particular purpose, shall be limited
in duration to the period of ownership by the original purchaser (and a maximum of 90 days from the date of sale if the tiller is
purchased for commercial or other non-residential use).
Some states do not allow the exclusion or limitation of incidental or consequential damages, or limitations on how long an
implied warranty lasts, so the above exclusions or limitations may not apply to you.
This limited warranty gives you specific legal rights, and you may also have other rights which vary from state to state.
For customer
TROY-BILT
assistance,
contact
LLC, P.O. Box 361131,
your nearest authorized
Cleveland,
dealer, or contact
Ohio 44136-0019,
us at:
1-866-840-6483