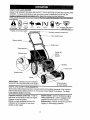
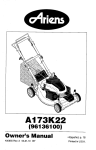
1
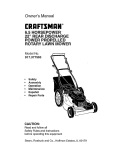
Owner's Manual
CRnFTSMnN
o
6.0 HORSEPOWER
22" REAR DISCHARGE
POWER PROPELLED
ROTARY LAWN MOWER
Model No.
917.377050
,
•
°
•
Safety
Assembly
Operation
Maintenance
•
=
EspaSol
Repair Parts
CAUTION'.
Read and follow al!
Safety Rules and Instructions
before operating this equipment
Sears, Roebuck and Co., Hoffman Estates, IL 60179
Visit our Craftsman website: www searscom/craftsman
Warranty
Safety Rules
Assembly
Operation
Maintenance
Schedule
Maintenance
2
4
6
10
10
Product Specifications
Service and Adjustments
Storage
Troubleshooting
Repair Parts
Parts Ordering
11
14
16
17
37
Back Cover
LIMITED TWO YEAR WARRANTY
ON CRAFTSMAN
POWER MOWER
For two years from date of purchase, when this Craftsman Lawn Mower is maintained,
lubricated, and tuned up according to the operating and maintenance
instructions in the
owner's manual, Sears will repair free of charge any defect in material or workmanship.
If this Craftsman Lawn Mower is used for commercial
or rental purposes, this warranty
applies for only 90 days from the date of purchase.
'This Warranty does not cover:
, Expendable
items which become worn during normal use, such as rotary mower
blades, blade adapters, belts, air cleaners and spark plug.
• Repairs necessary because of operator abuse or negligence,
including bent crankshafts and the failure to maintain the equipment according to the instructions contained in the owner's manual.
Warranty service is available by returning the Craftsman power mower to the nearest
Sears Service Center/Department
in the United States° 1his warranty applies only while
this product is in use in the United States,
This Warranty gives you specific legal rights, and you may also have other rights which
vary from state to state.
SEARS, ROEBUCK AND CO., D/817 WA, HQFFMAN
ESTATES, ILLINOIS
60179
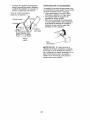
TRAINING;
* Do not operate mower if it has been
dropped or damaged in any manner,
Always have damage repaired before
using your mower.
. Do not use accessory attachments that
are not recommended
by the manufacturer. Use of such attachments may be
hazardous.
o Read this operator's manual carefully°
Become familiar with the controls and
. The blade turns when the engine is
running.
Safety standards
presence controls
risk of injury. "four
with such controls.
defeat tile function
presence controls
circumstances.
require operator
to minimize the
unit is equipped
Do not attempt to
of the operator
under any
know how to operate your mower
properly. Learn how to quickly stop
mower,
• Do not allow children to use your mower.
Never allow adults to use mower without
proper instructions.
• Keep the area of operation clear of all
persons, especially small children and
pets,
° Use mower only as the manufacturer
intended and as described ill this
manual.
PREPARATION:
- Always thoroughly check the area to be
mowed and clear it of all stones, sttcks,
wires, bones, and other foreign objects,
These objects wilt be thrown by the
biade and can cause severe injury.
° Always wear safety glasses or eye
shields when starting and while using
your mower.
• Dress properly. Do not operate mower
when barefoot or wearing open sandals.
Wear only solid shoes with good traction
2
when mowing.
- Checkfuel tank beforestartingengine.
Do not fill gastank indoors,when the
• Never cut grass by pulling the mower
towards you. Mow across the face of
slopes, never up and down or you
might lose your footing. Do not mow
excessively steep slopes, Use caution
when operating the mower on uneven
terrain or when changing directions -maintain good footing.
• Never operate your mower without
proper guards, plates, grass catcher or
other safety devices in place.
engine is running or when the engine is
hot. Allow the engine to cool for several
minutes before filling the gas tank. Clean
off any spilled gasoline before starting
the engine,
• Always make wheel height adjustments
before starting your mower. Never
attempt to do this while the engine is
running,
• Mow only in daylight or good artificial
light,
MAINTENANCE
AND STORAGE:
• Check the blade and the engine
mounting bolts often to be sure they are
tightened properly.
o Check all bolts, nuts and screws at
frequent intervals for proper tightness to
be sure mower is in safe working
condition°
OPERATION:
• Keep your eyes and mind on your
mower and the area being cut,, Do not let
other interests distract you.
• Do not mow wet or slippery grass. Never
run while operating your mower. Always
be sure of your footing .-- keep a firm
hold on the handles and walk,
° Keep all safety devices in place and
working.
° To reduce fire hazard, keep the engine
free of grass, leaves or excessive
grease and oil.
° Check grass catcher often for deterioration and wear and replace worn bags.
Use only replacement bags that are
recommended
by and comply with
specifications
of the manufacturer
of
your mower.
, Always keep a sharp blade on your
mower.
• Allow engine to cool before storing in
any enclosure.
• Never store mower with fuel in the tank
,, Do not put hands or feet near or under
rotating parts. Keep clear of the discharge opening at all times.
o Always stop the engine whenever you
leave or are not using your mower, or
before crossing driveways, walks, roads,
and any gravel--covered
areas,
o Never direct discharge of material
toward bystanders nor allow anyone
near the mower while you are operating
it.
° Before cleaning, inspecting, or repairing
your mower, stop the engine and make
absolutely sure the blade and all moving
parts have stopped_ Then disconnect the
spark plug wire and keep it away from
the spark plug to prevent accidental
starting.
• Do not continue to run your mower if you
hit a foreign object, Follow the procedure
outlined above, then repair any damage
before restarting and operating you
mower_
° Do not change the governor settings or
overspeed the engine. Engine damage
or personal injury may result.
° Do not operate your mower if it vibrates
abnormally. Excessive vibration is an
indicat)on of damage;
stop the engine,
safely check for the cause of vibration
and repair as required.
° Do not run the engine indoors_ Exhaust
fumes are dangerous.
inside a building where fumes may
reach an open flame or an ignition
source such as a hot water heater,
space heater,
clothes dryer, etc.
_i, Look for this symbol to point out
important safety precautions.
It means
CAUTION!!!
BECOMEALERT!!!
YOUR
SAFETY IS INVOLVED.
&CAUTION;
Always disconnect spark
plug wire and place wire where it cannot
contact spark plug in order to prevent
accidental starting when setting up,
transporting,
adjusting or making repairs_
_IbWARNING
The engine exhaust from this product
contains chemicals
known to the State of
Catifornia to cause cancer, birth defects,
or other reproductive
harm.
3
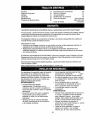
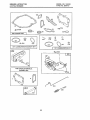
These accessories were available when this lawn mower was produced. They are not
shipped with your mower, They are also available at most Sears retail outlets and service
centers, Most Sears stores can also order repair parts for you, when you provide the model
number of your lawn mower° Some of these accessories may not apply to your lawn mower:
LAWN MOWER PERFORMANCE
c==r'-----/-_
...0,/'
CLIPPING DEFLECTOR
FOR REAR DISCHARGE
LAWN MOWER S
.
MULCHER
.
STABILIZER
GRASS CATCHERS
FOR
SIDE DISCHARGE
LAWN MOWERS
FOR
REAR DISCHARGE
GRASS
LAWN CATCHERS
MOWERS _
[____,_
KITS
GAS CANS
,,,,,,,,
,,,............
LAWN
MOWER
MAINTENANCE
MUFFLERS
AIR FtLTERN
SPARK PLUGS
,
BELTS
,,,,,..............
Read these instructions
BLADES
BLADE ADAPTERS
and this manual in its
WHEELS
• i i _
J,,,,
,
II i
ENGINE OIL
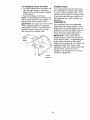
TO REMOVE LAWN MOWER FROM
CARTON
entirely before you attempt to assemble or
operate your new lawn mower..
IMPORTANT= This lawn mower is shipped
WITHOUT' OIL OR GASOLINE in the engine,
Your new lawn mower has been assembled
o Remove loose paris Included with mower.
* Cut down two end comers of carton and
.
at the factory with the exception of those parts
left unassembled for shipping purpose& AIt
parts such as nuts, washers, bolts, etc.,
necessary to complete the assembly have
been placed in the parts bag, To ensure safe
and proper operation of your lawn mower, all
parts and hardware you assemble must be
tightened securely. Use the correct tools as
necessary to ensure proper tightness.
,
4
lay end panel down fiat,
Remove all packing materials except
padding between upper and lower handle
and padding holding operator presence
control bar to upper handle,
Roll lawn mower out of carton and check
carton thoroughly for additional loose
pads,
HOW TO SET UP YOUR LAWN MOWER
TO INSTALL ATTACHM
TO UNFOLD HANDLE
ENTS
Your lawn mower was shipped ready to be
used as a muicher. To convert to bagging or
discharging:
• Open rear door and remove mulcher plug.
Store mulcher p_ug in a safe place.
_, You can now install catcher or optional
clipping deflector.
° To return to mulching operation, install
mulcher plug into discharge opening of
mower. Be sure all tabs are seated
IMPORTANT: Unfold handles carefully so as
not to pinch or damage control cables,
• Raise handles until lower handle section
locks into place in mowing position°
• Remove protective padding, raise upper
handle section into place on lower handle
and tighten both handle knobs°
• Remove handle padding holding operator
presence control bar to upper handle.
• Your lawn mower handle can be adjusted
for your mowing comfort, Refer to "Adjust
Handle" in the Service and Adjustment
section of this manual,
properly.
Operator presence
bar
Upper handle "--..,...
Lift up
Mulcher plug
up
,&CAUTION:
Do not run your lawn
mower without mulcher plug in place or
approved clipping deflector or grass
catcher In place. Never attempt to
operate the lawn mower with the rear
door removed or propped open,
Mowing
position
Lower handle
5
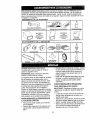
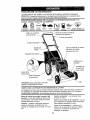
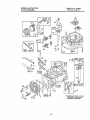
KNOW YOUR LAWN MOWER
READ THIS OWNER'S
MANUALAND
SAFETY RULES BEFORE OPERATING
YOUR LAWN
MOWER, Compare the illustrations with your lawn mower to familiarize yourself with the
location of var ous controls and adjustments, Save this manual for futurereference: ....
_...............
3"basesymbolsmayappear on your lawn moweror tn literaturesuppliedwflhtheproduct,Learnand understand
theremeaning,
CAUTION
OR WARNING
ENGINE
ON
ENGINE
OFF
FAST
SLOW
CHOKE
Engine zone control cable
FUEL
OIL
DANGER, KEEP HANDS
AND FEET AWAY
Operator presence control bar
Drive control lever
Starter handle
Handle knob
Grass catcher
Engine oil
w/
dipstick
Mulcher plug
Housing
Drive cover
Gasoline cap
Primer
IMPORTANT: This lawn mower is shipped
WITHOUT OIL OR GASOLINE in the engine_
_EETSCP_SAFETY
Wheel adjuster
(on each wheel)
REQUiRE:MENTS
_ .... "..................
"
"
'_".........
"' _'
Sears rotary walk-behind power lawn mowers conform to the safety standards of the American
National Standards institute and the US. Consumer Product Safety Commission, The blade
turns when the englne is running,
Operator
presence
control bar-
must be
S_rter
held down to the handle to start the engine,
Release to stop the engine,
Primer - pumps additional fuel from the
carburetor to the cylinder for use when
starting a cold engine,
handle ' used for starting the engine.
Drive control lever - used to engage powerpropelled forward motion of lawn mower.
Mulcher plug - must be removed to convert to
bagging or discharging operation,
6
TO ATTACH
mower can result in foreign
_
he operation of any lawn
objects thrown into the eyes,
which can result in severe eye damage.
Always wear safety glasses or eye shields
while operating your lawn mower or
performing
any adjustments
or repairs,
We recommend
a wide vision safety mask
over spectacles or standard safety
glasses,
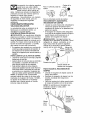
GRASS CATCHER
• Lift the rear door of the lawn mower
and place the grass catcher frame
hooks onto the door pivot pins,
• The grass catcher is secured to the
lawn mower housing when the rear
door is lowered onto the grass catcher
frame,
,&CAUTION:
Do not run your lawn
mower without clipping deflector or
approved grass catcher in place, Never
attempt to operate the lawn mower with
the rear door removed or propped open_
HOW TO USE YOUR LAWN MOWER
ENGINE SPEED
The engine speed was set at lhe factory
for optimum performance.
Speed is not
adjustable°
ENGINE ZONE CONTROL
,Rear door
Grass
catcher
handle
&CAUTION:
Federal regtTla!ions re.quire
an engine control to be Insiairea on this
lawn mower in order to minimize the risk
of blade contact injury. Do not under any
circumstances
attempt to defeat the
function o[ the operator control. "['he blade
turns when the engine is running.
Pivot
• Your lawn mower is equipped with an
operator presence control bar which
requires the operator to be positioned
behind the lawn mower handle to start and
pins
TO EMPTY GRASS CATCHER
operate the lawn mower.
TO ADJUST CUTTING
• Lift up on grass catcher
handle,
HEIGHT
.
• Raise wheels for low cut and lower wheels
for high cut,
° Adjust cutting height to suit your requirements. Medium position is best for most
lawns,
using the frame
Remove grass catcher with clippings
from under lawn mower handle.
.
Empty clippings from bag using both
frame handle and bag handle.
NOTE:
Do not drag the bag when
emptying;
it will cause unnecessary
wear,,
• To change cutting height, squeeze adjuster
lever toward wheel. Move wheel up or
down to suit your requirements° Be sure all
wheels are in the same setting+
NOTE: Adjuster is properly positioned
when plate lab insells into hole in lever.
Also, 9-position adjusters (if so equipped)
allow lever to be positioned between the
plate tabs.
Grass
catcher
Bag
handle
Plate Tab
7
frame
handle
DRIVE
CONTROL
ADD GASOLINE
• Self-propelling
is controlled
by holding
the operator presence control bar down
to the handle and pushing the drive
control lever forward until it clicks; then
release the lever.
NOTE: Before filling fuel tank, remove
and discard the debris plug that is inside
the tank.
° Fill fuel tank. Use fresh, clean, regular
unleaded gasoline with a minimum of 87
octane° Do not mix oil with gasoline.
Purchase fuel in quantities that can be
used within 30 days to assure fuel
freshness.
• Forward motion will stop when the
operator presence control bar is
released.
To stop forward motion
without stopping engine, release the
operator presence control bar slightly
until the drive control disengages.
Hold
operator presence control bar down to
handle to continue mowing without selfpropelling.
• To keep drive control engaged when
turning corners, push down on handle
and lift front wheels off ground while
turning lawn mower.
Operator presence control bar
/\.
:\. _,,.
RNING,: Experience indicates that
I blenaed fuels (called gasohof or
using ethanol or methanol) can attract
moisture which leads to separation and
formation of acids during storage. Acidic gas
can damage the fuel system of an engine
while in storage. To avoid engine problems,
the fuel system should be emptied before
storage of 30 days or longer. Drain the gas
tank, slart the engine and let it run until the
fuel lines and carburetor are empty. Use
fresh fuel next season. See Storage
Instructions for additional information. Never
Drive
control
use engine or carburetor cleaner products in
the fuel tank or permanent damage may
occur.
To engage drive
contro!
BEFORE STARTING
OIL
_,CAUTION:
Fill
filler neck° Do not
spilled oil or fuel.
use gasoline near
Drive control
disengaged
ENGINE
Gasoline tiler cap
Your lawn mower is shipped without oil in the
engine.
= Be sure mower is level and area around oi!
fill is clean.
• Remove engine oil cap
line.
to bottom of gas tank
overfill° Wipe off any
Do not store, spill or
an open flame,.
Engine oil cap
(Discard
debris plug
inside)
and fill to the full
NOTE: Allow oil to settle down into engine
for accurate dipstick reading,
o Engine holds 20 ozs. of oil. For type and
grade of oil to use, see "ENGINE" in
Maintenance section of this manual.
TO START ENGINE
," To start a cold engine, push primer three
(3) times before trying to start. Use a firm
push. This step is not usually necessary
when starting an engine which has
already run for a few minutes,
• Hold operator presence control bar down
to the handle and pull starter handle
,, Pour oit slowly. Do not over fill
• Check oil level before each use. Add oil if
needed° Fill to full line.
• To read proper level, tighten engine oil cap
each time.
• Reinstall engine oil cap and tighten,
° Change the oi! after ever,/25 hours of
operation or each season. You may need
to change the oil more often under dusty,
ditty conditions.
quickly.
back.
Do not allow starter rope to snap
° To stop engine, release operator presence
control bar.
NOTE:
8
tn cooler
weather
it may be
MULCHING
necessary to repeat priming steps, in
warmer weather over priming may cause
flooding and engine will not start, If you
do flood engine, wait a few minutes
before attempting to start and do not
repeat priming steps.
MOWING
,
MOWING
TIPS
IMPORTANT: For best performance, keep
mower housing free of built-up grass and
trash. See "Cleaning" in Maintenance section
of this manual.
• The special mulching blade will recut the
grass clippings many times and reduce
them in size so that as they fall onto the
lawn they will disperse into the grass and
not be noticed. Also, the mulched grass will
biodegrade quickly to provide nutrients for
the lawn. Always mulch with your highest
engine (blade) speed as this witl provide the
best recurring aclion of the blade&
• Avoid cutting your lawn when it is weL Wet
grass tends to form clumps and interferes
with the mulching action. The best time to
mow your lawn is the early afternoon. At
this time the grass has dried and the newly
cut area will not be exposed to the direct
TIPS
Under certain conditions, such as very
tall grass, it may be necessary to raise
the height of cut to reduce pushing effort
and to keep from overloading the engine
and leaving c]umps of grass clippings.
It
may also be necessary to reduce
ground speed and/or run the lawn
mower over the area a second time,
o For extremely heavy cutting, reduce the
width of cut by overlapping previously
cut path and mow slowly.
• For better grass bagging and most
cutting conditions, the engine speed
should be set in the fast position.
• When using a rear discharge lawn
mower in moist, heavy grass, clumps of
cut grass may not enter the grass
catcher.
Reduce ground speed (pushing speed) and/or n_n the lawn mower
over the area a second time,
sun,
• For best results, adjust the lawn mower
cutting height so that the lawn mower cuts
off only the top one-third of the grass blades.
If the lawn is overgrown it will be necessary
to raise the height of cut Io reduce pushing
effort and to keep from overloading the
engine and leaving clumps of mulched
grass, For extremely heavy mulching,
reduce your width of cut by overlapping
previously cut path and mow slowly.
• Certain types of grass and grass conditions
may require that an area be mulched a
second time to completely hide the
clippings, When doing a second cut, mow
across or perpendicular to the first cut path.
° Change your cutting pattern from week to
week. Mow north to south one week then
• If a trail of clippings is left on the right
side of a rear discharge mower, mow in
a clockwise direction with a small
overlap to collect the clippings on the
next pass.
• Pores in cloth grass catchers can
become filled with dirt and dust with use
and catchers will collect less grass. To
prevent this, regularly hose catcher off
with water and let dry before using.
• Keep top of engine around starter clear
and clean of grass clippings and chafL
This will help engine air flow and extend
engine life.
change to east to west the next week. This
will help prevent matting and graining of the
fawn_
Max 1/3
9
l__)_y
....
_
L
U
D
E
H
C
ls
REGULAR
o
/_/
SERVICE
SERVICE DATES
Check for Loose Fasteners
Clean/inspect Grass Catcller
....................................
!/' ......................
(.Equipped)
,'LmL_
_
V'
M
Clean Lawn Mower
.... 1/_
ti'
O
(PowePPropelled
Clean
Under DriveMowers!
Cover ............
Check drive belt/pulleys
(Power,Propel!ed Mowers)
E
Clean BatlerylRech arge
{Electric Start Mowers)
V'
_
Check Engine Oil Level
N
G Clean Air Filter
I inspec! Muffler
t
t/
..........
.............
_
2
N i Clean or Replace Spark Plug
V'
If'
E Replace A_FFiller Paper Cadridge
t/'2
i * Change
2_- Service
3, Replace
4 Charge
v'
_4
v3
v'
i
ChecldSharperdReplace Blade
Lubrication Chart
i
a
v'
......
E
o ge._._o
.........................................
E
'NTENA_]C
_A
o_ b_
more often whsn oper_ling Under a hea','y load or in high ambient lemperalures
mote often when operallng in dirty or dusly condlllons
blades rno_e oltenwhen mowing tn sandy soil
48 hours al end of season
GENERAL RECOtVIMENDATIONS
LUBRICATION
The warranty or] this lawn mower does not
cover items that have been subjected to
operator abuse or negligence.
To receive
full value from the warranty operator must
maintain mower as instructed in this
manual
\
CHART
Wheel adjuster
Engine oil
Sorne adjustments
will need to be made
periodically to properly maintain your unit
All adjustments
in the Service and
Adjustments
section of this manual should
be checked at least once each season
* Once a year, replace the spark plug,
replace air filter element and check
blade for wear A new spark plug and
clean/new air filter element assures
Rear door hinge
proper aiPfuel mixture and helps your
engine run better and last longer
° Follow the maintenance
schedule in this
manual
BEFORE EACH USE
Handle bracket mounting pin
Spray lubricant
(_) Refer to Maintenance "ENGINE" section,
, Check engine oil level°
, Check for loose fasteners°
LUBRICATION
Keep unit well lubricated
TION CHART)
IMPORTANT:
Do not oil or grease plastic
wheel bearings Viscous lubricants will attract
dust and dirt that will shorten the life of the self
lubricating bearings If you feel they must be
lubricated, use only a dry powdered graphite
type lubricant sparingly
(See "LUBRICA-
10
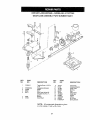
PRODUCT
SPECIFICATIONS
SERIALNUMBER
DATE OF PURCHASE
GASOLINE
CAPACITY/TYPE:
1.6 QUARTS
UNLEADED
Oi:L TYPE (API-SF/SG/SH):
SAE 30 (ABOVE 32°F)
SAE 5W-30 (BELOW 32°F_ ..........
20 OZS.
OIL CAPACITY:
SPARK
VALVE
PLUG (GAP_
CLEARANCE:
REGULAR
CHAMPION
,030")
INTAKE:
EXHAUST:
RJ19LM
,004 - ,008
.004 - .008
SOLID STATE IGNITION
AIR GAP:
.0t25
BLADE
35-40 FT. LBS.
BOLT TORQUE:
_nd
IN.
script number_,' Wil! be fodn_ on a decal attached
lawn mower housing.Record
provided above.
both seria! number
OR J19LM
to the rear oth'f'['6"e_
and date of purchase
in space
LAWN MOWER
NOTE:
Always observe safety nJles when performing
any maintenance,
TIRES
° Keep tires free of gasoline, oil, or insect
control chemicals which can harm rubber.
check tile key inside hub of blade adapter.
The key must be in good condition to work
properly,
Replace adapter if damaged.
TO REPLACE
and
BLADE
Position the blade adapter on the
engine crankshaft,
Be sure key in
adapter and crankshaft
keyway are
aligned.
° Position blade on the blade adapter
aligning the two (2) holes in the blade
with the raised lugs on the adapter,
° Be sure the trailing edge of blade
(opposite sharp edge) is up toward the
engine.
,, Install the blade bolt with the lock
washer and hardened washer into
BLADE
• Disconnect spark plug wire from spark
plug and place wire where it cannot
come in contact with spark plug.
• Turn lawn mower on its side. Make
sure air filter and carburetor
• Use a wood block between
the blade adapter
,
* Avoid stumps, stones, deep ruts, sharp
objects and other hazards that may cause
tire damage.
BLADE CARE
For best results, mower blade must be
kept sharp.
Replace bent or damaged
blades.
TO REMOVE
Remove
blade adapter and crankshaft.
• Use block of wo6d between blade
are u F
blade and
and
lawn mower housing and tighten the
blade bolt, turning clockwise.
, The recommended
tightening torque is
35-40 fl, fbs°
mower housing to prevent blade from
turning when removing blade bolt.
,, Protect your hands with gloves and!or
wrap blade with heavy cloth.
° Remove blade bolt by turning counterclockwise.
° Remove blade and attaching hardware
(boll, lock washer and hardened
washer).
1i
IMPORTANT:
treated,
Blade boft is grade 8 heat
TO SHARPEN
BLADE
,, Remove any trash or grass cuttings
fro_ inside the dust cover, pinion and/
or drive wheel gear teeth.
• Put wheels back in place.
• If after cleaning, the drive wl_eels do
not turn freely, contact your nearest
authorized
service center,
GEAR CASE
NOTE: We do not recommend
sharpening blade - but if you do, be sure the blade
is balanced.
Care should be taken to keep the blade
balanced,
An unbalanced
blade will
° To keep your drive system working
properly, the gear case and area
around the drive should be kept clean
and free of trash build-up.
Clean under
the drive cover twice a season.
cause eventual damage to lawn mower or
engine.
, The blade can be sharpened
with a file
or on a grinding wheel.
Do not attempt
to sharpen while on the mower.
• To check blade balance, drive a nail
into a beam or wall. Leave about one
° The gear case is filled with lubricant to
the proper level at the factory. The only
time the lubricant needs attention is if
inch of the straight nail exposed.
Place
center hole of blade over lhe head of
the nail, If blade is balanced,
it should
service has been performed on the
gear case.
• tf lubricant is required, use only Texaco
Starplex Premium ! Grease, Part No.
750369.
Do not substitute.
remain in a horizontal position.
If either
end of the blade moves downward,
sharpen the heavy
is balanced,
Blade
ado
end until the blade
Crank shaft
keyway
ENGINE
LUBRICATION
Use only high quality detergent oil rated
with API service classification
SF, SG or
SH. Select the oil's SAE viscosity grade
according
to your expected operating
temperature.
S_E
edge
Blade
adapter
shaft
NOTE:
Although multi-viscosity
oils
(5W30, i0W30 etc.) improve starting in
cold weather, these multi-viscosity
oils
wilt result in increased
oil consumption
when used above 32°R Check your
engine oil level more frequently to avoid
possible engine damage from running
low on oil.
GRASS CATCHER
• The grass catcher may be hosed with
water, but must be dry when used,
, Check your grass catcher often for
damage or deterioration. Through normal
use it wil! wear, If catcher needs replacing,
replace only with a manufacturer approved
replacement catcher, Give the lawn
mower model number when ordering.
Change the oil after every 25 hours of
operation or at least once a year if the
lawn mower is not used for 25 hours in
DRIVE WHEELS
Check front drive wheels
each
GRACES
1
Crank
bolt
,\\
Lock
washer Hardened
washer
VISCOSITY
one year°
Check the crankcase
time before
you mow to be sure they move freely.
The wheels not turning freely means
trash, grass cuttings, etc, are in the drive
wheel area and must be cleaned to free
drive wheels.
If necessa[y to clean the drive wheels,
check both front wheels.
• Remove hubcaps, hairpin cotters and
washers,
• Remove wheels from wheel adjusters.
oil level before
starting the engine and after each five (5)
hours of continuous
use, Tighten oi! plug
securely each time you check the oil
level.
12
TO CHANGE
ENGINE
OIL
Cover
tabs
NOTE: Before tipping lawn mower to
drain oil, drain fuel tank by runntng
engine until fuel tank is empty,
• Disconnect
spark plug wire from spark
plug and place wire where it cannot
come in contact with spark plug,
• Remove engine oil cap; lay aside on a
clean surface.
Lip
Slots
• Tip lawn mower on its side as shown
and drain oil into a suitable container.
Rock lawn mower back and forth to
•
,,
°
•
Cover
Cartridge
remove any oil trapped instde of
engine.
Wipe off any spilled oil on lawn mower
and on side of engine,
Filt englne with oil. Fill only to the
"FULL" line on the dipstick,
DO NOT
overfill.
Replace engine oil cap.
Reconnect
spark plug wire to spark
plug.
MUFFLER
Inspect and replace corroded muffler
it could create a fire hazard and/or
as
damage°
SPARK PLUG
Change your spark plug each year to
make your engine start easier and run
better. Set spark plug gap at .030 inch.
CLEANING
IMPORTANT:
For best performance,
keep mower housing free of built-up
grass and trash, Clean the underside
your mower after each use.
Container'
AIR FILTER
of
,&CAUTION:
Disconnect
spark plug wire
from spark plug and place wire where it
cannot come in contact with the spark
plug.
• Turn lawn mower on its side, Make
sure air filter and carburetor
are up.
Clean the underside
of your lawn
mower by scraping
to remove build-up
of grass and trash.
° Clean engine often to keep trash from
accumulating.
A clogged engine runs
hotter and shortens engine life.
• Keep finished surfaces
and wheels
free of all gasoline,
oil,etc°
• We do not recommend
using a garden
hose to clean lawn mower unless the
Your engine will not run properly and may
be damaged by using a dirty air filter,
Replace the air filter every year, more
often if you mow in very dusty, dirty
conditions.
TO CLEAN AIR FILTER
° Loosen
Back
plate
screw and tilt cover to remove,
° Carefully remove cartridge.
° Clean by gently tapping on a flat
surface.
If very dirty, replace cartridge.
`&CAUTION:
Petroleum solvents, such
as kerosene, are not to be used to clean
cartridge.
They may cause deterioration
of the cartridge_ Do not oil cartridge,
Do
not use pressurized air to clean or dry
cartridge.
electrical system, muffler, air filter and
carburetor
are covered to keep water
out. Water in engine can result in
shortened
engine life.
CLEAN UNDER DRIVE COVER
Clean under drive cover at least twice a
° Install cartridge, then replace cover
making sure the tabs are aligned with
the slots in the back plate. Fasten
screw securely.
season.
Scrape underside of cover with
putty knife or similar tool to remove any
build-up of trash or grass on underside
of drive cover.
13
,&CAUTION:
Before perl_orming
service and adjustments:
any
TO ADJUST
The handle can be mounted in a high or
low position. The rnounting holes in the
bottom of lower handle are off center for
raising or lowering the handle,
• Remove upper handle and all pads
attached to lower handle,
.
•
Release control bar and stop engine.
Make sure the blade and al! moving
parts have completely
stopped.
°
Disconnect spark plug wire from spark
plug and place where it cannot come
in contact with plug.
LAWN MOWER
TO ADJUST
CUTTING
,
Remove hairpin cotters from lower
handle bracket mounting pin..
• Squeeze lower handle in to remove it
from mounting pins.
• Turn lower handle over to raise or lower
handle,
HEIGHT
See "TO ADJUST CUTTING
HANDLE
HEIGHT" in the
Operation section of this manual.
REAR DEFLECTOR
• Squeeze lower handle in and position
holes onto mounting pins on handle
bracket.
The rear deflector, attached between the rear
wheels of your lawn mower, is provided to
minimize the possibility that objects will be
thrown out the rear of the lawn mower into the
operator's mowing position, If the rear
deflector becomes damaged, it should be
replaced,
TO REMOVE/REPLACE
DRIVE BELT
• Reassemble
upper handle and all parts
removed from lower handle,
Mowing
position
,.,
F.-_
Mowing
position
.,
/
,
Remove drive cover. Remove belt by
pushing down on gear case pultey and roll
belt off.
, Turn lawn mower on its side with carburetor and fuel cap up.
, Remove blade.
° Remove debris shield.
Low position
High posltton
° Remove belt from engine pulley on
crankshaft.
° Install new belt by reversing above steps°
* Always use factory approved belt to assure
fit and long life.
cover
Drive --/
Belt
handle
Push
down
Rotate
!4
__
TO ASSEMBLE
GRASS
CATCHER
ENGINE
• Put grass catcher frame into grass bag
with rigid pad of bag on the bottom.
Make sure the frame handle is outside
'(our engine speed has been factory seL
Do not attempt to increase engine speed
or it may result in personal injury. If you
believe that the engine is running too fast
or too slow, take your lawn mower to an
authorized service center for repair and
adjustment.
CARBURETOR
of the bag top,
° Slip vinyl bindings over frame.
NOTE: If vinyl bindings are too stiff, hold
them in warm water for a few minutes.
If
bag gets wet, let it dry before
SPEED
using.
_CAUTION:
Do not run your lawn mower
without cl!pping deflector or approved
grass catcher in place. Never attempt to
operate the lawn mower with the rear
door removed or propped open°
Your carburetor
has a non-adjustable
fixed main jet for mixture control, If your
engine does not operate properly due to
suspected carburetor problems, take your
lawn mower to an authorized
service
center for repair and/or adjustment,
IMPORTANT:
never tamper with the
engine governor, which is fac!ory set for
proper engine speed. Overspeeding
the
engine above the factory high speed
setting can be dangerous,
if you think the
engine-governed
high speed needs
adjusting, contact your nearest authorzed
service center, which has proper
equipment
and experience
to make any
necessary
adjustrnents.
Catcher
frame
handle
Frame
opening
15
immediately prepare your lawn mower for
storage at the end of the season or if the unit
will not be used for 30 days or more.
Operator presence control bar
X
Fold reward
LAWNMOWER
When lawn mower is to be stored for a period
of time, clean it thoroughly, remove all dirt,
grease, leaves, etc. Store in a clean, dry area.
• Clean entire lawn mower (See "CLEANING" in the Maintenance section of this
manual).
• Lubricate as shown in the Maintenance
section of this manual.
You can fold your lawn mower handle for
storage.
° Squeeze the bottom ends of the lower
handle toward each other until the lower
handle clears the handle bracket, then
move handle forward°
• Loosen upper handle mounting bolts
enough to allow upper handle to be folded
back.
IMPORTANT:
When folding the handle for
storage or transportation, be sure to fold the
handle as shown or you any damage the
control cables,
Squeeze to fold
Lower
.,_._.d/i_-._
_'_,_,._
_'_
Fold
backward
Lower >_:_
handle
-: -_.
Mowing
position
IMPORTANT: tt is important to prevent gum
deposits from forming in essential fuel system
parls such as carburetor, f fuel filter, fuel hose
or tank during storage. Also, experience
indicates that alcohol blended fuels ( called
gasohol or using ethanol or methanol) can
attract moisture which leads to separation and
formation of acids during storage. Acidic gas
can damage the fuel system of an engine
while in storage.
° Drain the fuel tank.
° Start the engine and let it run until the fue!
lines and carburetor are empty.
• Never use engine or carburetor cleaner
products in the fuel tank or permanent
damage may occur,
,, Use fresh fuel next season.
NOTE: Fuel stabilizer is an acceptable
alternative in minimizing the formation of fuel
gum deposits during storage. Add stabilizer
to gasoline in fuel tank or storage container.
Always follow the mix ratio found on stabilizer
container, Run engine at least 10 minutes
after adding stabilizer to allow the stabilizer to
reach the carburetoc Do not drain the gas
tank and carburetor if ustng fuel stabitizer.
° When setting up your handle from the
storage position, the lower handle will
automatically lock into the mowing position.
j.
Upper
handle
ENGINE
FUELSYSTEM
° Be sure that all nuts, bolts, screws, and pins
are securely fastened. Inspect moving
parts for damage, breakage and wear,
Replace if necessary,
• Touch up all rusted or chipped paint
surfaces; sand lightly before painting,
HANDLE
_ ...
for storage
,_
/.
bracket
cotter
16
ENGINE OIL
Drain oil (with engine warm) and replace with
clean engine oil, (See "ENGINE" in the
Maintenance section of this manual),
CYLINDER
gasoline will cause problems,
• If possible, store your unit indoors and
cover it to give protection from dust and dirt.
, Cover your unit with a suitable protective
cover that does not retain moisture+ Do
* Remove spark plug.
,, Pour one ounce (29 ml) of oil through spark
plug hole into cylinder.
° Pull starter handle slowly a few times to
distribute oil,
not use plastic+ Plastic cannot breathe
which allows condensation to form and will
,, Replace with new spark plug.
OTHER
* Do not store gasoline from one season to
another,
-
Replace your gasoline can if your can
starts to rust. Rust and!or dirt in your
TROUBLESHOOTING
Does not start
cause your unit to rust,
IMPORTANT:
Never cover mower while
engine and exhaust areas are still warm,
,&CAUTION:
Never store the lawn
mower with gasoline in the tank inside a
building where fumes may reach an open
flame or spark. Allow the engine to cool
before storing in any enclosure,
CHART
I+
2+
Dirty air filter.
Out of fuel
1. Clean/replace
2,+ Fill fuel tank.
3.
Stale fuel.
3.
4+ Water in fuel.
!4,
air filter+
Drain tank and refill with
fresh clean fuel,
Drain fuel tank and
carburetor and refill tank
.
Spark plug wire is
disconnected.
[5.
7,
Bad spark plug.
6+
Loose blade or broken blade 7,
84
adapter,
Control bar in released
g_
position.
Control bar defective,
6+
with fresh gasoline.
Connect wire to plug,,
Replace spark ptug,
Tighten blade bolt or
replace blade adapter+
8+ Depress control bar to
handle.
9+
Replace control bar.
J,
Loss of power
Rear of lawn mower housing
or cutting blade dragging
in heavy grass,
2+ Cutting too much gras&
i
,
t
1,
1.
3+
4.
Dirty air filter,
Buildup of grass, leaves,
and trash under mower.
2_ Set to "Higher Cut"
position,
3+ Clean/replace air filter.
4, Clean underside of mower
5.
Too much oil in engine.
5o
6+ Walking speed too fast.
6+
17
Set to "Higher Cut"
position.
housing.
Check oil level.
Cut at slower walking
speed,
t,
TROUBLESHOOTING
PROBLEM
Poor cut- uneven
CHART
CAUSE
CORRECTION
1,
Wom, bent or loose btade_
1,
RePlace blade T]ghten
blade bolt.
2.
Wheel heights
2o
Set all wheels at s;'_'rr
3,
Buildup of grass, leaves
and trash under mower.
3,
height
Clean undersidu
uneven.
mower housing.
1,
Worn, bent or loose blade.
2.
Bent engine crankshaft.
2,
Contact an authorfzed
service center.
I.
Engine flywheel brake is on
when control bar is released,
1,
Depfess control bar to
2,
Bent engine crankshaft.
2.
3.
4,
Biade adapter broken.
Blade dragging in grass,
3.
4,
Replace blade. Tighten
blade bolt.
vibration
Starter rope hard
topull
;_;
upper handle before
pulting starter rope,
Contact an authorized
service center.
Replace blade adapter,
Move lawn mower to cut
grass or to hard surface,
Loss of drive
1.
Drive wheels not turning
with drive control engaged,
t.
Adjust or replace drive control
cable.
2.
Belt not driving
2,
Put belt on pulleys or
replace belts if broken.
t
Grass catcher
not fillincj (if so
equipped)
1,
2.
3,
Cutting height too low.
Lift on blade worn off.
1.
Raise cutting height.
2,
Catcher not venting air.
3.
Replace blade.
Clean grass catcher:
Hard to push
1,
Grass is too high or wheel
height is too low,
Rear of lawn mower
1.
Raise cutting height.
2.
Raise rear of lawn mower
2,
housing or blade dragging
3,
4.
in grass.
Grass catcher too full.
Handle height position not
right for you.
18
housing one (1) setting
higher,
3.
4,
Empty grass catcher_
Adjust handle height to
suit.
Garantfa
Reglas de Seguridad
Montaje
Operaci6n
Mantenimiento
Programa de Mantenlmtento
19
19
21
23
27
27
Especificaciones del Producto
Servicio y Adjustes
Atmacenamiento
Identificaci6n de problemas
Partes de repuesto
Orden de Palles
GARANT[A
LIMITADA DE DOS ANOS PARA LA SEGADORA
28
31
33
34
Vea el manual
ingles del duefio
Contratapa
A MOTOR CRAFTSMAN
Por dos (2) afios, a partir de ja fecha de compra, cuando esta Segadora Craftsman se mantenga, lubrique
y afine seg(Jn las instpJccionespara la operad6n y el mantentmiento en el manual del duefio, Sears
repararA gratis todo defecto en el material y la mano de obra.
SI la Segadora Craftsman se usa para fines comerciates o de arflendo, esta garantfa s61ose aplica por
noventa (90) dfas a partir de la fecha de comprao
Esta Garant[a no cubre:
• Artfculos que se desgastan durante el uso normal tales como las cudllllas segadoras rotator;as, los
adaptadores de la cuchilla, tas correas, los flttros de aire y las bujfaSo
o Reparaciones necesarlas debido al abuso o a la negligencia del operador, incluy6ndose a los
cig0efiales doblados y a la falta de mantenimiento del equipo seg5n las instruccbnes que se incluyen
en el manual del due.rico
EL SERVICIO DE GARANT[A ESTA DISPONIBLE al devolver la segadpra a motor Craftsman al Centro/
Departmentode Servicto Sears mas cercano en los Estados Unldos, Esta garantfa se aplica solamente
mientras el producto este en uso en los Estados Unidos,.
Esta Garantfa le otorga derechos legales especfflcos, y puede que tambi6n tenga otros derechos que
varfan de estado a estado.
Sears, Roebuck and Co., 1:)/817WA,Hoffman Estates, IL 60179 USA
Los estandrares de seguridad exigen la presencia
del operator en los controles para reducir a un
minimo el desgode lesionarse. Su unidad viene
equtpada con dichos controles. Pot ntngun mottvo
trate del eltmlnar la funci0n de los controles que
ex}gen ta presencfa del operador,
ENTRENAMIENTO:
.
Use la segadora sotarnente para los fines
propuestas per el fabricante y
segun
las explicaciones descfitas en este manual
° No opere la segadora si se ha caldo o da5ado
en cualquiera forrna. Siempre repare los daP_os
antes de usarl&
• No use accesofios que no hayan sido
recomendados por el fabricanteo El uso de
dichos accesofios puede ser peligroso,.
° La cuchilta gira cuando el motor est&
funcionando.
PREPARACION:
• Lea este manual del operador
cuidadosamente, Familiarfcese con los
controles y aprenda a operar su segadora en
forma adecuad& Aprenda a parar su segadora
rApidamente.
• No permfta que los niSos usen su segadora.
Nunca permita que los adul[os operen la
segadom sin contar con las instrucciones
adecuadas.
° Mantenga el Area de operaci6n despejada
de gente, especialmente de nlRos peque_os
y de antmales domestfcos_
° Siempre revise cuidadosamente el &t_eaque se
va a segar y desp_jela de todas las piedras,
palos, alambres, huesos y otros objetos
extrafios. Estos objetos serdn lanzados cor_ la
cuchitla y pueden producir lesiones graves.
° Siempre use anteojos de segur_dado
protectores de ojos cuando arranque y durante
e! tiempo que use la segadora.
• Vfstase en forma adecuada, No opere la
segadora sin zapatos o con sandalias
mtentras que el motor es't& funcionando.
t9
o Revise el estanque de combustible antes de
hacer arrancar el motor. No Itene el
estanque de gasoltna en recintos cerrados,
ni cuando el motor est& funcionando o
cuando est& caliente, Permita que et motor
se enfrfe per varies minutes antes de llenar
e! estanque de gasolina° Limpie toda la
gasoltna derramada antes de hacer
arrancar el motor.
• Siempre haga los ajustes de altura de las
ruedas antes de hacer arrancar su
segadora Nunca trate de hacer _sto
mientras que el motor estA funcionandoo
• Siegue siempre durante el dla o con buena
luz a_tificial.
OPERAOiON:
• Mantenga sus ojos y su mente en la
segadora yen el Area que se est& cortando.
No permita que otros intereses lo dlstraigan,
o No code c#sped mojado o resbaloso Nunca
corra mientras est_ operando su segadora.
Siempre asegurese de mantener el equiIibrio
- mantenga el mango agarrado firmemente y
camine.
• No ponga las manes o los pies cerca
odebajo de las pades rotatodas. Mantengase
alejado de la abertura de descarga en rode
memento.
, Siempre pare el motor cuando se vaya
ocuando no est_ usando su segadora, o
antes de atravesar las entradas para autos,
los senderos, caminos y Areas cubier_as de
ripto._
• Nunca dirlja la descarga del matedal hacia
los espectadores nt permita a nadie cerca de
la segadora mientras la est_ operando,
° Antes de lirnpfar, inspeccionar o de reparar I
a segadora, pare el motor y este
completamente seguro de que la ouchllfa y
que todas las partes que se mueven se
hayan detenido, Luego, desconecte el
alambre de la bujfa y mant#ngalo alejado de
_sta para evitar el arranque per accldente.
• No continue haciendo funcionar su segadora
si le pega a un objeto extrafio. Siga el
procedimlento descdto anteriormente, luego
repare cualquier dare antes de velvet a
arrancar y de operar su segadora.
° No cambte los ajustes del regulador o
hagaque el motor ande a una velocidad
excestva. Se pueden producir daSos en el
motor y t esiones personales.
• No opere su segadora si vibra fuera de to
normal, La vibraciSn excesiva es una
indicaci6n de dafio; pare el motor, revise en
forma segura la causa de la vibracion y haga
las reparaciones segun sea necesario.
• No haga funcfonar el motor en
reclntoscerrados. Los gases de escape son
peltgrosos.
6 Nunca code e! c_sped tirando la segadora
hacia usted. Siegue a traves de la cara de
las pendientes, nunca hacia ardba o hacla
20
abajo pues puede perder el equtlibrio, No
siegue pendtentes demasiado empinadas.
Tenga cuidado cuando opere la segadora en
terreno disparejo o cuando cambie de
direcciSn - mantenga un buen equifibrio
• Nunca opere la segadora sin ias
protecciones adecuadas, las planchas, el
recogedor de cesped y otros disposttivos de
seguridad en su lugar
MANTENIMIEN'I'O
Y ALMACENAMIEN-
TO:
• Revise ta cuci_illa y los pernos de montaje
del motor a menudo, para asegurarse que
est&n apretados en la forma adecuada
° Revise todos los pemos, tuercas y torntltos a
intervalos frecuentes, para verificar si est&n
apretados en forma adecuada, y
asegurarseque la segadora se encuentra en
condiciones de funcionamiento seguro.
• Mantenga todos los dtspositlvos de
seguridad an su lugar y listes para funcionar.
• Para reduclr et peligro de incendio,
mantenga el motor sin cesped, hojas y grasa
o aceite en exceso.
• Revise el recogedor de c_sped a menudo
para verificar si hay deterioro y desgaste y
cambie las bolsas desgastada& Use
soiamenle las bolsas de repuesto
recomendadas per el fabricante de su
segadora o que cumpten con las
especificaclones de este.
• Stempre mantenga una cuchi/la aflfada en su
segadora.
° Siempre permita que el motor se enfrfe
antes de guardarla en cuatquler reclnto
cerrado.
° Nunca guarde la segadora con combustible
en et estanque dentro de un edificio en
deride los gases pueden alcanzar una llama
expuesta o una fuente de ignici6n, tal come
el cafentador de agua, la estufa de
calefacciSn, la secadora de ropa, etc,
_,Busque este sfmbolo que ser_ala las
precauciones de seguddad de impor-tancia,
Quiere decir- ifIATENC!ON!!I iltESTE
ALERTO!!! SU SEGURIDAD ESTA
COMPROMETIDA,
_PRECAUCI(_N:
Siempre desconecte el
alambre de ta bujia y p6ngalo donde no pueda
entrar en contacto con la bujfa, para evitar el
arranque pot accidente, durante la
preparaciSn, el transporte, el ajuste o cuando
se hacen reparaciones,
_I_PRECAUCI6N: Es conocido por el Estado
de California que los gases de escape del
motor de este productor contienen qufmicos
los cuates a ciertos ntveles, pueden ocasionar,
c_mcer, defectos de nacimiento, y otros daSos
al sistema reproductivo,
Estos accesorios estaban dtsponibies cuando se produjo la segadora. No son facilitados junto al
cortacesped TambI_n est_n disponibles en la mayoda de las tiendas de Sears yen los centros de
ser..4cio.La mayorfa de las tiendas Sears tambl_n pueden mandar a pedtr partes de repuesto para
usted, si les proporcfonael nSmero del mode!o de su segadora. Atgunos de estos accesodos tat vez no
se apliquen a su segadora
REND1MIENTO
DE LA
SEGADORA
........
i
,,,.,
, J.,
DESVIADOR DE RECORTES
PARA SEGADORAS CON OESCARGA TRASERA
"_
,,
JUEGOS
PARA LA ACOLCHAOQR,A
.....
SEGADORAS
CON
DESCARGA
RECOREDOR
LATERAL
ENVASES
DE GASOLINA
_, ,, ,,,
MANTENIMIENTO
DE LA SEGADORA
FILTROS
8!LE.NOIADORES
CORREAS
ESTABiLIZADORES
PAPA
REOOREDOR
PARA
CON DESCARGA
TRASERA
..
.........
1
ADAPTADORES
DE CUCHILLA
CUCHILLAS
BUJiAS
• :....
....
RUEOAS
_ ,,
ACEITE
DEL MOTOR
• Remueva todo el material de empaque, excepto
la cuSa entre el mango superior y g,Iinferior, y [a
curia que sujeta la barra de los control que
exige la presenda del operador junto con el
mango superior,
° Haga rodar la segadora hacla afuera de la caja
de cart6n y revlsela cuidadosamente para
vedficar si todavfa quedan partes sueltas
adtcionales,
Lea estas instrucciones y este manual
completamente antes de tratar de montar u
operar su segadora nuev&
IMPORTANTE: Este cortacesped viene SIN
ACEITE O GASOLiNA en el motor.
Su segadora nueva ha sido montada en fa f,_brica
con la excepci6n de aqueflas partes que se
dejaron sin montar por razones de envfo, Todas
1aspartes como las tuercas, las arandelas, los
pemos, etc, que son necesarias para completar
el montaje hart sido colocadas en la bolsa de
parteso Para asegurarse que su segadora
funcione en forma segura y adecuada, todas las
partes y los artfculos de terreteda que se monten
tlenen que ser apretados seguramente, Use las
herramientas correctas, como sea necesario,
para asegurar que se aprieten adecuadamente,,
PARA REMOVER LA SEGADORA
LA CAJA DE CARTON
DE AIRE
COMO PREPARAR
SU SEGADORA
PARA DESDOBLAR
EL MANGO
IIVIPORTANTE: Despliegue el mango con mucho
culdado para no petiizcar o dafiar los cables de
control,
° Levante los mangos hasta que la secci6n del
mango inferior se asegure en su lugar, en fa
posicl6n para segar,
• Remueva la cure protectora, levante fa secci6n
del mango superior hasta su lugar en et mango
Inferior, y apriete ambas manillas del mango.
° Remueva la curia del mango que sujeta la barra
de los control que exige ta presencia del
operador junto con el mango superior.
DE
• Remueva las partes sueltas que se inciuyen
con la segador&
. Corte las dos esquinas de los extremos de Ia
caja de carton y tienda el panel del extremo
ptano_
21
Elmangodelasegadora
puedeaiustarse
seg[]nleacomode
parasegar.Refi_rase
a
"AJUSTE
DELMANGO"
en laSecci6n
de
Servicioy Ajustesde este manual.
Barrade controlclueexJgela
presencfadel operador "-,,.
Mango superior ...
iiJ/_Levantarzf
t_/,r/i
_:;.{_-; _
"l
__--_
¢/'
PARA INSTALAR
_;_
ly
LOS ACCESORtOS
Su segadora fue enviada Ilsta para usarse como
una acolchadora de capa vegetal. Para convertirla
de modo que pueda ensacar o descargar:
• Abra la puerta trasera y remueva la tapon
acotcl_adora, Gu_rdela en un lugar seguro,
• Ahora puede instalar el recogedor o el
desvlador de recortes opcionaL
• Para volver a la operacbn de acolchamfento
con capa vegetal, tnstale la tapon acolchadora
en la abertura de descarga de la segador&
Asegurese de que todas las orejas est_n
asentadas en forrna adecuad&
para segar
Mango
Inferior
Tapon
aoolchadora
,_PRECAUCl6N:
No haga funclonar su
segadora sin ta tapon acolchadora aprobada
en su lugar, o sin el desvlador de recortes, o
sin et recogedor de cesped, aprobados, en su
lugaro Nunca trate de operar ta segadora
cuando se ha removido la puerta trasera o
cuando est_ un poco abierta_
22
FAMILIARICESE CON SU SEGADORA
LEA ESTE MANUAL DEL DUE_O Y LAS REGLAS DE SEGURIDAD ANTES DE OPERAR SU
SEGADORA° Compare las ilustraciones con su segadora para famitiarizarse con _aubtcaci6n de los
diversos controles y ajustes. Guarde este manual para referencia en el futuro.
Estos s{mbot0s pueden apareser sobre su segadora o en la iiteratura proporcionada con el .......................
producto, Aprenda y comprenda sus significados.
ATTENOI(_N O
ADVERTENCIA
MOTOR
ENCENDtDO
MOTOR
APAGADO
R,&PIDO
LENTO
ESTRANGU
LACION
Cable de control de
zona dei motor
COMBUSTIBLE
ACEITE
PBLIGRO. GUARDE LAS
MANOS Y LOS PIES LEJOS
de control qua extge la
presencia del operador
Control de impulsf6n
Cord6n
Manilla del
Tapa del deposito de aceite
de[ motor con varilla
indicadora de nivel
mango
Recogedor del c_sped
Cubierta de la
impulsi6n
Ajustador de
la rueda (en
cada rueda)
Tapon de la
acolchadora
Tapa del depos_o
de la gasotina
Cebador
Caja
IMPORTANT: Este cortacesped viene SIN
ACEITE O GASOLINA en el motor..
......
,....................
,,,,
CUMPLE CON LOS REQUIStTOS DE SEGURIDAD
.................
Las segadoras a motor, que se conducen desde la parte de atr#,s, rotatorias, Sears, cumplen con
ios est=Sndaresde seguridad del American National Standards Institute y de fa U.S. Consumer
Product Safety Commission, La cuchilla gira cuando el motor est,. funclonando.
Cord6n arrancador
arrancar el motor.
Barra de control que exige la prencia del
operador - tiene que sujetar-se abajo, junto
con el mango, para hacer arrancar el motor.
SuL_ltelapara parar el motor.
Cebador - bombea combustible adicional
desde el carburador al citindro para uso
cuando se necesita hacer arrancar un motor
fr{o.
- se usa para hacer
Patanca de control de la impulsi6n - se usa
para enganchar la segadora para movimtento
hacia adelante impulsada a motor.
Tapon de la acolchadora - situada en la
abertura de ta descarga y debe set quitada
cuando se convierte ta operacci6n de
ensacado a descarga.
23
La operactSn de cualquier segadora
puede hacer que saJten objetos
extraSos dentro de sus ojos, io que
puede producir dafios graves en
_stos. Stempre use anteoios de seguddad o
protecciSn pare los ojos mientras opere su
segadora o cuando haga ajustes o
reparaciones, Reoomendamos una mascara
de seguridad de visiCn amplia, para uso
espeJuelos o anteojos de seguddad
estandarle.
Orejas de la
Pare t,_ncorte alto, baje las
ruedas
Mango
Para un corte bajo, levante las ruedas
PARA MONTAR Y ADJUNTAR EL
RECOGEDOR DE Ct_SPED
COMO USAR SU SEGADORA
VELOCIDAD
• Levante la puerta trasera def cortac_sped y
ootocar los ganchos del armazon de la
recolectora de hIerba en los pasadores dot
quicio de la puerta.
• El recogedor de cesped queda asegurado
en fa caja de la segadora cuando se baja la
puerta trasera pare descansar en el
bastidor det recogedor de c_sped,
DEL MOTOR
La velocidad de! motor se estableci6 en la
fD.brlca para un rendimiento 6ptimo, La
velocidad no se puede ajustar,
CONTROL DE ZONA DEL MOTOR
dI_LPRECAUCICN." Las regutaciones federales
exlgen que se fnstale un control pare ef motor
en esta segadora pare reducir a un mlnimo el
rlesgo de lesionarse debido al contacto con la
cuchJlla. Por nlngt_n motivo trate de elimtnar la
funcion del control del operador, La cuchtUa
gira cuando el motor est_ funcionando.
• Su segadora vlene equtpada con una barra de
control que exige la presencia del operador, io
que requiere que el operador est8 detr.% del
mango de la segadora pare hacerla arrancar y
operarta.
PARA AJUSTAR LA ALTURA DE CORTE
• Levante las pJedas pare et torte bajo y baje las
ruedas para ei corte alto.
• Ajuste la aftura de corte para que se acomode a
sus requisites. La posfctCn del medic es la
meier pare la mayorfa de los c_spedeso
o Para cambiar la altura de corte, empuje la
palanca del ajustador hacia la rueda. Mueva la
rueda hada arrtba o hacia abajo de modo que
se acomode a sus requisitos. Asegtirese que
todas las ruedas queden igualmente ajustadas,.
AVISO; El ajustador esta correctamente
colocado cuando ]as orejas de laplaca est<_n
tnsertadas en el agujero del mango_ Tambi#n,
los ajustes de 9 posiciones (sl equipado)
permiten que el mango pueda set movido
entre las orejas de la ptaca.
I_tPRECAUCIO_N_ No hag,a funcionar su
segaoora sin e=aesvlaoor oe recortes o sin e!
recogedor de c_sped, aprobados, en su
lugar. Nunca trate de operar la segadora
cuando se ha removido ta puerta trasera o
cuando est#, un poco abierta.
Mango del
-._._..--;
Puerla bastidor del
" .-:_._- ...... "
trasera recogedor de
c_sped
+_,, ,
Pasador del qtiicio "7!i:4ai_ih_o::iaiera/.del
bastidor
PARA VACIAR
del recogedor
EL RECOGEDOR
DE
• Levante e! recogedor de c_sped usando el
mango del bastidor.
• Remueva el recogedor de c_sped, con los
recedes, de debajo del mango de la
segadorao
• Vact'e los recortes de la bolsa usando tanto
et mango del bastidor como _1 de la bolsa,
AVISO= No permita que el recogedor sea
arrastrado cuando io vaci_; puede
ocaslonarse daSos.
o del
bastidor del
Mango
de la
boise
24
recogedor de
cCsped
CONTROL
DE LA liVlPULSION
AGREGUE
• La autoimpulsi6n se controta al sujetar ta barra
de control que extge la presencia del operador
hncia abaje en el mango y al empujar ta palanca
de control de la Impulsi6n hacta adetante hasta
qua suene "clic," luego se sueita ta palanc&
• El movlmlento hacia adetante parar,_cuando la
barra de control que exige ta presencia del
opersdor se suelta. Para parar el movimiento
hacia adalsnte sin psrar el motor, suelte la barra
de control qua exige in presencia del operador un
poco hasta qua se desenganclle el control de la
impulsl6n. Sujete In barra de control que exige la
presencia del operador abajo en contra del
mango para continuar segando sin
autoimpulsi6n,
• Pare,mantener el control de la impulsi6n
enganchado cuando se de vuelta en las
esquinas, empuje el mango hacia abajo y levante
las ruedasdetanteras fuera del suelo al girar la
segadora,
Barra de control qua
exige la presencia de!\,,
operador \., \
_ ,.
Control de
ta impulsi6n
\
_'\& impulsio_'n _"_{
Para enganchar el
control de laimputsi6n
Control de la impulsi6n
desenganchado
ANTES DE HACER ARRANCAR
NE)TOR
ACEITE
EL
GASOLINA
AVISO: Antes de rellenarel deposito de
carburante, remover y descmlar los residous del
tapon que se encuentran al interior del deposito,,
° Llene el estsnque de combustible. Use
gasolina regular, sin ptomo, nuevn y timpia con
el mfnimo de 87 octanoso (El use de gasolina
con plomo aumentar& los dep6sitos de 6xido
de plomo y carbono y se reducir& la du_aciSn
de la v,_lvula). No mezcle el aceite con la
gasolina, Para asegurar que la gasolina
utilizada sea fresca compre estanques los
cuales puedan ser utilizados durante los
primeros 30 dlas,
_IbADVERTENClA: La expertencfa ha indicado
qua los combustibles mezclados con alcohol
(conocidos come gasohol, o el use de etanol o
metanol) pueden atraer ta humedad, la qua
conduce n JaseparaciSn y fon'naci6n de ,_cidos
durante el almacena.mientooLa gasoiina acfdica
puede daBar el sistema del combustible de un
motor durante el almacenamiento. Para evitar los
problemas con el motor, se debe vaciar el sistema
del combustible antes de guardarlo per un perfodo
de 30 dfas o m&s. Vac(e el estanque dot
combustible, hags arrancar el motor y hagalo
funcionar hasta quetas Ifneas del combustible y el
carburador queden vac[os. La pr6xima
temporada use combustible nuevo_Vea las
Instrucciones Para El Almacenamiento para m&s
informnci6n. Nunca use productos de timpiezs
para el motor o para el cnrburador en e! estanque
del combustible pues se puerJen produclr daSos
permanentes.
_PRECAUOION: Llano hasta la parte inferiordel
cual!o de ralleno del estanque de gasolina. No Io
Flenedemasiado. Limpie el aceite o et combustible
derramado, No almacene, derrame o use gasolina
cerca de una llama expuesta,
Tapa del
Tapa det
deposito de
deposito de
la gasolina
_'acelte
dei
/motor
Su segadora fue enviada sin aceite en el motor.
• Asegt)rese qua la segadora est_ nivetada y qua
el #_reaalrededor del depSs_tode aceite est_
timpiao
• Remueva fa tapa del dep6sito de aceite del
motor y rellene hasta la I/nea de llano en _sta.
(Descartar
/wISe: Permitir quel aceite se asfente bien en el
los
motor para ler bien su nivel.
restdous
• Et motor puede contener 20 oz, de aceite. Para
del Tapon)
e! ripe y In calidad yea "MOTOR" en la secci6n
de las Mantenlmento en este manual,
. Vac[e el aceite lentamente, No lo Hene
PARA HACER ARRANCAR EL MOTOR
demastado,
• Para hacer arrancar un motor frio, empuje e!
° Revise el nivel del aceite antes de cada use,
cebador tres (3) veces antes de tratado_
Agregue aceite si es necesado, Uene hasta la
Empuje firmemente_ Este paso normalmente no
linea de lleno en ta varttta indicadora de niveL
es necesarfo cuando se hace arrancar un
° Para leer el nivel adecuado, apriete la taps del
motor qua ya ha estado funcionando per unos
dep6sito de aceite del motor cada vez.
cuantos minutes,
• Vuelvn a instalar Is tapa del dep6sito de] aceite y
• Sujete ta barra de control que exige 13
apr_ete/a,
presencia del operador abajo en el mango y tire
. Cambie el acelte despu_s de 25 horas de
el mango del arrancador r@idamente. No
operaci6n o una vez per temporada. Pueda
permita que et cord6n arrancsdor se devuelva
necesttar cambiar el aceite m&s a menudo
3bruptarnente
cunndo las condtciones son polvorosas o
25 ° Para parar el motor, suelte 13barra de control
suciaso
que exige la presencia del operador.
CONSEJOS
AVISO: En climas m_,sfrios puede que sea
necesado repetJrlos pasos del cebado., En climas
m_,s calurosos el cebar demasiado puede
producir el ahogo y el motor no va a arrancar, Si
se ahoga el motor espere unos cuantos minutos
anles de tratar de hacerto arrancar y no repita los
pasos del cebado,
CONSEJOS
PARA
PARA SEGAR
Y ACOLCHAR
IMPORTANTE: Para obtener el mejor rendlmetnto
mantenga ia caja de la segador a sin acumiacion
de cesped y basura..Vea "LIMPIEZA" en seccion
de"Mantenimento" de este manual
, La cuchilla acotchadora espedal va a volver a
oortar los recortes de c_sped muchas veces,
y los reduce en tamaflo, de modo que si se
caen en el c_sped se van a dispesar entre
_ste y no se van a notar. Tambi_n, el c_sped
acolchado se va a deshacer r,:_pidamente
entregando substandas nutritivas para et
c_sped, Siempre acolche con la velocidad del
motor (cuchilla) m&s alta, pues asi" se obtendr&
la meier acciSn de recortede las cuchillaso
•Evtte cortar el cesped cuando est_ mojado, El
c_sped mojado tiende a {oEnarmontones e
inteffierecon ta acciSn de acotchado. La mejor
hora para segar el c_sped es temprano an la
tardeoA esa hora _ste se ha secado y el _rea
recien cortada no quedar_ expuesta al sol
directo,
° Para obtener los mejores resultados, ajuste la
aitura del corte de la segadora de modo que
_sta corte solamente e] tercio superior de las
hojas de c_,sped, En el caso de queet c_sped
haya crecido demasiado, puede ser necesario
el etevar la altura del code para reducirel
esfuerzo necesario para empujar la segadora y
para evitar sobrecargar el motor, dejando
montones de recortes de c(_sped_Para un
acolchamlento muy pesado, reduzca el ancho
de! corte pasando por encirna de1tugar
anteriormente cortado y siegue ]entamente.
° Ciertos tipos de c_sped y sus condlciones
pueden exigir que un _rea tenga que set
acolchada pot segunda vez para esconder
completamente los recortes. Cuando se haga
el segundo col're, slegue atravesado o en
forma perpendicular a la pasada del primer
corte_.
° Camble su patrSn de corte de semana a
semana, Siegue de nofle a sur una semana y
luego carnbie de este a oesle la prSx_ma
semana, Esto evitar& que el c6sped se enrede
y cambie de direcctOn,.
SEGAR
• Bajo ciertas condiciones, tal como c_sped
muy alto, puede ser necesario el elevar la
altura del corte para reducir el esfuerzo
necesario para empujar ta segadora y para
evitar sobrecargar el motor, dejando
montones de recortes de c_sped, Puede
que sea necesario reducir la velocidad del
recorddo y!o haga funcionar la segadora
sobre el ,_rea por segunda vez,
• Para un corte muy pesado, reduzca et
ancho det corte pasando parclalmente por
enctma del lugar anteriormente cortado y
siegue lentamente
• Para un mejor ensacado det c_sped y para
la mayorfa de tas condictones de corte, la
ve}ocidad del motor debe ajustarse a la
posici6n de r&pido,
• Cuando use una segadora con descarga
trasera en c6sped h_medo y pesado, los
montones del c6sped cortado puede que no
entren en el recogedor de cespedo Reduzca
la velocidad del recorddo (vetocidad de
empuje) y/o haga funcionar la segadora
sobre e} _,rea por segunda vez.
° Si queda una huelta de cortes en el fado
derecho de una segadora con descarga
trasera, siegue en la direcci6n en que giran
Ias manillas det re!oj, sotapando un poco
para recaudar los recortes en la pr6xtma
pasada.
o Los poros en !os recogedores de cesped de
tela pueden llenarse con mugre y polvo con
eJ uso y los recogedores recaudar#,n menos
c_sped, Para evitar 6sto, roc{e el recogedor
con la manguera de agua regutarmente y
d_jelo secarse antes de usarlo_
° Mantenga la parte superior del motor,
alrededor del arrancador, despejada y sin
recortes de c_sped y paja,. Esto ayudar_t el
flujo del aire del motor y extender#, su
duraci6n_.
Max_ 1/3
26
PROGRAMA DE MANTENIMIENTO
LLENE LAS FECHAS A MEDIDA
QUE COMPLETE SU SISRVICIO REGULAR
FECHA8 DE SERV1CIO
_
S
Revisar st hay__tadores
sueltos
Limplaritnspeccionar e_recogedor de
c_sped (s_viene equ_pado)
..............
E
Umpiar la segadora
......
V'
, vlf.-w
_
•sa_adas
poder
propulsor)
Rev]sar(segadotas
_as correascon
y ias
poleas
lmpuk
R
Tabla de lubdcaGi6n
LlmpiaTla"l_ateda/recargar
(segadoras con arranque el_ddco)
Revl_ar el nlvet del aceite
O
Cambiar elelflttro
aceite
Ltmplar
de del
airgmotor
O
a
'
v'
...................
Rev]sar o/aliladcamb]ar la cuchlI]a
r_
I
v'
G I mlGt_n
LFmplardebajod_
(segadoras lacubledade
con poder p_oputsor)
latrans-
D
.............
.......
......
V'
V'4
V f'
.........
Inspecc on,-v e sllanciador
Umpiar olcamblar la buj[a
Cambtar et caducho de papet del ffltro
de aire
_1,2,
Vr2
_...............
I_
t_2
.........................
.......
,.......................
__._.J
.......
1. Cambtar m-,_sa me_mdo cuando se opera bale cat'ga pesada oee ambianlas con alias temperaluras
2 .. Dar sentic]o m_._ a ment_do (_uando so opera en condlclones .gudas o pofvoro_a8
3 - Gamble las cUCll_lta,'_
m&s a menudo cuando 8tegue en terreno arenoso.
4 - Cargar per ..!8 horas at fin do ta temporada.
TABLA
RECOMENDAC1ONES
DE LUBRICAClON
GENERALES
La garantfa de esta segadora no cubre los
art[culos qua han estado sujetos al abuse o a la
negligencia del operadoro Para recibtr rode el
valor de la garantia, el operador tJenequa
mantener la segadora segen las lnstrucciones
descdtas en este manual,
AJustador
de la rueda
Aceite del
motor
Hay algunos ajustes qua se tienen qua hacer en
forma peri6dica para poder manlener su unidad
adecuadamente.
Tbdos los ajusles en ta secci6n de Servicio y
Ajustes de este manual tienen queser
revisados per 1o manes un vez per cada
temporada_
. Una vez al aSo, cambie la buji_ ;: ,_ _, 1
cambie el etemento del fittro de a_i_;_ lavise
si ta cuchilla ester desgastada. Una bujia
nueva y un elemento del filtro de aire llmpio/
nuevo aseguran la mezcla de alre-combus_
tibia adeouada y ayudan a qua su motor
funcione major y qua dure m&s,
• Siga el programa de mantenimiento en este
manual,
ANTES DE CADA USO
• Revise el nivel del aceite del motor'.
,, Revise si hay sujetadores sueltOSl
LUBRICACION
Mantenga la unidad bien iubricada (yea la
"TABLA DE LUBRtCACtON"),
\
Bisagra de la
puerta trasera
t._ Clavija de montaje
del puntat del mango
Q-) ROCIE EL LUBRICANTE
(_)
REFIERASE A LA 8ECCION DE
MANTENIMENTO EN "MOTOR"
IMPORTANTE: No acerit o engrase los
rodamtentos de fa rueda de plastlco,, Los
Iubdcantes viscosos atraeran polve y mugra,
lo qua acortara la duracion de los rodamientos
auto iubdcantes, Si cree qua lubricarse, use
solamente un lubricante tipo grafffo, de polve
27seco,
en forma moderada.
ESPECIFICACIONES
NOMERO
FECHA
DEL PRODUCTO
DE SERfE
DE COMPRA
:CAPACtDAD
Y TIPO
DE GASOLINA:
1,6 Cuartos
TIPO DE ACEITE:
SAE 30 (sobre 32°F)
SAE 5W-3_o32°F)
_APt-SF/SG)
CAPACIDAD
BUJfA
DE ACEfTE:
(ABERTURA:
TOLERANCIA
REGULAR
SIN PLOMO
20 oz. de c apacidad
CHAMPION
RJ19LM
.030")
ADMISION:
DESCARGA:
DE VALVULA:
i SENCENDIDO
DE ESTADO
SOLIDO ABERTURA
DE AIRE:
,0125 IN,
TORSION
DEL PERNO
DE LA CUCHILLA:
35-40 FT. LBS.
...... _
,_
o J19LM
,004 - .008
.004 - .008
• El num_ro de! nodelo y el de serie se encuentran en fa calcomania adjunta a la parte
trasera de la caja de la segadora. Debe registrar tanto et numero de sede come la fecha de
compra y mantengalos en un lugar seguro para refencia en el futuro,
SEGADORA
AVISO: Remueva el adaptador de la cuchilla y
revise el cubo Interior de Ia ranura del
adaptador de la cuchilla, La ranura tiene que
estar en buenas condiciones para que
functone en forma adecuad& Cambte el
adaptador si est_ daSado,
Siempre observe las reglas de seguridad
cuando Ilaga et mantenirnlento.
LLANTAS
* Mantenga las ltantas sin gasolina, aceite o
substancias qu[micas para control de tnsectos
que pueden daSar la goma.
o Evite los tocones, las piedras, las grietas
profundas, los objetos atltados y otros peligros
que pueden daSar alas Ilantas,
CUIDADO DE LA CUCHILLA
PARA CAMBIAR
• Ponga el adaptador de la cuchilla en el
cigueSal del motor_ Aseg_3rese que la ranura
del adaptador y que el chavetero del
cigueSal est6n alineados,
° Ponga la cuchitta en et adaptador de 6sta
altneando los dos (2) agujeros on ia cuchilla
con las satien_es elevadas en el adaptador.
° Asegt)rese de que el borde de sallda de la
cuchilla (opuesto al borde afilado) est_
hacla arriba hacia el motor,
° instaie el pemo de la cuchilla con la
arandeta de seguridad y la arandela
endurecida en el adaptador de la cuchilla y
el cigueSal.
° Use un bloque de madera entre la cuchtlla y
la caja de ta segadora y apriete el pemo de
la cuchilla gir&ndolo en el sentido en que
giran las manltlas def reloj.
• La torsi6n para apretar recomendada es de
35 - 40 pies libra&
Para obtener los mejores resultados, la
cuchilla de ta segadora tienen que mantenerse
afilada. Cambie la cuchllla doblada o dahada,
PARA REMOVER
LA CUCHtLLA
LA CUCHILLA
° Desconecte el alambre de la bujia y p6ngalo
en donde no pueda entrar on contacto con
_sta.
,, Haga descansar la segadora en su lade.
Aseg[)rese que el filtro de alre y que el
carburador queden mfrando hacia arriba.
• Use un bloque de madera entre la cuchitla y
la caja de ta segadora para evitar que la
cuchllla gire cuando se le quite el perno.
• Proteja sus manos con guantes y/o
envuetva la cuchtlla con una tela gruesa.
• Remueva el pemo de la cuchilla gir&ndolo
en e! sentido contrario en que glran las
manillas del reloj,
• Remueva la cuohtlla y los artfculos de
ferreterla adjuntadores (el pemo, la
arandela de seguridad y ta arandela
endurectda).
IMPORTANTE: Et perno de la cuchilla es
clase 8 tratado a calor.
28
PARA AFILAR
LA CUCHILLA
AVtSO: No recomendamos el afilar la cuchtlta pero sl Io hace, asegQrese de que quede
balanceada
Se tiene que tenet cuidado de mantenerta
balanceada. Una cuchilla que no est,i
batanceada va a producir eventualmente daBo
en la segadora o en el motor.
• La cuchiUa puede afilarse con una lima o en
una rueda rectificadora, No trate de afilarla
mientras se encuentra en la segadora.
,, Para revtsar el balance de la cuchilla, clave
un clavo en una viga o en la pared° Deje
alrededor de una pulgada de un clavo recto
expuesto. Ponga el agujero central de ta
cuchilla sobre la cabeza del clavo. Si ta
cuchilla estb. balanceada debe permanecer
en la posicl6n horizontal. Si cualquiera de los
extremos de la cuchilta se mueve hacia
abajo, afile el extremo pesado hasia que
_sta quede baianceada.
Adaptador de ia
Cuctlilla
Chavetero det
Ranut'a
......,........
Cuchifla
• Si se necesiEa lubricante, use solamente Grasa
'Texaco Starptex Premium 1, Parte No. 750369.
No use substituto&
RUEDAS DE IMPULSION
Revise tas ruedas de impulsi6n delanleras cada
vez antes de segar, para asegurarse de que se
mueven librementeo
Si tas ruedas no giran libremente quiere decir que
hay basura, recorles de c_sped, etc. en el &tea de
las paedasde impulsbn y tienen que timplarse para
Ilberarlas.
Es necesario limplar las ruedas de impulsi6n;
revise ambas ruedas detanteras,.
• Remueva los tapacubos, las clavijas de
horquilla y las amndelas.
° Remueva las ruedas de los ajusladores de las
nJedas°
• Remueva la basura y los recortes de c_sped
de dentro de la cubierta contra el polvo, pi56n y/
o de los dientes de los engranajes de las ruedas
de imputst6n.
° Ponga las ruedas de vueita en su lugar.
° Si despu6s de limpiar las ruedas de impulsi6n
no gim,_qlibremente, p6ngase en contacto con
su centro/depar[amento de servicio autorlzado
m&s cercano.
MOTOR
LUBRICACK)N
de ta
Pern°i--!
Cuchilla
Use solamente aceite de detergente de alia
caltdad clasificado con la clasiflcact6n SF SG
O SH de servicio APIo Seleccione la calidad de
vlscosidad SAE segun su temperatura de
o 3eraci6n esperada.,
___
Arandela de Arandela
Seguridad
Endurecida
RECOGEDOR
de
Salida
DE CESPED
° El recogedor de c_sped puede ser rociado con
el agua de ta manguera pero tiene que estar
seco cuando se vaya a usar.
° Revise su recogedor de c6sped a menudo para
verificar sl est#,da_ado o detefiorado. Se va a
desgastar con el uso normal Si se necesita
cambtar el recogedor, cAmblelo solamente por
uno que sea aprobado pot el fabricante D_ el
numero det modelo de la segadora cuando 1o
ordene.
CAJA DE ENGRANAJES
o Para mantener el sistema de impulsi6n
fiJncionando en forma adecuada, Ia caja de
engranajes y et &rea alrededor de la impulsi6n
tJenen que mantenerse lfmpias y sin
acumulaci6n de basura. Limpie debajo de la
cublerta de la impulsion dos veces pot
temporada.
• La caja de engranajes se flena con lubricante
hasta el nivel adecuado en la fAbrica. La i)nica
vez que el lubricante necesita atenci6n es
cuando sefe i_a prestado servicio a la caja de
engranajes
AVtSO: A pesar de que los aceites de
multiviscosidad (5W30, 10W30, etc.) mejoran
el arranque en cltma fifo, estos aceites de
multlvtscosidad van ha aumentar el consumo
de aceite cuando se usan en temperaturas
sobre 32 ° E Revise el nivel del aceite del
motor mAs a menudo, para evitar un posible
daSo en el motor, debido a que no tlene
suficiente aceite.
Cambie et acette despu6s de 25 horas de
operaci6n o por Io rnenos una vez al aSo si la
segadora se utiliza menos 25 horas el aSo.
Revise el ntvel del aceite del carter antes de
arrancar et motor y despu6s de cada cinco (5)
horas de uso continuado. Apriete et tap6n del
aceite en forma segura cada vez que revise el
nivel def aceite.
29
PARACAMBIARELACEITE DELMOTOR
AVIS0; Antesdelncltnartasegadora
para
drenarel aceite,dreneel tanquede
combustible
haciendocorrerel motorhaste
queettanqueest_vacio.
. Desconecte
el alambre de la bujfa y pSngalo
de mode que no pueda entrar en contacto
con _sta
* Remueva ta tape del dep6stto del aceite;
d6jela a un lade en una supefficie ltmpta
° Incline ta segadora y hSgala descansar en
su lade y drene et aceite en un envase
adecuado Mueva la segadora de atr_s para
adelante pare remover todo el aceite que se
haya quedado atrapado dentro det motor
° Limple todo el aoeite derramado on la
segadora y en el lade del motor
°Llene el motor con aceite LI6nelo solamente
haste la Ifnea de lleno (FULL) en la varilla
tndicadora de niveL NO LO LLENE
DEMAStADOo
o Vuelva a poner la tape en el depSslto del
aceite
° Vuelva a conectar el alambre de la bujira a
_sta
FILTRO DE AIRE
Su motor no funcionar_ en forma adecuada y
puede sufrir dales si se usa un fillro de aire suclo
Cambie el fittro de aire cada aSo, y m&s a menudo,
si siege en condiciones muy polvorosas o suclas
PARA LIMPIAR EL FfLTRO DE AIRE
• Suelte el tomtllo e incline la cublerta pare
removerloo
• Cutdadosamente, remueva el cartucho
• Umpielo golpe#,ndolosuavemente en una
superficie plan& Si es_ muy sucio cambie el
cartucho
_lbPREGAUCI6N: Los sofventes de petr61eo,
tales come el kerosene, no se deben user
para limpiar el cartucho Pueden producir el
deterioro de _ste No aceite et cartucho No
use aire a presi6n pare limpiado o secarlo
• Instale el cartucho, luego vuelva a poner la
cubierta asegur&ndose que las oreJas est_n
alineadas con Yestenures en la plancha
fraser& Apriete el tomillo en forma segura
Plancha
Orejas de la cubiertar
rasera
Labio
Cartucho
.__
__a_ura
s
Cubierta
SILENClADOR
Inspeccione y cambie el silenciador siest&
corrofdo pues producir un peligro de incendio
y/o daSo,,
BUJIA
Camble su bujia cada aSo pare hacer que su
motor arranque m&s fdcilmente y funclone
mejor, Ajuste la abertura de la bujla en 0,030
pulgada,
LIMPIEZA
IMPORTANTE: Pare obtener el mejor
redtmlentom mantenga lacajadelasgadorasin
acumutacion de cesped y gasur& Limpie la
parte de su segadora despues de cada USe
_PRECAUClON:
Desconecte el alambre de la
bujfa y pSngalo en deride no pueda entrar en
contacto con _sta
• Haga descansar ta segadora en su lade
AsegDrese que el filtro de aire y que el
carburador queden mirando hacia arribar
Umpie la parte inferior de eu segadora
rasp_ndola pare remover la acumulaci6n de
c_sped y basura.
• Umpie el motor a menudo pare evitar que se
acumule ta basura. Un motor tapado
funciona mds caliente y se acorta su
duracl6n
° Mantenga las superficies pulidas y las
ruedas sin gasolina, acette, etc
- No recomendamos el use de una manguera
de jardin para llmplar la segadora a menos
que el slstema el6c[rlco, et silenciador, el fillro
de afre y el carburador est_n tapados pare
evitar que les entre el ague El agua en el
motor puede acortar la duraciOn de _ste
LIMPIE DEBAJO DE LA CUBIERTA DE
LA IMPULSI()N
Limpie debajo de la cubierta de la imputsi6n per
Io menos dos veces cada temporada Raspe
debajo de la cubieda con un cuchilto pare
masilla o con una herramtenta parecida, pare
remover toda acumulacl6n de cesped o basura
en la parle inferior de la cubierta de la ImpulsfSn
3O
,_I,PRECAUCI6N: Antes de dar cuatquler
sercick:, o de hater ajustes:
• Su_:_ 1_.ca._rade control y pare el motor.
• A,_,etT,;::
__ que la cuchtlla y que todas las
p,_,_,a._
;,:.: .4"blesse hayan detenido
PARAAJUSTAR EL t' IANGO
o Deso:ii_ecte el atambre de la buj(a y pSngato en
donde no pueda entrar en contacto con _sta.
SEGADOP, A
PARA AJUSTAR LA ALTURA DE CORTE
Vea "PARA AJUSTAR LA ALZURA DE CORTE"
en ta secd6n de Operaci6n de este manual
DESVlADOR TRASERO
Se propordona un desviador trasero,adjunto
entre ias ruedas traseras de su segadora, para
reducir a un mfntmo la poslbtlldad que ebjetos
sean lanzados hacia afuera de la parte trasera de
la segadora, en la poslct6n en donde se encuentra
el operadoroSi se daSa el desviador debe
cambiarse,
PARA REMOVER/CAMBIAR
LA CORREA
DE IMPULSION
,
•
•
°
•
o
•
Remueva la cubierta de la impulsl6n.Remueva
la correa empujando hacla abajo en la polea de
ta caja de engranajes.
Haga descansar la segadora en su tado con el
filtro de atre y el carburador mirando hacia
arrtb&
Remueva la cuchilla.
Remueva la defensa en contra del desperdicio.
Remueva la correa de ta polea del motor en el
cigueSaL
Instale la correa nueva siguiendo los pasos
anteriores en el orden Inverso.
Siempre use fa correa aprobada pot la f,_brfca
para asegurarse que catce y dure.
El mango puede ser montado a una postci6n
alta o baJa, Los agujeros de montaje en el
mar_g,._inferior estAn fuera del centro para
leva_itar y bajar el mango.
° R_,;_ueva et mango superior y todas las
pert,_s atadas al mango inferior.
° Rernueva las ctavljas de horquilla de la
davJja de montaje del puntal del mango,
• Apreite el mango inferior hacia dentro para
_emoveflo de las clavijas de montaje,
° Gire el mango inferior pot encima para
levantar o ha Jarel mango.
° Vuelva a montar las clavtjas de horquilla per
encima de las clavijas de montaje.
o Vuelva a montar el mango superior y todas
las partes removldas del mango inferior,
Postci6n
Posici6n
para segar n""'
para segar ([_,
• ,_.
|
Posicidn baja
Cubterta
de la
impulsion
Girar
Correa
Empujar
hacia
abajo
31
Posfcidn atta
PARA MONTAR Y ADJUNTAR
RECOGEDOR
DE CF-'-SPED
MOTOR
VELOClDAD
EL
• Ponga el bastidor del recogedor de c_sped
en la bolsa del c_sped con la patte rlgtda de
la bolsa en ta paile Inferior. Asegurese que
e! mango det bastidor est_ en el exterior de
la parle superior de la bolsa.
• Destice ]os sujetadores de vintlo sobre el
bastidor.
AVtSO: Si los sujetadores de vtntfo est_,n muy
duros, m_talos en agua catiente pot algunos
minutos, Sl se moja la bolsa, d_jela que se
seque antes de usarla.
DEL MOTOR
La velocldad del motor ha sido ajustada en la
f&brica. No trate de aumentar la velocidad del
motor pues se pueden productr lestones
personales. Si cree que el motor est&
funcionando demasiado rapido o demasiado
lento, tleve su segadora a un centro/
departamento de sewicio autorizado para
repararla o ajustarla,
CARBURADOR
Su carburador no es ajustable, Si su motor no
est,, funcionando en forma adecuada debido a
problemas que se sospecha vtenen del
carburador, tieve su segadora a un centro de
servlcto autorlzado para repararla y/o ajustarla.
IMPORTANTE: Nunca maniputee el regulador
del motor, el que ha sido ajustado en la fabrica
para fa velocidad del motor adecuadao Puede
ser peligroso hacer funoionar el motor a una
veloctdad por seb;ce el ajuste de alta ve]ocfdad
de la fabrica. Si cree que la velocidad alia
regulada del motor necesita ajuste, pongase
en contacto con su centro/departmento de
servicio autodzado mas cercano, et que
cuenta con el equipo adecuado y la
experlencla para hater los ajustes necesados.
_]IPRECAUCI6N;
No haga funcionar su
segadora sin el desvlador de recortes o sin el
recogedor de c_sped, aprobados, en su
lugar. Nunca trate de operar la segadora
cuando se ha removido la puerta trasera o
cuando est,, un poco abierla.
Mango del
bastidor del
recogedor
32
Inmediatamente prepare su segadora para el
almacenamiento al final de cada temporada o si la
unldad no se va a usar pot 30 dfas o re,is.
SEGADORA
Mango
Cuando se va a guardar la segadora por cierto
perfodo de tiempo, Ifmpiela cuidadosamente,
remueva toda la mugre, la grasa, tas hojas, etcr
Gu#,rdelaen un #.tea llmpla y seca.
. Umpte toda ta segadora (Vea "LIMPIEZA" en la
secct6n de Mantenimento de este manual).
° Lubrfquela segun se muestra en 1asecci6n de
Mantenimento de este manual,
• AsegSrese de qua todas las tuercas y clavijas y
todos los pemos y tomillosest_n apretados en
foma segura. Inspecclone las partes que se
mueven para veriflcar st estoindahadas,
quebradas o desgastadas. C#,mbielas si es
necesafio.
o Retoque todas las superficies que est_n
oxidadas o con ta pintura picada; use una lija
antes de ptntar,
MANGO
Doblar hacla
adlante para
almacenar
Doblar
hacia arras
PosiciOn
pam segar
/
Mango inferior
MOTOR
SISTEMA
Puede doblar el mango de su segadora para
almacenalia,
• Apriete los extremos lnfertores del mango inferior
entre sl hasta que et mango inferior quede
separado del puntal del mango, luego muevalo
hacla adelante.
° Suefte los pemos de montaje del mango superior
to sufictente como para permitir que el mango
supedor se pueda doblar hacia atr_s_
IMPORTANTE: Cuando doble el mango para el
alacenamiento o el trasporte, asegurese que Io
doble segun se muestra o puede danar los cables
de control.
• Cuando prepare sus mangos a partir de la
posid6n de almacenamiento, et mango inferior
autom_,ticamente se asegurar_ en la posfd6n
para segar..
Mango tnfedor
_._._
Barra de control que exlge la
presencta del
Puntal del
Apdete para _
Clavfja de
doblar
../,._:_.s._._,_ "_k.--_....
33
DE COMBUSTIBLE
IMPORTANTE: Es tmportante evitar que se
formen deposttos de partes fundamentaies del
sistema de comustible tales como el carburador, el
filtro del combutible, la manguera del combustible o
en el estanque durante el almacenmiento. La
experiencea tambien endica que los combustibles
mezclados con alcohol (conocido come gasohol o
que tienen etanol o metanol) pueden atraer
humedad, Io que conduce a la separati6n y a la
lormad6n de Acidos durante alrnacemamiento_ la
gasolina &cldeca puede naffar el slstema de
combustible de un motor durante el perido de
alcamenmiento,
° Drene el estanque de combustible.
• Haga arrancar el motor y d_jelo funcionar hasta
que las ifneas det combustible y el carburador
est6n vaci_os.
° Nunca use los productos para limpieza del
carburador o del motor en el estanque de
combustible pues se pUeden producir dahos
permanentes.
• Use combustible rtuevo la pr6xima temporada
AVtSO: El establlizador de combustible es una
alternativa aceptable para reducir a un mfnimo
la formaci6n de dep6sitos de goma en el
combustibIe durante el peffodo de
almacenamiento, Agregue estabitizador a la
gasolina en el estanque de combustible o en el
envase para el almacenamiento_ Siempre siga
la pmporci6n de mezola que se encuentra en
el envase del estabilizador. Haga functonar el
motor pot Io menos 10 minutos despu6s de
agregar el estabilizador, para permitir que este
tlegue al carburador, No drene fa gasolina dot
estanque de gasolina y el carburador si se
est_ usando estabilizador de combustible.
AC EITE DEL MOTOR
• Si es posible, guarde su untdad en un recinto
cerrado y cSbrala para protegerla contra el
polvo y Ia mugre,
, Cubra su unidad con un forro protector
adecuado qua no retenga la humedad, No use
pl&stico, El pl&stico no puede respirar,Io que
pan'hire la formaciOn de condensaci6n, Io que
producir& la oxidacf6n de su unidad,
!MPORTANTE: Nunca cubra ta segasora
mientras el motor y las areas de escapetodavla
estan callentes°
_ibPRECAUCION: Nunca almacene la
segadora con gasolina en el estanque dentro
de un edificio en donde los gases pueden
alcanzar una llama expuesta o una chtspa,
Permtta que se enfrfe el motor antes de
almacenada en algen reclnto cerrado.
Drene el acelte (con el motor ca!iente) y c_mbielo
con aceite de motor limpio. (Vea "MOTOR" en la
secci6n de Mantentmento de este manual,)
ClLINDRO
° Remueva la bujfa_
° Vacfe una onza (29 ml) de aceite a trav_s del
agujero de la bujfa en el cllindro.
• Tire la manitla de atTanque lentamente unas
cuantas veces para distribuir el aceite
• Vuelva a montar la nueva bujfao
OTROS
• No guarde la gasolina de una temporada a ta
otra.
° Cambie el envase de la gasolina si se empieza
a oxldaroLa oxidaci6n yio la mugre en su
gasotina producir_n problemas.
IDENTIFICAOION
DE PROBLEMAS
PROBLEMA
CORRECCION
CAUSA
.....
No arranca
H.
1.
2,
Flltro de atre sucio.
Sin combustible,
3.
Combustible rancio,,
4.
Agua en el combustible.
5o
Alambre de ta bujfa
desconectado.
Bujia mala.
Cuchilla suelta o adaptador
de la cuchtlla quebrado.
5.
Conecte el alambre a la bujfa.
6.
7,
Barra de control en la
posiciSn suelta,
Barra de control defectuosao
8.
Cambie la bujia.
Apriete el perno de la cuchilla
camble el adaptador de la
cuchilla,
Presione la barra de control
hacia el mango.
Cambie ta barra de control
1. Limplefcambie el filtro de aire,
2_ Liana el estanque de combus
tible.
3. Drene el estanque y vuelva a
ltenarlo con combustible limpio
y nuevoo
4_ Drene el estanque de combus
fible y el carburador y vuelva a
Ilenar el estanque con gasolina
nueva.
6,
7.,
&
97
Fatta de fuerza
1.
2.
3.
4.
5.
6,
9.
Cuchtlla desgastada, doblada 1_
o suetta,
Altura de las ruedas dispareja, 2.
Velocidad del motor }enta.
Acumulaci6n de c6sped,
hojas o basura debajo
de la segador&
Demasiado aceite en
el motor.
Vetocidad de recorrido
demasiado r_pida.
34
Ajuste a la posiciOn de "Oorte
m&s attoo"
Ajuste a la posici6n de "Corte
m#,s alto,"
3. Limpie!cambte el filtro de aire,
4o Llmple la parte inferior de la
caJa de la segadora.
5,
Revise el nlvel del aceite.
6.
Corte a una vetoctdad de
recorrido m&s tenta.
IDENTIFICACION
DE PROBLEMAS
PROBLEMA
Mal cortedisparejo
CAUSA
1.
Cuchilla desgastada, (J'ob"iadaIi,
o suelta°
2, Altura de las ruedas dispareJa, !2
,
3_ Acumutaci6n de c_sped.
&
hojas o basura debajo
de la segadora.,
Vibract6n
excesiva
2_
Cord6n
arrancador
diffcil de ttrar
1
2,
3,
4,
Recogedor de
c_sped no se
llena (sl vlene
equipado)
1,
2.
3.
P_rdida de
impulsi6n
t.
2°
Dif_cil de empujar
CORRECClON
Cambie la cuchilla, Apriete el
perno de ta cuchilla.
Ajuste todas las ruedas a ia
Limpie la parte inferior de la
caja de la
segadora,
Cuchilta desgastada, doblada o 1,
suelta,
CfgueSal del motor doblado,
2,
Camble fa cuchilla.,Apriete el pemo
de la cuchilla
Contacto con su centre de
servicio autorlzado m&s
cercano,
El freno del volante del
motor est,_ apifcado
cuando se sueita la barra de
control,
Cigue_ial de! motor doblado,
Presione la barra de control
hacia el mango
superior antes de tirar e! cor( I
arrancador,
POngase en contacto con su
centre de servfcio autorizado
m_.s cercano,
Cambie el adaptador de la
cuchilla.
Mueva la segadora a un lugar en
donde el c_sped ha stdo cort_
o a una superficle firme para
hacer arrancar el motor,
!,
2.
Adaptador de la cuchitla
quebrado.
La cuchilla se arrastra en
el c6spedo
3,
Attura de corte demasiado
baja,
Levantamfento de la cuchilla
desgastado.,
Recogedor sin ventilaci6n
de aire,
1,
Ruedas tmpulsoras no
giran cuandoel control
de impulsi6n est&
enganchado
La correa no est,,
fmpulsando,.
1,
El c_sped est& demasiado
alto o ia altura de la rueda
demasiado baja,
2_ Parte trasera de la
caja/cuchiHa de la segadora
arrastr_.ndose en el c_sped.
3, Recogeder de c_sped
demasiado Iteno,
4, Posici6n de la aitura def
mango no adecuada para
ustedo
35
4,
Eleve la altura de corte.
,2,.
Cambte las cuchillas,
_3,
Limpie el recogedor de c_spe
1.
Ajuste o cambie el cable de
control deimpulsi6n, si est_
rote,
2,
Ponga las correas en Fas
poleas o c&mbielas
si estAn rotas,
1o Eieve la aitura de corte,
2,
3,
Eleve la parte trasera de la caja
de la segadora (t) un lugar mAs
alto,
Vacfe el recogedor de c_sped
4o Ajuste la altura del mango de
mode que le
acomode.
36
ROTARY LAWN MOWER -- MODEL NO. 917.377050
GEAR CASE ASSEMBLY PART NUMBER 702511
I
t
KEY
NO.
PART
NO.
17490416
2
3
4
6
137055X004
137053
57072
48373
7
8
77881
137O51
KEY
NO,
DESCRIPTION
Tapptng Screw 1/4-20 x
1-1/4
Engagement Bracket
Shifter
Seal
Gear Case Halves Kit
(Includes Key Noso 4,
and 7)
Beadng
Worm Shaff
9
t0
1t
12
13
14
15
16
17
18
19
PART
NO.
DESCRIPTION
137074
57079
131484
700343
86447
137050
750436X
750369
12000003
850848
81585X00_
Drive Shaft
HardenedWasher
Clutch Yoke
Bushing
Plug
Helical Gear
Clutch Jaw
Grease
E-Ring
HI.Pro Key
Spring Bracket
NOTE:
All component dimensions
in U,S, inches° 1 inch = 25<4 mm
37
given
o
1,0
o
I,,.
LI.I
rn
W
o
1,1.1
0
Z
>.
o
38
0
o
crJ
n_
w
m
c
P
8
<0
8. Z
N_mmm
W
0
_d
in
0
co
Z
to tr_
x
o
x
>.
0
0
m
l-O.
0
_9
iii
O_w._
03£0
t,.. _'_ I""/r" _:
_:
_ -_
_l"_ =]
_
_
_--
a.z
>.
_6
_Z
39
._
;r. ,._ _) _
m
_
_ 0
\
o
txt
1",,
W
lIl
=!
..!
ILl
0
L!.I
O
Z
0
\
\
4O
Em>,
E
z
0
0
0
0
111
I',,
O_
t:
I11
_d
Z
-I
IL!
0
,,,o
rr
ILl
0
¢4
Z
,.t
>.
E
_
,,o
×
Z
0
lg
0
o
_d
41
MODE[. NO. 12H802
TYPE NOo 2675-E1
BRIGGS & STRATTON
4-CYCLE ENGINE
;;:
969 _
,
.....
. ..
.........
{_
606
971A
529
62I
922_T'
%,
kl
124
@ 634
137
t30
°I
127
o5
7
42
r,
BRIGGS & STRATTON
4-CYCLE ENGINE
MODEL NO. 12H802
TYPE NO, 2675,.E1
'C_ :27
----J
!5
sg2_t _616 33
Z-_
22
_
lO
REQUIRES SPECIAL TOOLS
TO INSTALL, SEE REPAIR
INSTRUCTION MANUAL_
43
BRIGGS & STRATTON
4-CYCLE ENGINE
MODEL NO. 12H802
TYPE
NO. 2675-E1
9
842 _
O 670A
358 GASKET SET
_
3
1
{_
20
104
L_ 634
977 CARBURETOR
®
110
127
134
617
GASKET
617
SET
[
634
Q
121 CARBURETOR
KIT
_188A
"fl
8__S
I -6_°-
613
109G VALVI5 OVERHAUL
GASKET SET
670A
7
_
601
44
BRIGGS & STRATTON
4-CYCLE ENGINE
:::
_
,el
MODEL NO. 12H802
TYPE lktO,2675-E1
_T''_
"
I '11
I
111
[[
'1
'
iii ,i,i,
!11!1!11
I '
I
I
334
.i
304
363
55
_332
455
_ls 0
4B6 _
_-
g
46t
[_o36LAsE.K,T-E_,SSIO.]
45
MODEL
NO. 12H802
TYPE NO. 2675-E1
BRIGGS & STRATTON
4-CYCLE ENGINE
.....
KEY PART
NO,, NO.
1
2
3
4
5
7
8
9
9A
10
1!
12
13
15
16
20
22
493260
399269
299819
493279
214368
272916
495786
272481
272238
94650
231933
272198
94547
94720
498565
94388
399781
94220
94612
23
24
25
492177
222698
499429
26
499430
499431
499432
499425
27
28
29
32
33
34
35
4O
45
499426
499427
499428
263190
499423
499424
94699
262651
262652
262224
93312
262204
,,r,'
..... ,,,,,,
•. ....
I I"1 'q""l'l
DESCRIPTION
Cylinder Assembly
Bushing, Cylinder
*
Seal, Oil
Sump, Engine
Head, Cylinder
**** Gasket, Cylinder Head
Breather Assembly
.... Gasket, Valve Cover
*
Gasket, Baffle Piate
Screw, Hex Head
Tube, Breather
*
Gasket, Crankcase
Screw, Cylinder Head
Plug, Oil Drain
Crankshaft
Timing Gear Key
*
Seal, Oil
Screw, Hex Head
Screw, Hex Head
(Used in Hole Nearest
Breather)
Flywheel
Key, Ftywheef
Piston Assembly, Standard
Sfze
Piston Assy (.0t0" O.S..)
Piston Assy. (020" O.S_)
Piston Assy_ (.030" O.S, )
Ring Set, Piston, Standard
Size
Ring Set (.010" O.S,)
Ring Set (°020' O.S.
Ring Set (O30" O.&
Lock, Piston Pin
Ptn, Piston, Standard Size
Rod, Connecting
Screw, Connecting Rod
Vatve, Exhaust
Valve, Intake
Spring, Valve
Retainer, Valve Spring
Tappet, Valve
= ___
KEY
NO,
PART
NO.
46
47
51
54
55
56
58
498275
493737
272199
*
94526
4974420
498144
280399
60
65
81
95
104
! 10
281434
94696
223664
94098
231371
---
117
121
124
125
127
130
131
133
134
137
494870
498260
94525
498170
-..
224908
493267
398187
398188
....
163
187
188
188A
202
209
272653
492790
398540
94644
262579
263044
Gear, Cam
Slinger, Oil
Gasket, Intake E_bow
Screw, Hex Head
Housing, Rewind Starter
Pulley, Rewind Starter
Rope, Rewind Starter
(Cut To 88-5/8")
Grip, Starter Rope
Screw, Phillips
Lock, Muffler Screw
Screw, Round Head
** Pin, Float Hinge
*** Gasket, Sea_h_g (Sold in Kit
Only)
Jet, Main
Carburetor Kit
Screw, Carburetor Mounting
Carburetor
'* Plug, Welch (Sold In Ktt Only)
Valve, Throttle
Shaft, Throttle
Float, Carburetor
Valve, Inlet (Includes Seat)
**" Gasket, Bowl (Sold in Kit
Only)
*
Gasket, Air Cleaner
Hose, Fuel
Screw, Hex Head
Screw, Hex Head
Link, Governor
Spring, Governor
*
Included
tn Gasket Set (497316)
**
Included
in Carburetor
""*
Included in both Carburetor Kit (498260),
and Carburetor Gasket Set (498261)
....
lne|uded in both Gasket Set (497316),
and Valve overhaul Gasket Set (498528).
NOTE:
Inches.
46
DESCRIPTION
Kit (498260)
All component dimensions
! inch = 25.4 mm
given in U..S.
BRIGGS & STRATTON
4-CYCLE ENGINE
KEY PART
NO. NO,
227 492349
230
67072
258
945't2
284
945tl
300
497838
304
493293
305
94744
306 224324
307 94515
332 94877
333 802574
334 94731
337 802592
356 497833
358 497316
363
19069
383 89838
387 496115
455 225121
456 281503
459 281505
46t
94943
515
263073
523
495264
524 280393
525
495265
529 281299
562 94852
572 224328
592
231082
60I
93053
606
224815
608 497680
Includes:
94904
94908
613 94231
615 94474
616 263175
617 270344
620 499135
621 396847
625 497465
634
---
MODEL NO, 12H802
TYPE
KEY PART
NOo NO.
DESCRIPTION
*
Lever, Governor
Washer, Thrust
Screw, Hex Head
Screw, Hex Head
Muffler, Exhaust
Housing, Blower
Screw, Seres
Shield, Cylinder
Screw, Hex Head
Nut, Flywheel
Armature, Magneto
Screw, Sems
Plug, Spark
Wire, Ground
Gasket Set
Puller, Flywheel
Wrench, Spark Plug
Primer, Carburetor
Cup, Starter
Retainer, Starter
Pawl, Rachel
Screw, Shoulder
Spring, Retainer
Cap, Oil Filler
Seal, Ftfler Tube
Tube, Oil Flil
Grommet
Bolt, Governor Lever
Baffle, Cylinder
Nut, Hex
Clamp, Hose
Strap, Bracket
Starter, Rewind
NO, 2675-E1
DESCRIPTION
635
670
670A
74t
842
843
847
851
869
870
871
66538
Elbow, Spark Plug
280512
Spacer, Fuel Tank
493823 "
Spacer, Bracket
262598
Gear, Timing
280966
*
Seal, O-Ring
272616
Sleeve, Lever
495263
Tube Assembly, Oil
493880
Terminal, Ignition Cable
213512
Seat, tntake Valve
213513
Seat, Exhaust Valve
262001
Guide, Exhaust Valve
63709
Gutde, Intake Valve
922 262640
Sprtng, Brake
923 493442
Brake Assembly
930 497233
Guard, Finger
957 397974
Cap, Fuel Tank
966 496116
Base, Atr Cleaner
967 491588
Filter, Air
968 281340
Cover, Air Cleaner
969 94872
Screw, Hex Head
97!
94873
Screw, Hex Head
971A 94749
Screw, Hex Head
972 495224
Tank, Fuel
975
493640
Bowl, F_oat
977 498261
Gasket Set, Carburetor
1036 499341
Label Kit, Emission
I095
498258
Gasket Set, Valve Overhaul
2500
12J802-2915
Replacement
498826
RPM Settings:
Screw, Hex
Nut, Hex
Screw, He× Head
Fastener
Crank, Governor
*"* Sea!, h'_take Elbow
Bracket, Carburetor
Switch, Stop
Tube, Fuel intake
*** Washer, Shaft (Sold in Kit
Only)
*
Engine
Repfacement Shortblock
Low: 1900-2100;
High: 3000-3200
included In Gasket
Set (497316)
**
included in Carburetor
Kit (498260)
***
Included [n both Carburetor K_t (498260),
and Carburetor Gasket Set (498261)
*"*"
included in both Gasket Set (497316),
and Valve overhaul Gasket Set (498528).
NOTE: Ail componenl dimensions given tn US,
inches,, 1 inch = 25 4 mm
47
Get it fixed, at your home or ours!
For repair of major brandappliances in your ownhome...
no matter who made it, no matter who sold it!
1-800-4-[vIY-HOMEsMA°yti_e,
day or nlght
(1-800-469-4663)
www,sears.com
To bring in productssuch as vacuums,
lawn equipmentand electronicsfor repair,call for
the location of your nearest Sears Parts & Repair Center.
1-800-488-1222Anytime, day or night
www.sears.com
Forthe replacementparts, accessoriesand owner'smanuals
that you need to do-it-yourself, call Sears PartsDirectSM!
1-800-366-PART _a_-_ pm.CST,
(1-800-366-7278)
7 days a week
www.sears.comJpartsdlrect
To purchase or inquire about a Sears Service Agreeme
1-800-827-6655
7 a,m.- 5 p,m. CST, Non.- Sat
Para pedir servfcio de reparacfSn a domlcilio,
y para ordenar plezas con entrega a domtcllfo:
Au Canada pour service en fran_ais:
1-877-LE,,FOYERs_,_
1.888-SU-HOGAR _
(1.877-533-6937)
(1-888-784-6427)
II"
......
HomeCentral
s,,
® RegisteredTrademarkt TM Trademarko! Sears, Roebuck and Co,
@ Marca Reg}slradat TM Maroa de F_bric,_de Sears, Roebuckand Co,
© Sears, Roebuckand Co
173665
01_i2,00
VB
Prtntedin
US.A.