1
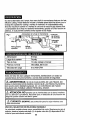
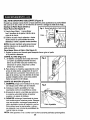
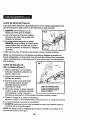
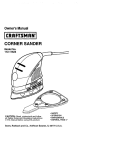
Owner's Manual
Reciprocating Saw
Variable Speed
Double Insulated
Model No.
172.17180
CAUTION:
Read, understand and follow
all Safety Rules and Operating
Instructions
in this manual before using this product.
•
•
•
•
SAFETY
OPERATION
MAINTENANCE
ESPAI_IOL, PGS. 00-00
Sears, Roebuck and Co., Hoffman Estates, IL 60179 U.S.A.
Warranty. ....................................................
Safety Instructions .....................................
Safety Symbols ..........................................
Description .................................................
Operation ...................................................
Maintenance ..............................................
Accessories ...............................................
Service Numbers ........... ,...........................
FULL ONEYEARWARRANTY
ON CRAFTSMAN
Page 2
Pages 3-7
Page 7
Page 8
Pages 8-11
Pages 12-13
Page 13
Back Cover
RECIPROCATING
SAW
If this CRAFTSMAN Reciprocating Saw fails to give complete satisfaction
within one year from the date of purchase, RETURN ITTOTHE NEAREST
SEARS STORE IN THE UNITED STATES, and Sears will replace it, free
of charge. If this CRAFTSMAN Reciprocating Saw is used for commercial
or rental purposes, this warranty applies for only 90 days from the date
of purchase.
This warranty gives you specific legal rights, and you may also have other
rights which vary from state to state.
Sears, Roebuck and Co., Dept. 817 WA, Hoffman
SAVE THESE INSTRUCTIONS!
READ ALL INSTRUCTIONS!
2
Estates, IL 60179
I
I
I
Failure to follow all instructions listed below may result in electric
WARNING:
BE SUREpersonal
to read injury.
and understand all instructions.
shock,
fire and/or serious
I
WORK AREA SAFETY
1. ALWAYS keep your work area clean and well lit. Cluttered benches and
dark areas invite accidents.
2. DO NOT operate power tools in explosive atmospheres, such as in (he
presence of flammable liquids, gases, or dust. Power tools create sparks
which may ignite the dust or fumes.
3. ALWAYS keep bystanders, children, and visitors away while operating
power tool. Distractions can cause you to lose control.
ELECTRICAL
a
SAFETY
1. Double insulated tools are equipped with a polarized plug
wider than the other.)This plug will fit in a polarized outlet
If the plug does not fit fully in the outlet, reverse the plug.
not fit, contact a qualified electrician to install a polarized
Do not change the plug in any way.
(one blade is
only one way.
If it still does
outlet.
2. Double insulation [] eliminates the need for the three wire grounded power
cord and grounded power supply system. Applicable only to Class II
(double insulated) tools.
3. Before plugging in the tool, BE SURE that the outlet voltage supplied is
within the voltage marked on the tool's data plate. DO NOT use "AC only"
rated tools with a DC power supply.
4. ALWAYS avoid body contact with grounded surfaces, such as pipes,
radiators, ranges and refrigerators. There is an increased risk of electric
shock if your body is grounded.
5. If operating the power tool in damp locations is unavoidable,
ALWAYS use a Ground Fault Circuit Interrupter to supply power to
your tool. ALWAYS wear electrician's rubber gloves and footwear
in damp conditions.
6. DO NOT expose power tools to rain or wet conditions.
a power tool will increase the risk of electric shock.
Water entering
7. DO NOT abuse the cord. NEVER use the cord to carry the tools or pull
the plug from the outlet. Keep cord away from heat, oil, sharp edges or
moving parts. Replace damaged cords immediately.
Damaged cords
increase the risk of electric shock.
3
ELECTRICAL SAFETY cont.
8. When operating a power tool outside, ALWAYS use an outdoor extension
cord marked "W-A" or 'W." These cords are rated for outdoor use and
reduce the risk of electric shock.
NOTE: The extension cord must have adequate wire size AWG (American Wire
Gauge) for safe, efficient use. Smaller gauge wires, have greater capacity
(16 gauge wire has more capacity than 18 gauge wire).
PERSONALSAFETY
1. ALWAYS stay alert, watch what you are doing and use common sense
when operating a power tool. DO NOT use tool while tired or under the
influence of drugs, alcohol, or medication. A moment of inattention while
operating power tools may result in serious personal injury.
2. ALWAYS dress properly. DO NOT wear loose clothing or jewelry. Pull
back long hair. Keep your hair, clothing, and gloves away from moving
parts. Loose clothes, jewelry, or long hair can be caught in moving parts.
3. ALWAYS avoid accidental starting. BE SURE switch is in the "Off"
position before plugging in. DO NOT carry tools with your finger on the
switch. Carrying tools with your finger on the switch or plugging in tools that
have the switch in the "On" position invites accidents.
4. ALWAYS remove adjusting keys or wrenches before turning the tool on.
A wrench or a key that is left attached to a rotating part of the tool may result
in personal injury.
5. DO NOT overreach, ALWAYS keep proper footing and balance at all
times. Proper footing and balance enables better control of the tool in
unexpected situations.
6. ALWAYS use safety equipment. Always wear eye protection.
Dust mask, non-skid safety shoes, hard hat, or hearing protection must be
used for appropriate conditions
4
TOOL USE AND CARE SAFETY
1. ALWAYSuse clamps or other practical ways to secure and support the
workpiece to a stable platform. Holding the work by hand or against your
body is unstable and may lead to loss of control.
2. DO NOT force tool. Use the correct tool and blade for your application.
The correct tool and blade will do the job better and safer at the rate for
which it is designed.
3. DO NOT use tool if switch does not turn it "On" or "Off" Any tool that"
cannot be controlled with the switch is dangerous and must be repaired.
4. ALWAYS disconnect the plug from the power source before making any
adjustments, changing accessories,or
storing the tool. Such preventive
safety measures reduce the risk of starting the tool accidentally.
5. ALWAYS store idle tools out of reach of children and other untrained
persons.Tools are dangerous in the hands of untrained users.
6. ALWAYS maintain tools with care. Keep cutting tools sharp and clean.
Properly maintained tools with sharp cutting edges are less likely to bind
and are easier to control.
7. ALWAYS check for misalignment or binding of moving parts, breakage
of parts, and any other condition that may affect the tool's operation.
If damaged, have the tool serviced before using. Many accidents are
caused by poorly maintained tools.
RECOMMENDED
FOR USE WITH THIS TOOL MAY CREATE
WARNING:CONDITION.
USE OF ACCESSORIES THAT ARE NOT
HAZARDOUS
JA
8. ALWAYS use only accessories that are recommended for this tool.
Accessories that may be suitable for one tool can become hazardous
when used on another tool.
5
SERVICE SAFETY
1. If any part of this saw is missing or should break, bend, or fall in any
way; or should any electrical component fail to perform properly:
ALWAYS shut off the power switch and remove the saw plug from the power
source and have the missing, damaged or failed parts replaced BEFORE
resuming operation.
2. Tool service must be performed only at a Sears Service Center. Service
or maintenance performed by unqualified personnel could result in a risk
of injury.
ADDITIONAL
SPECIFIC
SAFETY
RULES
1. Know your power tool. Read operator's manual carefully. Learn the
applications and limitations, as well as the specific potential hazards
related to this tool. Following this rule will reduce the risk of electric shock,
fire or serious injury,
2. ALWAYS hold tool by insulated gripping surfaces when performing an
operation where the cutting tool may contact hidden wiring or its own
cord. Contact with a 'live" wire will make the exposed metal parts of the tool
"live" and shock the operator.
3. ALWAYS keep your hands away from cutting area. DO NOT reach under
the material being cut because the nearness of the blade to your hand is
hidden from your sight.
4. DO NOT use dull or damaged
or cause kickback.
blades. Bent blades can break easily,
5. ALWAYS wear safety glasses or eye shields when using this saw.
ALWAYS wear a dust mask or respirator for applications which
generate dust.
6. ALWAYS protect your lungs. Wear a face mask or dust mask if the
operation is dusty. Following this rule will reduce the risk of serious
personal injury.
7. ALWAYS protect your hearing.Wear
hearing protection during extended
periods of operation. Following this rule will reduce the risk of serious
personal injury.
8. ALWAYS inspect and remove all nails from lumber before sawing.
Following this rule will reduce the risk of serious personal injury.
9. SAVE THESE INSTRUCTIONS.
Refer to them frequently and use them to
instruct others who may use this tool. If someone borrows this tool,
make sure they have these instructions also.
6
ADDITIONAL SPECIFIC SAFETY RULES cont.
WARNING:
Some dust particles created by power sanding,
sawing, grinding, drilling and other construction Jobs contain
chemicals known to cause cancer, birth defects or other reproductive
harm. Some examples of these chemicals are:
• Lead from lead-based paints.
• Crystalline silica from bricks and cement and other masonry products.
• Arsenic and chromium from chemically-treated lumber.
Your risk from these exposures varies, depending upon how often you do this
type of work. To reduce your exposure to these chemicals:
• Work in a well-ventilated area.
• Work with approved safety equipment, such as those dust
masks that are specially designed to filter out microscopic
particles.
WARNING:
The operation of any saw can
result in foreign objects being thrown into your eyes,
which can result in severe eye damage. Before
beginning power tool operation, ALWAYS wear
safety goggles or safety glasses with side shield
and a full face shield when needed. We recommend
a Wide Vision Safety Mask for use over eyeglasses
or standard safety glasses with side shield, both available
at Sears Retail Stores,
The label on your tool may include the following symbols.
V ...........................................................................
Volts
A ...........................................................................
Hz .........................................................................
W ..........................................................................
min .......................................................................
....
........................................................................
...................................................................
no ........................................................................
[] ........................................................................
.../min ...................................................................
z_
......................................................................
Amperes
Hertz
Watts
Minutes
Alternating current
Direct current
No-load speed
Class II construction
Revolutions or
reciprocation per minute
Indicates danger, warning
caution. It means attentionf!!
Your safety is involved.
IMPORTANT! READ ALL INSTRUCTIONS
7
Your 8.0-amp reciprocating saw has many built-in convenience features for fast,
efficient cutting. These features include a variable speed dial that allows you to
change the speeds for cutting a variety of materials. An adjustable/pivoting
shoe for maximum control in a variety of cuts and an easy-to-grip rubber boot,
The tool-less blade clamp has easy lever action for extra fast blade changes.
Input
Blade Stroke
8.0 Amps
11/8 in.
Blade Type
Rating
1/2 in. Universal
120 volts, 60 Hz AC
No-load Speeds
0 to 2400 SPM
Shank
Before attempting to use any tool, be sure to familiarize yourself with all
the operating features and safety instructions.
I
/K WARNING:
IF ANY PARTS ARE MISSING, DO NOT OPERATE
THIS SAW UNTILTHE
MISSING PARTS ARE REPLACED. FAILURE TO
DO SO COULD RESULT IN POSSIBLE SERIOUS PERSONAL INJURY.
I
I
I
z_ CAUTION: DO NOT let familiarity with your saw make you
careless. Remember that a careless fraction of a second is sufficient
to cause severe injury.
I
,/K CAUTION:
ALWAYS wear eye protection
while operating
I
I
power tool.
USING THE VARIABLE
this
SPEED DIAL
Variable speed provides increased cutting versatility.
Simply rotate the dial from the slowest setting (1)
to the highest setting (6) depending upon the material being cut.
8
Choosing the Correct Speed
The speed you use will depend on the type of materials that you are cutting:
1. Use high speeds for cutting wood.
2. Medium speed is best for non-ferrous materials.
3. Low speed is recommended for cutting metal.
NOTE:Material thickness and blade selection will also affect your speed
selection. As a general rule, as the material thickness increases, the speed
should be slower.
I
I
increase speed once the cut is started. Prolonged use at a very slow
very slow speed when beginning a cut. Then
speedCAUTION:
may damage Use
youra saw.
BLADE INSTALLATION
I
AND REMOVAL
This saw is designed to use all 1/2-in. universal shank blades.
/tk WARNING:
To prevent personal injury, ALWAYS disconnect the
plug from power source BEFORE assembling parts, making adjustments
or changing blades.
To Install Blade (Figure 2)
1. Disconnect saw from power source.
2. If necessary, extend the
adjustable/pivoting shoe away from
the blade clamp for easier access.
3. Push blade clamp lever up with your
thumb, as shown
4. Insert the blade into the saw's blade
clamp and make sure that blade
attaches to the blade nub inside clamp.
5. Push down blade clamp lever to make
sure blade is locked securely in place.
To Remove
Blade
1. Disconnect saw from power source.
2. If necessary, extend the
adjustable/pivoting shoe away from
the blade clamp for easier access.
3. Push blade clamp up with your thumb.
4. Pull the blade out of the blade clamp.
9
I
I
THE SLIDING / PIVOTING SHOE (Figure 3)
The shoe slides in or out to adjust the
depth of cut to material being cut for
maximum control and longer blade life,
To Slide Shoe In or Out: (See Fig, 3)
1. Use the Allen wrench (included) to
loosen the 2 screws on bottom of saw
housing.
2. Slide shoe in or out to the depth
of cut that you desire and
retighten both screws.
Fig. 3
Moves in or out
_'""'">"
,#........._
8hoe--
NOTE: The shoe also pivots to provide
maximum control against the surface
being cut.
To Pivot Shoe: (See Fig. 3)
1. Firmly hold saw and then pivot
shoe to desired position.
Fig. 4
FLUSH CUTTING (Figure 4)
1. Use the blade installed teeth up.
The compact design of the motor
housing and the adjustable/pivoting
shoe on this saw allows you to make
extremely close cuts in floors, corners
and other extremely tight areas.
2. To obtain the maximum flush cutting
capability of this saw, make sure that
the shoe is in its closest position to the
saw housing. And the teeth of the blade
are facing as close as possible to the
work surface.
WOOD CUTTING (Figure 5)
1. ALWAYS clamp the workpiece
down to prevent it from slipping.
2. Place the adjustable shoe and
the blade lightly against the
surface to be cut.
/
Fig. 5
3. Turn on saw and allow it to come
to full speed before applying pressure
to the workpiece.
4. ALWAYS hold the saw firmly with both
hands while cutting. Whenever possible,
hold the adjustable shoe firmly against
the material to be cut. This will prevent
the saw from jumping or vibrating and
help minimize blade breakage.
NOTE: Wear gloves if cutting for long periods.
10
METAL cu'n'ING (Figure 6)
This saw has different metal cutting capacities depending upon the
type of blade being used and metal being cut.
1. ALWAYSclamp the work down to
Rg.6
prevent it from slipping.
2. Use a finer blade for ferrous metals and a
coarse blade for non-ferrous metals.
3. When cutting thin gauge sheet metals,
ALWAYS clamp wood on both sides of the
sheet. This will give you a clean cut without
excess vibration or tearing of the metal.
4. DO NOT force the cutting blade. Forcing
the blade will reduce blade life and cause
the blade to break.
NOTE: We recommend that you spread a thin film of oil or other coolant along
the line of cut ahead of the saw. This will allow easier operation and help extend
blade life. When cutting aluminum, use kerosene.
POCKET CUTTING:
(Figure 7)
Wood Only
1. Measure the surface area to be
cut and mark it clearly using a pen,
pencil or chalk.
2. Install a pocket cutting blade
into saw.
3. Tip the saw backwards until the back
edge of the adjustable shoe is resting
on the work surface.
4. To avoid
the saw
to begin
increase
breaking the blade, start
and use the slowest speed
the cut. Then gradually
the speed as you start to cut.
Rock tool up to normal cutting
position after blade has cut
through material.
5. Hold the saw handle firmly and begin
to make a slow, deliberate upward swing
with the handle of the saw.
6. The blade will begin to feed into the material.
7. ALWAYS be sure that the blade is completely
continuing with the pocket cut.
through the material before
NOTE: In areas where blade visibility is limited, use the edge of the saw
guard as a guide.
11
SERVICE
I
personnel may result in misplacing of Internal wires and components,
WARNING:
maintenance performed by unauthorized
which
could cause Preventive
a serious hazard.
I
I
1. Tool service MUST BE performed only by a Sears Service Center,
Service or maintenance performed by unqualified personnel could result
in a risk of injury.
IMPORTANT N'OTE: All service that requires opening the saw should only be
performed at a Sears Service Center.
2. When servicing a tool, ALWAYS use only identical replacement parts. Follow
instructions in the Maintenance Section of this manual. Use of unauthorized
parts or failure to follow Maintenance Instructions may create a risk of electric
shock or injury.
TOOL LUBRICATION
Your CRAFTSMAN Reciprocating Saw has been propedy lubricated
and is ready to use.
1. In two to six months, depending on use, take your tool to the nearest Sears
Service Center for a complete cleaning, inspection and lubrication.
2. Tools used constantly on production jobs will need lubrication more often.
3. Tools that haven't been used for long periods of time should
be lubricated before you use them.
WHEN SERVICING,
USE ONLY IDENTICAL
REPLACEMENT
PARTS
WARNING: To avoid accidents, ALWAYS disconnect the
tool from the power source BEFORE cleaning or performing any
maintenance.
12
CLEANING
WARNING: To avoid accidents, ALWAYS disconnect the tool
from the power source BEFORE cleaning or performing any maintenance.
CAUTION:
Certain cleaning agents and solvents cause damage
to the plastic parts. These include gasoline, carbon tetrachloride,
chlorinated cleaning solvents, ammonia and household detergents
that contain ammonia.
1. Use a clean cloth to remove dirt, carbon dust, etc.
2. Electric tools are subject to accelerated wear and possible premature failure
when they are used to work on fiber glass boats, sports cars, etc. The fiber
glass chips and grindings are highly abrasive to electrical tool parts, such as
bearings, brushes, commutators, etc. Consequently, it is not recommended
that this tool be used for extended work on fiber glass. During any use on
fiber glass, it is extremely important that the tool is cleaned frequently with
compressed air.
I
with WARNING:
compressed air.
ALWAYS wear safety goggles when cleaning tools
I
I
IMPORTANT:
To assure product SAFETY and RELIABILITY, repairs, maintenance
adjustment MUST be performed by a Sears Service Center.
and
The following recommended accessories are currently available at
your local Sears Store.
BLADES
Sears has a large selection of reciprocating saw blades in a variety of lengths
and teeth per inch that are ideal for a wide variety of cutting needs. Choose
blades for cutting wood only, blades for metal cutting only and general-purpose
blades that cut wood or metal.
EXTENSION
CORDS
Sears offers a large selection of extension cords that help extend your
working range.
I recommended
/_ WARNING:
use of attachments or accessories
mightThe
be dangerous.
13
that are not
I
NOTES
14
Manual del propietario
Sierra de Movimiento
Alternativo
Velocidad variable
Doble aislaci6n
Modelo No.
172.17180
PRECAUCI6N:
Lea, comprenda y siga
las reglas de seguridad e instrucciones
operativas de este manual, antes de
usar el producto.
• SEGURIDAD
• OPERACI6N
• MANTENIMIENTO
Sears, Roebuck and Co., Hoffman Estates, IL 60179 EE.UU.
Garantia .....................................................
Instrucciones de Seguridad .......................
Sfmbolos de Seguridad .............................
DescripciSn ................................................
Funcionamiento .........................................
Mantenimiento ...........................................
Accesorios .................................................
NL_meros de Servicio ..................................
UN ANO DE GARANT|A SOBRE LA SIERRA
ALTERNATIVO CRAFTSMAN.
P_.gina 16
P_.gtnas 17-21
21
Pdgina
22
Pdgina
,°_.gmas 22-25
P_.gtnas 26-27
P&glna 27
Contraportada
DE MOVIMIENTO
Siesta sierra de movimiento alternativo Craftsman dejara de proporcionar
completa satisfacci6n dentro del a_o a partir de la fecha de su compra,
DEVUELVALA AL COMERClO SEARS MAS CERCANO A SU DOMIClLIO
DENTRO DE LOS ESTADOS UNIDOS, y Sears la reemplazard libre de
costos. Siesta sierra de movimiento alternativo Craftsman fuera utilizada
para prop6sitos comerciales o de alquiler, esta garantfa solo tendrd validez
por 90 dfas a partir de la fecha de compra.
Esta garantfa le otorga derechos legales especfficos y a_n podr_ usted
tenet otros derechos que podrian variar entre estados.
Sears, Roebuck and Co. Dep. 817WA. Hoffman Estates, IL 60179.
iCONSERVE ESTAS INSTRUCCIONES!
iLEA TODAS LAS INSTRUCCIONES!
16
I
las instrucciones.
El incumplimiento
de todas las ,nstruccionee
siguientes
podr|a
producir
un
choque
electrico,
incendlo
y/o lesiones
ADVERTENCIA: ASEGURESE
de leer.y
comprender
todas
personales graves.
SEGURIDAD
DEL AREA DE TRABAJO
1. SIEMPRE mantenga el lugar de trabajo limpio y bien iluminado. Los
bancos de trabajo desordenados y mal iluminados favorecen los accidentes.
2. NO utilice las herramientas eldctricas en una atm6sfera explosiva,
como en presencia de liquidos inflamables, gases o polvo. Las
herramientas el_etricas crean chispas que pueden inflamar el polvo
o los vapores.
tal
3. SIEMPRE mantenga a los espectadores, ni_os o visitantes a una
distancia prudente cuando est6 utilizando una herramienta eldctrica.
Las distracciones pueden hacerle perder el control.
SEGURIDAD
ELECTRICA
1. Las herramientas con aislamiento doble estdn equipadas con un
enchufe polarizado (una hoja de contacto es mds ancha que la otra.)
Este enchufe puede ponerse en un tomacorriente
polarizado en una
s61a direcci6n.
Si el enchufe no calza blen en el tomacorriente,
invierta
el enchufe. Si todavia no calza, contacte a un electricista calificado
para que instale un tomacorriente
adecuado.
NO modifique el enchufe
de ninguna manera.
2. El aislamiento doble [] elimina la necesidad del cordbn el_ctrico trifilar puesto
a tierra y del sistema de alimentaci6n de energfa puesto a tierra. Esto se
aplica s61o alas herramientas de Clase II (de doble aislamiento)
3. Antes de enchufar la herramienta, ASEGURESE que el interruptor de
voltaje corresponde al indicado en la placa de informaci6n de la herramienta.
NO USE "CA solamente" en herramientas que dicen CC.
4. SIEMPRE evite el contacto del cuerpo con las superficies puestas a
tierra tales como tuberias, radiadores, cocinas y refrigeradores.
Existe mayor riesgo de sufrir choque el_ctrico si su cuerpo estd a tierra.
5. Si no puede evitar usar su herramienta en lugares hdmedos, SIEMPRE
use un Interruptor de Circuito de Falla a Tierra para proporcionar
energia a su herramienta. En ambientes hdmedos use siempre guantes
de electricista y calzado.
6. NO exponga las herramientas eldctricas a la Iluvia ni a ambientes
h_medos. Cuando entra agua a una herramienta el_ctrica, se aumenta
riesgo de sufrir un choque electrico.
el
7. NO abuse del cord6n el_ctrico. NUNCA transporte la herramienta por
el cordbn ni tire de! cord6n para desenchufarla.
Manten_]a el cord6n
alejado del calor, del aceite, bordes afilados o piezas moviles.
Reemplace inmediatamente
los cordones eldctricos da_ados.
Los cordones da_ados aumentan el riesgo de sufrir un choque el_ctrico.
17
I
I
SEGURIDADELECTRICA cont.
8. Cuando utilice una herramienta eldctrica al aire libre, SIEMPRE use un
cord6n de extensibn marcado "W-A" o "W". Estos cordones est&n aprobados
para uso al aire libre y reducen el riesgo de cheque el_ctrico.
NOTA: El cord6n de extensi6n debe tener el tamaSo de alambre adecuado
AWG (American Wire Gauge) para uso eficiente y seguro. Los alambres de
calibre mds pequeSo tienen mayor capacidad (el alambre de calibre 16 tiene
mds capacidad que el alambre de 18).
SEGURIDAD
PERSONAL
1. SIEMPRE Mantdngase alerta, observe Io que estd haciendo y use sentido
comdn cuando estd usando una herramienta. NO USE la herramienta
cuando est6 cansado o bajo la influencia de drogas, alcohol o
medicamentos.
Un momento de distracci6n cuando est& trabajando con las
herramientas el_ctricas, puede ocasionar una lesi6n personal grave.
2. SlEMPRE vfstase adecuadamente.
NO use ropas sueltas o joyas.
Amdrrese el cabello largo. Mantenga su cabello, ropas y guantes
alejados de las piezas m6viles. Las ropas sueltas, las joyas o el cabello
largo pueden quedar atrapados en las piezas m6viles.
3. SIEMPRE evite la puesta en marcha accidental. ASEGURESE de que el
interruptor est6 en posici6n "Off" (Apagado) antes de enchufarla. NO
transporte las herramientas con su dedo en el interruptor. Si transporta las
herramientas con su dedo en el interruptor o si enchufa las herramientas que
tengan el interruptor en la posici6n "On" (Encendido) se favorecen los
accidentes.
4. SIEMPRE saque las Ilaves de ajuste o Ilaves inglesas antes de poner en
marcha la herramienta. Si se deja una Ilave inglesa o una Ilave de ajuste en
una pieza m6vil de la herramienta, se puede producir una lesi6n personal.
5. NO use la herramienta a una distancia demasiado alejada. Mantenga
SIEMPRE un buen equilibrio y una posici6n firme. El buen equilibrio
y la posici6n firme permiten un mejor control de la herramienta en
situaciones imprevistas.
6. SIEMPRE use equipo de seguridad. Use SIEMPRE lentes protectores.
Se debe usar m_scaras contra el polvo, zapatos de seguridad antirresbaladizos,
casco de seguridad o protecci6n auditiva de acuerdo con las circunstancias.
18
USOY CUIDADO DE LAS HERRAMIENTAS DE SEGURIDAD
1. SIEMPRE use mordazas u otro mdtodo prdctlco para asegurar y
apoyar la pieza de trabajo en una plataforma estable. Si sujeta el trabajo
con la mano crcontra su cuerpo queda inestable y puede conducir a la
pdrdida de control.
2. NO fuerce la herramienta.
Use la herramienta aproplada para el trabajo.
La herramienta correcta hard el trabajo mejor y de manera rods segura, a la
velocidad para la cual fue disefiada.
3. NO use la herramienta si el interruptor no funciona debidamente. Es
peligroso si la herramienta no puede ser controlada con el interruptor y por
Io tanto debe ser reparada.
4. SIEMPRE desenchufe la herramienta antes de hacer algdn ajuste,
cambiar accesorios o guardarla. Estas medidas preventivas de seguridad
reducen el riesgo de que la herramienta se ponga en marcha accidentalmente.
5. SIEMPRE guarde las herramientas lejos del alcance de los nifios y de
otras personas inexpertas. Las herramientas son peligrosas en manos de
personas inexpertas.
6, SlEMPRE
cortantes
mantienen
atascarse
mantenga bien cuidadas las herramientas.
Las herramientas
deben mantenerse afiladas y limpias. Las herramientas que se
bien cuidadas y bien afiladas tienen menos probabilidad de
y se pueden controlar mds fdcilmente.
7. SIEMPRE verifique si hay piezas desalineadas o atascadas, si hay
piezas quebradas o si existe cualquler otra situaci6n que pueda afectar
el funcionamiento
de la herramienta. Si la herramienta estd dafiada, debe
repararse antes de usarla nuevamente. Muchos accidentes son causados
debido al real estado de las herramientas.
ADVERTENCIA:
EL USO DE ACCESORIOS NO RECOMENDADOS
PARA SER USADOS CON ESTA HERRAMIENTA PUEDEN CREAR UNA
SlTUAClON PELIGROSA
8. SIEMPRE use solamente los accesorios recomendados por el fabricante
para su modelo. Los accesorios adecuados para una herramienta, pueden
ser peligrosos si se utilizan en otra herramienta.
19
SERVIClOTECNICO SEGURO
1. Si falta o se rompe, se dobla o falla alguna pieza de esta sierra o si
alguno de los componentes eldctricos no funciona en forma debida,
SIEMPRE apague el interruptor, desenchufe la sierra de la fuente de
alimentaci6n y haga reemplazar la piezas faltantes, dafiadas o defectuosas
ANTES de volver a ponefla en funcionamiento.
2. La reparaci6n de la herramienta debe ser efectuada solamente en un
Centro de Servicio Sears. La reparaci6n o mantenimiento
efectuaclo por
personal no especializado puede causar una lesi6n.
REGLAS
DE SEGURIDAD
ADICIONALES
ESPEClFICAS
1. Conozca su herramienta. Lea cuidadosamente
el manual del usuario.
Aprenda sus aplicaciones y limitaciones asi como tambi6n los riesgos
potenciales especificos relacionados con esta herramienta. Si se cumple
esta regla se reducird el riesgo de un choque el_ctrico, incendio o lesion grave.
2. SlEMPRE sostenga la herramienta por la superficie de sujecibn aislada
cuando la herramlenta de corte pueda tener contacto con alambrado
escondido o con su propio cord6n. Si la herramienta tiene contacto con un
alambre bajo "tensi6n" las piezas de metal expuestas de la herramienta
tambi_n quedardn bajo "tensi6n" y el operador puede sufrir un choque electrico.
3. SIEMPRE mantenga sus manos alejadas del drea donde estd cortando.
No trate de alcanzar el material cortado porque mientras masse acerca su
mano a la hoja, se aleja de su vista.
4. NO use hojas en malas condiciones.
romperse o devolverse con facilidad.
Las hojas dobladas pueden
5. Use SlEMPRE lentes protectores o pantallas de seguridad cuando use
esta sierra, SlEMPRE use una mascarilla para el polvo o respirador
para las aplicaciones que producen polvo.
6. SlEMPRE proteja sus pulmones. Utilice una mdscara contra el polvo
si la operacibn de corte va a despedir mucho polvo. El cumplimiento de
esta regla reducird el riesgo de sufrir una lesi6n personal grave.
7. SIEMPRE proteja su audicibn. Utilice protecci6n para los ofdos durante
peHodos prolongados de funcionamiento.
El cumplimiento de esta regla
reducir& el riesgo de sufrir una lesi6n personal grave.
8. SIEMPRE inspeccione y saque todos los clavos de la madera antes de
usar la sierra. El cumplimiento de esta regla reducira el riesgo de sufrir una
lesi6n personal grave.
9. CONSERVE ESTAS INSTRUCClONES.
Consdltelas con frecuencia
y dselas para ayudar a otros que puedan usar esta herramienta.
Si usted presta esta herramienta a otra persona, entregue tambidn
las instrucciones.
2O
REGLAS DE SEGURIDAD ADICIONALES ESPECIFICAS cont.
ADVERTENCIA: Algunas particulas de polvo creadas al lilar con
una herramienta, moler, taladrar y hacer otros trabajos de constru'cci6n
contienen quimicos que se sabe pueden producir cdncer, defectos al
nacer u otros da_os reproductivos. Algunos ejemplos de estos
quimicos son:
• Plomo de las pinturas a base de plomo,
• Sflice cristalino a partir de ladrillos y cemento y otros productos
• Ars_nico y cromo a partir de maderas tratadas con qufmicos
de alba_ilerfa.
Su riesgo a estas exposiciones varfa, dependiendo de la frecuencia con que
hace este tipo de trabajo. Para reducir su exposici6n a estos qufmic0s:
• Trabaje en un drea bien ventilada.
• Trabaje con equipo de seguridad aprobado, como por ejemplo mdscaras para
polvo diseSadas especfficamente
para filtrar las partfculas microsc6picas.
Z_ ADVERTENCIAh
La utilizaci6n de cualquier
sierra puede causar la proyecci6n de objetos extrafios a
sus ojos, Io cual puede ocasionar daSos oculares severos.
Antes de comenzar a usar la herramienta mecdnica,
SlEMPRE use sus lentes protectores o pantallas de
seguridad con protecci6n lateral y una mdscara completa
cuando sea necesario. Recomendamos una Mdscara de
Visi6n Amplia para usar sobre sus lentes protectores o
lentes de seguridad estdndar, con protecci6n lateral,
disponible en los Almacenes Sears.
La etiqueta en su herramienta puede incluir los siguientes
V ...........................................................................
Voltios
sfmbolos.
A ...........................................................................
Hz .........................................................................
W ..........................................................................
rain .......................................................................
"_ ........................................................................
Amperios
Hertz
Watts
Minutos
Corriente Alterna
....
Corriente Continua
•..................................................................
no ........................................................................
[] ........................................................................
Velocidad sin carga
Construcci6n Clase II
.../rain ...................................................................
Revoluciones o
Golpes por Minuto
OPM ......................................................................
Orbitas por Minuto
Z_ ......................................................................
Indica peligro, advertencia
atenci6n. Puede usarse
conjuntamente con otros
sfmbolos o pictogramas.
ilMPORTANTE! iLEATODAS LAS INSTRUCCIONES!
21
o
Su sierra alternativa de 8 amps. has many built-in convenience features for fast,
efficient cutting. These features include a variable speed dial that allows you to
change the speeds for cutting a variety of materials. An adjustable/pivoting
shoe for maximum control in a variety of cuts and an easy-to-grip rubber boot.
La abrazadera de la hoja no necesita herramienta, gracias a la fdcil acci6n de
_alanca, Io cual permite cambios extra rdpidos de las hojas.
hoja sin herramienta
Rg. 1
de variacibn
de velocidad
Hoja
de gatillo
3 de
Pafin g
ajustable
I_ mgo
de goma
Alimentaci6n
goma
8 Amps.
1/8pulg.
Largo de la carrera
Tipo de hoja
1/2pulg. v_.stagouniversal
Potencia nominal
120 voltios,60 Hz CA
Velocidad sin carga
0 to 2400 CPM
Antes de tratar de usar cualquier herramienta, familiaricese con todas las
caracterfsticas de funcionamiento y con las instrucciones de seguridad.
Ak ADVERTENClA" S_ FALTA CUALQUIERA DE I_AS PIEZAS, NO
HAGA FUNCIONAR ESTA SIERRA HASTA QUE I_AS PIEZAS FALTANTES
NO HAYAN SIDO REEMPLAZADAS. DE LO CONTRARIO SE PUEDE
CAUSAR UNA POSIBLE LESION PERSONAL GRAVE.
/_, ATENClON: NO permita que su familiaridad con la sierra interfiera
con su atenci6n y prudencia. Recuerde que un descuido de una fracci6n de
segundo puede causar una lesi6n grave.
Z_ CUIDADO:
SIEMPRE
use protecci6n
para los ojos mientras usa
esta herramienta
USO DEL SELECTOR
DE VELOCIDAD
VARIABLE
La velocidad variable ofrece mayor versatilidad de corte. Simplemente gire el
selector desde el ajuste m,_s bajo (1) al ajuste mds alto (6) dependiendo del
material que esta siendo cortado.
22
Selecclonar la velocidad correcta
La velocidad usada dependerd del tipo de materiales que estd usando:
1. Use velocidades altas para cortar madera.
2. El uso de velocidad media para materiales no ferrosos es la mds adecuada.
3. La velocidad baja se recomienda para cortar metal.
NOTA: El grosor del material y la selecci6n de la hoja afectardn la selecci6n de
la velocidad. Como regla,general, si el grosor del material aumenta, la velocidad
debe disminuir / o ser mas baja.
I
I
Despu_s aumente la velocidad una vez que inicie el corte. El use prolongado
la puede
velocidad
mdssubaja
cuando empiece un corte.
I
a unaCUIDADO:
velocidad muyUse
baja
dafiar
sierra.
SACADO
E INSTALAClON
Esta sierra estd disefiada
DE LA HOJA
para usarse con todas las hojas U-Shank de pulgada.
ANTES de montar
hacer ajustes
o cambiar
hojas.
I desenchufe
Z_ ADVERTENCIA:
Para repuestos,
prevenir lesiones
personales,
SlEMPRE
Para instalar la hoja (Figura 2)
1. Desenchufe la sierra.
2. Si es necesario, extienda el patfn
ajustable/pivoteante
alejdndolo de la
abrazadera de la hoja para facilitar el
acceso.
3. Empuje la palanca de la abrazadera
de la hoja hacia arriba con el pulgar.
4. Inserte la hoja en la abrazadera y
asegerese de que quede instalada en
el soporte de la hoja dentro de la
abrazadera.
Eje
altematJvo
de la hoja
5. Empuje hacia abajo la palanca de la
abrazadera para comprobar que la
hoja quede asegurada en su lugar.
Para retirar la hoja
1. Desenchufe la sierra.
2. Si es necesario, extienda el patfn
ajustable/pivoteante
alej&ndolo de la
abrazadera de la hoja para facilitar
el acceso.
3. Empuje la palanca de la abrazadera de la hoja hacia arriba con el pulgar.
4. Tire de la hoja para sacarla fuera de la abrazadera.
23
I
DEL PATINGIRATORIO DESLIZANTE (Figura 3)
El patfn se desliza hacia afuera o hacia adentro para ajustarse a la profundidad
del corte a fin de cortar con el mdximo de control y alargar la vida de la hoja.
Deslizar el Patfn Hacia Dentro y
Hacia Fuera (Ver figura 3)
1. Use la Ilave Allen ( ) para aflojar
los 2 tornillos de la parte inferior de la
caja de la sierra.
2. Deslice el patfn hacia adentro o hacia
afuera hasta la profundidad de corte
deseada y vuelva a apretar ambos tomillos.
NOTA: El patfn tambi_n gira para proveer
control mdximo en la superficie que se
estd cortando.
Para Hacer Girar el Patin: (Ver figura 3)
1. Sujete la sierra con firmeza para despues hacer girar el patfn
a la posici6n deseada.
CORTE AL RAS (Figura 4)
1.. El diseSo compacto de la caja del motor
Fig. 4
y el patfn ajustable/pivotante de esta
sierra le permiten ejecutar cortes muy
cercanos en pisos, esquinas y otras
dreas muy estrechas.
2. Para obtener la m_xima capacidad de corte
al ras de esta sierra, asegL_rese de que el
patfn este en su posici6n mas cercana a la
caja de la sierra y que los dientes de la hoja
queden dirigidos tanto como sea posible
hacia la superficie de trabajo.
CORTE DE MADERA (Figura 5)
1. SIEMPRE ponga una mordaza en la pieza
de trabajo para evitar que se resbale.
!
Fig. 5
2. Coloque el patfn ajustable y la hoja
levemente contra la superficie a cortar.
3. Encienda la sierra y permita que alcance
la m_,xima velocidad antes de aplicar
presi6n a la pieza de trabajo.
4. SIEMPRE sostenga firmemente la sierra
con ambas manos mientras corta. Siempre
que sea posible, sostenga firmemente el
patfn ajustable contra el material a cortar.
Esto evitar_, que la sierra salte o vibre y
se reducird a un mfnimo la posibilidad de
que la hoja se rompa.
NOTA: Use guantes siva a cortar con la sierra durante perfodos prolongados.
24
CORTE DE METALES (Figura 6)
Esta sierra tiene diferentes capacidades para cortar metales dependiend0 del
tipo de hoja que se estd usando y del metal que se estd cortando.
1. SlEMPRE use mordazas con su
trabajo par evitar que se resbale.
Rg.6
2. Use una hoja m&s fina para metales
ferrosos y una hoja rods gruesa para
metales no ferrosos.
3. AI cortar laminas delgadas de metal,
SIEMPRE ponga madera en ambos tados
de las Idmina, esto resultar_, en un buen
corte sin el exceso de vibraci6n o desgarre
del metal.
4. NO fuerce la hoja. Si fuerza la hoja durar_, menos y puede romperse.
NOTA: Le recomendamos que aplique una pelfcula delgada de aceite o un
liquido refrigerante a Io largo de la Ifnea de corte de la sierra. Esto le permitir_.
usarla m_,s fdcilmente y le ayudar& que le dure m_.s la hoja. AI cortar aluminio
use kerosene.
Rg.7
CORTE DE BOLSILLOS:
...5- )_._$
:.
..
;:-<',.-..,,,
.,..:....;.;:b_._,
!
S61o en Madera (Figura 7)
7, -_"
1. Mida la superficie a ser cortada y
m_.rquela claramente utilizando un
lapicero, Idpiz o tiza.
.'..--:':."
/ ;" .':_i:/
. >.
2. Instale una hoja para corte de
bolsillos en la sierra.
3. Incline la sierra hacia atrds hasta
que el borde trasero del pafin
ajustable descanse sobre la
Hacer un movimientohacia
superficie de trabajo.
arriba, en la posici6nnormal,
4. Para evitar romper la hoja, encienda
cuando la hoja ha pasado a
travds del material
la sierra y use la velocidad mds baja
para empezar a cortar. Despu6s
aumente la velocidad en forma gradual mientras empieza a cortar.
5. Sujete el mango de la sierra con firmeza y
empiece a hacer un movimiento lento, hacia arriba con el mango de la sierra.
6. La hoja empezar_l a avanzar en el material.
7. SIEMPRE asegL_rese que la hoja ha pasado a trav_s del material antes de
continuar con el corte de bolsillo.
(/
NOTA: En areas donde la visibilidad
cubierta de la sierra como gufa.
de la hoja es limitada, use el lado de la
25
SERVIClO
I
personal no autorizado puede resultar en que alambres internos y
componentes
sean puestos
en forma equivocada,
ocasionando
k ADVERTENClA:
El mantenimiento
preventivo
realizado una
por
situacion de peligro.
1. La reparaci6n de las herramientas DEBE SER efectuada solamente por el
Centro de Servicio Sears u otro personal calificado. La reparaci6n o
mantenimiento efectuado por personal no especializado puede causar
una lesi6n personal
NOTA IMPORTANTE: Todo servicio que requiem abrir la sierra debe ser
realizado en un Centro de Servicio T_cnico Sears.
2. Cuando efect6e reparaciones a una herramienta, use SlEMPRE s61o
repuestos legftimos. Siga las instrucciones indicadas en la secci6n
Mantenimiento de este manual. El uso de piezas no autorizadas o el
incumplimiento de las instrucciones de mantenimiento, puede crear un
riesgo de choque el_ctrico o lesiones.
LUBRICAClON
DE LA HERRAMIENTA
Su Sierra Alternativa CRAFTSMAN ha sido lubricada en forma adecuada y
est,. lista para ser usada.
1. Dentro de 6 meses, dependiendo del uso, Ileve su herramienta al Centro de
Servicio T6cnico Sears mds cercano para una limpieza, inspecci6n y
lubricaci6n completa.
2. Las herramientas usadas constantemente en trabajos de producci6n
necesitardn lubricaci6n rods a menudo.
3. Las herramientas que no hayan sido usadas por periodos largos de
tiempo deben lubricarse antes de ser usadas.
CUANDO
REALICE
REPARAClONES
USE SOLO PIEZAS LEGITIMAS.
la herramienta
ANTES de Para
Iimpiarla
hacerle mantenimiento,
ADVERTENCIA:
evitar oaccidentes,
SIEMPRE desenchufe
26
LIMPIEZA
ADVERTENCIA: Para evitar accidentes, SIEMPRE desenchufe
la herramienta ANTES de limpiarla o hacerle mantenimiento.
dafiar las piezas pldsticas. Estos incluyen gasolina, tetracloruro de
carb6n, solventes de limpieza a base de cloro, amoniaco y detergente
PRECAUCION:
domestico
con amonfaco, Ciertos agentes de limpieza y solventes pueden
1. Use patios limpios para sacar la suciedad, polvo de carbbn, etc.
2. Las herramientas eldctricas se desgastan rods rdpidamente y pueden fallar
prematuramente si se usan en embarcaciones de fibra de vidrio y carros
deportivo, etc. Las astillas de la fibra de vidrio y residuos son altamente
abrasivos para las piezas de las hermmientas eldctricas, como son cojinetes,
cepillos y conmutadores, etc. Por Io tanto, no se recomienda usar esta
herramienta durante largo tiempo en trabajos con fibra de vidrio. Durante el
use con fibra de vidrio, es muy importante que la herramienta se limpie
frecuentemente
con aire comprimido.
I
ADVERTENCIA:
use lentes
de
seguridad
cuando limpie SIEMPRE
las herramientas
conprotectores
aire comprimido.
I
IMPORTANTE:
Para asegurar la seguridad y confiabilidad del producto, reparaciones,
mantenimiento y ajustes deben ser realizados en el Centro de Servicio
T_cnico de Sears.
Los siguientes accesorios
su Almac_n Sears.
recomendados
est_n disponibles
actualmente
en
HOJA
Sears tiene una gran selecci6n de hojas de sierras alternativas en una
variedad de largos y dientes per pulgada que son ideales para un sinnLimero
de necesidades de cortes. Hojas para cortar madera solamente, hojas para
cortar metal solamente y hojas para usos generales que cortan madera o metal.
CORDONES
DE EXTENSION
Sears ofrece una gran selecci6n
prolongar el alcance etil.
I
de cordones de extensi6n que ayudan a
ADVERTENCIA:
El uso
de accesorios o piezas que se acoplan,
no recomendadas
puede ser
peligroso.
27
I
I
Your Home
For repair in your home of all major brand appliances,
lawn and garden equipment, or heating and cooling systems,
no matter who made it, no matter who sold it!
For the replacement parts, accessories and
owner's manuals that you need to do-it-yourself.
For Sears professional installation of home appliances
and items like garage door openers and water heaters.
1-800-4-MY'HOM
Ee
(1-800-469-4663)
www.sears.com
Anytime, day or night
(U.S.A. and Canada)
www.sears.ca
Our Home
For repair of carry-in products like vacuums, lawn equipment,
and electronics, call or go on-line for the nearest
Sears Parts and Repair Center.
1-800-488-1222
Anytime,day or night (U.S.A.only)
www.sears.com
To purchase a protection agreement (U.S.A.) or maintenance
agreement (Canada) on a product serviced by Sears:
1-800-827-6655
(us_)
Para pedir sewicio de reparaci6n
a domicilio,y para ordenar piezas:
1-888-SU-HOGAR su
(1-888-7_
1-800-361-6665
(Canada)
Au Canada pour service en frar_is:
1-800-LE-FOYER Mc
(1-ax_33-_c_
www.sears.ca
©Sears,Roebud<
andC_
® Registered Trademark / TM Trademark / SMService Mark of Seam, Roebuck and Co.
® Marca Registrada / TM Marca de F. brica / SM Marca de Servicio de Seam, Roebuck and Co
MCMarque de commerce / MOMarque dOpos(_e de Sears, Roebuck and Co.