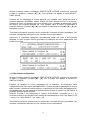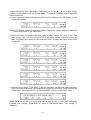
1
MANUALE UTENTE – USER’S MANUAL
DMX OPERATOR
PLBR256MH2
Rev. 07/2006
INDICE
INFORMAZIONI DI SICUREZZA ...................................................................................... 4
CARATTERISTICHE TECNICHE ..................................................................................... 5
CARATTERISTICHE PRINCIPALI.................................................................................... 5
CONTROLLI DI BASE ...................................................................................................... 6
SETUP .............................................................................................................................. 7
1. INTERNAL LIBRARY............................................................................................... 8
1.1 Create New Fixture: ........................................................................................... 8
1.2 Edit Existing Fixture: ........................................................................................ 16
1.3 Delete Fixture:.................................................................................................. 17
2. PATCH ................................................................................................................... 19
2.1 Fixture Patch: ................................................................................................... 20
2.2 Parcan Patch:................................................................................................... 20
2.4 Smoke Patch:................................................................................................... 21
3. MIDI CHANNEL ..................................................................................................... 22
4. STROBE TYPE...................................................................................................... 22
5. GOOSENECK DIMMER ........................................................................................ 23
6. VIEW FREE MEMORY .......................................................................................... 23
7. SEND DATA FILE.................................................................................................. 23
8. LOAD DATA FILE .................................................................................................. 25
9. UPDATE SOFTWARE ........................................................................................... 26
10. SAVE TO CARD .................................................................................................. 26
11. LOAD FROM CARD ............................................................................................ 28
RECORD......................................................................................................................... 29
1. RECORD SHOWS................................................................................................. 29
1.1 Active Effects: .................................................................................................. 30
1.2 Edit Steps:........................................................................................................ 30
1.3 Step’s Time: ..................................................................................................... 31
2. RECORD CHASES................................................................................................ 32
3. RECORD SCENES................................................................................................ 33
PLAYBACK ..................................................................................................................... 34
CONTROLLO STROBO.................................................................................................. 35
2
MANUAL FIXTURES ...................................................................................................... 35
UTILITA’ .......................................................................................................................... 36
TEMPO ...................................................................................................................... 36
COPIA........................................................................................................................ 37
RESET ....................................................................................................................... 37
LAMP ......................................................................................................................... 38
MIDI ........................................................................................................................... 38
APPENDICE A ................................................................................................................ 39
3
BENVENUTI
Congratulazioni per aver scelto questa centralina.
Ciascuna unità è stata accuratamente testata ed imballata prima della vendita.
Togliere l’imballo accuratamente e conservare la scatola e tutto il materiale dell’imballo
per un eventuale uso futuro.
Assicurarsi che il prodotto non sia danneggiato e che manchino degli accessori. In caso
affermativo, non utilizzare la macchina e contattare il rivenditore locale.
Leggere attentamente il presente manuale, in quanto esso riporta importanti informazioni
di sicurezza e riguardanti l’uso e la manutenzione dell’apparecchio. Tenere sempre il
manuale a portata di mano per consultazioni future.
INFORMAZIONI DI SICUREZZA
-
Per ridurre i rischi di shock elettrici o incendio, non esporre l’unità a pioggia o
umidità.
-
Non rovesciare acqua o altri liquidi sopra o all’interno dell’apparecchio.
-
Assicurarsi che la rete locale di alimentazione riporti gli stessi valori di tensione e
frequenza di quelli dell’unità.
-
Non tentare di utilizzare l’apparecchio se il cavo di alimentazione è danneggiato.
-
Spegnere immediatamente l’apparecchio in caso di malfunzionamento. Nel caso in
cui si avvertano fumo o strani odori provenire dall’apparecchio, disconnettere
immediatamente l’alimentazione.
-
Non aprire l’apparecchio, all’interno non ci sono componenti che necessitano di
manutenzione.
-
Non smontare o modificare l’apparecchio, in quanto questo provoca il decadimento
della garanzia.
-
Non tentare di riparare. Riparazioni effettuate da personale non qualificato
potrebbero provocare danni o malfunzionamenti. Contattare il centro di assistenza
tecnica autorizzato.
Evitare l’acqua: il prodotto non è impermeabile e potrebbe avere dei malfunzionamenti
se esposto ad elevati livelli di umidità. Ruggine all’interno dei meccanismi potrebbe
provocare danni irreparabili.
Evitare scuotimenti: il prodotto potrebbe avere malfunzionamenti se soggetto a urti
violenti o forti vibrazioni.
4
Evitare forti campi magnetici: non utilizzare o posizionare il prodotto vicino ad apparecchi
che generano forti radiazioni o campi elettromagnetici. Elevate cariche elettrostatiche o
campi magnetici prodotti da apparecchi come radiotrasmettitori, potrebbero interferire
con il display o la circuiteria interna.
Pulizia: potrebbe essere necessaria la pulizia dell’apparecchio in caso di depositi di
polvere, fumo prodotto dalle macchine del fumo ecc. Utilizzare in tali casi un panno
morbido e asciutto per la pulizia della scocca esterna.
Memorie: le schede di memoria potrebbero riscaldarsi durante il normale uso; osservare
la dovute precauzioni per la rimozione delle schede dall’apparecchio.
Attenzione: sono raccomandate solo schede di memoria Compact Flash 32 M.
La consolle richiede l’uso delle schede di memoria per uso esclusivo. Nel caso in cui tali
schede fossero utilizzate su altre consolle, potrebbero verificarsi degli errori.
Informazioni sul copyright: nessuna parte del presente manuale, relativo a
quest’apparecchio, può essere riprodotta, trasmessa, trascritta, tradotta in altra lingua,
senza autorizzazione scritta.
CARATTERISTICHE TECNICHE
Modello:
PLBR256MH2
Alimentazione:
AC 230V / AC 120V
Scocca:
in metallo verniciato a polvere epossidica
Display:
2 x 40 caratteri
Canali DMX:
512 canali massimo, configurabili per proiettori intelligenti,
PAR tradizionali e strobo DMX
Ingressi / Uscite:
4 x DMX OUT – 3 poli
MIDI IN / OUT / THRU – connettore standard DIN 5 poli
Porta RS 232 – connettore DB9
Audio IN – connettore RCA
Audio trigger:
Microfono interno incorporato o tramite Audio IN
Dimensioni:
mm. 650 x 400 x 115 (h)
Peso:
kg. 8,3
Accessori opzionali:
Scheda di memoria: 32 MB Compact Flash
Lampada USB 5V / 1W
Cavo RS 232
CARATTERISTICHE PRINCIPALI
- 512 canali DMX (24 canali per PAR tradizionali, 8 canali per strobo, fino a 36 canali
per proiettori intelligenti)
- 20 programmi strobo pre-impostati e 48 scene programmabili
5
- 48 show programmabili per i proiettori intelligenti, ciascuno con un massimo di 48
passi
- 48 show programmabili per i PAR, ciascuno con un massimo di 48 passi
- Libreria interna editabile, con un massimo di 256 apparecchi
- Accesso libero alle schede di memoria per lo scambio di dati (librerie, memorie e
setup)
- Files di dati scaricabili su PC
- Software aggiornabile
- Ingresso audio o microfono interno per sincronizzazione musicale
- Joystick per regolazioni del pan e tilt per i proiettori intelligenti
- Black out e Grand Master
CONTROLLI DI BASE
FIXTURE (1-16)
I pulsanti [FIXTURE] 1-16 sono utilizzati per selezionare gli apparecchi inseriti in libreria,
per il funzionamento in modalità programmazione o manuale. Possono essere utilizzati
anche per creare gruppi di apparecchi, tenendo premuto il pulsante [FIXTURE].
JOYSTICK
Il joystick è utilizzato per il controllo del Pan e del Tilt degli apparecchi
PAN / TILT
Il pulsante [PAN] accende e spegne la funzione Pan del joystick, Il pulsante [TILT]
accende e spegne la funzione Tilt del joystick.
SETUP
Premere questo pulsante per accedere al menu Setup
RECORD
Premere questo pulsante per accedere alla modalità Record
CURSOR (▲ / ▼ / ◄ / ►)
I pulsanti [▲] [▼] sono utilizzati per le regolazioni all’interno della funzione attiva. I
pulsanti [◄] [►] sono utilizzati per selezionare le funzioni da attivare, scorrendo da una
sezione all’altra, indicate nella parte superiore del display.
SLIDERS EFFETTI (1-6)
Questi 6 sliders sono utilizzati per le regolazioni dei parametri visualizzati nel display,
direttamente sopra ciascun slider.
6
PULSANTI OK [→] ED ESC [←]
Premere OK [→] per confermare o accedere al sottomenu. Allo stesso modo premere
ESC [←] per annullare o tornare al menu precedente.
SLIDERS CANALI (1-12)
Questi 12 sliders, in combinazione con il pulsante [CHANNEL], possono essere usati per
la regolazione dei 24 canali di controllo dei fari PAR.
FLASH (1-12)
Questi 12 pulsanti possono essere utilizzati per portare il singolo canale alla massima
intensità. Essi inoltre sono usati in combinazione con il pulsante [PAGE] per selezionare
le scene o i passi all’interno dei chase o degli show. Il blocco del pulsante può essere
abilitato se esso è premuto per più di 2 secondi.
FLASH PAGE
In combinazione con i pulsanti [FLASH] questo pulsante è utilizzato per richiamare,
attraverso le pagine 1-4, le scene o i passi dei chase o degli show.
CHANNEL
Questo pulsante è utilizzato per selezionare i canali tra due banchi: il primo i canali 1-12,
il secondo i canali 13-24.
SLIDER MASTER
Questo slider è utilizzato per controllare l’uscita generale dei due banchi di canali (1-12,
13-24)
SLIDER GRAND MASTER
Questo slider è utilizzato per controllare la massima uscita di tutti gli sliders.
SLIDER PRESET (1-8)
Questi 8 sliders sono utilizzati per controllare il livello di uscita dei rispettivi preset.
BLACKOUT
Premendo questo pulsante tutti i valori impostati per le varie funzioni, vengono portati a
zero (il led lampeggiante al di sopra del pulsante indica che la rispettiva funzione è
attivata). Premendo di nuovo il pulsante, i valori vengono reimpostati.
AUDIO
Questo pulsante viene utilizzato per abilitare o disabilitare la sincronizzazione audio delle
scene, chase o show selezionati e dei programmi strobo.
SETUP
Per prima cosa assicurarsi che l’apparecchio sia in modalità Control Fixture, osservando
lo stato del led del pulsante [FIXTURE] ed il display di destra. Il primo deve essere
acceso ed il secondo dovrà mostrare il messaggio SELECT FIXTURE. Premere il
pulsante [SETUP] per attivare la relativa modalità. Il led giallo in corrispondenza di tale
pulsante inizierà a lampeggiare ed il display mostrerà il messaggio CONFIGURATION &
SETUP MENU.
7
Il menù SETUP contiene 11 sottomenù nominati: INTERNAL LIBRARY – PATCH – MIDI
CHANNEL – STROBE TYPE – GOOSENECK DIMMER – VIEW FREE MEMORY –
SEND DATA FILE – LOAD DATA FILE – UPDATE SOFTWARE – SAVE TO CARD –
LOAD FROM CARD.
1. INTERNAL LIBRARY
Premere il pulsante [SETUP] per accedere al relativo menù. Muovere lo slider 4 oppure
premere i pulsanti [▲] / [▼] fino a che il display non mostri la scritta INTERNAL
LIBRARY nella riga inferiore.
Premere ok per accedere al menù dei settaggi, il quale ha 3 sottomenu: CREATE NEW
FIXTURE – EDIT EXISTING FIXTURE – DELETE FIXTURE
1.1 Create New Fixture:
Muovere lo slider 5 oppure premere i pulsanti [▲] / [▼] fino a che non appare il
messaggio CREATE NEW FIXTURE nel display.
Premere ok, una nuova finestra apparirà nel display, ad indicare che è possibile iniziare
la configurazione per una nuova macchina. I menù che seguono permettono di
aggiungere in nuovo apparecchio ed i suoi attributi, all’interno della libreria (si possono
memorizzare massimo 256 apparecchi).
All’interno del menù CREATE NEW FIXTURE sono presenti 10 sottomenù denominati:
TOTAL DMX CHANNEL – LCD EFFECT LABEL – INTERNAL PATCH – PAN/TILT
PATCH – HARD/SOFT CROSS – FIXTURE NAME – RESET/LAMP VALUES – DIPSWITCH CONFIGURATION – CONTROL TYPE – DIMMER PATCH.
1.1.1 Total DMX Channel
Quando il display mostra il messaggio CREATE NEW FIXTURE, premere ok, muovere
lo slider 5 o premere i pulsanti [▲] / [▼], fino a quando non appare la scritta TOTAL
DMX CHANNEL.
Premere ok, apparirà una nuova finestra dove è richiesto il numero di canali DMX che
l’apparecchio utilizzerà. Muovere lo slider 5 o premere i pulsanti [▲] / [▼] per
selezionare un numero compreso tre 1 e 36, quindi premere ok per confermare e tornare
al menù precedente.
8
1.1.2 LCD Effect Label
Quando il display mostra il messaggio CREATE NEW FIXTURE, premere ok, muovere
lo slider 5 o premere i pulsanti [▲] / [▼], fino a quando non appare la scritta LCD
EFFECT LABEL.
Premere ok, apparirà una nuova finestra dove è richiesto il numero di pagine totali (da 1
a 5 massimo), per visualizzare tutti gli effetti dell’apparecchio sullo schermo. Muovere lo
slider 5 oppure premere i pulsanti [▲] / [▼] per selezionare un valore tra 1 e 5, quindi
premere ok per confermare o esc per uscire.
Premendo ok apparirà una nuova finestra in cui è richiesto di inserire delle stringhe per
ciascun effetto dell’apparecchio (una lista dei comandi per ciascuna funzione, che
successivamente si ritroveranno scritti sul display).
Ogni pagina contiene 6 stringhe ed ogni stringa può avere un massimo di 6 caratteri.
Premere i pulsanti [▲] / [▼] per richiamare le stringhe degli effetti già inseriti. Se
necessario, è possibile creare delle stringhe personalizzate premendo i pulsanti [◄] /
[►] per scorrere tra le singole lettere, quindi muovere lo slider 1 per inserire un carattere
alla volta.
9
Una volta completate le etichette degli effetti della prima pagina, premere ok per passare
alla pagina successiva. Terminata la procedura, premere esc per tornare al menu
precedente. I dati saranno memorizzati automaticamente.
1.1.3 Internal Patch
Quando il display mostra il messaggio CREATE NEW FIXTURE, premere ok, muovere
lo slider 5 o premere i pulsanti [▲] / [▼], fino a quando non appare la scritta INTERNAL
PATCH.
Premere ok, un messaggio di avviso apparirà, invitando a non utilizzare lo stesso canale
per 2 o più effetti. Premere di nuovo ok, riappariranno le etichette degli effetti, create nel
precedente paragrafo.
Questa funzione permette di assegnare ad ogni etichetta, il rispettivo canale, in accordo
con le caratteristiche dell’apparecchio stesso. Muovere gli slider 1-6 per assegnare ad
ogni etichetta il proprio canale. In alternativa è possibile utilizzare i pulsanti [◄] / [►] per
passare da un effetto all’altro, quindi i pulsanti [▲] / [▼] per selezionare il numero del
canale desiderato per l’effetto evidenziato. Premere ok per proseguire nell’assegnazione
dei canali, se sono presenti più pagine. Terminata la procedura di assegnazione,
premere esc per tornare al menù precedente. I dati saranno memorizzati
automaticamente.
NOTA: se si desidera controllare il Pan e Tilt con il joystick, non bisogna effettuare
l’assegnazione dei canali dei due movimenti, all’interno di questa sezione, ma solo nella
successiva. Viceversa, se si desidera controllare il Pan ed il Tilt esclusivamente con gli
sliders, l’assegnazione va fatta soltanto nella presente sezione, non nella successiva.
Se l’assegnazione viene fatta contemporaneamente nelle due sezioni, tutta la procedura
di creazione del nuovo apparecchio non andrà a buon fine.
I movimenti dell’apparecchio, non possono essere controllati contemporaneamente dagli
sliders e dal joystick.
1.1.4 Pan / Tilt Patch
10
Quando il display mostra il messaggio CREATE NEW FIXTURE, premere ok, muovere
lo slider 5 o premere i pulsanti [▲] / [▼], fino a quando non appare la scritta PAN / TILT
PATCH.
Premere ok, un messaggio di avviso apparirà, invitando a riservare i canali del Pan e
Tilt, esclusivamente per queste funzioni. Premere di nuovo ok, apparirà una nuova
finestra in cui è richiesto di assegnare i movimenti Pan e Tilt dell’apparecchio.
Alcuni apparecchi supportano le modalità 8 o 16 bit, altri solo la modalità 8 bit. In
modalità 16 bit, il movimento Pan richiede 2 canali denominati high (H) e low (L)
(rispettivamente Pan e Pan Fine); allo stesso modo per il Tilt. In modalità 8 bit sono
richiesti un sono canale per il Pan ed uno solo per il Tilt (solo high (H)). Muovere gli
slider 1-4 per selezionare i canali del Pan e Pan Fine e del Tilt e Tilt Fine.
In alternativa è possibile utilizzare i pulsanti [◄] / [►] per attivare un elemento ed i
pulsanti [▲] / [▼] per selezionare il numero di canale da assegnare.
Terminata la procedura, premere ok o esc per ritornare al menù precedente. I dati
saranno memorizzati automaticamente.
Attenzione: è importante assegnare correttamente i canali Pan e Tilt dell’apparecchio. In
caso contrario tutta la procedura di creazione del nuovo apparecchio non andrà a buon
fine.
1.1.5 Hard / Soft Cross
Quando il display mostra il messaggio CREATE NEW FIXTURE, premere ok, muovere
lo slider 5 o premere i pulsanti [▲] / [▼], fino a quando non appare la scritta HARD /
SOFT CROSS.
Premere ok. Le stringhe degli effetti create precedentemente nel menù LCD EFFECT
LABEL riappariranno. Questa funzione permette di determinare in che modo i canali
dell’apparecchio riceveranno i comandi. Scegliendo hard il comando verrà inviato senza
nessun tempo di dissolvenza; scegliendo soft il comando verrà inviato con un certo
tempo di dissolvenza. Muovere gli slider 1-6 per selezionare hard o soft per gli effetti
indicati direttamente al di sopra di ciascuno slider. In alternativa è possibile utilizzare i
11
pulsanti [◄] / [►] per attivare un elemento ed i pulsanti [▲] / [▼] per selezionare hard o
soft per l’effetto sottolineato. Premere ok per andare avanti se c’è più di una pagina.
Terminata la procedura, premere ok o esc per ritornare al menù precedente. I dati
saranno memorizzati automaticamente.
1.1.6 Fixture Name
Quando il display mostra il messaggio CREATE NEW FIXTURE, premere ok, muovere
lo slider 5 o premere i pulsanti [▲] / [▼], fino a quando non appare la scritta FIXTURE
NAME
Premere ok, apparirà una nuova finestra dove inserire o modificare il nome
dell’apparecchio. Premere i pulsanti [◄] / [►] per muovere la sottolineatura sulla
posizione desiderata, poi muovere lo slider 4 per selezionare il carattere desiderato per
quella posizione.
Terminata la procedura di caricamento del nome del nuovo apparecchio, premere ok per
confermare e ritornare al menù precedente. Per annullare l’operazione premere esc per
ritornare al menù precedente.
1.1.7 Reset / Lamp value
12
Quando il display mostra il messaggio CREATE NEW FIXTURE, premere ok, muovere
lo slider 5 o premere i pulsanti [▲] / [▼], fino a quando non appare la scritta RESET /
LAMP VALUE.
Premere ok, un messaggio di avviso apparirà, per ricordare che i canali del reset e
controllo lampada, dovrebbero essere diversi da quelli riservati al Pan,Tilt e dimmer.
Premere di nuovo ok, apparirà una nuova finestra in cui è richiesto di assegnare i canali
del reset e del controllo lampada ed i loro rispettivi valori di on/off. In alternativa è
possibile utilizzare i pulsanti [◄] / [►] per attivare un elemento ed i pulsanti [▲] / [▼] per
assegnare il valore.
Terminata la procedura, premere ok per confermare e ritornare al menù precedente. Per
annullare l’operazione premere esc per ritornare al menù precedente.
Attenzione: è importante assegnare correttamente canali del reset e del controllo
lampada. In caso contrario tutta la procedura di creazione del nuovo apparecchio non
andrà a buon fine.
1.1.8 Dip-Switch Configuration
Quando il display mostra il messaggio CREATE NEW FIXTURE, premere ok, muovere
lo slider 5 o premere i pulsanti [▲] / [▼], fino a quando non appare la scritta DIPSWITCH CONFIG.
Premere ok, apparirà un nuovo messaggio per la creazione, se necessario, della
configurazione dei Dip-Switch dell’apparecchio. Questa procedura permetterà di tenere
sotto controllo il sistema di indirizzamento e la posizione dei Dip-Switch dell’apparecchio.
Se l’apparecchio ha una modalità di indirizzamento diverso da quello con Dip-Switch, è
possibile ignorare questa sezione.
Muovere lo slider 2 per selezionare il numero di Dip-Switch, compreso tra 5 e 10;
muovere lo slider 5 per scegliere tra il sistema di indirizzamento 0 (tutti i Dip-Switch in off
= valore 1) o 1 (Dip-Switch 1 = on, resto = off).
Terminata la procedura, premere ok per confermare e ritornare al menù precedente. Per
annullare l’operazione premere esc per ritornare al menù precedente.
13
1.1.9 Control Type
Quando il display mostra il messaggio CREATE NEW FIXTURE, premere ok, muovere
lo slider 5 o premere i pulsanti [▲] / [▼], fino a quando non appare la scritta CONTROL
TYPE.
Premere ok. Le stringhe degli effetti create precedentemente nel menù LCD EFFECT
LABEL riappariranno. Questa funzione permette di determinare in che modo i canali
dell’apparecchio riceveranno i comandi. Alcuni proiettori, infatti, hanno la possibilità di
regolare in maniera continua la ruota colori e la ruota gobo, la qual cosa consente
all’utilizzatore di ottenere interessanti effetti di proiezione. Allo stesso modo è inoltre
importante avere la possibilità di accedere direttamente ad un particolare colore o effetto
durante la programmazione.
Le tipologie di controllo disponibili sono: lineare (LIN) e Tabset (TAB). La prima modalità
consente di controllare proporzionalmente il canale dell’apparecchio attraverso lo slider
corrispondente; la seconda modalità, invece, attraverso i pulsanti [▲] / [▼],consente di
cambiare repentinamente lo stato in relazione a quanto settato inizialmente.
Muovere gli sliders 1-6 per selezionare LIN o TAB per le corrispondenti funzioni
dell’apparecchio, visualizzate sullo schermo.
14
Come descritto sopra, la funzione TAB permette di utilizzare i pulsanti [▲] / [▼] per
cambiare repentinamente lo stato della macchina, in relazione a quanto settato
inizialmente. Per effettuare tale settaggio, attenersi alla procedura seguente:
a.
premere il pulsante funzione al disotto dell’effetto riportato sul display, apparirà una
nuova finestra
In cui TOT.Pset indica il valore complessivo delle tabulazioni, Pset indica il numero
di tabulazione e VALUE indica il valore assegnato.
b.
muovere lo slider 3 per determinare quante tabulazioni si vogliono inserire, tale
valore può avere un range da 1 a 50. Una volta deciso il numero di tabulazioni
muovere lo slider 5 per selezionare il numero di tabulazione e lo slider 6 per
assegnare a tale tabulazione un valore da 0 a 255.
c.
Ripetere l’operazione muovendo gli slider 5 e 6 fino a quando tutti i valori non siano
stati assegnati.
15
Terminata la procedura, premere ok per confermare e ritornare al menù precedente. Per
annullare l’operazione premere esc per ritornare al menù precedente.
Premere ok per proseguire nelle pagine, eventualmente ve ne fossero delle altre.
Terminati tutti i settaggi, premere esc per tornare al menù precedente, il salvataggio è
automatico.
1.1.10 Dimmer Patch
Quando il display mostra il messaggio CREATE NEW FIXTURE, premere ok, muovere
lo slider 5 o premere i pulsanti [▲] / [▼], fino a quando non appare la scritta DIMMER
PATCH.
Premere ok, apparirà un messaggio di avviso per ricordare che il canale del dimmer
dovrebbe essere diverso da quello del Pan, Tilt, Reset e controllo lampada. Premere di
nuovo ok, apparirà un messaggio che indica di assegnare il canale del dimmer.
Muovere lo slider 5 per selezionare il valore del canale del dimmer, in accordo con le
caratteristiche del faro.
Terminata la procedura, premere ok per confermare e ritornare al menù precedente. Per
annullare l’operazione premere esc per ritornare al menù precedente.
1.2 Edit Existing Fixture:
Premere il pulsante [SETUP] per accedere al relativo menù. Muovere lo slider 4 oppure
premere i pulsanti [▲] / [▼] fino a che il display non mostri la scritta INTERNAL
LIBRARY.
Premere ok, apparirà una nuova finestra. Muovere lo slider 5 o premere i pulsanti [▲] /
[▼] fino a quando il messaggio EDIT EXISTING FIXTURE non appare sullo schermo.
16
Premere ok, apparirà una nuova finestra dove selezionare l’apparecchio da modificare.
Questa procedura permette di modificare gli attributi degli apparecchi residenti in
memoria.
Muovere lo slider 4 oppure premere i pulsanti [▲] / [▼] per selezionare l’apparecchio
desiderato. Premere quindi ok, apparirà una nuova finestra per ricordare che la
procedura di modifica sta per avere inizio.
Far riferimento alla sezione 1.1 per le istruzioni relative alla configurazione degli
apparecchi.
1.3 Delete Fixture:
Premere il pulsante [SETUP] per accedere al relativo menù. Muovere lo slider 4 oppure
premere i pulsanti [▲] / [▼] fino a che il display non mostri la scritta INTERNAL
LIBRARY.
Premere ok, apparirà una nuova finestra. Muovere lo slider 5 o premere i pulsanti [▲] /
[▼] fino a quando il messaggio DELETE FIXTURE non appare sullo schermo. Premere
ok, apparirà una nuova finestra dove selezionare l’apparecchio da cancellare. Questa
procedura permette di cancellare dalla memoria gli apparecchi non utilizzati.
Muovere lo slider 4 oppure utilizzare i pulsanti [▲] / [▼] per selezionare l’apparecchio
desiderato. Premere poi ok, comparirà un messaggio di avviso in cui si richiede la
sicurezza nel procedere con l’operazione di cancellazione dell’apparecchio. Premere ok
per confermare. L’apparecchio sarà cancellato con successo, se alla fine dell’operazione
il display mostrerà il menù precedente. Se l’apparecchio è al momento utilizzato dalla
macchina, non sarà possibile effettuare l’eliminazione ed apparirà un messaggio sul
display. Premere esc per annullare il processo di cancellazione e riprovare
successivamente.
Premere il pulsante corrispondente alla scritta no sul display, per annullare il menù,
senza cancellare l’apparecchio.
17
MESSAGGI DI ERRORE
Se sono stati commessi degli errori durante la configurazione dell’apparecchio, sul
display apparirà un messaggio di errore.
Se sono stati cambiati degli attributi ad un apparecchio esistente, nel momento in cui si
esce per salvare, apparirà un messaggio come il seguente
Premere ok per confermare o esc per annullare le modifiche e riprovare, oppure no per
abbandonare l’operazione senza modificare gli attributi dell’apparecchio e ritornare al
menù precedente.
La libreria può contenere un massimo di 256 apparecchi. Quando ci sono già 256
apparecchi memorizzati in libreria e si tenta di memorizzarne un altro, apparirà un
messaggio di avviso.
Se si tenta di cancellare un apparecchio al momento in uso, apparirà il seguente
messaggio di avviso.
18
Se in libreria non ci sono apparecchi memorizzati e si tenta di eliminarne uno, comparirà
il seguente messaggio di avviso.
2. PATCH
Premere il pulsante [SETUP] per accedere al relativo menù. Muovere lo slider 4 oppure
premere i pulsanti [▲] / [▼] fino a che il display non mostri la scritta PATCH.
Premere ok, apparirà una nuova finestra dove selezionare ON o OFF per il patching
automatico dei canali DMX (DMX CHANNEL AUTO PATCH). Questo menù permette di
selezionare il patch automatico o manuale. Muovere lo slider 5 oppure premere i pulsanti
[▲] / [▼] per selezionare ON o OFF.
Quando è selezionato ON (patch automatico attivo), gli indirizzi da 1 a 479 vengono
automaticamente configurati per essere assegnati a 16 proiettori intelligenti (testemobili
e scanner), gli indirizzi da 480 a 503 (12 slider 1-12 / 13-24) vengono automaticamente
configurati per essere assegnati a dimmer per il controllo di proiettori PAR, gli indirizzi da
504 a 511 vengono automaticamente configurati per essere assegnati a 4 strobo (2
canali cadauna), infine l’idirizzo DMX 512, viene automaticamente configurato per
essere assegnato ad una macchina del fumo.
Quando è selezionato OFF, (patch manuale), è possibile configurare gli indirizzi DMX a
propria discrezione.
Una volta selezionata la modalità di patching, premere ok, apparirà una nuova finestra,
dove confermare. Se si è sicuri, premere ok per la selezione, ed accedere al menù di
configurazione del patching. Premere esc per cancellare e riprovare, no per annullare e
tornare al menù precedente.
Dopo aver premuto ok per l’accesso al menù di configurazione, apparirà una nuova
finestra per la selezione delle tipologie di apparecchi. Sia che ci si trovi in modalità
manuale, sia che ci si trovi in modalità automatica, saranno individuate 4 tipologie di
19
apparecchi: Proiettori intelligenti (Fixtures), Parcan, Strombo e Macchine del fumo.
Muovere lo slider 5 oppure premere i pulsanti [▲] / [▼] fino a quando la tipologia
desiderata non appare sul display.
2.1 Fixture Patch:
Muovere lo slider 5 oppure premere i pulsanti [▲] / [▼] fino a quando il messaggio
FIXTURE PATCH non appare sul display.
Premere ok per accedere al menù di configurazione, apparirà una nuova finestra.
Questo menu permette di effettuare il patching di 16 fixtures. Muovere lo slider 1 per
selezionare il numero di fixture da 1 a 16, quindi muovere lo slider 2 per selezionare
l’apparecchio desiderato dalla libreria, da assegnare al relativo numero di fixture.
Ripetere la procedura fino al completamento di tutta l’assegnazione. E’ possibile
utilizzare i pulsanti [◄] / [►] per passare dal numero della fixture alla tipologia, quindi
premere i pulsanti [▲] / [▼] per selezionare il numero o la tipologia.
In modalità patching automatica, tutte le fixtures selezionate, saranno automaticamente
indirizzate tra 1 e 479. In modalità patching manuale è importante calcolare
attentamente il numero di canali DMX per poter effettuare un patching corretto.
Per rimuovere una fixture durante la fase di patching, premere il pulsante funzione al di
sotto dello slider 5. Terminata la procedura, premere ok o esc per ritornare al menù
precedente. La memorizzazione è automatica.
2.2 Parcan Patch:
Muovere lo slider 5 oppure premere i pulsanti [▲] / [▼] fino a quando il messaggio PAR
PATCH non appare sul display. Premere ok per accedere al menù di configurazione,
apparirà una nuova finestra. Questo menu permette di indirizzare 24 Par consecutivi.
In modalità patching automatica, i Par saranno indirizzati sui canali da 480 a 503 ed
automaticamente sugli slider 1-12 / 13-24. In modalità patching manuale è importante
calcolare attentamente il numero di canali DMX per poter effettuare un patching corretto.
Muovere lo slider 2 oppure premere i pulsanti [▲] / [▼] per selezionare l’indirizzo DMX di
partenza, i 24 indirizzi consecutivi saranno automaticamente occupati. Premere ok per
confermare la configurazione, quindi premere esc per uscire e tornare al menu
precedente.
20
2.3 Strobe Patch:
Muovere lo slider 5 oppure premere i pulsanti [▲] / [▼] fino a quando il messaggio
STROBE PATCH non appare sul display. Premere ok per accedere al menù di
configurazione, apparirà una nuova finestra. Questo menù permette di indirizzare 4
strobo con 2 canali ciascuna.
In modalità patching automatica, le strobo saranno indirizzate sui canali da 504 a 511. In
modalità patching manuale è importante calcolare attentamente il numero di canali DMX
per poter effettuare un patching corretto.
Muovere lo slider 2 oppure premere i pulsanti [▲] / [▼] per selezionare l’indirizzo DMX di
partenza, le 4 strobo saranno automaticamente indirizzate. Premere ok per confermare
la configurazione, quindi premere esc per uscire e tornare al menu precedente.
2.4 Smoke Patch:
Muovere lo slider 5 oppure premere i pulsanti [▲] / [▼] fino a quando il messaggio
SMOKE PATCH non appare sul display. Premere ok per accedere al menù di
configurazione, apparirà una nuova finestra. Questo menù permette di indirizzare una
macchina del fumo.
In modalità patching automatica, la macchina del fumo sarà indirizzata sul canale DMX
512. In modalità patching manuale è importante calcolare attentamente il numero di
canali DMX per poter effettuare un patching corretto.
Muovere lo slider 2 oppure premere i pulsanti [▲] / [▼] per selezionare l’indirizzo DMX
della macchina del fumo. Premere ok per confermare la configurazione, quindi premere
esc per uscire e tornare al menu precedente.
21
3. MIDI CHANNEL
Premere il pulsante [SETUP] per accedere al relativo menù. Muovere lo slider 4 oppure
premere i pulsanti [▲] / [▼] fino a che il display non mostri la scritta MIDI CHANNEL.
Premere ok, apparirà una nuova finestra dove selezionare il canale MIDI, in relazione
all’apparecchio o sequencer MIDI collegati. Questa funzione permette di controllare
questa centralina attraverso un apparecchio o un sequencer MIDI. Muovere lo slider 4
oppure premere i pulsanti [▲] / [▼] per selezionare il valore da 1 a 16. Premere ok per
confermare oppure esc per uscire e tornare al menu precedente.
4. STROBE TYPE
Premere il pulsante [SETUP] per accedere al relativo menù. Muovere lo slider 4 oppure
premere i pulsanti [▲] / [▼] fino a che il display non mostri la scritta STROBE TYPE.
Premere ok, apparirà una nuova finestra. Questa funzione permette di selezionare le
strobo tra tre tipi: SPQ-2, Energy DMX e SP-1500/SP-750/SP-200H, tramite i quali
controllare le strobo con questa console. Muovere lo slider 4 oppure premere i pulsanti
[▲] / [▼] per selezionare il tipo di strobo desiderata. Premere ok per confermare oppure
esc per uscire e tornare al menu precedente.
Attenzione: per adattare a questa centralina, le strobo da collegare, potrebbe essere
necessario ricorrere ad ulteriori settaggi sulle strobo. Per es. utilizzando la tipologia
SPQ-2, assicurarsi che gli switch 1 e 2 delle strobo siano in on ed il resto in off.
22
5. GOOSENECK DIMMER
Premere il pulsante [SETUP] per accedere al relativo menù. Muovere lo slider 4 oppure
premere i pulsanti [▲] / [▼] fino a che il display non mostri la scritta GOOSENECK
DIMMER. Premere ok, apparirà una nuova finestra. Questa funzione permette di
regolare l’intensità di una lampada collegata alla presa USB (venduta a parte). Muovere
lo slider 4 oppure premere i pulsanti [▲] / [▼] per selezionare un valore da 0 a 16.
0 indica minima intensità, 16 massima intensità. Premere ok per confermare oppure esc
per uscire e tornare al menù precedente.
6. VIEW FREE MEMORY
Premere il pulsante [SETUP] per accedere al relativo menù. Muovere lo slider 4 oppure
premere i pulsanti [▲] / [▼] fino a che il display non mostri la scritta VIEW FREE
MEMORY. Premere ok, apparirà una nuova finestra, che indica la quantità di dati
presente in memoria e la memoria disponibile. Premere ok o esc per tornare al menù
precedente.
7. SEND DATA FILE
Premere il pulsante [SETUP] per accedere al relativo menù. Muovere lo slider 4 oppure
premere i pulsanti [▲] / [▼] fino a che il display non mostri la scritta SEND DATA FILE.
Premere ok, apparirà una nuova finestra dove selezionare gli elementi di cui fare il
backup nella memoria di un PC, tramite la porta RS-232. Prima di iniziare con l’invio dei
files, assicurarsi di aver stabilito una corretta comunicazione tra la centralina ed il PC.
Leggere attentamente il paragrafo successivo per come effettuare una connessione
corretta.
23
CONNESSIONE TRAMITE LA PORTA RS-232 E CONFIGURAZIONE DEL SISTEMA
Per connettere la centralina ad un PC, è necessario un cavo seriale disponibile presso
un qualsiasi punto vendita di materiale informatico.
Collegare la porta seriale RS-232 della PLBR256MH2 ad una porta seriale COM del
computer.
E’ necessario disporre di un computer con Windows 95/98 o superiore. Windows
dispone di un accessorio chiamato Hyper Terminal tramite il quale stabilire la
connessione tra la centralina ed il PC.
Per prima cosa è necessario configurare Hyper Terminal per lavorare con la
PLBR256MH2. Avviare il programma selezionando START \ Programmi \ Accessori \
Hyper Terminal. Se per qualche motivo tale programma non è installato in Windows,
bisogna installarlo dal CD di installazione di Windows stesso.
Selezionare il pannello di controllo, quindi Aggiungi / Rimuovi Programmi, cliccare su
Installazione Windows,selezionare Comunicazioni. Seguire le istruzioni per completare
l’installazione.
Una volta avviato il programma Hyper Terminal bisognerà scegliere un nome ed
un’icona. Nominare come PLBR256MH2 e scegliere l’icona desiderata. Nella schermata
successiva Connetti a:, selezionare la porta COM a cui si è connessa la centralina.
Ignorare il numero di telefono e le altre voci in questa finestra di dialogo, quindi premere
ok. Nella finestra successiva, impostare la voce Bit per secondo a 38400, Bit di dati a 8,
Parità su Nessuno, Bit di Stop a 1 e Controllo di flusso su Nessuno.
A questo punto si accede alla schermata di Hyper Terminal. Cliccare su file-proprietà,
quindi su impostazioni. Cliccare su Impostazioni ASCII. Nella finestra di dialogo
successiva deselezionare tutto, quindi scegliere ok. Chiudere Hyper Terminal. Una
finestra di dialogo chiederà di salvare le impostazioni. Cliccare su ok, in questo modo si
creerà un programma sotto il menù Hyper Terminal, denominato PLBR256MH2. E’
possibile creare un collegamento su desktop, se si prevede di utilizzare spesso il
collegamento tra centralina e PC. In questo modo, quando necessario, sarà sufficiente
cliccare sul programma PLBR256MH2 per lanciare velocemente Hyper Terminal con le
configurazioni per il collegamento alla centralina.
Una volta configurato, è possibile utilizzare Hyper Terminal per inviare i dati della
centralina e salvarli sul proprio hard disk. Collegare la centralina al PC, come sopra
descritto, cliccare sul file creato precedentemente PLBR256MH2, cliccare su
trasferimento sulla barra dei menù, quindi selezionare Acquisisci testo. Apparirà una
finestra di dialogo dove scegliere la directory ed il nome del file da acquisire. Utilizzare
un nome tipo PLBR256MH2.txt. Assicurarsi di non utilizzare un nome già esistente, in
quanto i dati ricevuti, non saranno soprascritti sul vecchio file.
Cliccare su Avvia, Hyper Terminal è ora pronto a ricevere il file dalla centralina.
All’interno del menù di selezione degli elementi di cui fare il backup, muovere lo slider 4
oppure premere i pulsanti [▲] / [▼] fino a che l’elemento desiderato da inviare non
appare sul display.
24
Si raccomanda di non interrompere la comunicazione durante il trasferimento dei files.
Quando la trasmissione è finita, apparirà sul display un messaggio di conferma. Premere
ok oppure esc per ritornare al menù precedente.
8. LOAD DATA FILE
Premere il pulsante [SETUP] per accedere al relativo menù. Muovere lo slider 4 oppure
premere i pulsanti [▲] / [▼] fino a che il display non mostri la scritta LOAD DATA FILE.
Premere ok, apparirà una nuova finestra dove selezionare gli elementi che si vogliono
scaricare da PC. Questa funziona permette di scaricare una nuova libreria, nuove
memorie o nuovi settaggi, da scaricare dal proprio PC, per sovrascrivere i vecchi.
Prima di iniziare con il trasferimento dei dati, assicurarsi di aver stabilito una
connessione tra la centralina ed il PC e di aver effettuato una corretta configurazione di
Windows. A tal proposito si rimanda al capitolo precedente, per le istruzioni per la
connessione via porta RS-232.
Richiamare il file creato precedentemente PLBR256MH2, cliccare su Trasferimento sulla
barra dei menu e selezionare Invia file di testo. Apparirà una finestra dove selezionare il
file da trasmettere. Individuato il file, cliccare su Apri. Hyper Terminal inizierà con la
trasmissione del file. Quando il download sarà terminato, un messaggio di conferma
apparirà sul display.
25
Premere ok oppure esc per ritornare al menù precedente. Se qualcosa dovesse andare
storto, sul display apparirà un messaggio di errore. Controllare la connessione e
riprovare.
9. UPDATE SOFTWARE
Premere il pulsante [SETUP] per accedere al relativo menù. Muovere lo slider 4 oppure
premere i pulsanti [▲] / [▼] fino a che il display non mostri la scritta UPDATE
SOFTWARE.
Premere ok, apparirà una nuova finestra dove un messaggio di attesa indica che la
centralina è pronta a ricevere il novo software.
Accendere il PC e richiamare il file creato con Hyper Terminal e denominato
PLBR256MH2.
Cliccare su Trasferimento sulla barra dei menù e selezionare Invia file di testo. Apparira
una finestra di dialogo dove selezionare un file di testo per l’aggiornamento del software
(tale file sarà fornito da PROEL). Selezionare il disco e la direcory dove tale file è stato
salvato e ciccare su Apri. Hyper Terminal inizia la trasmissione del file. Sono necessari
circa 2 minuti per completare l’operazione. Se il trasferimento è avvenuto correttamente
la centralina si riavvierà ed effettuerà la procedura di avvio. Se qualcosa è andato storto,
sul display apparirà un messaggio di errore; controllare la connessione e riprovare.
10. SAVE TO CARD
Premere il pulsante [SETUP] per accedere al relativo menù. Muovere lo slider 4 oppure
premere i pulsanti [▲] / [▼] fino a che il display non mostri la scritta SAVE TO CARD.
Prima di accedere al menù, inserire una Compact Flash Card nello slot. Premere ok,
apparirà una nuova finestra dove selezionare e nominare il numero di settori che
saranno utilizzati per la formattazione della scheda di memoria.
Muovere lo slider 3 per selezionare i settori da 1 a 15 ed utilizzare il pulsante [►]
unitamente allo slider 5 per nominare il settore.
Premere ok per accedere al menù vero proprio; apparirà una nuova finestra dove
indicare la categoria di files per i quali si vuole effettuare un backup.
Questo menù permette di effettuare un backup della libreria, della memoria o del setup,
utilizzando la scheda di memoria. Muovere lo slider 4 oppure premere i pulsanti [▲] / [▼]
fino a quando il nome della categoria di files di cui si vuole effettuare il backup non
appare sul display.
26
Premere ok per dare inizio al backup. Sul display appare un messaggio di attesa fino a
quando il processo non è stato completato. In seguito apparirà un messaggio di
avvenuto completamento, premere ok o esc per tornare al menu precedente. Se la
scheda di memoria non è stata inserita, sul diaplsy apparirà il messaggio NO CARD.
27
11. LOAD FROM CARD
Premere il pulsante [SETUP] per accedere al relativo menù. Muovere lo slider 4 oppure
premere i pulsanti [▲] / [▼] fino a che il display non mostri la scritta LOAD FROM
CARD. Premere ok per leggere i dati dalla scheda di memoria. Apparirà una finestra
dove è possibile scegliere il numero ed il nome del settore da scaricare. Muovere lo
slider 3 per selezionare un settore da 1 a 15.
Premere ok, apparirà una nuova finestra dove scegliere tra Libreria, Memoria o Setup,
da scaricare sulla centralina. Muovere lo slider 3 oppure premere i pulsanti [▲] / [▼], per
effettuare la selezione, premere ok per iniziare con il donload.
Al termine della procedura, il vecchio file sulla centralina sarà sovrascritto dal nuovo.
Se la scheda di memoria non è stata inserita oppure è stata inserita non correttamente,
sul display apparirà il messaggio NO CARD.
La scheda di memoria per il trasferimento dei files, dovrebbe essere utilizzata soltanto
con questa centralina. In caso contrario potrebbero generarsi errori di lettura e scrittura.
Quando il download dalla scheda è ultimato, premere ok o esc per tornare al menù
precedente.
28
RECORD
Questo apparecchio permette di registrare fino a 48 shows, chases e scenes. Questa
sezione spiega le procedure per la registrazione di shows, chases e scenes. Per
accedere alla modalità Record, premere il pulsante [RECORD], il led corrispondente
inizierà a lampeggiare e sul display apparirà una nuova finestra. Per uscire dalla
modalità Record premere di nuovo il pulsante [RECORD] ed il led si spegnerà. Si può
uscire dalla modalità Record anche premendo esc.
1. RECORD SHOWS
Premere il pulsante [RECORD], il led corrispondente inizierà a lampeggiare e sul display
apparirà una nuova finestra dove selezionare se registrare uno show, chase o scene.
Premere il pulsante [SHOW] per accedere al relativo menu di edit, il corrispondente led
inizierà a lampeggiare ed apparirà una nuova finestra dove selezionare lo show da
editare.
Selezionare il numero dello show tramite i pulsanti flash 1-12 e tramite il pulsante
[PAGE] per accedere alle pagine 13-24, 25-36, 37-48. Apparirà una nuova finestra.
Muovere lo slider 2 oppure premere i pulsanti [▲] / [▼] per selezionare il numero dei
passi da 1 a 48. Premere ok (edit) per accedere al successivo menù.
Questo menù ha 3 opzioni denominate ACTIVE EFFECT, EDIT STEPS e STEP’S TIME.
I successivi paragrafi spiegano in dettaglio le 3 opzioni.
29
1.1 Active Effects:
Muovere lo slider 4 oppure premere i pulsanti [▲] / [▼] fino a che il display non mostri la
scritta ACTIVE EFFECTS. Premere ok per accedere al menù. Questo menù permette di
selezionare quali fixtures saranno utilizzate nello show, quanti canali saranno attivi e
quanti no.
Per prima cosa bisogna selezionare le fixtures, premere i relativi pulsanti Fixture 1-16, i
rispettivi led inizieranno a lampeggiare e gi effetti delle fixtures appariranno sul display.
E’ possibile selezionare più fixture alla volta, solo l’ultima, della quale lampeggerà il
relativo led, sarà attiva per lo show. E’ possibile inoltre creare un gruppo di più fixtures,
purché abbiano gli stessi effetti. Per creare un gruppo premere e mantenere premuto il
pulsante [FIXTURE], contemporaneamente premere i pulsanti Fixture 1-16 per
selezionare fixtures similari. Premere infine uno tra i pulsanti relativi agli slider 1-6. Il
gruppo attivo sarà indicato dal led acceso di uno di tali pulsanti, i led delle fixtures
appartenenti al gruppo selezionato lampeggeranno contemporaneamente.
Fare attenzione a selezionare fixture similari per la creazione di un gruppo, in caso
contrario sul display apparirà un messaggio di errore.
Una volta selezionate le fixtures, i relativi effetti appariranno sul display. E’ possibile
premere i pulsanti relativi agli slider 1-6 ed i pulsanti [PAN] [TILT], per abilitare o
disabilitare gli effetti stessi. I led corrispondenti agli effetti abilitati saranno lampeggianti,
per contro quelli relativi agli effetti disabilitati saranno spenti. Premere ok per continuare
con le selezioni degli effetti, se sono presenti più pagine. Ultimata l’operazione, premere
ok oppure esc per tornare al menù precedente.
IMPORTANTE: questa centralina utilizza il principio LTP (Latest Takes Priorità – l’ultimo
ha priorità), secondo il quale, se una fixture viene utilizzata in più di uno show, verrà
preso in considerazione l’ultimo attivato.
1.2 Edit Steps:
Muovere lo slider 4 oppure premere i pulsanti [▲] / [▼] fino a che il display non mostri la
scritta EDIT STEPS. Premere ok per accedere al menù. Le fixtures selezionate per lo
show saranno abilitate ed i loro effetti appariranno sul display. Questo menù permette di
creare o modificare i passi che compongono uno show.
30
Muovere gli sliders 1-6 ed il joystick per regolare la configurazione delle fixture attivate.
Se la configurazione risulta soddisfacente premere e tenere premuto il pulsante
[STORE], sul display apparirà il seguente messaggio.
Contemporaneamente premere uno dei pulsanti flash 1-12 unitamente al pulsante
[PAGE] per accedere alle pagine 13-24, 25-36 e 37-48, per memorizzare il passo.
Procedere analogamente per tutti i passi dello show.
E’ possibile accedere direttamente o richiamare un passo da editare. Premere e
mantenere premuto il pulsante [STEP], sul display apparirà il seguente messaggio.
Contemporaneamente premere uno dei pulsanti flash 1-12 unitamente al pulsante
[PAGE] per accedere alle pagine 13-24, 25-36 e 37-48, per selezionare il passo da
editare. Questo si renderà immediatamente disponibile. Modificare e memorizzare il
passo, come indicato precedentemente.
Al termine della procedura, premere esc per ritornare al menù precedente.
1.3 Step’s Time:
Muovere lo slider 4 oppure premere i pulsanti [▲] / [▼] fino a che il display non mostri la
scritta STEPS’S TIME. Premere ok per accedere al menù. Apparirà una nuova finestra.
Questo menù permette di impostare il tempo di attesa ed il tempo di dissolvenza di ogni
passo dello show.
31
Muovere lo slider 2 per selezionare il numero del passo, muovere lo slider 4 per
impostare il tempo di attesa tra 0 e 1min:39,9sec, e lo slider 3 per impostare il tempo di
dissolvenza tra 0 e 100%. Procedere in questa maniera per tutti i passi dello show.
E’ possibile impostare più passi con le stesse caratteristiche. Premere e tenere premuto
il pulsante [STEP], contemporaneamente selezionare gli step attraverso i pulsanti flash
1-12, unitamente al pulsante [PAGE] per accedere alle pagine 13-24, 25-36 e 37-48. I
led dei passi selezionati lampeggeranno e sul display apparirà il seguente messaggio.
Impostare i valori come descritto precedentemente. Premere ok per tornare al menù
precedente.
Ultimata la procedura di creazione dello show, premere il pulsante [SHOW] o il pulsante
[RECORD] per uscire. Sul display apparirà un messaggio. Per uscire e memorizzare
tutto premere il pulsante [ENTER]. Per uscire senza memorizzare premere il pulsante
sotto lo slider 6. Al contrario premere esc per rientrare nel menù ed effettuare altre
modifiche.
2. RECORD CHASES
Questa centralina permette di registrare fino a 48 chases per fari convenzionali (Par).
Premere il pulsante [RECORD], il led corrispondente inizierà a lampeggiare e sul display
apparirà una nuova finestra dove selezionare se registrare uno show, chase o scene.
Premere il pulsante [CHASE] per accedere al relativo menu di edit, il corrispondente led
inizierà a lampeggiare ed apparirà una nuova finestra dove selezionare il chase da
editare.
Selezionare il numero del chase tramite i pulsanti flash 1-12 e tramite il pulsante [PAGE]
per accedere alle pagine 13-24, 25-36, 37-48. Apparirà una nuova finestra.
32
Questo menù permette di impostare il numero di passi che deve contenere il chase, il
tempo di attesa per ciascun passo ed il tempo di dissolvenza e permette inoltre di creare
o modificare i passi che costituiscono il chase.
Muovere lo slider 2 per selezionare il numero dei passi da 1 a 48. Muovere quindi lo
slider 5 per impostare il tempo di attesa tra 0 e 1min:39,9sec e lo slider 4 per impostare il
tempo di dissolvenza tra 0 e 100%.
A questo punto è possibile creare i passi per un chase. Ogni chase è composto al
massimo da 48 passi ed in ogni passo è possibile gestire un massimo di 24 canali.
Utilizzare gli slider 1-12 unitamente al pulsante [CHANNEL BANK] per accedere alla
pagina 13-24, per impostare la configurazione desiderata, premere quindi il pulsante
[STORE] per salvare il primo passo del chase. Il display a segmenti vicino gli sliders 112 mostrerà la scritta St.2 che indica che è possibile editare il secondo passo. Creare
quindi tutti i restanti passi fino al completamento della procedura.
E’ possibile inoltre richiamare direttamente ed editare un singolo passo. Premere e
tenere premuto il pulsante [STEP], contemporaneamente premere uno dei pulsanti flash
1-12 unitamente al pulsante [PAGE] per accedere alle pagine 13-24, 25-36 e 37-48, per
selezionare il passo da editare, che sarà indicato nel display a segmenti. Procedere
come indicato precedentemente per editare e salvare così il passo.
Premere ok per salvare tutto (numero di passi, tempo di attesa e tempo di dissolvenza) e
ritornare al menù precedente. Premere esc per uscire senza salvare.
Premere il pulsante [RECORD] o il pulsante [CHASE] per uscire. I relativo led si
spegnerà.
3. RECORD SCENES
Questa centralina permette di registrare fino a 48 scene per fari convenzionali (Par).
Premere il pulsante [RECORD], il led corrispondente inizierà a lampeggiare e sul display
apparirà una nuova finestra dove selezionare se registrare uno show, chase o scene.
Premere il pulsante [SCENE] per accedere al relativo menu di edit, il corrispondente led
inizierà a lampeggiare ed apparirà una nuova finestra dove selezionare la scena da
editare.
Selezionare il numero di scena tramite i pulsanti flash 1-12 e tramite il pulsante [PAGE]
per accedere alle pagine 13-24, 25-36, 37-48. Apparirà una nuova finestra.
33
Questo menù permette di creare o modificare una scena che può gestire fino a 24
canali, e impostare il temo di dissolvenza. Utilizzare gli slider 1-12 unitamente al
pulsante [CHANNEL BANK] per accedere alla pagina 13-24, per impostare la
configurazione desiderata, premere quindi il pulsante [STORE] per salvare la scena.
Muovere lo slider 2 oppure premere i pulsanti [▲] / [▼] per impostare il tempo di
dissolvenza tra 0 e 1min:39,9sec. Premere ok per salvare e tornare al menù precedente,
premere esc per uscire senza cambiare il tempo di dissolvenza della scena. Allo stesso
modo è possibile creare un’altra scena fino ad un massimo di 48.
Premere il pulsante [RECORD] o il pulsante [SCENE] per uscire. Il relativo led si
spegnerà.
PLAYBACK
Questa sezione illustra ciò che bisogna fare dopo aver terminato la programmazione di
Shows, Chases e Scenes.
Il display in alto a sinistra è molto utilizzato durante la fase di playback. Di seguito i
messaggi che appaiono sul display:
Messaggio
Descrizione
En01
Permette di attivare o sospendere il playback
Ch01
Permette di scorrere tra tutti i 48 Shows, Chases e Scenes
Go01 – Go48
SH01 – SH48
Permette di attivare il playback dello Show, Chase o Scena selezionati
Permette di sospendere il playback dello Show, Chase o Scena
selezionati
Shows 1-48
CA01 – CA48
Chase 1-48
SC01 – SC48
Scene 1-48
Pu01 – Pu48
I pulsanti [CHOSE] possono essere utilizzati per selezionare la modalità Choose (Ch) o
la modalità Enter (En). Selezionando Ch, sulla linea inferiore del display apparirà il
messaggio Ch01. Premere i pulsanti [GO] oppure [PAUSE] per scorrere tra Show,
Chase o Scena, che si vuole far eseguire.
Effettuata la selezione, premere il pulsante [CHOOSE] per entrare in modalità Enter;
sulla linea inferiore del display apparirà la scritta En01. Premere il pulsante [GO] per far
eseguire lo Show, Chase o Scena selezionati; contemporaneamente è possibile premere
il pulsante [AUDIO] per sincronizzare l’esecuzione del programma con l’audio. Premere il
pulsante [PAUSE] per sospendere l’esecuzione. E’ possibile premere continuamente il
pulsante [PAUSE] per far eseguire il programma un passo alla volta. Durante
l’esecuzione del programma è possibile utilizzare gli slider Preset 1-8 per controllare il
livello (dimmer) di esecuzione dello Show, Chase o Scena selezionati. Per interrompere
la modalità di esecuzione premere il pulsante [CHOOSE] per ritornare in modalità
Choose.
34
Questa centralina permette di memorizzare 32 presets (Shows, Chases, Scenes) allocati
nelle pagine preset 1-4 (8 presets per pagina). Questo layout di presets è conveniente
quando si vogliono eseguire più presets alla volta. E’ possibile attivare massimo 4
Shows, 4 Chases e 4 Scenes contemporaneamente. Non è possibile inoltre attivare lo
stesso Show, Chase o Scena in più di un preset alla volta.
CONTROLLO STROBO
Questa centralina può impegnare 8 canali DMX per controllare delle strobo. E’ possibile
scegliere tra 20 programmi prepostati.
Il pulsante [MENU] può essere utilizzato per accedere al penu programmi (Pr) velocità
(SP) o dimmer (di).
Premere il pulsante [MENU] fino a quando la scritta Pr non apparirà sul display.
Utilizzare i pulsanti [▲] / [▼] per selezionare i programmi 1-19 oppure ripetizione ciclica
automatica dei programmi.
Premere il pulsante [MENU] fino a quando la scritta SP non apparirà sul display.
Utilizzare i pulsanti [▲] / [▼] per selezionare la velocità di esecuzione del programma
corrente. Valore 01 indica minima velocità, valore 99 indica massima velocità.
Premere il pulsante [MENU] fino a quando la scritta Di non apparirà sul display.
Utilizzare i pulsanti [▲] / [▼] per selezionare l’intensità delle strobo durante l’esecuzione
del programma. Valore 01 indica intensità minima, valore 99 indica intensità massima.
Il pulsante [FULL ON] viene utilizzato per effettuare l’accensione completa alla massima
intensità. La funzione si abilita premendo il pulsante, si disabilita rilasciandolo.
Premere il pulsante [STAND BY] per attivare la modalità Stand By. Premere di nuovo per
disattivare. La funzione Full on ha la priorità se attivata contemporaneamente alla
funzione Stand By.
MANUAL FIXTURES
Oltre ai 48 Shows, questa centralina permette di controllare le fixtures manualmente.
Fino a 16 fixtures configurate, possono essere richiamate per il controllo manuale, per
permettere maggiore flessibilità nella creazione di effetti sia che le fixtures siano
utilizzate in modalità automatica, sia manuale.
35
Quando il led corrispondente al pulsante [FIXTURE] è acceso e sul display di destra
appare la scritta SELECT FIXTURE, premere uno dei pulsanti Fixtures 1-16 per
selezionare il proiettore che si vuole controllare in manuale. Il led relativo all’apparecchio
scelto lampeggerà e sul display di destra appariranno gli effetti del proiettore
selezionato.
Muovere gli sliders 1-6 per controllare manualmente i rispettivi effetti riportati sul display.
Allo stesso modo il joystick può essere utilizzato per controllare il Pan ed il Tilt attivando
il relativo controllo tramite i rispettivi pulsanti. Premere ok per passare alle pagine
successive nel caso ve ne fossero più di una. I pulsanti 1-6 corrispondenti ai rispettivi
sliders, possono essere utilizzato per richiamare direttamente i valori tabulati durante la
fase di setup.
Se la Fixture è utilizzata in uno show, i canali che non subiscono una variazione
manuale dei valori, continuano ad essere controllati dallo show. Per eliminare la modalità
sui canali controllati manualmente e riassegnarli ai comandi dello show premere
contemporaneamente i pulsanti [SETUP] e [RECORD].
I gruppi di Fixtures sono spesso utilizzati se si desiderano controllare insieme più
apparecchi. Premere e mantenere premuto il pulsante [FIXTURE], sul display
appariranno sei gruppi. Premere i pulsanti 1-6 al di sotto dei rispettivi sliders, per
selezionare un gruppo, il led acceso evidenzia il gruppo selezionato. Premere i pulsanti
Fixture 1-16 per selezionare gli apparecchi da includere nel gruppo, i rispettivi led
lampeggeranno simultaneamente. Se le fixtures utilizzano gli stessi effetti sugli stessi
canali questi appariranno sul display, indicando che il gruppo è stato creato con
successo. Se si crea un gruppo con fixtures differenti, sul display apparirà il massaggio
different fixture: no effect control. Una volta creati i gruppi è possibile richiamarli
premendo i pulsanti al di sotto degli sliders 1-6 mantenendo premuto il pulsante
[FIXTURE].
UTILITA’
TEMPO
Il pulsante [TIMES] è utilizzato per fissare alcuni fattori relativi alla velocità di esecuzione
degli Shows, Chases o Scenes. Quando il led relativo al pulsante [FIXTURE] è acceso e
sul display appare la scritta SELECT FIXTURE, premere il pulsante [TIMES], per
accedere al relativo menù, il led lampeggerà e sul display apparirà il seguente
messaggio.
36
Questa funzione permette di modificare la velocità di esecuzione degli Shows, Chases o
Scenes tra il 25% e il 400%.
Premere il pulsante [SHOWS], gli shows in esecuzione appariranno sul display. Premere
i pulsanti relativi agli sliders 1-4 oppure i pulsanti [◄] / [►] per selezionare lo show il
quale sarà evidenziato da due asterischi “* *”. Muovere lo sliders 5 oppure premere i
pulsanti [▲] / [▼] per selezionare la velocità tra il 25% e il 100%. Il massimo tempo di
esecuzione (minima velocità) non può essere superiore a 1min : 39,9s. Procedere alla
stessa maniera per impostare la velocità per i Chases e Scenes.
Tramite i pulsanti flash 1-12, unitamente al pulsante [PAGE] per accedere alla pagina
13-24, si possono richiamare direttamente i passi dello show selezionato.
Premere il pulsante [TIMES] per uscire, il relativo led si spegnerà.
COPIA
Quando il led relativo al pulsante [FIXTURE] è acceso e sul display appare la scritta
SELECT FIXTURE, premere il pulsante [COPY], per accedere al relativo menù, il led
lampeggerà e sul display apparirà il seguente messaggio.
Questa funzione permette di creare una copia di uno Show, Chase o Scena Premere il
pulsante [SHOW], muovere lo slider 3 per selezionare lo Show da copiare, muovere lo
slider 4 per selezionare la destinazione per la copia. Premere okapparirà il seguente
messaggio.
Premere il pulsante [ENTER] per salvare ed uscire. Premere il pulsante relativo allo
slider 6 (esc) per uscire senza effettuare la copia. Premere esc per uscire
definitivamente.
Ogni volta che si effettua una copia con successo, automaticamente si esce dal menù.
Premere di nuovo il pulsante [COPY] per effettuare una nuova copia.
RESET
Questa funzione permette di inviare il comando di reset ad un apparecchio, direttamente
dalla centralina. Premere il pulsante [RESET] per accedere al relativo menù, il led
lampeggerà e sul dislpay apparirà il seguente messaggio.
37
Premere uno dei pulsanti Fixture 1-16 (relativo alla macchina che si vuole resettare) per
qualche secondo fino a quando l’apparecchio non avvia la procedura di reset. Per poter
effettuare questa procedura, si deve aver prima assegnato il canale del reset ed il suo
relativo valore, durante l’editing della fixture. Il tempo di reset dipende ovviamente dalle
caratteristiche della fixture.
LAMP
Questa funzione permette di spegnere la lampada della fixture, tramite comando DMX.
Premere il pulsante [LAMP] per accedere al relativo menù, il led lampeggerà e sul
dislpay apparirà il seguente messaggio.
Tutte le lampade sono impostate automaticamente su On quando la centralina viene
accesa. Premere uno dei pulsanti Fixture 1-16 (relativo alla macchina di cui si vuole
spegnere la lampada) per 5 secondi. Il relativo led si spegnerà. Per riaccendere la
lampada, premere di nuovo il corrispondente pulsante Fixture per 5 secondi.
Per poter effettuare questa procedura, si deve aver prima assegnato il canale del
controllo lampada ed il suo relativo valore, durante l’editing della fixture.
MIDI
Per attivare la modalità MIDI, selezionare un canale MIDI, in accordo con il sequencer di
controllo. La PLBR256MH2 invia e riceve segnali MIDI Program Changes, secondo la
seguente tabella:
NOTA
0-47 (00H-2FH)
48-95 (30H-5FH)
96-115 (60H-73H)
116-125 (74H-7DH)
126 (7EH)
127 (7FH)
FUNZIONE
Show 01-48
Chase 01-48
Scene 01-20
Programma strobo 01-10
Macchina del fumo
Blackout
38
APPENDICE A
A seguire la lista dei proiettori inseriti di default nella libreria della PLBR256MH2. Per
nuovi apparecchi da inserire, far riferimento al relativo manuale d’uso.
American DJ Arcbeam 150
American DJ Mighty Scan
American DJ Pocket Scan
American DJ Star Tec H150
Martin Acrobat
Martin CX2
Martin CX4
Martin Destroyer
Martin Exterior 200
Martin Exterior 600
Martin Exterior 600 Compact
Martin Mac 250 Mode 4
Martin Mac 300 Mode 4
Martin Mac 500 Mode 4
Martin Mac 600 Mode 4
Martin Mac 600 NT Mode 4
Martin Mac 1200 Mode 4
Martin Minimac Profile
Martin Minimac Wash
Martin MX-1, MX-4
Martin PAL 1200 Mode 4
Martin PAL 1200FX Mode 4
Martin QFX150
Martin Robocolor Pro 400
Martin Roboscan 812
Martin Roboscan Pro 918
Martin Wizard
Elation Joy 150
Elation Joy 300
GLP Max 250
GLP Patent Light 1200 HMI
GLP Patent Light Basic
GLP Startec-1200I
GLP Ypoc 250
Coemar CF 1200 Hard Edge
Coemar CF 7 Wash Zoom
Coemar Ispot 150
Coemar Icyc 250
Coemar Ispot 575 DMX EB
Coemar Micro / Mini Ultra Scan
Coemar MM 1200 DX
Coemar MM 1200 Zoom
Coemar NAT 1200
Coemar PC 1000 and 1200
Coemar Prospot LX
Coemar Prowash LX
Coemar Samurai
Coemar Super CYC
Studio Due City Beam
Studio Due City Color
Studio Due Giant / Giant Color
Studio Due Mini City
Studio Due Shark 150
Studio Due Stratos
Studio Due Stratos CMY
Abstract Futurescan 2CE
Abstract Futurescan 3CE
Abstract Galactic Moon 2CE
Elite Servo Color 250
Elite Servo Color 575
Elite Servo Spot 250
Clay Packy Atomic 3000
Clay Packy Color 1000 DMX
Clay Packy Color 1200 DMX
Clay Packy Color 3000 DMX
Clay Packy Color 575 DMX
Clay Packy Cpcolor 150
Clay Packy Golden Color
Clay Packy Golden Scan
Clay Packy Golden Scan HPE
Clay Packy Golden Spot
Clay Packy Stage Scan DMX
High End Cyberlight Mode 1
PSL Autoscan Plus
PSL Omniscan HQI 150
PSL Omniscan MSD 250
PSL Rotoscan
Varilite AR5
Varilite AR500
Varilite VL1
Varilite VL5
39
High End Cyberlight Mode 2
High End Cyberlight Mode 3
High End EC-1
High End EC-2
High End ES-1
High End Studio Beam
High End Studio Color 250
High End Studio Color 575
High End Studio Spot 250
High End Technobeam 18 channel mode
High End Technobeam-I (with iris)
Varilite VL6
Varilite VLM
Work Blade 250
FAL Primoscan
FAL Superscleverscan
SGM Colorlab250
SGM Galileo 1200
SGM Galileo 2
SGM Galileo 2-250
SGM Galileo 3
SGM Galileo 4
SGM Giotto Spot 1200
SGM Giotto Spot 400
SGM Giotto Wash 1200
SGM Newton
SGM Victory 250
SGM Victory II 250
Futurelight MH-640
Futurelight MH-660
Futurelight MH-840
Futurelight SC-240
Futurelight SC-470
Futurelight SC-570
Futurelight SC-780
Futurelight SC-940
Futurelight SC-980
Sagitter Infinity
Sagitter Prince
40
CONTENTS
SAFETY RULES ............................................................................................................. 43
TECHNICAL SPEFICATIONS ........................................................................................ 44
MAIN FEATURES ........................................................................................................... 44
BASIC CONTROL PARTS.............................................................................................. 45
SETUP ............................................................................................................................ 46
1. INTERNAL LIBRARY............................................................................................. 47
1.1 Create New Fixture: ......................................................................................... 47
1.2 Edit Existing Fixture: ........................................................................................ 55
1.3 Delete Fixture:.................................................................................................. 56
2. PATCH ................................................................................................................... 57
2.1 Fixture Patch: ................................................................................................... 58
2.2 Parcan Patch:................................................................................................... 59
2.3 Strobe Patch: ................................................................................................... 59
2.4 Smoke Patch:................................................................................................... 60
3. MIDI CHANNEL ..................................................................................................... 60
4. STROBE TYPE...................................................................................................... 61
5. GOOSENECK DIMMER ........................................................................................ 61
6. VIEW FREE MEMORY .......................................................................................... 61
7. SEND DATA FILE.................................................................................................. 62
8. LOAD DATA FILE .................................................................................................. 63
9. UPDATE SOFTWARE ........................................................................................... 64
10. SAVE TO CARD .................................................................................................. 65
11. LOAD FROM CARD ............................................................................................ 66
RECORD......................................................................................................................... 67
1. RECORD SHOWS................................................................................................. 67
1.1 Active Effects: .................................................................................................. 67
1.2 Edit Steps:........................................................................................................ 68
1.3 Step’s Time: ..................................................................................................... 69
2. RECORD CHASES................................................................................................ 70
3. RECORD SCENES................................................................................................ 71
PLAYBACK ..................................................................................................................... 72
MANUAL FIXTURES ...................................................................................................... 73
UTILITY FACILTIES........................................................................................................ 74
41
TIMES ........................................................................................................................ 74
COPY ......................................................................................................................... 74
RESET ....................................................................................................................... 75
LAMP ......................................................................................................................... 75
MIDI ........................................................................................................................... 75
APPENDICE A ................................................................................................................ 76
42
Welcome!
You made the right decision by choosing this sophisticated and intelligent product.
Every unit has been thoroughly tested and carefully packed before shipment. Unpack the
shipping carton carefully, saving the carton and all packing materials for possible later
use.
Check carefully for sure your product is not damaged and all accessories not missing.
If your product appears to be damaged or missing, please do use it and contact your
local distributor immediately.
Please read this manual carefully and thoroughly, as it gives important information
regarding safety, use and maintenance. Keep this manual with the unit for possible
future reference.
SAFETY RULES
•
To reduce the risk of electrical shock or fire, do not expose this unit to rain or
moisture.
•
Do not spill water or other liquids into or on to your unit.
•
Be sure that the local power outlet matches that of the required voltage for
your unit.
•
Do not attempt to operate this unit if the power cord has been damaged.
•
Turn off immediately in the event of malfunction. If you should notice smoke or
an unusual smell coming from the equipment, disconnect it from the power
immediately.
•
Do not open the unit - there are no user serviceable parts inside.
•
Do not dismantle or modify the unit, as this voids all warranties.
•
Do not attempt repairs. Repairs by unqualified people could cause damage or
faulty operation. Contact your local authorized service center.
Keep dry
This product is not waterproof, and may malfunction if exposed to high levels of humidity.
Rusting of the internal mechanism can cause irreparable damage.
Do not drop
This product may malfunction if subjected to strong shocks or vibration.
Keep away from strong magnetic fields
Do not use or place this device in vicinity of equipment that generates strong
electromagnetic radiation or magnetic fields. Strong static charges or the magnetic fields
produced by equipment such as radio transmitters could interfere with the display or
affect the product's internal circuitry.
43
Cleaning
Due to fog residue, smoke, and dust cleaning the exterior of the case may become
necessary. Use normal glass cleaner and soft cloth to wipe down the outside casing.
CF cards
Memory card may become hot during use. Observe due caution when removing memory
cards from this device.
Attention! Use recommended 32 M Compact Flash Card only.
The console requires a CF card for its exclusive use, otherwise data error may occur
when you use the CF card for other consoles.
Copyright Notice
No part of the manual included with this product may be reproduced, transmitted,
transcribed, translated into any language without authorized written permission.
TECHNICAL SPEFICATIONS
Model:
PLBR256MH2
Power Requirement:
AC 230V / AC 120V
Housing:
Sheet metal with apoxy powder finish
Display:
2 x 40 characters
DMX Channels:
512 max., Configurable for intelligent fixtures;
traditional pars and DMX strobes.
Ingressi / Uscite:
4 x DMX OUT – 3 pin
MIDI IN / OUT / THRU – standard DIN 5 pin connector
Porta RS 232 – connettore DB9
Audio IN – RCA connector
Audio trigger:
Built-in microphone or line in
Dimensions:
mm. 650 x 400 x 115
Weight:
kg. 8,3
Optional Accessories:
Memory Card: ScanDisk 32 MB Compact Flash Card
DJ Lamp: USB connector, 5V / 1W gooseneck light,
RS 232 cable.
MAIN FEATURES
•
512 DMX channels (24 channels for pars, 8 channels for strobes and 30
channels per fixture)
•
20 preset Strobe programs & 48 programmable scenes
•
48 freely programmable shows for the fixtures, each with a maximum of 48
steps
•
48 freely programmable chases for the pars, each with a maximum of 48 steps
44
•
Internal Library is editable for up to 256 fixtures
•
Free access of CF card(32MB) to exchange the data files, including the library,
memory and setup
•
The data files can be downloaded or uploaded to a PC
•
Audio input and built-in microphone for music sync. functions
•
Joystick for Pan / Tilt adjustment of fixtures
•
Blackout & grand master
•
Two LCD displays, 40x2 characters each & two 4- digit LED display
Basic Control Parts
Fixture
This button allows you to choose fixtures for manual control. Group function is enabled
when the Fixture button is pressed down.
Number Fixtures 1-16
These 16 buttons are used to enable or disable the fixtures in the patch.
Joystick
This joystick is used to control the Pan or Tilt movement of the fixtures.
Pan/Tilt
These two buttons are used to enable or disable the Pan or Tilt control of joystick.
Setup
This button is used to access setup menu.
Record
This button is used to access recording menu.
Cursor Buttons (▲ / ▼ / ◄ / ►)
These [▲] [▼] two buttons are used for menu adjustment of the active items. Meanwhile
these [◄] [►] buttons are used to select the active item by moving from field to field in
the bottm line of the screen display.
Effect Faders (1-6)
These six faders are used for effects adjustment in the screen display directly above
each fader.
OK [→] & ESC [←] buttons
Press OK [→] to confirm your settings or access its subordinate. Likewise, press ESC
[←] to cancel your settings or return to the previous menu.
Dimmer Faders (1-12)
These 12 faders, in combination with the Channel button, can be used to control the 24
individual channels of the lightings
45
Flash (1-12)
These 12 buttons are used to bring an individual channel to full intensity. They also are
used in combination with the Flash Page button, to select the scene or the step number
of the chases or shows. "Latch" can be enabled when the buttons are pressed down for
2 seconds.
Flash Page
In combination with the Flash buttons, this button is used to page through four pages 1-4
of 12 scenes, 12 steps of the chases or shows.
Channel Bank
This button is used to select the channels between two banks, the first 1-12 channels,
and the second 13-24 channels.
Dimmer Master Fader
This fader is used to control the overall intensities of the 24 channels.
Grand Master Fader
This fader is used to determine maximum output of all dimmer dafers.
Preset Faders (1-8)
These 8 faders are used to control the dimmer levelof the preset respectively.
Blackout
When pressed all levels will go to zero. The flashing LED above the button will indicate
this). Pressing again all levels will return.
Audio Button
This button is used to enable or disable audio synchronized control of the selected
scenes, chases, shows and the strobe programs.
SETUP
First make sure that the console is in Fixture Control Mode by observing the fixture LED
indicator and LCD Screen on upper-right. The fixture LED indicator will be lit and the
LCD Screen will show the message “Select Fixture”. Press the Setup button to activate
Setup Mode. A yellow LED above the button will blink briefly and the overhead LCD
Screen will show the message “Configuration & Setup Menu” indicating you’re in Setup
menu.
The Setup menu contains 11 submenus: INTERNAL LIBRARY, PATCH, MIDI
CHANNEL, STROBE TYPE, GOOSENECK DIMMER, VIEW FREE MEMORY, SEND
DATA FILE, LOAD DATA FILE, UPDATE SOFTWARE, SAVE TO CARD AND LOAD
FROM CARD.
46
1. INTERNAL LIBRARY
Press the [SETUP] button to access setup menu. Move the faser 4 or press the UP [▲]
or DOWN [▼] buttons until Screen shows[ Internal Library ] in the bottom line.
Press [OK] to access setting menu which consist of three(3) items, including CREATE
NEW FIXTURE, EDIT EXISTING FIXTURE and DELETE FIXTURE.
1.1 Create New Fixture:
In Internal Library menu, use Cursor UP[▲] / DOWN [▼] buttons or F5 fader to scroll to
[CREATE NEW FIXTURE ].
Press OK to start to establish the configuration for the newly-added fixture. This menu
allows you to add a fixture and its attributes into the fixture library (The library can hold a
maximum of 255 types of fixtures). There are ten (10) options in CREATE NEW
FIXTURE: TOTAL DMX CHANNEL – LCD EFFECT LABEL – INTERNAL PATCH –
PAN/TILT PATCH – HARD/SOFT CROSS – FIXTURE NAME – RESET/LAMP VALUES
– DIP-SWITCH CONFIGURATION – CONTROL TYPE – DIMMER PATCH.
1.1.1 Total DMX Channel
When the LCD Screen shows the message CREATE NEW FIXTURE press OK then
move the fader 5 or press [▲] UP / [▼] DOWN, buttons until [ TOTAL
DMX CHANNEL] appears in the Screen.
After pressing OK, in a new window you must define the number of the channels that are
used by your new fixture.
Move the fader 5 or cursors [▲] UP / [▼] DOWN to select a value within 1-36, then
press OK to confirm your setting and return to the earlier menu.
47
1.1.2 LCD Effect Label
When the LCD Screen shows the message CREATE NEW FIXTURE, press OK then
move the fader 5 or press [▲] UP / [▼] DOWN button until LCD EFFECT LABEL
apeears in the screen.
Press OK and a new window will ask you to enter a value within 1-5 for the amount of
pages required to view all lighting effects on the screen. Move the fader 5 or the [▲] /
[▼] buttons to select the value and press OK to confirm or ESC to exit. Press OK and a
new window will ask you to enter a string of effects (a definition list of the commands
required by the fixture to be written on the screen for each page). Each page contains 6
strings of effects and each string consists of a maximum of 6 characters. Press [▲] / [▼]
buttons to recall in string effects from built-in. If you need some special effects, you’ll
have to make a new one yourself. Press [◄] / [►] buttons to pass from letter to letter,
the move fader 1 to enter the character one by one.
Once you’ve completed the effects label of the 1st page, press OK to go on with the 2nd
page.
Had you finished all effects label, please press ESC to return to the earlier menu. The
storage is automatic.
48
1.1.3 Internal Patch
When the LCD screen shows the message CREATE NEW FIXTURE, press OK then
move the fader 5 or press the [▲] / [▼] buttons until INTERNAL PATCH appears in the
screen.
Press OK and a new window will warn you to not reuse a channel for two or more
effects. Press OK again, the effect strings previously created in menu 1.1.2 LCD Effect
Label will appear. This function allows you to give an assignment of fixture channels
according to fixture profile. Move respective faders 1-6 to select appropriate channel
number for function effects in the screen directly above these faders 1-6. Also you can
press the [◄] / [►] buttons to pass from effect to effect, then use [▲] / [▼] to select the
desired channel number for the underline effect. Press OK to go on with channel
assignment if there is more than mne page. Had you finisched all channels assignment,
press ESC to return to the earlier menu. The storage is automatic.
NOTE: If you need to control Pan and Tilt movements by joystick, it’s not necessary to
assign the their channel in this section. You must to do it in the next section. If you need
to control Pan and Tilt movements only by faders, you must to assign their channels in
this section and not in the next one. If you assign the channel in both section, all the
procedure will be wrong. The unit’s movements cannot to be controlled by faders and
joysticks at the same time.
49
1.1.4 Pan / Tilt Patch
When the LCD screen shows the message CREATE NEW FIXTURE press OH, then
movete fader 5 or press [▲] / [▼] PAN / TILT PATCH appears in the screen.
Pressing OK a warning message will appears in the screen telling you that every Pan
and Tilt channel should be solely reserved. Press OK again and a new window will
appear requesting you to assign the Pan or Tilt movemet of the fixture. Most fixtures
allow both 8 and 16 bit control, some only 8 bit. In 16 bit mode the Pan movement
requires two channels - high (H) and low (L) – so at the same way for the Tilt movement.
In 8 bit mode just one channel is used for Pan or Tilt, so only high position is set. Move
the respective faders 1-4 to select proper channel numbers for Pan coarse, Pan fineM
Tilt coarse an item, then use [▲] / [▼] to select the channel number for the item.
Once you finished all channels assignment, press OK or ESC to return to earlier menu.
The storage is automatic.
Caution! Please take note you must assign the Pan or Tilt movement of the fixture
correctly, otherwise you will not successfully create a new fixture.
50
1.1.5 Hard / Soft Cross
When the LCD screen shows the message CREATE NEW FIXTURE, press OK then
move the fader 5 or press [▲] / [▼], until HARD / SOFT CROSS appears in the screen.
Press OK, the effect strings previously created in menu 1.1.2 LCD EFFECT LABEL will
reappear. This function allows you to determine how a fixture channel will obtain its
desired setting. This may be HARD, i.e. taking place with no fadetime, or SOFT, i.e.
taking place with fadetime. Respectively move faders 1-6 to select HARD or SOFT for
the function effects in the screen directly above these faders 1-6. Also you can press [◄]
/ [►] to pass from effect to effect, then use [▲] / [▼] to select HARD or SOFT for the
underlined effect. Press OK to go on if there are more than one page. Once you have
finished al setting, press ESC to return to the earlier menu.
The storage is automatic.
1.1.6 Fixture Name
When the LCD screen shows the message CREATE NEW FIXTURE, press OK then
move the fader 5 or press [▲] / [▼], until FIXTURE NAME appears in the screen.
Press OK and a new windows will ask you to enter or modify the name of the fixture.
Press [◄] / [►] to move the underline to desires position, then move fader 4 or press
[▲] / [▼] to select the character for the underline position. Once you’ve finished to
change the fixture’s name, press ok to confirm it and return to the earlier menu. If you
want to give up, just press ESC to return to the earlier menu.
51
1.1.7 Reset / Lamp value
When the LCD screen shows the message CREATE NEW FIXTURE, press OK then
move the fader 5 or press [▲] / [▼], until RESET / LAMP VALUE appears in the screen.
Press OK and a message will appear in the screen warning you that Reset and Lamp
channels shold not be identical to the Pan, Tilt and Dimmer channels. Press OK again
and a new window will appear requesting you to assign the Reset and Lamp and their
on/off values. This function allows you to carry out Remote Reset and Remote Lamp
on/off if your fixture supports. Respectively move faders 1-6 to set up Reset and Lamp
as well as their on/off values. Also you can press [◄] / [►] to activate an item, then use
[▲] / [▼] to select the settings.
Once you have finished your settings, press OK to confirm it and return to the earlier
menu. If you want to give up just press ESC to return to the earlier menu.
Caution! Please take note you must correctly set up Reset and Lamp functions,
otherwise you will not successfully create a new fixture.
1.1.8 Dip-Switch Configuration
When the LCD screen shows the message CREATE NEW FIXTURE, press OK then
move the fader 5 or press [▲] / [▼], until DIP-SWITCH CONFIG. appears in the screen.
Press OK. A new windows indicate you to make a configuration fo dip-switch if
necessary. This function allows you to select the dip-switch and addressing system that
is used by your fixture. If your fixtures have new addressing setup instead of dip-switch
setup, you can ignore this setup. Move fader 2 to select the number of dip-switches
within 5-10, move fader 5 to select the addressing system between 0 (all the dipswitches off = value 1) and 1 (dip-switch 1 = on ; rest = off).
Once you have finished your settings, press OK to confirm it and return to the earlier
menu. If you want to give up just press ESC to return to the earlier menu.
52
1.1.9 Control Type
When the LCD screen shows the message CREATE NEW FIXTURE, press OK then
move the fader 5 or press [▲] / [▼], until CONTROL TYPE appears in the screen.
Press OK and the effects strings previously created in menu 1.1.2 LCD Effect Label will
reappear. This function allows you to select the control type for lighting effects. Many
fixtures in fact, have the possibility to rotate continuously the color and gobo wheels,
which enables operators to obtain interesting projection effects. However, it is more
important to be able to directly jump to a certain color or effect during programming. The
types of control avaible are Linear (LIN) ad Tabset (TAB): the first allows you to use the
programmed fader to adjust the fixture chennel proportionally, the second allows you to
use [▲] / [▼] to quickly change the condition in accordance with the preset tabset.
Move the respective faders 1-6 to select LIN or TAB for the function effects in the screen
directly above these faders 1-6. Also you can press [◄] / [►] to pass from effect to
effect, then use [▲] / [▼] to select LIN or TAB for the effect.
ì
53
As described in the above paragraph, TAB allows you to use [▲] / [▼] to jump to certain
condition in accordance with the preset tabset. To establish a tabset, please follow the
below procedures:
a. Press the function button directly below the function efffect in the LCD Screen, a new
window will appear:
Where TOT.Pset is amount of tabulation values, Pset is the ordinal number of tabulation
values and VALUE is the assignation.
b. Move the Fader 3 to determinate how many taulation values you wish to use. This
value ranger from 1-50. Once the amount of tabulation values is decided, move the
fader 5 to select the number for Pset and the Fader 6 to select the value within 0-255
for VALUE.
c. Repeat moving fader 5 and fader 6 until all tabulation values have been assigned.
Once you have finished the whole tabulation, press OK to confirm it and return to the
earlier menu. If you want to give up, just press ESC to return to the earlier menu.
Press OK to go on with your setup with control type if there is more than one page.
Finished your settings, press ESC to return to the earlier menu. The storage is
automatic.
54
1.1.10 Dimmer Patch
When the LCD screen shows the message CREATE NEW FIXTURE press OK then
move the fader 5 or press [▲] / [▼] until DIMMER PATCH appears in the screen.
Press OK and a message will appear in the screen warning you that the Dimmer channel
channel shold not be identical to the Pan, Tilt and Reset/Lamp channels. Press OK again
and a new window will appear indicating you to assign the dimmer channel.
Move fader 5 to select a value for the dimmer channel according your fixture profile.
Pnce you have finished your settings, press OK to confirm it and return to the earlier
menu. If you want to give up, just press ESC to the earlier menu.
1.2 Edit Existing Fixture:
Press [SETUP] to access Setup menu. Move fader 4 or press [▲] / [▼] until the
message INTERNAL LIBRARY appears in the screen.
Press OK and move fader 5 or press [▲] / [▼] until message EDIT EXISTING FIXTURE
appears in the screen. Press OK and a new window will indicate you to select the fixture
you want to edit.
This menu allows you to modify the sttributes of fiktures already in the library.
Move fader 4 [▲] / [▼] buttons to select desired fixture from library. Once the fixture is
selected, press OK and a new window will appear indicating that you can start to modify
the attributes of this fixture.
Please refer to menu 1.1 and its submenus for instructions of configuration of fixture.
55
1.3 Delete Fixture:
Press [SETUP] to access Setup menu. Move fader 4 or press [▲] / [▼] until the
message INTERNAL LIBRARY appears in the screen.
Press OK and a new window will appear. Move fader 5 or press [▲] / [▼] until the
message DELETE FIXTURE appears in the screen. Press OK and a new window will
appear indicating you to select the fixture you want to delete. This menu allows you to
delete unwanted fixtures from library.
Move fader 4 or [▲] / [▼] buttons to select desired fixture. Once the fixture is selected,
press OK to delete the relative fixture. The fixture will be deleted from the library
successfully when it returns to the earlier menu. If the fixture is currently used in the
Patch, you‘re not allowed to delete this fixture. Press ESC to abandon or press F6 sited
below NO in the screen to leave this menu without deleting this fixture.
ERROR MESSAGES
If any mistakes are made or any steps are omitted during the new fixture creation, the
following prompt will appear on the screen:
56
If you have changed the sttributes of an existing fixture, when you leave this menu the
following message appear:
Press OK to confirm your modifications, ESC to cancel your modification and retry or NO
to abort this setup without modifyng the attributes of the fixture and return to the earlier
menu.
The library can contain a maximum of 256 fixtures. Whrn there are 256 fixture in the
library and you try to add a new one, a reminder meassage eill appear:
If you want to delete the fixture that has been patched, a reminder message will appear.
When there is no fixture in the library and you try to delete a fixture, a rimender message
will appear.
2. PATCH
Press [SETUP] to access Setup menu. Move fader 4 or press [▲] / [▼] until the
message PATCH appears in the screen.
Press OK and select ON or OFF for DMX CHANNEL AUTO PATCH. This menu allows
you to select automatic or manual patching. Move fader 5 or press [▲] / [▼] to select ON
or OFF. When ON is selected (automatic patch is active), the channels included within 1
and 479 are automatically assigned to 16 fixtures (moving heads or scanners), the DMX
addresses from 480 to 503 will be assigned to the dimmer to control PAR lights (12
57
faders: 1-12 / 13-24), DMX address from 504 to 511 will allocated to 4 strobes and al last
the DMX address no. 512 will be left for the fog machine.
When OFF is selcted (Manual oatch is active), you can allocate DMX addresses at your
discretion)
Once you have changed the patch mode, press OK to confirm. If you are sure, press OK
to confirm your selection and access the setting menu. Press ESC to quit. NO will abort
this setting and return to the earlier menu.
Press OK to access the setting menu and selct the unti type you want to patch. Wheter
you are in automatic or manual patch mode, there are 4 unit types called Fixture,
Parcan; Strofe and Fog Machine. Move fader 5 or press [▲] / [▼] until desired unit
appears in the screen.
2.1 Fixture Patch:
Use the Cursor UP/DOWN buttons or F5 fader to scroll to [FIXTURE PATCH].
Press OK to access the setting menu. This alloew you to establish a patch of up 16
fixtures. Move the fader 1 to select fixture number within 1-16, then move the fader 2 to
select your desired fixture from library for the selected number. Repeat this setup until
you’ve completed this patch. Also you can use [◄] / [►] to pass from fixture number to
type, the press [▲] / [▼] to select the number or type.
When you are in automatic patch mode, all patched fixtures will be automatically
addressed within 1-479. When you are in Manul patch mode, please calculate the DMX
channels carefully so tht you can establish a proper patch. To remove a fixture from this
patch, you just have to press the function button below the fader 5. When you have
finished this patch, you can press OK or ESC to return to the earlier menu. The storage
is automatic.
58
2.2 Parcan Patch:
Use the Cursor UP/DOWN buttons or F5 fader to scroll to PAR PATCH.
Press OK to access the setting menu. This menu allows you to address 24 PAR-lights
consecutively.
When you are in Automatic patch mode, DMX addresses 480-503, i.e. 12 channel faders
1-12 / 13-24 will be automatically addressed to the PAR-light. When you are in Manual
patch mode, please calculate the DMX channel carefully to address properly.
Move fader 2 or press [▲] / [▼] to select the starting DMX address, 24 consecutive
addresses will be automatically give. Press OK to confirm your setting, eighter you can
press ESC to give up and return to the earlier menu.
2.3 Strobe Patch:
Use the Cursor UP/DOWN buttons or F5 fader to scroll to STROBE PATCH.
Press OK to access the setting menu that allows you to address 4 strobes with 2 channel
each. When you are in automatic patch mode, DMX addresses 504-511 will be
automatically addressed to the strobes. When you are in Manual patch mode, be sure to
properly calculate the DMX channels to addressing. Move fader 2 or press [▲] / [▼] to
select the starting DMX address, 4 strobes will be automatically addressed. Press OK to
confirm your setting, eighter you can press ESC to give up and return to the earlier
menu.
59
2.4 Smoke Patch:
Move the fader 5 or press until the message SMOKE PATCH appears in the screen.
Press OK to access the setting menu where you can address the fog machine. When
you are in automatic patch mede, DMX address 512 will be automatically addressed to
the fog machine. When you are in manual patch mode, please calculate the DMX
chnnels carefully to address properly. Move fader 2 or press [▲] / [▼] to select the
proper DMX address for the Fog Machine. Press OK to confirm your setting, eighter you
can press ESC to give up and return to the earlier menu.
3. MIDI CHANNEL
Press the Setup button to access setup menu. Move fader 4 or press [▲] / [▼] until MIDI
CHANNEL appears in the screen.
Press OK to access settino menu and select MIDI channel in accordance with MIDI
device / sequencer channel. This function alloes you to use a MIDI device or sequencer
to operate this console. Move fader 4 or press [▲] / [▼] to select a value included within
1-16. Press OK to confirm your setting or you can press ESC to give up and return to the
earlier menu.
60
4. STROBE TYPE
Press [SETUP] and move fader 4 or press [▲] / [▼] buttons until the message STROBE
TYPE appears in the screen. Press OK to access setting menu. This function allows you
to select the following strobes: SPQ-2, Energy DMX e SP-1500/SP-750/SP-200H that
you can control by this console. Move fader 4 or press [▲] / [▼] to select desired strobe
type. Press OK to confirm your setting or you can press ESC to give up and return to the
earlier menu.
Warning! To have your strobes adaptes to this condole, you may have to do some extra
setup on your strobe. As the SPQ-2, make sure that you switch dip-switch 1 & 2 on and
the rests off.
5. GOOSENECK DIMMER
Press [SETUP] and move fader 4 or press [▲] / [▼] buttons until the message
GOOSENECK DIMMER appears in the screen. Press OK to access setting menu and
adjust the light intensity for DJ work light (sold separately). Move Fader 4 or press [▲] /
[▼] to select a value within 0-16. 0 will give zero intensity and 16 will give full intensity.
Press OK to confirm your setting or you can press ESC to gice up and return to the
earlier menu.
6. VIEW FREE MEMORY
Press [SETUP] and move fader 4 or press [▲] / [▼] buttons until the message VIEW
FREE MEMORY appears in the screen.Press OK and a new window will tll you how
many data files there are and how much memory space is available for the fixture
library.Press OK or ESC to return to the earlier menu.
61
7. SEND DATA FILE
Press [SETUP] and move fader 4 or press [▲] / [▼] buttons until the message SEND
DATA FILE appears in the screen. Press OK to access setting menu and select desired
data file to make a backup in your PC. This function allows you to make a backup of the
Fixture Library, Memory or Setup in your PC via RS-232 port.
Please read the following paragraph to learn how to setup RS-232 connection and
window configuration.
RS-232 CONNECTION AND WINDOW CONFIGURATION
To connect to a PC, you will need a serial lap link cable (available at any computer
store). Connect the RS-232 port on PLBR256MH2 to one of the serial “COM” ports on
your PC.
You will need a PC running windows 95/98 or higher to connect to PLBR256MH2
Windows comes with an accessory called Hyper Terminal that can communicate with
PLCB256MH2 via one of the COM ports in your PC.
First you must configure Hyper Terminal to work with PLBR256MH2. In Windows start
the Hyper Terminal program by clicking on Start/Programs/Accessries/Hyper
Terminal/Hypertrm. If for some reasons Hyper Terminal is not installed on your version of
Windows, install it from Windows CD. Go to the control panel, select Add/Remove
Programs and select Windows Setup. Select Communication and follow the instructions
to complete the installation.
Once the Hyper Terminal Program is getting started, it will be asked you to choose a
name and an icon. Name it PLBR256MH2 then pick any icon and at last click OK.
Go to the next dialog box “Connect to” and choose “Direct to COM2”. Ignore the
telephone number and other settings in this box, then click OK. In the next dialog box,
set bits per second to 38400, data bits to 8, parity to none, stop bits to 1, flow control to
none, then click OK. You will access Hyper Terminal desktop. Click File menu in the
upper left corner of the desktop, then Properties then select the setting tab. From the
setting tab click ASCII setup. In the next dialog box, leave all settings deselect, then OK.
Close Hyper Terminal and you will have a program labeled PLBR256MH2.ht.
Once configures, you can use Hyper Terminal to send the PLBR256MH2 data file and
save it on your hard disk. Connect to your PC as described here before. Next call the
version of Hyper Terminal that you created for PLBR256MH2. Click on Transfer on the
top of menu bar and select Capture text. A dialog box will appear allowing you to select a
folder and name for the data file you want to send. Use a name like PLBR256MH2lib.txt.
Be sure to give a new file name that is not available in this folder, because the data sent
form PLBR256MH2 wil not be overwritten the old and instead be added to the existed
file. Click Start and Hyper Teminal is now ready ro receive the file from PLBR256MH2.
Go to the menu setting on PLBR256MH2, move Fader 4 or press [▲] / [▼] until desired
data name appears in the screen. Press ok to start to send the file.
62
Don’t discontinue the communication while you are sending the file. When the
trasmission is over, a complete message will appear in the screen. Press OK oe ESC to
return to the earlier menu.
8. LOAD DATA FILE
Press the Setup button to access setup menu. Move fader 4 ore press [▲] / [▼]until
LOAD DATA FILE appears in the screen. Press OK to access setting menu, a new
window will appear indicating you to select desired data file you want to download from
your PC. This function allow you to download the new library, memoty or setup from your
PC to overwrite old library, memory or setup stored in your console. Before you can start
downloading the data file, please make sure you’ve established the communication
between this console and tour PC successfully and Windows configuration has been
completesd properly.
Please refer to menu 7 on page for instructions of RS-232 connection and Windows
configuration.
Call the version of Hyper Terminal that you previously created for PLBR256MH2. Click
on TRANSFER on the rop menu bar and select Send Text File. Adialog box will appear
allowing you to select the text file. Find the drive and folder, select the file and click on
OPEN. Hyper Terminal will begin to trasmit the file. When the downloading is over, a
receiving prompt message will appear in the screen.
63
Press OK or ESC to return to earlier menu. If there is something wrong, an error
message will appear in the LCD. Check your connectors and try again.
9. UPDATE SOFTWARE
Press [SETUP] and move fader 4 or press [▲] / [▼] buttons until the message UPDATE
SOFTWARE appears in the screen.
Press OK to access settin menu. The following windows will appear indicating that the
console is ready to receive the spftware.
Turn to your PC and call the version of Hyper Terminal that you have created for
PLBR256MH2. Click on Transfer on the top of menu bar and select Send Text File. Find
the drive and folder where the text file (supplied by PROEL) is located and open it. Hyper
Terminal will begin to trasmit the file. It will take 2 minutes to complete this software
updating. If the software has been update successfully, your PLBR256MH2 will reboot its
system and get started with its procedures. If there is something wrong, an error
message will appear. Check the connection and try again.
64
10. SAVE TO CARD
Press [SETUP] and move fader 4 or press [▲] / [▼] buttons until the message SAVE TO
CARD. appears in the screen. Insert your Scandisk 32 MB Compact Flash cardbefore
you access this menu. Press OK and select the sector which will be used to format your
CF card preliminary.
Move fader 3 to select the sector within 1-15, then use [►] forward button together with
Fader 5 to name this sector.
Press OK to access setting menu and select the file category you wish to make a
backup.
This menu allows you to make a backup of the library, memory or setup using CF card.
Move fader 4 or press [▲] / [▼] until wanted file category appears in the screen.
Press OK to strat backup. Once the backup is complete, you are warned by a window
where you have to click OK or ESC to return to the earlier menu.
If the CF card is not inserted or improperly inserted, the message NO CARD will appear
in the screen.
65
11. LOAD FROM CARD
Press [SETUP] button to access Setup menu and move fader 4 or press [▲] / [▼]
buttons until the message LOAD FROM CARD appears in the screen. Press OK to read
this CF card. Move fader 3 to select the sector within 1-15.Press OK to access setting
menu, a new window will appear allowing you to select the library, memory or setup to
restore your console. Move fader 3 or press [▲] / [▼] to select the licrary, memory or
setup. Press OK to start reading this CF card.
The old file will be overwritten by the new file from the CF card when you have
successfully read in this CF card.
If the CF card is not inserted or improperly inserted, the message no card will appear in
the screen.
The CF card that you use to load the library, memory or setup, should be written by this
console before. Otherwise, you wont,t read in this CF card successfully, accordingly
causing data read error.
Press OK or ESC to return to the earlier menu when you have successfully read in the
CF card.
66
RECORD
This section describe the procedure for creating scenes, chases and shows. You will
learn how to start the recording, how to create or save a show for selected fixtures or
effects, how to create chase and edit steps, etc.
1. RECORD SHOWS
To start recording, simply click the Record button, its LED will blink briefly, and a new
window will ask you to select what you want to record.
Press [SHOW] button to access the edit menu. Its LED will be lit and a new window will
appear indicating you to select the showyou wish to edit.
Select the show number using Flash 1-12 togheter with the Flash Page button, a new
window will appear.
Move fader 2 or press [▲] / [▼] to select the number of the step within 1-48. Press OK
(EDIT) to access settino menu. This menu has 3 options named Active Effects, Edit
Steps and Step’s Time. The following paragraphs will detail these options respectively.
1.1 Active Effects:
Move the fader 4 or press [▲] / [▼] buttons until the message ACTIVE EFFECTS
appears in the screen. Press OK to access this setting menu. This menu allows you to
determine which fixture is used by the show, which channel (effect) is actice and which
one is not.
67
First you will have to select fixture if no fixture has been selected for the show. Press the
fixture 1-16 to select the fixture, the LED above the fixture number will blink briefly and
the fixture’s effects will appear in the screen.
You may select several fixtures at a time, however, only the last one, whose LED blinks,
is active for the show. Meanwhile, a group of several fixtures can be active for the show.
Several fixtures with the same effects can make up a group. Press and hold down the
fixture button, and in the meantime press the fixture 1-16 to select several similar fixture
to make a group following selecting the group number by pressing the fader 1-6 button.
The group number is indicated by the lit LED above the button, and the LED of the
fixtures in the group will blink simultaneously.
Take note of selecting the similar fixture for one group, or a prompt message will appear
indicatine you to have a try again.
The fixture’s effects will appear in the screen once the fixture is selected. You can press
the fader 1-6 directly below tha effects in the screen or Pan/Tilt button to enable or
disabile these effects. The LEDs corresponding to these effect are lit when these effects
are enabled, whereas th LEDs are off when these effects are disabile.
Press OK to continue your setting if there is more thsn one page of effects. When you
have finished these settings, please press OK oe ESC to return to earlier menu.
IMPORTANT! This console complies with LTP (Latest Takes Priority) principle, as a
result, if a fixture is used by more than one show, the latest activated show will surely
become the first consideration.
1.2 Edit Steps:
Move fader 4 or press [▲] / [▼] buttons until the message LOAD FROM CARD appears
in the screen. Press OK to access this setting menu, the fixture you selected for the
show will be enacle and its effects will appear in the screen. Yhis menu allows you to
create or modify the steps which make up the show.
Move the fader 1-6 and use the joystick to control the adjustment of enable fixture. If this
adjustment is satisfactory, press and hold doen the STORE button, a message will
appear in the screen.
68
In the meantime, press FLASH 1-12 together with Flash PAGE to select the step number
where you wish to store this step. Proceed in this way for each step required.
You can also directly access and call a step required to be edited. Press and hold down
the Step button, a message Select step to edit will appear in the screen.
Meanwhile press FLASH 1-12 together with PAGE button to select the step you wish to
edit. The step will be avaible immediately. Modify and store the step in accordance with
the editing procedure described before.
When the procedure is finished, press ESC to return to the settino menu.
1.3 Step’s Time:
Move fader 4 or press [▲] / [▼] until STEP’S TIME appears in the screen. This menu
allows you to set the stnding time and crossfade of eachstep in a show.
Move the fader 2 to select the step number (STEP), then move the fader 4 to select the
standing time of the step from 0 sec to 1 min and 39.9 sec., in the end move the fader 3
to select the crossfade (CROSS%), i.e. percentage of the standing time, within 0-100%.
Proceed in this way for each step required.
It’ possible to set several steps at a time with the same setup. Press and hold the step
button, meanwhile select several steps (indicated by the li LED) using th flash 1-12
buttons together with page button. Amessage will appear in the screen.
Set the values as the way described before. Press OK to return to the setting menu.
When you have finished editing the show, press SHOW or RECORD button to leave the
edit menu. A prompt message will appear in the screen. Please remember to press the
ENTER button to store your setting definitively when you leave the edit menu. If you
want to leave this menu without modifying this show, you have to press the fader 6
button below the ESC. Press the ESC button to re-enter in this menu foe another try.
69
2. RECORD CHASES
This console allows you to record up to 48 scenes of convetional light. Press the Record
buitton to cause itl LED to blink briefly, a new window wil appear telling you to select the
show, chase or scene you wish to record.
Press the Scene button to access edit scene menu, its LED will be lit, and a new window
will appear indicating you to select the scene you wish to edit.
Select the scene number using Flash buttons 1-12 together with the Flash page button to
access the pages 13-24, 25-36, 37-48.
This menu allows you to determine how many steps constituite this case, set the
duration time (i.e. chase rate) and crossfade for the chase, and create or modify the
steps which make up the chase.
Move fader 2 to select the value within 1-48 for the amount of step, then move the fader
5 to select the duration time (TIME) within 0 sec to 1 min and 39.9 sec. and move the
fader 4 to select the crossfade (CROSS%) i.e. percentage of the duration time,
within 0-100%.
Now we can start editing the step for the chase. The chse has a minimum of 48 steps
and each step consists create or modify a scene consisting of up 24 channels Use the
channel faders 1-12 together with the CHANNEL BANK button to create a desired
lighting setup (scene). Then Press the STORE button to save the scene as the 1st step of
the chase. The dsplay shows “step 2” indicating you are ready to edit the 2nd step. Carry
on the 2nd step and the rest steps until all steps are completed.
You can also directly access and call a step required to be edited. Press and hold the
STEP button, mean while press the Flash 1-12 together with the Page to select the step
that will be indicated by display. Proceed in the way stated in the above paragraph to edit
and save the step.
Press OK to save the attributes – the amount of the steps, standing time, crossfade etc.
and return to earlier menu. Press ESC to leave this menu without changing these
attributes.
Press RECORD or CHASE button causing Chase LED to go out, you will leave the
record chase menu.
70
3. RECORD SCENES
This console alloes you to record up 48 scenes of conventional lights. Press RECORD
button and relative LED will blink briefly. Select the show, chase or scene you want to
record.
Press SCENE button to access edit scene menu. Its LED will be lit and a new window
will appear indicating you to select the scene you wish to edit.
Select the scene number using Flash 1-12 buttons together with the PAGE button to
access pages 13-24, pages 25-36 and pages 37-48.
This menu allows you to create or modify a scene consisting of up to 24 channeles and
set the fade time (TIME) for the scene. Use the channels faders 1-12 together with the
CHANNEL BANK button to create a desired lighting setup, then press the STORE button
to save it permanently as a scene.
On the other hand, move the fader 2 or press [▲] / [▼] to select the fade-time within 0 to
1 min and 39.9 sec. Press OK to save your new faderime and return to the earlier menu,
then you can start editing another scene or more. Press ESC to leave this menu without
changing the fade time of the scene. Proceed in this way until all 48 scenes have been
finished.
Press the RECORD or SCENE button to leave the Record Scene menu (Scene LED will
turn off).
71
PLAYBACK
This section details the operations that can be performed when you have finished
recording the shows, chases and scenes. The LCD screen on the upper left is very
useful during the playback of scenes, chases or shows. There are the following
messages avaible in the screen:
Questa sezione illustra ciò che bisogna fare dopo aver terminato la programmazione di
Shows, Chases e Scenes.
Il display in alto a sinistra è molto utilizzato durante la fase di playback. Di seguito i
messaggi che appaiono sul display:
MESSAGE
FUNCTION DESCRIPTION
En01
Allowing you to start or suspend the playback
Ch01
Allowing you to scroll through all 48 shows, chases and scenes
Go01 – Go48
To play the selected show, chase or scene
Pu01 – Pu48
To suspend the show, chase or scene being played
SH01 – SH48
Shows 1-48
CA01 – CA48
Chase 1-48
SC01 – SC48
Scene 1-48
The [CHOSE] buttons can be used to select Choose (Ch) or Enter (En) mode. If you
select Ch mode, the message Ch01 will appear in the bottom line of the screen. Press
the GO or PAUSE nutton to scroll to the show/chase/scene you wish to play.
Once you have selected the show/chase/scene, press the CHOOSE button to select En
mode until the message En01 appears in the bottom line of the screen. Press GO button
to play the show/chase/scene, meanwhile you can press the Audio button to synchronize
them with audio beat. Press the PAUSE button to suspend the playing, then repeatedly
tappins of PAUSE button will play the show or chase step by step. During tha playback,
you can move the Preset faders 1-8 to control the dimming level of the
show/chase/scene. To call off the playing, press the CHOOSE to return to Ch mode.
This console allows you to have 32 presets (shows/chases/scenes) allocated for preset
pages 1-4, 8 preset per page. Such a layout of preset offers a great convenience when
you want to play several presets at a time. A maximum of 4 shows, 4 chases and 4
scenes can be played simultaneously. Please take note that one show/chase/scene can
not be played in two preset or more.
This console exclusively allocates 8 DMX channels for the control of the strobes. There
are 20 built-in programs that you can select for the chase of up to 4 strobe lights.
The MENU button can be used to access the Preogram, Speed or Dimmer menu.
Press the MENU button until the message “Pr” appear in the Display. Use [▲] / [▼]
buttons to select programs 1-19 or autoclycling-program.
72
Press the MENU button until the message “SP” appears in the display. Use [▲] / [▼]
buttons to select the speed within 1-99 for the current program. A value of 01 will give
you the slowest speed and 99 will give you the fastest speed.
Press the MENU button until message “di” appears in the sidply. Use [▲] / [▼] buttons to
select the intensity within 1-99 fort the program. Avalue 01 gives the lowest putpu and
99 give full intensity.
The FULL ON button is used to bring the overall output to full intensity. This function is
enables when the FULL ON button is pressed down and disable when set free. Press the
STANDBY button to activate Stanby mode. Press again to deactivate this function. The
full on function takes priority of Stnaby if both are active.
MANUAL FIXTURES
In addition to 48 shows, this console also allows you to control the fixtures manually. Up
to 16 patched fixtures are readily on call, giving you a great flexibility to get to desired
effects whether the fixtures are being used by the shows or not.
When th Fixture LED is lit and the message “Select fixture” appears in the upper-right
LCD Screen, press the Fixture 1-16 button to select what you want to control manually.
The LED above the Fixture 1-16 will blink briefly and the message of channel effects
patched for the fixture will appear in the upper right LCD Screen.
Move the faders 1-6 to manually control the effects displayed in the screen. Meanwhile
the joystick can be used to control the X (Pan) or Y (Tilt) movements if the Pan and Tilt is
active (indicated by the li LEDs). Press the OK button to scrool to the next page if there
is more than on page. The fader 1-6 buttons can be used to call the tabulating values if
you’ve set up the tabulations during the setup of menu 1.1.9 Control Type.
In the fixture is being used by ashow, the rest channels not having handled by the
manual control will still be subject to the show. If you want to call off the manual channel
to restore the show over the manually-affected channels, you can press eighter of the
SETUP and RECORD buttons.
Group of fixtures is useful if there are several equivalent fixtures, which you want to
control at a time, in the patch. Press and hold the FIXTURE button, the message of 6
73
group code will appear in the screen. Press the faders 1-6 button below the group code
display to select a group, the LED will be lit to indicate the group code. Press the fixture
1-16 buttons to select the fixtures. Their LEDs will blink simultaneously. If the fixtures use
the same channel effects, these effects string will appear in the screen indicating this
group has been established successfully. If you want to try to group different fixtures, a
message “different ficture: no effect control” will appear in the screen. Once you’ve
created the groups of fixtures you can call the group by pressing the FADERS 1-6
buttons while holding the FIXTURE button.
UTILITY FACILTIES
TIMES
The [TIMES] button is used to set a multiplyning factor for the playing speed of the
shows, chases or scenes. When the Fixture LED is lit and the message “SELECT
FIXTURE” appears in the screen, press the TIMES button to access the times menu, its
LED will blink briefly and a new window will appear.
this function allows you to multiply speed within 25% - 400% for the shoes, chases or
scenes.
Press the SHOW button, the chows being played will appear in the screen. Press the
Fader 1-4 button or [◄] / [►] buttons to select the show which is indicated by the
marking “* *”. Move the fader 5 ore press [▲] / [▼] to set the SPEED% within 25%400%. After all, the ultimate playing speed complies with the limit of 1 minute and 39.9
seconds. Proceed in this way to continue the setup of speed% for chases or scenes.
Additionally, the Flash 1-12 buttons can be used together with the FLASH PAGE button
to directly call a certain step of the active show or chase with the mark “* *”.
Press the TIMES button again to leave this menu, its LED will turn off.
COPY
When the Fixture LED is lit and the message “SELECT FIXTURE” appears in the screen,
press the COPY button to access the copy menu, its LED will blink briefly and a new
window will appear.
this function allows you to make a copy between two shows, chases or scenes. Press
the SHOW button, move the fader 3 to select the source show you wish to have a copy,
then move fader 4 to select the target show wish to place this copy. After your selections,
press “OK”, a prompt message will appear telling you the target show will be updated.ì
74
Press [ENTER] to save and leave this menu. Press fader 6 button ESC to leave this
menu without having a copy. Press ESC to cancel this copy and have another try.
Everytime you finish a copy successfully, it will automatically leave this menu. Press the
COPY button to have a new copy. Repeat the same procedure stated in the above
paragraph for every copy required.
RESET
This function allows you to send the reset command to your fixtures. Press the RESET
button to access the reset menu, its LED will be lit and a new window will appear in the
screen.
Press the fixture 1-16 button for several seconds until the fixture starts resetting. The
time you keep pressing for depends on the fixture’s performance. Please remember you
should have assigned the reset channel and its values of on/off before you can carry out
this function.
LAMP
This function allows you to switch on or off the fixture lamp by DMX command. Press the
LAMP button to access the Lamp menu and its LED will be lit.
All the lamps are set to ON by default when this console is turned on. Press the
FIXTURE 1-16 button for 5 seconds and the relative LED will tun off. To switch on the
fixture lamp, you’ll have to press the fixture 1-16 button for 5 seconds again until its LED
is lit.
Please remember you should have assigned the lamp channel and its values of ON/OFF
first before you can carry out this function.
MIDI
To activate MIDI operation, you must first select a MIDI channel identical to that of the
MIDI keyboard or sequencer. The PLBR256MH2 will send and receive MIDI program
changes according to the following table:
NOTE
FUNCTION
0-47 (00H-2FH)
48-95 (30H-5FH)
96-115 (60H-73H)
Show 01-48
Chase 01-48
Scene 01-20
75
116-125 (74H-7DH)
126 (7EH)
127 (7FH)
Strobe Program 01-10
Fog Machine
Blackout
APPENDICE A
The following is the list of “built-in” lighting fixtures in the PLBR256MH2 fixture library.
Please refer to your fixture’s user manuals for fixture profiles.
American DJ Arcbeam 150
American DJ Mighty Scan
American DJ Pocket Scan
American DJ Star Tec H150
Martin Acrobat
Martin CX2
Martin CX4
Martin Destroyer
Martin Exterior 200
Martin Exterior 600
Martin Exterior 600 Compact
Martin Mac 250 Mode 4
Martin Mac 300 Mode 4
Martin Mac 500 Mode 4
Martin Mac 600 Mode 4
Martin Mac 600 NT Mode 4
Martin Mac 1200 Mode 4
Martin Minimac Profile
Martin Minimac Wash
Martin MX-1, MX-4
Martin PAL 1200 Mode 4
Martin PAL 1200FX Mode 4
Martin QFX150
Martin Robocolor Pro 400
Martin Roboscan 812
Martin Roboscan Pro 918
Martin Wizard
Elation Joy 150
Elation Joy 300
GLP Max 250
GLP Patent Light 1200 HMI
GLP Patent Light Basic
GLP Startec-1200I
GLP Ypoc 250
Coemar CF 1200 Hard Edge
Coemar CF 7 Wash Zoom
Coemar Ispot 150
Coemar Icyc 250
Coemar Ispot 575 DMX EB
Coemar Micro / Mini Ultra Scan
Coemar MM 1200 DX
Coemar MM 1200 Zoom
Coemar NAT 1200
Coemar PC 1000 and 1200
Coemar Prospot LX
Coemar Prowash LX
Coemar Samurai
Coemar Super CYC
Studio Due City Beam
Studio Due City Color
Studio Due Giant / Giant Color
Studio Due Mini City
Studio Due Shark 150
Studio Due Stratos
Studio Due Stratos CMY
Abstract Futurescan 2CE
Abstract Futurescan 3CE
Abstract Galactic Moon 2CE
Elite Servo Color 250
Elite Servo Color 575
Elite Servo Spot 250
Clay Packy Atomic 3000
Clay Packy Color 1000 DMX
Clay Packy Color 1200 DMX
Clay Packy Color 3000 DMX
Clay Packy Color 575 DMX
Clay Packy Cpcolor 150
Clay Packy Golden Color
Clay Packy Golden Scan
PSL Autoscan Plus
PSL Omniscan HQI 150
PSL Omniscan MSD 250
PSL Rotoscan
76
Clay Packy Golden Scan HPE
Clay Packy Golden Spot
Clay Packy Stage Scan DMX
High End Cyberlight Mode 1
High End Cyberlight Mode 2
High End Cyberlight Mode 3
High End EC-1
High End EC-2
High End ES-1
High End Studio Beam
High End Studio Color 250
High End Studio Color 575
High End Studio Spot 250
High End Technobeam 18 channel mode
High End Technobeam-I (with iris)
Varilite AR5
Varilite AR500
Varilite VL1
Varilite VL5
Varilite VL6
Varilite VLM
Work Blade 250
FAL Primoscan
FAL Superscleverscan
SGM Colorlab250
SGM Galileo 1200
SGM Galileo 2
SGM Galileo 2-250
SGM Galileo 3
SGM Galileo 4
SGM Giotto Spot 1200
SGM Giotto Spot 400
SGM Giotto Wash 1200
SGM Newton
SGM Victory 250
SGM Victory II 250
Futurelight MH-640
Futurelight MH-660
Futurelight MH-840
Futurelight SC-240
Futurelight SC-470
Futurelight SC-570
Futurelight SC-780
Futurelight SC-940
Futurelight SC-980
Sagitter Infinity
Sagitter Prince
77
Notes:
78
79