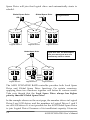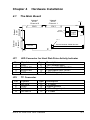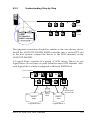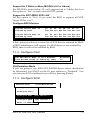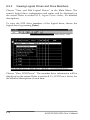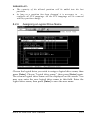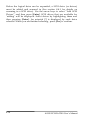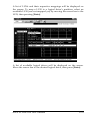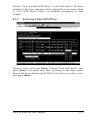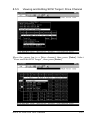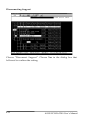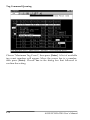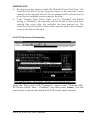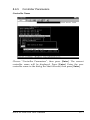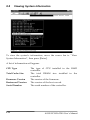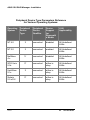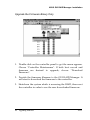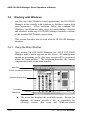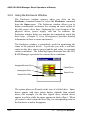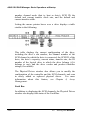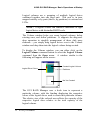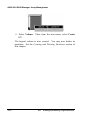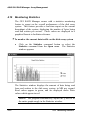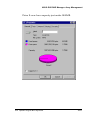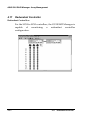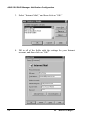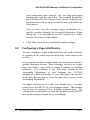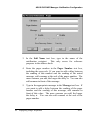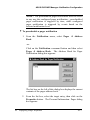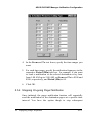
1
PCI-DA2200
PCI-to-Ultra2 SCSI RAID Controller
User’s Manual
Version 1.2
Copyright Information
Copyright © 1999
This edition first published 1999
All rights reserved. No part of this publication may be reproduced, transmitted, transcribed, stored in a retrieval system, or translated into any
language or computer language, in any form or by any means, electronic,
mechanical, magnetic, optical, chemical, manual or otherwise, without the
prior written consent of ASUSTeK Computer Inc.
Disclaimer
ASUSTeK Computer Inc. makes no representations or warranties with respect to the contents hereof and specifically disclaims any implied warranties
of merchantability or fitness for any particular purpose. Furthermore,
ASUSTeK Computer Inc. reserves the right to revise this publication and to
make changes from time to time in the content hereof without obligation to
notify any person of such revisions or changes.
Trademarks
ASUS and ASUSTeK are registered trademarks of Computer Inc.
AMD is a trademark of Advanced Micro Devices, Inc.
DEC and Alpha are registered trademarks of DIGITAL Equipment
Corporation in the U.S. and/or other countries.
Microsoft, Windows, Windows NT and MS-DOS are registered trademarks
of Microsoft Corporation in the U.S. and other countries.
Novell and NetWare are registered trademarks of Novell, Inc. in the U.S.
and/or other countries.
OS/2 and OS/2 Warp are registered trademarks of International Business
Machines Corporation in the U.S.
Solaris is a trademark of Sun Microsystems, Inc.
SCO, OpenServer, and Unix Ware are trademarks or registered trademarks
of The Santa Cruz Operation, Inc. in the U.S. and/or other countries.
All other names, brands, products or services are trademarks or registered
trademarks of their respective companies.
Contact Information
ASUSTeK COMPUTER INC. (Asia-Pacific)
Marketing
Address:
150 Li-Te Road, Peitou, Taipei,
Taiwan 112
Telephone: +886-2-2894-3447
Fax:
+886-2-2894-3449
Email:
info@asus.com.tw
Tech Support Tel (English): +886-2-2894-3447 ext. 706
Tel (Chinese): +886-2-2894-3447 ext. 701
Fax:
+886-2-2895-9254
Email:
tsd@asus.com.tw
Newsgroup: news2.asus.com.tw
WWW:
www.asus.com.tw
FTP:
ftp.asus.com.tw/pub/ASUS
ASUS COMPUTER INTERNATIONAL (America)
Marketing
Address:
6737 Mowry Avenue, Mowry Business
Center, Building 2, Newark, California
94560, USA
Fax:
+1-510-608-4555
Email:
info-usa@asus.com.tw
Tech Support Fax:
BBS:
Email:
WWW:
FTP:
+1-510-608-4555
+1-510-739-3774
tsd-usa@asus.com.tw
www.asus.com
ftp.asus.com.tw/pub/ASUS
ASUS COMPUTER GmbH (Europe)
Marketing
Address:
Harkort Str. 25, 40880 Ratingen, BRD,
Germany
Telephone: 49-2102-445011
Fax:
49-2102-442066
Email:
sales@asuscom.de
Tech Support Hotline:
BBS:
Email:
WWW:
FTP:
49-2102-499712
49-2102-448690
tsd@asuscom.de
www.asuscom.de
ftp.asuscom.de/pub/ASUSCOM
FCC & DOC Compliance
Federal Communications Commission Statement
This device complies with FCC Rules Part 15. Operation is subject to the
following two conditions:
•
•
This device may not cause harmful interference, and
This device must accept any interference received, including
interference that may cause undesired operation.
This equipment has been tested and found to comply with the limits for a
Class B digital device, pursuant to Part 15 of the FCC Rules. These limits
are designed to provide reasonable protection against harmful interference in
a residential installation. This equipment generates, uses and can radiate
radio frequency energy and, if not installed and used in accordance with
manufacturer's instructions, may cause harmful interference to radio
communications. However, there is no guarantee that interference will not
occur in a particular installation. If this equipment does cause harmful
interference to radio or television reception, which can be determined by
turning the equipment off and on, the user is encouraged to try to correct the
interference by one or more of the following measures:
•
•
•
•
Re-orient or relocate the receiving antenna.
Increase the separation between the equipment and receiver.
Connect the equipment to an outlet on a circuit different from that to
which the receiver is connected.
Consult the dealer or an experienced radio/TV technician for help.
WARNING! The use of shielded cables for connection of the monitor to the
graphics card is required to assure compliance with FCC regulations.
Changes or modifications to this unit not expressly approved by the party
responsible for compliance could void the user's authority to operate this
equipment.
Canadian Department of Communications Statement
This digital apparatus does not exceed the Class B limits for radio noise
emissions from digital apparatus set out in the Radio Interference
Regulations of the Canadian Department of Communications.
Table of Contents
Chapter 1 Introduction ............................................................ 1-1
Chapter 2 Features................................................................... 2-1
Chapter 3 Functional Description ........................................... 3-1
3.1 RAID Management ........................................................... 3-1
3.2 Drive Failure Management ............................................... 3-5
3.3 Disk Array Parameters.................................................... 3-11
3.4 Cache Parameters.......................................................... 3-13
3.5 Drive-Side SCSI Parameters .......................................... 3-15
3.6 Dynamic Logical Drive Expansion .................................. 3-20
Chapter 4 Hardware Installation.............................................. 4-1
4.1 The Main Board ................................................................ 4-1
4.2 Installing DRAM SIMM..................................................... 4-2
4.3 Basic Operational Set-Up ................................................. 4-3
4.4 Configuration Examples and Termination Settings............ 4-4
Chapter 5 Quick Setup............................................................. 5-1
5.1 Using the BIOS RAID Manager......................................... 5-1
Chapter 6 Configuring RAID.................................................... 6-1
6.1 Starting to Build a RAID System Drive.............................. 6-1
6.2 How Does the RAID Controller Work? .............................. 6-4
Chapter 7 BIOS Configuration Utility...................................... 7-1
7.1 Configuration .................................................................... 7-1
7.2 Color/Monochrome ........................................................... 7-5
Chapter 8 Text RAID Manager User Interface......................... 8-1
8.1 The Main Menu................................................................. 8-1
8.2 Viewing and Editing Logical Drives ................................. 8-10
8.3 Viewing and Editing SCSI ID Map................................... 8-27
8.4 Viewing and Editing SCSI Drives .................................... 8-32
8.5 Viewing and Editing SCSI Channels ............................... 8-37
8.6 Viewing and Editing Configuration Parameters ............... 8-62
8.7 System Functions ........................................................... 8-79
8.8 Viewing System Information ........................................... 8-86
Chapter 9 Remote Administration........................................... 9-1
9.1 GUI RAID Manager Using SNMP Service......................... 9-1
Appendix A Driver Installation ................................................A-1
1 MS-DOS® ASPI Drivers Installation.........................................A-1
2 NetWare® Driver Installation ...................................................A-3
2.1 Installing NetWare 3.1x ....................................................A-3
2.2 Installing NetWare 4.0x/4.1/4.11.......................................A-5
3 Windows NT® 3.1/3.51 Driver Installation..............................A-11
3.1 Installing Driver During Windows NT 3.1/3.51 InstallationA-12
3.2 Installing Driver in Existing Windows NT 3.1/3.51 SystemA-13
3.3 Updating Windows NT 3.1/3.51 Device Driver ................ A-14
3.4 Installing the Driver During Windows NT 4.0 Installation A-15
3.5 Installing the Driver During Installation of Windows NT 4.0
(for DEC Alpha)........................................................................ A-17
3.6 Installing the Driver in Existing Windows NT 4.0
(for DEC Alpha)........................................................................ A-18
4 Windows® 95/98 Driver Installation ....................................... A-19
4.1 Installing Windows 95/98 and the Driver......................... A-19
4.2 Updating Device Driver for Windows 95/98 .................... A-21
®
5 OS/2 Driver Installation ....................................................... A-21
5.1 Installing Driver During OS/2 2.x or 3.0 Installation......... A-22
5.2 Installing Driver in an Existing OS/2 2.x/3.0 System ....... A-22
5.3 Updating ASUS PCI-DA2200 OS/2 Device Driver .......... A-23
5.4 ASUS PCI-DA2200 OS/2 Driver Command-Line OptionsA-23
6 Driver Installation for SCO OpenServer and UnixWare......... A-25
6.1 Installing the SCO OpenServer Driver ............................ A-25
7 Drivers and Utilities for Linux ................................................ A-27
7.1 Making Floppy Diskettes for Red Hat 5.1 Installation ...... A-27
7.2 Making Floppy Diskettes for SlackWare 3.2 Installation.. A-28
7.3 Installing Red Hat Linux.................................................. A-28
7.4 Installing SlackWare Linux ............................................. A-30
7.5 Running the ASUS Text RAID Manager for Linux........... A-31
8 Drivers and Utilities for Sun Solaris™ .................................... A-32
8.1 Solaris 2.5.x and 2.6 (x86 platform)................................ A-32
8.2 Installing the x86 Platform Driver and ASUS Text RAID
Manager................................................................................... A-33
8.3 Drivers and Utilities for Solaris 2.5.x and 2.6 (SPARC
platform) .................................................................................. A-34
8.4 Installing the SPARC platform Driver and ASUS Text RAID
Manager................................................................................... A-35
8.5 Configuring RAID in Solaris with ASUS Text RAID ManagerA-37
Appendix B SCSI Cable Specifications ..................................B-1
Appendix C Upgrading BIOS, Firmware, and Boot Record..C-1
Appendix D Sync. Clock Period & Sync. Clock Frequency...D-1
Appendix E Troubleshooting Guide....................................... E-1
Appendix F Specifications...................................................... F-1
Appendix G Record the Settings ............................................G-1
View and Edit Logical Drives ......................................................G-1
View and Edit Host LUNs ...........................................................G-2
View and Edit SCSI Drives .........................................................G-2
View and Edit SCSI Channels ....................................................G-3
View and Edit Configuration Parameters ....................................G-3
Index
Chapter 1
Introduction
The ASUS PCI-DA2200 is a PCI-to-SCSI RAID controller specifically
designed to provide RAID 0, 1, 3 or 5 capability to any host system
equipped with a Little Endian PCI Local Bus interface. All the RAID
functions of ASUS PCI-DA2200 are performed by an AMD 5x86 CPU
coupled with high-speed DRAMs and firmware in flash memory. In
effect, it endows the host system with the high-performance and
fault-tolerant disk storage operation of RAID technology. It is also an
ideal solution for weaving several hard disks into one contiguous
volume.
The controller has comprehensive drive failure management that
allows automatic reassignment of reserved blocks when a bad sector
is encountered during a write. Hot-swapping is supported through
automatic disconnection of a failed drive and detection of a reserved
drive followed with background rebuilding of data. The controller
also supports spare drive operation. Remarkably, all of these failure
recovery procedures are transparent to the host system.
The ASUS PCI-DA2200 has been designed with ease of integration
and maintenance in mind. The major features are described in the
next chapter.
The controller already includes all the major
operational requirements for a RAID subsystem. The overall features
of a fully-built RAID subsystem will, however, depend on the actual
components used and the creativity of the integrator.
ASUS PCI-DA2200 User’s Manual
1-1
This page is left intentionally blank.
1-2
ASUS PCI-DA2200 User’s Manual
Chapter 2
Features
ü Five operating modes:
Non-RAID
Disk Spanning
RAID-0
Disk Striping
RAID-1
Disk Mirroring and Striping (RAID 0+1)
RAID-3
Disk Striping with Dedicated Parity
RAID-5
Multiple Block Striping with Interspersed
Parity
ü Comprehensive failure management including:
§ Automatic bad sector reassignment
§ Hot-swapping
§ Spare drive operation (Supports both Global Spare and Local
Spare)
§ Background rebuilding (Rebuild priority selectable)
§ Verify-after-Write supported on normal writes, rebuild
writes and/or RAID initialization writes
ü PCI Rev. 2.1 compliant
ü PCI form factor: 9.21”(L) x 4.2”(W)
ü Supports up to 15 SCSI drives per channel
ü Up to 8 logical drives, each with independent RAID modes
ü Up to 8 partitions per logical drive
ü Number of drives for each logical drive has no limitation
ü Dynamic mapping of LUNs to logical drives
ü Concurrent/Background logical drive initialization
ü Performance optimization for Sequential or Random I/O
ü Allows multiple drive failure and concurrent multiple drive
rebuild of a RAID (0+1) logical drive
ü Configuration of individual SCSI target parameters
ü Prior to first disk access, it allows adjustment of delay time
during controller initialization to enhance compatibility with
slow-initial drives
ü All channels are Ultra2-Wide-SCSI (downward compatible to
SCSI-1)
ü Compatible and will automatically match any SCSI hard disks
with SCSI-1, SCSI-2 or (Ultra)-Wide-SCSI (1 or 2) specification
ASUS PCI-DA2200 User’s Manual
2-1
ü Full Ultra2 Wide SCSI-2 implementation including Tagged
Command Queuing and Multi-Threaded I/O
ü Uses AMD 5x86-133 CPU with all executable firmware
downloaded into high-speed DRAM
ü EDO DRAM supported for enhanced performance
ü Up to 128 Mbytes of intelligent Read-Ahead/Write-Back cache
ü Firmware resides in easy-to-update Flash Memory
ü GUI RAID Manager and Text RAID Manager interfaces for RAID
management
2-2
ASUS PCI-DA2200 User’s Manual
Chapter 3
Functional Description
The advantages of RAID are: Availability, Capacity and Performance.
Choosing the right RAID level and drive failure management can
increase Availability, subsequently increasing Performance and
Capacity. The ASUS PCI-DA2200 RAID controller provides complete
RAID functionality and enhanced drive failure management.
3.1
RAID Management
RAID stands for Redundant Array of Independent Drives.
advantages of using a RAID storage subsystem are:
The
•
Provides disk spanning by weaving all connected drives into one
single volume.
•
Increases disk access speed by breaking data into several blocks
when reading/writing to several drives in parallel. With RAID,
storage speed increases as more drives are added.
•
Provides fault-tolerance by mirroring or parity operation.
What are the RAID levels?
RAID
Description
Level
NRAID Non-RAID
RAID 0 Disk Striping
RAID 1 Mirroring Plus
(0+1)
Striping (if N>1)
RAID 3 Striping with Parity
on dedicated disk
RAID 5 Striping with
interspersed parity
Minimum
Drives
1
N
Data
Availability
N+1
>>NRAID
==RAID 5
>>NRAID
==RAID 5
>>NRAID
==RAID 5
N+1
N+1
ASUS PCI-DA2200 User’s Manual
==NRAID
Performance
Sequential
Drive
R: Highest
W: Highest
R: High
W: Medium
R: High
W: Medium
R: High
W: Medium
Performance
Random
Drive
R: High
W: Highest
R: Medium
W: Low
R: Medium
W: Low
R: High
W: Low
3-1
NRAID
Disk Spanning
2 GB Hard Drive
+
3 GB Hard Drive
+
1 GB Hard Drive
+
2 GB Hard Drive
=
NRAID
Minimum
Disks required
Capacity
Redundancy
1
Logical
Drive
N
No
2 + 3 + 1 + 2 = 8 GB Logical Drive
NRAID stands for Non-RAID. The capacity of all the drives are
combined to become one logical drive (no block striping). In other
words, the capacity of the logical drive is the total capacity of the
physical drives. NRAID does not provide data redundancy.
JBOD
Single-drive Control
2
L
o
g
L
o
g
L
o
g
G
i c
a
i c
a
i c
a
3
L
JBOD
Minimum
Disks required
Capacity
Redundancy
o
g
D
l
D
l
D
a
i
v
e
r
i
v
e
r
i
v
e
=
=
B
l
D
2
G
B
H
a
r
=
B
G
i c
r
B
G
2
=
B
l
G
1
r
i
v
d
3
1
G
B
H
a
2
r
d
G
D
B
r i v
H
D
G
r i v
B
e
H
a
r
d
D
r i v
e
e
a
r
d
D
r i v
e
e
1
1
No
JBOD stands for Just a Bunch of Drives. The controller treats each
drive as a stand-alone disk, therefore each drive is an independent
logical drive. JBOD does not provide data redundancy.
3-2
ASUS PCI-DA2200 User’s Manual
RAID 0
Disk Striping
Logical Drive
Physical Disks
Block 1
RAID 0
Minimum
Disks required
Capacity
Redundancy
Striping
Block 2
Block 3
Block 1
Block 2
Block 4
Block 5
Block 3
Block 5
Block 4
Block 6
2
Block 6
Block 7
Block 8
.
.
Block 8
.
.
N
No
Block 7
.
.
RAID 0 provides the highest performance but no redundancy. Data
in the logical drive is striped (distributed) across several physical
drives.
RAID 1
Disk Mirroring
Logical Drive
Physical Disks
Block 1
Block 2
RAID 1
Disks required
Capacity
Redundancy
Block 3
Block 4
2
N/2
Yes
Block 5
Block 6
Block 7
Block 8
.
.
Mirroring
Block 1
Mirror 1
Block 2
Block 3
Mirror 2
Mirror 3
Block 4
.
.
Mirror 4
.
.
RAID 1 mirrors the
data stored in one hard drive to another. RAID 1 can only be
performed with two hard drives. If there are more than two hard
drives, RAID (0+1) will be performed automatically.
ASUS PCI-DA2200 User’s Manual
3-3
Physical Disks
Logical Drive
Striping
Block 1
Block 2
Block 3
Block 4
RAID (0+1)
Minimum
4
Disks required
Capacity
N/2
Redundancy
Yes
Block 1
Block 2
Block 3
Block 4
Block 5
Block 7
Block 6
Block 8
.
.
Mirror
RAID (0+1)
Disk Striping with
Mirroring
.
.
Block 5
Block 6
Block 7
Block 8
.
.
Mirror 1
Mirror 2
Mirror 3
Mirror 5
Mirror 4
Mirror 6
Mirror 7
Mirror 8
Striping
.
.
.
.
RAID (0+1) combines RAID 0 and RAID 1 - Mirroring and Striping.
RAID (0+1) allows multiple drive failure because of the full
redundancy of the hard drives. If there are more than two hard
drives assigned to perform RAID 1, RAID (0+1) will be performed
automatically.
IMPORTANT:
“RAID (0+1)” will not appear in the list of RAID levels supported by the
controller. If you wish to perform RAID 1, the controller will determine
whether to perform RAID 1 or RAID (0+1). This will depend on the drive
number that has been selected for the logical drive.
RAID 3
Disk Striping with
Dedicated Parity Disk
RAID 3
Minimum
Disks required
Capacity
Redundancy
Logical Drive
Block 1
Block 2
Block 3
3
N-1
Yes
Block 4
Block 5
Block 6
Block 7
Physical Disks
Dedicated
Parity
Striping
Block 1
Block 2
Parity (1,2)
Block 3
Block 4
Parity (3,4)
Block 5
Block 6
Parity (5,6)
Block 7
Block 8
Parity (7,8)
.
.
.
.
.
.
Block 8
.
.
RAID 3 performs Block Striping with Dedicated Parity. One drive
member is dedicated to storing the parity data. When a drive
member fails, the controller can recover/regenerate the lost data of
the failed drive from the dedicated parity drive.
3-4
ASUS PCI-DA2200 User’s Manual
RAID 5
Striping with
Interspersed Parity
Logical Drive
Block 1
Striping + non-dedicated Parity
Block 2
Block 3
RAID 5
Minimum
Disks required
Capacity
Redundancy
3
N-1
Yes
Physical Disks
Block 4
Block 5
Block 1
Parity (3,4)
Block 6
Block 2
Block 3
Parity (5,6)
Parity (1,2)
Block 4
Block 5
Block 7
Block 8
Parity (7,8)
.
.
.
.
.
.
Block 6
Block 7
Block 8
.
.
RAID 5 is similar to RAID 3 but the parity data is not stored in one
dedicated hard drive. Parity information is interspersed across the
drive array. In the event of a failure, the controller can
recover/regenerate the lost data of the failed drive from the other
surviving drives.
3.2
Drive Failure Management
3.2.1
Global and Local Spare Drive
Local Spare Drive
LS
1
Local Spare Drive is a standby drive
assigned to serve one specified logical
drive. When a member drive of this
specified logical drive fails, the Local
Spare Drive becomes a member drive and
automatically starts to rebuild.
2
3
Logical Drive
X
Local 1
Spare
Drive
LS
Assigns one Local Spare
Drive to a logical drive
2
3
When one member
drive fails, the Local
Spare Drive joins the
logical drive and
automatically starts
to rebuild.
Logical Drive
Global Spare Drive does not only serve one specified logical drive.
When a member drive from any of the logical drive fails, the Global
ASUS PCI-DA2200 User’s Manual
3-5
Spare Drive will join that logical drive and automatically starts to
rebuild.
Global Spare Drive
Global Spare Drive
GS
1
GS
2
1
2
3
Logical Drive 0
Logical Drive 1
3
Logical Drive 0
X
1
2
2
4
3
When a member drive from any
logical drive fails, the Global Spare
Drive joins that logical drive and
automatically starts to rebuild.
GS
2
1
Logical Drive 2
Global Spare Drive
1
Global Spare Drives serve
any logical drives.
1
2
Global
3
Spare 4
Drive
Logical Drive 1
Logical Drive 2
GS
The ASUS PCI-DA2200 RAID controller provides both Local Spare
Drive and Global Spare Drive functions. On certain occasions,
applying these two functions together will better fit various needs.
Take note though that the Local Spare Drive always has higher
priority than the Global Spare Drive.
In the example shown on the next page, the member drives in Logical
Drive 0 are 9 GB drives, and the members in Logical Drives 1 and 2
are all 4 GB drives. It is not possible for the 4 GB Global Spare Drive
to join Logical Drive 0 because of its insufficient capacity. However
3-6
ASUS PCI-DA2200 User’s Manual
using a 9GB drive as the Global Spare drive for a failed drive that
comes from Logical Drive 1 or 2 will bring huge amount of excess
capacity since these logical drives require 4 GB only. In the settings
below, the 9 GB Local Spare Drive will aid Logical Drive 0 once a
drive in this logical drive failed. If the failed drive is in Logical Drive
1 or 2, the 4 GB Global Spare drive will immediately give aid to the
failed drive.
Local Spare Drive
Global Spare Drive
LS
GS
(9GB)
(4GB)
Local Spare Drive always
has higher priority than
Global Spare Drive.
1
2
(9GB) (9GB)
1
(4GB)
1
2
3
4
(9GB)
Logical Drive 0
3.2.2
2
(4GB) (4GB)
(4GB)
3
(4GB) (4GB)
Logical Drive 1
Logical Drive 2
Identifying Drives
Assuming there is a failed drive in the RAID 5 logical drive, make it a
point to replace the failed drive with a new drive to keep the logical
drive working.
When trying to remove a failed drive and you mistakenly removed
the wrong drive, you will no longer be able to read/write the logical
drive because the two drives may have already failed.
To prevent this from happening, the controller provides an easy way
of identifying for the failed drive. That is, the read/write LED of the
failed hard drive will light. This LED will prevent you from
removing the wrong drive, and is also helpful when locating for a
drive.
ASUS PCI-DA2200 User’s Manual
3-7
Flash Selected SCSI Drive
The Read/Write LED of the drive you selected
will light steadily for about one minute.
R/W LED
R/W LED
LED Steadily ON
R/W LED
R/W LED
Flash All SCSI Drives
The Read/Write LED of all connected drives will
light for about one minute. If the LED of the
defective drive did not light on the “Flash
Selected SCSI Drive” function, use “Flash All
SCSI Drives”. The “Flash All SCSI Drives”
function will light LEDs of all the drives except
the defective one.
LED Steadily ON
LED Steadily ON
LED Steadily ON
LED Steadily ON
LED Steadily ON
3.2.3
3-8
Automatic Rebuild and Manual
ASUS PCI-DA2200 User’s Manual
Rebuild
Automatic Rebuild
Any
local spare drive
assigned to logical
drive?
One member drive
fails in logical drive
Yes
Rebuild using the
local spare drive
Yes
Rebuild using the
global spare drive
Yes
Rebuild using the
swapped drive
No
Any
global spare drive
assigned to logical
drive?
No
Waiting for spare
drive to be added
or manual rebuild
No
“Periodic
Auto-Detect Failure
Drive Swap Check Time”
enabled?
Yes
Has the
failed drive been
swapped?
No
Keep detecting if drive
has been swapped or
spare drive has been
added
When a member drive in the logical drive failed, the controller will
first check whether there is a Local Spare Drive assigned to this
logical drive. If yes, it will automatically start to rebuild.
If there is no Local Spare Drive available, the controller will search
for a Global Spare Drive. If there is a Global Spare Drive, it will
automatically rebuild the logical drive.
If neither a Local Spare Drive nor a Global Spare Drive is available,
and the “Periodic Auto-Detect Failure Drive Swap Check Time” is
“Disabled,” the controller will not try to rebuild unless the user
applies a forced manual rebuild.
When the “Periodic Auto-Detect Failure Drive Swap Check Time” is
enabled (i.e., a check time interval has been selected), the controller
will detect whether or not the failed drive has been swapped (by
checking the failed drive’s channel/ID). Once the failed drive has
been swapped, the rebuild will begin immediately.
ASUS PCI-DA2200 User’s Manual
3-9
If the failed drive is not swapped but a local spare drive is added to
the logical drive, rebuilding will begin with the spare drive.
Manual Rebuild
When a user applies forced-manual rebuild, the controller will first
check whether there is any Local Spare Drive assigned to this logical
drive. If yes, it will automatically start to rebuild.
If there is no Local Spare Drive available, the controller will search
for a Global Spare Drive. If there is a Global Spare Drive, it will
automatically rebuild the logical drive.
User applies
forced-manual
rebuild
Any
Local Spare Drive
assigned to this
logical drive?
Yes
Rebuild using the
Local Spare Drive
Yes
Rebuild using the
Global Spare Drive
Yes
Rebuild using the
replaced drive
No
Any
Global Spare Drive
assigned to this
logical drive?
No
Has the failed drive
been replaced?
No
Wait for
manual rebuild
If neither a Local Spare Drive nor a Global Spare Drive is available,
the controller will detect the SCSI channel and ID of the failed drive.
Once the failed drive has been replaced by a new drive/used drive, it
starts to rebuild using the replaced drive. If there is no available
drive for rebuilding, the controller will not try to rebuild again until
the user applies another forced-manual rebuild.
3-10
ASUS PCI-DA2200 User’s Manual
3.2.4
Concurrent Rebuild in RAID (0+1)
RAID (0+1) allows multiple drive failure and concurrent multiple
drive rebuild. Newly replaced drives must be scanned and set as
Local Spare Drives. These drives will be rebuilt at the same time (you
do not need to repeat the rebuilding process for each drive).
3.3
Disk Array Parameters
3.3.1
Rebuild Priority
Rebuilding time will depend on the capacity of the logical drive. The
ASUS PCI-DA2200 RAID controller provides background rebuilding
ability. Meaning, the controller is able to serve other I/O requests
while rebuilding the logical drives. The rebuilding process is totally
transparent to the host computer or the operating system.
The background rebuild process has four priority options:
• Low
• Normal
• Improved
• High
The default priority is “Low” which uses the controller’s minimum
resources to rebuild. Choosing “Normal” or “Improved” will
speedup the rebuilding process and choosing “High” will use the
controller’s maximum resources to complete the rebuilding process
at the shortest time.
Rebuild priority can be configured through either the Text RAID
Manager or the GUI RAID Manager.
3.3.2
Verify-after-Write
The controller has the ability to force the hard drives to verify after
data has been written to the media of the HDD. There are three
selectable methods:
•
•
•
Verification on LD Initialization Writes
Performs Verify-after-Write while initializing the logical drive.
Verification on LD Rebuild Writes
Performs Verify-after-Write during the rebuilding process.
Verification on LD Normal Drive Writes
Performs Verify-after-Write during normal I/O requests.
ASUS PCI-DA2200 User’s Manual
3-11
Each method can be enabled or disabled individually. Hard drives
will perform Verify-after-Write according to the selected method.
3-12
ASUS PCI-DA2200 User’s Manual
ASUS PCI-DA2200 User’s Manual
3-13
IMPORTANT:
The “Verification on LD Normal Drive Writes” method will affect “write”
performance during normal use.
3.4
3.4.1
Cache Parameters
Optimization for Sequential or Random I/O
When using RAID with applications such as video or image oriented
applications, the application reads/writes from the drive using largeblock, sequential files instead of small-block, random access files. The
ASUS PCI-DA2200 RAID controller provides the options to optimize
for large-sequential I/O or optimize for small-random I/O access.
“Optimization for Sequential I/O” provides a larger – 128K – stripe
size (or “block” size, also known as “chunk” size) than does
“Optimization for Random I/O” (with a size of 32K). A lot of the
controller’s internal parameters will also be changed to optimize for
sequential or random I/O. The change will take effect after the
controller reboots.
If the existing logical drives were built with “Optimization for
Random I/O”, these logical drives will not read/write when using
“Optimization for Sequential I/O” (shows "INVALID") and vice
versa because the stripe size is different. Change it back to the
original setting and reset the controller to make available the logical
drive data again.
3-14
ASUS PCI-DA2200 User’s Manual
ASUS PCI-DA2200 User’s Manual
3-15
IMPORTANT:
Changing the setting to “Optimization for Sequential I/O” or
“Optimization for Random I/O” should be performed only when no logical
drive exist. Otherwise, you will not be able to access the data in the logical
drive later on.
3.5
3.5.1
Drive-Side SCSI Parameters
SCSI Motor Spin-up
When the power supply is unable to provide sufficient current for all
the hard drives and controllers that are powered-up at the same time,
spinning-up the hard drives serially is one of the best way of
consuming lower power-up current.
By default, all hard drives will spin-up when powered-on. These
hard drives can be configured so that all of them will not spin-up at
power-on. There are 3 methods of spinning-up the hard drive’s
motor: Spin-up at power-on, Spin-up serially in random sequence or
Spin-up by SCSI command. Please refer to the hard drive’s user’s
manual for instructions on configuring the hard drive using the
“Spin-up by SCSI command”. The procedure for each brand/model
of hard drive should vary.
Configure all the hard drives as above and enable “SCSI Motor SpinUp” in Drive-Side SCSI Parameters. Power off all hard drives and
controller, and power them on again. All the hard drives will not
spin-up at this time. The controller will then spin-up the hard drives
one by one at four seconds interval.
3-16
ASUS PCI-DA2200 User’s Manual
ASUS PCI-DA2200 User’s Manual
3-17
IMPORTANT:
If the drives are configured as “Delay Motor Spin-up” or “Motor Spin-up
in Random Sequence,” some of these drives may not be ready yet for the
controller to access when the system powers up. Increase the disk access
delay time so that the controller will wait a longer time for the drive to be
ready.
3.5.2
SCSI Reset at Power Up
By default, when the controller is powered up, it will send a SCSI bus
reset command to the SCSI bus. When disabled, it will not send a
SCSI bus reset command on the next power-up.
When connecting dual host computers to the same SCSI bus, the SCSI
bus reset will interrupt all the read/write requests that are being
performed. This may cause some operating systems or host
computers to act abnormally. Disable the “SCSI Reset at Power-up”
to avoid this situation.
3.5.3
Disk Access Delay Time
Sets the delay time before the controller tries to access the hard drives after
power-on. The default is 15 seconds.
3.5.4
SCSI I/O Timeout
The “SCSI I/O Timeout” is the time interval that the controller waits
for a drive to respond. If the controller attempts to read data from or
write data to a drive, but the drive does not respond within the SCSI
I/O timout value, the drive will be judged to be a failed drive.
When the drive itself detects a media error while reading from the
drive platter, it will retry the previous reading or recalibrate the
head. When the drive has encountered a bad block on the media, it
has to reassign the bad block to another spare block. However, all of
this takes time. The time to perform these operations can vary
between different brands and models of drives.
During SCSI bus arbitration, a device with higher priority can utilize
the bus first. A device with lower priority will sometimes get a SCSI
I/O timeout when higher priority devices keep utilizing the bus.
The default setting for “SCSI I/O Timeout” is 7 seconds. It is highly
recommended not to change this setting. Setting the timeout to a
lower value will cause the controller to judge a drive as failed a drive
3-18
ASUS PCI-DA2200 User’s Manual
is still retrying or while a drive is unable to arbitrate the SCSI bus.
Setting the timeout to a greater value will cause the controller to
keep waiting for a drive, and it may sometimes cause a host timeout.
3.5.5
Maximum Tag Count
The maximum number of tags that can be sent to each drive at the
same time. A drive has a built-in cache that is used to sort all of the
I/O requests (“tags”) which are sent to the drive, allowing the drive
to finish the requests faster. The cache size and maximum number of
tags varies between different brands and models of drive. Using the
default setting – “32” – is highly recommended. Changing the
maximum tag count to “Disable” will cause the internal cache of the
drive to be ignored (i.e., not used).
3.5.6
Periodic Drive Check Time
The “Periodic Drive Check Time” is an interval for the controller to
check all of the drives that were on the SCSI bus at controller startup
(a list of all the drives that were detected can be seen under “View
and Edit SCSI Drives”). The default value is “Disabled”. “Disabled”
means that if a drive is removed from the bus, the controller will not
be able to know – so long as no host accesses that drive. Changing the
check time to any other value allows the controller to check – at the
selected interval – all of the drives that are listed under “View and
Edit SCSI Drives.” If any drive is then removed, the controller will be
able to know – even if no host accesses that drive.
3.5.7
SAF-TE Enclosure Monitoring
What is SAF-TE?
SAF-TE stands for SCSI Accessed Fault-Tolerant Enclosures. It is an
enclosure management technology that uses the SCSI bus to interact
with the controller. A SAF-TE-compliant enclosure monitors the fan
temperature, power supply, UPS and also provides drive status
LED’s.
How does it work?
The SAF-TE device, which is often a back-plane within a drive-bay
enclosure, must occupy a connector on one of the drive channels’
SCSI cables. The presence of a SAF-TE device will be detected and its
presence will be displayed in the BIOS configuration utility, Text
RAID Manager and the GUI RAID Manager programs. The RAID
ASUS PCI-DA2200 User’s Manual
3-19
controller communicates with the SAF-TE enclosure with standard
SCSI commands, polling the device in order to get SAF-TE
information.
The default value for “Periodic SAF-TE Device Check Time” is
“Disabled”. If the enclosure does have a SAF-TE device and features,
enable the controller to poll the device by selecting a time interval.
The RAID controller will then check the SAF-TE device status at that
interval.
SAF-TE Support
UPS Failure
Signal Input
Text RAID Manager
error alert
PCI-to-SCSI
SAF-TE
Chipset
System with
RAID controller
installed
Cooling Fan
Failure
Signal Input
Power Supply
Failure
Signal Input
GUI RAID Manager
error alert
Drive Status
Indicators
Temperature Alert
Signal Input
• The SAF-TE chipset connects to the drive channel of the
controller together with the other SCSI drives.
3.5.8
Periodic Auto-Detect Failure Drive
Swap Check Time
The “Drive-Swap Check Time” is the interval at which the controller
checks to see whether a failed drive has been swapped. When a
logical drive’s member drive fails, the controller will detect the failed
drive (at the selected time interval). Once the failed drive has been
swapped with a drive that has adequate capacity to rebuild the
logical drive, the rebuild will begin automatically.
The default setting is “Disabled,” meaning that that the controller
will not Auto-Detect the swap of a failed drive. To enable this
feature, select a time interval.
3-20
ASUS PCI-DA2200 User’s Manual
3.6
3.6.1
Dynamic Logical Drive Expansion
What Is It and How Does It Work?
Before Dynamic Logical Drive Expansion, increasing the capacity of a
RAID system using traditional methods meant backing up, recreating and then restoring. Dynamic Logical Drive Expansion allows
users to add new SCSI hard disk drives and expand a RAID 0, 3 or 5
Logical Drive without powering down the system.
3.6.2
Two Modes of Dynamic Logical Drive Expansion
There are two modes of Dynamic Logical Drive Expansion: Mode 1
and Mode 2.
On-line RAID Expansion
Mode 1
Mode 2
Mode 1 Expansion involves adding more SCSI hard disk drives to a
logical drive, which may require that the user obtain an enclosure
with more drive bays. The data will be re-striped onto the original
and newly added disks.
ASUS PCI-DA2200 User’s Manual
3-21
RAID Expansion - Mode 1
2GB
2GB
2GB
2GB
2GB
+
+
RAID 5 Logical Drive - 4GB
Add-in New Drives
2GB
2GB
2GB
2GB
2GB
RAID
Expansion
RAID 5 Logical Drive - 8GB
In the figure above, new drives are added to increase the capacity of
a 4-Gigabyte RAID 5 logical drive. The two new drives increase the
capacity to 8 Gigabytes.
Mode 2 Expansion, on the other hand, requires the same number of
higher-capacity SCSI hard disk drives for a given logical drive.
RAID Expansion - Mode 2 (1/3)
2 GB
2 GB
2 GB
The original logical drive
RAID 5 (4GB)
4 GB
1
2 GB
2 GB
2 GB
New
Drive
RAID 5 (4GB)
Copy and Replace
one of the member drives
Copy and Replace each of the member drives. Even
if one member drives fails during the Copy and
Replace, the logical drive will still be available for
access.
In use
Unused
The figure above illustrates expansion of the same 4-Gigabyte RAID 5
logical drive using Mode 2 Expansion. Drives are copied and
replaced, one by one, onto three higher-capacity drives.
3-22
ASUS PCI-DA2200 User’s Manual
This results in a new 4-Gigabyte, RAID 5 logical drive composed of
RAID Expansion - Mode 2 (2/3)
2
2 GB
2 GB
4 GB
4 GB
New
Drive
RAID 5 (4GB)
Copy and Replace the other member drives one by one
until all the member drives have been replaced
Copy and Replace each member drive. After all the
member drives have been replaced, execute the
“RAID Expansion” to use the additional capacity.
In use
Unused
three physical drives. The 4 Gigabytes of increased capacity is in a
new partition.
RAID Expansion - Mode 2 (3/3)
RAID 5 (8GB)
n partitions
Partition n+1
3
4 GB
4 GB
4 GB
RAID
Expansion
or
RAID 5 (8GB)
RAID 5 (4GB)
After the RAID Expansion, the additional capacity
will appear as another partition. Adding the extra
capacity into the existing partition requires OS
support.
ASUS PCI-DA2200 User’s Manual
In use
Unused
3-23
3-24
ASUS PCI-DA2200 User’s Manual
IMPORTANT:
•
The increased capacity from Mode 1 and Mode 2 Expansion of a logical
drive will be a new partition.
•
Adding the extra capacity to the existing partition could crash the file
system in most current operating systems, so this is not supported.
Technically, the controller could easily combine the two partitions
together. But, as this may compromise protection of the existing
partition’s data (due to the questions regarding OS capabilities), this
function is not offered as a choice at this time.
•
At the time of this printing, the firmware does not support the “Copy
and Replace” function that is required for Mode 2 Expansion. Thirdparty hard disk utilities may be used for Mode 2 Expansion of logical
drives. Future versions of the firmware will support “Copy and
Replace.”
3.6.3 Example: RAID Expansion in Windows NT® Server
Limitations When Using Windows NT 4.0
1.
2.
3.
Only the Windows NT Server Disk Administrator includes the
Extend Volume Set function; Windows NT Workstation does not
have this feature.
The system drive (boot drive) of a Windows NT system cannot
be extended.
The drive that will be extended should be using the NTFS file
system.
ASUS PCI-DA2200 User’s Manual
3-25
The Example:
The following example demonstrates the expansion of a 900MB
RAID 0 logical drive. The Text RAID Manager software that comes
with the ASUS PCI-DA2200 is used to communicate with the RAID
controller.
You can view information about this drive in the Windows NT
Server’s Disk Administrator.
3-26
ASUS PCI-DA2200 User’s Manual
Place the cursor on Disk 1, right-click your mouse, and select
"Properties." You will see that the total capacity for the Drive E: is
just under 900MB.
ASUS PCI-DA2200 User’s Manual
3-27
Follow the steps described in section 8.2.8 to add SCSI disk drives
and perform Mode 1 Dynamic Logical Drive Expansion.
The 900MB logical drive has become a 1800MB logical drive. Place
the cursor on that logical drive, and then press <Enter>.
3-28
ASUS PCI-DA2200 User’s Manual
From the menu, select Partition Logical Drive. You will see that the
1800MB logical drive is composed of two 900MB partitions.
Follow the directions in section 8.3.1 to map the new partition to a
Host LUN. The new partition must be mapped to a host LUN in
order for the HBA (host-bus adapter) to see it. Once you have
mapped the partition, reboot Windows NT. The HBA should be able
to detect an additional "disk."
ASUS PCI-DA2200 User’s Manual
3-29
Return to Windows NT Server’s Disk Administrator. There now
exists a Disk 2 with 900MB of free space. Click on Disk 2 to select it.
From the "Partition" menu, select "Extend Volume Set."
3-30
ASUS PCI-DA2200 User’s Manual
The screen will display that volume set of Drive E: has been extended
by the 900MB in Disk2. Move the cursor to "Commit Changes Now"
to confirm that you want the free space to become a part of the same
logical drive.
ASUS PCI-DA2200 User’s Manual
3-31
Logical Drive E: is now composed of two 900MB partitions with a
total volume of 1800MB. To see this, hold down on the <Ctrl> key
and select both Disk 1 and Disk2; then right-click your mouse and
select "Properties."
3-32
ASUS PCI-DA2200 User’s Manual
Drive E: now has a capacity just under 1800MB.
ASUS PCI-DA2200 User’s Manual
3-33
This page is left intentionally blank.
3-34
ASUS PCI-DA2200 User’s Manual
Chapter 4
The Main Board
Internal
SCSI
Channel 0
Internal
SCSI
Channel 1
CH0
CH1
External
SCSI
Channel 1
External
SCSI
Channel 0
4.1
Hardware Installation
JP7
Pin
1
2
3
4
JP9
Pin
1
2
3
4
Pin 1
JP7
Flash
Memory
5x86
CPU
JP9
Pin 1
Pin 1
Cache Module SIMM Socket
NVRAM
LED Connector for Hard Disk Drive Activity Indicator
Symbol
VCC
BUSYLED
BUSYLED
VCC
Type
P
O
O
P
Description
+5V voltage input
Front panel LED:”BUSY”
Front panel LED:”BUSY”
+5V voltage input
Type
O
G
P
O
Description
I2C clock
Signal ground
+5V voltage input
I2C data
I2C Connector
Symbol
I2CCLK
GND
VCC
I2CDATA
ASUS PCI-DA2200 User’s Manual
4-1
4.2
Installing DRAM SIMM
IMPORTANT:
The ASUS PCI-DA2200 requires a minimum of 8 Mbytes of DRAM
in one SIMM (with or without parity function) installed in SIMM
socket to operate. The controller is normally delivered without any DRAM
installed.
F
The following are guidelines with regards to DRAM:
• Use 72-pin 60ns DRAM or 60ns EDO RAM SIMM modules. EDO
RAM is recommended to improve the performance.
• DRAM with or without parity is auto-detected by ASUS PCIDA2200, but DRAM with parity is recommended for security.
• Minimum DRAM required is 8 Mbytes installed in SIMM socket,
however 16Mbytes is recommended.
• ASUS PCI-DA2200 supports 8, 16, 32, 64, and 128 Mbyte DRAM
SIMM modules. Maximum DRAM size is 128 Mbytes.
To install DRAM SIMM
1.
Power off the system and disconnect the power connector.
2.
Insert the DRAM SIMM paralleled with the key to the left (1). Then,
push towards the back until the hooks on both sides of the socket
snap into place (2) as shown below.
4-2
ASUS PCI-DA2200 User’s Manual
4.3
Basic Operational Set-Up
Following is a description of a sample operational set-up:
Ultra2 Wide SCSI Bus (LVD)
SCSI cable
Terminator
…..
Up to
15 drives
Ultra2 Wide SCSI Bus (LVD)
SCSI cable
…..
PCI-Ultra2 SCSI
RAID Controller
Terminator
Up to
15 drives
* All drives, terminators and SCSI cables should
use Ultra2 Wide SCSI (LVD) devices only.
•
•
•
•
•
•
Only use Ultra2 (LVD) twisted SCSI cables and Ultra2 (LVD) SCSI
terminators.
Drives connected to channel 0 and/or 1.
SCSI nodes on the same channel have unique ID number. The
SCSI ID 7 is reserved for the ASUS PCI-DA2200 adapter and thus
no drives should use ID 7.
Both ends of all SCSI cables are properly terminated. Terminate
the SCSI cable by installing an external terminator on the end
connector. The terminators embedded in ASUS PCI-DA2200
should be enabled. The default state of terminators embedded on
ASUS PCI-DA2200 controller are enabled and can be changed by
running RAIDMAN.EXE or configured in the ASUS PCI-DA2200
BIOS settings
Both SCSI drive channels on ASUS PCI-DA2200 are Ultra2 Wide
SCSI LVD channels, only connect Ultra2 Wide LVD devices to the
drive channels.
Ultra2 Wide SCSI (LVD) is backward compatible with Ultra Wide
SCSI devices (Single-ended). However, any Singled-ended devices
connecting to an LVD bus will cause all the other LVD devices on
the same bus switch back to Single-ended mode. The cable length
will also be limited to Single-ended standard instead of LVD
standard, if any Single-ended devices connecting to an LVD SCSI
bus.
ASUS PCI-DA2200 User’s Manual
4-3
•
Since all non-disk SCSI devices are single-ended, it is not
recommended to attach any non-disk devices to ASUS PCIDA2200 PCI RAID controller if Ultra2 Wide SCSI drives (LVD)
are attached.
F
4.4
IMPORTANT:
Changing any settings in “View and Edit SCSI Channels” requires a
system reset to take effect.
Configuration Examples and Termination Settings
Drive Channel 0
(68-pin internal SCSI connector)
Drive Channel 0
(68-pin external SCSI connector,
ultra-high-density)
CH0
CH0
Drive Channel 1
(68-pin external SCSI connector,
ultra-high-density)
CH1
Drive Channel 1
(68-pin internal SCSI connector)
CH1
Channel 0
Embedded
LVD Terminator
Channel 1
Embedded
LVD Terminator
Both the drive SCSI channels on ASUS PCI-DA2200 are Ultra2 Wide
LVD channels. Each channel has two SCSI connectors, one for internal
connection, the other for external connection. Each SCSI drive channel
has embedded Ultra2 Wide LVD terminators. The termination on each
channel can be enabled or disabled by user with Text RAID Manager in
each operating system, or configured in the ASUS PCI-DA2200 BIOS
settings.
4-4
ASUS PCI-DA2200 User’s Manual
4.4.1 Internal Drives Only
Ultra2 Wide SCSI Bus (LVD)
SCSI cable
…..
SCSI cable
External
LVD
Terminator
Up to
15 drives
External
LVD
Terminator
Ultra2 Wide SCSI Bus (LVD)
CH1
CH0
…..
CH0
Up to
15 drives
Terminator
Enabled
Terminator
Enabled
CH1
* All drives, terminators and SCSI cables should
use Ultra2 Wide SCSI (LVD) compliant devices only.
Termination should be enabled if only the internal SCSI connectors are
used to connect the drives. All devices (including SCSI drives, cables and
terminators) should be Ultra2 Wide LVD SCSI compliant.
It is not recommended to connect any Single-ended devices to the LVD
drive SCSI bus directly.
4.4.2 External Drives Only
Ultra2 Wide SCSI Bus (LVD)
SCSI cable
…..
SCSI cable
CH0
CH1
External
LVD
Terminator
Up to
15 drives
External
LVD
Terminator
Ultra2 Wide SCSI Bus (LVD)
CH1
…..
CH0
Up to
15 drives
Terminator
Enabled
Terminator
Enabled
* All drives, terminators and SCSI
cables should use Ultra2 Wide SCSI
(LVD) compliant devices only.
Termination should be enabled if only the external SCSI connectors are
used to connect the drives. All devices (including SCSI drives, cables and
terminators) should be Ultra2 Wide LVD SCSI compliant.
It is not recommended to connect any Single-ended devices to the LVD
drive SCSI bus directly.
ASUS PCI-DA2200 User’s Manual
4-5
4.4.3 Mixing Internal and External Drives
Ultra2 Wide SCSI Bus (LVD)
SCSI cable
…..
SCSI cable
CH0
Ultra2 Wide SCSI Bus (LVD)
CH1
…..
CH0
Terminator
Disabled
CH1
External
LVD
Terminator
External
LVD
Terminator
* All drives, terminators and SCSI cables
should use Ultra2 Wide SCSI (LVD)
compliant devices only.
Terminator
Disabled
SCSI cable
Ultra2 Wide SCSI Bus (LVD)
Internal and External Channel 1 totally Up to 15 drives
…..
SCSI cable
External
LVD
Terminator
Ultra2 Wide SCSI Bus (LVD)
Internal and External Channel 0 totally Up to 15 drives
…..
External
LVD
Terminator
The termination should be disabled if both internal and external SCSI
connectors of the same channel are being used.
All devices (including SCSI drives, cables and terminators) should be
Ultra2 Wide LVD SCSI compliant. It is not recommended to connect any
Single-ended devices to the LVD drive SCSI bus directly.
4-6
ASUS PCI-DA2200 User’s Manual
4.4.4 Mixing LVD and Single-ended Devices
Ultra2 Wide SCSI Bus (LVD)
SCSI cable
…..
SCSI cable
CH0
S.E. to LVD
SCSI
Converter
Terminator
Disabled
CH1
Ultra2 Wide SCSI Bus (LVD)
CH1
CH0
External
LVD
Terminator
…..
External
LVD
Terminator
Single-ended CD-ROM Drive
or
other Single-ended device
Terminator
Disabled
SCSI cable
Ultra2 Wide SCSI Bus (LVD)
Internal and External Channel 1 totally Up to 15 drives
…..
SCSI cable
Internal and External Channel 0 totally Up to 15 drives
* All drives, terminators and SCSI cables
should use Ultra2 Wide SCSI (LVD)
compliant devices only.
* Singled-ended devices should be converted
to LVD mode using a “Single-ended to LVD
converter” before connecting to the LVD
SCSI bus.
External
LVD
Terminator
Ultra2 Wide SCSI Bus (LVD)
S.E. to LVD
SCSI
Converter
…..
External
LVD
Terminator
Single-ended MO Drive
or
other Single-ended device
It is not recommended to connect any Single-ended devices to the LVD
drive SCSI bus directly. Using a “single-ended to LVD converter” to
convert the Single-ended device to LVD before connecting to the drive
SCSI bus.
Any Single-ended devices connecting directly to the LVD SCSI bus will
force all the devices switch back to single-ended mode. The cable length
and maximum devices should follow Single-ended standard if the bus is
operating in Single-ended mode.
F
IMPORTANT:
Changing any settings in “View and Edit SCSI Channels” requires a system
reset to take effect.
ASUS PCI-DA2200 User’s Manual
4-7
This page is left intentionally blank.
4-8
ASUS PCI-DA2200 User’s Manual
Chapter 5
Quick Setup
NOTE:
A "Logical Drive" is a set of drives grouped together to operate under a
given RAID level and appears as a single contiguous drive. The ASUS
PCI-DA2200 is capable of grouping connected drives into 8 logical
drives, each operating on the same or different RAID levels. The logical
drive can be further divided into a maximum of 8 "Partitions". During
operation, the host sees the logical drive or partition as one single drive.
5.1
Using the BIOS RAID Manager
1. When the system is powered on, the following text will appear:
ASUS PCI-DA2200 (PCI-TO-SCSI RAID) BIOS v1.17B
PCI Bus # = 00
Device # = 09 Port = E000 IRQ = 10 EDORAM=8 MB FW=2.12
!! Press <Ctrl><I> for Configuration Utility, <Q> to Skip !!
2. Press <Ctrl><I> to enter the BIOS Configuration Utility.
3. Choose “Configure RAID” to enter the terminal emulation.
4. Move the cursor to “ANSI” (or another terminal emulation mode)
and press [Enter] to see the main menu of the BIOS RAID
Manager.
5. The keys used in the RAID ManagerRAIDRAID operation are as
follows:
←→↑↓
Left, right, up and down arrow to select
options.
[Enter]
To go into a submenu or to execute an
option.
[Esc]
To escape and go back to the preceding
menu.
Type Q, or use the ↑ ↓
keys, to select "Quick
installation" and press
[Enter]. Choose Yes to
create the logical drive.
ASUS PCI-DA2200 User’s Manual
5-1
6. All the possible RAID levels will be displayed,
choose a RAID level by using the ↑ ↓ keys to select a
RAID level and press [Enter]. The spear drive assigned
in this item is Local Spare drive, not Global Spare
drive.
The controller will start initialization and automatically map the
logical drive to LUN 0 of the first host channel.
5-2
ASUS PCI-DA2200 User’s Manual
Chapter 6
6.1
Configuring RAID
Starting to Build a RAID System Drive
The following figure is a basic flowchart when configuring a RAID
system. Hardware installation must be completed before any
configurations take place.
Create
Logical Drive
Partition
Logical Drive
Map
Host LUN
(System Drive)
When power is turned on, the ASUS PCI-DA2200 RAID controller
scans all the hard drives that are on all the drive channels. If a hard
drive was connected after the controller completes initialization, use
the "SCAN SCSI DRIVE" function to let the controller recognize the
newly added hard drive and configure it as a member of a logical
drive or a spare drive.
In accordance to your requirement, configure a logical drive to
contain one or more hard drives based on the desired RAID level,
and partition the logical drive into one or several partitions. Map
each partition as one system drive (LUN). The host SCSI adapter will
recognize the system drives after re-scanning the host SCSI bus.
Since the controller is totally operating system independent, the
operating system of the host computer will not be able to find out
whether the attached devices are physical hard drives or virtual
system drives created by the RAID controller.
ASUS PCI-DA2200 User’s Manual
6-1
6-2
ASUS PCI-DA2200 User’s Manual
NOTE:
A “Logical Drive” is a set of drives grouped together to operate under a
given RAID level and appears as a single contiguous drive. The ASUS PCIDA2200 controller is capable of grouping connected drives to as many as 8
logical drives, each configured on the same or different RAID levels. A
logical drive can be further divided into a maximum of 8 “Partitions”.
During operation, the host sees an unpartitioned logical drive or a partition
of a partitioned logical drive as one single physical drive.
ASUS PCI-DA2200 User’s Manual
6-3
6.2
6.2.1
How Does the RAID Controller Work?
SCSI Channel, SCSI ID and LUN
A SCSI channel (SCSI bus) can connect up to 15 devices (the SCSI
controller itself excluded) when the Wide function is enabled (16-bit
SCSI). It can connect up to 7 devices (the SCSI controller itself
excluded) when the Wide function is disabled (8-bit SCSI). Each
device has one unique SCSI ID. Two devices having the same SCSI ID
is not allowed.
LUN 0
LUN 1
LUN 2
6-4
The figure on the left illustrates this. To file a
document into a cabinet, you must put the
document into one of the drawers. Let’s apply
this metaphor to SCSI: the SCSI ID is the
cabinet, and the drawers are the LUNs (LUN is
short for logical unit number.) Each cabinet
(SCSI ID) can have up to 32 drawers (LUNs).
Data can be stored into one of the LUNs of the
SCSI ID. Most SCSI host adapters treat a LUN
like another SCSI device.
ASUS PCI-DA2200 User’s Manual
6.2.2
Understanding Step by Step
SCSI cable
Terminator
…..
SCSI cable
…..
ASUS
PCI-DA2200
RAID Controller
Up to
15 drives
Terminator
Up to
15 drives
The physical connection should be similar to the one shown above.
Install the ASUS PCI-DA2200 RAID controller into a vacant PCI slot
in the host system, connect the drives to the SCSI channels on the
ASUS PCI-DA2200.
A Logical Drive consists of a group of SCSI drives. Drives in one
logical drive do not have to come from the same SCSI channel. Also,
each logical drive can be configured a different RAID level.
Drive Channel 0
4
GB
4
GB
ID 5
2
GB
2
GB
ID 3
ID 0
ID 2
Drive Channel 1
4
GB
4
GB
2
GB
ID 6
RAID 5
8GB
ID 1
Global
Spare
Drive
Logical Drive 0
ASUS PCI-DA2200 User’s Manual
2
GB
ID 0
ID 14
Local Spare
Drive of LD1
RAID 0
6GB
Logical Drive 1
6-5
Partition 0 - 2GB
RAID 5
8GB
Partition 1 - 1GB
Logical Drive 0
Partition 2 - 5GB
Partition 0
2.5GB
RAID 0
6GB
Partition 1
1.5GB
Logical Drive 1
A drive can be assigned as the Local Spare Drive of one specified
logical drive, or as a Global Spare Drive.
You may divide a logical drive into several partitions, or use the
entire logical drive as one single partition.
ID 0
ID 1
LUN 0
2.5GB
LUN 1
Logical Drive 1
Partition 0
LUN 0
Logical Drive 0 LUN 1
Partition 1
1GB
5GB
1.5GB
LUN 2
2GB
Logical Drive 0
Partition 2
Logical Drive 1
Partition 1
Logical Drive 0
Partition 0
Map each partition to the host SCSI ID. Each SCSI ID will act as one
individual hard drive to the host computer virtually.
Logical Drive 1
Partition 0
Logical Drive 0
Partition 2
4.5GB
5GB
ID 0
ID 1
1GB
Logical Drive 0
Partition 1
6-6
ID 2
Logical Drive 0
Partition 0
2GB
ID 3
1.5GB
Logical Drive 1
Partition 1
ID 4
ID 7
Host SCSI Channel
ASUS
PCI-DA2200
RAID Controller
ASUS PCI-DA2200 User’s Manual
Chapter 7
BIOS Configuration Utility
At system bootup, the ASUS PCI-DA2200 BIOS displays the
following message:
ASUS PCI-DA2200 (PCI-TO-SCSI RAID) BIOS v1.17B
PCI Bus # = 00
Device # = 09 Port = E000 IRQ = 10 EDORAM=8 MB FW=2.12
!! Press <Ctrl><I> for Configuration Utility, <Q> to Skip !!
PCI Bus#, Device #:
displays the PCI bus and PCI device number that has
been assigned to ASUS PCI-DA2200. The numbers
are in hexadecimal.
Port :
shows the I/O port base address that has been
assigned to ASUS PCI-DA2200.
IRQ :
shows the Interrupt level that has been assigned to
ASUS PCI-DA2200. The level is in decimal.
EDORAM :
displays the cache RAM type and size that is been
installed on ASUS PCI-DA2200.
FW :
shows the firmware version number of ASUS PCIDA2200.
The ASUS PCI-DA2200 BIOS waits 3 seconds for a keystroke. You
can press [Ctrl-I] to enter the configuration utility, or press Q to skip
waiting for a keystroke.
If [Ctrl-I] is pressed to enter configuration utility, the main menu will
appear. There are two functions in the main menu: Configuration and
Color/Monochrome.
7.1
Configuration
There are five functions in the Configuration Option: Configure BIOS,
Configure Card, Configure SCSI, Configure RAID and Reset to
Defaults.
ASUS PCI-DA2200 User’s Manual
7-1
Configuration
Color/Monochrome
Configure BIOS
Configure Card
Configure SCSI
Configure RAID
Reset to Defaults
7.1.1. Configure BIOS
Enable BIOS INT 13H Function
BIOS Translation Mode
Support for Disks > 1 GB
Support for 3 Disks or More (MS-DOS v5.0 or above)
Support for NOT-ZERO SCSI LUN
Configure BIOS Devices
Yes
Auto
Yes
Yes
Yes
<Enter>
Move the cursor to the item desired to change.
Enable BIOS INT 13H Function
Press [Space] to toggle between Yes or No.
BIOS Translation Mode
Press [Space] to toggle between Auto and Fixed. Use fixed mode
together with disabling "Support for Disks > 1GB" for UNIX/DOS or
UNIX/OS2 dual boot system. Use Auto mode for other OS'.
Auto mode :
BIOS detects the existing CHS mapping from the disk.
If any valid CHS mapping is found, BIOS uses it.
If no valid CHS mapping is found, BIOS uses Fixed mode.
Fixed mode :
If option "Support for Disks > 1 GB" is disabled, BIOS uses
SectorsPerTrack = 32, TotalHeads = 64.
If option "Support for Disks > 1 GB" is enabled, For disk size <= 1GB,
BIOS uses SectorsPerTrack = 32, TotalHeads = 64. For disk size >
1GB, BIOS uses SectorsPerTrack = 63, TotalHeads = 255.
Support for Disk > 1 GB
Press <Space> to toggle between Yes or No.
7-2
ASUS PCI-DA2200 User’s Manual
Support for 3 Disks or More (MS-DOS v5.0 or Above)
For MS-DOS version below 5.0, only supports up to 2 disks, don't set
this option to "Yes" on such versions DOS system.
Support for NOT-ZERO SCSI LUN
Set this option to "Yes", if you want the BIOS to support all SCSI
Target LUNs, 0 to 7.
Configure BIOS Devices
Logical Device SCSI ID
Scanned By BIOS
#0 #1 #2 #3 #4 #5 #6 #7
Yes Yes Yes Yes Yes Yes Yes Yes
Logical Device SCSI ID
Scanned By BIOS
#8 #9 #10 #11 #12 #13 #14 #15
Yes Yes Yes Yes Yes Yes Yes Yes
If this option is selected, a status list of SCSI devices scanned by BIOS
at BIOS initialization will appear. If a SCSI device is not scanned by
BIOS, then it will not be installed by BIOS.
7.1.2. Configure Card
ISA Emulation Mode IO Port Address
Disk Access Delay on Power-up (Sec)
Disabled
15
ISA Emulation Mode
If you are going to use ASUS PCI-DA2200 device driver distributed
by Infortrend, you MUST set the IO port address to "Disabled". You
can select an IO Port address from a list by pressing [Enter].
7.1.3. Configure SCSI
Configuration
Color/Monochrome
Configure BIOS
Configure Card
Configure SCSI
SCSI Channel 0
Configure RAID
SCSI Channel 1
Reset to Defaults
ASUS PCI-DA2200 User’s Manual
7-3
If this option is selected, a list of physical SCSI channels will appear.
Select a SCSI channel that you want to configure, then a new dialog
box of SCSI Channel Configuration will appear.
SCSI Channel 0 Configuration :
SCSI ID
Enable SCSI Termination
Configuration SCSI Devices
Enable Wide SCSI
7
Yes
<ENTER>
Yes
SCSI ID
Use this option to change SCSI ID of SCSI Channel.
Enable SCSI Termination
Use this option to enable/disable SCSI termination.
Configure SCSI Devices
Use this option to change the low-level SCSI features of SCSI devices.
Device SCSI ID
Sync Transfer Period (4ns)
Enable SCSI Disconnect
Enable SCSI Parity
Enable Wide SCSI
#0
12
Yes
Yes
Yes
#1
12
Yes
Yes
Yes
#2
12
Yes
Yes
Yes
#3
12
Yes
Yes
Yes
#4
12
Yes
Yes
Yes
#5
12
Yes
Yes
Yes
#6
12
Yes
Yes
Yes
#7
12
Yes
Yes
Yes
Device SCSI ID
Sync Transfer Period (4ns)
Enable SCSI Disconnect
Enable SCSI Parity
Enable Wide SCSI
#8
12
Yes
Yes
Yes
#9
12
Yes
Yes
Yes
#10
12
Yes
Yes
Yes
#11
12
Yes
Yes
Yes
#12
12
Yes
Yes
Yes
#13
12
Yes
Yes
Yes
#14
12
Yes
Yes
Yes
#15
12
Yes
Yes
Yes
Please refer to Appendix D, Sync. Clock Period & Sync. Clock
Frequency, for the Sync. Transfer Period calculation.
Enable Wide SCSI
Use this option to enable/disable wide SCSI.
7-4
ASUS PCI-DA2200 User’s Manual
7.1.4
Configure RAID
Configuration
Color/Monochrome
Configure BIOS
Configure Card
Configure SCSI
Configure RAID
Reset to Defaults
Selecting this option starts the BIOS RAID Manager. The utility is
identical in appearance and features to the Text RAID Manager. See
chapter 8, Text RAID Manager User Interface, for complete details on
the use of the BIOS RAID Manager.
7.1.5
Reset to Defaults
If this option is selected, all the configurations are reset to the
manufacturer's defaults.
7.2
Color/Monochrome
Switches display mode between color and monochrome.
ASUS PCI-DA2200 User’s Manual
7-5
This page is left intentionally blank.
7-6
ASUS PCI-DA2200 User’s Manual
Chapter 8
Text RAID Manager User Interface
To operate Text RAID Manager, simply put the ASUS PCI-DA2200
driver diskette into your floppy disk drive. Change the directory to
RAIDMAN. You will see directories for various operating systems.
Change to the directory that corresponds to your operating system.
For Windows® 95/98, Windows NT® and MS-DOS®, the program is
called RAIDMAN.EXE. For NetWare®, the program is called
RAIDMAN.NLM. Run the program.
In addition, all of the functions of the Text RAID Manager are
available from a BIOS configuration utility. For complete instructions
on starting the BIOS RAID Manager, please see section 7.1.4.
8.1
The Main Menu
8.1.1
The Initial Screen
Controller Name
Controller Name
Transfer Rate Indicator
Cache
Status
Gauge
Range
?????????????????
Cursor Bar
Cursor Bar:
Move the cursor bar to a desired item,
then press [Enter] to select.
Controller Name:
Identifies the type of controller.
Transfer Rate Indicator:
Indicates the current data transfer rate.
Gauge Range:
Use + or - keys to change the gauge
range in order to view the transfer rate
indicator.
ASUS PCI-DA2200 User’s Manual
8-1
Cache Status:
Indicates the current cache status.
PC Graphic (ANSI Mode):
Enters the Main Menu
operates in ANSI mode.
and
Terminal (VT-100 Mode):
Enters the Main Menu
operates in VT-100 mode.
and
PC Graphic (ANSI+Color Mode): Enters the Main Menu and
operates in ANSI color mode.
Show Transfer Rate+Show Cache Status: Press ENTER on this item
to show the cache status and
transfer rate.
8.1.1
Main Menu
Use the arrow keys to move the cursor bar through the menu item,
then press ENTER to choose a menu, or ESC to return to the
previous menu/screen.
8-2
ASUS PCI-DA2200 User’s Manual
8.1.3
Logical Drive’s Status
LG
Logical Drive number.
RAID
RAID Level.
Size(MB)
Capacity of the Logical Drive.
Status
Logical Drive Status.
INITING
INVALID
The logical drive is now initializing.
The logical drive was created with
“Optimization for Sequential I/O”, but
the current setting is “Optimization for
Random I/O”.
Or
The logical drive was created with
“Optimization for Random I/O”, but the
current setting is “Optimization for
Sequential I/O”.
GOOD
The logical drive is in good condition.
DRV FAILED A drive member failed in the logical
drive.
ASUS PCI-DA2200 User’s Manual
8-3
REBUILDING Rebuilding the logical drive.
DRV ABSENT One of the drives cannot be
detected.
INCOMPLETE Two or more drives failed in the
logical drive.
#OnLine
Total drive members in the logical drive.
#STB
Standby drives available for the logical drive. This
includes all the spare drives available for the logical
drive.
#Fail
Failed drive member in the logical drive.
Name
Logical drive name.
8.1.4
SCSI Drive’s Status
Slot
Slot number of the SCSI drive.
Chl
The SCSI Channel of the connected drive.
ID
The SCSI ID of the drive.
Size (MB)
Drive Capacity.
8-4
ASUS PCI-DA2200 User’s Manual
Speed
LG_DRV
xxMB
The maximum sync. transfer rate
of this drive.
Async
The drive is using asynchronous
mode.
x
The SCSI drive is a drive
member of logical drive x.
If the Status column showed
“STAND-BY”, the SCSI drive is
a Local Spare Drive of logical
drive x.
Status
Global
The SCSI drive is a Global Spare
Drive.
INITING
Processing initialization.
ON-LINE
The drive is in good condition.
REBUILD
Processing Rebuild.
STAND-BY Local Spare Drive or Global
Spare Drive. The Local Spare
Drive’s LG_DRV column will
show the logical drive number.
The Global Spare Drive’s
LG_DRV column will show
“Global”.
NEW DRV The new drive has not been
configured to any logical drive
or as a spare drive.
USED DRV The used drive has not been
configured to any logical drive
or as a spare drive.
BAD
Failed drive.
ABSENT
Drive does not exist.
MISSING Drive once exist, but is missing
now.
SB-MISS
Spare drive missing.
Vendor and Product ID
The vendor and product model
information of the drive.
ASUS PCI-DA2200 User’s Manual
8-5
8.1.5
Chl
SCSI Channel’s Status
The SCSI channel’s ID.
(ID number) The Primary Controller is using the SCSI ID
for LUN mapping.
NA
No SCSI ID applied (Drive Channel mode
only).
DefSynClk Default SCSI bus sync clock:
DefWid
8-6
??.?M
The default setting of the SCSI channel is
??.? Mhz in Synchronous mode.
Async
The default setting of the SCSI channel is
Asynchronous mode.
Default SCSI Bus Width:
Wide
16-bit SCSI
Narrow
8-bit SCSI
ASUS PCI-DA2200 User’s Manual
Term
Terminator Status:
On
Terminator is enabled.
Off
Terminator is disabled.
CurSynClk Current SCSI bus sync clock:
CurWid
??.?M
The default setting of the SCSI channel is
??.? Mhz in Synchronous mode.
Async
The default setting of the SCSI channel is
Asynchronous mode.
(empty)
The default SCSI bus sync clock has
changed. Reset the system for the changes
to take effect.
Current SCSI Bus Width:
Wide
16-bit SCSI
Narrow
8-bit SCSI
(empty)
The default SCSI bus width has changed.
Reset the controller for the changes to take
effect.
ASUS PCI-DA2200 User’s Manual
8-7
8.1.6
Viewing the Current Setting of Each Function
Most of the current settings of each function can be viewed in the
menu.
In the example shown above:
• The current setting of “Write-Back Cache” is “Enabled”.
• The current setting of Optimization is “Optimization for Random
I/O”.
IMPORTANT: Write-Back Cache is normally Enabled to increase
performance. Write-Back Cache must be “Disabled” (to use writethrough) when installing operating systems that automatically
restarts the system during installation such as Microsoft Windows
95/98. Data in the cache may be cleared before writing to disk, thus
resulting in data loss. Once the operating system is fully installed, the
cache will be instructed to be written to disk before restarting or
shutting down through the operating system.
WARNING: Using hardware restart or shut down (using buttons or
switches on the chassis) will result in data loss if write-back cache is
“Enabled.”
8-8
ASUS PCI-DA2200 User’s Manual
In the example shown above:
• The current setting of “SCSI Motor Spin-Up” is “Disabled”.
• The current setting of “SCSI Reset at Power-Up” is “Enabled”.
• The current setting of “Disk Access Delay Time” is “15 seconds”.
• The current setting of “Maximum Tag Count” is “32”.
ASUS PCI-DA2200 User’s Manual
8-9
8.2
8.2.1
Viewing and Editing Logical Drives
Creating a Logical Drive
Choose “View and Edit Logical Drives” in the Main Menu. The
current logical drive configuration and status will be displayed on
the screen. Choose a logical drive number that has not yet been
defined, then press [Enter]. A prompt “Create Logical Drive?” will
appear. Select “Yes” and press [Enter].
8-10
ASUS PCI-DA2200 User’s Manual
A list of supported RAID levels will appear. Choose a RAID level for
this logical drive.
ASUS PCI-DA2200 User’s Manual
8-11
The drives can be tagged for inclusion by positioning the cursor on
the drive and then pressing [Enter] to select. An asterisk (*) will
appear on the drive that has been selected. Press [ESC] when done.
To limit the capacity of each drive included in the logical drive, select
“Maximum Drive Capacity”, and then enter the maximum capacity
that will be used by each drive.
You can assign a Local Spare Drive by choosing “Assign Spare
Drives” in the above screen. A list of available drives will be
displayed on the screen. Mark an asterisk (*) on the drive(s) that will
be assigned by moving the cursor bar to that device, then pressing
[Enter]. Press [ESC] when done.
To exit this menu, press [ESC].
A prompt to confirm the changes will appear. Select Yes to create the
logical drive, or No to cancel.
8-12
ASUS PCI-DA2200 User’s Manual
When a fault-tolerant RAID level (1, 3 or 5) has been selected, the
controller will start initializing parity. A progress indicator will be
displayed on the screen. After initialization is done, the created
logical drive is also complete.
ASUS PCI-DA2200 User’s Manual
8-13
8.2.2
Viewing Logical Drives and Drive Members
Choose “View and Edit Logical Drives” in the Main Menu. The
current logical drive configuration and status will be displayed on
the screen. Refer to section 8.1.2, Logical Drive’s Status, for detailed
descriptions.
To view the SCSI drive members of the logical drive, choose the
logical drive by pressing [Enter].
Choose “View SCSI Drives”. The member drive information will be
displayed on the screen. Refer to section 8.1.3, SCSI Drive’s Status, for
the detailed descriptions of each item.
8-14
ASUS PCI-DA2200 User’s Manual
8.2.3
Deleting a Logical Drive
Choose the logical drive you wish to delete, then press [Enter].
Choose “Delete logical drive”. Choose Yes when prompted to
confirm.
8.2.4
Partitioning a Logical Drive
Choose the logical drive you wish to partition, then press [Enter].
Choose “Partition logical drive”, then press [Enter]. Choose Yes to
confirm.
ASUS PCI-DA2200 User’s Manual
8-15
The screen will display a partition table of up to 8 partitions with the
last partition selected. Press [Enter] and type the desired size for the
selected partition, then press [Enter]. The remaining size will be
allotted to the next partition.
8-16
ASUS PCI-DA2200 User’s Manual
8.2.5
Deleting a Partition of a Logical Drive
Choose the logical drive of the partition you wish to delete, then
press [Enter]. Choose “Partition logical drive”. The current partition
table of the logical drive will be displayed in tabulated form. Move
the cursor bar to the partition you wish to delete, then press [Enter].
Enter “0” on the partition size to delete this partition.
The capacity of the deleted partition will be added into the last
partition.
Logical Drive
1000MB
Logical Drive
1000MB
Partition 0 - 100MB
Partition 0 - 100MB
Partition 1 - 200MB
Partition 2 - 300MB
Delete
Partition 1
• The capacity of the deleted
partitions will be added to
the last partition.
Partition 1 - 300MB
Partition 3 - 400MB
Partition 2 - 600MB
=
400 + 200
ASUS PCI-DA2200 User’s Manual
8-17
8-18
ASUS PCI-DA2200 User’s Manual
IMPORTANT:
• The capacity of the deleted partition will be added into the last
partition.
• As long as a partition has been changed, it is necessary to
reconfigure all LUN mappings. All the LUN mappings will be removed
with any partition change.
8.2.6
Assigning a Logical Drive Name
Choose the logical drive you wish to assign a logical drive name, then
press [Enter]. Choose “logical drive name”, then press [Enter] again.
The current logical drive name will be displayed on the screen. You
may now enter the new logical drive name in this field. Enter the
logical drive name, then press [Enter] to save the new name.
ASUS PCI-DA2200 User’s Manual
8-19
8.2.7
Rebuilding Logical Drive
Choose the logical drive that has a failed member drive, then press
[Enter]. Choose “Rebuild logical drive”, then press [Enter]. When
prompted with “Rebuild Logical Drive?”, select Yes. The rebuilding
progress will be displayed on the screen.
8-20
ASUS PCI-DA2200 User’s Manual
When rebuilding has already started or the logical drive has been
automatically rebuilt by a Local Spare Drive or Global Spare Drive,
choose “Rebuild progress” to view the rebuilding progress.
ASUS PCI-DA2200 User’s Manual
8-21
8-22
ASUS PCI-DA2200 User’s Manual
IMPORTANT:
•
•
The Rebuild function will appear only when a logical drive (with RAID
level 1, 3 or 5) has a failed drive member.
Refer to “3.2.3 Automatic Rebuild and Manual Rebuild” for more
information.
8.2.8
Dynamic Logical Drive Expansion
From the main menu, select “View and Edit Logical Drives.” The
logical drive that you wish to expand will be displayed. Move the
cursor to that logical drive (if there is more than one) and press
[Enter] to select it.
ASUS PCI-DA2200 User’s Manual
8-23
Before the logical drive can be expanded, a SCSI drive (or drives)
must be added and scanned in (See section 8.4.1 for details on
scanning in a SCSI drive). Use the arrow keys to select “Add SCSI
Drives,” and then press [Enter]. SCSI drives that are available for
‘adding’ will be displayed. Select drives by highlighting them and
then pressing [Enter]. An asterisk [*] is displayed by each drive
selected. When you are finished selecting, press [Esc] to confirm.
8-24
ASUS PCI-DA2200 User’s Manual
You will be prompted to confirm that you would like to add the SCSI
drives to the logical drive.
A bar will appear displaying the progress of adding the SCSI drives
ASUS PCI-DA2200 User’s Manual
8-25
8-26
ASUS PCI-DA2200 User’s Manual
IMPORTANT:
•
•
•
Mode 1 Expansion can only be performed on RAID 0, 3 and 5 logical
drives. Mode 1 Expansion cannot be performed on an NRAID or RAID
1 logical drive.
Mode 1 Expansion (Expanding logical drives by adding more SCSI
hard disk drives) cannot be canceled once started. If a power failure
occurs, the Mode 1 Expansion will be paused and the controller will
NOT automatically continue the expansion when the power comes back
on. Resumption of the RAID expansion must be performed manually.
If a member drive of the logical drive fails during RAID expansion, the
Mode 1 expansion will be paused. The expansion will resume
automatically after logical drive rebuild has been completed.
8.3
8.3.1
Viewing and Editing SCSI ID Map
Mapping a Logical Drive to an ID/LUN
Choose “View and Edit SCSI ID Map” in the Main Menu, then press
[Enter]. When prompted to “Map Logical Drive?”, select Yes.
ASUS PCI-DA2200 User’s Manual
8-27
Choose the SCSI ID you wish to map, then press [Enter].
8-28
ASUS PCI-DA2200 User’s Manual
A list of LUNs and their respective mappings will be displayed on
the screen. To map a LUN to a logical drive’s partition, select an
available LUN (one not mapped yet) by moving the cursor bar to the
LUN, then pressing [Enter].
A list of available logical drives will be displayed on the screen.
Move the cursor bar to the desired logical drive, then press [Enter].
ASUS PCI-DA2200 User’s Manual
8-29
A partition table of the logical drive will be displayed on the screen.
Move the cursor to the desired partition, then press [Enter].
8-30
ASUS PCI-DA2200 User’s Manual
The prompt shown above will display the mapping you wish to
create. Choose Yes to create the LUN mapping you selected. In the
example above, partition 3 of logical drive 0 will map to LUN 0 of
SCSI ID 3 on channel 0.
8.3.2
Viewing and Deleting the LUN Mappings
Choose the channel and SCSI ID of the LUN mapping you wish to
view or delete.
ASUS PCI-DA2200 User’s Manual
8-31
A list of the current LUN mapping will be displayed on the screen.
Move the cursor bar to the LUN mapping you wish to delete, then
press [Enter]. Select Yes to delete the LUN mapping, or No to cancel.
8.4
8-32
Viewing and Editing SCSI Drives
ASUS PCI-DA2200 User’s Manual
Choose “View and Edit SCSI Drives” in the Main Menu. All drives
attached to the drive channels will be displayed on the screen. Refer
to “8.1.4 SCSI Drive’s Status” for detailed descriptions of each
column.
8.4.1
Scanning a New SCSI Drive
Choose a drive and press [Enter]. Choose “Scan SCSI drive”, then
press [Enter]. The menu may vary according to the drive status.
Choose the drive channel and SCSI ID of the drive you wish to scan,
then press [Enter].
ASUS PCI-DA2200 User’s Manual
8-33
8.4.2
Viewing Drive Information
Choose the SCSI drive you wish to view, then press [Enter]. Select
“View drive information”. The revision number, serial number and
disk capacity (counts in block; one block refers to 512K) of the drive
will be displayed on the screen.
8-34
ASUS PCI-DA2200 User’s Manual
8.4.3
Adding a Local Spare Drive
Move the cursor bar to the SCSI drive that has not yet been assigned
to a logical drive or as a spare drive, then press [Enter]. Choose “Add
Local Spare Drive”. A list of available logical drives will be displayed
on the screen. Move the cursor bar to a logical drive, then press
[Enter]. The unassigned SCSI drive will be assigned to this logical
drive as the Local Spare Drive. When prompted with “Add Local
Spare Drive?”, choose Yes.
ASUS PCI-DA2200 User’s Manual
8-35
8.4.4
Adding a Global Spare Drive
Move the cursor bar to the SCSI drive that has not yet been assigned
to a logical drive or as a spare drive, then press [Enter]. Choose “Add
Global Spare Drive”. When prompted with “Add Global Spare
Drive?”, choose Yes.
8.4.5
Deleting a Spare Drive (Global / Local Spare)
Move the cursor to a Local Spare Drive or Global Spare Drive, then
press [Enter]. Choose “Delete Global/Local Spare Drive”, then press
[Enter] again. Choose Yes.
8-36
ASUS PCI-DA2200 User’s Manual
8.5
Viewing and Editing SCSI Channels
Choose “View and Edit SCSI Channels” in the Main Menu. A list of
all the channels will be displayed on the screen. Refer to section
8.1.4, SCSI Channel Status, for detailed information.
ASUS PCI-DA2200 User’s Manual
8-37
8.5.1
Viewing and Editing a SCSI ID / Channel
Choose a channel, then press [Enter]. Choose “SCSI ID”. A list of the
existing ID(s) will be displayed on the screen.
8-38
ASUS PCI-DA2200 User’s Manual
ASUS PCI-DA2200 User’s Manual
8-39
IMPORTANT:
Any changes to SCSI ID/channel settings require a system reset to take
effect.
8.5.2
Setting a SCSI Channel’s Terminator
Choose the channel you wish the terminator enabled or disabled,
then press [Enter]. Choose “SCSI Terminator”, then press [Enter]. A
dialog box will appear. Choose Yes, then press [Enter].
8-40
ASUS PCI-DA2200 User’s Manual
ASUS PCI-DA2200 User’s Manual
8-41
IMPORTANT:
Every time you change a SCSI channel’s termination, you must reset the
system for the changes to take effect.
8.5.3
Setting a Transfer Speed
Move the cursor bar to a channel, then press [Enter]. Choose “Sync
Transfer Clock”, then press [Enter]. A list of the clock speed will
appear. Move the cursor bar to the desired speed and press [Enter].
A dialog box “Change Sync Transfer Clock?” will appear. Choose
Yes.
8-42
ASUS PCI-DA2200 User’s Manual
ASUS PCI-DA2200 User’s Manual
8-43
IMPORTANT:
• Every time you change the SCSI Transfer Speed, you must reset the
system for the changes to take effect.
8.5.4
Setting a Transfer Width
Move the cursor bar to a channel, then press [Enter]. Select “Wide
Transfer”, then press [Enter]. A dialog box “Disable Wide Transfer?”
or “Enable Wide Transfer?” will appear. Choose Yes.
8-44
ASUS PCI-DA2200 User’s Manual
ASUS PCI-DA2200 User’s Manual
8-45
IMPORTANT:
• Every time you change the SCSI Transfer Width, you must reset the
system for the changes to take effect.
8-46
ASUS PCI-DA2200 User’s Manual
8.5.5
Viewing and Editing SCSI Target / Drive Channel
Move the cursor bar to a Drive channel, then press [Enter]. Select
“View and Edit SCSI Target”, then press [Enter].
ASUS PCI-DA2200 User’s Manual
8-47
A list of all the SCSI targets and their current settings will appear.
Press [Enter] on a SCSI target and a menu list will appear on the
screen.
Slot Number
Slot Number is reserved from use.
8-48
ASUS PCI-DA2200 User’s Manual
Maximum Synchronize Transfer Clock
Choose “Maximum Sync. Xfer Clock”, then press [Enter]. A dialog
box will appear on the screen. Enter the clock, then press [Enter].
Please refer to Appendix D, Sync. Clock Period and Sync. Clock
Frequency, for more information.
ASUS PCI-DA2200 User’s Manual
8-49
Wide Transfer
Choose “Wide Transfer”, then press [Enter]. Choose Yes in the dialog
box to confirm the setting.
8-50
ASUS PCI-DA2200 User’s Manual
Parity Check
Choose “Parity Check”. Choose Yes in the dialog box that followed
to confirm the setting.
ASUS PCI-DA2200 User’s Manual
8-51
Disconnecting Support
Choose “Disconnect Support”. Choose Yes in the dialog box that
followed to confirm the setting.
8-52
ASUS PCI-DA2200 User’s Manual
SCSI I/O Timeout
Choose “SCSI I/O Timeout”, then press [Enter]. A list of available
timeout intervals will appear. Move the cursor bar to an interval,
then press [Enter]. Choose Yes in the dialog box that followed to
confirm the setting.
ASUS PCI-DA2200 User’s Manual
8-53
Tag Command Queuing
Choose “Maximum Tag Count”, then press [Enter]. A list of available
tag count numbers will appear. Move the cursor bar to a number,
then press [Enter]. Choose Yes in the dialog box that followed to
confirm the setting.
8-54
ASUS PCI-DA2200 User’s Manual
ASUS PCI-DA2200 User’s Manual
8-55
IMPORTANT:
• Disabling the Maximum Tag Count will disable the internal cache of
the SCSI drive.
• Disabling Tag Command Queuing will disable the Write-Back cache
built in the hard drive.
8-56
ASUS PCI-DA2200 User’s Manual
Idle Drive Failure Detection
From the “Drive-side SCSI Parameters” menu, select “Periodic Drive
Time – Disable” and then press [Enter]. Choose the desired interval
for idle drive failure detection.
ASUS PCI-DA2200 User’s Manual
8-57
8-58
ASUS PCI-DA2200 User’s Manual
IMPORTANT:
• By choosing a time value to enable the "Periodic Drive Check Time", the
controller will poll all of the connected drives in the controller’s drive
channels at the assigned interval. Drive removal will be detected even if
a host does not attempt to access data on the drive.
• If the "Periodic Drive Check Time" is set to "Disabled" (the default
setting is "Disabled"), the controller will not be able to detect any drive
removal that occurs after the controller has been powered on. The
controller will only be able to detect drive removal when a host attempts
to access the data on the drive.
SAF-TE Enclosure Monitoring
From the “Drive-side SCSI Parameters” menu, select “Periodic SAFTE Device Check Time – Disabled” and then press [Enter]. Use the
arrow keys to choose the desired SAF-TE status check interval.
ASUS PCI-DA2200 User’s Manual
8-59
Detection of Drive Hot Swap Followed by Auto Rebuild
From the “Drive-side SCSI Parameters” menu, select “Periodic AutoDetect Failure Drive Swap Check Time – Disabled” and then press
[Enter]. Use the arrow keys to select the desired interval for "Auto
Checking Drive Hot Swap," and then press [Enter] to confirm. If a
member drive of a logical drive fails, the controller will start to check
the failed drive to check if it has been replaced (i.e., the controller
checks the same drive channel and ID at the assigned interval.) Once
the drive has been replaced with another drive, the controller will
automatically start to rebuild to that replacement drive.
8-60
ASUS PCI-DA2200 User’s Manual
Restoring the Default Setting for Target
Choose “Restore to default setting”, then press [Enter]. Choose Yes in
the dialog box that followed to restore all the settings of the SCSI
target.
ASUS PCI-DA2200 User’s Manual
8-61
8.6
8.6.1
Viewing and Editing Configuration Parameters
Caching Parameters
Write-Back Cache Enable/Disable
Choose “Caching Parameters”, then press [Enter]. Select “WriteBack Cache”, then press [Enter]. “Enabled” or “Disabled” will
display the current setting of the Write-Back Cache. Choose Yes in
the dialog box that followed to confirm the setting.
8-62
ASUS PCI-DA2200 User’s Manual
ASUS PCI-DA2200 User’s Manual
8-63
IMPORTANT:
• Every time you change the Cache Parameters, you must reset the system
for the changes to take effect.
8-64
ASUS PCI-DA2200 User’s Manual
Optimization for Random or Sequential I/O
Choose “Optimization for Random I/O” or “Optimization for
Sequential I/O”, then press [Enter]. The “Random” or “Sequential”
dialog box will appear, depending on the option you have selected.
Choose Yes in the dialog box that followed to confirm the setting.
ASUS PCI-DA2200 User’s Manual
8-65
8-66
ASUS PCI-DA2200 User’s Manual
IMPORTANT:
• Every time you change this setting, you must reset the system for the
changes to take effect.
• Refer to “3.4.1 Optimal for Sequential or Random I/O” for more
information.
ASUS PCI-DA2200 User’s Manual
8-67
8.6.2 SCSI Parameters
Maximum Queued I/O Count
Choose “SCSI Parameters”, then press [Enter]. Choose “Maximum
Queued I/O Count”, then press [Enter]. A list of available selections
will appear. Move the cursor bar to an item, then press [Enter].
Choose Yes in the dialog box that followed to confirm the setting.
8-68
ASUS PCI-DA2200 User’s Manual
8.6.3
Drive-side SCSI Parameters
Choose “Drive-side SCSI Parameters”, then press [Enter]. The Driveside SCSI parameters menu will appear.
SCSI Motor Spin-Up
ASUS PCI-DA2200 User’s Manual
8-69
Choose “SCSI Motor Spin-Up”, then press [Enter]. Choose Yes in the
dialog box that followed to confirm the setting.
SCSI Reset at Power-Up
Choose “SCSI Reset at Power-Up”, then press [Enter]. Choose Yes in
the dialog box that followed to confirm the setting. Please refer to
section 3.5.2 for more information.
8-70
ASUS PCI-DA2200 User’s Manual
Disk Access Delay Time
Choose “Disk Access Delay Time”, then press [Enter]. A list of
selections will appear. Move the cursor bar on a selection, then press
[Enter]. Choose Yes in the dialog box that followed to confirm the
setting. Please see section 3.5.3 for more information.
Maximum Tag Count
ASUS PCI-DA2200 User’s Manual
8-71
Choose “Maximum Tag Count”, then press [Enter]. A list of
selections will appear. Move the cursor bar to a selection, then press
[Enter]. Select Yes in the dialog box that followed, then press [Enter]
to confirm the setting. Please see section 3.5.5 for more information.
8.6.4
Disk Array Parameters
Choose “Disk Array Parameters”, then press [Enter]. The Disk Array
Parameters menu will appear.
8-72
ASUS PCI-DA2200 User’s Manual
Rebuild Priority
Choose “Rebuild Priority”, then press [Enter]. A list of the priority
selections will appear. Move the cursor bar to a selection, then press
[Enter]. Please see section 3.3.1 for more information.
ASUS PCI-DA2200 User’s Manual
8-73
Verification On Writes
Choose “Verification on Writes”, then press [Enter]. Move the cursor
bar to an item, then press [Enter]. Choose Yes in the dialog box that
followed to confirm the setting. (Refer to section 3.3.2 for more
information.)
8-74
ASUS PCI-DA2200 User’s Manual
ASUS PCI-DA2200 User’s Manual
8-75
IMPORTANT:
• Every time you change this setting, you must reset the system for the
changes to take effect.
• Refer to “3.5.2 SCSI Reset at Power-Up” for more information.
8-76
ASUS PCI-DA2200 User’s Manual
8.6.5
Controller Parameters
Controller Name
Choose “Controller Parameters”, then press [Enter]. The current
controller name will be displayed. Press [Enter]. Enter the new
controller name in the dialog box that followed, then press [Enter].
ASUS PCI-DA2200 User’s Manual
8-77
Password Validation Timeout
From the “Controller Parameters” menu, select “Password Validation
Timeout” and then press [Enter]. You may select an interval for
password validation, “Always check,” or “Disabled.” Press [Enter]
and then select Yes to confirm your selection.
8-78
ASUS PCI-DA2200 User’s Manual
8.7
System Functions
Choose “System Functions” in the Main Menu, then press [Enter].
The System Functions menu will appear. Move the cursor bar to an
item, then press [Enter].
8.7.1
Mute Beeper
ASUS PCI-DA2200 User’s Manual
8-79
When the controller’s beeper has been activated, choose “Mute
beeper”, then press [Enter]. Choose “Yes” and press [Enter] in the
next dialog box to turn the beeper off temporarily. The beeper will
still activate on the next event.
8.7.2
Change Password
Use the controller’s password to protect the controller from
unauthorized entry. Once the controller’s password has been set,
regardless of whether the Text RAID Manager or the GUI RAID
Manager is used, the user can only configure and monitor the RAID
controller by providing the correct password.
8-80
ASUS PCI-DA2200 User’s Manual
ASUS PCI-DA2200 User’s Manual
8-81
IMPORTANT:
• The controller will verify the password only when entering the Main
Menu from the Initial screen. Always go back to the Initial screen when
the controller is going to be unattended.
• The controller password and controller name are sharing a 16-character
space. The maximum characters for the controller password is 15. When
the controller name occupied 15 characters, there is only one character
left for the controller password and vice versa.
Changing the Password
To set or change the controller password, move the cursor bar to
“Change Password”, then press [Enter].
If a password has previously been set, the controller will ask for the
old password first. If the password has not yet been set, the
controller will directly ask for the new password. The password can
not be replaced unless a correct old password is provided.
Key-in the old password, then press [Enter]. If the password is
incorrect, it will not allow you to change the password. Instead, it
will display the message “Password incorrect!”, then go back to the
previous menu.
If the password is correct, or there is no preset password, it will ask
for the new password.
Setting a New Password
8-82
ASUS PCI-DA2200 User’s Manual
Enter the desired password in the column, then press [Enter]. The
next dialog box will display “Re-Enter Password”. Enter the
password again and press [Enter].
The new password will now become the controller’s password.
Providing the correct password is necessary when entering the Main
Menu from the Initial screen.
Disabling the Password
To disable or delete the password, press [Enter] only in the password
column that is used for entering a new password. The existing
password will be deleted. No password checking will occur when
entering the Main Menu from the Initial screen.
ASUS PCI-DA2200 User’s Manual
8-83
8.7.3
Reset Controller
This function is not supported. The controller is reset when the
system is reset.
8.7.4
8-84
Shutdown Controller
ASUS PCI-DA2200 User’s Manual
This function is not supported. The controller is shutdown when the
system is shutdown.
8.7.5
Controller Maintenance
This function is not supported from within the Text RAID Manager.
Controller maintenance functions – such as downloading new
firmware – can be performed from the start-up menu of the Text
RAID Manager.
ASUS PCI-DA2200 User’s Manual
8-85
8.8
Viewing System Information
To view the system’s information, move the cursor bar to “View
System Information”, then press [Enter].
A list of information will appear.
CPU Type
The type of CPU installed in the RAID
controller.
Total Cache Size
The total DRAM size installed in the
controller.
Firmware Version
The version of the firmware.
Bootrecord Version
The version of the boot record.
Serial Number
The serial number of the controller.
8-86
ASUS PCI-DA2200 User’s Manual
Chapter 9
Remote Administration
The ASUS PCI-DA2200 RAID Controller can be administrated
remotely. When there is an event, warning or controller notification
happened, the ASUS PCI-DA2200 can inform the administrator to
take measure in time.
9.1
GUI RAID Manager Using SNMP Service
TCP/IP+SNMP
LAN
WAN
Internet
TCP/IP+SNMP
SNMP Agent for:
Windows NT
NetWare
SCO OpenServer
SCO Unix Ware
ASUS
PCI-DA2200
RAID Controller
GUI RAID Manager
Host Computer
Install the SNMP agent for the corresponded operating system on
Host computer and enable the SNMP service. The client computer
running with GUI RAID Manager will be able to administrate the
ASUS PCI-DA2200 RAID Controller remotely.
How to establish the connection through SNMP?
Choose the “File” menu, click on “Connect” and choose “SNMP”
from the pop up menu.
ASUS PCI-DA2200 User’s Manual
9-1
Enter the Agent name or the IP address and the Community name of
the host computer in the first column.
Click on the select button in front of “Host Bus Interface” to select.
Choose “0” if there is only one ASUS PCI-DA2200 RAID controller
installed in the remote host computer. Press “OK” to establish the
connection. After the connection established, all the operation will act
exactly the same as executing the GUI RAID Manager from the host
computer.
The “Controller Index” refers to the number of the ASUS PCIDA2200 be found by the host computer. If there is only one controller
9-2
ASUS PCI-DA2200 User’s Manual
installed in the host computer, “0” should be chosen. When more
than one ASUS PCI-DA2200 RAID controller installed in the same
host computer, the second ASUS PCI-DA2200 controller found by the
host computer is numbered as “1”, and the third controller found by
the host computer is numbered as “2”.
ASUS PCI-DA2200 User’s Manual
9-3
This page is left intentionally blank.
9-4
ASUS PCI-DA2200 User’s Manual
Index
A
ASPI, A-1
automatic rebuild, 3-9
B
bad sector reassignment, 2-1
basic operational set-up, 4-3
beeper
mute, 8-79
BIOS
RAID Manager, 5-1, 7-5, 8-1
BIOS configuration utility, 7-1
building a RAID system drive, 6-1
C
cable specifications
SCSI, B-1
cache
disable write-back during OS installation, A-1
display of RAM type and size, 7-1
enable write-back, 8-62
cache parameters, 3-13
record of settings, G-3
capacitance, B-1
changing the password, 8-80, 8-82
concurrent rebuild
in RAID (0+1), 3-10
configuration parameters
viewing and editing, 8-62
configure
BIOS, 7-1
card, 7-1
SCSI, 7-1
configuring RAID, 6-1
controller
maintenance, 8-85
reset, 8-84
shutdown, 8-84
controller name, 8-77
controller parameters, 8-77
CPU, 1-1, 2-2
Ctrl-I, 7-1
D
data cache, 2-2
data rebuilding, 2-1
DC resistance, B-1
DEC Alpha/Windows NT
installing driver during NT v4.0 installation, A-17
installing driver in existing NT v4.0 system, A-18
default setting
restoring, 7-1, 8-61
delay skew, B-1
Device #, 7-1
disable
write-back, 8-62
disabling the password, 8-83
disconnecting support, 8-52
disk access delay time, 3-17, 3-18, 8-71
disk array parameters, 3-11
record of settings, G-3
DOS ASPI drivers
installation, A-1
drive failure management, 3-5
drives
identifying, 3-7
drive-side SCSI parameters, 3-15, 8-69
record of settings, G-3
dynamic logical drive expansion, 3-20, 8-23
F
firmware, 1-1, 2-2
display of version number, 7-1
flash
all SCSI drives, 3-8
selected SCSI drive, 3-8
form factor, 2-1
G
global spare drive, 3-5
adding one, 8-36
deleting, 8-36
H
hardware installation, 4-1
hot swap, drive
detection of followed by auto rebuild, 8-60
hot-swapping, 2-1
How does it work?
logical drive expansion, 3-20
SAF-TE, 3-18
the RAID controller, 6-4
I
I/O port base address, 7-1
identifying drives, 3-7
idle drive
failure detection, 8-57
impedance, B-1
installation
DOS ASPI drivers, A-1
hardware, 4-1
NetWare v4.0x/v4.1/v4.11, A-5
OS/2 driver, A-21
Windows 95 driver, A-19
Installation
SCO Unix and UnixWare, A-25
IRQ, 7-1
J
JBOD, 3-2
K
keys
for navigation in Text RAID Manager, 5-1
L
Linux
drivers and utilities for, A-27
drivers and utilities for SPARC platform, A-34
installing Red Hat, A-29
installing SlackWare, A-30
making floppy disks for Red Hat, A-27
making floppy disks for SlackWare, A-28
Text RAID Manager, A-31
local spare drive, 3-5
adding one, 8-35
deleting, 8-36
logical drive, 2-1
assigning a name, 8-19
creating, 8-10
defined, 5-1
deleting, 8-15
deleting a partition, 8-17
expansion, 3-20, 8-23
expansion – example using Windows NT, 3-24
explained, 6-5
mapping to an ID/LUN, 8-27
partitioning, 8-15
rebuilding, 8-20
record of settings, G-1
status, 8-3
viewing and editing, 8-10
viewing drives and drive members, 8-14
LUN, 2-1
defined, 6-4
LUN mappings
record of settings, G-2
viewing and deleting, 8-31
M
main menu, 8-1, 8-2
manual rebuild, 3-9
maximum queued I/O count, 8-68
maximum synchronize transfer clock, 8-49
maximum tag count, 8-54, 8-71
maximum transfer width, 8-50
mirroring
RAID 1, 3-3
mode 1 expansion, 3-20
mode 2 expansion, 3-21
mute beeper, 8-79
N
NetWare
v4.0x installation, A-5
v4.1 installation, A-5
v4.11 installation, A-5
NRAID, 3-2
O
optimization
for sequential or random I/O, 3-13
OS/2
command-line options of IFT-2101U2 OS/2 driver, A-23
driver installation, A-21
installing driver during v2.x/3.0 installation, A-22
installing driver in an existing v2.x/3.0 system, A-22
updating IFT-2101U2 OS/2 device driver, A-23
P
parameters
cache, 3-13, 8-62
controller, 8-77
disk array, 3-11
drive-side SCSI, 3-15
SCSI, 8-68
parity check, 8-51
partition
record of settings, G-1
partitions, 2-1
mapping them to LUNs, 6-6
password
changing it, 8-80, 8-82
disabling it, 8-83
setting a new one, 8-82
validation timeout, 8-78
PCI bus #, 7-1
periodic drive check time, 8-57
periodic drive swap auto check, 3-19, 8-60
peripheral device active signal
record of settings, G-4
port
I/O, 7-1
propagation delay, B-1
Q
queued I/O count
maximum, 8-68
quick setup, 5-1
R
RAID
(0+1), 3-4
0, 3-3
1, 3-3
3, 3-4
5, 3-5
a definition, 3-1
configuring, 6-1
RAID level, 5-2
RAID levels, 3-1
RAID management, 3-1
random I/O
optimization for, 3-13, 8-65
rebuild
automatic, 3-9
manual, 3-9
rebuild priority, 3-11, 8-73
rebuild, concurrent
in RAID (0+1), 3-10
remote administration, 9-1
reset controller, 8-84
S
SAF-TE, 3-18
periodic check time, 8-59
SCO Unix
driver installation, A-25
SCSI
I/O timeout, 3-17, 8-53
SCSI bus
maximum throughput, B-1
width, B-1
SCSI channel, 6-4
record of settings, G-3
setting the terminator, 8-40
status, 8-6
viewing and editing, 8-37, 8-38
SCSI drive
record of settings, G-2
scanning a new one, 8-33
status, 8-4
viewing and editing, 8-32
viewing information, 8-34
SCSI drive channel
viewing and editing, 8-47
SCSI ID, 6-4
viewing and editing, 8-38
SCSI ID map
viewing and editing, 8-27
SCSI motor spin-up, 3-15, 8-69
SCSI parameters, 8-68
drive-side, 8-69
SCSI reset at power-up, 3-17, 8-70
SCSI standards, B-1
SCSI target
viewing and editing, 8-47
sequential I/O
optimization for, 3-13, 8-65
set-up
basic operation, 4-3
shutdown controller, 8-84
single-drive control
JBOD, 3-2
slot number, 8-48
SNMP
establishing the connection, 9-1
GUI RAID Manager via, 9-1
Solaris
drivers and utilities for x86 platform, A-32
installing SPARC platform driver and Text RAID Manager, A-35
installing x86 platform driver and text RAID Manager, A-33
Text RAID Manager, A-37
spanning
NRAID, 3-2
spare drive
adding a global, 8-36
adding a local, 8-35
global, 3-5
local, 3-5
priority, 3-6
spare drive deleting, 8-36
spare drive operation, 2-1
status
SCSI channel, 8-6
SCSI drive, 8-4
striping
RAID 0, 3-3
striping with dedicated parity disk
RAID 3, 3-4
striping with interspersed parity
RAID 5, 3-5
striping with mirroring
RAID (0+1), 3-4
synchronize transfer clock
maximum, 8-49
synchronous clock
frequency, D-1
period, D-1
system functions, 8-79
system information
record of settings, G-4
viewing, 8-86
T
tag command queuing, 8-54
tag count
maximum, 3-18, 8-54, 8-71
Text RAID Manager, 8-1
keys, 5-1
transfer rate, B-1
transfer speed
setting it, 8-42
transfer width
maximum, 8-50
setting it, 8-44
troubleshooting, E-3
U
UnixWare
driver installation, A-25
V
verification on writes, 8-74
verify-after-write, 3-11
viewing current settings, 8-8
viewing system information, 8-86
VT-100 terminal, 5-1
W
Windows 95
driver installation, A-19
updating device driver, A-21
Windows NT
example of RAID expansion, 3-24
installing driver during DEC Alpha v4.0 installation, A-17
installing driver during v4.0 installation, A-15
installing driver in existing DEC Alpha v4.0 system, A-18
updating device driver in v3.1/3.51 system, A-14
GUI RAID Manager
For ASUS Disk Array Controllers
User’s Guide
Revision 1.5
Copyright Information
Copyright © 1999
This edition first published 1999
All rights reserved. No part of this publication may be reproduced, transmitted,
transcribed, stored in a retrieval system, or translated into any language or
computer language, in any form or by any means, electronic, mechanical,
magnetic, optical, chemical, manual or otherwise, without the prior written
consent of ASUSTeK Computer Inc.
Disclaimer
ASUSTeK Computer Inc. makes no representations or warranties with respect
to the contents hereof and specifically disclaims any implied warranties of
merchantability or fitness for any particular purpose. Furthermore, ASUSTeK
Computer Inc. reserves the right to revise this publication and to make changes
from time to time in the content hereof without obligation to notify any person
of such revisions or changes.
Trademarks
ASUS and ASUSTeK are registered trademarks of Computer Inc.
Microsoft, Windows, Windows NT and MS-DOS are registered trademarks of
Microsoft Corporation in the U.S. and other countries.
Novell and NetWare are registered trademarks of Novell, Inc. in the U.S. and/or
other countries.
OS/2 and OS/2 Warp are registered trademarks of International Business
Machines Corporation in the U.S.
Solaris is a trademark of Sun Microsystems, Inc.
SCO, OpenServer, and Unix Ware are trademarks or registered trademarks of
The Santa Cruz Operation, Inc. in the U.S. and/or other countries.
All other names, brands, products or services are trademarks or
registered trademarks of their respective companies.
Table of Contents
About this Guide.................................................................................. v
Overview of the User’s Guide ............................................................ vi
1 Introduction................................................................................... 1
1.1 System Description............................................................... 2
1.2 Feature Summary................................................................. 3
1.3 Feature Highlights ................................................................ 6
2 Installation..................................................................................... 1
2.1 System Requirements .......................................................... 2
2.2 Hardware Setup.................................................................... 3
2.3 In-band SCSI........................................................................ 8
2.4 Software Setup................................................................... 22
2.5 Upgrading Firmware ........................................................... 27
3 Basic Operations at Startup ......................................................... 1
3.1 Starting the GUI RAID Manager............................................ 1
3.2 Connecting and Disconnecting from a Disk Array.................. 4
3.3 Setting Up Security............................................................. 13
3.4 Displaying and Hiding the Toolbar ...................................... 14
3.5 Displaying and Hiding the Status Bar .................................. 16
3.6 Working with Windows........................................................ 18
3.7 Exiting GUI RAID Manager ................................................. 37
4 Array Management........................................................................ 1
4.1 Background Information........................................................ 3
4.2 Operation without Spare Drives ............................................ 5
4.3 Before you Start ................................................................... 7
4.4 Defining Enclosures.............................................................. 8
4.5 Setting Controller Configuration .......................................... 11
4.6 Setting Channel Configuration ............................................ 13
4.7 Scanning in Drives.............................................................. 17
4.8 Creating and Deleting Logical Drives .................................. 19
4.9 Assigning Spare Drives....................................................... 22
4.10 Rebuilding Logical Drives .................................................. 24
4.11 Creating and Deleting Logical Volumes.............................. 25
4.12 Creating and Deleting Partitions......................................... 28
4.13 Mapping Logical Volumes/Partitions to Host LUNs............. 32
4.14 Displaying the Event Log ................................................... 34
4.15 Monitoring Statistics........................................................... 36
4.16 Dynamic Logical Drive Expansion ...................................... 37
ASUS GUI RAID Manager: Table of Contents
5
6
A
B
C
ii
4.17 Redundant Controller ........................................................ 50
Notification Configuration............................................................ 1
5.1 Introduction .......................................................................... 1
5.2 Before You Begin... .............................................................. 2
5.3 Notification Levels ................................................................ 9
5.4 Configuring Notification Options ......................................... 11
5.5 Configuring a Pager Notification ......................................... 13
5.6 Configuring a Fax Notification............................................. 21
5.7 Configuring an E-Mail Notification....................................... 24
5.8 Configuring a Broadcast Message Notification.................... 27
Running in Demo Mode................................................................ 1
6.1 Introduction .......................................................................... 2
6.2
Starting the Demo Program................................................. 3
6.3 Failing a Drive...................................................................... 5
6.4 Exiting the Demo Program ................................................... 8
Command Summary .................................................................... 1
Menu Commands .......................................................................... 1
Command Buttons ......................................................................... 6
Troubleshooting .......................................................................... 1
Startup Errors ................................................................................ 2
Notification Errors .......................................................................... 3
SNMP Errors ................................................................................. 5
RAID Levels.................................................................................. 1
RAID Description ........................................................................... 1
Non-RAID Storage......................................................................... 1
RAID 0........................................................................................... 2
RAID 1........................................................................................... 3
RAID 1(0+1) .................................................................................. 4
RAID 3........................................................................................... 5
RAID 5........................................................................................... 6
About this Guide
Congratulations on your decision to use ASUS’ GUI RAID
Manager disk array management program. This management
program allows you to control and monitor disk array systems,
either from a local host, or from a remote station connected
through a local area network (LAN), telephone line, or the
Internet.
This guide discusses how to install and use the GUI RAID
Manager to manage disk array systems incorporating ASUS’
PCI-to-SCSI or SCSI-to-SCSI controllers.
In addition to the GUI RAID Manager, you can also use the onboard RS-232 menu interface (SCSI-to-SCSI controllers only) or
the text-based RAID Managers available for various operating
systems to manage disk array systems incorporating ASUS’ disk
array controllers. For information about these programs, see the
documentation that comes with your hardware.
ASUS GUI RAID Manager: About this Guide
Overview of the User’s Guide
♦ Chapter 1, Introduction. Provides information about the
GUI RAID Manager, including the system description,
feature summary, and feature highlights.
♦ Chapter 2, Installation. Discusses how to install the GUI
RAID Manager to your computer. Discussions include the
system requirements, setting up the hardware, software
installation, and how to update your software through
software downloading from ASUS’ FTP site.
♦ Chapter 3, Basic Operations at Startup. Discusses the
basic operations at system startup. These include starting
the GUI RAID Manager, connecting and disconnecting
from a disk array system, setting up the system security,
displaying and hiding the toolbar and status bar, working
with various disk array windows, and exiting from the
program.
♦ Chapter 4, Array Management. Provides information on
disk array management, including defining enclosures,
setting the controller and channel configurations, scanning
in drives, creating and deleting logical drives, assigning
spare drives, rebuilding logical drives, creating and
deleting logical volumes, defining volume partitions,
mapping logical volumes to host LUNs, deleting LUN
mappings, displaying the contents of the log file, and
monitoring the disk array statistics.
♦ Chapter 5, Notification Configuration. Describes how to
configure the GUI RAID Manager notification functions
for the pager, fax, e-mail, and broadcast. Information
about the supported notification levels are also provided to
aid in the explanation of these functions.
vi
ASUS GUI RAID Manager: About this Guide
♦ Chapter 6, Running in Demo Mode. Provides information
on how to run the GUI RAID Manager in demo mode.
You can use the demo mode as a tool for learning the
basics of disk array system management and for
demonstrating the GUI RAID Manager functionality
without connecting to a real disk array.
♦ Appendix A, Command Summary. Summarizes the
available commands and command buttons in the GUI
RAID Manager.
♦ Appendix B, Troubleshooting. Provides troubleshooting
tips for some problems you may encounter while using the
GUI RAID Manager.
♦ Appendix C, RAID Levels. Provides information about the
various RAID levels.
vii
1
Introduction
This chapter provides information about the GUI RAID Manager
management program. These include the following topics:
♦ System description
♦ Feature summary
♦ Feature highlights
1-1
ASUS GUI RAID Manager: Introduction
1.1
System Description
The ASUS’ GUI RAID Manager is a Windows-based program
specifically designed for use in managing disk array systems
implemented using any of ASUS’ line of PCI-to-SCSI or SCSIto-SCSI controllers (GUI stands for graphic user interface.) The
GUI RAID Manager provides a user-friendly interface that
facilitates understanding of the relationship between disk array
elements and simplifies the normally complicated process of
array configuration. The GUI RAID Manager also provides realtime reporting on the status of the entire array, thus making the
task of monitoring disk arrays virtually effortless.
The GUI RAID Manager complements the on-board console
interface found on the ASUS’ SCSI-to-SCSI controllers and a
line of host-based, text-based RAID Managers providing the
same functionality, but with greater ease of use. The following
sections describe the outstanding features of the GUI RAID
Manager.
1-2
1.1
System Description
ASUS GUI RAID Manager: Introduction
1.2
Feature Summary
The list below summarizes the GUI RAID Manager features.
♦ User-friendly graphical interface running under the
Windows NT or Windows 95/98 environment
♦ Supports the entire new line of ASUS’ SCSI-to-SCSI and
PCI-to-SCSI RAID controllers
♦ Communicates with the controllers via the RS-232 cable,
over a LAN, telephone line, Internet, over the PCI bus
(PCI-to-SCSI controllers only), or over the SCSI bus
(SCSI-to-SCSI controllers only)
♦ Supports multiple instances of RAID managers over the
network, allowing multiple management sessions with a
disk array system
♦ Illustrates graphically and clearly the relationship between
various disk array elements
♦ At a glance monitoring of the entire disk array status
♦ Supports remote management over the network of
host/agent running Windows NT or Windows 95/98 via
the Simple Network Management Protocol (SNMP)
♦ Supports remote management over the telephone line via a
pair of modems; one directly connected to the RS-232
interface of the controller, the other connected to the serial
port of the remote station running the GUI RAID Manager
♦ Provides standard disk array functions, including
examining and modifying controller configuration;
viewing and monitoring configuration and status of
physical drives; scanning in new physical drives; creating,
deleting, and monitoring configuration and status of
1.2
Feature Summary
1-3
ASUS GUI RAID Manager: Introduction
logical drives; rebuilding logical drives; defining spare
drives; creating, deleting, and partitioning logical volumes;
and mapping logical volume partitions to specific host
channels/LUNs
♦ Enclosure management functions, including defining
multiple customizable enclosures, dimensions, and number
of drives; monitoring physical drives, power supply, fan,
and temperature status; displaying relative location of
failed physical drives for reduced risk of replacing the
wrong drives
♦ Provides a log file for logging in various event
occurrences, including the time when an event occurs,
event severity, and event description; log file can be
accessed using any text editor program
♦ Supports statistics
throughput history
monitoring
for
displaying
I/O
♦ Provides innovative, user-configurable event notification
functions
Ø Configurable severity level qualifying the event
severity that will initiate the selected notification
sequence
Ø Configurable latency time between event occurrence
and notification sequence initiation provides local
administrator the option to abort issuance of the
notification sequence
Ø Pager/telephone notification via a local modem:
•
1-4
Provides user-configurable address book for
keeping names and numbers to be paged/called,
and message to be sent
1.2
Feature Summary
ASUS GUI RAID Manager: Introduction
•
Optional
notification
retransmission
until
addressee responds locally at the console or
remotely over the Local Area Network (LAN),
Internet, or modem
•
Configurable latency time between notification
retransmission; can be set to different values at
different times of the day
Ø E-Mail notification via the MAPI service of Windows
NT or Windows 95/98:
•
Provides user-configurable address book for
keeping names, E-mail addresses, and messages to
be sent
Ø Broadcast notification over the LAN:
•
Provides
user-configurable
address
book
containing names/groups and network addresses to
which the specified message will be broadcasted
•
Broadcasts user-configurable message along with
the event description
Ø Facsimile (FAX) notification via a local FAX/modem:
1.2
Feature Summary
•
Provides
user-configurable
address
book
containing names, FAX numbers, and messages to
be sent
•
User-configurable FAX messages sent along with
the event description
•
Automatic message retransmission in the event
previous transmission attempts fail
1-5
ASUS GUI RAID Manager: Introduction
♦ Provides password protection for guarding against
unauthorized modification of disk array configuration.
♦ Provides Demo mode for use as a learning tool and for
demonstration
purposes.
You
can
perform
experimentation on various disk array configurations and
monitor the performance of the system under such
conditions. This Demo supports both the SCSI-to-SCSI
and PCI-to-SCSI controllers.
1.3
Feature Highlights
This section explains in detail the important features of the GUI
RAID Manager.
1.3.1 Graphical User Interface
The GUI RAID Manager’s graphical interface is based on the
Windows specifications. It draws symbolic icons representing
physical and logical drives, and logical volumes on the screen to
identify the current configuration of a disk array system. Pulldown and pop-up menus are used with all command options
listed. You just point and click the mouse button to select an
icon or command. The program also identifies the current status
of various drives by changing the colors of their respective icons.
With the Windows interface, complicated disk array operations
such as logical drive and logical volume creation, drive
partitioning, and drive partition mapping to host channels/LUNs
only involve a few mouse clicks.
1.3.2 Enclosure Management
The GUI RAID Manager provides a window dedicated to
enclosure management. Multiple customizable enclosures can
be defined within this window, including the number of drives
1-6
1.3
Feature Highlights
ASUS GUI RAID Manager: Introduction
per row and column, and drive orientation. Once an enclosure is
defined, drives can be dragged and dropped into their respective
drive bays corresponding to their actual locations. In this way,
drives can be monitored in an enclosure-relative context.
The enclosure window provides real-time reporting of the status
of the connected physical drives. When a drive fails, the system
highlights the corresponding icon of the failed drive by placing a
red X mark on it; when you remove a drive, its icon is removed
from the enclosure window. This feature is particularly useful in
cases where a drive fails, and you need to identify its exact
location for subsequent replacement.
In addition to monitoring drives in the enclosure, the enclosure
window also allows you to monitor the status of the power
supply, fan, temperature inside the enclosure, and the status of
the uninterruptible power supply (UPS) supplying power to the
enclosure.
1.3.3 Powerful Event Notification Function
The GUI RAID Manager sends notifications to administrators
for reporting event occurrences and status changes of the disk
array system. These notifications can be sent via a local modem
to a pager or telephone, via the Internet as E-mail messages, via
1.3
Feature Highlights
1-7
ASUS GUI RAID Manager: Introduction
a LAN as broadcast packets, or via FAX/modem as FAX
messages. Any number of notification destinations can be set
with messages user-configurable through the address book.
Optional notification retransmission can be activated for each
destination to ensure message reception by the intended
addressee. Furthermore, you can specify retry periods depending
on your specific needs.
1.3.4 Remote Management via SNMP or Modem
The GUI RAID Manager supports remote management of the
ASUS’ disk array controllers over a LAN using SNMP, or over
the telephone line using a dial-up modem. Management over the
LAN is achieved through the exchanges of SNMP management
packets between the remote GUI RAID Manager station and the
SNMP agent on the Windows NT or Windows 95/98 local host.
The remote GUI RAID Manager sends management requests to
the SNMP agent, which in turn checks the connected controller,
1-8
1.3
Feature Highlights
ASUS GUI RAID Manager: Introduction
and then sends back a reply to the requesting manager. The
following figure shows a typical SNMP connection:
Network
RAID
Controller
Local Host
with SNMP Agent
GUI RAID
Manager Station
Alternatively, for management at even greater distances, the RS232 port on the RAID controller can be directly connected to a
modem and a GUI RAID Manager running on a remote station
can dial in and manage the array over the telephone line. See the
figure below for information.
GUI RAID
Manager Station
Local Host
Telephone Line
Modem/Fax
1.3
Feature Highlights
Modem/Fax
RAID
Controller
1-9
ASUS GUI RAID Manager: Introduction
1.3.5 Password Protection
The GUI RAID Manager comes with password protection to
prevent unauthorized users from maliciously modifying the
configuration of the disk array system. This security feature is
put into effect the first time an attempt is made to modify the
disk array configuration after turning on the GUI RAID Manager
station or after the station comes back from a period of
inactivity.
With the password security feature, you have the luxury of
leaving your GUI RAID Manager station unattended knowing
that the currently managed disk array system is safe from any
unauthorized modifications.
1.3.6 Demo Mode
The GUI RAID Manager provides a Demo program for use as a
learning tool and for demonstration purposes. This tool allows
you to experiment on various disk array configurations and
monitor how the system responds and operates under such
conditions without connecting to a real disk array.
This Demo program supports all management functions
available in the GUI RAID Manager, making your imaginary
system as real as possible. You can select the controller for your
imaginary system, the number of hosts (for SCSI-to-SCSI
controller only) and drive channels, the number of physical
drives, configure your logical drives and volumes, partition
logical volumes, and map partitions to hosts. You can even
force drives to fail and observe the system’s reaction.
1-10
1.3
Feature Highlights
ASUS GUI RAID Manager: Introduction
1.3
Feature Highlights
1-11
2
Installation
This chapter contains information about software setup and
hardware setup for local and remote management.
The
following topics are discussed:
♦ System requirements
♦ Hardware setup
♦ Software setup
♦ Downloading new releases of the GUI RAID Manager
program
2-1
ASUS GUI RAID Manager: Installation
2.1
System Requirements
The minimum hardware and software requirements for the GUI
RAID Manager are listed below.
System running the GUI RAID Manager
♦ IBM-compatible 386 or above running Windows NT or
Windows 95/98
♦ At least 8 MB of RAM
♦ At least 3 MB of free hard disk space
♦ VGA monitor
♦ Microsoft-compatible mouse
♦ At least one available RS-232 port (if remote management
over the telephone line is desired)
♦ Hayes-compatible modem (if pager/telephone event
notification is desired) or FAX/modem (if FAX event
notification is desired)
♦ SNMP service for Windows NT (if SNMP remote
management is desired)
Local host running ASUS’ SNMP agent (for SNMP remote
management only)
♦ IBM-compatible 386 or above running Windows NT or
Windows 95/98
♦ SNMP service for Windows NT/Windows 95/98 (if SNMP
agent is under Windows NT or Windows 95/98
environment)
2-2
2.1
System Requirements
ASUS GUI RAID Manager: Installation
2.2
Hardware Setup
The GUI RAID Manager supports both local and remote
management of the ASUS’ disk array system.
Local
management refers to management of the disk array from a local
host − management transactions traverse the PCI bus (for PCI-toSCSI controller) or an RS-232 cable (for SCSI-to-SCSI
controller) connected between the controller and the host’s serial
interface. Remote management refers to management of the disk
array from a remote station connected to the controller either via
a modem or through a network cable.
Typically, management will be done locally. A local host runs
the GUI RAID Manager to configure and monitor the connected
controller.
Local management is simpler than remote
management for it requires less hardware in its configuration.
Remote management is more complicated than local
management but provides the following benefits:
♦ Allows management even at distant remote places. Since
remote management utilizes the network cable or the
telephone line, management anywhere around the globe is
possible. All you need is a simple attachment to an
existing network where the disk array’s host exists, or dial
up the number of the modem connected to the controller.
♦ Allows multiple instances of GUI RAID Manager stations
over the network managing concurrently a particular disk
array system.
Depending on your specific needs and configuration
requirements, you may perform management either from a local
host or from a remote station. The following sections describe
how to set up your hardware for local and remote management.
2.2
Hardware Setup
2-3
ASUS GUI RAID Manager: Installation
2.2.1 Local Management
For local management, the controller is either installed in (for
PCI-to-SCSI controller) or connected to (for SCSI-to-SCSI
controller) the host. The following figure illustrates a typical
setup for a PCI-to-SCSI controller:
GUI RAID
Manager Station
PCI-to-SCSI
RAID Controller
PCI Bus
Since the controller is already installed in the host, no extra
connection is necessary. Just load the necessary driver for the
controller and then run the GUI RAID Manager from the local
host to start management of the disk array system.
2-4
2.2
Hardware Setup
ASUS GUI RAID Manager: Installation
4Setting up a SCSI-to-SCSI controller using RS-232
1. Connect the RS-232 port of the SCSI-to-SCSI controller to a
null modem using the appropriate RS-232 cable. Do the
same to the serial interface of the local host. If your local
host has more than one serial interface, write down the
corresponding port number of the selected port (that is,
COM1, COM2, etc.).
2. Configure the RS-232 serial communication port of the local
host to correspond to that of the interface on the controller.
You will only need to set the baud rate; the GUI RAID
Manager automatically sets the other communications
parameters. If you want to modify the baud rate setting on
the controller, use the on-board console interface or the GUI
RAID Manager. For information on the latter, see Chapter
4, Array Management.
Your hardware should be set up as shown in the following
figure:
GUI RAID
Manager Station
SCSI-to-SCSI
RAID Controller
RS-232 Cable
2.2
Hardware Setup
2-5
ASUS GUI RAID Manager: Installation
2.2.2 Remote Management
You can set up your hardware two ways in remote management:
network and telephone. Network setup provides a faster data
transfer rate than the telephone setup for it utilizes the network
bandwidth of 10 Mbps (million bits per second) for Ethernet,
100 Mbps for Fast Ethernet, and so on; the telephone setup is
restricted to the speed of the modem, which is 38.4 Kbps
maximum (currently). Another advantage of using the network
is you can have your GUI RAID Manager station manage other
disk array systems on the network. Alternatively, you can
manage the disk array system from other GUI RAID Manager
stations on the network.
Network setup requires running the GUI RAID Manager on the
target manager station(s), and enabling the SNMP service on the
local host. The following figure illustrates a typical network
setup:
PC System with GUI
RAID Manager &
Windows NT SNMP
Agent
Network
PC System with
SNMP Agent
(Windows NT/95/98)
SCSI-to-SCSI
RAID
PC System with
ASUS DA-2200
(Windows NT/95/98)
SNMP Agent
Management via the telephone line is slower but it allows
management of the disk array system even from distant remote
locations. As long as you have a telephone line and a modem,
you can perform management anywhere around the globe. The
following figure displays the hardware configuration for
management via the telephone line:
2-6
2.2
Hardware Setup
ASUS GUI RAID Manager: Installation
Local Host
GUI RAID
Manager Station
RS-232
RS-232
(Windows 95, Windows NT)
Modem/Fax
Modem/Fax
Telephone Line
SCSI Bus
SCSI-to-SCSI
RAID Controller
To manage the disk array system, just dial in the number of the
modem connected to the SCSI-to-SCSI controller.
NOTES: Ensure that the baud rates of the RS-232 port and
the modem are set accordingly; otherwise, you will
encounter communication problems.
The PCI-to-SCSI controller does not support direct
connection to a modem for remote management. To manage
this controller using the modem, you will need to connect the
modem instead to the local host’s serial interface. This
user’s guide does not provide information on this type of
configuration.
2.2
Hardware Setup
2-7
ASUS GUI RAID Manager: Installation
2.3
In-band SCSI
What is it and what is it used for?
These days more and more external devices require
communication with the host computer for device monitoring and
administration. This is usually done through RS-232C ports.
An alternative means of communication is now available for SCSIto-SCSI RAID controllers—In-band SCSI. The traditional way for
SCSI controllers to communicate with the host computer has been
via software (such as the GUI RAID Manager) using an RS-232C
connection. With In-band SCSI, integrators have more flexibility.
They may use RS-232C or the existing SCSI cable instead.
How is it able to use the SCSI cable? In-band SCSI technology
translates the original commands into standard SCSI commands.
These SCSI commands are then sent to and received from the SCSI
raid controller. The GUI RAID Manager can administrate the
RAID controller just as it could before via RS-232C. (Note: It is
assumed that users of In-band SCSI possess the following: a thirdparty SCSI adapter and a channel on their ASUS RAID controller
that can be designated as a host channel.) Both of these are
required for In-band SCSI communication between the host and
the RAID controller. )
2.3.1
How Do You Configure the GUI RAID Manager to
Use In-band SCSI?
RAID Controller Adjustments
Don't disconnect your RS-232C cable yet! It is required for another
10 minutes or so. Some adjustments must be made to the RAID
2-8
2.3
In-band SCSI
ASUS GUI RAID Manager: Installation
controller and to the host computer's SNMP settings before the
two can communicate using SCSI commands. (Note: The SNMP
settings must be changed prior to installation of the GUI RAID
Manager. See SNMP Settings below for a detailed explanation.)
The RAID controller settings can be changed using the Front
Panel. (Your front panel may be different in appearance from the
one shown in this example.)
Controller v2.11
Ready
ATTEN BUSY
ENT
ESC
POWER
From the Main Menu, press t or s
to
select
"View
and
Edit
Configuration Parameters. "
View and Edit
Config Parms
Press <Enter>; and then use the t or
s to select "Host-side SCSI
Parameters." Then press <Enter>.
Host-side SCSI
Parameters ..
You will need to make adjustments in the following four
submenu's: Peripheral Device Type, Peripheral Device Qualifier,
Device Support for Removable Media, and LUN Application.
Different host operating systems require different adjustments.
Look at the table below to find the proper settings for your host
operating system.
2.3
In-band SCSI
2-9
ASUS GUI RAID Manager: Installation
Peripheral Device Type Parameters Reference
for Various Operating Systems:
Operating
System
Peripheral
Device
Type
Peripheral
Device
Qualifier
Device
Support
for
Removabl
e Media
LUN
Applicability
NT 4.0
3
connected
disabled
All Undefined
LUNs
NT 5.0
3
connected
enabled
All Undefined
LUNs
NetWare
4.x
1f
connected
disabled
All Undefined
LUNs
SCO Unix
5.0x
7f
connected
either is
okay
All Undefined
LUNs
UnixWare
2.1x
3
connected
either is
okay
All Undefined
LUNs
Solaris
2.5.x/2.6
7f
connected
either is
okay
All Undefined
LUNs
2-10
2.3
In-band SCSI
ASUS GUI RAID Manager: Installation
Peripheral Device Type Settings:
Device Type
Setting
No Device Present
7f
Direct-access Device
0
Sequential-access Device
1
CD-ROM Device
5
Scanner Device
6
MO Device
7
Unknown Device
1f
Processor Type
3
Example: Settings for Windows NT 4.0
The settings for Windows NT 4.0 are provided here as an
example. For the settings for other operating systems, please refer
to the table above, Peripheral Device Type Parameters Reference for
Various Operating Systems.
On the front panel, use t or s to
select "Peripheral Device Type
Parameters"; and then press <Enter>.
2.3
In-band SCSI
Periph
Dev
Type Parameters
2-11
ASUS GUI RAID Manager: Installation
(For this example, we assume that
there are currently no peripheral
devices.)
Device Type No Device (0x7f)
Press t or s to choose "Unknown
Device - 1f".
Set Device Type?
Unknown (0x1f)
Press <Enter> to confirm the selection. Now that we have
changed the Peripheral Device Type, let us set the Peripheral
Device Qualifier. Press <Esc> to return to the sub-menu’s
mentioned above. Use the arrow keys to scroll down to Device
Qualifier., press t or s to select "Device Qualifier Connected. "
The default setting is "Connected." If
your Front Panel reads "Disconnected,"
press <ENT> and you will be prompted
to change to "Connected". If your
Device
Qualifier
setting
reads
"Connected," press <Esc> to return to
the Host-side SCSI submenu’s.
Use the t or s to select Support for
Removable Media. The default setting
2-12
Device Qualifier
Connected
SupportRemovable
Media - Disabled
2.3
In-band SCSI
ASUS GUI RAID Manager: Installation
is "Disabled." If the LCD reads
"Enabled," press <Enter> and you will
be prompted to accept a change. If the
screen reads “Disabled,” press <Esc> to
return
to
the
Host-side
SCSI
submenu’s.
Press t or s to select "LUN
Application"; and then press <Enter>.
The default setting is "All Undefine
LUN."
LUN ApplicationAll Undefine LUN
Press <Enter> and use t or s to select
"Undefine LUN-0’s."
Applies to
?
Undefine LUN-0’s
Press <Enter> to accept. The screen
should display the following message.
LUN ApplicationUndefine LUN-0’s
The RAID controller adjustments necessary to use In-band SCSI
have been completed. For locally accessing the host computer (see
section 4.10.3.1, Local Connection — SNMP Not Required), all steps
2.3
In-band SCSI
2-13
ASUS GUI RAID Manager: Installation
have been completed. For remotely accessing the host computer,
further adjustments must be made (see section 4.10.3.2, Remote
Connection — SNMP Required).
2.3.2 Using In-band SCSI in GUI RAID Manager
Local Connection — SNMP Not Required
If you are using the GUI RAID Manager on the host computer
that is using In-band SCSI -- ie., ‘local access’ -- SNMP service is
not required. You may now connect by going to FILE>CONNECT
and selecting the port address.
2-14
2.3
In-band SCSI
ASUS GUI RAID Manager: Installation
Remote Connection — SNMP Required
SNMP Service is required to administrate a RAID controller
installed in a remote computer. This passage describes how to
establish a connection from the GUI RAID Manager to a RAID
controller that is connected to a remote host via In-band SCSI. For
information regarding other operations and of the GUI RAID
Manager, please refer to the GUI RAID Manager User Guide.
Manager Site
Agent Site
RAID
Controller
LAN
Win NT
+
GUI
RAID
Manager
Host Computer
With In-band
SCSI SNMP
Agent Installed
In the figure above, the "Agent Site" is a host computer connected
to a RAID controller via a SCSI cable. The "Manager Site" is a
Windows NT system with the GUI RAID Manager. The Agent Site
could be running an operating system other than Windows NT.
ASUS provides the In-band SCSI SNMP agents for the following
operating systems:
◊
Windows NT
◊
NetWare
◊
SCO Unix OpenServer
◊
SCO UnixWare
◊
Sun Solaris
2.3
In-band SCSI
2-15
ASUS GUI RAID Manager: Installation
The Manager Site should be a Windows NT Workstation or Server
with SNMP service and the GUI RAID Manager installed.
Basic Procedures to Establish the Connection
The following criteria must be met for the Agent Site and Manager
Site:
Checklist for Agent Site
1. The host computer is connected to the RAID controller via the
host SCSI cable (the cable which is used to transfer data between
the host computer and the RAID — there’s no need for an extra
SCSI cable.)
2. The host computer’s operating system has SNMP service
installed.
3. The host computer has the In-band SCSI SNMP agent installed
for the corresponding operating system. (The example described
herein is Windows NT.)
4. The host computer is up and running.
IMPORTANT:
This following applies to Windows NT 4.0 with Service Pack 3: if the
"SNMP Service" is installed after the Service Pack 3 has been installed,
Service Pack 3 must be re-installed in order for the SNMP service to
work properly.
2-16
2.3
In-band SCSI
ASUS GUI RAID Manager: Installation
Checklist for Manager Site
1. The system is running Windows NT (Workstation or Server)
and has SNMP Service installed.
2. The ASUS GUI RAID Manager was installed with the "SNMP
Manager Site" option selected.
3. The GUI RAID Manager is running.
IMPORTANT:
This following applies to Windows NT 4.0 with Service Pack 3: if the
"SNMP Service" is installed after the Service Pack 3 has been installed,
Service Pack 3 must be re-installed in order for the SNMP service to
work properly.
Example Settings for Agent Site Using Windows NT
1. Install SNMP Service in Windows NT. Look for the "Network"
icon in the Control Panel. Double click on the "Network" icon to
open it.
2.3
In-band SCSI
2-17
ASUS GUI RAID Manager: Installation
The Properties window appears. Choose the "Service" tab. If the
SNMP Service is already installed, please go ahead to step called
"Install the SNMP Agent and GUI RAID Manager." If the SNMP
Service is not yet installed, click on "Add" and choose "SNMP
Service" to install.
IMPORTANT:
This following applies to Windows NT 4.0 with Service Pack 3: if the
"SNMP Service" is installed after the Service Pack 3 has been installed,
Service Pack 3 must be re-installed in order for the SNMP service to
work properly.
2-18
2.3
In-band SCSI
ASUS GUI RAID Manager: Installation
2. Install the SNMP Agents and GUI RAID Manager. The GUI
RAID Manager can install the In-band SCSI SNMP Agent during
installation. During GUI RAID Manager installation, be sure to
select both the "SNMP Manager Site" and "SNMP Agent Site"
options. Complete the installation by following the on-screen
instructions.
Example Settings for Manager Site
1. Install the SNMP manager and GUI RAID Manager. During
the installation of GUI RAID Manager, click to select the option
"SNMP Manager Site." Complete the installation by following the
on-screen instructions.
1. Run the GUI RAID Manager. Start the connection by choosing
FILE>CONNECT>SNMP.
2.3
In-band SCSI
2-19
ASUS GUI RAID Manager: Installation
2. The "Setting of SNMP Interface" window appears. Enter the IP
address and community name of the Agent Site. For "Agent-site
Communication Type," choose "SCSI Bus Interface." The
"Controller Index" refers to the sequence of the RAID controller
which is going to be administrated. If only one RAID controller is
installed in the agent site computer, choose "0". If there is more
than one RAID controller installed in the agent site computer,
choose "1" to administrate the second RAID controller. Choose "2"
to administrate the third RAID controller, etc.
2-20
2.3
In-band SCSI
ASUS GUI RAID Manager: Installation
3. After the connection is established, all of the operations in the
GUI RAID Manager are the same as before (please refer to the GUI
RAID Manager User Guide for complete details on its operation.)
2.4
Software Setup
This section discusses how to set up the GUI RAID Manager in
your system. Before proceeding with the setup procedure, read
through the notes listed in the Before you Start section. You will
need the information provided in this section to complete setup
successfully.
2.4.1 Before you Start
Before starting with setup, read through the notes listed below,
and ensure that you understand each. These notes will help
facilitate the setup process for you. If you need additional
information, see the Hardware Setup section in this chapter.
2.4
Software Setup
2-21
ASUS GUI RAID Manager: Installation
♦ Ensure that your system meets the minimum hardware and
software requirements listed in the System Requirements
section.
♦ Ensure that the disk array system is installed properly. For
the installation procedure, see the documentation that came
with the controller.
♦ For local management (that is, management from the local
host) and remote management via the telephone line, you
will only need to set up for a Local Manager Site. For fast
setup, just accept the default values presented by the setup
program.
♦ For remote management over the network using SNMP,
ensure that the remote manager station has Windows NT.
You will need to set up for an SNMP Manager Site on the
remote station, and SNMP Agent Site on the local host.
The setup program helps you achieve these tasks by
providing setup options.
2.4.2 Setting up the GUI RAID Manager
Follow these steps to set up the GUI RAID Manager on your
system:
1. Insert DISK1 into the appropriate disk drive.
2. Run SETUP.EXE from DISK1. The setup welcome screen
appears:
2-22
2.4
Software Setup
ASUS GUI RAID Manager: Installation
3. If you are currently running other applications, close them
first before proceeding with the setup process. This will
minimize the possibility of encountering system errors
during setup. Then, click OK to continue.
4. To accept the default destination directory, click on the setup
button at the top left portion of the screen; to specify a
different directory, click on the Change Directory button and
then specify the directory you want. The following screen
will then appear:
2.4
Software Setup
2-23
ASUS GUI RAID Manager: Installation
5. Select the appropriate option for the type of system on which
you are setting up the GUI RAID Manager. If you are
setting up on a host where array management will be
performed, you only need the Local Manager Site option
(selected by default); for a local host where SNMP
transactions from remote manager stations will be processed,
you need the SNMP Agent Site option; for a remote manager
station where array management will be performed over the
network, you need the SNMP Manager Site option.
To select an option, just check its corresponding check box.
You may select more than one option if you want; be
reminded though that the more options you select, the bigger
the disk space requirement will be. Click Continue to
proceed.
6. If you select the SNMP Agent Site option, the following
message will appear:
2-24
2.4
Software Setup
ASUS GUI RAID Manager: Installation
If you select the same option, and the SNMP service is not
installed to your system, this message appears:
Follow the instruction displayed on the screen. Click OK to
continue.
Setup will then start copying the necessary files to the
selected directory. After copying the files, the following
screen will be displayed:
7. Click OK.
8. If necessary, restart the SNMP service.
Setup is complete. You may now start managing the disk array
system. For information on first time operating instructions, see
Chapter 3, Basic Operations at Startup.
2.4.3 Program Updates
As ASUS’ valued customer, you are entitled to free program
updates. You can download the latest GUI RAID Manager
program from ASUS’ FTP sites at ftp.ASUS.com in the U.S.A.,
or ftp.ASUS.com.tw in Taiwan. For more information about this
service, call ASUS or call the local distributor or dealer in your
area.
2.4
Software Setup
2-25
ASUS GUI RAID Manager: Installation
2.5
Upgrading Firmware
The SCSI-to-SCSI RAID controllers’ firmware resides in
Flash Memory that can be updated through the COM ports
or In-band SCSI. New releases of the firmware are
available in the form of a DOS file, which is located in the
"pub" directory of ASUS’ FTP site or on a 5.25" or 3.5"
diskette. The file available at the FTP site is usually a selfextracting file that contains the following:
FW30Bxyz
Firmware Binary (where "xyz" refers to the
firmware version)
B30Buvw
Boot Record Binary (where "uvw" refers to the boot
record version)
README.TXT
Read this file first before upgrading the firmware
or boot record. It contains the most up-to-date
information which is very important to the
firmware upgrade and usage.
These files must be extracted from the compressed file and
copied to directory in drive C.
2-26
2.5
Upgrading Firmware
ASUS GUI RAID Manager: Installation
IMPORTANT:
•
Allow the downloading process to finish. Do not reset or turn off the
computer or the controller while it is downloading the file. Doing so
may result in an unrecoverable error that requires the service of the
manufacturer.
•
While the firmware is new, the boot record that comes with it may be
the same version as the one in the controller. If this is the case, there
is no need to upgrade the Boot Record Binary.
Upgrading the firmware using In-band SCSI + GUI RAID
Manager
The In-band SCSI connection and the ability to upgrade
the firmware via In-band SCSI are supported in ASUS GUI
RAID Manager, version 1.61B and later versions. This
version of the GUI RAID Manager is for use with the
firmware 2.11. If the firmware currently in the controller is
earlier than 2.11, In-band SCSI is not supported.
Establish the In-band SCSI connection in GUI RAID Manager
Please refer to section 4.10.3 for details on establishing the
In-band SCSI connection in GUI RAID Manager.
2.5
Upgrading Firmware
2-27
ASUS GUI RAID Manager: Installation
Upgrade Both Boot Record and Firmware Binaries
1. Double click on the controller panel to get the menu appears.
Choose "Controller Maintenance" > "Advanced Maintenance" > "Download Boot Record and Firmware".
2. Provide the boot record binary filename, the GUI RAID
Manager will start to download the boot record binary to the
controller.
3. After the boot record download completed, provide the
firmware filename to the GUI RAID Manager. It will start to
download the firmware to the controller.
4. Shutdown the system which is accessing the RAID, then reset
the controller in order to use the new downloaded firmware.
2-28
2.5
Upgrading Firmware
ASUS GUI RAID Manager: Installation
Upgrade the Firmware Binary Only
1. Double click on the controller panel to get the menu appears.
Choose "Controller Maintenance". If both boot record and
firmware are desired to upgrade, choose "Download
Firmware".
2. Provide the firmware filename to the GUI RAID Manager. It
will start to download the firmware to the controller.
3. Shutdown the system which is accessing the RAID, then reset
the controller in order to use the new downloaded firmware.
2.5
Upgrading Firmware
2-29
3
Basic Operations at Startup
This chapter discusses the basic operations you may want to
learn first and tasks you may want to take care of when you start
the GUI RAID Manager for the first time. These include the
following topics:
♦ Starting the GUI RAID Manager
♦ Connecting and disconnecting from a disk array system
♦ Setting up security
♦ Displaying and hiding the toolbar
♦ Displaying and hiding the status bar
♦ Working with various system windows
♦ Exiting from the GUI RAID Manager
3.1
Starting the GUI RAID Manager
Depending on your hardware setup, you can start the GUI RAID
Manager in various ways. For local management, your task is
quite simple. Please refer to the appropriate section below for
information.
4Starting the GUI RAID Manager under the Windows 95/98
or Windows NT 4.0 environment
1. From the Start menu, select Programs à ASUS GUI
RAID Manager.
-or-
3-1
ASUS GUI RAID Manager: Basic Operations at Startup
Double-click on the ASUS GUI RAID Manager icon. The
ASUS GUI RAID Manager main window appears on the
screen.
2. Connect to the disk array system. For information on how to
connect, see the Connecting and Disconnecting from a Disk
Array System section of this chapter.
4Starting the GUI RAID Manager under the Windows NT
3.5x environment
1. Open the ASUS GUI RAID Manager group window from
the Program Manager, if not yet open.
2. From the ASUS GUI RAID Manager group window,
double-click on the ASUS GUI RAID Manager icon. The
ASUS GUI RAID Manager main window appears on the
screen.
3. Connect to the disk array system. For information on how to
connect, see the Connecting and Disconnecting from a Disk
Array System section of this chapter.
For remote management, see the appropriate section below.
4Starting the GUI RAID Manager for remote management via
network
1. Turn on the local host and enable the appropriate SNMP
service. For information on how to enable the SNMP
service for Windows NT, Windows 95/98, or Novell
NetWare, see their respective manuals.
2. Check to ensure that the local host is properly connected on
the network. Take note of its IP address (or SNMP agent’s
name) and community names.
3-2
3.1
Starting the GUI RAID Manager
ASUS GUI RAID Manager: Basic Operations at Startup
3. Run the GUI RAID Manager on the remote station. If you
are using Windows 95/98 or Windows NT 4.0, follow these
steps:
3a. From the Start menu, select Programs à ASUS GUI
RAID Manager.
-orDouble-click on the ASUS GUI RAID Manager icon.
The ASUS GUI RAID Manager main window appears
on the screen.
If you are using Windows NT 3.5x, perform these steps:
3a. Open the ASUS GUI RAID Manager group window
from the Program Manager, if not yet open.
3b. From the ASUS GUI RAID Manager group window,
double-click on the ASUS GUI RAID Manager icon.
The ASUS GUI RAID Manager main window appears
on the screen.
4. Connect to the disk array system. For information on how to
connect, see the Connecting and Disconnecting from a Disk
Array System section of this chapter.
4Starting the GUI RAID Manager for remote management via
telephone line
1. Ensure that a modem is connected to the RS-232 port of your
SCSI-to-SCSI controller, and to the serial interface of your
GUI RAID Manager station. Check that the baud rates of
the ports and the modems are set accordingly.
2. From the GUI RAID Manager station, dial in the number of
the modem connected to the controller.
3.1
Starting the GUI RAID Manager
3-3
ASUS GUI RAID Manager: Basic Operations at Startup
3. When a link is established, connect to the disk array system.
For information on how to connect, see the Connecting and
Disconnecting from a Disk Array System section of this
chapter.
3.2
Connecting and Disconnecting from
a Disk Array
The GUI RAID Manager provides a feature that facilitates
connection and disconnection from disk array systems. Before
management can be performed on a particular disk array system,
you need to establish first a connection between your GUI RAID
Manager station and the target system. Once a connection is
established successfully, management can be started.
Disconnection is used for breaking the link between the GUI
RAID Manager station and the array system. This option is
particularly useful in cases where multiple disk array systems are
being managed at the same time − instead of restarting the GUI
RAID Manager every time you need to switch to another system,
you just need to disconnect from the current system and then
connect to a new one.
The following discusses the various ways of connecting to a disk
array system. Information on disconnection is provided at the
latter part of this section.
4 Connecting to a PCI-to-SCSI controller from the local host
1. From the File menu, select Connect.
-or-
3-4
3.2
Connecting and Disconnecting from a Disk Array
ASUS GUI RAID Manager: Basic Operations at Startup
Click on the Connect/Open command button.
following submenu appears on the screen:
The
Note that there will be one PCI Bus entry for each PCI-toSCSI controller installed. If none are installed, then no PCI
Bus entries will be displayed.
2. Select the corresponding entry for a PCI-to-SCSI controller.
Based on the previous figure, the entry should be PCI Bus
#0 PCI Dev#12 Port:D000 Irq:11.
The enabling of the toolbar buttons signifies a successful
connection.
4Connecting to a SCSI-to-SCSI controller from the local host
1. From the File menu, select Connect.
-orClick on the Connect/Open command button.
following submenu appears on the screen:
3.2
Connecting and Disconnecting from a Disk Array
The
3-5
ASUS GUI RAID Manager: Basic Operations at Startup
2. Select RS-232. The Settings of RS-232 Interface dialog box
appears:
3. From the COM Port# drop-down list box, select which
COM port on the local host is connected to the controller via
the RS-232 cable. To select a different COM port, click on
the down-arrow button at the right of the box, then select the
desired option.
4. From the Baud Rate drop-down list box, select the baud rate
setting on the RS-232 port of the controller. To select,
perform the same procedure described in step 3.
You can modify the baud rate on the controller through the
on-board console interface or through the GUI RAID
Manager. For information on the latter, see Chapter 4, Array
3-6
3.2
Connecting and Disconnecting from a Disk Array
ASUS GUI RAID Manager: Basic Operations at Startup
Management. For information about the console interface,
see the documentation that came with the controller.
5. Click OK.
The enabling of the toolbar buttons signifies a successful
connection.
4Connecting to a PCI-to-SCSI controller from a remote station
(via network)
1. From the File menu, select Connect.
-orClick on the Connect/Open command button.
following submenu appears on the screen:
The
2. Select SNMP. The Settings of SNMP Interface dialog box
appears on the screen:
3.2
Connecting and Disconnecting from a Disk Array
3-7
ASUS GUI RAID Manager: Basic Operations at Startup
3. In the Agent Name or IP Address text box, type in the IP
address of the local host where the target disk array system is
connected. Alternatively, you may specify the host name of
the local host.
4. In the Community Name text box, type in one of the
community names of the SNMP agent. Community names
act as passwords that screen accesses to the SNMP agent of a
particular network device. Before access is granted to a
requesting station, this station must incorporate a valid
community name to its request; otherwise, the SNMP agent
will deny access to the system.
By default, most network devices use “public” as one of
their community names. This value is case-sensitive.
5. In the Agent-side Communication Type section, click on
the Host Bus Interface option button. Then, select the
corresponding index of the controller in the Controller
Index drop-down list box. To select, click on the down-
3-8
3.2
Connecting and Disconnecting from a Disk Array
ASUS GUI RAID Manager: Basic Operations at Startup
arrow button at the right of the box, then select the option
you need.
6. Click OK.
The enabling of the toolbar buttons signifies a successful
connection.
4Connecting to a SCSI-to-SCSI controller from a remote
station (via network)
1. From the File menu, select Connect.
-orClick on the Connect/Open command button.
following submenu appears on the screen:
The
2. Select SNMP. The Settings of SNMP Interface dialog box
appears on the screen:
3.2
Connecting and Disconnecting from a Disk Array
3-9
ASUS GUI RAID Manager: Basic Operations at Startup
3. In the Agent Name or IP Address text box, type in the IP
address of the local host where the target disk array system is
connected. Alternatively, you may specify the host name of
the local host.
4. In the Community Name text box, type in one of the
community names of the SNMP agent. Community names
act as passwords that screen accesses to the SNMP agent of a
particular network device. Before access is granted to a
requesting station, this station must incorporate a valid
community name to its request; otherwise, the SNMP agent
will deny access to the system.
By default, most network devices use “public” as one of
their community names. This value is case-sensitive.
5. In the Agent-side Communication Type section, click on
the RS-232 Interface option button. Then, specify the COM
port number and the baud rate.
3-10
3.2
Connecting and Disconnecting from a Disk Array
ASUS GUI RAID Manager: Basic Operations at Startup
From the COM Port# drop-down list box, specify which
COM port on the local host is used to connect to the disk
array system. To select, click on the down-arrow button at
the right of the box, then select the option you need.
From the Baud Rate drop-down list box, select the baud rate
setting on the RS-232 port of the controller. To select,
perform the same procedure described previously. If you
wish to modify the baud rate setting on the controller, use
the on-board console interface or the GUI RAID Manager.
For information on the latter, see Chapter 4, Array
Management.
6. Click OK.
The enabling of the toolbar buttons signifies a successful
connection.
4Connecting to a SCSI-to-SCSI controller from a remote
station (via telephone line)
1. From the File menu, select Connect.
-orClick on the Connect/Open command button.
following submenu appears on the screen:
3.2
Connecting and Disconnecting from a Disk Array
The
3-11
ASUS GUI RAID Manager: Basic Operations at Startup
2. Select RS-232. The Settings of RS-232 Interface dialog box
appears on the screen:
3. From the COM Port# drop-down list box, select which
COM port on your GUI RAID Manager station you
connected the modem. To select, click on the down-arrow
button at the right of the box, then select the option you
need.
4. From the Baud Rate drop-down list box, specify the baud
rate of the modem connected to your GUI RAID Manager
station. To select, perform the same procedure described in
step 3.
5. Click OK.
The enabling of the toolbar buttons signifies a successful
connection.
4 Disconnecting from the disk array system
•
From the File menu, select Disconnect.
All toolbar buttons, except the Connect/Open and Notification
command buttons, turn gray signifying disconnection from the
current disk array system.
3-12
3.2
Connecting and Disconnecting from a Disk Array
ASUS GUI RAID Manager: Basic Operations at Startup
3.3
Setting Up Security
The GUI RAID Manager provides password protection to
prevent unauthorized modification of the system configuration.
This protection, which is implemented on the GUI RAID
Manager station, prompts a user for the station password the first
time he or she attempts to modify the disk array settings after
turning on the GUI RAID Manager station or after the station
comes back from a period of inactivity. Specifying the correct
password gives the user full control over the disk array system;
specifying otherwise, only allows the user to view the current
configuration of the system.
By default, the GUI RAID Manager station comes without any
password, thus when prompted for the password for the first
time, just press ENTER. After gaining control, set a password to
provide security to the managed disk array system. The set
password will be saved into the memory of the GUI RAID
Manager station.
You can also set an inactivity time, which will determine when
to reactivate the password security feature after a period of
station inactivity. If, within the specified period, there is no
activity from the keyboard or mouse, this security feature will be
put back into effect − prompting again for the station password
the first time there is an attempt to modify the disk array
configuration. This feature is particularly useful in protecting
unattended GUI RAID Manager stations.
4 Setting a password for the GUI RAID Manager station
1. Display the Physical Drives window by clicking on the
Physical Drives command button or selecting the Physical
Drives command from the Open menu.
2. From the Physical Drives window, double-click on the
displayed controller (that is, front panel for a SCSI-to-SCSI
3.3
Setting Up Security
3-13
ASUS GUI RAID Manager: Basic Operations at Startup
controller or card layout for a PCI-to-SCSI controller). The
Controller Settings dialog box appears:
3. Check the Change Password check box.
4. Type in the password you want in the New Password text
box taking note that the password is case-sensitive.
5. Type in again the password in the Verify Password text box
to confirm.
6. Click OK.
3.4
Displaying and Hiding the
Toolbar
The GUI RAID Manager provides a toolbar located just beneath
the menu bar for displaying the available command buttons.
These buttons serve various purposes, which are described in
detail in the Working with Windows section of this chapter.
3-14
3.4
Displaying and Hiding the Toolbar
ASUS GUI RAID Manager: Basic Operations at Startup
You have the option to display or hide the toolbar depending on
your specific needs. If you need bigger working space for
viewing the various disk array elements or for executing various
management operations, hide the toolbar; if you need to use the
command buttons for simplified operations, unhide the toolbar.
You also have the option to hide the status bar located beneath
the windows display area for even bigger working space. For
information about this option, see the Displaying and Hiding the
Status Bar section next.
3.4
Displaying and Hiding the Toolbar
3-15
ASUS GUI RAID Manager: Basic Operations at Startup
4 Hiding the toolbar
•
From the View menu, click on Toolbar until the check mark
“√“ next to this command disappears.
The toolbar will disappear from the ASUS GUI RAID Manager
main window.
4 Unhiding the toolbar
•
From the View menu, click on Toolbar until a check mark
“√“ appears next to this command.
The toolbar is displayed back in the ASUS GUI RAID Manager
main window.
3.5
Displaying and Hiding the Status
Bar
The status bar at the bottom of the windows display area supplies
information about the results of the different disk array
operations, and errors that occur on the system.
You can hide or display the status bar depending on your
particular needs. If you need bigger working space, you can hide
the status bar; if you are closely monitoring the status of the disk
array system, unhide the status bar for a real-time report on the
condition of the system.
You also have the option to hide the toolbar found just beneath
the menu bar for even bigger working space. For information
about this option, see the previous section, Displaying and
Hiding the Toolbar.
4 Hiding the status bar
3-16
3.5
Displaying and Hiding the Status Bar
ASUS GUI RAID Manager: Basic Operations at Startup
•
From the View menu, click on Status Bar until the check
mark “√” next to this command disappears.
The status bar will disappear from the ASUS GUI RAID
Manager main window.
4 Unhiding the status bar
•
From the View menu, click on Status Bar until a check
mark “√” appears next to this command.
The status bar will reappear in the ASUS GUI RAID Manager
main window.
3.5
Displaying and Hiding the Status Bar
3-17
ASUS GUI RAID Manager: Basic Operations at Startup
3.6
Working with Windows
Just like any other Windows-based applications, the GUI RAID
Manager works entirely with windows to facilitate various disk
array operations. These windows follow the standard MS
Windows specifications, thus steps for manipulating elements
and windows within any GUI RAID Manager windows conform
to the standard MS Windows procedures.
This section describes how to work with the GUI RAID Manager
windows.
3.6.1 Using the Main Window
After starting the GUI RAID Manager, the ASUS GUI RAID
Manager main window appears on the screen. All management
operations pertaining to the disk array system will be performed
within the main window. The following describes the various
components found on the main window:
Menu Bar
Toolbar (Command Buttons)
Windows Display Area
Scroll Bars
Status Bar
♦ The menu bar displays the available menus. Except for
Options, all menus provide a list of commands for
invoking various disk array and Windows-related
3-18
3.6
Working with Windows
ASUS GUI RAID Manager: Basic Operations at Startup
operations. Most commonly used commands such as
Statistics and Event Log come with command buttons to
facilitate their execution − you can either select the
command from the menu, or click on its respective
command button on the toolbar. For a summary of the
available commands, see Appendix A, Command
Summary.
♦ The GUI RAID Manager provides command buttons to
assist in the execution of most commonly used commands.
These buttons are displayed on the toolbar, which can be
hidden if bigger working space is required for certain
management operations. For information on how to hide
the toolbar, see the Displaying and Hiding the Toolbar
section of this chapter.
The following figure displays the command buttons on the
toolbar:
Tile In-Sequence
Logical Volume
Physical Drives
Event Log
Statistics
Connect/Open
Logical Drives
Enclosure
Notification
Host LUN Assignment
Ø The Connect/Open command button is used for
connecting to a disk array system when you start the
GUI RAID Manager. This button has the same
function as the Connect command in the File menu.
After establishing a connection with the target disk
array system, this button changes to an Open button;
this time, providing the same function as Open in the
menu bar.
3.6
Working with Windows
3-19
ASUS GUI RAID Manager: Basic Operations at Startup
Ø The Tile In-Sequence command button arranges the
displayed windows next to each other, with
arrangement based on their uses, and each window
reduced to fit all elements within its width. This
button, however, only affects the Enclosure, Physical
Drives, Logical Drives, Volume, Host LUN
Assignment, and Statistics windows. This button has
the same function as the Tile In-Sequence command
in the Window menu.
Ø The Enclosure command button displays the
Enclosure window for defining customizable
enclosures. This button provides the same function as
the Enclosure command in the Open menu.
Ø The Physical Drives command button displays the
Physical Drives window for configuring the controller
and the physical drives included in the disk array
system. This button provides the same function as the
Physical Drive command in the Open menu.
Ø The Logical Drives command button displays the
Logical Drives window for creating and configuring
logical drives in the disk array system. This button
provides the same function as the Logical Drive
command in the Open menu.
Ø The Logical Volume command button displays the
Volume window for defining and configuring logical
volumes in the disk array system. This button
provides the same function as the Logical Volume
command in the Open menu.
Ø The Host LUN Assignment command button displays
the Host LUN Assignment window for assigning
logical volume partitions to various host LUNs. This
button provides the same function as the Host LUN
Assignment command in the Open menu.
3-20
3.6
Working with Windows
ASUS GUI RAID Manager: Basic Operations at Startup
Ø The Event Log command button displays the Event
Log window for viewing the contents of the log file.
This button provides the same function as the Event
Log command in the Open menu.
Ø The Notification command button allows you to
specify the notification configuration of the disk array
system. This button provides the same function as
Notification in the menu bar.
Ø The Statistics command button displays the Statistics
window for monitoring the performance of the disk
array system. This button has the same function as the
Statistics command in the Open menu.
♦ The windows display area is where the system displays the
GUI RAID Manager windows. You have the option to
arrange the displayed windows on this area in various
ways depending on your specific needs. The Window
menu provides you with the commands you will need to
arrange these windows. For information on how to do this,
see the Arranging Windows section of this chapter.
♦ The status bar displays results of various disk array
operations, error messages, and information about specific
elements in the system. You have the option to hide the
status bar to free some space on the windows display area.
For information on how to hide the status bar, see the
Displaying and Hiding the Status Bar section of this
chapter.
♦ The scroll bars let you move parts of a window into view
when the entire window does not fit into the windows
display area.
3.6
Working with Windows
3-21
ASUS GUI RAID Manager: Basic Operations at Startup
3.6.2 Using the Enclosure Window
The Enclosure window appears when you click on the
Enclosure command button or select the Enclosure command
from the Open menu. The Enclosure window allows you to
define customizable enclosures for creating an exact replica of
the disk array’s drive bays, displaying the exact location of the
physical drives, power supply, and fan. In addition, the
Enclosure window helps you monitor the temperature inside the
drive bays. (Chapter 4, Array Management, provides detailed
information on how to create enclosures.)
The Enclosure window is particularly useful in monitoring the
status of the physical drives. It provides you with a real-time
report on the drive status, using symbols and colors to represent
various conditions. The following figure illustrates how the GUI
RAID Manager represents the various drive conditions:
Assigned/Normal Drive
Failed Drive
Unassigned Drive
Spare Drive
Vacant Drive Bay
The system places an X mark on the icon of a failed drive. Spare
drives appear with their colors darker (shaded) than normal
drives (for example, for the first logical drive, normal drives
appear in yellow while the spare appears in dark yellow). When
you remove a drive from the drive bay, its corresponding icon on
the Enclosure window disappears.
3-22
3.6
Working with Windows
ASUS GUI RAID Manager: Basic Operations at Startup
NOTE: The Physical Drives window also provides you
with a real-time report on the drive status, using the same
symbols and colors to represent various conditions. What
you see on the Enclosure window is also reflected on the
Physical Drives window. These windows though differ in
the way physical drives are presented; in the Enclosure
window, the drives are arranged according to their actual
locations in the drive bays, while in the Physical Drives
window, the drives are arranged according to the connectors
they connect onto.
You can also display some information about a particular drive
by simply placing the mouse pointer on its respective icon. A
table similar to the following appears:
This table displays the current configuration of the drive,
including the drive’s slot number, the channel number of the
connector on the controller to which the drive’s SCSI cable is
connected, the ID number of the connector on the SCSI cable
where the drive is installed, the drive’s capacity, status, transfer
rate, the ID number of the logical drive where the drive belongs
(if there is one), and the drive’s manufacturer (if available).
To facilitate management of the Enclosure window, the GUI
RAID Manager supports the drag-and-drop function for moving
objects within the Enclosure window. If you need to move an
object to a different location within the window, just drag its
corresponding icon to the target destination.
3.6
Working with Windows
3-23
ASUS GUI RAID Manager: Basic Operations at Startup
3.6.3 Using the Physical Drives Window
The Physical Drives window is where you view and modify the
configuration of the controller and manage physical drives. This
window provides almost the same function as the Enclosure
window, using the same symbols and colors to represent various
drive conditions (for information about these symbols and
colors, see the previous section, Using the Enclosure Window).
The main difference between these two windows is in the way
they present the physical drives; the Enclosure window presents
the drives according to their actual locations in the drive bays,
while the Physical Drives window presents them based on the
connectors they connect onto.
To display the Physical Drives window, you can either click on
the Physical Drives command button or select the Physical
Drives command from the Open menu. A window similar to the
following will appear on the screen:
Front Panel
SCSI Channel Icons
Fault Bus Icon
Host Channel
Power Supply
Status
SCSI ID
Fan Status
Failed Drive
Global Spare Drive
UPS Status
Local Spare Drive
Assigned/Normal
Drive
Unassigned Drive
Temperature Status
Vacant Connector (double-click on connector to scan in a drive)
Depending on the controller you are using, this window displays
either the front panel of a SCSI-to-SCSI controller or the card
layout of a PCI-to-SCSI controller. The front panel display
3-24
3.6
Working with Windows
ASUS GUI RAID Manager: Basic Operations at Startup
reflects what appears on the actual front panel of a SCSI-to-SCSI
controller.
Also shown in this window are the physical drives and hosts (for
SCSI-to-SCSI controllers only) connected to the controller.
How they are connected and configured, including their current
status (for drives only), are all depicted on the screen. If you
need information about a particular object in this window,
simply place the mouse pointer on its respective icon. Letting
the mouse pointer hover over the front panel displays the
following table:
This table shows some information about the controller,
including the total cache size, the version of the firmware
currently stored in the Flash memory, the boot record version,
serial number, and the CPU type.
Letting the mouse pointer hover over a SCSI Channel displays a
table similar to the following:
This table provides information pertaining to the current
configuration of the SCSI channel. This includes the channel
3.6
Working with Windows
3-25
ASUS GUI RAID Manager: Basic Operations at Startup
number, channel mode (that is, host or drive), SCSI ID, the
default and current transfer clock rate, and the default and
current transfer width.
Letting the mouse pointer hover over a drive displays a table
similar to the following:
This table displays the current configuration of the drive,
including the drive’s slot number, the channel number of the
SCSI channel to which the drive is connected, the SCSI ID of the
drive, the drive’s capacity, current status, transfer rate, the ID
number of the logical drive to which the drive belongs (if it
belongs to one), and the drive vendor and product identifier
strings (if available).
The Physical Drives window also allows you to modify the
configuration of the controller and the SCSI channels, and scan
in newly added or replaced physical drives.
For more
information about this feature, see Chapter 4, Array
Management.
Fault Bus
In addition to displaying the SCSI channels, the Physical Drives
window also displays the status of the Fault Bus.
3-26
3.6
Working with Windows
ASUS GUI RAID Manager: Basic Operations at Startup
Fault Bus is a proprietary enclosure management interface. It
will warn the user if a dangerous situation occurs within the
RAID system. Fault Bus gathers the failure signals from the
cooling fans, redundant power supply, enclosure temperature
sensor and UPS device. In the GUI RAID Manager, it reports
this failure information to the user by displaying a red “X” on
whichever device has failed.
Fault Bus only collects the failure signals; it does not detect the
temperature, fan rotation, power supply failure or the UPS power
failure. Either a user-designed circuit or a 3rd-party circuit is
necessary for Fault Bus. This circuit must be configured properly
for Fault Bus to work. To configure the user-designed/3rd-party
circuit, double-click on the Fault Bus icon with your mouse.
3.6
Working with Windows
3-27
ASUS GUI RAID Manager: Basic Operations at Startup
The user is given the choice of enabling or disabling failure
signals. In addition, each signal must be configured as either
High or Low (refer to your 3rd-party circuit’s manual for the
proper settings.)
SAF-TE Enclosure Management
What is SAF-TE?
SAF-TE stands for SCSI Accessed Fault-Tolerant
Enclosures. It is an enclosure management technology. A
SAF-TE-compliant
enclosure
monitors
the
fan
temperature, power supply, UPS and also provides drive
status LED’s. (Note: the system integrator must connect
the cables from the SAF-TE device to the drive status
LED’s in the drive cannisters.) The SAF-TE enlcosure
connects to the RAID Controller via a SCSI connector. The
RAID controller communicates with the SAF-TE enclosure
with standard SCSI commands.
3-28
3.6
Working with Windows
ASUS GUI RAID Manager: Basic Operations at Startup
SAF-TE Support
Front Panel
error alert
RAID
Controller
UPS Failure
Signal Input
SCSI
SAF-TE
Chipset
Cooling Fan
Failure
Signal Input
GUI RAID Manager
error alert
Drive Status
Indicators
Temperature Alert
Signal Input
Power Supply
Failure
Signal Input
• SAF-TE chipset connects to the drive channel of the
controller together with the other SCSI drives.
How Does SAF-TE work?
The SAF-TE device (often a back plane within a drive-bay
enclosure) must occupy a connector on one of the drive
channels’ SCSI cables. The presence of a SAF-TE device
will be detected and its presence will be displayed in the
GUI RAID Manager program in place of the Fault Bus
icon.
3.6
Working with Windows
3-29
ASUS GUI RAID Manager: Basic Operations at Startup
SAF-TE is configured by selecting the "SAF-TE Polling
Period" under the "SCSI" menu.
Intervals ranging from .05 to 60 seconds are available. The
default polling period is "Disabled."
3-30
3.6
Working with Windows
ASUS GUI RAID Manager: Basic Operations at Startup
3.6.4 Using the Logical Drives Window
The Logical Drives window is where you perform management
on the logical drives of the disk array system. Logical drives are
combinations of physical drives, which are used to create logical
volumes. These volumes (or their partitions) can then be
mapped to various host LUNs.
The Logical Drives window allows you to create logical drives,
delete existing ones, and rebuild failed drives. It uses unique
colors to distinguish between logical drives. When a physical
drive within a logical drive fails, the system notifies you by
darkening the color of the affected logical drive. The logical
drive will remain in this state until either a spare is detected and
rebuilding is automatically started, or the drive is replaced and
rebuilding is manually initiated.
While rebuilding a logical drive, the GUI RAID Manager reports
the progress of the rebuilding process by filling in the color of
the logical drive accordingly. After rebuilding is complete, the
logical drive will display its normal color, signifying on-line
condition.
To facilitate management of the Logical Drives window, the
GUI RAID Manager supports drag-and-drop operations to
establish certain associations. For example, to assign a particular
physical drive as a spare to a logical drive, just drag the desired
physical drive over to the logical drive window and drop it into
the target logical drive.
To display the Logical Drives window, you can either click on
the Logical Drives command button or select the Logical
Drives command from the Open menu. A window similar to the
following will appear on the screen:
3.6
Working with Windows
3-31
ASUS GUI RAID Manager: Basic Operations at Startup
If you need information about a particular logical drive, just let
the mouse pointer hover over its corresponding icon. A table
similar to the following will appear:
This table displays the ID number of the logical drive, the RAID
level, total capacity, current status, total number of physical
drives combined to create this logical drive, number of spare
drives, and number of failed drives.
For more information on how to create, delete, and rebuild
logical drives, see Chapter 4, Array Management.
3.6.5 Using the Volume Window
The GUI RAID Manager provides a Volume window for use in
the management of logical volumes in the disk array system.
3-32
3.6
Working with Windows
ASUS GUI RAID Manager: Basic Operations at Startup
Logical volumes are a grouping of multiple logical drives
combined together into one large unit. This unit is, in turn,
mapped entirely or by parts (that is, by partitions) to various host
LUNs.
NOTE: A logical volume can contain a maximum of eight
logical drives with dissimilar RAID levels.
The Volume window helps you create logical volumes, delete
existing ones, and define partitions. It supports the drag-anddrop operation to simplify management of these disk array
elements − you simply drag logical drives over to the Volume
window and drop them into the logical volume being created.
To display the Volume window, you can either click on the
Logical Volume command button or select the Logical Volume
command from the Open menu. A window similar to the
following will appear on the screen:
Created Logical Volume
Logical Drive Colors
Partitions
Not Yet Created
The GUI RAID Manager uses a book icon to represent a
particular volume, with the binding displaying the respective
colors of the logical drives used to create this particular volume.
The relative size of the colored area reflects the capacity of the
respective logical drive relative to the total capacity of the
logical volume.
3.6
Working with Windows
3-33
ASUS GUI RAID Manager: Basic Operations at Startup
Logical volumes that have been partitioned appear with dotted
lines on them. The relative position of a dotted line indicates the
location of the boundary between partitions within the volume.
Moving this line will change the location of the boundary
thereby changing the size of the partitions so bounded.
If you need information about a particular logical volume,
simply let the mouse pointer hover over its corresponding icon.
A table similar to the following will appear:
This table displays information about the existing partitions of a
logical volume. These include the total number of partitions into
which the volume has been divided and their respective sizes.
This table also displays the volume ID and its total capacity.
For information on how to create, delete, and set partitions for
logical volumes, see Chapter 4, Array Management.
3.6.6 Using the Host LUN Assignment Window
The Host LUN Assignment window depicts the Logical Unit
Numbers (LUNs) for the existing host channels in the disk array
system with their current logical volume and/or partition
assignments. Depending on the type of controller used in the
system, this window displays one or more host channels; the
PCI-to-SCSI controller only supports one host channel (that is,
the PCI bus itself). Each host LUN appears to the host on one
access letter with a capacity equal to the mapped volume (or
partition).
3-34
3.6
Working with Windows
ASUS GUI RAID Manager: Basic Operations at Startup
To display the Host LUN Assignment window, you can either
click on the Host LUN Assignment command button or select
the Host LUN Assignment command from the Open menu. A
window similar to the following appears on the screen:
Host Channel
LUN ID Number
LUN Mapping
This window displays the available host channels and their
respective LUN assignments. LUNs with mapped volumes or
partitions appear with book icons on their connectors. These
icons are similar to those used for logical volumes only that they
appear smaller. If you need information on any of these
mappings, just place the mouse pointer on the target book icon.
A table similar to the following appears on the screen:
This table displays the SCSI number for the respective host
channel, the LUN number, the index number of the logical
volume used in this mapping, the partition index, and the
capacity.
3.6
Working with Windows
3-35
ASUS GUI RAID Manager: Basic Operations at Startup
For information on mapping logical volumes and/or partitions to
host LUNs, and deleting existing mappings, see Chapter 4, Array
Management.
3.6.7 Arranging Windows
The Window menu provides you with commands for rearranging
the displayed GUI RAID Manager windows (excluding the main
window) in various ways. You have the option to cascade these
windows so that they will overlap with each other making their
title bars visible, arrange the open windows in smaller sizes to fit
next to each other on the screen, or display the windows in such
a way that they appear according to their uses and the maximum
number of elements are displayed.
All commands in the Window menu are standard MS Windows
commands, except for Tile In-Sequence. The Tile In-Sequence
command is specifically designed for disk array management. It
arranges the open windows based on their uses, with each
window reduced to fit all elements within its width. Since all
elements within the width are displayed, a horizontal scroll bar is
not necessary for each window; however, for the main window,
it might be necessary specially when multiple windows are
displayed.
4Arranging windows using the Tile In-Sequence command
•
From the Window menu, select Tile In-Sequence.
-orClick on the Tile In-Sequence command button.
4 Cascading the displayed windows
•
3-36
From the Window menu, select Cascade.
3.6
Working with Windows
ASUS GUI RAID Manager: Basic Operations at Startup
4Arranging windows using the Tile Horizontal command
•
From the Window menu, select Tile Horizontal.
4Arranging windows using the Tile Vertical command
•
3.7
From the Window menu, select Tile Vertical.
Exiting GUI RAID Manager
Exiting from the GUI RAID Manager terminates the current
management session with the disk array system. When you exit,
the system automatically saves the disk array configuration for
use later when connecting to the same system. The system also
releases all used or occupied resources for use by other
applications.
4 Exiting from the GUI RAID Manager
•
3.7
From the File menu, select Exit.
Exiting GUI RAID Manager
3-37
4 Array Management
This chapter describes the steps on how to manage a disk array
system. The topics include the following:
♦ Background information about disk array management
♦ Defining enclosures
♦ Setting controller configuration
♦ Setting channel configuration
♦ Scanning in drives
♦ Creating logical drives
♦ Assigning spare drives
♦ Deleting logical drives
♦ Rebuilding logical drives
♦ Creating logical volumes
♦ Defining volume partitions
♦ Deleting volume partitions
♦ Deleting logical volumes
♦ Mapping logical volumes or partitions to host LUNs
♦ Deleting LUN mapping
♦ Displaying the contents of the event log
♦ Monitoring performance statistics
If this is your first time to manage a disk array system, we
recommend that you read through the first section of this
4-1
ASUS GUI RAID Manager: Array Management
chapter, Background Information, to get basic information about
disk array management. You will need this basic knowledge to
be able to effectively use the GUI RAID Manager.
4-2
4.1
Background Information
ASUS GUI RAID Manager: Array Management
4.1
Background Information
Redundant Arrays of Independent Disks (RAID) is a storage
technology used to improve the processing capability of storage
systems. This technology is designed to provide reliability in
disk array systems and to take advantage of the performance
gains multiple disks can offer.
RAID comes with a redundancy feature that ensures faulttolerant, uninterrupted disk storage operations. In the event of a
disk failure, disk access will still continue normally with the
failure transparent to the host system.
RAID has six levels: RAID 0 ~ 5. RAID levels 1, 3 and 5 are
the most commonly used levels, while RAID levels 2 and 4 are
the less popular ones. Appendix C, RAID Levels, gives
information about these levels, including the benefits of each.
ASUS disk array controllers support hot-swapping where a failed
drive can be replaced while the disk array system continues to
function. Spares can also be assigned so that, as soon as a drive
fails, the spare will be automatically configured into the array
and reconstruction will commence.
4.1.1 Definition of Terms
This section describes some of the disk array terms used in this
documentation.
♦ Physical drives. These are the actual SCSI drives
installed on the connectors of the SCSI cables. These
drives are displayed on the Physical Drives window.
♦ Spare drives. These are physical drives that serve as
backups. When a drive fails, the spare is automatically
configured into the array, and data reconstruction will
4.1
Background Information
4-3
ASUS GUI RAID Manager: Array Management
immediately commence. Spare drives appear in darker
(shaded) colors than normal drives.
♦ Replacement drives. These are physical drives that are
manually configured into the array to replace failed drives.
In the absence of spare drives, you will need to use
replacement drives to replace defective drives before
rebuilding can be performed.
♦ Failed drives. These are physical drives that fail due to
errors of some type. Failed drives appear with X marks on
their respective icons.
♦ Logical drives. These drives are created using physical
drives. Combining physical drives into one logical drive
gives you a disk array with a certain RAID level. To view
logical drives, use the Logical Drives window.
♦ Logical volumes. These volumes are created using logical
drives. Combining logical drives into one logical volume
gives you a single logical unit with even larger capacity.
Logical volumes or their partitions are mapped to various
host LUNs. To view logical volumes, use the Volume
window.
4.1.2 Operation with Spare Drives
You can assign spare drives to a particular logical drive to serve
as backup drives. When a drive fails within the logical drive,
one of the spares will be automatically configured into the
logical drive, and data reconstruction onto it will immediately
commence.
The following are guidelines for disk failure recovery when a
spare drive is available:
4-4
4.1
Background Information
ASUS GUI RAID Manager: Array Management
♦ If a spare drive exists in the same logical drive, the
controller will automatically mount the spare drive and
start data rebuilding in the background.
♦ Depending on the design of the system external to the
controller, it may be possible to remove a defective drive
and replace it with a new drive without shutting down the
system (hot-swapping). Alternatively, the system can be
shut down at a convenient time and the failed drive
replaced.
♦ The replacement drive must then be assigned as a new
spare drive.
4.2
Operation without Spare Drives
The following are guidelines for disk failure recovery when a
spare drive is not available:
♦ Depending on the design of the system, it may be possible
to remove a defective drive and replace it with a new drive
without shutting down the system (hot-swapping).
Alternatively, the system can be shut down at a convenient
time and the failed drive replaced.
♦ If the replacement drive is installed on the same channel
and SCSI ID, you can then proceed with data rebuilding.
♦ If the replacement drive is installed on a different channel
or SCSI ID, you need to scan in the new drive first then
assign it as a spare drive of the logical drive. Data
rebuilding will have to be manually initiated.
IMPORTANT: Although the RAID system provides
uninterrupted disk access even after a disk failure, do not
leave a failed drive unattended to. Without replacement, the
system will not survive a failure of a second drive on the
4.2
Operation without Spare Drives
4-5
ASUS GUI RAID Manager: Array Management
same logical drive. A defective drive must be promptly
replaced and data rebuilt.
CAUTION: When performing hot-swapping, be sure to
remove only the defective drive. Removing the wrong drive
will result in unrecoverable data loss. Use the Enclosure or
Physical Drives window to locate the exact location of the
failed drive.
4-6
4.2
Operation without Spare Drives
ASUS GUI RAID Manager: Array Management
4.3
Before you Start
The GUI RAID Manager station comes with password protection
that prevents unauthorized modification of the disk array
configuration. During first attempts at modifying the system
configuration after starting up the GUI RAID Manager or after
the GUI RAID Manager comes back from a period of inactivity,
the configuration will be password protected. After specifying
the correct password, all subsequent configuration modifications
will be permitted without any password protection; however, if
there is no station activity within a specified period of time, the
password will be put back into effect.
By default, the GUI RAID Manager station comes without any
password. For information on how to set a password and other
security features, see the Setting Up Security section of Chapter
3, Basic Operations at Startup.
4.3
Before you Start
4-7
ASUS GUI RAID Manager: Array Management
4.4
Defining Enclosures
You create custom enclosures to facilitate management of the
physical drives in the disk array system. These enclosures can
replicate closely real enclosures with real drive bays, depicting
the exact locations and positions of the physical drives. When a
drive fails, determining which drive to replace is simply a matter
of checking the Enclosure window for the exact location of the
failed drive (a failed drive appears with an X mark on its icon).
4 Creating an enclosure
1. Display the Enclosure window, if not yet displayed. To
display it, click on the Enclosure command button or select
the Enclosure command from the Open menu.
If you have not defined an enclosure yet for the disk array
system, the Enclosure window will be blank; otherwise, the
existing enclosures appear in the window. If you want to
delete an existing enclosure, see the instructions below.
2. Double-click on an empty space within the Enclosure
window. The following menu will appear:
3. Depending on the orientation of your drive bays, select
either Create Vertical Enclosure or Create Horizontal
Enclosure. One of the following enclosure icons will
appear on the screen:
4-8
4.4
Defining Enclosures
ASUS GUI RAID Manager: Array Management
4. Resize the enclosure icon to display the exact number of
drive bays you need. To resize, place the mouse pointer on
the bottom-side or right-side of the icon and press and hold
the left mouse button. When the mouse pointer changes to a
double-headed arrow, drag the mouse pointer until the
desired number of drive bays is displayed. As you drag the
mouse pointer, the number of drive bays will change
dynamically.
5. Repeat the same procedure for the other drive bays you may
still have in your configuration.
6. To fill in the drive bays in the enclosure just created, display
the Physical Drives window. To display this window, click
on the Physical Drives command button or select the
Physical Drives command from the Open menu.
7. From the Physical Drives window, drag the physical drives
to their respective drive bays in the Enclosure window.
8. Check to ensure that all drives are in their respective drive
bays. To check, let the mouse pointer hover over each drive
icon. A table will appear displaying some information about
the drive.
NOTE: If you have placed the wrong drive in a drive bay,
just drag over the correct drive from the Physical Drive
window over and drop it into the correct drive bay.
4 Removing a drive bay from an enclosure
4.4
Defining Enclosures
4-9
ASUS GUI RAID Manager: Array Management
1. Double-click on the target drive bay. The following menu
will appear on the screen:
2. Select Remove Bay from Enclosure.
4 Moving an enclosure
1. Place the mouse pointer on the left-side or top-side of the
enclosure icon and press and hold the left mouse button.
2. Drag the icon to the desired location within the Enclosure
window. When you have reached the target location, release
the mouse pointer to drop the enclosure icon.
4 Deleting an enclosure
1. Double-click on any area of the enclosure icon, except on
occupied drive bays. The following message will appear on
the screen:
2. Click OK to delete the entire enclosure.
4-10
4.4
Defining Enclosures
ASUS GUI RAID Manager: Array Management
4.5
Setting Controller
Configuration
The GUI RAID Manager enables you to modify the
configuration of the disk array controller from your manager
console. You can enable or disable the write-back cache of the
system, set whether or not the controller will reset the SCSI bus
during power-on, stagger the drives’ motor spin-up sequence, set
the baud rate of the controller’s RS-232 port, and modify the
station password.
The following describes the user-configurable parameters:
♦ Write-Back. This parameter allows you to enable or
disable the write-back cache of the system. The writeback cache allows write data to be stored in the cache
memory prior to writing to the disk, thereby pipelining the
I/O write process.
♦ SCSI Reset on Power-up. This parameter determines
whether or not the controller will assert SCSI bus reset
during power-on initialization.
♦ Staggered Drive Spin-Up. This parameter determines
whether or not the controller will sequence the drives to
start spinning in succession at five-second intervals.
Enabling staggered drive spin-up can help prevent
overloading the power supply when many drives spin up at
the same time.
♦ RS-232 Baud Rate. This parameter sets the baud rate of
the RS-232 port on the controller. When connecting a host
computer, terminal, or other device (such as a modem)
onto this port, ensure that their baud rates are set
accordingly; otherwise, there will be communication
problems.
4.5
Setting Controller Configuration
4-11
ASUS GUI RAID Manager: Array Management
♦ Change Password. This parameter allows you to modify
the current password of the GUI RAID Manager station.
This password prevents any unauthorized modifications on
the system configuration. For more information about the
station password and other security issues, see the Setting
Up Security section of Chapter 3, Basic Operations at
Startup.
4 Setting the controller configuration
1. Display the Physical Drives window by clicking on the
Physical Drives command button or selecting the Physical
Drives command from the Open menu.
2. From the Physical Drives window, double-click on the
displayed controller (that is, front panel for a SCSI-to-SCSI
controller or card layout for a PCI-to-SCSI controller). The
Controller Settings dialog box will appear:
3. From the Write-Back drop-down list box, select the writeback cache state. To select, click on the down-arrow button
at the right of the box, then select the option you need. To
4-12
4.5
Setting Controller Configuration
ASUS GUI RAID Manager: Array Management
enable the write-back cache, select Enabled; to disable,
select Disabled.
4. If you want a SCSI bus reset to be issued on the drive
channels every time you power on or reset the disk array
system, set the SCSI Reset on Power-Up parameter to
Enabled. Otherwise, set this parameter to Disabled.
5. To avoid overloading the power supply when several drives
spin up at the same time, set the Staggered Drive Spin-Up
parameter to Enabled. If a fast system startup is needed,
and the power supply is capable of handling all the power
requirements of the drives at the same time, set this
parameter to Disabled.
6. Use the RS-232 Baud Rate drop-down list box to set the
baud rate of the RS-232 port on the controller. If you have a
host computer, terminal, or other device (such as a modem)
connected to this port, specify here the baud rate of the
connected device, or set the port’s baud rate here and make
the baud rate of the device correspond to this value.
7. If you want to modify the password, check the Change
Password check box, and then specify the new password in
the provided text box. You will need to confirm your
password.
8. Click OK to save the new controller configuration. If you
specified a new password, this value will be saved into the
non-volatile memory on the disk array controller.
4.6
Setting Channel
Configuration
From within the GUI RAID Manager, you can modify the
configuration of any channel on the controller. You can set the
4.6
Setting Channel Configuration
4-13
ASUS GUI RAID Manager: Array Management
channel operation mode to host or drive, enable or disable the
channel termination, set its SCSI ID, set the transfer clock rate
for synchronous communication, and select the transfer width.
The following describes the user-configurable parameters:
♦ Channel Mode. This parameter sets the operation mode
of a particular channel on the SCSI-to-SCSI controller. It
configures the operation mode to either host or drive,
where a host channel is used when connecting to a host,
while a drive channel is for connecting to SCSI drives.
Any SCSI channel on the SCSI-to-SCSI controller can
serve as either a host or a drive channel. Channel 0 is the
default host channel with SCSI ID number 0.
For a PCI-to-SCSI controller,
permanently set to Drive.
this
parameter
is
♦ Termination. This parameter enables or disables SCSI
channel termination. SCSI cables must be properly
terminated at both ends; that is, when connecting one end
of a SCSI cable to a channel, the termination of the
channel must be enabled. Note that the other end of the
cable must also be properly terminated.
You can terminate the other end of the cable by installing
or enabling termination on the SCSI drive farthest from the
controller or by installing an external terminator on the end
connector. The latter method is recommended so that
removal of the drives will not affect cable termination. All
other terminators must be removed or disabled making
sure that only one terminator is installed on each end.
♦ SCSI ID. This parameter sets the SCSI ID of the channel.
Each channel must have a unique SCSI ID in order to
work properly. SCSI ID ranges from 0 up to 15, with 0
4-14
4.6
Setting Channel Configuration
ASUS GUI RAID Manager: Array Management
assigned as the default value for host channels, and 7 for
drive channels.
♦ Default Sync Clock (MHz), Default Xfer Width. These
parameters set the data transfer clock rate for synchronous
communication over the SCSI bus, and enable or disable
wide transfer, respectively. For a detailed description of
these parameters, see the discussion below.
Data that is transferred across the SCSI bus in synchronous
transfer mode is clocked using a synchronous transfer
clock signal. The frequency of this signal determines the
rate at which data is transferred. If, for example, the
synchronous transfer clock is 10 MHz, data transfer rate
will be 10 million bytes per second (assuming narrow
transfer).
Data transfer across the SCSI bus can be either 8 bits or 16
bits at a time. The former is referred to as narrow”
transfer, while the latter is referred to as wide” transfer.
At the same synchronous transfer clock rate , data transfer
rate using wide transfer will be double that using narrow.
With synchronous transfer clock of 10 MHz, data transfer
rate will be 10 Mbytes/second under narrow transfer, and
20Mbytes/second for wide.
Occasionally, under conditions in which SCSI signal
quality is poor, such as long cables, poor connections, or
bad termination, it may be necessary to reduce the
synchronous transfer clock to allow the SCSI channel to
function normally. Under worst conditions, it may be
necessary to switch to asynchronous communication
mode.
Furthermore, certain older SCSI devices may only support
narrow transfer and behave abnormally when an attempt to
negotiate wide transfer is made. Under such conditions,
4.6
Setting Channel Configuration
4-15
ASUS GUI RAID Manager: Array Management
wide transfer may need to be disabled, forcing the
controller to use narrow transfer mode with that device.
4 Setting the configuration of a channel
1. Display the Physical Drives window by clicking on the
Physical Drives command button or selecting the Physical
Drives command from the Open menu.
2. From the Physical Drives window, double-click on the
corresponding SCSI Channel icon of the target channel.
SCSI Channel icons are displayed on the card layout of a
PCI-to-SCSI controller, or just below the front panel of a
SCSI-to-SCSI controller. The Channel Setting dialog box
will appear:
3. If you are using a SCSI-to-SCSI controller, select the
channel mode from the Channel Mode drop-down list box.
To select, click on the down-arrow button at the right of the
box, then select the option you want. If you want to
configure the selected channel as a host channel, select Host;
to configure as a drive channel, select Drive.
4-16
4.6
Setting Channel Configuration
ASUS GUI RAID Manager: Array Management
4. From the Termination drop-down list box, specify whether
to enable the channel termination or not. To enable, select
Enabled; to disable, select Disabled.
5. If you want to assign a different SCSI ID to the selected
channel, specify the new ID in the SCSI ID drop-down list
box. When selecting a value, be sure that it does not conflict
with0 the other SCSI devices on the channel.
6. To change the speed of the SCSI bus synchronous transfer
clock, type in the new value in the Default Sync Clock
(MHz) text box.
7. From the Default Xfer Width drop-down list box, select
whether to use narrow or wide transfer. To use narrow
transfer, select Narrow; to use wide transfer, select Wide.
8. Click OK to save the new channel configuration into the
non-volatile memory of the controller.
4.7
Scanning in Drives
Disk scanning is a process in which a newly installed drive is
introduced to the disk array system. You need to scan in a drive
when:
♦ The drive is a new one. A drive is considered a new drive
if it is not yet displayed in the Physical Drives window.
♦ The drive is a replacement for a failed drive which is
installed on a different channel or has a different SCSI ID.
If you do not scan in the drive on such occasions, the system will
not be able to see the drive, rendering the drive useless.
4.7
Scanning in Drives
4-17
ASUS GUI RAID Manager: Array Management
4 Scanning in a drive
1. Display the Physical Drives window by clicking on the
Physical Drives command button or selecting the Physical
Drives command from the Open menu.
2. From the Physical Drives window, double-click on the
connector corresponding to the SCSI ID of the drive being
scanned. A confirmation message similar to the following
will appear on the screen:
3. Click OK. The system will scan for a drive with the
specified ID and then will display either a successful
message or an error message.
4. Click OK.
The GUI RAID Manager will place a drive icon on the
respective connector if the scanning process is successful.
4-18
4.7
Scanning in Drives
ASUS GUI RAID Manager: Array Management
4.8
Creating and Deleting Logical Drives
You can create logical drives by simply combining physical
drives together. The GUI RAID Manager provides you with two
options for creating logical drives: automatic and manual. In the
automatic method, the GUI RAID Manager automatically selects
all available (that is, unassigned) drives in the system and then
recommends the appropriate RAID level. Drives can be
manually deselected and/or a different RAID level can be
selected if so desired.
In the manual method, you select the drives you want to be
included in and the RAID level of the logical drive. To assist in
the selection of the RAID level, the GUI RAID Manager
recommends a RAID level based on the number of drives you
have selected. You can either accept the recommended RAID
level or specify the one you prefer.
The GUI RAID Manager also provides you with the option to
delete logical drives. Before deleting though, be sure that the
stored data on the target logical drive is no longer needed.
Deleting a logical drive erases all stored information.
NOTE: When you delete a logical drive, all assigned
physical drives to this drive will be released, making them
available again for logical drive creation.
4.8
Creating and Deleting Logical Drives
4-19
ASUS GUI RAID Manager: Array Management
4 To create a logical drive
1. Display the Logical Drives window by clicking on the
Logical Drives command button or selecting the Logical
Drives command from the Open menu. If you intend to use
the manual method, display also the Physical Drives window
by clicking on the Physical Drives command button or
selecting the Physical Drives command from the same
menu.
2. From the Logical Drives window, double-click on an unused
logical drive icon.
-orDouble-click the right mouse button on an unused logical
drive icon and then select Create from the displayed menu.
The Logical Drive Creation dialog box will appear:
3. If you want to use the automatic method, check the Auto
Drive Selection check box and then proceed to step 8.
4. If you want to use the manual method, uncheck the Auto
Drive Selection check box.
4-20
4.8
Creating and Deleting Logical Drives
ASUS GUI RAID Manager: Array Management
5. From the Physical Drives window, click on the target drives.
Be sure to select only unassigned drives (those that appear in
gray). The Number of Drives Selected field displays the
number of selected drives.
6. If you want to modify the recommended RAID level, specify
the level you prefer in the RAID Level drop-down list box.
To select, click on the down-arrow button at the right of this
box and then select the option you want. The 1+Spare,
3+Spare, and 5+Spare options are RAID 1, RAID 3, and
RAID 5 levels respectively, each with a spare drive. For
information on the various RAID levels, see Appendix C,
RAID Levels.
7. The value in the Max Drive Capacity (MB) text box
determines how much capacity from each drive will be used
in the logical drive. It may be useful to utilize this parameter
to restrict capacity when the possibility exists that
replacement drives acquired in the future might have slightly
less capacity than the drives to be included in the logical
drive. Type in the desired capacity in this box.
8. Click OK.
4 To delete a logical drive
1. Display the Logical Drives window by clicking on the
Logical Drives command button or selecting the Logical
Drives command from the Open menu.
2. From the Logical Drives window, double-click the right
mouse button on the target logical drive. The following
menu will appear on the screen:
4.8
Creating and Deleting Logical Drives
4-21
ASUS GUI RAID Manager: Array Management
3. Select Delete.
4.9
Assigning Spare Drives
You can assign spare drives to a logical drive to serve as backups
for failed drives. In the event of a drive failure, the spare drive
will be automatically configured into the array and
reconstruction (or rebuilding) will immediately commence.
Logical drives can support multiple spare drives; this
configuration however is rarely used due to its high cost and
uncommon occurrences of drive failures. A practical
configuration calls for one spare drive per logical drive − after
rebuilding on this drive, just replace the failed drive and then
configure the replacement as the new spare drive of the logical
drive.
4-22
4.9
Assigning Spare Drives
ASUS GUI RAID Manager: Array Management
NOTE: Adding a spare drive can be done automatically by
selecting the 1+Spare, 3+Spare or 5+Spare option from the
Logical Drive Selection dialog box when creating a logical
drive. These options however only apply to RAID 1, RAID
3, and RAID 5 levels respectively.
4 Assigning a spare drive
1. Display the Physical Drives and Logical Drives windows.
To display the former, click on the Physical Drives
command button or select the Physical Drives command
from the Open menu. To display the Logical Drives
window, click on the Logical Drives command button or
select the Logical Drives command from the same menu.
2. From the Physical Drives window, position the mouse
pointer on the icon of the drive you wish to be the spare
drive and press and hold the left mouse button.
3. Drag the drive icon over to the destination logical drive and
then release the mouse button. The following message will
appear on the screen:
4. Click OK.
4.9
Assigning Spare Drives
4-23
ASUS GUI RAID Manager: Array Management
4.10
Rebuilding Logical Drives
Depending on whether or not there is a spare drive, rebuilding is
initiated automatically or manually. In the presence of a spare
drive, the system automatically rebuilds onto the spare drive.
This process is done in the background, thus it appears
transparent to the user.
In the absence of a spare drive, rebuilding must be initiated
manually. Before initiating a manual rebuild, you need to first
replace the failed drive. If you install the replacement drive on
the same connector (that is, same channel and SCSI ID), then
you can proceed with the rebuilding process; otherwise, you
need to scan in the drive first.
4 To rebuild a logical drive
1. Display the Logical Drives window by clicking on the
Logical Drives command button or selecting the Logical
Drives command from the Open menu.
2. From the Logical Drives window, double-click the right
mouse button on the degraded logical drive. The following
menu will appear on the screen:
3. Select Rebuild.
4-24
4.10
Rebuilding Logical Drives
ASUS GUI RAID Manager: Array Management
4.11
Creating and Deleting Logical
Volumes
You can create and delete logical volumes from your GUI RAID
Manager station. Logical volumes are created by simply
combining unassigned logical drives together. You can combine
logical drives with different capacities and RAID levels into one
logical volume. Alternatively, you can delete existing logical
volumes. Before deleting though, be sure that the data stored in
the logical volume is no longer needed. Deleting a logical
volume erases all stored information.
NOTE: When you delete a logical volume, all assigned
logical drives to this volume will be released, making them
available again for logical volume creation.
4 To create a logical volume
1. Display the Logical Drives and Volume windows. To
display the former, click on the Logical Drives command
button or select the Logical Drives command from the Open
menu. To display the Volume window, click on the Logical
Volume command button or select the Logical Volume
command from the same menu.
2. From the Logical Drives window, position the mouse pointer
on the icon of a logical drive you wish to include in creating
the logical volume and press and hold the left mouse button.
3. Drag the icon over to the target logical volume and then
release the mouse button.
4. Repeat steps 2 ~ 3 for the remaining logical drives you want
to include in the logical volume.
5. Double-click the right mouse button on the target logical
volume. The following menu will appear:
4.11 Creating and Deleting Logical Volumes
4-25
ASUS GUI RAID Manager: Array Management
6. Select Volume. Then, from the next menu, select Create
LV.
The logical volume is now created. You may now define its
partitions. See the Creating and Deleting Partitions section of
this chapter.
4-26
4.11
Creating and Deleting Logical Volumes
ASUS GUI RAID Manager: Array Management
4 To delete a logical volume
1. Display the Volume window by clicking on the Logical
Volume command button or selecting the Logical Volume
command from the Open menu.
2. Double-click the right mouse button on the target logical
volume. The following menu will appear:
3. Select Volume. Then, from the next menu, select Delete
LV.
4.11 Creating and Deleting Logical Volumes
4-27
ASUS GUI RAID Manager: Array Management
4.12
Creating and Deleting
Partitions
Depending on your specific needs, you can either partition a
logical volume into smaller sizes or just leave it at its default size
(that is, one large partition covering the entire volume). If you
intend to map the entire logical volume to a single host LUN,
then partitioning becomes irrelevant; however, if the volume is
to be mapped to multiple host LUNs, then you need to define
partitions for later mapping to specific LUNs.
NOTE: You can create a maximum of eight partitions per
logical volume.
4 Creating partitions for a logical volume
1. Display the Volume window by clicking on the Logical
Volume command button or selecting the Logical Volume
command from the Open menu.
2. Double-click the right mouse button on the target logical
volume. The following menu will appear:
3. Select Partition. The following menu will appear on the
screen:
4-28
4.12
Creating and Deleting Partitions
ASUS GUI RAID Manager: Array Management
4. Select Create Partition. A table similar to the following
will appear displaying the current partition layout:
5. Adjust the partition size using the vertical scroll bar on the
displayed table. Click OK when the desired size is achieved.
You can also adjust the partition size by placing the mouse
pointer on the logical volume icon and then moving the
displayed dotted line. As you move the line, the partition
size changes accordingly. The table reflects the changes on
the size of the affected partition. Click the mouse button
when the desired size is reached or move the mouse pointer
over to the vertical scroll bar for micro adjustment then click
OK.
6. If you wish to create a subpartition for an already existing
partition, double-click the right mouse button anywhere
within its area. Then, repeat steps 3 ~ 5.
You can create up to eight partitions per logical volume.
4.12 Creating and Deleting Partitions
4-29
ASUS GUI RAID Manager: Array Management
7. After defining the desired partitions, double-click the right
mouse button on the current logical volume.
8. From the displayed menu, select Partition. Then, select Set
Partition.
The logical volume is now ready for mapping to host LUNs. See
the Mapping Logical Volumes/Partitions to Host LUNs section
of this chapter.
4 Deleting logical volume partitions
1. Display the Volume window by clicking on the Logical
Volume command button or selecting the Logical Volume
command from the Open menu.
2. Double-click on the partition you wish to delete.
following menu appears on the screen:
The
3. Select Partition. The following menu will appear on the
screen:
4-30
4.12
Creating and Deleting Partitions
ASUS GUI RAID Manager: Array Management
4. Select Delete Partition.
5. Repeat the same procedure to delete the other unwanted
partitions.
6. After deleting partitions, double-click the right mouse button
on the current logical volume.
7. From the displayed menu, select Partition. Then, select Set
Partition.
4.12 Creating and Deleting Partitions
4-31
ASUS GUI RAID Manager: Array Management
4.13
Mapping Logical Volumes/Partitions to Host LUNs
After creating a logical volume, you can map it as is to a host
LUN if you prefer; or, if partitions are set, you can map each
partition to specific host LUNs. Each host supports 32 LUNs,
each of which appears as a single drive letter to the host if
mapped to a logical volume (or its partition).
Alternatively, you can delete existing host LUN mappings. In
cases where certain mappings are found useless, or disk array
reconfiguration is needed, you can delete unwanted mappings in
your system.
4 Mapping an entire logical volume to a host LUN
1. Display the Volume and Host LUN Assignment windows.
To display the former, click on the Logical Volume
command button or select the Logical Volume command
from the Open menu. To display the Host LUN Assignment
window, click on the Host LUN Assignment command
button or select the Host LUN Assignment command from
the same menu.
2. From the Volume window, position the mouse pointer on the
icon of the logical volume you wish to map and press and
hold the left mouse button.
3. Drag the icon over to the target host LUN and then release
the mouse button.
4 Mapping logical volume partitions to host LUNs
1. Display the Volume and Host LUN Assignment windows.
To display the former, click on the Logical Volume
command button or select the Logical Volume command
from the Open menu. To display the Host LUN Assignment
4-32
4.13
Mapping Logical Volumes/Partitions to Host LUNs
ASUS GUI RAID Manager: Array Management
window, click on the Host LUN Assignment command
button or select the Host LUN Assignment command from
the same menu.
2. From the Volume window, position the mouse pointer on the
partition you wish to map and press and hold down the left
mouse button.
3. Drag the partition over to the target host LUN and then
release the mouse button.
4. Repeat the same procedure for the other remaining partitions
on the logical volume to be mapped.
4 Deleting a host LUN mapping
1. Display the Host LUN Assignment window by clicking on
the Host LUN Assignment command button or selecting the
Host LUN Assignment command from the Open menu.
2. From the Host LUN Assignment window, double-click on
the icon of the mapped logical volume. The following
confirmation message appears on the screen:
3. Click OK.
4.13
Mapping Logical Volumes/Partitions to Host LUNs
4-33
ASUS GUI RAID Manager: Array Management
4.14
Displaying the Event Log
The GUI RAID Manager keeps a log file for documenting all
events that occurred in the disk array system ranging from
simple notifications, to warnings, to alerts.
The GUI RAID Manager saves the system log into a file named
EVENT.LOG in the GUI RAID Manager directory. You can
view the contents of this text file using any text editor program
such as Windows’ NOTEPAD application. You can also print
out the contents of the log file on a printer for reference
purposes. In the event of a system failure, you can use the printouts for diagnosis.
4 To display the event log
1. Click on the Event Log command button or select the Event
Log command from the Open menu. The Event Log
window will appear:
The events in the window are sorted according to the date
and time they occurred. Description for each event is also
provided to facilitate reference.
4-34
4.14
Displaying the Event Log
ASUS GUI RAID Manager: Array Management
2. To scroll through the list, use the vertical scroll bars.
4.14 Displaying the Event Log
4-35
ASUS GUI RAID Manager: Array Management
4.15
Monitoring Statistics
The GUI RAID Manager comes with a statistics monitoring
feature to report on the overall performance of the disk array
system. This feature provides a real-time report on the current
throughput of the system, displaying the number of bytes being
read and written per second. These values are displayed in a
graphical format to facilitate reference.
4To monitor the current data traffic on the disk array system
•
Click on the Statistics command button or select the
Statistics command from the Open menu. The Statistics
window appears:
The Statistics window displays the amount of data being read
from and written to the disk array system, in MB per second.
Read values appear in green, and are displayed under Write
values which appear in red.
NOTE: The program automatically adjusts the y-axis to fit
the entire graph snugly in the Statistics window.
4-36
4.15
Monitoring Statistics
ASUS GUI RAID Manager: Array Management
4.16
Dynamic Logical Drive Expansion
What Is It and How Does It Work?
Before Dynamic Logical Drive Expansion, increasing the
capacity of a RAID system using traditional methods
meant backing up, re-creating and then restoring. Dynamic
Logical Drive Expansion (a new feature of firmware
version 2.11) allows users to add new SCSI hard disk
drives and expand a RAID 0, 3 or 5 Logical Drive without
powering down the system.
4.16.1
Two Modes of Dynamic Logical Drive Expansion
There are two modes of Dynamic Logical Drive Expansion:
Mode 1 and Mode 2.
Dynamic Logical Drive Expansion
Mode 1
4.16 Dynamic Logical Drive Expansion
Mode 2
4-37
ASUS GUI RAID Manager: Array Management
Mode 1 Expansion involves adding more SCSI hard disk
drives to a logical drive, which may require that the user
obtain an enclosure with more drive bays. The data will be
re-striped onto the original and newly added disks.
RAID Expansion - Mode 1
2GB
2GB
2GB
+
+
RAID 5 Logical Drive - 4GB
2GB
2GB
2GB
Add-in New Drives
2GB
2GB
2GB
2GB
RAID
Expansion
RAID 5 Logical Drive - 8GB
In the figure above, new drives are added to increase the
capacity of a 4-Gigabyte RAID 5 logical drive. The two
new drives increase the capacity to 8 Gigabytes.
4-38
4.16
Dynamic Logical Drive Expansion
ASUS GUI RAID Manager: Array Management
Mode 2 Expansion, on the other hand, requires the same
number of higher-capacity SCSI hard disk drives for a
given logical drive.
RAID Expansion - Mode 2 (1/3)
2 GB
2 GB
2 GB
The original logical drive
RAID 5 (4GB)
4 GB
1
2 GB
2 GB
2 GB
New
Drive
RAID 5 (4GB)
Copy and Replace
one of the member drives
Copy and Replace each of the member drives. Even
if one member drives fails during the Copy and
Replace, the logical drive will still be available for
access.
In use
Unused
The figure above illustrates expansion of the same 4Gigabyte RAID 5 logical drive using Mode 2 Expansion.
Drives are copied and replaced, one by one, onto three
higher-capacity drives.
4.16 Dynamic Logical Drive Expansion
4-39
ASUS GUI RAID Manager: Array Management
RAID Expansion - Mode 2 (2/3)
2
2 GB
2 GB
4 GB
4 GB
New
Drive
RAID 5 (4GB)
Copy and Replace the other member drives one by one
until all the member drives have been replaced
Copy and Replace each member drive. After all the
member drives have been replaced, execute the
“RAID Expansion” to use the additional capacity.
In use
Unused
This results in a new 4-Gigabyte, RAID 5 logical drive
composed of three physical drives. The 4 Gigabytes of
increased capacity is in a new partition.
RAID Expansion - Mode 2 (3/3)
RAID 5 (8GB)
n partitions
3
Partition n+1
4 GB
4 GB
4 GB
RAID
Expansion
or
RAID 5 (8GB)
RAID 5 (4GB)
After the RAID Expansion, the additional capacity
will appear as another partition. Adding the extra
capacity into the existing partition requires OS
support.
4-40
4.16
In use
Unused
Dynamic Logical Drive Expansion
ASUS GUI RAID Manager: Array Management
F
IMPORTANT:
•
The increased capacity from Mode 1 Expansion of
a logical drive will be a new partition.
•
At the time of this printing, Firmware version 2.11
does not support the "Copy and Replace" function
that is required for Mode 2 Expansion. Third-party
hard disk utilities may be used for Mode 2
Expansion of logical drives. Later versions of the
firmware will support "Copy and Replace."
Example: RAID Expansion in Windows NT Server
Limitations When Using Windows NT 4.0
1. Only the Windows NT Server Disk Administrator includes the
Extend Volume Set function; Windows NT Workstation does
not have this feature.
2. The system drive (boot drive) of a Windows NT system cannot
be extended.
3. The drive that will be extended should be using the NTFS file
system.
4.16 Dynamic Logical Drive Expansion
4-41
ASUS GUI RAID Manager: Array Management
The Example:
The following example demonstrates the expansion of a
900MB RAID 0 logical drive. The GUI RAID Manager is
used to connect to the RAID controller.
You can view information about this drive in the Windows
NT Server’s Disk Administrator.
4-42
4.16
Dynamic Logical Drive Expansion
ASUS GUI RAID Manager: Array Management
Place the cursor on Disk 1, right-click your mouse, and
select "Properties." You will see that the total capacity for
the Drive E: is just under 900MB.
4.16 Dynamic Logical Drive Expansion
4-43
ASUS GUI RAID Manager: Array Management
Three new drives are scanned in (see section 4.7 for details
on scanning in new drives.) To add the drives to the logical
drive, first right-click on the logical drive icon, and then
select "Add SCSI Drive."
The logical drive icon will appear to be degraded while the
new drives are being added to the logical drive. The color
will return to normal once the adding the drives has been
completed.
When you rest the mouse on the logical drive icon, you
now see that the capacity has increased from 900MB to
1800MB.
4-44
4.16
Dynamic Logical Drive Expansion
ASUS GUI RAID Manager: Array Management
From the menu, select Partition Logical Drive. You will see
that the 1800MB logical drive is composed of two 900MB
partitions.
Follow the directions in section 4.13 to map the new
partition to a Host LUN. The new partition must be
mapped to a host LUN in order for the HBA (host-bus
adapter) to see it. Once you have mapped the partition,
reboot Windows NT. The HBA should be able to detect an
additional "disk."
Return to Windows NT Server’s Disk Administrator. There
now exists a Disk 2 with 900MB of free space. Click on
Disk 2 to select it.
4.16 Dynamic Logical Drive Expansion
4-45
ASUS GUI RAID Manager: Array Management
From the "Partition" menu, select "Extend Volume Set."
4-46
4.16
Dynamic Logical Drive Expansion
ASUS GUI RAID Manager: Array Management
The screen will display that volume set of Drive E: has
been extended by the 900MB in Disk2. Move the cursor to
"Commit Changes Now" to confirm that you want the free
space to become a part of the same logical drive.
4.16 Dynamic Logical Drive Expansion
4-47
ASUS GUI RAID Manager: Array Management
Logical Drive E: is now composed of two 900MB partitions
with a total volume of 1800MB. To see this, hold down on
the <Ctrl> key and select both Disk 1 and Disk2; then
right-click your mouse and select "Properties."
4-48
4.16
Dynamic Logical Drive Expansion
ASUS GUI RAID Manager: Array Management
Drive E: now has a capacity just under 1800MB.
4.16 Dynamic Logical Drive Expansion
4-49
ASUS GUI RAID Manager: Array Management
4.17
Redundant Controller
Redundant Controllers
For the SCSI-to-SCSI controllers, the GUI RAID Manager is
capable of monitoring a redundant controller
configuration.
4-50
4.17
Redundant Controller
ASUS GUI RAID Manager: Array Management
The failed controller will display a red "X".
Primary and Secondary controllers must be configured
using the front panel. Please refer to your RAID controller
instruction manual for details.
4.17 Redundant Controller
4-51
5
Notification Configuration
This chapter discusses how to configure notifications.
topics include the following:
The
♦ Description of the notification function
♦ Notification levels
♦ Configuring notification options
♦ Configuring a pager notification
♦ Configuring a fax notification
♦ Configuring an e-mail notification
♦ Configuring a broadcast notification
5.1
Introduction
A management program is almost useless without reporting or
notification function ability. For this reason, the GUI RAID
Manager enables you to configure notifications to occur in
response to various disk array events. For example, if you
configure an e-mail notification, the GUI RAID Manager will
send an e-mail to selected computers on the network if the event
(that just occurred) falls within the selected notification level. If
the notification is detailed enough, the recipient can respond
accordingly.
The notification function makes it possible to manage (or
monitor) the disk array system even when the administrator is
away from the manager station. When properly configured, this
function can notify the administrator of event occurrences in the
managed disk array system instantly even when he or she is at
home, or in other places around the globe.
5-1
ASUS GUI RAID Manager: Notification Configuration
The GUI RAID Manager provides four methods of sending
notifications:
♦ Pager
♦ Fax
♦ E-mail
♦ Broadcast
You can use any of the notification methods mentioned above;
be reminded though that before you can use a particular method,
you should have the proper hardware (like a modem for the
pager notification) and software (like Windows NT for the
broadcast message notification) installed in your system.
5.2
Before You Begin...
Before the GUI’s event notification can be used, some
adjustments may need to be made to the Windows NT
configuration.
5.2.1 Pre-configuring for a Pager Notification in
Windows NT 4.0
There are no special steps required for using pager notification;
however, the modem must be properly installed. (The same is
true for Fax Notification; see section 5.2.2.) Please follow all of
the instructions in the modem’s user guide for correctly
installing it for use with Windows NT 4.0.
Please see section 5.5 for complete details on Configuring a
Pager Notification.
5-2
5.2
Before You Begin...
ASUS GUI RAID Manager: Notification Configuration
5.2.2 Pre-configuring the Fax Service in Windows NT 4.0
Microsoft Windows NT 4.0 ships without fax service.
Administrators who desire fax notification have two choices:
one, installing a MAPI-compliant fax software; or two, obtaining
the file FAX_I386.EXE from Microsoft, which – at the time of
this printing – is freely available from their web server at the
following URL:
http://www.microsoft.com/ntworkstation/fax.htm
The following are instructions for installing fax service using the
FAX_I386.EXE file.
5.2
Before You Begin...
5-3
ASUS GUI RAID Manager: Notification Configuration
1. From the Windows Start bar, run the file FAX_I386.EXE.
Enter information regarding your desired fax configuration
as prompted.
2. Open the Control Panel and click on the Mail icon.
5-4
5.2
Before You Begin...
ASUS GUI RAID Manager: Notification Configuration
3. The Windows Messaging Settings Properties window will be
displayed. The profile now displays two new services – Fax
Address Book and Fax Mail Transport.
5.2
Before You Begin...
5-5
ASUS GUI RAID Manager: Notification Configuration
4. The format of the fax can be configured by selecting Fax
Mail Transport and clicking on Properties. The user can
select whether or not to include a cover page as well as the
fax’s font and size.
Please see section 5.6 for complete details on Configuring a Fax
Notification.
5.2.3 Pre-configuring E-Mail Service in Windows NT 4.0
Microsoft Windows NT 4.0 ships with the Internet Mail E-mail
service. Administrators who desire E-mail notification have two
choices: one, using the Internet Mail service which ships with
NT 4.0; or two, installing a third-party, MAPI-compliant E-mail
software.
5-6
5.2
Before You Begin...
ASUS GUI RAID Manager: Notification Configuration
The following are instructions for installing the Internet Mail
service in Windows NT 4.0:
1. Open the Control Panel and click on the Mail icon.
2. The Windows Messaging Settings Properties window will be
displayed. If no services have been selected for this profile,
click on the “Add” button.
5.2
Before You Begin...
5-7
ASUS GUI RAID Manager: Notification Configuration
3. Select “Internet Mail,” and then click on “OK.”
4. Fill in all of the fields with the settings for your Internet
account, and then click on “OK.”
5-8
5.2
Before You Begin...
ASUS GUI RAID Manager: Notification Configuration
5. Repeat steps 1 through 3, selecting “Personal Address Book”
and “Personal Folders” at step 3.
Please see section 5.7 for complete details on Configuring an
E-Mail Notification.
5.2.4 Pre-configuring Broadcast in Windows NT 4.0
To broadcast a message to another computer on a network, the
following criteria must be met:
♦ The GUI RAID Manager station has a network card and is
properly connected to the network
♦ The recipient(s) of the broadcast are connected to the same
network
♦ The correct computer name(s)
recipient(s) of the broadcast
are entered for the
Please see section 5.8 for complete details on Configuring a
Broadcast Message Notification.
5.3
Notification Levels
The GUI RAID Manager classifies disk array events into three
levels depending on their severity. These include Level 1, Level
2, and Level 3. The first event level covers notificational events
such as initialization of the controller and initiation of the
rebuilding process; Level 2 includes events which require the
issuance of warning messages; Level 3 is the highest level, and
covers events the need immediate attention (and action) from the
administrator. The following lists sample events for each level:
Level 1 Sample Events
♦ Controller Initialization Complete
5.3
Notification Levels
5-9
ASUS GUI RAID Manager: Notification Configuration
♦ Rebuild Initiated
♦ Rebuild Complete
♦ Rebuild Failed
♦ Logical Drive Initialization Started
♦ Logical Drive Initialization Complete
♦ Logical Drive Initialization Failed
Level 2 Sample Events
♦ SCSI Target Select Timeout
♦ SCSI Target Phase/Signal Error
♦ SCSI Target Unexpected Disconnect
♦ SCSI Target Negotiation Error
♦ SCSI Target Timed Out
♦ SCSI Target Parity Error
♦ SCSI Bus Reset Issued
♦ SCSI Target Not Ready Error
♦ SCSI Target Media Error
♦ SCSI Target Hardware Error
♦ SCSI Target Unit Attention
♦ SCSI Target Unexpected Sense Date
♦ SCSI Target Block Reassignment Failure
♦ SCSI Target Unexpected Data Over/Underrun
♦ Drive SCSI Unrecognized Event
5-10
5.3
Notification Levels
ASUS GUI RAID Manager: Notification Configuration
Level 3 Sample Events
♦ SCSI Drive Failure
You select the notification level from the RAID Manager
Options dialog box. Selecting a relatively low level also selects
the level(s) above it; thus, selecting Level 1 events, for example,
will also select Levels 2 and 3 events. Since Level 3 is the
highest level, selecting this will only select Level 3 events.
5.4
Configuring Notification Options
The RAID Manager Options dialog box allows you to enable or
disable the notification function of the GUI RAID Manager,
select the notification level, specify the event countdown limit,
and stop all on-going pager notifications. Event countdown is
the latency time between event occurrence and notification
sequence initiation; this helps administrators to abort issuance of
the notification sequence should they be on-site already.
4 To configure notification options
1. Select Options from the menu bar. The RAID Manager
Options dialog box appears:
5.4
Configuring Notification Options
5-11
ASUS GUI RAID Manager: Notification Configuration
2. To enable the notification function of the GUI RAID
Manager, select the Enable option button in the Event
Notification field. To disable, select the Disable option
button.
3. From the RAID Event Level drop-down list box, select the
notification level. To select, click on the down-arrow button
at the right of this box, then select the option you want. The
All Events option includes Levels 1, 2, and 3 events;
Warning covers Levels 2 and 3 events; Alert covers Level 3
events. Default notification level is Alert.
4. In the Event Countdown Limit text box, type in the latency
time you need. This determines how long to wait after the
occurrence of the event before actually sending the
configured notification.
5. To stop all on-going pager notifications, check the Stop All
In-Progress Event Notification check box. Since the pager
notification function repeatedly sends the notification at a
5-12
5.4
Configuring Notification Options
ASUS GUI RAID Manager: Notification Configuration
user-configurable time interval, you can stop subsequent
transmissions with this check box. Be reminded though that
this will only affect the current event; for succeeding events,
this check box will revert to its default state of disabled (no
check mark).
You can also stop the on-going pager notification to a
specific recipient through the Personal Information: Pager
dialog box. For information, see the Configuring a Pager
Notification section of this chapter.
6. Click OK to save the new notification option settings.
5.5
Configuring a Pager Notification
You can configure a pager notification that will send a message
to a paging device when a specific disk array event occurs in the
system.
It is recommended that a unique number be assigned to identify a
specific disk array system. Since messages received on a pager
may vary widely, you need to assign a number to facilitate
reference. For example, if the disk array system in the
Accounting Department of your company has 01131965
assigned to it, when this number is sent to the pager, the recipient
knows that the message is from the disk array system in the
Accounting Department.
For pager notification to work, you should have a modem
connected to the RS-232 of your manager station. This modem
should then be connected to a working telephone line. The
communication parameters of both the modem and the RS-232
port on the computer should be set accordingly.
5.5
Configuring a Pager Notification
5-13
ASUS GUI RAID Manager: Notification Configuration
5.5.1 Selecting the Destinations
You can configure the pager notification function to send a
notification to multiple pagers. This is achieved through the
pager address book provided by the GUI RAID Manager. From
this book, you can add and remove entries, and select which of
these entries will receive notification from the system.
4To maintain the pager address book
1. From the Notification menu, select Pager à Address
Book.
-orClick on the Notification command button and then select
Pager à Address Book. The Address Book for Pager
Notification dialog box appears:
The list box on the left of this dialog box displays the current
contents of the pager address book.
2. Click on the Add button to add a new entry. The Personal
Information: Pager dialog box appears:
5-14
5.5
Configuring a Pager Notification
ASUS GUI RAID Manager: Notification Configuration
3. In the Full Name text box, type in the name of the
notification recipient.
This only serves for reference
purposes in the address book.
4. Enter the pager number in the Pager Number text box,
including the area code. If you want to add a delay between
the sending of this number and the sending of the actual
message, add commas at the end of the pager number. The
more commas you add, the longer the delay is. You can also
add commas in front of the message.
5. Type in the appropriate message in the Message text box. If
you want to add a delay between the sending of the pager
number and the sending of this message, add commas in
front of this value. The more commas you add, the longer
the delay is. You can also add commas at the end of the
pager number.
5.5
Configuring a Pager Notification
5-15
ASUS GUI RAID Manager: Notification Configuration
6. To enable pager notification for this particular entry, select
the Enable option button. To disable, select the Disable
option button.
7. If you want to check the reachability of the specified
destination, click on the Test button. Then, check whether
or not the notification is received successfully on the pager.
8. Click OK to add the specified destination to the address
book.
9. Repeat the same procedure to add the other entries you want.
10. If you want to delete an entry from the address book, select it
from the list box and then click on the Remove button.
11. If you want to modify the settings of a particular entry, select
it and then click on the Properties button. From the
displayed dialog box, modify the parameters you want.
5.5.2 Prescheduling Pager Notification
You can preschedule the pager notification for a particular
destination to occur automatically at specific intervals. This
notification will be sent regardless of the events occurring in the
disk array system.
5-16
5.5
Configuring a Pager Notification
ASUS GUI RAID Manager: Notification Configuration
NOTE: The prescheduled pager notification does not affect
in any way the configured pager notification − prescheduled
pager notification is triggered by time, while configured
pager notification is triggered by events based on the
selected notification level.
4 To preschedule a pager notification
1. From the Notification menu, select Pager à Address
Book.
-orClick on the Notification command button and then select
Pager à Address Book. The Address Book for Pager
Notification dialog box appears:
The list box on the left of this dialog box displays the current
contents of the pager address book.
2. From the list box, select the target entry, then click on the
Properties button. The Personal Information: Pager dialog
box appears:
5.5
Configuring a Pager Notification
5-17
ASUS GUI RAID Manager: Notification Configuration
3. Click on the Period button. The Scheduled Period for
Calling Pager dialog box appears:
5-18
5.5
Configuring a Pager Notification
ASUS GUI RAID Manager: Notification Configuration
4. In the From and To text boxes, specify the time ranges you
want.
5. For each time range, specify the notification frequency in the
respective Period (Min) text box. For example, if you want
to send a notification to the selected destination every hour
from 1:00 AM up to 5:00 AM, set From and To to 0100 and
0500, respectively, and Period (Min) to 60.
6. Click OK.
5.5.4 Stopping On-going Pager Notification
Once initiated, the pager notification function will repeatedly
send the notification to the destination pagers at a specific time
interval. You have the option though to stop subsequent
5.5
Configuring a Pager Notification
5-19
ASUS GUI RAID Manager: Notification Configuration
retransmissions for a particular destination, or for all
destinations.
4To stop any on-going pager notification to a particular
destination
1. From the list box in the Address Book for Pager Notification
dialog box, select the target entry, then click on the
Properties button. The Personal Information: Pager dialog
box appears displaying the current settings of the selected
entry:
To determine if there is any on-going pager notification on
the selected pager, check the Error Recovery Status field.
If this field displays Active, it means that there is; if this
displays Stand-by, it means that there is none.
5-20
5.5
Configuring a Pager Notification
ASUS GUI RAID Manager: Notification Configuration
2. If there is on-going pager notification and you want to stop
subsequent retransmissions, check the Stop In-Progress
Event Notification check box.
3. Click OK.
You can also stop on-going pager notification for all destination
pagers through the RAID Manager Options dialog box. For
information about this feature, see the Configuring Notification
Options section of this chapter.
5.6
Configuring a Fax Notification
The GUI RAID Manager sends fax messages to specific
destinations using the fax service that is installed to the MAPI of
Windows NT. If your manager station does not have this
service, install it first before using the fax notification function
of the system. You will also need to connect a fax/modem to
your computer. Installing a fax/modem can be a tricky process,
so consult your operating system manuals for instructions on
how to install your fax/modem software.
Since the GUI RAID Manager depends largely on the fax service
installed to the MAPI of Windows NT for the delivery of fax
messages, most fax notification parameters are configured
through this software package. The GUI RAID Manager only
allows you to select which users will receive the notification
messages, and specify the notification message for each
recipient.
For information on how to configure users for fax reception and
other pertinent information about the fax service, refer to the fax
service’s documentation. Ensure that the fax service is properly
configured in your computer before using the fax notification
function of the GUI RAID Manager.
5.6
Configuring a Fax Notification
5-21
ASUS GUI RAID Manager: Notification Configuration
5.6.1 Selecting the Destinations
You can configure the fax notification function to send a
notification to multiple users. This is achieved through the fax
address book provided by the GUI RAID Manager. From this
book, you can add and remove entries, and select which of these
entries will receive notification from the system.
4 To maintain the fax address book
1. From the Notification menu, select Fax à Address Book.
-orClick on the Notification command button and then select
Fax à Address Book. The Address Book for Fax
Notification dialog box appears:
The list box on the left of this dialog box displays the current
contents of the fax address book.
2. Click on the Add button to add a new entry. The Personal
Information: Fax dialog box appears:
5-22
5.6
Configuring a Fax Notification
ASUS GUI RAID Manager: Notification Configuration
3. In the Display Name text box, type in the name of the user
that will receive a fax notification. If you specify a name
that does not have an account on Fax Exchange yet, the
program will prompt you to create one for this particular
user.
4. In the Message text box, specify the fax message you want
to relay to the selected user.
5. To enable fax notification for this particular entry, select the
Enable option button. To disable, select the Disable option
button.
6. If you want to check the reachability of the selected user,
click on the Test button.
7. Click OK to add the specified entry to the address book. The
Choose Profile dialog box appears on the screen.
8. To accept the MS Fax Exchange default setting, click OK.
To choose another profile, click the New button. For
assistance on how to proceed from here, refer to your
Windows manual.
5.6
Configuring a Fax Notification
5-23
ASUS GUI RAID Manager: Notification Configuration
9. Repeat the same procedure to add the other entries you want.
10. If you want to delete an entry from the address book, select it
from the list box and then click on the Remove button.
11. If you want to modify the settings of a particular entry, select
it and then click on the Properties button. From the
displayed dialog box, modify the parameters you want.
12. To put the Fax notification function into effect, start the MS
Fax Exchange.
5.7
Configuring an E-Mail Notification
The GUI RAID Manager sends e-mail messages to specific
people on the network or Internet using the Microsoft Internet
Mail service or third-party, MAPI-compliant e-mail service.
You will need these services to enable the e-mail notification
function of the GUI RAID Manager. In addition to this, you will
also need a network interface card or modem to connect your
manager station to the network or Internet.
Since the GUI RAID Manager depends largely on services
mentioned above for the delivery of e-mail messages, most email notification parameters are configured through these
packages. The GUI RAID Manager only allows you to select the
users who will receive the notification messages, and specify the
notification message for each recipient.
For information on how to configure users for e-mail reception
and other pertinent information about the Microsoft Internet Mail
service in Windows NT, refer to the Windows NT manual. Be
sure that these services are configured properly, and functioning
before using the e-mail notification function of the GUI RAID
Manager.
5-24
5.7
Configuring an E-Mail Notification
ASUS GUI RAID Manager: Notification Configuration
5.7.1 Selecting the Destinations
You can configure the e-mail notification function to send a
notification to multiple users. This is achieved through the email address book provided by the GUI RAID Manager. From
this book, you can add and remove entries, and select which of
these entries will receive notification from the system.
4 To maintain the e-mail address book
1. From the Notification menu, select E-mail à Address
Book.
-orClick on the Notification command button and then select
E-mail à Address Book. The Address Book for E-mail
Notification dialog box appears:
The list box on the left of this dialog box displays the current
contents of the e-mail address book.
2. Click on the Add button to add a new entry. The Personal
Information: E-mail dialog box appears:
5.7
Configuring an E-Mail Notification
5-25
ASUS GUI RAID Manager: Notification Configuration
3. In the Display Name text box, type in the name of the user
that will receive an e-mail notification. Typing the e-mail
address directly may work; it all depends on the e-mail
program that you are using. You can enter the destination email address in this box if you are using the Microsoft
Internet Mail service.
4. In the Message text box, specify the message you want to
send to the selected user.
5. To enable e-mail notification for this particular entry, select
the Enable option button. To disable, select the Disable
option button.
6. If you want to check the reachability of the selected user,
click on the Test button.
7. Click OK to add the specified entry to the address book. The
Choose Profile dialog box appears on the screen.
8. To accept the MS Exchange default setting, click OK. To
choose another profile, click the New button. For assistance
5-26
5.7
Configuring an E-Mail Notification
ASUS GUI RAID Manager: Notification Configuration
on how to proceed from here, refer to your Windows
manual.
9. Repeat the same procedure to add the other entries you want.
10. If you want to delete an entry from the address book, select it
from the list box and then click on the Remove button.
11. If you want to modify the settings of a particular entry, select
it and then click on the Properties button. From the
displayed dialog box, modify the parameters you want.
12. To put the E-mail notification function into effect, start
Microsoft Internet Mail (or your third-party, MAPIcompliant e-mail service).
5.8
Configuring a Broadcast Message
Notification
The GUI RAID Manager provides a way to notify selected users
on the network by sending broadcast messages to their respective
stations. This notification method only works on Windows NT
stations with the Windows NT Messenger service installed. If
your system does not have these programs, you will not be able
to use this method. In addition to these programs, your station
also needs a network interface card to connect to an existing
network. Be sure that the adapter is properly installed and
configured, and the correct driver is used.
For information on how to configure users for broadcast message
reception in Windows NT and other pertinent information about
this software, refer to the Windows NT manual.
Windows 95/98 systems cannot receive broadcast messages
unless the program WINPOPUP.EXE is running. If the intended
recipient for a broadcast message is a Winodws 95/98 system, it
5.8
Configuring a Broadcast Message Notification
5-27
ASUS GUI RAID Manager: Notification Configuration
is necessary to first execute WINPOPUP.EXE on that system.
WINPOPUP.EXE is located in the Windows directory.
5.8.1 Selecting the Destinations
You can configure the broadcast message notification function to
send messages to multiple users. This is achieved through the
broadcast message address book provided by the GUI RAID
Manager. From this book, you can add and remove entries, and
select which of these entries will receive notification from the
system.
4 To maintain the broadcast message address book
1. From the Notification menu, select Broadcast à Address
Book.
-orClick on the Notification command button and then select
Broadcast à Address Book. The Address Book for
Messenger Information dialog box will appear:
5-28
5.8
Configuring a Broadcast Message Notification
ASUS GUI RAID Manager: Notification Configuration
The list box on the left of this dialog box displays the current
contents of the broadcast message address book.
2. Click on the Add button to add a new entry. The Personal
Information: Broadcast dialog box will appear:
3. In the Computer Name text box, type in the computer name
for the computer that will receive a broadcast message. Be
sure that the name you specify has a network account with
Windows NT.
4. In the Message text box, specify the message you want to
send to the selected computer.
5. To enable broadcast message notification for this particular
entry, select the Enable option button. To disable, select the
Disable option button.
6. If you want to check the reachability of the selected
computer, click on the Test button.
5.8
Configuring a Broadcast Message Notification
5-29
ASUS GUI RAID Manager: Notification Configuration
7. Click OK to add the specified entry to the address book.
8. Repeat the same procedure to add the other entries you want.
9. If you want to delete an entry from the address book, select it
from the list box and then click on the Remove button.
10. If you want to modify the settings of a particular entry, select
it and then click on the Properties button. From the
displayed dialog box, modify the parameters you want.
5.8.2 Prescheduling Broadcast
Message Notification
You can preschedule the broadcast message notification for a
particular destination to occur automatically at specific intervals.
This notification will be sent regardless of the events occurring
in the disk array system.
NOTE: The prescheduled broadcast message notification
does not affect in any way the configured broadcast message
notification − prescheduled broadcast message notification is
triggered by time, while configured broadcast message
notification is triggered by events based on the selected
notification level.
4 To preschedule a broadcast message notification
1. From the Notification menu, select Broadcast à Address
Book.
-orClick on the Notification command button and then select
Broadcast à Address Book. The Address Book for
Messenger Information dialog box appears:
5-30
5.8
Configuring a Broadcast Message Notification
ASUS GUI RAID Manager: Notification Configuration
The list box on the left of this dialog box displays the current
contents of the broadcast message address book.
2. From the list box, select the target entry, then click on the
Properties button. The Personal Information: Broadcast
dialog box appears:
3. Click on the Period button.
Broadcast dialog box appears:
5.8
Configuring a Broadcast Message Notification
The Scheduled Period for
5-31
ASUS GUI RAID Manager: Notification Configuration
4. In the From and To text boxes, specify the time ranges you
want.
5. For each time range, specify the notification frequency in the
respective Period (Min) text box. For example, if you want
to send a notification to the selected destination every hour
from 1:00 AM up to 5:00 AM, set From and To to 0100 and
0500, respectively, and Period (Min) to 60.
6. Click OK.
5.8.3 Stopping On-going
Broadcast Notification
The broadcast message notification function automatically
retransmits the message to a destination computer until an ACK
(acknowledgment) message is received from it. This ensures
5-32
5.8
Configuring a Broadcast Message Notification
ASUS GUI RAID Manager: Notification Configuration
message reception by the intended administrator. If, however,
the destination computer is off-line, you can terminate
subsequent message retransmissions to cut back in the
processing time of your computer, and also to lessen traffic on
the network.
4To stop message retransmission to a particular destination
1. From the list box in the Address Book for Messenger
Information dialog box, select the target entry, then click on
the Properties button. The Personal Information: Broadcast
dialog box appears displaying the current settings of the
selected entry:
To determine if there is any on-going broadcast message
notification to the selected computer, check the Error
Recovery Status field. If this field displays Active, it
means that there is; if this displays Stand-by, it means that
there is none.
5.8
Configuring a Broadcast Message Notification
5-33
ASUS GUI RAID Manager: Notification Configuration
2. If there is on-going broadcast message notification and you
want to stop subsequent retransmissions, check the Stop InProgress Event Notification check box.
3. Click OK.
5-34
5.8
Configuring a Broadcast Message Notification
6 Running in Demo Mode
This chapter provides information on how to run the GUI RAID
Manager in Demo mode. These include the following topics:
♦ Introduction about the Demo program
♦ Starting the Demo program
♦ Failing a drive
♦ Exiting the Demo program
6-1
ASUS GUI RAID Manager: Running in Demo Mode
6.1
Introduction
The GUI RAID Manager provides a Demo program for use as a
learning tool and for demonstration purposes. This program
allows you to experiment with various disk array configurations
and check how the system responds and operates under various
conditions.
The Demo program supports all management functions available
in the actual GUI RAID Manager, making management of the
virtual disk array system as real as possible. You can select the
controller for your virtual system, the number of host (for SCSIto-SCSI controller only) and drive channels, the number of
physical drives, configure your logical drives and volumes,
partition logical volumes, and map partitions to hosts. You can
even fail drives to check how the particular system configuration
reacts under such a condition.
6-2
6.1
Introduction
ASUS GUI RAID Manager: Running in Demo Mode
6.2
Starting the Demo
Program
You can use the Demo program any time, even without a real
disk array system (that is, a controller and SCSI drives) installed
in your computer. Since the Demo program only simulates
management of a disk array system, you will not need any of
these devices.
4 To start the Demo program
1. Start the GUI RAID Manager by performing the appropriate
startup procedure described in the Starting the GUI RAID
Manager section of Chapter 3, Basic Operations at Startup.
2. From the File menu, select Connect.
-orClick on the Connect/Open command button.
following submenu appears on the screen:
3. Select Demo Mode.
dialog box appears:
6.2
Starting the Demo Program
The
The Demo Configuration Options
6-3
ASUS GUI RAID Manager: Running in Demo Mode
4. In the Controller Type section, select the type of controller
you want to use. To use a PCI-to-SCSI controller, select the
Host Adapter option button; to use a SCSI-to-SCSI
controller, select Target Controller.
5. From the Channel Count drop-down list box, select the
total number of channels you want to assign to the selected
controller. To select, click on the down-arrow button at the
right of the box. Then, select the option you want from the
displayed list. Maximum setting for each controller is eight.
As you select a value, the program enables the
corresponding number of Channel x Mode (where x is the
channel number) sections below.
6-4
6.2
Starting the Demo Program
ASUS GUI RAID Manager: Running in Demo Mode
6. If you selected Host Adapter in step 4, proceed to the next
step; otherwise, select the channel mode for each enabled
Channel x Mode section. To configure the channel as a
host channel, select the Host option button; to configure it as
a drive channel, select Drive.
7. Click OK.
The Demo program creates a virtual disk array system based on
the configuration specified in the Demo Configuration Options
dialog box. For each drive channel, the program places four
SCSI drives, which you can increase if you want by simply
scanning in drives from unoccupied connectors.
You may now start managing the selected disk array system
using the available commands. Try experimenting on various
commands to see how the system reacts, and also to help clarify
the use of such commands. All disk array icons on the screen
respond accordingly − just like a real system. For information
on disk array management, see Chapter 4, Array Management.
NOTE: The management operations you perform and
settings you specify in Demo mode do not have any effect on
the actual disk array system installed in your computer,
assuming you have one installed. Everything you do under
the Demo mode is only a simulation.
6.3
Failing a Drive
The Demo program comes with a Fail One Drive function that
allows you to fail a drive (that is, one physical drive) from any
existing logical drives in the system.
This function is
particularly useful in testing the response of the selected disk
array system when there is failure in one of its drives.
6.3
Failing a Drive
6-5
ASUS GUI RAID Manager: Running in Demo Mode
During a drive failure, the system responds differently depending
on the current array configuration. The following describes the
possible scenarios:
♦ If there is a spare drive assigned to the selected logical
drive, the virtual controller will automatically start data
rebuilding in the background onto the spare drive.
♦ If there is no spare drive assigned to the selected logical
drive, the failed drive must be replaced and rebuilding
must be initiated manually. If the replacement drive is
installed on a different connector, you will need to first
scan in the drive and assign it as a spare drive for the
affected logical drive before rebuilding can be initiated.
While the logical drive is being rebuilt, its respective icon on the
Logical Drives window reflects the rebuilding status. The
Physical Drives window also reflects the rebuilding status
through the assigned spare drive.
6-6
6.3
Failing a Drive
ASUS GUI RAID Manager: Running in Demo Mode
4 To fail a drive
1. Display the Logical Drives window by clicking on the
Logical Drives command button or selecting the Logical
Drives command from the Open menu.
2. From the Logical Drives window, double-click the right
mouse button on the target logical drive. The following
menu will appear on the screen:
3. Select Fail One Drive.
The Demo program fails one of the drives belonging to the
selected logical drive. The Physical Drives window, and the
Enclosure window if implemented, displays which drive has
failed. The Logical Drives window displays the selected logical
drive in degraded mode.
The system will then react to this situation based on its current
configuration; that is, whether or not a spare drive exists. For
information, see the discussion earlier in this section.
If you want to fail drives from other existing logical drives,
follow the same procedure.
6.3
Failing a Drive
6-7
ASUS GUI RAID Manager: Running in Demo Mode
6.4
Exiting the Demo
Program
If you are done with the Demo program and you want to manage
the real disk array system installed in your computer, quit from
the Demo program and then connect to your disk array system.
Quitting from the Demo program only requires disconnecting
from it.
4 Exiting from the Demo program
•
From the File menu, select Disconnect.
All toolbar buttons, except the Connect/Open and Notification
command buttons, turn gray signifying termination of the Demo
program.
6-8
6.4
Exiting the Demo Program
A
Command Summary
This appendix describes the available commands in the GUI
RAID Manager disk array management program.
These
commands are presented either in menus or command buttons.
Menu Commands
This section lists and explains in tabular form the commands
available from the menus in the menu bar. Keyboard strokes for
commands that can also be executed from the keyboard are
indicated in the tables inside angle brackets. For example:
Connect
<C>
means that you can connect to a disk array system by selecting
Connect from the File menu or by pressing the C key on your
keyboard.
File Menu Commands
Command
Connect <C>
Disconnect <D>
Exit <X>
Description
Connects the GUI RAID Manager station to a
particular disk array system for management.
This command has the same function as the
Connect/Open command button found on the
toolbar.
Disconnects from the current disk array system,
terminating the current management session
with the device.
Exits the GUI RAID Manager.
A-1
ASUS GUI RAID Manager: Command Summary
Open Menu Commands
Command
Enclosure <E>
Physical Drive <P>
A-2
Description
Displays the Enclosure window. This command
has the same function as the Enclosure
command button found on the toolbar.
Displays the Physical Drives window. This
command has the same function as the
Physical Drives command button found on the
toolbar.
Menu Commands
ASUS GUI RAID Manager: Command Summary
Command
Logical Drive <L>
Logical Volume
<V>
Host LUN
Assignment <H>
Event Log <L>
Statistics <S>
Description
Displays the Logical Drives window.
This
command has the same function as the Logical
Drives command button found on the toolbar.
Displays the Volume window. This command
has the same function as the Logical Volume
command button found on the toolbar.
Displays the Host LUN Assignment window.
This command has the same function as the
Host LUN Assignment command button found
on the toolbar.
Displays the Event Log window. This command
has the same function as the Event Log
command button found on the toolbar.
Displays the Statistics window. This command
has the same function as the Statistics
command button found on the toolbar.
View Menu Commands
Command
Toolbar <T>
StatusBar <S>
Description
Toggles between displaying and hiding the
toolbar. To display the toolbar, select this
option until a check mark “√“ appears next to it;
to hide, remove the displayed check mark.
Toggles between displaying and hiding the
status bar. To display the status bar, select this
option until a check mark “√“ appears next to it;
to hide, remove the displayed check mark.
Window Menu Commands
Command
Menu Commands
Description
A-3
ASUS GUI RAID Manager: Command Summary
Tile In-Sequence
<S>
Cascade <C>
Tile Horizontal
<H>
Tile Vertical <V>
A command specifically designed for disk array
management. This command arranges the
displayed windows horizontally based on their
uses, with each window reduced to fit all
elements within its width.
Has the same
function as the Tile In-Sequence command
button found on the toolbar.
A standard Windows command that cascades
windows in such a way that they overlap with
each other, making their title bars visible.
A standard Windows command that arranges
windows into smaller sizes, fitting them
horizontally next to each other.
A standard Windows command that arranges
windows into smaller sizes, fitting them vertically
next to each other.
Notification Menu Commands
Command
Pager <P>
Fax <F>
E-Mail <E>
Broadcast <B>
A-4
Description
Configures pager notification.
Configures fax notification.
Configures e-mail notification.
Configures broadcast notification.
Menu Commands
ASUS GUI RAID Manager: Command Summary
Options Command
Command
Options
Description
This command allows you to configure the
system notification function. From this
command, you can enable or disable the
notification function, select the event severity,
specify the event countdown limit, and stop all
on-going pager notifications.
Help Menu Commands
Command
Contents
About RAID
Manager
Menu Commands
Description
Displays the GUI RAID Manager on-line help
manual.
Displays some information about the GUI RAID
Manager program.
A-5
ASUS GUI RAID Manager: Command Summary
Command Buttons
This section describes the various command buttons provided by
the system to facilitate execution of commonly used commands.
These buttons can be found on the toolbar.
Logical Volume
Tile In-Sequence
Event Log
Physical Drives
Statistics
Connect/Open
Logical Drives
Enclosure
Command Button
Connect/Open
A-6
Notification
Host LUN Assignment
Description
Connects your GUI RAID Manager station to a
particular disk array system for management.
Has the same function as the Connect
command in the File menu.
After connection to a disk array system has
been established successfully, this button
becomes the Open button, providing the same
function as Open in the menu bar.
Command Buttons
ASUS GUI RAID Manager: Command Summary
Command Button
Tile In-Sequence
Enclosure
Physical Drives
Logical Drives
Logical Volume
Host LUN
Assignment
Event Log
Notification
Command Buttons
Description
A command button specifically designed for disk
array management.
This button arranges the displayed windows
horizontally based on their uses, with each
window reduced to fit all elements within its
width. Has the same function as the Tile InSequence command found in the Window
menu.
Displays the Enclosure window. This button
has the same function as the Enclosure
command in the Open menu.
Displays the Physical Drives window. Has the
same function as the Physical Drive command
found in the Open menu.
Displays the Logical Drives window. Has the
same function as the Logical Drive command
found in the Open menu.
Displays the Volume window. This button has
the same function as the Logical Volume
command in the Open menu.
Displays the Host LUN Assignment window.
Has the same function as the Host LUN
Assignment command found in the Open menu.
Displays the Event Log window. This button
has the same function as the Event Log
command found in the Open menu.
Allows you to configure system notifications.
This button provides the same function as
Notification in the menu bar.
A-7
ASUS GUI RAID Manager: Command Summary
Command Button
Statistics
A-8
Description
Displays the Statistics window. Has the same
function as the Statistics command in the Open
menu.
Command Buttons
B
Troubleshooting
This appendix provides troubleshooting tips for common
problems you may encounter while using the GUI RAID
Manager. These include the following topics:
♦ Startup errors
♦ Notification errors
♦ SNMP errors
B-1
ASUS GUI RAID Manager: Troubleshooting
Startup Errors
Error Message1: Error encountered during OPEN: Unable to
Connect to Controller
Cause1: The GUI RAID Manager was not able to establish a link
with the target disk array system. This may be caused by one (or
more) of the following: a wrong baud rate or communication port
setting, no disk array controller is installed, bad RS-232 cable, bad
connection, or no null modem is installed.
Solution1: Specify the correct baud rate and/or COM port in the
Settings of RS-232 Interface dialog box. Ensure that the settings you
specify correspond to the actual settings on the RS-232 port. Check
also for the required hardware and cable connection.
Error Message2: Error encountered during OPEN: Selected Port
Not Available
Cause2: The COM Port you selected does not exist in your system.
Solution2: Specify the correct COM port in the Settings of RS-232
Interface dialog box. Be sure to select the port to which the disk
array system is actually connected.
Error Message3: Error encountered during OPEN: Selected Port
Already in Use
Cause3: The selected COM port is in use by another program or
device.
Solution3: Select an unused COM port from the Settings of RS-232
Interface dialog box and connect the controller to this COM port.
Or, locate the program or device that is using the port and disable or
remove it.
B-2
Startup Errors
ASUS GUI RAID Manager: Troubleshooting
Error Message4: Error in loading DLL
Cause4:
The GUI RAID Manager cannot find one of its
components.
Solution4: Re-install the GUI RAID Manager.
Notification Errors
Error Condition1: Pager notification does not work
Cause1: This error can be caused by one (or more) of the following:
no modem is connected, the modem is not properly connected to the
RS-232 port of the computer, modem is not connected to a telephone
line, bad telephone line, wrong pager number, selected COM port is
currently in use by another program or device, or modem
initialization string is not properly set.
Solution1: Check the modem, the modem’s RS-232 connection,
telephone line, etc. Check also if the specified pager number is
correct. If the selected COM port is in use by another program or
device, select a different COM port from the Settings for Modem
dialog box. Or, locate the program or device that is using the port
and disable or remove it. Check the documentation that comes with
the modem for information on how to set properly the modem
initialization string. To check whether or not your modem settings
are correct, use the Test button on the mentioned dialog box.
Error Condition2: Some numbers are missing from the message
displayed on the pager
Cause2: There is not enough delay between the start of dialing and
the actual sending out of the message.
Solution2: Add commas between the pager number and the
message number in the Personal Information: Pager dialog box. You
may place the commas at the end of the pager number, or in front of
Notification Errors
B-3
ASUS GUI RAID Manager: Troubleshooting
the message number. If your pager number is 1234567, for example,
and the message you want to send is 911, you can specify one of the
following:
1234567,,, (in the Pager Number text box)
-or,,,911 (in the Message text box)
You can specify as many commas as you want; be reminded though
that as you increase the number of commas, the more delay you are
adding between these processes. Use the Test button on the
mentioned dialog box to check whether or not the pager notification
is functioning properly.
Error Condition3: Fax notification does not work
Cause3: This error can be caused by one (or more) of the following:
the Microsoft Fax Exchange is not properly installed in your system,
there is no modem connected, modem is not properly connected to
the RS-232 port of the computer, modem is not connected to a
telephone line, bad telephone line, Fax transmission is not supported
by the modem (you should be using a Fax/modem), wrong Fax
number, selected COM port is currently in use by another program or
device, or modem is configured incorrectly.
Solution3: Install the Microsoft Fax Exchange (if not yet installed),
check to verify that the Microsoft Fax Exchange settings are correct,
check the system modem settings by selecting the Modem Settings
option from the Control Panel, check the connected modem for any
connection related errors, and check the Fax number. If the selected
COM port is currently in use by another program or device, select
another port, or disable or remove the program (or device). Use the
Test button on the Personal Information: Fax dialog box to check the
Fax notification functionality.
B-4
Notification Errors
ASUS GUI RAID Manager: Troubleshooting
Error Condition4: E-mail notification does not work
Cause4: This error can be caused by one (or more) of the following:
the Microsoft Exchange, Microsoft Mail and/or Microsoft Internet
Mail is not properly installed in your system, there is problem with
your Internet connection, E-mail address is not correct, or the
recipient’s Mail Server is not active.
Solution4: Check the Microsoft Exchange, Mail and Internet Mail
settings, check the Internet connectivity of the local host (specifically
the network interface card and driver programs), and E-mail address.
Use the Test button on the Personal Information: E-mail dialog box
to check the reachability of the selected destinations.
Error Condition5: LAN Broadcast notification does not work
Cause5: This error can be caused by one (or more) of the following:
the system you are using is not a Windows NT station, the Windows
NT Messenger Service is not properly installed, the local host is not
properly connected to the network, destination station is not
connected to the LAN, or the computer name is not set.
Solution5: Check that you have the required software installed in
your system. Check also the Internet connectivity of the local host
(specifically the network interface card and driver programs) and the
destination computers, and computer name. Use the Test button on
the Personal Information: Message dialog box to check the
reachability of the selected destinations.
SNMP Errors
Error Message1: SNMP service not installed
Cause1: The SNMP service of the local host or the remote manager
station is not installed.
SNMP Errors
B-5
ASUS GUI RAID Manager: Troubleshooting
Solution1:
Install the appropriate SNMP service for the
environment you are using for the local host or the remote manager
station. You can get this service from the software provider; that is,
Microsoft for Windows NT and Windows 95, and Novell for
NetWare.
Error Message2: Failed to open SNMP agent comm
Cause2: This error can be caused by one (or more) of the following:
the SNMP agent is not reachable over the LAN or WAN, the SNMP
service is not properly installed on the local host and/or the remote
manager station, the GUI RAID Manager’s SNMP agent software is
not installed on the local host, or the disk array controller is not
installed or properly connected.
Solution2: Check the LAN/WAN connections, install the required
software to the local host and/or remote manager station, check the
SNMP service settings, and check that the controller is properly
installed and connected.
B-6
SNMP Errors
C
RAID Levels
This appendix provides a functional description of Redundant
Array of Independent Disks (RAID). This includes information
about RAID and available RAID levels.
RAID Description
Redundant Array of Independent Disks (RAID) is a storage
technology used to improve the processing capability of storage
systems. This technology is designed to provide reliability in
disk array systems and to take advantage of the performance
gains multiple disks can offer.
RAID comes with a redundancy feature that ensures faulttolerant, uninterrupted disk storage operations. In the event of a
disk failure, disk access will still continue normally with the
failure transparent to the host system.
RAID has six levels: RAID 0 ~ 5. RAID levels 1, 3 and 5 are
the most commonly used levels, while RAID levels 2 and 4 are
virtually never used. The following sections described in detail
each of the commonly used RAID levels.
Non-RAID Storage
One common option for expanding disk storage capacity is
simply to install multiple disk drives into the system and then
combine them end to end. This method is called disk spanning.
In disk spanning, the total disk capacity is equivalent to the sum
of the capacities of all SCSI drives in the combination. This
combination appears to the system as a single logical drive.
Thus, combining four 1GB SCSI drives in this way, for example,
C-1
ASUS GUI RAID Manager: RAID Levels
would create a single logical drive with a total disk capacity of
4GB.
Disk spanning is considered non-RAID due to the fact that it
neither provides redundancy nor improves performance. Disk
spanning is inexpensive, flexible, and easy to implement;
however, it does not improve the performance of the drives and
any disk failure could result to total data loss.
2 GB Hard drive
+
3 GB Hard drive
+
1 GB Hard drive
+
2 GB Hard drive
=
Logical
Drive
2 + 3 + 1 + 2 = 8 GB Logical Drive
RAID 0
RAID 0 implements block striping where data is broken into
logical blocks and striped across several drives. Although called
RAID 0, this is not a true implementation of RAID because there
is no facility for redundancy. In the event of a disk failure, data
is lost.
In block striping, the total disk capacity is equivalent to the sum
of the capacities of all SCSI drives in the combination. This
combination of drives appears to the system as a single logical
drive.
RAID 0 provides the highest performance without redundancy.
It is fast because data can be simultaneously transferred to/from
C-2
RAID 0
ASUS GUI RAID Manager: RAID Levels
multiple disks. Furthermore, for I/Os that do not span more than
one drive, read/writes to different drives can be processed
concurrently.
Logical Drive
Physical Disks
Block 1
Block 2
Block 3
Block 4
Block 5
Block 6
Block 7
Block 8
.
.
Striping
Block 1
Block 3
Block 5
Block 7
.
.
Block 2
Block 4
Block 6
Block 8
.
.
RAID 1
RAID 1 implements disk mirroring where a copy of the same
data is recorded onto two sets of striped drives. By keeping two
copies of data on separate disks or arrays, data is protected
against a disk failure. If, at any time, a disk on either side fails,
the good disks can provide all of the data needed, thus
preventing downtime.
In disk mirroring, the total disk capacity is equivalent to half the
sum of the capacities of all SCSI drives in the combination.
Thus, combining four 1GB SCSI drives, for example, would
create a single logical drive with a total disk capacity of 2GB.
This combination of drives appears to the system as a single
logical drive.
RAID 1 is simple and easy to implement; however, it is more
expensive as it doubles investment required for a non-redundant
disk array implementation.
RAID 1
C-3
ASUS GUI RAID Manager: RAID Levels
Logical Drive
Physical Disks
Block 1
Block 2
Block 3
Block 4
Block 5
Block 6
Block 7
Block 8
.
.
Mirroring
Block 1
Block 2
Block 1
Block 2
Block 3
Block 4
Block 3
Block 4
.
.
.
.
In addition to the data protection RAID 1 provides, this RAID
level also improves performance. In cases where multiple
concurrent I/Os are occurring, these I/Os can be distributed
between two disk copies thus reducing total effective data access
time.
RAID 1(0+1)
RAID 1(0+1) combines RAID 0 and RAID 1 -- Mirroring and
Disk Striping. RAID (0+1) allows multiple drive failure because
of the full redundancy of the hard disk drives. If more than two
hard disk drives are chosen for RAID 1, RAID (0+1) will be
performed automatically.
F
C-4
IMPORTANT:
RAID (0+1) will not appear in the list of RAID
levels supported by the controller. If you wish
to perform RAID 1, the controller will
determine whether to perform RAID 1 or RAID
(0+1). This will depend on the drive number
that has been selected for the logical drive.
RAID 1(0+1)
ASUS GUI RAID Manager: RAID Levels
Physical Disks
Logical Drive
Block 2
Block 3
Block 4
Block 5
Block 6
Block 7
Block 8
.
.
Block 2
Block 3
Block 5
Block 4
Block 6
Block 7
.
.
Block 8
.
.
Mirror
Block 1
Striping
Block 1
Mirror 1
Mirror 2
Mirror 3
Mirror 5
Mirror 4
Mirror 6
Mirror 7
.
.
Striping
Mirror 8
.
.
RAID 3
RAID 3 implements block striping with dedicated parity. This
RAID level breaks data into logical blocks, the size of a SCSI
disk block, and then stripes these blocks across several drives.
One drive is dedicated to parity. In the event a disk fails, the
original data can be reconstructed from the parity information.
In RAID 3, the total disk capacity is equivalent to the sum of the
capacities of all SCSI drives in the combination, excluding the
parity drive. Thus, combining four 1GB SCSI drives, for
example, would create a single logical drive with a total disk
capacity of 3GB. This combination appears to the system as a
single logical drive.
RAID 3 provides increased data transfer rates when data is being
accessed in large chunks or sequentially. However, in write
operations that do not span multiple drives, performance is
reduced since the information stored in the parity drive needs to
be re-calculated and re-written every time new data is written to
any of the data disks.
RAID 3
C-5
ASUS GUI RAID Manager: RAID Levels
Logical Drive
Block 1
Block 2
Block 3
Block 4
Block 5
Block 6
Block 7
Block 8
.
.
Physical Disks
Dedicated
Parity
Striping
Block 1
Block 3
Block 5
Block 7
Block 2
Block 4
Block 6
Block 8
Parity (1,2)
Parity (3,4)
Parity (5,6)
Parity (7,8)
.
.
.
.
.
.
RAID 5
RAID 5 implements multiple-block striping with distributed
parity. This RAID level offers the same redundancy available in
RAID 3; though the parity information this time is distributed
across all disks in the array. Data and relative parity are never
stored on the same disk. In the event a disk fails, original data
can be reconstructed using the available parity information.
For small I/Os, as few as one disk may be activated for improved
access speed.
RAID 5 offers both increased data transfer rates when data is
being accessed in large chunks or sequentially and reduced total
effective data access time for multiple concurrent I/O’s that do
not span multiple drives.
C-6
RAID 5
ASUS GUI RAID Manager: RAID Levels
Logical Drive
Block 1
Block 2
Block 3
Block 4
Block 5
Block 6
Block 7
Block 8
.
.
RAID 5
Physical Disks
Striping + non-dedicated Parity
Block 1
Block 2
Parity (1,2)
Parity (3,4)
Block 6
Block 3
Parity (5,6)
Block 7
Block 8
Block 4
Block 5
Parity (7,8)
.
.
.
.
.
.
C-7
Index
—D—
—A—
address book 1-4, 1-5, 1-8, 5-14,
5-15, 5-16, 5-17, 5-22, 5-23, 524, 5-25, 5-26, 5-27, 5-28, 5-29,
5-30, 5-31
—B—
baud rate 2-5, 2-7, 3-3, 3-6, 3-10,
3-11, 3-12, 4-11, 4-13, B-2
block striping with dedicated parity
C-5
—C—
cache 3-25, 4-11, 4-12
card layout 3-14, 3-24, 4-16
channel configuration 4-1, 4-17
channel mode 3-26, 4-16, 6-5
COM port 3-6, 3-10, 3-11, 3-12,
B-2, B-3, B-4
command buttons 3-12, 3-15, 319, 6-8, A-1, A-6
community name 3-2, 3-8, 3-10
Connect command 3-19, A-6
Connect/Open command button
3-4, 3-5, 3-7, 3-9, 3-11, 3-19, 63, A-1
controller configuration 4-1, 412, 4-13
controllers 1-2, 1-3, 1-6, 1-8, 325, 4-3
creating logical drives 4-19
data traffic 4-36
data transfer clock rate 4-15
dedicated parity C-5
deleting partitions 4-31
disk mirroring C-3
disk spanning C-1
Dynamic Logical Drive Expansion
4-37
—E—
Enclosure command button 3-22,
4-8, A-2
enclosure management 1-6, 3-27
Event Log command button 3-21,
4-34, A-3
Expansion
in Windows NT
Mode 1
4-38
Mode 2
4-39
4-41
external terminator 4-14
—F—
failed drive 1-7, 3-22, 3-31, 3-32,
4-3, 4-4, 4-5, 4-8, 4-17, 4-22, 424, 6-6
Fault Bus 3-26
fax notification 5-1, 5-21, 5-23,
A-4
ASUS GUI RAID Manager: Index
Firmware
upgrading
2-27
front panel 3-13, 3-24, 4-12
FTP sites 2-26
—G—
graphical interface
1-3, 1-6
—H—
hardware setup 2-1, 3-1
Host LUN Assignment command
button 3-20, 3-35, 4-32, 4-33,
A-3
Host LUN Assignment window
3-20, 3-34, 3-35, 4-32, 4-33, A3, A-7
—I—
In-band SCSI 2-8
IP address 3-2, 3-8, 3-10
—L—
latency time 1-5, 5-11, 5-12
local management 2-3, 2-4, 2-23,
3-1
Logical Drive
expansion
4-37
Logical Drive command 3-20, A7
logical drives 1-4, 1-6, 1-10, 320, 3-31, 3-33, 4-1, 4-4, 4-19, 425, 6-2, 6-5
Index-2
Logical Drives command button
3-20, 3-31, 4-20, 4-21, 4-23, 424, 4-25, 6-7, A-3
Logical Drives window 3-20, 331, 4-4, 4-20, 4-21, 4-23, 4-24,
6-6, 6-7, A-3, A-7
Logical Volume command button
3-20, 4-25, 4-27, 4-28, 4-30, 432, A-3
logical volume partitions 1-4, 320, 4-30, 4-32
logical volumes 1-4, 1-6, 1-10, 320, 3-32, 3-33, 3-34, 3-36, 4-1,
4-25, 6-2
—M—
main window 3-1, 3-3, 3-16, 317, 3-18, 3-36
management functions 1-4, 1-10,
6-2
mapping logical volume 1-4, 3-36
menu bar 3-18, 3-19, 5-11, A-1
monitoring physical drives 1-4
multiple management sessions 13
—N—
narrow transfer 4-15, 4-17
Notification command button 312, 5-14, 5-17, 5-22, 5-25, 5-28,
5-31, 6-8
notification destinations 1-8
notification methods 5-2
notification retransmission 1-5, 18
ASUS GUI RAID Manager: Index
—P—
pager notification 5-1, 5-2, 5-11,
5-12, 5-13, 5-14, 5-16, 5-17, 519, 5-20, 5-21, A-4, A-5, B-4
pager number 5-15, B-3
partitions 1-4, 3-20, 3-31, 3-33,
3-34, 3-35, 3-36, 4-1, 4-26, 4-28,
4-30, 4-31, 4-32, 4-33, 6-2
password protection 1-6, 1-10, 313, 4-7
Peripheral Device Type
Parameters Reference
Settings
2-11
2-12
Physical Drive command 3-20,
A-7
physical drives 1-3, 1-4, 1-7, 110, 3-20, 3-22, 3-23, 3-24, 3-25,
3-26, 3-32, 4-3, 4-4, 4-8, 4-9, 419, 6-2
Physical Drives command button
3-13, 3-20, 3-24, 4-9, 4-12, 4-16,
4-18, 4-20, 4-23
Physical Drives window 3-13, 320, 3-23, 3-24, 3-26, 4-3, 4-6, 49, 4-12, 4-16, 4-17, 4-18, 4-20,
4-21, 4-23, 6-6, 6-7, A-2, A-7
program updates 2-26
—R—
RAID 0 4-3, C-1, C-2, C-4
RAID 1 4-21, 4-23, C-3, C-4
RAID 1(0+1) C-4
RAID 3 4-21, 4-23, C-5, C-6
RAID 5 4-21, 4-23, C-6
RAID levels 3-33, 4-3, 4-21, 425, C-1, C-4
rebuilding logical drives 1-4
Redundant Controller 4-50
remote management 1-3, 1-8, 2-1,
2-2, 2-3, 2-6, 2-7, 2-23, 3-2, 3-3
replacement drives 4-4, 4-21
—S—
SAF-TE
enclosure management
polling period
3-28
3-30
scroll bars 3-21, 4-35
SCSI ID 3-26, 4-5, 4-14, 4-17, 418, 4-24
SNMP errors B-1
software requirements 2-2, 2-23
software setup 2-1
spare drive 1-4, 3-32, 4-1, 4-4, 45, 4-21, 4-22, 4-23, 4-24, 6-6, 67
Statistics command button 4-36,
A-3
statistics monitoring 1-4, 4-36
status bar 3-1, 3-15, 3-16, 3-17,
3-21
synchronous transfer mode 4-15
—T—
termination 4-14, 4-16
Tile Horizontal command 3-37
Tile Vertical command 3-37
troubleshooting B-1
—U—
Upgrading Firmware
2-27
Index-3
ASUS GUI RAID Manager: Index
—V—
Volume window 3-20, 3-33, 425, 4-27, 4-28, 4-30, 4-32, 4-33,
A-3, A-7
Index-4
—W—
wide transfer 4-15, 4-17
windows display area 3-15, 3-16,
3-21