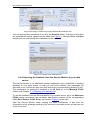
1
Service Monitor End User Manual
442007
MTC Message Manager
End-User Manual
Version 1.0
20
th
June
ServiceMonitor Message Manager
End-User Manual
version: 1.5
April 25, 2011
Page 1 of 18
Service Monitor End User Manual
Copyright
Copyright © 2001 – 2011 PowerMeMobile Co. All rights reserved. No part of this publication, or any
software included with it may be reproduced, stored in a retrieval system, or transmitted in any form or by
any means, including photocopying, electronic, mechanical, recording, or otherwise, without the prior
written permission of the copyright holder.
Trademarks and Registered Trademarks
Products and product names mentioned in this document may be trademarks or registered trademarks of
their respective owners.
Page 2 of 18
Service Monitor End User Manual
Service Monitor for the Message Manager Platform
End User manual
INTRO ...........................................................................................................................................................................4 ABOUT THE SERVICE MONITOR ..................................................................................................................................4 ABOUT THIS MANUAL .................................................................................................................................................5 DISCLAIMER ...............................................................................................................................................................6 I. GETTING STARTED ........................................................................................................................................7 I.1. I.2. II. THE SERVICE MONITOR INSTALLATION .......................................................................................................7 LAUNCHING AND CONFIGURING THE SERVICE MONITOR .............................................................................7 DEFINING DATA SOURCES FOR YOUR SMS NOTIFICATIONS ..........................................................9 II.1. PREPARING YOUR DATA SOURCE ..................................................................................................................9 II.2. LINKING THE DATA SOURCE TO THE SERVICE MONITOR ............................................................................10 II.2.a. Applying filters to the data source columns .........................................................................................11 II.2.b. Defining the SMS notification parameters ...........................................................................................12 II.2.c. Defining the SMS notification text ........................................................................................................12 II.2.d. Ensuring the feedback from the Service Monitor to your data source .................................................13 II.2.e. Processing the data source again from the beginning .........................................................................14 II.2.f. Starting Service Monitor as a Windows service ...................................................................................14 III. MONITORING THE SERVICE REALTIME .........................................................................................14 IV. CHECKING THE SERVICE OPERATION HISTORY .........................................................................15 OUTRO ........................................................................................................................................................................17 YOUR OPINION IS IMPORTANT FOR US .......................................................................................................................17 Page 3 of 18
Service Monitor End User Manual
Intro
About the Service Monitor
Thank you for choosing the Service Monitor as a most complete solution for your
immediate business communication.
The application allows you to streamline your business communication through
complete automation of messaging to your partners and customers. After easy
configuration the Service Monitor is able to analyze your changing databases according
to the conditions you set, and send SMS messages to designated mobile phones all
over the world via Internet directly from your PC. The message texts are configurable
and can automatically change according to the business events reflected in the
databases. After the proper configuration the Service Monitor runs as a standard
Windows service.
The application gives your customers and employees practically immediate feedback on
business-critical events, while considerably reducing the operation costs. The Service
Monitor is able to keep an eye on the situation in the 24/7/365 mode. Alternatively, you
can configure it to so that, for example, evenings and weekends can be free from the
business notifications.
Business tasks to be conveniently solved with the help of the Service Monitor are limited
only by entrepreneurship and the tasks you set for your business. Some examples can
be the following:
•
Informing bank traders about the most recent changes on the currency markets;
•
Notifying car insurance holders about their insurance contracts expiring soon and
the actions they should take to renew the contracts;
•
Briefing the parents about the private school events and updating them on their
kids’ performance.
Please remember that your Service Monitor is a part of a sophisticated software
complex called the Message Manager Platform, and its outer look and operating
depend on other parts of the complex.
You as a user of the Service Monitor can:
•
Monitor one or several business data sources;
•
Use practically any major type of databases;
•
Customize the texts to send using the databases records;
•
Schedule the messaging time and days;
•
Use proxy connection if necessary;
•
Send messages in English, French, or Arabic with Arabic or Latin numbers;
Page 4 of 18
Service Monitor End User Manual
•
Control queries, retries, and message status checks to optimally balance your
server load;
•
Watch the Service Monitor operating real-time;
•
Check the messages sent;
•
Select the interface language (currently Arabic, English, or French).
Please note that availability of this features above depends on your Operator’s settings
and the software edition you are using. Naturally, you must have an active account at a
GSM provider, and the SMS messages automatically sent by the Service Monitor will be
charged to your account.
The Service Monitor is just one of many software applications, though probably the
most unique because of its hidden nature and ability to solve your problems with no or
little help from you. In the Messaging Platform software complex you can always choose
clients most suitable for your business and personal needs. The complete list of
software clients for Messaging Platform software complex includes, but is not limited to,
the following:
•
Facebook Message Manager (a web-based application for Facebook);
•
Firefox Message Manager (a toolbar for Mozilla Firefox);
•
Internet Explorer Message Manager (a toolbar for Internet Explorer);
•
Lotus Message Manager (a plugin for Lotus Notes);
•
Message Manager (a standalone client software);
•
MSN Bot Message Manager (a plugin for Windows Live Messenger);
•
Outlook Express Message Manager (a plugin for MS Outlook Express);
•
Outlook Message Manager (a plugin for MS Outlook);
•
WAP Message Manager (a wap-based application for mobile phones);
•
Web Message Manager (a standalone web-based application);
You can get more information on the software clients at www.powermemobile.com.
About this manual
This manual is to conveniently assist you with how to install the software, tune it to your
business requirements, and operate it conveniently and efficiently.
We organized the manual as a reference and a small study guide, so that each chapter
stands alone, giving you quick and easy answers to particular questions and step-bystep instructions for specific tasks. You can find the necessary information in the
Contents chapters for immediate help in most typical situations.
Page 5 of 18
Service Monitor End User Manual
But we are reasonable enough not to boast that in our manual we predicted all possible
questions, in any situation, for all our most respected users. That is why we would
greatly appreciate any of your comments, critique especially. You can always send
them to us if you click the About button in the bottom-right corner of the Service Monitor
Configurator, and then click the email link there.
Your Service Monitor is also a customizable tool, and your Operator administrator can
change the options available and the outer look according to your needs as a client and
the Operator’s needs as the provider. Hence the screenshots in this manual may
insignificantly differ from what you have onscreen. Also because of our ongoing efforts
to improve the Service Monitor performance, the screenshot can show previous version
numbers of the software. In this case the new version has higher productivity and
stability, but the functionality remains the same.
This icon signals technical stuff that you may find informative and
interesting but isn’t essential for the Service Monitor everyday use. Feel
free to skip over this stuff, or you may need to show the info to your
system administrator if you experience a problem.
This icon warns you of any potential pitfalls—and gives you the allimportant information on how to avoid them.
Disclaimer
PowerMeMobile Co. makes no representations or warranties with respect to the contents hereof and
specifically disclaims any implied warranties of merchantability or fitness for any particular purpose.
Further, PowerMeMobile Co. reserves the right to revise this publication and to make changes from time
to time in the contents hereof without obligation to notify any person of such revision or changes.
While every reasonable precaution has been taken in the preparation of this document, neither
PowerMeMobile Co. nor its development team assumes responsibility for typos, errors, or omissions, or
for damages resulting from the use of the information contained herein.
The software application described in this manual is intended exclusively for clients who acquired it
legally and are bound by the appropriate License Agreement. Any unauthorized copying and distribution
of this software application is an infringement of the copyright law and can be severely prosecuted.
Under no circumstances the Company which provides the client with this software application bears any
responsibility for losses or damages which the client may incur as a result of using the described software
application, neither it bears any responsibility for losses or damages which a third party may incur as a
result of the client using the application.
All personal and geographical names and other proper names, as well as phone numbers used in this
manual are completely fictitious, any references to real persons or organizations are strictly accidental.
Page 6 of 18
Service Monitor End User Manual
I. Getting started
I.1. The Service Monitor installation
The procedure is a standard one, just like for any professionally developed Windows
application. Run the installation file (install.bat) and follow the instructions from the
screen.
Please remember that in order to use the Service Monitor, you must also log in to your
account and configure the software.
If you are upgrading your Service Monitor, you do not have to uninstall the previous
version. The old database is also backed up, to eliminate any risk of data loss and make
you feel secure.
To install the Service Monitor, you must have Administrator privileges. In
case your computer does not let you install the program, switch to
Administrator account or contact your system administrator.
In case you need to uninstall the program, evoke the standard uninstalling
procedure through Start→ Control Panel→ Add or Remove Programs.
Please keep a copy of your installation file in a secure place, in order to
reinstall the Message Manager when you need it again.
I.2. Launching and configuring the Service Monitor
When you launch the Service Monitor by double-clicking the Configurator.exe file,
the first thing you see is the Login section as shown in Figure 1.
Page 7 of 18
Service Monitor End User Manual
Figure 1. Logging in and configuring the Service Monitor.
Login is probably one of the most important sections for successful operation of the
Service Monitor, rivaled only by the Data Source section. In the Login section you are
to do the following:
•
Provide your login credentials, which are the User name, Password, and Client
ID (Customer ID);
•
Define the proxy connection if necessary;
•
Schedule your SMS notifications. You can use this feature if you do not want
your recipients to get your SMS notifications on weekends, or after work hours,
or any other time periods;
•
Set the locations for the Log file and Error log file;
•
Define how often the Service Monitor is to check the source data sources (Query
interval), how many times the Service Monitor is to retry checking the source
data sources in case the first check fails (Number of retries), and the Retry
interval;
•
Set the parameters for log files, specifying when the Service Monitor is to check
the statuses of the messages sent (Check statuses of sent messages), and
how long the log information must be kept (Purge report after);
In the Login section you can also define the behavior of the Service Monitor on your
computer screen, so that it collapses to the tray when minimized (the Collapse
configurator in tray when minimized check box), and select the interface language
(see the group of three buttons at the bottom of the section as shown in Figure 1).
Currently you can choose English, French, or Arabic.
Page 8 of 18
Service Monitor End User Manual
To finalize the configuration of the Service Monitor connection to the server, click the
OK button.
II. Defining data sources for your SMS notifications
The section is probably the most important, because it controls from where the Service
Monitor is going to take the data for the SMS notifications. By preparing and handling
your data sources correctly, you can ensure smooth and efficient messaging from your
Service Monitor.
II.1.
Preparing your data source
The Service Monitor allows you operate a wide variety of data sources, covering
practically all the types available on the market. Those can be:
•
Microsoft dBASE files;
•
Microsoft Excel files;
•
Microsoft Access files;
•
DSN files;
•
Oracle databases;
•
Microsoft Paradox databases;
•
SQL databases;
•
Microsoft Visio databases;
•
Text files (.txt);
•
Comma-separated values files (.csv).
Before you set the route for the data sources, you must prepare the data source. It is
strongly advised to include the ID field in your database. First, it noticeably increases
the performance of the Service Monitor when working with the data source. Second, it
lets you ensure backup to your data source, which can give you information on your
message current delivery status, delivery cost, and delivery errors occurred (if any).
The Service Monitor is an advanced software application with a possibility of sending
feedback to your data source. After sending a message it can tell you whether the
message is properly delivered, how much money it cost, and inform you about any
errors occurred. This feedback information is sent with the help of the Advanced Fields
(see more detail in Chapter II.2.d. Ensuring the feedback from the Service Monitor to
your data source). Hence in your data source you may want to provide for the following
fields to be filled in by the Service Monitor:
•
A field showing the delivery status (the Deliv Report field in the Service Monitor):
the Service Monitor is to put the delivery status for the message related to this
line in your data source;
•
A field showing the message delivery cost (the Credit field in the Service
Monitor);
•
A field showing any errors occurred during the message sending (the Error field
in the Service Monitor).
Page 9 of 18
Service Monitor End User Manual
Those fields are empty in your original file, and the Service Monitor fills them in during
its operation. None of the above fields is obligatory to use, but we advise you to try them
to discover the full potential of your Service Monitor. You can deactivate any of the
fields any time you want (see more detail in Chapter II.2.d. Ensuring the feedback from
the Service Monitor to your data source).
II.2.
Linking the data source to the Service Monitor
After you have prepared your data source, you must link it to the Service Monitor. To do
this, click the Data Sources button on the left.
Figure 2. The initial form for defining the data source and the button to start.
To start linking, press the New button in the top-right corner. Some fields in the form
become active then. You can provide a meaningful name for your new connection,
define the source type, and select the necessary data source with the help of the
Browse button which appears in the Data source configuration section.
If the data source requires the User name and Password, the corresponding form
appears (similar to the one shown in Figure 3), where you are to enter the user details.
If those are not required, click Cancel.
Figure 3. Entering the user details for the data source you selected.
Page 10 of 18
Service Monitor End User Manual
If your data source has several data sheets or tables, you can select the necessary one
in the corresponding drop-down menu just below the File field. If your data source is a
.txt or .csv file, the Delimiter field becomes active, and you must define the delimiter
sign. Then the selected table from the data source appears in the Data Preview section
(see an example in Figure 4).
Figure 4. A data source (a MS Excel file) configured for sending SMS notifications.
II.2.a. Applying filters to the data source columns
You can configure your Service Monitor so that it then processes only the records
corresponding to certain conditions. For example, your messages can be sent only if the
name in the cell equals the one you set, or if the number of days in the column is less
than 7.
To set criteria for your message sending, you must use the filters which show up if you
click the top cell in a column (it is set to Any by default). Then a drop-down list appears
(see Figure 5), where you can select the necessary sign and provide the value for
comparison.
Page 11 of 18
Service Monitor End User Manual
Figure 5. Applying a filter to a column in the data source.
An example of the case where the SMS notifications are sent only if the number of days
before the contract expiration is less than 7 is shown in Figure 4.
II.2.b. Defining the SMS notification parameters
To define the SMS notification text, the fields in the Message Fields section are used.
To make the operation of the Service Monitor more efficient, it is strongly advised to
define the ID field in your database (see Chapter II.1. Preparing your data source).
First, it noticeably increases the performance of the Service Monitor when working with
the data source. Second, it lets you ensure backup to your data source, which can give
you information on your message current delivery status, delivery cost, and delivery
errors occurred (see more detail in Chapter II.2.d. Ensuring the feedback from the
Service Monitor to your data source).
To specify the recipient’s number, use the Destination field. Please note that here you
can type the mobile number manually, or you can select a column from your data
source table (an example is shown in Figure 4). In this case every new record produces
an SMS notification which is then sent to a different recipient.
To specify the Originator for your SMS notification, use the Originator field. Here you
can select an originator from the list of your regular originators (an example is shown in
Figure 4), or define one of the column’s values as the originator for the SMS notification
for this record.
If you want your SMS notifications to be delivered not immediately, but at a certain time,
use the Deferred Delivery field. Here you can select a column from your data source
table which is to serve as the time and date of delivery for each record. Note that in this
case your date/time format must correspond to the Date/Time format field.
II.2.c. Defining the SMS notification text
You are to define the actual SMS notification text which the recipient is going to get in
the Message field. First of all, you may want to select the text language in the Type
field. Currently you can type messages in Latin characters, in Arabic with Latin
numbers, and in Arabic with Arabic numbers.
Please remember that the choice of language influences the character
limit for your SMS messages. Generally there can be up to 160 Latin
characters, and about 70 characters for languages like Arabic. If your
message exceeds the limit, the Service Monitor automatically breaks it
into several parts, with every part charged separately.
You have an opportunity not only to type the text manually, but also include the values
from the appropriate columns. The column to be included can be specified right in the
notification text if you right-click in the necessary place and then select the column from
the list (Figure 6).
Page 12 of 18
Service Monitor End User Manual
Figure 6. Inserting a variable from a table column in the notification text.
You can preview the notifications if you click the Preview button. Then the column titles
are replaced with actual values from the table (see Figure 7). Using the Prev and Next
buttons you can leaf through the notifications to be created.
Figure 7. Previewing your notification text.
II.2.d. Ensuring the feedback from the Service Monitor to your data
source
The Service Monitor is an advanced software application with a possibility of sending
feedback to your data source, so that you can know whether your messages are
delivered or not, how much they cost, and what errors occurred during sending (if any).
The prerequisite for getting the feedback is the ID field set in the Message Fields
section (see Chapter II.1. Preparing your data source).
To get the feedback from the Service Monitor to your data source, go to the Advanced
Fields section and assign the necessary data source columns to the corresponding
fields (Deliv Report, Credit, Error), as shown in Figure 6 on the right.
After the Service Monitor starts sending the SMS notifications, it also puts the
information on the message sending to the columns in the data source, so that you can
check it any time.
Page 13 of 18
Service Monitor End User Manual
To deactivate the feedback, just set the corresponding field in the Advanced Fields
section empty.
II.2.e. Processing the data source again from the beginning
Generally, the Service Monitor remembers the last line in the table it has processed,
and if the service is stopped, it resumes processing from the record where it stopped. It
is not uncommon that if you make changes in the Service Monitor settings, you may
need all the records in the table to be processed again. In this case check the Process
Records from Beginning of Table box. Then after you start the service and close the
Service Monitor Configurator interface, the whole data source table is going to be
processed anew.
Please remember that this setting is one-time action, i. e., after the service is started
again, the Service Monitor deselects the Process Records from Beginning of Table
box. If you change the settings again, you may have to check the box again as well.
II.2.f. Starting Service Monitor as a Windows service
After you made all the settings in the Service Monitor interface, click the Save button to
save your connection with the name you specified in the Name field.
Now you can set it running as a Windows service. The Service Monitor prompts you to
start the service by default when you click OK at the bottom of the form.
You can also start the service by clicking the
button at the
bottom of the form. The notice on the button shows the current service status. To stop
the service while it is running, you must click the same button.
III.Monitoring the Service Realtime
To monitor the service operation realtime, you can use the Realtime section (see
Figure 8). Here you can set how often the table is to be refreshed (the Refresh Every N
seconds field), or refresh it manually any time you need with the help of the Refresh
button.
Figure 8. The Realtime section for immediate monitoring of the service.
In the table itself you can perform all the operations necessary for effective data search.
Thus, data in every column can be filtered according to the following criteria:
Page 14 of 18
Service Monitor End User Manual
All: this selection returns all the records with any data in the column;
Blanks: this selection returns all the records with no data in the column;
Non blanks: this selection returns all the records with any data other than blank in the
column;
Custom: this selection lets you set your own criteria for filtering the records. The
Custom filter form (Figure 9) lets you set flexible search parameters. For example, the
parameters set in Figure 9 will return all the records with the originators starting with
‘Fa’.
Figure 9. The Custom filter form.
When setting parameters for your search, you can use the ‘%’ as the wildcard
character.
After the filter is applied, it is then shown under the records displayed, and the filter
button for the corresponding column turns from gray to blue.
Please note that if you apply several filters, the result you get is the
intersection of them. In case you apply a filter and then see a blank
table, you may need to deactivate another filter previously set.
IV.
Checking the Service operation History
If you run your business responsibly, you must periodically check how your operations
flow. To do this, you can use the History section logs.
The initial parameters to display the logs can be set with the help of the fields in the
upper part of the form (see Figure 10). After you set the parameters, click the Load
button, and the data are displayed broken by days (note the [-] buttons next to the dates
which can collapse the day records).
To filter the data further on, you can use the filters in each table column. The filter
settings are:
All: this selection returns all the records with any data in the column;
Blanks: this selection returns all the records with no data in the column;
Non blanks: this selection returns all the records with any data other than blank in the
column;
Custom: this selection lets you set your own criteria for filtering the records. The
Custom filter form (Figure 9) lets you set flexible search parameters. For example, the
parameters set in Figure 9 will return all the records with the originators starting with
‘Fa’.
Page 15 of 18
Service Monitor End User Manual
Figure 10. The History section for the service operations.
When setting parameters for the filters in your table, you can use the ‘%’ as the wildcard
character.
After the filter is applied, it is then shown under the records displayed, and the filter
button for the corresponding column turns from gray to blue.
Please note that if you apply several filters, the result you get is the
intersection of them. In case you apply a filter and then see a blank
table, you may need to deactivate another filter previously set.
Page 16 of 18
Service Monitor End User Manual
Outro
Your opinion is important for us
If you have any questions or comments on the Service Monitor outer look and
performance, you are most welcome to contact the developer team. To do this, click the
About button in the Login section as shown in Figure 1, and send your email message
to the address provided there.
Page 17 of 18
Service Monitor End User Manual
Page 18 of 18