1
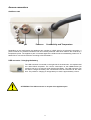
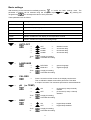
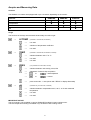
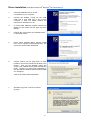
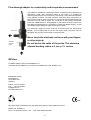
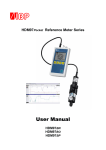
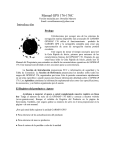
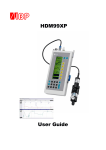
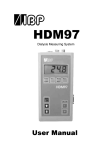
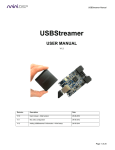
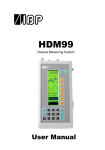
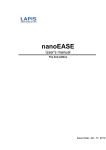
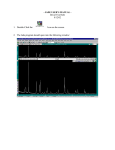
HDM97Pocket Reference Meter Series
HDM97BP
HDM97BO
HDM97BN
Safety Instructions and Quick Start Guide
This document describes the major functions of the HDM97Pocket instrument series. The complete manual
can be found in Adobe® Acrobat® PDF format on the installation CD. For reading the document Adobe®
Reader it's necessary to have Adobe® Reader installed. Adobe® Reader for Microsoft® Windows® is included
in many language versions on the CD.
Display
Tare (pressure) / Adjust (pH)
and navigationkey
"OK"
Functions / Special functions
and navigation key
"next"
Unit / Compensationmode
and navigation key
"previous"
ON / OFF switch
Key "Channel select"
Conductivity + Temperature ; Temperature ;
Pressure (only BO and BP) ; pH (only BP)
and navigation key
e.g. discard settings
1
"ESCAPE"
SAFETY INSTRUCTIONS
For your and your patients safety read and follow carefully the safety instructions below
• Read the entire manual (not only this guide) carefully before using the HDM97Pocket
• Keep the instrument away from unauthorised persons.
• Only use the HDM97Pocket as reference instrument to measure Conductivity, Temperature, Pressure and
pH depending to it's equipped features.
• Never use the HDM97Pocket as a replacement of sensors of a medical device.
• Do not use the HDM97Pocket in conjunction with a medical device during a treatment.
• Only use the instrument in a dry environment and do not touch it with wet hands.
• Make sure that no liquids intrude inside the instrument or it's inlets / outlets.
• Always use a clean protection filter for the pressure transducer inlet.
• Prevent every mechanical overstraining of electrical wires. Never buckle or pull the cable of the
conductivity probe
• If the acquired values seem to be not believable, make sure that the HDM97Pocket is not defective
• Prevent electrostatic discharge on the connectors. This can lead to substantial damage of the
instrument. Make sure to be completely discharged before touching the connectors or cables
connected to the instrument.
• Adjust the meter only, if you are familiar with the consequences of the adjustment. Consider the hints
for reference solutions in the user manual.
• Potentials above 42V against earth ground are dangerous. This potentials can lead to electrical shock
and therefore to health hazards. Make sure that none of the connectors has higher voltage than
mentioned before.
• The direct connection of earth potential to any connector of the instrument is not applicable for safety
purposes and may substantially damage the instrument. Make sure that the medical device itself is
properly connected to earth ground according to its instruction manual.
• Make sure that the instrument never heats over 60°C / 140°F. Prevent direct sunlight.
• Never sterilize the instrument using an autoclave. Danger of explosion of the battery!
• Never throw the meter into a fire. Danger of explosion of the battery!
• Never open the meter. There are no servicable parts inside.
• Never try to replace or repair the internal battery. Handled in the wrong way these part is dangerous.
Extreme risk of fire and explosion!
2
Access connectors
Appliance part
pH
Pressure
Conductivity and Temperature
Depending on the configuration the appliance part consists of a BNC inlet for pH electrode connection, a
pmale connector for pressure transducer inlet and a directly attached cable which leads to the conductivity /
temperature probe. The appliance part is insolated against the USB-Connector withstanding 4000V AC or
6000V DC for one minute minimum according to ISO EN 60601-1.
USB connector / charging the battery
The USB connector is mounted on the right side of the instrument. It is implemented
as a Mini-USB-A receptacle. The current consumption of the HDM97Pocket (all
versions) can be up to 500 mA while charging the battery. The USB connector can
be used to charge the battery and communicate with the instrument at the same
time. The period for charging an empty battery to 100% is approximately 3 hours.
ATTENTION: The USB connector is not part of the appliance part.
3
Basic settings
After switching on the instrument immediately press key
to invoke the basic settings menu. The
parameter to change can be selected using the navigation keys
and
. By pressing the
you can adjust the value of each parameter.
navigation key
These parameters are as follows:
Parameter
Description
AUTO-OFF
Set the delay time fort he auto power off function or disables it.
LANGUAGE
Adjusts the display language.
CAL-RES
Overwrites the user calibration dataset with the device initial calibration dataset.
PH
enables / disables the pH channel
TEMP
enables / disables the sole display of the temperature channel
BEEP
enables / disables the keypad acknowledge beep
→
→
→
AUTO-OFF
→
→
→
→
OFF
30 MIN
60 MIN
90 MIN
Then
or
to apply this setting,
to discard this setting.
→
disables function
30 minutes delay
60 minutes delay
90 minutes delay
LANGUAGE
→
→
DEUTSCH
ENGLISH
Then
or
to apply this setting,
to discard this setting.
→
→
german language
english language
CAL-RES
→
→
→
→
→
→
pH
Press 5 seconds until the counter in the display reaches zero.
Then a calibration dataset reset will be performed. This takes
a couple of seconds. The instrument performes a restart afterwards.
(or TEMP)
→
ON
→
→
OFF
→
Then
or
to apply this setting,
to discard this setting.
→
→
ON
OFF
Then
or
to apply this setting,
to discard this setting.
pH channel (or temp-channel)
enabled
pH channel (or temp- channel)
disabled
BEEP
→
→
4
keypad beep enabled
keypad beep disabled
Acquire and Measuring Data
Versions
The HDM97Pocket meters are equipped with up to 4 channels, depending on the version:
Channel
HDM97BN
HDM97BO
HDM97BP
3
3
3
3
3
3
3
3
3
Conductivity
Temperature
Pressure
pH
Usage
The functions of the keys are structured hierarchically from left to right.
→
→
→
LF/TEMP
→
not used
→
selection of temperature coefficient
→
not used
TEMP
(available in versions BN, BO and BP, if enabled)
→
selection between units °F or °C
→
not used
→
not used
PRES
(only available in versions BO, and BP)
→
selection between units mmHg, mbar, kPa
→
Stopwatch / Pressure drop acquisition
→
→
→
→
(available in versions BN, BO and BP)
pH
→start stopwatch
→cancel
or.
or.
press 5 seconds → tare (shown with "ZERO" in display afterwards)
(available only in version BP, if enabled)
→
selection between compensation 20°C, 25°C, 37°C and measured
temperature
→
not used
→
not used
IMPORTANT NOTICE:
The pH channel is only available in version HDM97BP if enabled in basic settings menu.
The sole temperature reading is available only if enabled in basic settings menu.
5
Driver installation, example for Microsoft® Windows® XP Service Pack 2
1.
Insert the Installation-CD in the CD
or DVD drive of your computer.
2.
Connect the HDM97 Pocket via the USBcable with a free USB port of the running
computer. It does not matter whether the
instrument is switched on or off.
3.
A "Found New Hardware Wizard" Window will
appear on the screen like that right here from
the text.
4.
Choose "No, not this time" and afterward click
on the button "Next".
5.
Driver source selection dialog: Choose "Install
from a list or specific location (Advanced)", and
click on the "Next" button afterwards
6.
Choose "Search fort he best driver in these
locations" and check "Include this location in the
search:". Then use the "Browse" button and
choose your CD/DVD drive's letter and add the
folder "drivers" to it. In the giveen expample on
the right side the CD/DVD driver has drive letter
"D:\" assigned.
Click on the "Next" button afterwards.
7.
Windows Logo Test : Choose "Continue
Anyway".
6
8.
The driver installation is in progress. This can
take a couple of minutes.
9.
The driver installation was successful, click on
the
button
"Finish"
to
complete
the
procedure.
After you have finished this procedure another similar Wizard will popup. Do exactly the same you did in the
first procedure as described earlier. One installation is for the COM port emulation, the other installation is for
the USB interface itself.
Checking the driver installation (optional)
The USB interface of the HDM97 Pocket emulates a serial COM port and offers a proprietary interface to
communicate directly with the USB interface.
Use the "My Computer/Manage" function to open the
Device Manager and search for a Group called "Ports
(COM and LPT)". You should find an entry called "USB
<-> HDM Interface". At the end of the line you will find
the number of the associated COM port (in this case
"COM3").
In addition you will find the USB communication interface in the Group "USBController" It is named " USB <-> HDM Interface ".
7
Flow-through adapter for conductivity and temperature measurement
The adapter is suitable for measuring pressure, temperature and conductivity in
flow-though mode. With immersion usage of the probe it is suitable for
measuring temperature and conductivity concurrently. The preferred orientation
of the adapter is vertical. The axial connector must point down (see picture). In
flow-through mode the axial connector is to be used as inlet meanwhile the side
connector is to be used as outlet. The connection to the pressure transducer
inside the HDM97Pocket is accomplished by the lateral connection above the
inlet. Before measurement it is necessary to shake the adapter slightly, so that
air bubbles trapped inside can pass off through the outlet.
For immersion usage the probe must be unscrewed from the flow-through
adapter. To accomplish that do not turn the upper shank, the probe may be
damaged. Only turn the nut as shown in the picture left.
Screw cap
Í
Never touch the electrode surfaces with your fingers
or other objects.
Dialysate
pressure
outlet
Do not buckle the cable of the probe. The minimum
allowed bending radius is 3 cm or 1¼ inches.
Ï
IBPView
For details read the user manual HDM97Pocket.
Templates for the HDM97Pocket meters are available on the CD „HDM97Pocket“.
IBP Medical GmbH
Ikarusallee 15
30179 Hannover
Germany
Phone: +49 511 651647
Fax:
+49 511 652284
info@ibpmt.com
www.ibpmedical.com
0482
All brand names mentioned in this document are property of their respective owners.
IBP Art.-No. 80.0202.01
Rev 0 ; for Software Version 1.00 … 1.09, 26.05.2008 HKL/WPF
8