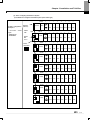
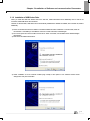
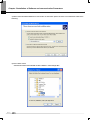
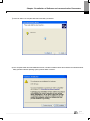
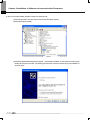
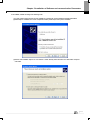
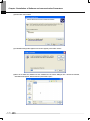
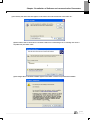
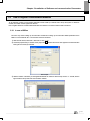
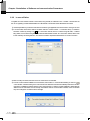
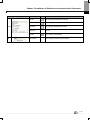
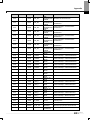
1
Right choice for ultimate yield LSIS strives to maximize customers' profit in gratitude of choosing us for your partner. Programmable Logic Controller Ethernet/IP I/F Module XGT Series User’s Manual XGL-EIPT Read this manual carefully before installing, wiring, operating, servicing or inspecting this equipment. Keep this manual within easy reach for quick reference. http://eng.lsis.biz Safety Instruction Before using the product … For your safety and effective operation, please read the safety instructions thoroughly before using the product. ► Safety Instructions should always be observed in order to prevent accident or risk with the safe and proper use the product. ► Instructions are divided into “Warning” and “Caution”, and the meaning of the terms is as follows. Warning This symbol indicates the possibility of serious injury or death if some applicable instruction is violated Caution This symbol indicates the possibility of severe or slight injury, and property damages if some applicable instruction is violated Moreover, even classified events under its caution category may develop into serious accidents relying on situations. Therefore we strongly advise users to observe all precautions properly just like warnings. ► The marks displayed on the product and in the user’s manual have the following meanings. Be careful! Danger may be expected. Be careful! Electric shock may occur. ► The user’s manual even after read shall be kept available and accessible to any user of the product. Safety Instruction Safety Instructions for design process Warning Please install a protection circuit on the exterior of PLC so that the whole system may operate safely regardless of failures from external power or PLC. Any abnormal output or operation from PLC may cause serious problems to safety in whole system. - Install protection units on the exterior of PLC like an interlock circuit that deals with opposite operations such as emergency stop, protection circuit, and forward/reverse rotation or install an interlock circuit that deals with high/low limit under its position controls. - If any system error (watch-dog timer error, module installation error, etc.) is detected during CPU operation in PLC, all output signals are designed to be turned off and stopped for safety. However, there are cases when output signals remain active due to device failures in Relay and TR which can’t be detected. Thus, you are recommended to install an addition circuit to monitor the output status for those critical outputs which may cause significant problems. Never overload more than rated current of output module nor allow to have a short circuit. Over current for a long period time maycause a fire . Never let the external power of the output circuit to be on earlier than PLC power, which may cause accidents from abnormal output oroperation. Please install interlock circuits in the sequence program for safe operations in the system when exchange data with PLC or modify operation modes using a computer or other external equipments Read specific instructions thoroughly when conducting control operations with PLC. Safety Instruction Safety Instructions for design process Caution I/O signal or communication line shall be wired at least 100mm away from a high-voltage cable or power line. Fail to follow this instruction may cause malfunctions from noise Safety Instructions on installation process Caution Use PLC only in the environment specified in PLC manual or general standard of data sheet. If not, electric shock, fire, abnormal operation of the product may be caused. Before install or remove the module, be sure PLC power is off. If not, electric shock or damage on the product may be caused. Be sure that every module is securely attached after adding a module or an extension connector. If the product is installed loosely or incorrectly, abnormal operation, error or dropping may be caused. In addition, contact failures under poor cable installation will be causing malfunctions as well. Be sure that screws get tighten securely under vibrating environments. Fail to do so will put the product under direct vibrations which will cause electric shock, fire and abnormal operation. Do not come in contact with conducting parts in each module, which may cause electric shock, malfunctions or abnormal operation. Safety Instruction Safety Instructions for wiring process Warning Prior to wiring works, make sure that every power is turned off. If not, electric shock or damage on the product may be caused. After wiring process is done, make sure that terminal covers are installed properly before its use. Fail to install the cover may cause electric shocks. Caution Check rated voltages and terminal arrangements in each product prior to its wiring process. Applying incorrect voltages other than rated voltages and misarrangement among terminals may cause fire or malfunctions. Secure terminal screws tightly applying with specified torque. If the screws get loose, short circuit, fire or abnormal operation may be caused. Securing screws too tightly will cause damages to the module or malfunctions, short circuit, and dropping. Be sure to earth to the ground using Class 3 wires for FG terminals which is exclusively used for PLC. If the terminals not grounded correctly, abnormal operation or electric shock may be caused. Don’t let any foreign materials such as wiring waste inside the module while wiring, which may cause fire, damage on the product or abnormal operation. Make sure that pressed terminals get tighten following the specified torque. External connector type shall be pressed or soldered using proper equipments. Safety Instruction Safety Instructions for test-operation and maintenance Warning Don’t touch the terminal when powered. Electric shock or abnormal operation may occur. Prior to cleaning or tightening the terminal screws, let all the external power off including PLC power. If not, electric shock or abnormal operation may occur. Don’t let the battery recharged, disassembled, heated, short or soldered. Heat, explosion or ignition may cause injuries or fire. Caution Do not make modifications or disassemble each module. Fire, electric shock or abnormal operation may occur. Prior to installing or disassembling the module, let all the external power off including PLC power. If not, electric shock or abnormal operation may occur. Keep any wireless equipment such as walkie-talkie or cell phones at least 30cm away from PLC. If not, abnormal operation may be caused. When making a modification on programs or using run to modify functions under PLC operations, read and comprehend all contents in the manual fully. Mismanagement will cause damages to products and accidents. Avoid any physical impact to the battery and prevent it from dropping as well. Damages to battery may cause leakage from its fluid. When battery was dropped or exposed under strong impact, never reuse the battery again. Moreover skilled workers are needed when exchanging batteries. Safety Instruction Safety Instructions for waste disposal Caution Product or battery waste shall be processed as industrial waste. The waste may discharge toxic materials or explode itself. Revision History Revision History Version Date Contents Revised position V 1.0 ’09.12 First edition - V 1.1 ’11.05 How to enable link through flag added CH 6.3.1 ※ The number of User’s manual is indicated right part of the back cover. ⓒ 2009 LSIS Co., Ltd All Rights Reserved. 1 About User’s Manual Thank you for purchasing PLC of LSIS Co.,Ltd. Before use, make sure to carefully read and understand the User’s Manual about the functions, performances, installation and programming of the product you purchased in order for correct use and importantly, let the end user and maintenance administrator to be provided with the User’s Manual. The User’s Manual describes the product. If necessary, you may refer to the following description and order accordingly. In addition, you may connect our website (http://eng.lsis.biz/) and download the information as a PDF file. Relevant User’s Manuals Title Description XG5000 User’s Manual (for XGK, XGB) XG5000 User’s Manual (for XGI, XGR) XGK/XGB Instructions & Programming User’s Manual XGI/XGR/XEC Instructions & Programming User’s Manual XGK CPU User’s Manual (XGK-CPUA/CPUE/CPUH/CPUS/CPUU) XGI CPU User’s Manual (XGI-CPUU/CPUH/CPUS) XGR redundant series User’s Manual XG5000 software user manual describing online function such as programming, print, monitoring, debugging by using XGK, XGB CPU XG5000 software user manual describing online function such as programming, print, monitoring, debugging by using XGI, XGR CPU User’s manual for programming to explain how to use instructions that are used PLC system with XGK, XGB CPU. User’s manual for programming to explain how to use instructions that are used PLC system with XGI, XGR, XEC CPU. XGK-CPUA/CPUE/CPUH/CPUS/CPUU user manual describing about XGK CPU module, power module, base, IO module, specification of extension cable and system configuration, EMC standard XGI-CPUU/CPUH/CPUS user manual describing about XGI CPU module, power module, base, IO module, specification of extension cable and system configuration, EMC standard XGR- CPUH/F, CPUH/T user manual describing about XGR CPU module, power module, extension drive, base, IO module, specification of extension cable and system configuration, EMC standard Current XGL-EIPT manual is written based on the following version. Related OS version list Product name OS version XGK-CPUH, CPUS, CPUA, CPUE, CPUU V2.2 XGI-CPUU, CPUH, CPUS V2.1 XGR-CPUH/F, CPUH/T V1.6 XG5000(XG-PD) V3.1 1 Contents ◎ Contents ◎ Chapter 1 Overview 1.1 Overview --------------------------- --------------------------------------------- ----------------------1.2 Features ---------------------------------------- --------------------------- ----------------------- ----1.3 Product Components ------------------------------------------------------------------------------------------1.3.1 Indication of Type Names ---------------------------------------------------------------------------------1.3.2 The Number of Installation available – units by CPUs -----------------------------------------1.4 Software for Using Products -----------------------------------------------------------------------1.4.1 Confirms for Software ---------------------------------- ---------------------------- ---------1.4.2 XG-PD -------------------------------------- -------------------------------------------------------1.4.3 Confirmation of Versions -------------------------------------------------------------------------------- 1-1 1-2 1-3 1-3 1-3 1-4 1-4 1-4 1-5 Chapter 2 Product Specification 2.1 2.2 2.3 2.4 General Specification -------------------------------------------------------------------------------------------Performance Specification ------------------------------------------------------------------------------------------Name in Each Part ------------------------------------------ ------------------------------------ ----------Cable Standards ----------------------------------------------------------------------------------------- 2-1 2-2 2-3 2-5 Chapter 3 Installation and Trial- Run 3.1 3.2 3.3 3.4 Installation Environment -------------------------------------------------------------------------------------- 3-1 Cautions when Handling -------------------------------- --------------------------------------------- 3-2 The Order for Setting up Products till Running -------------------------------------------------------------------- 3-3 I/O Allotment and Device Information --------------------------------------------------------------------------- 3-4 3.4.1 I/O Allotment ----------------------------------------------------------------------------------------------- 3-4 3.5 Installation of Products --------------------------------------------------------------------------- 3-9 3.5.1 Installation of XGL-EIPT ------------------------------------------------------------------------------ 3-9 3 . 6 Tr i a l - R u n - - - - - - - - - - - - - - - - - - - - - - - - - - - - - - - - - - - - - - - - - - - - - - - - - - - - - - - - - - - - - - - - - - - - - - - - - - - - - - - - - - - - - - 3 - 11 3.6.1 Directions when Configuring Systems --------------------------------------------------------------------- 3-11 Chapter 4 System Configuration 4.1 Configuration of a Usable System -----------------------------------------------------------------------------4.1.1 System Configuration using a Switch --------------------------------------------------------------------4.1.2 System Configuration not using a Switch -------------------------------------------------------------4.2 Configuration of an unusable System ---------------------------------------------------------------------------4.2.1 System Configuration using a Switch--------------------------------------------------------4.2.2 Configuration of a Ring System (Configuration of a XGL-EIPT Ring) --------------- 4-1 4-1 4-1 4-2 4-2 4-2 Chapter 5 Installation of Software and Communication Parameters 5.1 Installation and Execution of Software -------------------------------------------------------------------------- 5-1 1 Contents 5.1.1 Installation of XG5000---------------------------------------------------------------------------------- 5-1 5.1.2 Installation of USB Device Drive ------------------------------------------------------------------- 5-5 5.1.3 Confirmation on the Installation of USB Device Driver -------------------------------------- 5-8 5.2 How to Register Communication Modules ------------------------------------------------------------------------------- 5-15 5.2.1 In case of Offline -------------------------------------------------------------------------- 5-15 5.2.2 In case of Online ------------------------ --------------------------------------------------- 5-16 5.2.3 In case of Reading Parameter stored in PLC -------------------------------------- 5-18 5.2.4 How to Set-up Modules -------------------------------------------------------------------- 5-19 5.2.5 The Relationship between the Menu Bar and Shortcut Icons --------------------5-21 Chapter 6 EIP Service 6.1 EtherNet/IP Communication Method -------------------------------------------------------------------------------- 6-1 6 .1.1 EtherNet/IP Terms ------------------------------------------------------------------------- 6- 1 6.1.2 EDS File ------------------------------------------------- ------------------------------------ 6- 1 6 .1 .3 Pe r i o d i c C om m u n i c a ti o n ( Im p l i c i t ) S ys te m - - - - - - - - - - - - - -- - - - - - - - - - - - - -- - - - - - - - - - - - - 6 - 2 6.1.4 Aperiodic Communication (Explicit) System ------------------------------------- 6-3 6.2 EIP Service ------------ ----------------------------------------------------------------------------- 6-4 6.3 Communication Set-up with Own Communication Module ------------------------------------------------------ 6-5 6.3.1 Periodic Client Communication Service --------------------------------------- 6-5 6 . 3 .2 Se t - u p o f Ap e r i o d i c C l i e n t C o m m u n i c a t i o n S e r vi c e - - - - - - - - - - - - - - - - - - - - - - - - - - - - 6 - 1 2 6.3.3 Periodic Server Communication Service ----------------------------------------- 6-14 6.4 Operation Start ------------------------------------------------------------------------------------- 6-16 6.4.1 XG-PD Set-up ------------------------------------------------------------------------------- 6-16 6.5 Use Examples -------------------------------------------------------- --------------------------------- 6-18 6.5.1 Communication with Rockwell 1756 -ENBT Communication Module -------------- 6-18 6.5.2 Communication with OMRON CJ1W-EIPT Communication Module ----------------- 6-21 Chapter 7 Diagnosis Function 7.1 System Diagnosis ---------------------------------------------------------------------------------------- 7-1 7.2 System Diagnosis Items and Contents ---------------------------------------------------------------------- 7-3 7.3 Troubleshooting ----------------------------------- ------------------------------------------------- -- 7-8 7.3.1 Check-out through LED in Communication Module ------------------------------------------------------------------ 7-8 7.3.2 Check out of Module Errors through XG5000 ----------------------------------------------------------- 7-9 7.3.3 Check-out on Module Errors through System Log ------------------------------------------------------- 7-10 Appendix A . 1 Te r m s - - - - - - - - - - - - - - - - - - - - - - - - - - - - - - - - - - - - - - - - - - - - - - - - - - - - - - - - - - - - - - - - - - - - - - - - - - - - - - - - - - - - - - - - A - 1 A.2 Flag List ---------------------------------------------------------------------------------- A-5 A.2.1 Special Relay (F) List ---------------------------------------------------------------------- A-5 A.2.2 Communication Relay (L) List -------------------------------------------------------------------------- A-13 A. 3 External Dimension ---------------------------------------------------------------------------------------------------- A-14 2 Chapter 1 Overview Chapter 1 Overview 1.1 Overview This user guide is made out to describe EtherNet/IP I/F module (Referred to as “EPI Module”) among XGT PLC system networks. EtherNet/IP is the protocols where Common Industrial Protocol (CIP: industrial protocols used in common, such as Device Net, ControlNet, CompoNet, etc) has been laid on an upper layer of open protocol Ethernet. Thus, EtherNet/IP allows DeviceNet, ControlNet, and CompoNet developers to secure the interoperability between multi-band and lower network devices by applying the same objects and profiles. EIP module provides two Ethernet Ports (Ethernet Port) and the switch function required for the existing STAR system is built in and it is the module for transmitting data between PCCs or between PLC and EtherNet/IP I/F IO module. Make a program in reference with these following user guides XG5000 User Guide XGK Instructions XGK User Guide XGI Instructions XGI User Guide XGR Instructions XGR User Guide Be careful of these configuration items when you constitute XGT EIP module system. XGT PLC XG5000 Programming Tool: Over V3.1 XG-PD: Over V3.1 XGK, XGI CPU: Over V2.1 XGR CPU: Over V1.6 1-1 Chapter 1 Overview 1.2 Features XGT EtherNet/IP I/F Module have the following features. (1) Communication Methods: Extensive Client Messaging Support ▶ Encapsulated Messages, UCMM Explicit Messaging ▶ Class 3 Connected Explicit Messaging(Server Only) ▶ Class 1 Connected Implicit(IO) Messaging(Cyclic I/O Service Only) (2) Compatibility: XGT EtherNet/IP I/F meet EtherNet/IP Conformance Test Suite Version 2.10 (3) 100BASE-TX media is provided and 100Mbps/ (Full Duplex) are supported. (4) It is possible to be equipped with 24 units per CPU and installation to basic base and extension base is available. However, only installation to base is possible in XGR system. . (5) With the built - in switch, there is no need to install a separate switch and hub and wiring is saved and flexibility in installation is provided. (6) As Auto Cross Over- function is provided, cabling job is convenient. (7) A variety of diagnose functions, the states information of modules and networks are provided. ▶ The state of a communication module ▶ The state of a communication service(EIP, Non-circular server) ▶ Auto Scan-function providing an information of own corporation’s and other corporations’ modules connected into network ▶ The kinds of packets and the quantity of data received by communication module (Network load – prediction is available) ▶The diagnosis function through network is available 1-2 Chapter 1 Overview 1.3 Product Components 1.3.1 Indication of Type Names Components of XGT EtherNet/IP I/F module product are described. Type Name XGL-EIPT Components Electric 2 –port EtherNet/IP Module Remarks More than category 5 1.3.2 The Number of Installation available – units by CPUs Up to 24 units of XGT EtherNet/IP I/F module are possible to be installed regardless of basic base and extension base. However, when XGR CPU is applied, it is possible to be installed into the basic base. To achieve the maximum performance, if possible, install this module to the basic module. The following table shows the kinds of services which are possible to be used by CPUs. When you configure the system, consider the number of communication modules. Segment The Number of Modules using P2P(EIP) (Maximum) Maximum number of modules (The Module used as server is included) CPUH CPUU XGK CPUA CPUS CPUE CPUU XGI CPUH XGR CPUS CPUH 8 units 6 units 24 units 6 units 1-3 Chapter 1 Overview 1.4 Software for Using Products The following explains main programming tools and other production software for using EIP module. For more exact application of programs and communication, refer to the contents below and apply it to systems. 1.4.1 Confirms for Software Segment Component Products Communication Set-up Tool XGL-EIPT Communication Module for XGT XG-PD Notice 1) To use the above program, download from the current website you are visiting. In case you can not use the internet, visit near agencies and ask for CD-ROM for installation. Internet Web - address : http://www.eng.lsis.biz 2) To program XG5000 and XG-PD, use RS-232C port and USB of CUP module. For cable, refer to the XGT catalogue. (USB-301A, K1C-050A) 1.4.2 XG-PD XG-PD is the software for dedicatedly using all communication modules including XGnet I/F module for basic parameter set-up, frame make-up, module and network diagnosis. The following illustration shows the initial screen of XG-PD. [Illustration 1.4.1] XG-PD – Initial Screen 1-4 Chapter 1 Overview 1.4.3 Confirmation of Versions Check out the version of the module before using XGT EtherNet/IP I/F. 1) Confirmation through XG-PD To read the information of a communication module, access to the communication module. . If interface is normally maintained with CPU, the information like the following illustration can be got. (1) Execute XG-PD. (2) Connect with CPU via access through [Online]-[Connect] on menu. (3) When connected with CPU, execute the diagnosis of XG-PD. (4) Locate the mouse to the communication module in system diagnosis screen of online menu. (5) Double-click the communication module or click right button of mouse and select Detailed Module Information. ` [Illustration 1.4.2] Confirmation of Versions through XG-PD 2) Confirmation of Versions through Case Label of Products In each module, the information of the module product is attached to the exterior case. In case there is no connector with PC and it is impossible to check out online, confirmation is available after you remove the module in case. The label attached to the backside of a product and the type name and the version information is marked. 1-5 Chapter 2 Specification Chapter 2 Specification 2.1 General Specification The general specification of XGT series is as follows. No. Items Specifications Ambient 1 0 ~ 55 C temperature Storage 2 Related standards 25 ~ 70 C temperature 3 Ambient humidity 5 ~ 95%RH (Non-condensing) 4 Storage humidity 5 ~ 95%RH (Non-condensing) Occasional vibration Vibration 5 - Frequency Acceleration Amplitude 10 f 57Hz 0.075mm 57 f 150Hz 9.8m/s2(1G) resistance How many times 10 times each Continuous vibration Frequency Acceleration Amplitude 10 f 57Hz 0.035mm 4.9m/s2(0.5G) 57 f 150Hz directions IEC61131-2 (X, Y and Z) Peak acceleration: 147 m/s (15G) 2 Shock 6 resistance Duration: 11ms IEC61131-2 Half-sine, 3 times each direction per each axis Square wave 1,500 V Impulse noise Electrostatic Noise resistance Radiated electromagnetic field noise Fast transient/bust noise IEC61131-2 4kV (Contact discharge) discharge 7 LSIS standard IEC61000-1-2 IEC61131-2, 80 ~ 1,000 MHz, 10V/m IEC61000-1-3 Segme nt Power supply Digital/analog input/output module communication interface Voltage 2kV 1kV 8 Environment Free from corrosive gasses and excessive dust 9 Altitude Up to 2,000 ms 10 Pollution degree Less than equal to 2 11 Cooling Air-cooling IEC61131-2 IEC61000-1-4 N0ote 1) IEC (International Electrotechnical Commission): An international nongovernmental organization which promotes internationally cooperated standardization in electric/electronic field, publishes international standards and manages applicable estimation system related with. 2) Pollution degree: An index indicating pollution degree of the operating environment which decides insulation performance of the devices. For instance, Pollution degree 2 indicates the state generally that only non-conductive pollution occurs. However, this state contains temporary conduction due to dew produced. 2-1 Chapter 2 Specification 2.2 Performance Specification The following table describes the specification of system configuration in accordance with EtherNet/IP I/F module’s media. When you configure systems, refer to the below table. Item Transmission Standard Standard Transmission Speed 100Mbps Transmission Method Base Band Maximum Extension Distance between Nodes 100m Communication Zone Excess Method CSMA/CD Frame Error – Checking Method CRC 32 = X32 + X26 + X23+ ,,,,, + X2 + X + 1 The Number of Maximum Installments (When server is included ) 24 units*주commet1) Topology Line , Star Diagnosis Function Module Information , Service State , Media Information , Auto Scan, Ping Test Service The Number of Connections (Client/Server) Periodic Cline t Implicit IO Client Aperiodic Client UCMM Client Periodic Server Implicit IO Server TCP 64/128 CIP(IO Communication) 64/128 The Number of Maximum Services 8 The Number of Maximum Installments 24 Media UTP/STP Category 5 Basic Standards Dimension (mm) 98(H) X 27(W) X 90(D) Consumption Current (mA) 400 Weight (g) 102 Notice 1) As XGR CPU can be installed into basic base, the number of maximum installments is limited to 6 units . 2-2 Chapter 2 Specification 2.3 Name in Each Part The name in each module is as follows. LED Display IP Set-up Switch Ethernet Connector (Channel No. 1) LOG Switch Ethernet Connector (Channel No.2) [Illustration 2.3.1] The Front View for Module PLC ▶ LED Names and Contents Silk Mark RUN I/F P2P PADT SVR MS NS LED State ON OFF OFF Flicker/OFF ON OFF ON OFF ON OFF Green Light ON Green Light flickers Red Light flickers Red Light ON Red Green Light flickers Green Light flickers Green Light ON Red Light flickers Red Light ON Red / Green Light flickers n ACT Flicker n LNK ON OFF Contents Power -on and Process normally operating Power –off and Process abnormally operating I/F operating normally with CPU I/F operating abnormally with CPU In case of stetting up P2P Service In case of canceling P2P Service XG5000 being connected via remote control XG5000 remote connection has been released When exterior client has been connected, Light ON When there is no exterior client connection, Light OFF When normal operating When configuration for device is not over In case of wrong set-up or restorable errors happened When errors which are impossible to restore have been made When self-diagnosis is proceeding When there is no connection of a device When there is connection more than 1 with a device at least When Timeout with a device more than 1 unit happened When repeated IP address has been detected When self-diagnosis is preceding In case of frame – transmitted and received (n=1,2) When network link has been formed (n=1,2) When network link has not been formed (n=1,2) 2-3 Chapter 2 Specification ▶ Log Switch In case of reading Log in communication module and needing to store the Log, if you push it for more than 1 second, it is stored into Flash area from Memory area. The Log in the memory area is the one erased when power is supplied again and the Log in Flash area is the one which is maintained when power is supplied again. ▶ IP Set-up Switch (1~89) When IP address has not been inserted via XG-PD within 10 seconds after power was supplied, switch value ‘192.168.250’ is set up. ▶ IP Set-up Switch (90~98) This switch is designed for setting up the inside of communication. If you change it arbitrary, it may cause problems. ▶ IP Set-up Switch (90~98) This switch functions to configure the system into a ring form and when set-up is not finished, normal operation is impossible. It is possible to form a ring system in terms of appearance by supporting 2 connectors but actual ring system is not supported. 2-4 Chapter 2 Specification 2.4 Cable Standards 2.4.1 UTP Cable UTP cable is classified into the 3 types according to the following standards. ▶ With or without Shield: 3 Types (UTP, FTP, STP) ▶ Used - frequency Band: 7 Categories (Category 1 ~ Category 7) ▶ Inflammable Grade: 4 Grades (CMX, CM, CMR, CMP) 1) Kinds of Cables with or without Shield Classification Details UTP(or U.UTP) Unshielded Cables for High Speed – Signals Use Maximum 200MHz Voice +Information (Data)+ Low grade Video Signal Maximum 100MHz Electro Magnetic Interference (EMI) and Electric Stability is considered Voice + Information (Data) + Low grade Video Signal FTP(or S.UTP) 1 Layer Shield, Cable Core only shielded * Shield Materials: AL/Plastic Complex Foil Or Copper Braid STP(or S.STP) Dual - shielded Construction, Pair Shielded Cables or Core Shielded Cables Maximum 500MHz * Pair - shielded Materials : AL/Plastic Complex Foil Voice + Information (Data)+ Video Signal * Core - shielded Materials : AL/Plastic Complex Foil or An Alternative to 75Ω – Coaxial Cable Copper Braid UTP FTP STP Notice 1) UTP : Unshielded Twisted Paired Copper Cable FTP : (Overall) Foiled Twisted Paired Copper Cable STP : (Overall) Shielded(and Shielded Individually Pair)Twisted Paired Copper Cable 2) Patch Cable(or Patch Cord) Instead of Solid Conductors, Stranded Conductors may be used for the purpose of improving the Flexibility of a UTP 4Pair Cable. The materials and sizes of strands used are regulated in accordance with UL444, and representative sizes and materials are Un-coated AWG 24 (7/0203A). In other words, diameter of unshielded wire is 0.203mm and wires are stranded in 1+6 structure. The materials are annealed coopers. 2-5 Chapter 2 Specification 2) Classification by Frequencies used Classification Frequency used (MHz) Category 1 Category 2 Voice Frequency 4 Transmission Speed(Mbps) 1 4 Category 3 16 16 Category 4 20 20 Category 5 and Enhanced Category 5 100 100 Uses Telephone Network (2 Pair) Multi- Pair Communication Cable Telephone Network + Computation Network 1) Computation Network – Transmission Speed Up 2)Low-loss Communication Cable 1)Digital Telephone Network + Computation Network 2)Low Loss, Wideband Cable Notice 1) The classification currently applied at home and abroad is Category 3, 5, Enhanced Category 5, and Category 6. Category 4 is not now used as Category 5 appears. Category 7 is in STP structure and it is at a development stage over the world. 3) Classification by Inflammable Grades(Base on UL Certification ) Segment Induced Calorie Induced Time Combustion Smoke Length Regulation CMP 88(kW) 20 minutes Less than 73m/min CMR 150(kW) 30 minutes Less than 3.6m Not Regulated CM 21(kW) 20 minutes Less than 2.4m Not regulated CMX 1(kW) 1 minute Less than 0.5m Not regulated Regulated Remarks • For Installing ceilings without duct • Plenum Cable • UL 910 (Plenum Test) • Vertical Installation Type • Non-Plenum Cable • UL 1666(Riser Test) • General Type • Non-Plenum Cable • UL 1581(VTFT Test) • Restrictive Use • Non-Plenum Cable • UL 1581 (VW-1 Test) Notice 1) CMG is located in the middle grade between CM and CMR, but generally it is not applied to LAN Cable such as UTP Cable. Example) CMG: CAS FT4 (VTFT Test), similar to CM of UL 1581. →Burner Angle (Horizontality → 45 degree – Upward) and Sample Conditions (1/2 interval arrangement → A Bundle of 6 ones x 6 units) are different. 2-6 Chapter 2 Specification 4) An Example (CTP-LAN5) of Category - 5 Twisted Pair Cable(UTP) Items Conductor Resistance (Maximum) Insulation Resistance (Minimum) Anti- voltage Characteristic Impedance Units Values Ω/km 93.5 MΩ/km 2500 V/minute AC 500 Ω(1~100MHz) 100 ± 15 Attenuation Less than dB/100m Near End Cross-talk Attenuation Less than dB/100m 10MHz 16MHz 20MHz 10MHz 16MHz 20MHz 6.5 8.2 9.3 47 44 42 2-7 Chapter 3 Installation and Trial-Run Chapter 3 Installation and Trial- Run 3.1 Installation Environment This product is very reliable regardless of installation environments, but to guaranty the reliability and stability of the system, pay attention to the following items. 1) Environment Conditions (1) Install in the control board where waterproof and dustproof are possible. (2) The places where constant impacts or vibrations are imposed. (3) The places where direct rays are not directly exposed . (4) The places where dew is not formed by the rapid change in temperature. (5) The places where surrounding temperature is maintained to be at 0-55℃. 2) Installation Constructions (1) Make sure wiring leavings are not inserted inside the PLC when you process screw holes or do wiring jobs. (2) Install the places where it is easy to control. (3) Do not install into the same panel as high press machine. (4) Make sure the distance to the duct and the surrounding module is maintained to be more than 50㎜. (5) Put to earth where surrounding noise environment is good. 3-1 Chapter 3 Installation and Trial-Run 3.2 Cautions when Handling Observe the following directions when you configure the system using EtherNet/IP I/F module. 1) Do not drop or impose strong impact. 2) Do not separate PCB from the case. It may cause malfunctions. 3) Make sure foreign objects are not put into the upper area of the module while you do wiring jobs. 4) If foreign objects are entered, remove them. 5) Do not remove the module when light is ON. 6) Use standard cables and install within maximum distance. 7) Make sure communication lines are not affected by surges and inductive noises that may occur from alternating current or current parts. 8) In case the machinery or the substances that may generate high temperature are nearby you or when wires directly come into contact oil and other things for a long time when you do wiring jobs, it may cause a short cut, damage, or malfunctions. 9) When you do wirings during pipe arrangement, it is necessary to put to earth to pipes. 3-2 Chapter 3 Installation and Trial-Run 3.3 The Order for Setting up Products till Running The following describes the order of installing or setting up products. Install the system and setting up the parameter so that they can operate in order. Start ● Check out the sizes and standards to be used ● Install the module to the base ● Check out the location of the base and the slot ● Check out the LED state of a communication module after power is authorized. (RUN: Green) ● Connect to CPU using XG-PD ● Carry out “Read IO Information” in XG-PD ● The module appears in project window after executing “Read IO Information” ● Set up the basic parameter ▶ IP Address, Subnet Mask, Gateway ● Install the necessary EDS file ● Set up EIP parameter ▶ Channels, Functions, Starting Conditions, Data Sizes and Areas, Types ● Execute “Write Parameter” and “Enable Link” ● Execute EIP communication 3-3 Chapter 3 Installation and Trial-Run 3.4 I/O Allotment and Device Information 3.4.1 I/O Allotment 1) When using XGK CPU (1) How to Configure the Basic System The features of the basic system, which is configured after the basic base and the extension base are connected through cables, are as follows. The step number of bases is restricted in accordance with kinds of CPUs and the allotment method of In/Output number. Thus, it is possible to select a fixed type and a variable type. Segment XGK-CPUE XGK-CPUS XGK-CPUA XGK-CPUH XGK-CPUU 1step 3 steps 3 steps 7steps 7steps 24 modules 48modules 48modules 96 modules 96 modules 1,536 point 3,072 point 3,072 point 6,144point 6,144point The Step Number s of Maximum Extension The Installation Number of Maximum In/Output Module s Maximum In/Output Point Maximum Extension Distance 15m (2) Allotment of In/Output Numbers(Fixed Type) a) For each slot of a base, 64 points are allotted regardless of a module installed or not and kinds of modules. b) In one base, in/output numbers for 16 slots are allotted. In other words, the starting number of base 1 will be P00640.(Refer to 2.3.2) c) The example of allotment of in/output numbers in the slot base 12 is as follows. Slot No. P W C P U 0 1 2 3 4 5 6 7 8 9 10 11 I 1 6 I 1 6 I 3 2 I 6 4 O 1 6 O 3 2 O 3 2 O 6 4 I 3 2 O 1 6 O 3 2 O 3 2 P0 P40 P80 P120 P160 P200 P240 P280 P320 P360 P400 P440 ~ ~ ~ ~ ~ ~ ~ ~ ~ ~ ~ ~ P3F P7F P11F P15F P19F P23F P27F P31F P35F P39F P43F P47F R (3) Allotment of Output Numbers (Variable Type) a) Points are allotted in accordance with the installation modules by slots. b) Installation modules are designated by parameters, designated points are allotted. c) The slots not designated by I/O parameter are automatically allotted according to installation modules (8 points - module is allotted to be 16 points). d) The empty slot not designated by I/O parameter is processed to be 16 points. e) Using I/O parameter, you can designate points only without designating a module. f) For the slots which special modules and communication modules have been installed, 16 points are allotted. g) The example of allotment of in/output numbers in the slot base 12 is as follows. Slot No. P W R 3-4 C P U 0 1 2 3 4 5 6 7 8 9 10 11 I 1 6 I 1 6 I 3 2 I 6 4 O 1 6 O 3 2 O 3 2 O 6 4 I 3 2 O 1 6 O 3 2 O 3 2 P00 P10 P20 P40 P80 P90 P110 P130 P170 P190 P200 P220 ~ ~ ~ ~ ~ ~ ~ ~ ~ ~ ~ ~ P0F P1F P3F P7F P8F P10F P12F P16F P18F P19F P21FP23F Chapter 3 Installation and Trial-Run (4) When Configuring the Maximum System a) The Maximum Configure of the Basic System (Point- fixed Type) Slot No. 0 1 2 3 4 5 6 7 슬롯번호: P0000 P0040 P0080 P0120 P0160 P0200 P0240 P0280 System Configuration Example.1 - I/O Point – fixed Type - XGK-CPUH - 8 Slot Base Basic Base Power ~ CPU ~ ~ ~ ~ ~ ~ ~ P003F P007F P011F P015F P019F P023F P027F P031F (Base No. 0) Extension Cable 0 Slot No. 1 2 3 4 5 6 7 P0640 P0680 P0720 P0760 P0800 P0840 P0880 P0920 Extension Base 설베이스 Base No. ~ Power ~ ~ ~ ~ ~ ~ ~ P067F P071F P075F P079F P083F P087F P091F P095F Slot No. 0 1 2 3 4 5 6 7 P1280 P1320 P1360 P1400 P1440 P1480 P1520 P1560 Set-up Switch: 1 Power ~ ~ ~ ~ ~ ~ ~ ~ P131F P135F P139F P143F P147F P151F P155F P159F 1234 Slot: No. 0 1 2 3 4 5 6 7 P1920 P1960 P2000 P2040 P2080 P2120 P2160 P2200 Power ~ ~ ~ ~ ~ ~ ~ ~ P195F P199F P203F P207F P211F P215F P219F P223F Slot No. 0 1 2 3 4 5 6 7 P2560 P2600 P2640 P2680 P2720 P2760 P2800 P2840 Power ~ ~ ~ ~ ~ ~ ~ ~ P259F P263F P267F P271F P275F P279F P283F P287F Slot No. 0 1 2 3 4 5 6 7 P3200 P3240 P3280 P3320 P3360 P3400 P3440 P3480 Power ~ ~ ~ ~ ~ ~ ~ ~ P323F P327F P331F P335F P339F P343F P347F P351F Slot No. 0 1 2 3 4 5 6 7 P3840 P3880 P3920 P3960 P4000 P4040 P4080 P4120 Power ~ ~ ~ ~ ~ ~ ~ ~ P387F P391F P395F P399F P403F P407F P411F P415F Slot No. 0 1 2 3 4 5 6 7 P4480 P4520 P4560 P4600 P4640 P4680 P4720 P4760 Power ~ ~ ~ ~ ~ ~ ~ ~ P451F P455F P459F P463F P467F P471F P475F P479F 3-5 Chapter 3 Installation and Trial-Run b)The Maximum Configuration of the Basic System (Points - Variable Type) 0 Slot NO. System Configuration Example 2 - I/O Points Variable Type - XGK-CPUH - 8 Slot Base - When 16 points module installed Basic Base (Base NO.:0) 1 2 3 4 5 6 7 P0000 P0010 P0020 P0030 P0040 P0050 P0060 P0070 Power CPU ~ ~ ~ ~ ~ ~ ~ ~ P000F P001F P002F P003F P004F P005F P006F P007F Extension Cable Extension Base 0 Slot NO. 1 2 3 4 5 6 7 P0080 P0090 P0100 P0110 P0120 P0130 P0140 P0150 Power ~ ~ ~ ~ ~ ~ ~ ~ P008F P009F P010F P011F P012F P013F P014F P015F Base NO. Slot NO 0 1 2 3 4 5 6 7 P0160 P0170 P0180 P0190 P0200 P0210 P0220 P0230 Set-up Switch: 1 Power ~ ~ ~ ~ ~ ~ ~ ~ P016F P017F P018F P019F P020F P021F P022F P023F 1234 Slot NO. 0 1 2 3 4 5 6 7 P0240 P0250 P0260 P0270 P0280 P0290 P0300 P0310 Power ~ ~ ~ ~ ~ ~ ~ ~ P024F P025F P026F P027F P028F P029F P030F P031F Slot NO. 0 1 2 3 4 5 6 7 P0320 P0330 P0340 P0350 P0360 P0370 P0380 P0390 Power ~ ~ ~ ~ ~ ~ ~ ~ P032F P033F P034F P035F P036F P037F P038F P039F Slot NO. 0 1 2 3 4 5 6 7 P0400 P0410 P0420 P0430 P0440 P0450 P0460 P0470 Power ~ ~ ~ ~ ~ ~ ~ ~ P040F P041F P042F P043F P044F P045F P046F P047F Slot NO. 0 1 2 3 4 5 6 7 P0480 P0490 P0500 P0510 P0520 P0530 P0540 P0550 Power ~ ~ ~ ~ ~ ~ ~ ~ P048F P049F P050F P051F P052F P053F P054F P055F Slot NO. 0 1 2 3 4 5 6 7 P0560 P0570 P0580 P0590 P0600 P0610 P0620 P0630 Power ~ ~ ~ ~ ~ ~ ~ ~ P056F P057F P058F P059F P060F P061F P062F P063F 3-6 Chapter 3 Installation and Trial-Run 2) When using XGI CPU (1) The Configuration Method of the Basic System Segment The Number of Maximum 7 steps Extension Steps The Number of Maximum 96 modules In/Output Modules XGI-CPUU When installing 16 points – module : 1,536 points Maximum In/Output Points When installing 32points – module : 3,072 points When installing 64points – module : 6,144points Maximum Extension Distance 15m In/Output numbers are allotted to be 64 points fixed per the slot of a base. To each slot of a base is allotted, 64 points are allotted regardless of with or without the installation and kinds. The installation location of special modules and the number of uses are not restrictive. In case of special modules, fixed in/output numbers are not allotted, unlike digital in/output modules. Special modules are controlled by exclusive function blocks and memories are automatically allotted. The example of allotment of in/output numbers in12 Slot Base is as follows. Slot NO. Pow er C P U 0 I 1 6 1 2 3 I 1 6 O 3 2 O 6 4 4 O 1 6 5 6 7 O 3 2 O 3 2 O 6 4 8 O 3 2 9 O 1 6 10 O 3 2 11 O 3 2 %QX 0.11.0 ~ 31 %QX 0.10.0 ~ 31 %QX 0.9.0 ~ 15 %IX 0.8.0 ~ 31 Base NO. 1 Notice 1) The basic base is fixed at 0 in base NO, and the extension base has a switch extending base numbers. 2) Only if the module type set up through I/O parameter corresponds to the type of the module actually installed running starts. 3-7 Chapter 3 Installation and Trial-Run (2) When Configuring the Big System Slot no. System Configuration Example 2 Basic Base (Base NO.:0) Power CPU 0 1 2 3 4 5 6 7 0.0.0 0.1.0 0.2.0 0.3.0 0.4.0 0.5.0 0.6.0 0.7.0 ~ ~ ~ ~ ~ ~ ~ ~ 0.0.16 0.1.15 0.2.15 0.3.15 0.4.15 0.5.15 0.6.15 0.7.15 - XGI-CPUU - 8 Slot Base - When installing 16 modules Extension Cable Extension Base Base No. Slot no. Power 0 1.0.0 1 1.1.0 2 1.2.0 3 1.3.0 4 1.4.0 5 1.5.0 6 1.6.0 7 1.7.0 ~ ~ ~ ~ ~ ~ ~ ~ 1.0.16 1.1.15 1.2.15 1.3.15 1.4.15 1.5.15 1.6.15 1.7.15 Set-up Switch: 1 Slot no. 1234 Power 0 2.0.0 1 2.1.0 2 2.2.0 3 2.3.0 4 2.4.0 5 2.5.0 6 2.6.0 7 2.7.0 ~ ~ ~ ~ ~ ~ ~ ~ 2.0.16 2.1.15 2.2.15 2.3.15 2.4.15 2.5.15 2.6.15 2.7.15 Slot no. Power 0 3.0.0 1 3.1.0 2 3.2.0 3 3.3.0 4 3.4.0 5 3.5.0 6 3.6.0 7 3.7.0 ~ ~ ~ ~ ~ ~ ~ ~ 3.0.16 3.1.15 3.2.15 3.3.15 3.4.15 3.5.15 3.6.15 3.7.15 Slot no. Power 0 4.0.0 1 4.1.0 2 4.2.0 3 4.3.0 4 4.4.0 5 4.5.0 6 4.6.0 7 4.7.0 ~ ~ ~ ~ ~ ~ ~ ~ 4.0.16 4.1.15 4.2.15 4.3.15 4.4.15 4.5.15 4.6.15 4.7.15 Slot no. Power 0 5.0.0 1 5.1.0 2 5.2.0 3 5.3.0 4 5.4.0 5 5.5.0 6 5.6.0 7 5.7.0 ~ ~ ~ ~ ~ ~ ~ ~ 5.0.16 5.1.15 5.2.15 5.3.15 5.4.15 5.5.15 5.6.15 5.7.15 Slot no. Power 0 1 2 3 4 5 6 7 6.0.0 6.1.0 6.2.0 6.3.0 6.4.0 6.5.0 6.6.0 6.7.0 ~ ~ ~ ~ ~ ~ ~ ~ 6.0.16 6.1.15 6.2.15 6.3.15 6.4.15 6.5.15 6.6.15 6.7.15 Slot no. Location for terminal resistor 3-8 Power 0 1 2 3 4 5 6 7 7.0.0 7.1.0 7.2.0 7.3.0 7.4.0 7.5.0 7.6.0 7.7.0 ~ ~ ~ ~ ~ ~ ~ ~ 7.0.16 7.1.15 7.2.15 7.3.15 7.4.15 7.5.15 7.6.15 7.7.15 Chapter 3 Installation and Trial-Run 3.5 Installation of Products 3.5.1 Installation of XGL-EIPT Twist Pair Cable CaCaCaCaCCaCableCaleCab le트위스트 페어 케이블 8 Pin - RJ45 Plug [Illustration 3.6.1] How to Install 100BASE-TX The maximum segment distance of 100BASE-TX reaches 100m. (The distance between modules) Straight cables and cross cables are used. If a cross cable is used when connected between these communication modules, the time for connecting links can be shortened. This module doesn‟t support a ring system. When configuring a ring form, IP address switch of a module – front view must be set up at ‟99.‟ Then, a ring system is formed in external aspect, but the service for a ring system will not be supported. If IP address switch is not set up at 99‟after formed in a ring, data burst may happen and modules can not execute normal actions. Pin NO. Signal Straight Cable between Cables 1:1 Cross Cable 1 TD+ 1-1 1-3 3 RD+ 3-3 3-1 6 RD- 6-6 6-2 4,5,7,8 Not used - - Notice 1) 100BASE-TX cable is designed to be weak in cable structure, so only if cables are twisted (Two wires are stranded) after No.1 (TD+) and No. 2 (TD-) wires are twisted and No. 3 and No. 6 are twisted with each other. wiring will be strong in strength. 2) For cable terminal treatment and manufacture, consult with professional providers to install 3-9 Chapter 3 Installation and Trial-Run 1) How to Install UTP (1) For reliable transmission of 100Mbps signal using UTP cables, Patch Cord, Line Cord, Patch Panel, DVO(Data Voice Outlet), etc must meet 5 spec (Category 5 Spec.- EIA/TIA-568A). (2) Make sure the length of patch code will be over 7m in cross-connect, If the length exceeds 7m, the length corresponding to 90m, as much as the allowable value in Horizontal Distribution System, must be deducted. (3) Make sure the length of line cord does not exceed 3m in line cord length. If the length exceeds 3m, as much as the length corresponding to 90m, the allowable value in Horizontal Distribution System, must be deducted. (4) Make sure the loose of paired pitch of UIP cable in case of disconnection to patch panel and DVD does not exceed the following dimension. (5) Maximum Paired Pitch – Loose : Category 5 : 13mm, Category 3 : 26mm (6) Use jumper wires in DC cross-connect system. Then, also the loose of paired pitch must not exceed the above standards. Especially, in case of seriously bending cables, pay attention so that damage or separation between pairs does not happen. (7) Maximum Curvature Diameter : 4 Pair Cable : 4 times the Diameter Cable more than 25 Pair: 10 times the Diameter (8) Make sure the maximum tensile force while using does not exceed 110N (11.3Kgf) based on 4 Pair (9) Make sure jumper cables and patch codes are loosely disconnected. When tightly connected, the features of category 5 may lower. When using Tie-wrap, make sure cables are not stressed. (10) Make sure proper distance is maintained between EMI source and UTP cable when installing cables. The proper distance in each case is as follows. Minimum Separation Distance Conditions Less than 2.0KVA 2.5 KVA More than 5.0KVA In case unshielded power lines or electric facilities are open and are in the state of being closely located nearby nonmetal pipes 127mm 305mm 610mm In case unshielded power lines or electric facilities are in the state of being located nearby buried metal pipes 64mm 152mm 305mm In case buried metal pipes the power line (or the same shields)are in the state of being located nearby buried metal pipes - 76mm 152mm Notice 1) In case voltage reaches 480V and electric power source reaches more than 5KVA, separated calculation is required. 3-10 Chapter 3 Installation and Trial-Run 3.6 Trial- Run 3.6.1 Directions when Configuring Systems 1) To use P2P service including this module, make sure IP Addresses of all channels are different from IP addresses of all other channels. 2) To use communication cables, select the ones in designated sizes. Using cables that have not been designated may cause serious communication obstacles. 3) Check out whether cables are disconnected or short-circuited before installing communication cables. 4) Completely tighten the connectors of communication cables so that cable connections can be fixed. 5) Incomplete cable connections may cause serious obstacles to communication. 6) In case of connecting communication cables to a long distance, make sure cables are not separated from power lines or inductive noises. 7) Coaxial cables are low in flexibility, so they must be re-branched lowering down at least more than 30 cm from the connector in communication module, and if cables are bent on the square and forcibly transformed, it may cause the destruction of the connector located in the communication module. 8) In case LED does not normally operate, refer to „Chapter 10 Troubleshooting‟ and check out causes. If something is wrong even if actions have been taken, contact Warranty Service Center. 3-11 Chapter 4 System Configuration Chapter 4 System Configuration EtherNet/IP I/F modules can be installed regardless of XGT CPU modules. The number of maximum installments reaches 24 units including basic bases and extension bases. For EIP service , 8 units can be used as EIP service to the maximum. If used as a aperiodicserver, 24 units can be used to the maximum. It is possible for the communication system using this module to be applied to a variety of configurations. This chapter describes the examples of the cases when system configuration is available and unavailable by applications. 4.1 Configuration of a Usable System 4.1.1 System Configuration using a Switch 4.1.2 System Configuration not using a Switch 4-1 Chapter 4 System Configuration 4.2 Configuration of an unusable System 4.2.1 System Configuration using a Switch It is impossible for EtherNet/IP I/F module to normally operate as data burst happens when each module is connected to each switch of 2 communication ports. 4.2.2 Configuration of a Ring System (Configuration of a XGL-EIPT Ring) EtherNet/IP I/F does not support a ring system. When you configure a ring form, it is necessary to set up the IP address switch of the module – front view at ’99.’ Then, it is configured into a ring system in external aspect, but the service on an actual ring system is not supported. In case IP address switch is not set up at NO. ‘99’ after configured into a ring, data burst happens and the module does not normally execute operations. 4-2 Chapter 5 Installation of Software and communication Parameters Chapter 5 Installation of Software and Communication Parameters 5.1 Installation and Execution of Software To use software XG-PD, it is necessary to install XG5000. Then, only if the version of XG5000 is over V3.1, it is possible to use XGT EtherNet/IP I/F module. The requirements for system needed to execute are as follows. 1) PC and Memory: It is necessary to need a computer with more than 128MB memory and the memory with more than 512MB is recommended. 2) Communication Port: RS-232C serial port or USB port are required. 3) Hard Disk: The area where more than 200MB is possible to use is required. 4) Mouse: A mouse that can be connected with a computer is required. 5) Monitor: The resolution must reach more than 1024 X 768. 6) Window: It is possible to execute in Window 2000/XP/VISTA. However, if several applications including other products are executed, XG5000 can be on the blitz due to the restriction to using memories. 5.1.1 Installation of XG5000 1) Execute the installation file. 2) InstallShield Wizard prepares for installation as follows. 5-1 Chapter 5 Installation of Software and communication Parameters 3) Click next button. 4) Insert a company‟s name and press next button. 5) Designate the folder that XG5000 will be installed. If you want to change the folder, click” Index” and enter or select new folder. As XG5000 needs installation space of 200MByte, select the disk with enough room. If the installation room is not enough, warning message is on and thus, it is impossible to proceed to next step. 5-2 Chapter 5 Installation of Software and communication Parameters 6) If you have selected a folder, press next button. 7) Check out the installation path and press next button. Install as follows. 5-3 Chapter 5 Installation of Software and communication Parameters XG5000 USB device drive install screen appears while installing, and soon, installation is completed as follows. 5-4 Chapter 5 Installation of Software and communication Parameters 5.1.2 Installation of USB Device Drive When you install XG 5000 into Window XP for the first time, install USB Device Drive additionally. Even if USB is not connected, install USB device drive as follows. However, in Window 2000, USB device drive is automatically installed when XG5000 is installed, and in Window XP, install it additionally. 1) Check out whether there are driver folders in the folder XG5000 has been installed into. In Drivers folder, there are two drive files - GmUSBD.sys, GmUSBD.inf. If there is no folder or drive file, install XG again. 2) Turn off PLC power and connect USB connector to PC. When connected, new hardware search Wizard Dialogue Box appears 3) Order a user to install the device drive. 4) Select “Installation in List or Particular Location (High Grade)” of the options in new hardware search wizard dialogue box” and press next button. 5-5 Chapter 5 Installation of Software and communication Parameters 5) Select “Search the Most Suitable Drive in this Location” of drive search options and check out “Include Next Location when Searching” 6) Press “Search” button Select Drivers Folder where XG5000 has been installed in “Index Dialogue Box” 5-6 Chapter 5 Installation of Software and communication Parameters 7) Press “Ok” button. The computer searches for the folder you selected. 8) If the computer selects the most suitable device drive, it will ask to install the device driver selected. As USB device driver stably operates in Window operating system, press the button “Continue”. 5-7 Chapter 5 Installation of Software and communication Parameters 9) The completion of a device driver is completed; the dialogue box for installation like this appears. If you press “Finish” button, driver installation is terminated. 5.1.3 Confirmation on the Installation of USB Device Driver If USB is not connected, confirm the installation of device driver as follows. (1) Click the right button in “My Computer” on the desktop and select menu [Management]. 5-8 Chapter 5 Installation of Software and communication Parameters 1) The computer management dialogue box appears like this. In the left tree list of the dialogue box, extension proceeds in this order - [Computer Management (Local)] - [System Tool] - [ Device Manager ]. 2) The items appearing in the list can differently come out with each other according to the devices installed in the computer. (1) In case of normal state If the list [LGIS XG Series] located in the lower of [Universal Serial Bus] appears, the device driver has been normally installed. (2) In case of abnormal state The following illustration appears, it is the case the device drive has not normally been installed. 5-9 Chapter 5 Installation of Software and communication Parameters In case of not normally installed, reinstall according to the following order. (3) Click the right button in the device driver where “Exclamation Mark” appears. (4) Select Menu [Driver Update] (5) Hardware Update Wizard Dialogue Box appears. Select Option “Installation in List or Particular Location (High Grade)”List and press next button. The following procedures are manual and are the same to the installation of the device driver. 5-10 Chapter 5 Installation of Software and communication Parameters If not installed, reinstall according to the following order. (1) In case a device driver has been wrongly installed or is problematic, execute Hardware Update Wizard Start. (2) Select Option “Installation from a List or a specific location (Advanced)” List and press next button. (3) Search and Installation Option “Do not research”. Select “Directly Select the Driver You Will install” and press next button. 5-11 Chapter 5 Installation of Software and communication Parameters (4) Press button “Disc Loaded”. (5) If Installation Dialogue Box appears from the disc appears, press button “Search.” (6) Move to the folder File XG5000 has been installed from File Search Dialogue Box. If drivers fold selected, GmUSBD.inf file appears. Select this file and press button “Open.” 5-12 Chapter 5 Installation of Software and communication Parameters (7)The directory with device driver files appears on the location of the manufacture‟s file. Press button “Ok.” (8)Select “Select LGIS XG Series”drive in hardware indication list in select dialogue box for selecting drive which is compatible and press button “Next.” (9)The Dialogue Box for Hardware Installation appears. Press button “Continue” and proceed with installation. 5-13 Chapter 5 Installation of Software and communication Parameters (10)Dialogue Box for Hardware Update Wizard Completed appears. Press button “Finish” and complete the installation of device drive. 5-14 Chapter 5 Installation of Software and communication Parameters 5.2 How to Register Communication Modules To use XGnet I/F module, communication parameter must be made up in XG-PD and to set up the system on XGnet I/F module, the module must be registered to XG-PD. How to register XGnet I/F module located at discretion is as follows in accordance with the state of on/off line. 5.2.1 In case of Offline This is the way used in setting up communication modules and making up communication related parameters in the state of not connected with PLC. The execution method is as follows. 1) After execute XG-PD, select „File-> „New File ‟or click ( ). 2) Create the projects that you will store in the project name, and select the names of the projects to be stored and the CPU types of PLC that you selected. New Project 3) After the location of the base you will register EtherNet/IP I/F module in „Basic Set-up Screen” of XG-PD, click the right mouse and set up slots and communication modules 5-15 Chapter 5 Installation of Software and communication Parameters 5.2.2 In case of Online To register the communication module in online state, using XG-PD, the methods in NO. 1 and NO. 2 are the same as the one in registering modules of EtherNet/IP I/F in offline state. The execution order afterwards is as follows. 1) Create Project Name you will store and select „PLC Series” type applied to PLC series and PLC CPU type for CPU. 2) If not connected, check out the state of connection with PLC or select „Online „-> „Connection Set-up,‟ or select the connection method by clicking icon . As a connection method, there is a method using RS-232C, a method using cables, and a method using Ethernet module and EtherNet/IP module. As a connection method, select Local in case of directly connecting with PLC. The remote connection steps will be described in 7.3 remote connection. 3) When normally connected, the lower menus of online menus are activated. 4) To check out the modules installed to the current base, select „Online‟ „IO Information Reading‟ or click icon , communication modules existing in the main base and the extension base are automatically searched for and the information of installation modules appears on the project window. In case the module registered in offline state are different from the information of PLC currently connected or kinds of communication modules, check out whether they have changed or not with the above message. 5-16 Chapter 5 Installation of Software and communication Parameters 5) The list of the communication module installed to a product is created on “Project Window.” 5-17 Chapter 5 Installation of Software and communication Parameters 5.2.3 In case of Reading Parameter stored in PLC The method for reading the basic set-up values for the communication module stored in PLC and for reading P2P setup values are in the below order. 1) Select “Read” from PLC in the File. 2) Click “Connection” or “Ok” after setting up connection methods and connection steps 3) Enter the name of the project you will store and click “Ok” after entering the storing location of the file. 4) It is possible to check out the basic set-up values and PSP set-up values stored in PLC. 5-18 Chapter 5 Installation of Software and communication Parameters 5.2.4 How to Set-up Modules To operate EtherNet/IP I/F modules, set up in the following order. 1) Execution Order (1) Enter in the Project Window In the base where online → project window → module will be installed, the communication module set- up window appears as follows. 5-19 Chapter 5 Installation of Software and communication Parameters (2) I/O Information - Read Select Online → Online after Connection →I/O information – Read and read the module installed to the current base. 2) Operation Check –out (1) Select Online → System Diagnosis or click icon ( ). (2) Click the right button of the mouse in the module of the„System Diagnosis‟ Window and check out whether communication has been in normal state or not after clicking Communication Module Information ‟or State by Services. 5-20 Chapter 5 Installation of Software and communication Parameters 5.2.5 The Relationship between the Menu Bar and Shortcut Icons Menu Bar Menu Contents New File When making up new files Open When opening stored files Open from PLC File Icon - Save Save As When storing the file which is being made up - Print Preview Print Project Printer Setup When reading the file stored in PLC When storing a file in other names When printing - When previewing the contents that will be printed When printing set-up parameters When setting up a printer and printing direction Undo When returning to the current state Redo When returning to the original state after executing “Undo” Cut When deleting contents made up or post them to others Copy When copying Paste When pasting contented copies Delete When deleting Edit 5-21 Chapter 5 Installation of Software and communication Parameters Menu Bar Menu Icon Contents Connection When connecting PLC to a computer Connection Setting When setting up connection methods between a computer and PLC Read IO Information When reading the information of PLC Write Parameter When writing parameter contents edited from XG-PD Read Parameter When reading the parameter stored in PLC Online When approving the communication on high speed link and Enable Link Upload/Download communication set up - SyCon Upload System Diagnosis Reset PLC Reset When O/S downloading communication module When reading the data set in SyCon (Corresponding to Dnet, Pnet) When monitoring the operating state of communication module - When resetting PLC Reset Individual When resetting communication modules Module Register EDS File EDS When registering EDS file When deleting EDS file (Used to delete EDS of the module activated on Delete EDS File EIP Configuration Window ) When marking EDS file on the memo pad (The activated information of View EDS File Tools - When selecting / canceling a user of the menu related to a tools Shortcut Settings - When setting up/canceling a hotkey for each menu Options - Applying/canceling the option related to the projection Project Window - When activating tool bars in XG-PD Message Window - Module Information Window View EDS Information - When the message window is activated When displaying whether the online - system diagnosis has been activated - When displaying EDS information window State Bar - When displaying a state display line Used Device - When displaying the used device area on the parameter Ascii Table - When wanting to see Ascii and Sexadecimal Values Window 5-22 the module EIP on the configuration window ) Customize Chapter 5 Installation of Software and communication Parameters Menu Bar Window Help Menu Icon Contents Cascade When arranging the Edit Window in stair type Tile Horizontally When arranging the Edit Window horizontally Te Vertically When arranging the Edit Window vertically Arrange Icon Not used Close All When closing all - open windows About XG-PD When checking out XG-PD version information 5-23 Chapter 6 EIP Service Chapter 6 EIP Service 6.1 EtherNet/IP Communication Method The communicant method of EtherNet/IP is divided into Implicit Communication Method and Explicit Communication Method and each method is again divided into client and server function. In XGT EtherNet/IP IF module, Implicit communication method is provided by periodic client /periodic server and explicit communication method is provided by aperiodic client/aperiodic server. The periodic client/server is similar to the high speed link of the existing XGT communication service, which is the service used when data is transmitted and received periodically. The aperiodic /server method is the communication method used when particular events happen. In XGT EtherNet/IP I/F module these two services are incorporated into EIP service and provided. 6.1.1 EtherNet/IP Terms 1) Implicit Messaging: Suggestive message, the message where the information has been implicated to the minimum other than data (In XGT EtherNet/IP I/F module the message is provided via client /periodic server communication) 2) Explicit Messaging: Clear message, including all information that can translate frames other than data (In XGT EtherNet/IP I/F module the message is provided via aperiodic client communication) 3) Client: The subject requiring information 4) Server: The subject that provides information at request 5) Producer: The entity that create producers, information 6) Consumer: The entity that receives consumer information and consumes it 7) Tag: Nameplate , Named Variable 8) EDS File: The abbreviation for Electric Data Sheets. The file where the information on the device and on the communication set –up is recorded 9) RPI: The abbreviation for Requested Packet Interval, meaning the period when Packet will be sent (In XGT EtherNet/IP I/F module, packet is provided at transmission period) 6.1.2 EDS File Electrical Description Script (EDS) File is a description on devices and it includes the information about a product type and connection, as well as Vendor ID. In EtherNet/IP I/F module it is the basic principle to set up using EDS File. To install RDS Fie, EDS register menu of XG-PD should be set up. 6-1 Chapter 6 EIP Service 6.1.3 Periodic Communication (Implicit) System Implicit Message provided in periodic communication in XGT EtherNet/IP I/F module means a suggestive and implied message. As this message contains header information to the minimum except for the data in frame, it also refers to the message which is impossible to see what data means. In addition, if we translate it in different way, this message means that header information is small in quantity, so the process of translating the frame has been simplified and it is possible to process data quickly. In EtherNet/IP, connection between client and server is set up with the parameter for sending this data. Client requires connection and it becomes the object that receives and consumes data, and sever comes to transmit the said data in transmission period (Requested Packet Interval: RPI) like the way client wants. Thus, client comes to set up consumed tag and server will set up produced tag (XGT EtherNet/IP IF: Input Only Type). [Illustration 5.1] Client and Server in XGT EtherNet/IP I/F - Module Periodic Communication Notice Implicit Server is created also in Implicit Client. Server can set up timeout in the period that client grants according to types. Using data that client provides, it is possible to output to his own module . 6-2 Chapter 6 EIP Service 6.1.4 Aperiodic Communication (Explicit) System Explicit Message provided in aperiodic communication from GT EtherNet/IP I/F module means clear and explicit message. This message also means that all information which is possible to translate data to date frame. Thus, even though it takes some time to translate frame, if the message we want is sent without the process of setting parameter, frame is translated from server and the response is made. In general it is utilized as monitoring data to aperiodic data rather than control data. The following table shows the parameter items set up when XGT EtherNet/IP I/f module is used. Parame Inferior ter Configuration EIP Set-up or Not Set-up Items Set-up Scope EIP Periodic Periodic Aperiodic Client Server Client Remarks o x x Drag & drop from EDS File Configuration 0-63 x o o Set up other’s IP Channel 0-63 o o o Enter the channel you will use of set up Operation Pursuant o o o Mode EIP Channel I/O Type Defined o x x Select I/O type defined in EDS o x x Select one among connection types x x o Select one among aperiodic clients o x o Set up the parameter defined in EDS EIP Channel EIP Block channels in EIP channel to Automatically displayed in accordance with set up channels in EDS Connection Multicast, Type Point to Point Function Write, Read, defined in EDS Tag Read, Tag Write Parameter Defined in EDS - In case of aperiodic client, only read/write can be set up for read /write Parameter Defined in x x Display the contents set up in the Contents EDS Mobile Special Flag, x x o Set up mobile conditions Conditions Contact Point Transmitting 20-10000 o x X Period transmitting data Timeout 0-7 o x X Transmission Period – Timeout(0-7) Data Type BIT,1/2/4/8 o o o Set up a data type o o O The device area of the local axis where Parameter Period BYTE Tag Set- up/ XGT Local Tag Device Tag Set- up/ TAG PLC “Write” or “Read” is executed you will o x o Remote Tag Designate Other’s TAG(Maximum 40 letters) In case remote station is XGT PLC, it is set up as “% + Device Name” (Ex.% MW200) Tag up/Size Set- o o O Periodic Client/Server : Maximum 500 Byte Aperiodic Client : Maximum 1400 Byte 6-3 Chapter 6 EIP Service 6.2 EIP Service EtherNet/IP is divided into a periodic message service (Implicit Service), and an aperiodic message service (Explicit Service). In XGL-EIPT module these two services are incorporated to be provided as periodic/client server and aperiodic client. In Periodic Client / Server Service the tag for communication must be set up in parameter system. Thus, client and server tag must be shared with information for communication when parameter is exchanged. In XGT EhterNet/IP I/F module, client and server must be set up with XG-PD. Make sure client is set up in periodic client and sever is set up with periodic server. For the detail contents, see 6.2. Aperiodic client service must be communicated after you put the tag to be communicated and communication set-up. Thus, when required from client, server receives al information in frame and translates, and responds. In other words, it is the service without setting up from server side. In this part, EIP types and use methods provided to a user are described. The flowing refers to the order for making up the program using EIP. Connection and Basic Parameter Set-up • Connect with CPU • Register Communication Module • Set Up basic parameter EIP Parameter Set-up • Register EDS • Configure EIP and Set up Channels • Set up EIP Block Write Parameter • Download EIP Parameter Parameter – Write • Enable EIP 6-4 Chapter 6 EIP Service 6.3 Communication Set-up with Own Communication Module 6.3.1 Periodic Client Communication Service After set up the communication module and the basic parameter using XG-PD, drag EDS File with the mouse of an opponent’s country and start set-up. 1) Basic Parameter Set – up and EDS Register Order Set-up Procedure How to Set up Communication Module Set-up 1 1) Click the base you want and select EtherNet/IP I/F module 2) Double click communication module and set up basic parameter EDS File Register 2 1) Register the EDS file of the communication module you want to set up 2) Clock View→EDS Information Window of XG-PD 3) If you register, you will be able to view EDS File registered in EDS File Information Window 6-5 Chapter 6 EIP Service Order 3 Set-up Procedure How to Set up EIP Service Register Double click P2P(EIP) of Set - up Window and enter the module number and the slot number. 6-6 Chapter 6 EIP Service 2) EIP Configuration and Parameter Set-up Order Set – up Procedure How to Set up EIP Configuration 1 1) Drag registered EDS File from EDS Information Window and post it on EIP Configuration Window. 2) Channel Set-up Window appears as soon as registered EDS is posted. 3) Set up channel No. and IP address. EIP Channel Information Check-out 2 1) After registration in EIP Configuration, it is possible to check out the information on channels in EIP channel window. 2) In periodic client communication, more set-up is not required, so the said channel becomes inactivated. 6-7 Chapter 6 EIP Service Order Set-up Procedure How to Set up EIP Block Set-up 3 6-8 1) Channel: Drag EDS File and display channels set up. If several channels are set up, it is possible to select the channel a user wants and form the block. 2) Operating Mode: This mode is the contents displayed in accordance with the channel set up and it is expressed as periodic communication, aperiodic communication, and periodic server. 3) I/O Type: The name of connection defined in the EDS File of the device. Connection will be open with server the connection way as set up here. 4) Connection Type: The method for communicating with server is set up. The information supported according to modules is recorded in EDS, which can be MULTICAST, Point To Point (UNICAST). 5) Parameter: This is the parameter on the server side that a user must set up. For the contents of the parameter, refer to the manual of the server side ▶In case of using own EtherNet/IP: In case of own company, Output/Input Assembly Instance should be the same. (1) T2O Tag Size : The data size that server will read (Word) (2) Output Assembly Instance(8bit) : The block number of server that will read (3) Input Assembly Instance(8bit) : The block number of the server that will read ▶ In case of using other Company’s EtherNet/IP (1) Output Assembly Instance (8bit): This is the block number of the server where a user wants to use data, and index No. 0 matches No. 130. (2) Input Assembly Instance (8bit): This is the block number of the server which a user wants to read, and index No. 0 matches No. 130. 6) Parameter Contents: The contents of the parameter set up are displayed. 7) Transmission period (ms): This is the transmission period of data and the set – up scope is established at 20~10000 ms. 8) Timeout: If frame does not appear within the time set up after the value as much as constant times of the time set up in transmission period, the time for displaying errors is set up. Set up scope is obtained in this calculation – transmission period × 0~7. 9) Date Type: This refers to data type (BIT, 1 BYTE, 2 BYTE, 4 BYTE, 8 BYTE). In own company, it is fixed to be 2BYTE. 10) Local Tag: This tag is used to read local data or to set up the area to write it. Chapter 6 EIP Service Order Set-up Procedure How to Set up Write Parameter and Enable Link 4 1) Online → Click “ Write Parameter,” check out P2P(EIP), and click “Ok” 2) After click online → Enable Link, check out P2P(EIP)set up, click “Write.” 3) If Enable Link has not been checked out, EIP set up does not operate. 6-9 Chapter 6 EIP Service * Enable Link through flag It describes “Enable Link” method through flag. The following XG5000 version, CPU OS version is needed. Item XG5000 XGR CPU XGI CPU XGK CPU Version V3.61 or above V1.91 or above V3.4 or above V3.7 or above Flag list related with “Enable Link” -XGR Flag Data type _HS_ENABLE_STATE ARRAY[0..11] OF BOOL _HS_REQ ARRAY[0..11] OF BOOL _HS_REQ_NUM ARRAY[0..11] OF BOOL _P2P_ENABLE_STATE ARRAY[0..7] OF BOOL _P2P_REQ ARRAY[0..7] OF BOOL _P2P_REQ_NUM ARRAY[0..7] OF BOOL Device %FX19040 %FX31520 %FX31536 %FX19072 %FX31552 %FX31568 Description HS link enable/disable current state HS link enable/disable request HS link enable/disable setting P2P enable/disable current state P2P enable/disable request P2P enable/disable setting Device %FX15840 %FX16480 %FX16496 %FX15872 %FX16512 %FX16528 Description HS link enable/disable current state HS link enable/disable request HS link enable/disable setting P2P enable/disable current state P2P enable/disable request P2P enable/disable setting -XGI Flag _HS_ENABLE_STATE _HS_REQ _HS_REQ_NUM _P2P_ENABLE_STATE _P2P_REQ _P2P_REQ_NUM Data type ARRAY[0..11] OF BOOL ARRAY[0..11] OF BOOL ARRAY[0..11] OF BOOL ARRAY[0..7] OF BOOL ARRAY[0..7] OF BOOL ARRAY[0..7] OF BOOL -XGK Flag _HS1_ENABLE_STATE _HS2_ENABLE_STATE _HS3_ENABLE_STATE _HS4_ENABLE_STATE _HS5_ENABLE_STATE _HS6_ENABLE_STATE _HS7_ENABLE_STATE _HS8_ENABLE_STATE _HS9_ENABLE_STATE _HS10_ENABLE_STATE _HS11_ENABLE_STATE _HS12_ENABLE_STATE _HS1_REQ _HS2_REQ _HS3_REQ _HS4_REQ _HS5_REQ _HS6_REQ _HS7_REQ _HS8_REQ _HS9_REQ 6-10 Data type BIT BIT BIT BIT BIT BIT BIT BIT BIT BIT BIT BIT BIT BIT BIT BIT BIT BIT BIT BIT BIT Device F09600 F09601 F09602 F09603 F09604 F09605 F09606 F09607 F09608 F09609 F0960A F0960B F10300 F10301 F10302 F10303 F10304 F10305 F10306 F10307 F10308 Description HS link 1 enable/disable current state HS link 2 enable/disable current state HS link 3 enable/disable current state HS link 4 enable/disable current state HS link 5 enable/disable current state HS link 6 enable/disable current state HS link 7 enable/disable current state HS link 8 enable/disable current state HS link 9 enable/disable current state HS link 10 enable/disable current state HS link 11 enable/disable current state HS link 12 enable/disable current state HS link 1 enable/disable request HS link 2 enable/disable request HS link 3 enable/disable request HS link 4 enable/disable request HS link 5 enable/disable request HS link 6 enable/disable request HS link 7 enable/disable request HS link 8 enable/disable request HS link 9 enable/disable request Chapter 6 EIP Service Flag _HS10_REQ _HS11_REQ _HS12_REQ _HS1_REQ_NUM _HS2_REQ_NUM _HS3_REQ_NUM _HS4_REQ_NUM _HS5_REQ_NUM _HS6_REQ_NUM _HS7_REQ_NUM _HS8_REQ_NUM _HS9_REQ_NUM _HS10_REQ_NUM _HS11_REQ_NUM _HS12_REQ_NUM _P2P1_ENABLE_STATE _P2P2_ENABLE_STATE _P2P3_ENABLE_STATE _P2P4_ENABLE_STATE _P2P5_ENABLE_STATE _P2P6_ENABLE_STATE _P2P7_ENABLE_STATE _P2P8_ENABLE_STATE _P2P1_REQ _P2P2_REQ _P2P3_REQ _P2P4_REQ _P2P5_REQ _P2P6_REQ _P2P7_REQ _P2P8_REQ _P2P1_REQ_NUM _P2P2_REQ_NUM _P2P3_REQ_NUM _P2P4_REQ_NUM _P2P5_REQ_NUM _P2P6_REQ_NUM _P2P7_REQ_NUM _P2P8_REQ_NUM Data type BIT BIT BIT BIT BIT BIT BIT BIT BIT BIT BIT BIT BIT BIT BIT BIT BIT BIT BIT BIT BIT BIT BIT BIT BIT BIT BIT BIT BIT BIT BIT BIT BIT BIT BIT BIT BIT BIT BIT Device F10309 F1030A F1030B F10310 F10311 F10312 F10313 F10314 F10315 F10316 F10317 F10318 F10319 F1031A F1031B F09620 F09621 F09622 F09623 F09624 F09625 F09626 F09627 F10320 F10321 F10322 F10323 F10324 F10325 F10326 F10327 F10330 F10331 F10332 F10333 F10334 F10335 F10336 F10337 Description HS link 10 enable/disable request HS link 11 enable/disable request HS link 12 enable/disable request HS link 1 enable/disable setting HS link 2 enable/disable setting HS link 3 enable/disable setting HS link 4 enable/disable setting HS link 5 enable/disable setting HS link 6 enable/disable setting HS link 7 enable/disable setting HS link 8 enable/disable setting HS link 9 enable/disable setting HS link 10 enable/disable setting HS link 11 enable/disable setting HS link 12 enable/disable setting P2P1 enable/disable current state P2P2 enable/disable current state P2P3 enable/disable current state P2P4 enable/disable current state P2P5 enable/disable current state P2P6 enable/disable current state P2P7 enable/disable current state P2P8 enable/disable current state P2P1 enable/disable request P2P2 enable/disable request P2P3 enable/disable request P2P4 enable/disable request P2P5 enable/disable request P2P6 enable/disable request P2P7 enable/disable request P2P8 enable/disable request P2P1 enable/disable setting P2P2 enable/disable setting P2P3 enable/disable setting P2P4 enable/disable setting P2P5 enable/disable setting P2P6 enable/disable setting P2P7 enable/disable setting P2P8 enable/disable setting ▶ How to enable link -HS link/P2P enable/disable setting flag ON HS link/P2P enable/disable request flag ON ▶ How to disable link -HS link/P2P enable/disable setting flag OFF HS link/P2P enable/disable request flag ON ▶ You can monitor the Enable/Disable state of the each link through “enable/disable current states” flag. 6-11 Chapter 6 EIP Service 6.3.2 Set-up of Aperiodic Client Communication Service Aperiodic Communication is the service when reading or writing an opponent’s tag data. This service is used similarly to P2P service of XGT. It is possible to use an opponent’s tag service without setting up EDS set-up. 1) Basic Parameter Set-up and EIP Service Register Set-up Procedure Order How to Set up Communication Module Set-up 1 1) Click the base you want and select EtherNet/IP I/F module. 2) Double click the communication module and set up the basic parameter. EIP Service Register 2 Double - click P2P (EIP) on P2P (EIP) Set-up Window and enter modules and slot numbers. 6-12 Chapter 6 EIP Service 2) EIP Channel and Parameter Set-up Order 1 Set-up Procedure Hot to Set up EIP Channel Information Check-out 1) After double click EIP Channel, set up operation mode into aperiodic client. 2) Enter an opponent country’s IP address ▶ Example of Tag Read ▶ Example of Read Block Set-up ▶ Example of Parameter Set-up 2 1) Channel: Select and use the one among those set up with aperiodic client. 2) Operating Mode: The operation of the channel set up in accordance with channel set-up is displayed. 3) Function: There are Tag Read – Order that reads tag data from server and Tag Write - Order that stores data into server, and Read/Write that enters parameter, not tag. 4) Parameter: Set up is available only if Read/Write is set up. ▶ Service Code(Hex): Enter the Service Code that you will use.(Example : 0E : Get ,10 : Set) ▶ Class(Hex): Enter the Class that sets up parameter ▶ Instance(Hex): Enter the Instance that you will set up parameter ▶ Attribute(Hex): Enter the Attribute that you will set up parameter 5) Conditional flag: Set up operation conditions where you will send messages. 6) Data Type: Input the Data Type if Tag that you will set up. 7) Tag Settings: Make sure client (own) tag is set up into local tag and the tag of server is set up into remote tag, and set up the size. Notice Aperiodic client includes size information in tag, so the size information is not needed. In XGT EtherNet/IP I/F module, device is used as tag, so it is possible to set up the size. If you want to communicate with the size, when you attach % in front of remote tag, it is recognized as own tag and a user can communicate with as much as the size he entered. 6-13 Chapter 6 EIP Service 6.3.3 Periodic Server Communication Service In case of the module operating via sever when a user communicates via periodic communication, using EtherNet/IP I/F, it is necessary to set up the size of tag and address. 1) Basic Parameter Set-up and EIP Service Registry Set-up Procedure Order How to Set up Communication Module Set – up 1 1) Click the base you want using the right side of the mouse and select EtherNet/IP I/F module 2) Double click communication module and set up the basic parameter EIP Service Register 2 Double - click P2P (EIP) on P2P (EIP) Set-up Window and enter modules and slot numbers. 6-14 Chapter 6 EIP Service 2) EIP Channel and Parameter Set-up Order 1 Set - up Procedure How to Set up EIP Channel Information Check - out 1) Double click EIP channel and set up operation mode into periodic server. 2) The module where the basic module has been set up operates, there is no need to enter an opponent country’s IP address. Block Set-up 2 1) Channel : Select and use the one among the channels where periodic servers have been set up 2) Operating Mode: The operation mode of the channel set up according to the channel set-up is displayed. 3) Date Type: Enter the data type of the tag that you will set up. 4) Local Tag: This tag is the device area of the module operating via server. 5) Size: The data size of the module operating via server. Notice When a user sets up the module operating via periodic server, the index of EIP block is granted the following meanings. ▶ In case periodic client is own module 1. Output/Input Assembly Instance is same. 2. For example. in case of setting up Index No.0 as periodic server, make sure Output/Input Assembly Instance is set up at 0 ▶ In case periodic client is other provider’s module 1. The Start Index of Input Assembly Instance is 1. 2. Output Assembly Instance is the value where Input Assembly Instance + 129 has been applied. 3. For example, in case of setting up Index No. 0 as periodic server, make sure Input Assembly Instance set up at 1 and Output Assembly Instance at 130. 6-15 Chapter 6 EIP Service 6.4 Operation Start The operation of the XGT EtherNet/IP I/F module is largely divided into periodic communication service and aperiodic communication service. For set - up contents, refer to 5.3 and 5.4. 6.4.1 XG-PD Set-up Set-up Procedure Order How to Set up Connection Set-up 1 1) Online → Select Connection Set-up or Click Icon ( ). 2) After setting up the connection option suitable for a use’s environment, click “Connection.” Read I/O Information 2 Select Online → I/O Information Read or click icon ( Enable Link 3 1) Online → Select Link Enable or click icon ( ). 2) Check out EIP where set-up has been completed and click “Write” 6-16 ), and read the information loaded in the module Chapter 6 EIP Service Order Set-up Procedure How to Set up Operation Check-out 3 1) Select Online → System Diagnosis or click icon ( ). 2) After clicking the module, press the right side of the mouse, then it is possible to check out whether communication has been successfully done by clicking frame monitoring or the state by services. * For the details on system diagnosis, refer to Diagnosis Function Chapter 7. 6-17 Chapter 6 EIP Service 6.5 Use Examples 6.5.1 Communication with Rockwell 1756-ENBT Communication Module 1) System Configuration Client Server Segment IP Address 1756-ENBT 192.168.250.100 XGL-EIPT 192.168.250.100 Data Size 4 BYTE 4 BYTE Reading Area Storing Area Communication Method EIPT Tag Periodic Client (Implicit service) %MB0~3 Periodic Server 2) Set –up of XGT EtherNet/IP I/F Module Parameter XGT is used as Server, so refer to the Server Set-up Contents in 6.2.3 above. Herein, for example, server has been set up to Channel No.0 and Block No.0. Order Set-up Procedure How to Set up Server Set-up 1 1) Channel: Select the one among the channels where periodic servers have been set up. 2) Operating Mode: The operation mode of the channel set up in accordance with channel set-up is displayed. 3) Data Type: Enter the data type of the tag a user will set up 4) Local Tag : This tag is the device area of the module operating via server 5) Size: The data size of the module operating via server. 6-18 Chapter 6 EIP Service 3) Rockwell 1756-ENBT Communication Module and Communication Set-up Set up Rockwell’s의 Client using Rockwell의 S/W(RSLogix 5000). Order 1 Set-up Procedure How to Set up Module Set - up Search for the module in I/O Configuration and install it Network Module Installation 2 1) If ENBT Module has been installed, extend it into network and install the module of the network connected. 2) Herein, the installation of Rockwell’s module only is available, and modules, not Rockwell’s one, are possible to set up, using Generic Device. 3) For the connection of XGT EtherNet/IP I/F Module, set up Generic Device. 6-19 Chapter 6 EIP Service Order Set-up Procedure How to Set up Network Address and Connection Information Input 3 1) Name: Enter the names that will used to modules 2) IP Address: Enter IP of Sever Module 3) Connection Parameter: Enter connection information. Mapping has been done between this information and block set-up number), and the number has been allotted to Consumed Tag input by blocks and Produced Tag output, respectively. As own module operates via server, set-up will be completed by adding Index numbers to Index and Input+129 to Output. (1) Input : Set up at 1 (2) Output: Set up at 130. (3) Size: XGT EtherNet/IP has set up at 4 BYTE m so make sure the size is set up at 4. PPI Set-up 4 1) Requested Packet Interval (RPI): Set up the period of data that a user will receive from server. Client sets up on what information to get and the server adopts this set-up, data (Produced Tag) will be transmitted as the way set up. Thus, client allots to this RPI parameter in how long period server will transmit. 2) If clicking OK, parameter is downloaded and is automatically connected. Then, data communication starts. Data Checkout 5 When a module set up, the tag named to Controller Tags in module name is automatically set up, so the check--out of data is confirmed in Controller Tags. In case of being set up as seen above, data check - out is available in EIPT: I. 6-20 Chapter 6 EIP Service 6.5.2 Communication with OMRON CJ1W-EIPT Communication Module This illustration is the example on when XGT EtherNet/IP I/F Module and OMRON CJ1W-EIPT Communication is communicated (Implicit). Then, the periodic client is XGT EtherNet/IP I/F and the server will be OMRON CJ1W-EIPT. 1) System Configuration Client Server Segment IP Address XGL-EIPT 192.168.250.100 192.168.250.10 Data Size 2 BYTE 2 BYTE Reading Area Storing Area Communication Method MW0 Periodic Client (Implicit service) D0 Periodic Server 2) XGT EtherNet/IP I/F Module Parameter Set-up In case of the basic set-up and EDS registry, the set-up is same as 6.2.1 - periodic client communication service. Order Set-up Procedure How to Set up EIP Configuration 1 1) Drag registered EDS File from EDS Information Window and posts it on EIP Configuration Window. 2) As soon as EDS File is posted, Channel Set-up Window appears. 3) In Set-up Window, set up channel numbers and IP addresses. 2 Channel Setup Set up channel numbers and IPs and start setting up blocks. 6-21 Chapter 6 EIP Service Set-up Procedure Order How to Set up EIP Block Set-up 3 4 If a user sets up blocks, using the channels set up, the information that has to be input in EDS File that OMRON Module provides appears. A user must enter this information and complete Connection. 1) I/O Type: The Connection name that EDS provides. 2) Connection Type: Select from Multicast/Unicast. 3) Transmission Period : Set up transmission period(RPI)(ms unit) 4) Timeout: Select as much as constant times of the time set up in transmission period and carry out set-up. 5) Remote Tag: Set up the tag of server side. On the server side tag must be set up already. 1) After carrying out Write the EIP of Parameter, execute Enable EIP Link. 6-22 Chapter 7 Diagnosis Function Chapter 7 Diagnosis Function This chapter describes how to check out systems and modules, how to check out network state, and how to download 0/S. When checking out states of system configuration and EtherNet/IP I/F Module, a user should review the following procedure. 7.1 System Diagnosis This diagnosis is the method to check out the state of EtherNet/IP I/F Module and systems. If click „Online‟ „System Diagnosis‟ after clicking „Online‟ „Connection‟ on XG-PD, the system diagnosis screen is open as seen in [Illustration 7.1.1] and Module Information Window is open in system diagnosis below as seen in [Illustration 7.1.2]. [Illustration 7.1.1] System Diagnosis Screen [Illustration 7.1.2] Module Information Window When Extension Base has been connected, if a user clicks the extension base on module information window to open System Diagnosis Screen, the system diagnosis screen of the extension base appears. The above [Illustration 7.1.1] and [Illustration 7.1.2] show the main base system diagnosis screen of the system composed of the main base and the extension base. If a user clicks the base 1 in [Illustration 7.1.2] to see the system diagnosis screen of the extension base in the above illustration, he can see the extension base diagnosis screen in Illustration [7.1.3]. 7-1 Chapter 7 Diagnosis Function [Illustration 7.1.3] Extension Base System Diagnosis Screen [Illustration 7.1.4] Extension Base Module - Information Window 7-2 Chapter 7 Diagnosis Function 7.2 System Diagnosis Items and Contents This part describes the diagnosis items and contents of EtherNet/IP I/F Module provided from XG-PD. Order Diagnosis Items How to Set up and Contents System Diagnosis 1 1) Select XG-PD → „Connection‟ → „Online‟ → „System Diagnosis‟ 2) Put the mouse on XGL-EIP and click it with the right side of the mouse to check out the diagnosis information of EtnerNet/IP I/F Module a user wants. Communication Module Information 2 The general information of EtherNet/IP I/F Module is displayed. 1) Module Kind: Displays kinds of modules (XGL-EIPT). 2) Base No. : Displays the base location of the module installed. 3) Slot No.: Displays the slot location of the module located. 4) IP Address: Displays IP address set up in module. 5) MAC Address: Displays MAC address set up in the modules. 6) Module Status: Displays the state of the module. 7) Hardware Error: Displays whether the error of the hardware has been made or not. 8) Hardware Version: Displays the version of the hardware. 9) OS Version: Displays the version of module OS. 10) Vender ID: Vendor ID of Displays EtherNet/IP Module 11) Product Type: Displays the Product Type of Ethernet/IP 12) Serial No.: Displays the serial no. of the module. 13) Product Code: Displays the code No. of the module 14) Product Name : Displays the name of the module 15) Dedicated service: Displays when operation channel exists as aperiodic server 16) System parameter information: Displays basic parameter setting status 7-3 Chapter 7 Diagnosis Function Order Diagnosis Items How to Set up and Contents State by Services EIP Service 3 7-4 1) Specific Flag Information Window (1) Block No. : Displays the index of the parameter that a user set up with EIP Service. (2) Channel No.: Displays the number of the channel that a user set up in each block. (3) Service Kind: Displays the type of the service that a user set up : Implicit Client / Implicit Server / Explicit Client (4) Connection Status: Displays whether EIP Block has been connected or not. ▶CONNECT: State that connection has been completed ▶IDLE: State that connection has not been completed (5) Block Status: Displays the block state of EIP Block ▶NONEXIST: State that the set-up of connection has not been done ▶REGSESSION: State that TCP Connection has been completed and EtherNet/IP Connection is in the process of being set up ▶READY: State that communication is available ▶BUSY: State that response on required frame has not been received yet (6) Service Count per Second: Displays how many times the service has been carried out per 1 second. (7) Accumulative Service Count : Displays the number of services till now (8) Accumulative Error Count : Displays the number of errors till now Chapter 7 Diagnosis Function Order Diagnosis Items How to Set up and Contents State by Services Explicit Server Information 4 1) Session Handle : The original number granted to connected client 2) IP Address : IP Address of connected client 3) The Number of RR packets sent: The Number of Transmission Packets of the Message in the form of Request/Reply 4) The Number of RR Packets received: The Number of Reception Packets of the Message in the form of Request/Reply 5) The Number of Unit Packets sent: The Number of Transmission Packets of the Message used after connection set-up 6) The Number of Unit Packets received: The Number of Reception Packets of the Message used after connection set-up 7) The Number of Error Packets : The Number of Error Packets coming into Server 5 Media Information 1) Service State Information: Displays the number of service completed in EtherNet/IP I/F Module. 2) Media State Information: Displays the packet quantity per second in service type of EtherNet/IP I/F Module. 3) Packet Monitoring 7-5 Chapter 7 Diagnosis Function Order Diagnosis Items How to Set up and Contents Ping Test 6 It is possible to check out the operation state of an opponent country by entering an opponent country‟s IP Address In case of not receiving the signal from an opponent country, it is necessary to check out the basic set-up information Auto Scan 7 A user can check out the system configuration state of the whole system. ▶ Parameter: In case EIP Parameter is set up, it is marked as P.‟ ▶ Active: The module operating normally (Online State) is marked as„A.‟ ▶ Diagnostic: The module that diagnosis needs to be marked as „D.‟ 7-6 Chapter 7 Diagnosis Function Order Diagnosis Items How to Set up and Contents System Log 8 In case a user cannot check out the performance of errors and services or stores the contents of the current memory area into flash, when pressing the Log switch, memory area log is automatically stored to flash. 1) Memory Area Log: Displays the history when errors and the problems in service performance are made. In case of Memory Area Log, when the power is turned off, it automatically extinct. 2) Flash Area Log: When a user presses the log switch on the module‟s front side, the log of the memory area is stored into memory, and even if the power is turned off, the history can be maintained. 7-7 Chapter 7 Diagnosis Function 7.3 Troubleshooting This part describes causes and actions on failures and errors that may happen in operating systems. When a user wants to check out errors and problems in EtherNet/IP I/F Module, the following procedure will help you check out those malfunctions. When judging whether the module is in abnormal state or not, make sure to take actions in order, using Troubleshooting. Do not repair and disassemble at your discretion. 7.3.1 Check-out through LED in Communication Module This check-out is the way of checking out the state of the module to see whether it is defective or not. 1) Abnormal Operation Display LED located on the front side of EtherNet/IP I/F Module enables a user to check out. [Illustration 7.3.1] LED of EtherNet/IP I/F Module LED Contents RUN I/F P2P PADT SVR MS 7-8 Error Contents Actions 1) Check out whether EtherNet/IP Communication Modules has been properly installed or not - Check out whether the DC 5V – supply power for power module has been Light out after supplying normal or not. the module power - Check out whether the communication module has been properly installed to the base 2) Consult with Warranty Service Center 1) Check out whether CPU and Communication Modules have been properly Operation stops when light installed is on and off 2) Consult with Warranty Service Center 1) Check out whether command language has been properly entered or not Light is off during service 2) Check out connection has been properly done or not for command languages 3) Check out whether Link Enable in Menu is on or not 1) Check out whether telephone office numbers for remote connection(PADT) Light is off during remote have been properly set up or not connection service 2) Check out whether PADT Program – Remote Connection has been canceled Light is off during server 1) Check out whether the connection with client has been properly done operation Red light is on and off 1) Check out the basic set-up and supply power again 1) Supply power again Red light is on 2) Consult with Warranty Service Center Chapter 7 Diagnosis Function LED Contents NS ACT LNK Error Contents Red light is on and off Red light is off Light is off during normal communication Light is off during normal communication Actions 1)Check out the device where Timeout happened 1) Set up IP Address again (Find the same IP Address) 1) Check out the transmission or reception parameter 2) Check out whether connection has been properly done 1) Check out whether cables have been properly connected ports 2) Check out whether an opponent‟s port is normally operating ha been 7.3.2 Check out of Module Errors through XG5000 It is possible to simply monitor errors of the module through XG5000 Program. After connecting RS-232C or USB Connector to CPU, check out online‟ „PLC History‟, „PLC Error /Warning‟in XG5000. [Illustration 7.3.2] PLC History - Specific Information Monitor In case hard errors or CPU interface errors are made to the module, naturally LED abnormally operates, but it is possible to figure out this state, using exclusive programs. [Illustration 7.7.2] will help a user check out error/warning information through PLC history from [Online] of XG5000 and it is possible to solve problems by referring to “Details and Actions” contents. 7-9 Chapter 7 Diagnosis Function 7.3.3 Check-out on Module Errors through System Log It is possible to monitor whether communication module has been malfunctioned through XG-PD Program. After connecting RS-232C or USB Connector to CPU Module, click EtherNet/IP I/F Module with the right side of the mouse on “Diagnosis Screen” in XG-PD and select “System Log,”and then Log Screen is open. 1) Memory Area Log It is possible to check out whether errors have been made or services have been performed. [Illustration 7.3.3] shows the memory area log screen of „System Log.‟ [Illustration 7.3.3] Memory Log Area Screen of „System Log‟ It is possible to check out the date, time, contents when events, such as error occurring or service performing, happened. 1) Flash Area Log If it is impossible to check out errors or service performances through XG-PD or if a user wants to store the contents in current memory area into flash, when pressing Log Switch on the front side on EtherNet/IP I/F Module, memory area log is automatically stored to Flash. [Illustration 7.3.4] shows the flash area – log screen of „System Log.‟ 7-10 Chapter 7 Diagnosis Function [Illustration 7.3.4] Flash Area Log Screen of „System Log‟ 7-11 Appendix Appendix A.1 Terms 1. IEEE 802.3 IEEE 802.3 regulates standards on Ethernet based on CSMA/CD. In other words it is a short distance net(LAN) based on CSMA/CD (Carrier Sense Multiple Access with Collision Detection)Ethernet devised by IEEE 802.3 Group, divided into the following specific projects. (1) IEEE P802.3 - 10G Base T Study Group (2) IEEE P802.3ah - Ethernet in the First Mile Task Force (3) IEEE P802.3ak - 10G Base-CX4 Task Force ※ Ethernet and IEEE 802.3 must be standardized in RFC894 and RFC1042, and mutual frame processing must be possible. 2. ARP (Address Resolution Protocol) This Protocol is created to find MAC Address, using an opponent‟s IP address in Ethernet LAN. 3. Bridge This is the device used to connect two networks so that they can operate as if those two were one. Bridge is used to connect two networks an also applied to divide one big network into two small networks for improving performance ability. (1) Related Standards: IEEE 802.1D (2) Bridge (Layer2 Switch) is the devise connected in Layer 2, which extends transmission limit distance of Ethernet and operates in Filtering and Forwarding as well. 4. Client This refers to a user of network service, or a computer or a program using the resources of other computer (In general, the part who asks for services). 5. CSMA/CD (Carrier Sense Multiple Access with Collision Detection) Each Client transmits its own data in case network is empty by checking out(Carrier Sense) whether there is a signal or not before sending off data to network. Then, all Clients are same in authority for transmission (Multiple Access), and if Clients more than two ones transmit, collision conflict occurs and the Client that detected these transits again in fixed hours. 6. DNS (Domain Name System) This system is the method used to convert Domain Name on the internet in alphabet into Internet Number (Namely, IP Address) corresponding to it. 7. Dot Address This refers to IP Address expressed into „100.100.100.100‟ and each number is represented in decimal number, and it takes up 1 BYTE among 4 BYTES in total. 8. E-mail Address This is the address of a user having his login account in the special device connected through the internet, and in general, it is expressed in a user‟s ID@ domain name (Device Name). In other words, it is expressed like hjjee@microsoft.com, where @ is called “at” and it is the key board appearing if a user press shift+2 on keyboard. The letters in the back of “@” refer to special institutions (school, research center, corporation …) and the letters in front of “@” becomes a user‟s ID. A-1 Appendix The end letters in domain name are top-ranked ones, and in case of USA, the following abbreviation is mostly used and in case of Korea, Korea is expressed in .kr for displaying nationality: .com: usually corporations (company) / .edu: usually educational institutions like university (education). / .ac (academy) used in Korea, / .gov: governmental institutions, for example, NASA - nasa.gov (government) / .mil: sites related to the military. For example, USA air force is “to af.mil, (military)”/ .org means private organizations. Nations are expressed as follows: (/ .au: Australia / .uk: England / .ca: Canade / .kr: Korea / .jp: Japan / .fr: France / .tw: Taiwan, etc.). 9. Ethernet This net is LAN Connection System (IEEE 802.3) that USA (Xerox), Intel, and DEC jointly developed. Ethernet, a network connection with 10Mbps transmission ability and 1500 BYTE packet used, can collect a variety of computers in network. Thus, it is called “pronoun of LAN” and the diverse products in generality in size, not for special providers, have been launched. 10. FTP (File Transfer Protocol) This program is used to transmit files between computers among application programs that TCP/IP Protocol provides. Only f a user has Account on the computer he will log in, it is possible to copy files by logging in anywhere wherever the computer is located. 11. Gateway This part is software/hardware translating two different protocols and is the device corresponding to the exit enabling a user to exchange information with other systems. 12. Header This device is the part of the packet including own country‟s and an opponent country‟s addresses, and the part for checking out errors. 13. HTML (Hypertext Markup Language, Standard Language of WWW) This is the language system for making hypertext texts and the documents made up in HTML are seen via web browser. 14. HTTP (Hypertext Transfer Protocol, Standard Protocol of WWW) This is the protocol used to provide and receive a variety of files and data existing in World Wide Web (WWW). 15. ICMP (Internet Control Message Protocol) This protocol creates error messages and test packets for managing internet via extension protocol of IP address and is designed to report errors and take control. 16. IP (Internet Protocol) This protocol is deigned for network layers for internet. This is the protocol in non-connective datagram which transmits and receives data as data like TCP, UDP, ICMP, IGMP uses IP (32BYTE). 17. IP Address This term means the address on internet in each computer composed of numbers and this address consists of binary numbers in 32BYTE (4BYTE) size to classify each device on internet. IP address is divided into 2 parts in total and is composed of address for classifying network and host address for dividing hosts. IP address is classified into 3 classes - A-2 Appendix (Class) A/ B/ C – according to how many BYTES are allotted to network address and host address. IP address is unique one over the world, so it is not decided at discretion but NIC (Network Information Center), the regional information net center allots when subscribing to internet, and In case of Korea, KRNIC (Korea Network Center) is in charge of allotment. Example) 165,244.149.190 18. ISO (International Organization for Standardization) This organization is a subsidiary under UN established to enact international standards and to carry out management. 19. LAN (Local Area Network) This network is a short distance network or an information communication network in region which enables a user to connect a variety of computers in limited scope and to exchange data with each other. 20. MAC (Medium Access Control) This term refers to the way of deciding which device will use network within given time In Broadcast Network. 21. Node Each computer connected to network net is called “node,” respectively. 22. Packet This is a bundle of data which becomes the basic unit for transmitting data via network. In general packet creates a bundle in size from tens to hundreds BYTE. On the front side of each bundle Header is posted and the information on which way this bundle to be sent and more information required are added. 23. PORT number This number is an identifier used to classify applications on TCP/UDP. On TCP, this PORT number is used to decide to which PORT data should be sent and the program used in general operation system has each own PORT. Example) 21/tcp: Telnet 24. PPP (Point-to-Point Protocol) This protocol is an agreement on telephone communication that allows packets to be transmitted. In other words, it is the commonest protocol on internet that enables a computer to be connected to TCP/IP through general telephone lines and modems. This protocol is similar to SLIP, but it is equipped with modern – communication protocol factors such as error detection, data compression, etc., so it displays excellent performances compared to SLIP. 25. Protocol Protocol is the regulations on how computers connected to network transmit and receive information with each other. Protocol means the regulation for exchanging messages on high level as the interface between one device and the A-3 Appendix other device is specifically described on low level(For example, which BIT/BYTE should go through lines) or files are transmitted through internet. 26. Router This device is used to transmit data packets between networks. It also judges whether to send data packets to the final destination or not and whether to wait or not if network is busy, and which LAN to be connected to from a plural LAN diverging point. In other words, this device is a special computer /software that manage the connection for more than two networks. 27. Server This term means the part which passively responds to Client‟s request and shares its own resources. 28. TCP (Transmission Control Protocol) (1) Transport Layer Protocol for the Internet - Supports Transmission/Reception, using Connection - Supports Multiplexing Function - Performs reliable transmission of data in connecting - oriented aspect - Supports transmission of emergency data 29. TCP/IP (Transmission Control Protocol/Internet Protocol) This term means the agreement on transmission for communication between computers in different model. This protocol plays a role that enables the communication between general PC and medium host, IBM PC and MAC, and among medium or large scaled computers produced by other manufactures. This term is used as a general term of the protocol for transmitting the information between computer networks and included FTP, Telnet, SMTP, etc. TCP is divided into data packets and transmitted by IP, and the packet transmitted is configured by TCP again. 30. Near-end crosstalk Near-end crosstalk is a kind of disturbance generated by the electricity from a communication signal or a magnetic field that affect other signals in neighboring lines. In telephone line, near-end crosstalk may cause some dialogue contents on other lines to be heard. The phenomenon generated by near-end crosstalk is called “Electro Magnetic Interference.” This may happen on small circuits in computer or audio equipments as well as network lines. This term may be applied to optic signals that disturb each other. For example, as seen in an insulated conductor of a telephone cable, if electrostatic coupling or electromagnetic coupling between one insulated conductor and the other insulated conductor occurs and the phone current on one insulated conductor is derelict to other insulated conductor, crosswalk-talk happens. Of these crosswalk-talks, the crosswalk-talk that happened to a transmitting part called “Near-end crosstalk” and the one that happened to a receiving part is called Far-end crosstalk. A-4 Appendix A.2 Flag List A.2.1 Special Relay (F) List Device1 Device2 Type - DWORD F00000 Variable Function Description _SYS_STATE Mode and State Displays the Mode and Run State of PLC BIT _RUN RUN Run State F00001 BIT _STOP STOP Stop state F00002 BIT _ERROR ERROR Error state. F00003 BIT _DEBUG DEBUG Debug State F00004 BIT _LOCAL_CON LOCAL CONTROL Local Control Mode F00005 BIT _MODBUS_CON MODE BUS MODE Mode Bus Control Mode F00006 BIT _REMOTE_CON REMOTE MODE Remote Control Mode CORRECTING WHILE RUN CORRECTING WHILE RUN CORRECTION COMPLETED WHILE RUN CORRECTION END WHILE RUN F00008 BIT _RUN_EDIT_ST Downloading Correction Program while Run. F00009 BIT _RUN_EDIT_CHK F0000A BIT _RUN_EDIT_DONE F0000B BIT _RUN_EDIT_END F0000C BIT _CMOD_KEY OPERATION MODE Operation Mode Transformed by the Key F0000D BIT _CMOD_LPADT OPERATION MODE Operation Mode Transformed by the Local PADT F0000E BIT _CMOD_RPADT OPERATION MODE Operation Mode Transformed by Remote PADT Operation Mode Transformed by Remote Communication Mode Internal Processing for Correction while Run Correction Completed while Run Correction Ended while Run F0000 F0000F BIT _CMOD_RLINK OPERATION MODE F00010 BIT _FORCE_IN FORCIBLE ENTRY Forcible Entry State F00011 BIT _FORCE_OUT FORCIBLE OUTPUT Forcible Output State F00012 BIT _SKIP_ON IN/OUTPUT SKIP Executing In/Output Skip F00013 BIT _EMASK_ON FAILED MASK Executing Failed Mask F00014 BIT _MON_ON MONITOR Executing Monitor F00015 BIT _USTOP_ON STOP Stopped by Stop Function F00016 BIT _ESTOP_ON ESTOP Stopped by EStop Function F00017 BIT _CONPILE_모드 COMPILING Performing Compiling F00018 BIT _INIT_RUN INITIALIZING Performing Initializing Task F0001C BIT _PB1 PROGRAM CODE 1 Program Code 1 Selected F0001D BIT _PB2 PROGRAM CODE 2 Program Code 2 Selected F0001E BIT _CB1 COMPILE CODE1 Compile Code 1 Selected F0001F BIT _CB2 COMPILE CODE 2 Compile Code 2 Selected A-5 Appendix Device 1 F0002 F0004 A-6 Device 2 Type Variable Function - DWORD _CNF_ER SYTEM ERROR Reports Serious Failure State of the System F00020 BIT _CPU_ER CPU ERROR Errors in CPU Configuration F00021 BIT _IO_TYER F00022 BIT _IO_DEER F00023 BIT _FUSE_ER F00024 BIT _IO_RWER F00025 BIT _IP_IFER F00026 BIT _ANNUM_ER F00028 BIT _BPRM_ER BASIC PARAMETER Errors in Basic Parameter F00029 BIT _IOPRM_ER IO PARAMETER Errors with IO Configuration Parameter F0002A BIT _SPPRM_ER SPECIAL MODULE PARAMETER Special Module Parameter is in Abnormal State F0002B BIT _CPPRM_ER COMMUNICATION MODULE PARAMETR Communication Module Parameter is in Abnormal State F0002C BIT _PGM_ER PROGRAM ERROR Errors in Program F0002D BIT _CODE_ER CODE ERROR Errors in Program Code F0002E BIT _SWDT_ER SYSTEM WATCH DOG Scan Watchdog Operated F0002F BIT _BASE_POWER_E POWER ERROR R Errors in Base Power F00030 BIT _WDT_ER SCAN WATCHDOG Scan Watchdog Operated - DWORD _CNF_WAR SYSTEM WARNIGN Reports on the Light Errors of the System F00040 BIT _RTC_ER RTC ERROR Errors in RTC Data F00041 BIT _DBCK_ER BACKUP ERROR Problem Occurred in Data Back Up F00042 BIT _HBCK_ER RESTART ERROR Hot Restart Impossible F00043 BIT _ABSD_ER OPERATION ERROR STOP Stops due to Abnormal Operation F00044 BIT _TASK_ER TASK COLLIDE Task Colliding F00045 BIT _BAT_ER BATTERY ERROR Errors in Battery F00046 BIT _ANNUM_WAR EXTERIAL DEVCIE ERROR The Light Error of the External Device Detected F00047 BIT _LOG_FULL MEMORY FULL Log Memory Fully Filled F00048 BIT _HS_WAR1 F00049 BIT _HS_WAR2 F0004A BIT _HS_WAR3 F0004B BIT _HS_WAR4 F0004C BIT _HS_WAR5 F0004D BIT _HS_WAR6 F0004E BIT _HS_WAR7 HIGH LINK1 HIGH LINK2 HIGH LINK3 HIGH LINK4 HIGH LINK5 HIGH LINK6 HIGH LINK7 High Speed Link – More Than Parameter 1 High Speed Link – More Than Parameter 2 High Speed Link – More Than Parameter 3 High Speed Link – More Than Parameter 4 High Speed Link – More Than Parameter 5 High Speed Link – More Than Parameter 6 High Speed Link – More Than Parameter 7 MODULE TYPE ERROR MODULE REMOVAL ERROR FUSE ERROR MODULE IN/OUTPUT ERROR MODULE INTERFACE ERROR EXTERNAL DEVICE ERROR SPEED SPEED SPEED SPEED SPEED SPEED SPEED Description Module Type does not corresponds. Module Removed Fuse Disconnected Problems occurred in to Module In/Output Problems occurred in Special / Communication Module Interface Serious Errors detected from External Devices Appendix Device 1 F0004 F0009 Device 2 Type Variable F0004F BIT _HS_WAR8 F00050 BIT _HS_WAR9 F00051 BIT _HS_WAR10 F00052 BIT _HS_WAR11 F00053 BIT _HS_WAR12 F00054 BIT _P2P_WAR1 F00055 BIT _P2P_WAR2 F00056 BIT _P2P_WAR3 F00057 BIT _P2P_WAR4 F00058 BIT _P2P_WAR5 F00059 BIT _P2P_WAR6 F0005A BIT _P2P_WAR7 F0005B BIT _P2P_WAR8 F0005C BIT _CONSTANT_ER - WORD F00090 BIT F00091 Function Description HIGH SPEED LINK 8 HIGH SPEED LINK 9 HIGH SPEED LINK 10 HIGH SPEED LINK 11 HIGH SPEED LINK12 P2P PARAMETER 1 P2P PARAMETER 2 P2P PARAMETER 3 P2P PARAMETER 4 P2P PARAMETER 5 P2P PARAMETER 6 P2P PARAMETER 7 P2P PARAMETER 8 FIXED PERIOD ERROR F USER CONTACING POINT High Speed Link – More Than Parameter 8 High Speed Link – More Than Parameter 9 High Speed Link – More Than Parameter 10 High Speed Link – More Than Parameter 11 High Speed Link – More Than Parameter 12 _T20MS 20ms 20ms Periodic Clock BIT _T100MS 100ms 100ms Periodic Clock F00092 BIT _T200MS 200ms 200ms Periodic Clock F00093 BIT _T1S 1s 1s Periodic Clock F00094 BIT _T2S 2s 2s Periodic Clock F00095 BIT _T10S 10s 10s Periodic Clock F00096 BIT _T20S 20s 20s Periodic Clock F00097 BIT _T60S 60s 60s Periodic Clock F00099 BIT _ON ALWAYS - ON Always On – State Bit F0009A BIT _OFF ALWAYS - ON Always Off – State Bit F0009B BIT _1ON 1 SCAN - ON 1st Scan Only On –State F0009C BIT _1OFF 1 SCAN -OFF 1st Scan Only Off –State F0009D BIT _STOG ANTi - CLOCK Every Scan Anti –Clocked - WORD _USER_CLK USER-CLOCK User Set-up Available Clock F00100 BIT _USR_CLK0 F00101 BIT _USR_CLK1 F00102 BIT _USR_CLK2 _USER_F F0010 DEGIGNATED SCAN REPEATED DEGIGNATED SCAN REPEATED DEGIGNATED SCAN REPEATED P2P – More Than Parameter 1 P2P – More Than Parameter 2 P2P – More Than Parameter 3 P2P – More Than Parameter 4 P2P – More Than Parameter 5 P2P – More Than Parameter 6 P2P – More Than Parameter 7 P2P – More Than Parameter 8 Fixed Period Errors User Usable Timer On/Off Clock as much as Designated Scan 0 On/Off Clock as much as Designated Scan 1 On/Off Clock as much as Designated Scan 2 A-7 Appendix Device 1 F0011 Type Variable F00103 BIT _USR_CLK3 F00104 BIT _USR_CLK4 F00105 BIT _USR_CLK5 F00106 BIT _USR_CLK6 F00107 BIT _USR_CLK7 - WORD F00110 Function DEGIGNATED SCAN REPEATED DEGIGNATED SCAN REPEATED DEGIGNATED SCAN REPEATED DEGIGNATED SCAN REPEATED DEGIGNATED SCAN REPEATED Description On/Off Clock as much as Designated Scan 3 On/Off Clock as much as Designated Scan 4 On/Off Clock as much as Designated Scan 5 On/Off Clock as much as Designated Scan 6 On/Off Clock as much as Designated Scan 7 _LOGIC_RESULT LOGIC RESULTS Displays Logic Results BIT _LER CALCULATION ERROR On during 1 Scan when Errors made to Calculation F00111 BIT _ZERO ZERO FLAG On if Calculation Result is 0 F00112 BIT _CARRY CARRY FLAG On if Carry occurred during Calculation F00113 BIT _ALL_OFF ALL OUTPUT OFF On if All Outputs are OFF _LER_LATCH CALCULATION ERROR LATCH COMPARISION RESULTS F00115 BIT - WORD F00120 BIT _LT LT FLAG On if “ Less Than “ F00121 BIT _LTE LTE FLAG On if “The Same or Less Than” F00122 BIT _EQU EQU FLAG On if “The Same ” F00123 BIT _GT GT FLAG On if “Larger Than ” F00124 BIT _GTE GTE FLAG On “Larger Than or The Same ” F00125 BIT _NEQ NEQ FLAG On if “Not The Same ” F0013 - WORD _AC_F_CNT FREQUENT BLACKOUT Displays Blackout Frequency F0014 - WORD _FALS_NUM FALS NUMBER Displays the Number of FALS F0012 A-8 Device 2 _CMP_RESULT F0015 - WORD _PUTGET_ERR0 F0016 - WORD _PUTGET_ERR1 F0017 - WORD _PUTGET_ERR2 F0018 - WORD _PUTGET_ERR3 F0019 - WORD _PUTGET_ERR4 F0020 - WORD _PUTGET_ERR5 F0021 - WORD _PUTGET_ERR6 F0022 - WORD _PUTGET_ERR7 F0023 - WORD _PUTGET_NDR0 F0024 - WORD _PUTGET_NDR1 F0025 - WORD _PUTGET_NDR2 F0026 - WORD _PUTGET_NDR3 F0027 - WORD _PUTGET_NDR4 PUT/GET ERROR 0 PUT/GET ERROR 1 PUT/GET ERROR 2 PUT/GET ERROR 3 PUT/GET ERRO 4 PUT/GET ERROR 5 PUT/GET ERROR 6 PUT/GET ERROR 7 PUT/GET COMPLETED 0 PUT/GET COMPLETED 1 PUT/GET COMPLETED 2 PUT/GET COMPLETED 3 PUT/GET COMPLETED 4 On Maintained when Errors made to Calculation Display Comparison Results Main Base PUT / GET ERROR Extension Base Step 1 - PUT / GET ERROR Extension Base Step 2 - PUT / GET ERROR Extension Base Step 3 - PUT / GET ERROR Extension Base Step 4 - PUT / GET ERROR Extension Base Step 5 - PUT / GET ERROR Extension Base Step 6 - PUT / GET ERROR Extension Base Step 7 - PUT / GET ERROR Main Base PUT / GET COMPLETED Extension Base Step 1 PUT / GET COMPLETED Extension Base Step 2 PUT / GET COMPLETED Extension Base Step 3 PUT / GET COMPLETED Extension Base Step 4 PUT / GET COMPLETED Appendix Device 1 Device 2 Type Variable Function F0028 - WORD _PUTGET_NDR5 F0029 - WORD _PUTGET_NDR6 F0030 - WORD _PUTGET_NDR7 F0044 - WORD _CPU_TYPE CPU TYPE Displays the Information on CPU Type F0045 - WORD _CPU_VER CPU VERSION Displays CPU Version F0046 - DWORD _OS_VER O/S VERSION Displays O/S Version F0048 - DWORD _OS_DATE O/S DATE Displays O/S Distribution Date PUT/GET COMPLETED 5 PUT/GET COMPLETED 6 PUT/GET COMPLETED 7 MAXIMUM SCAN TIME MINIMUM SCAN TIME CURRENT SCAN TIME Description Extension Base Step 5 PUT / GET COMPLETED Extension Base Step 6 PUT / GET COMPLETED Extension Base Step 7 PUT / GET COMPLETED F0050 - WORD _SCAN_MAX F0051 - WORD _SCAN_MIN F0052 - WORD _SCAN_CUR F0053 - WORD _MON_YEAR MONTH /YEAR Month, Year Data of PLC F0054 - WORD _TIME_DAY HOUR / DATE Hour, Date Data of PLC F0055 - WORD _SEC_MIN SECOND / MINUTE Second, Minute Data of PLC F0056 - WORD _HUND_WK 100 YEARS / DAY 100 Years , Minute Data of PLC - WORD _FPU_INFO Displays Calculation Results in Immovable Decimal Point F00570 BIT _FPU_LFLAG_I F00571 BIT _FPU_LFLAG_U FPU CALCULATION RESULT INACCURATE ERROR LATCH UNDERFLOW LATCH F00572 BIT _FPU_LFLAG_O OVERFLOW LATCH Latches if Overflow Occurs. F00573 BIT _FPU_LFLAG_Z 0 DIVISION LATCH F00574 BIT _FPU_LFLAG_V F0057A BIT _FPU_FLAG_I F0057B BIT _FPU_FLAG_U UNDEFLOW Reports if Underflow Occurs. F0057C BIT _FPU_FLAG_O OVERFLOW Reports if Overflow Occurs F0057D BIT _FPU_FLAG_Z O DIVISION Reports if O Division F0057E BIT _FPU_FLAG_V NULL CALCUATION Reports if Null Calculation F0057F BIT _FPU_FLAG_E F0058 - DWORD _ERR_STEP F0060 - DWORD _REF_COUNT REFRESH Increases if Module Refresh Performed F0062 - DWORD _REF_OK_CNT REFRESH OK Increases if Module Refresh is in Normal State F0064 - DWORD _REF_NG_CNT REFRESH NG Increases if Module Refresh in Abnormal State F0066 - DWORD _REF_LIM_CNT REFRESH LIMIT Increases if Module Refresh in Abnormal State (Timeout ) F0068 - DWORD _REF_ERR_CNT REFRESH ERROR Increases if Module Refresh in Abnormal State _MOD_RD_ERR_CN T _MOD_WR_ERR_C NT MODULE READ ERROR MODULE WRITE ERROR _CA_CNT BLOCK SERVICE F0057 F0070 - DWORD F0072 - DWORD F0074 - DWORD NULL CALCULATION LATCH INACCURATE ERROR Displays Maximum Scan Time Displays Minimum Scan Time Displays Current Scan Time. Latches if Inexact Errors Latches if Underflow Occurs Latches 0 Division Latches if Null Calculation Reports on Inexact Error Occurrence. IRREGULAR VALUE Reports when Entering Irregular Value ENTRY ERROR Stores Error Step. STTEP Increases if Reading Module 1 Word Abnormally Increases if Writing Module 1 Word Abnormally Increases if Block Data Service of Module Performed A-9 Appendix A-10 Device 1 Device 2 Type Variable F0076 - DWORD _CA_LIM_CNT F0078 - DWORD _CA_ERR_CNT F0080 - DWORD _BUF_FULL_CNT BUFFUR FULL Increases if CPU Internal Buffer FULL F0082 - DWORD _PUT_CNT PUT COUNT Increases if Performing PUT. F0084 - DWORD _GET_CNT GET COUNT Increases if Performing GET. F0086 - DWORD _KEY CURRENT KEY Displays the Current State of Local Key. F0088 - DWORD _KEY_PREV PREVIOUS KEY Displays the Previous State of Local Key F0090 - WORD _IO_TYER_N Displays Module Type – Inconsistent Slot No. F0091 - WORD _IO_DEER_N F0092 - WORD _FUSE_ER_N INCONSISTENT SLOT REMOVAL SLOT FUSE DISCONNECTION SLOT F0093 - WORD _IO_RWER_N RW ERROR SLOT Displays Module Read/Write –Error Slot No. F0094 - WORD _IP_IFER_N I/F ERROR SLOT F0096 - WORD _IO_TYER0 F0097 - WORD _IO_TYER1 F0098 - WORD _IO_TYER2 F0099 - WORD _IO_TYER3 F0100 - WORD _IO_TYER4 F0101 - WORD _IO_TYER5 F0102 - WORD _IO_TYER6 F0103 - WORD _IO_TYER7 F0104 - WORD _IO_DEER0 F0105 - WORD _IO_DEER1 F0106 - WORD _IO_DEER2 F0107 - WORD _IO_DEER3 F0108 - WORD _IO_DEER4 F0109 - WORD _IO_DEER5 F0110 - WORD _IO_DEER6 F0111 - WORD _IO_DEER7 Function BLOCK SERVICE LIMIT BLOCK SERVICE ERROR MODULE TYPE 0 ERROR MODULE TYPE 1 ERROR MODULE TYPE 2 ERROR MODULE TYPE 3 ERROR MODULE TYPE 4 ERROR MODULE TYPE 5 ERROR MODULE TYPE 6 ERROR MODULE TYPE 7 ERROR MODULE REMOVAL 0 ERROR MODULE REMOVAL 1 ERROR MODULE REMOVAL 2 ERROR MODULE REMOVAL 3 ERROR MODULE REMOVAL 4 ERROR MODULE REMOVAL 5 ERROR MODULE REMOVAL 6 ERROR MODULE REMOVAL 7 ERROR Description Increases if Block Data Service in Abnormal State Increases if Block Data Service in Abnormal State Displays Slot No. where Module Removal Occurred Displays Slot No. where Fuse Disconnection Occurred Displays Interface Error Slot No. Main Base - Module Type Error Extension Base Step 1 – Module Type Error Extension Base Step 2 – Module Type Error Extension Base Step 3 – Module Type Error Extension Base Step 4 – Module Type Error Extension Base Step 5 – Module Type Error Extension Base Step 6 – Module Type Error Extension Base Step 7 – Module Type Error Main Base Module Removal Error Extension Base Step 1 – Module Removal Error Extension Base Step 2 – Module Removal Error Extension Base Step 3 – Module Removal Error Extension Base Step 4 – Module Removal Error Extension Base Step 5 – Module Removal Error Extension Base Step 6 – Module Removal Error Extension Base Step 7 – Module Removal Error Appendix Device 1 Device 2 Type Variable F0112 - WORD _FUSE_ER0 F0113 - WORD _FUSE_ER1 F0114 - WORD _FUSE_ER2 F0115 - WORD _FUSE_ER3 F0116 - WORD _FUSE_ER4 F0117 - WORD _FUSE_ER5 F0118 - WORD _FUSE_ER6 F0119 - WORD _FUSE_ER7 F0120 - WORD _IO_RWER0 F0121 - WORD _IO_RWER1 F0122 - WORD _IO_RWER2 F0123 - WORD _IO_RWER3 F0124 - WORD _IO_RWER4 F0125 - WORD _IO_RWER5 F0126 - WORD _IO_RWER6 F0127 - WORD _IO_RWER7 Function FUSE DISCONNECTION 0 ERROR FUSE DISCONNECTION 1 ERROR FUSE DISCONNECTION 2 ERROR FUSE DISCONNECTION 3 ERROR FUSE DISCONNECTION 4 ERROR FUSE DISCONNECTION 5 ERROR FUSE DISCONNECTION 6 ERROR FUSE DISCONNECTION 7 ERROR MODULE RW 0 ERROR MODULE RW 1 ERROR MODULE RW 2 ERROR MODULE RW 3 ERROR MODULE RW 4 ERROR MODULE RW 5 ERROR MODULE RW 6 ERROR MODULE RW 7 ERROR MODULE I/F 0 ERROR MODULE I/F1 ERROR MODULE I/F 2 ERROR MODULE I/F 3 ERROR MODULE I/F 4 ERROR I MODULE I/F 5 ERROR MODULE I/F 6 ERROR MODULE I/F 7 ERROR Description Main Base Fuse Disconnection Error Extension Base Step 1 – Fuse Disconnection Read/Write Error Extension Base Step 2 – Fuse Disconnection Read/Write Error Extension Base Step 3 – Fuse Disconnection Read/Write Error Extension Base Step 4 – Fuse Disconnection Read/Write Error Extension Base Step 5 – Fuse Disconnection Read/Write Error Extension Base Step 6 – Fuse Disconnection Read/Write Error Extension Base Step 7 – Fuse Disconnection Read/Write Error Main Base - Module Read/Write Error Extension Base Step 1 – Module Read/Write Error Extension Base Step 2 – Module Read/Write Error Extension Base Step 3 – Module Read/Write Error Extension Base Step 4 – Module Read/Write Error Extension Base Step 5 – Module Read/Write Error Extension Base Step 6 – Module Read/Write Error Extension Base Step 7 – Module Read/Write Error F0128 - WORD _IO_IFER_0 F0129 - WORD _IO_IFER_1 F0130 - WORD _IO_IFER_2 F0131 - WORD _IO_IFER_3 F0132 - WORD _IO_IFER_4 F0133 - WORD _IO_IFER_5 F0134 - WORD _IO_IFER_6 F0135 - WORD _IO_IFER_7 F0136 - WORD _RTC_DATE RTC DATE Current Date of RTC F0137 - WORD _RTC_WEEK RTC DAY Current Day of RTC F0138 - DWORD _RTC_TOD RTC HOUR Current Time of RTC (ms unit) F0140 - DWORD _AC_FAIL_CNT F0142 - DWORD _ERR_HIS_CNT Main Base Module - Interface Error Extension Base Step 1 – Module Interface Error Extension Base Step 2 – Module Interface Error Extension Base Step 3 – Module Interface Error Extension Base Step 4 – Module Interface Error Extension Base Step 5 – Module Interface Error Extension Base Step 6 – Module Interface Error Extension Base Step 7– Module Interface Error POWER SHUT-OUT Stores the Frequency that Power has been Shut out. FREQUENCY ERROR Stores the Frequency that Error s were Made OCCURRENCE A-11 Appendix Device 1 Device 2 Type Variable Function Description FREQUENCY F0144 - DWORD _MOD_HIS_CNT F0146 - DWORD _SYS_HIS_CNT F0148 - DWORD _LOG_ROTATE LOG ROTATE SLOT INFORMATION SLOT INFORMATION SLOT INFORMATION SLOT INFORMATION SLOT INFORMATION SLOT INFORMATION SLOT INFORMATION SLOT INFORMATION Stores Log Rotate Information F0150 - WORD _BASE_INFO0 F0151 - WORD _BASE_INFO1 F0152 - WORD _BASE_INFO2 F0153 - WORD _BASE_INFO3 F0154 - WORD _BASE_INFO4 F0155 - WORD _BASE_INFO5 F0156 - WORD _BASE_INFO6 F0157 - WORD _BASE_INFO7 F0158 - WORD _RBANK_NUM USED BLOCK NO. Block No. used Currently F0159 - WORD _RBLOCK_STATE FLASH STATE Flash Block State F0160 - DWORD F0162 - DWORD F0164 - DWORD - WORD F10240 BIT _RTC_WR RTC RW Writes and Read Data to RTC F10241 BIT _SCAN_WR SCAN WR Scan Value Initialization F1024 0 1 2 3 4 5 6 7 _RBLOCK_RD_FLA FLASH READ G _RBLOCK_WR_FLA WRITE ON FLASH G _RBLOCK_ER_FLA FLASH ERROR G USABLE _USER_WRITE_F CONTACTING POINT EXTERNA L SERIOUS FAILURE REQUEST EXTERNAL WARNING REQUEST USER CONTACTING POINT INTIALIZATION COMPLETED EXTERNAL SERIOUS FAILURE INFORMATION Main Base Slot Information Extension Base Step 1 – Slot Information Extension Base Step 2 – Slot Information Extension Base Step 3 – Slot Information Extension Base Step 4 – Slot Information Extension Base Step 5 – Slot Information Extension Base Step 6 – Slot Information Extension Base Step 7 – Slot Information ON when Reading Data of Flash N Block ON when Writing Data of Flash N Block Errors occurs during Flash N Block Service Contacting Point Usable in Program F10242 BIT _CHK_ANC_ERR F10243 BIT _CHK_ANC_WAR - WORD _USER_STAUS_F F10250 BIT _INIT_DONE F1026 - WORD _ANC_ERR F1027 - WORD _ANC_WAR EXTERNAL LIGHT Displays the Light Failures Information of External FAILURE Devices WARNING F1034 - WORD _MON_YEAR_DT MONTH / YEAR Clock Information Data (Month / Year) F1035 - WORD _TIME_DAY_DT HOUR / DAY Clock Information Data ( Hour / Day ) F1036 - WORD _SEC_MIN_DT SECOND / MINUTE Clock Information Data (Second / Minute ) F1037 - WORD _HUND_WK_DT 100 YEARS / DAY Clock Information Data( 100 Years / Day ) F1025 A-12 MODE CONVERSIO Stores the Frequency that the Mode has been Converted N FREQUENCY HISTORY OCCURRENCE Stores the Frequency that the System History Occurred. FREQUENCY Requires Serious Failures from External Devices Requests to Detect Light Failures from External Devices User Contacting Point Displays Initialization Task Performance Completed Displays Serious Failures Information of External Devices Appendix A.2.2 Communication Relay (L) List -Special Register for Data Link *P2P Parameter: 1~8, P2P Block: 0~63 No. Key Word Type L006250 L006251 L00626 L00627 _P2P1_NDR00 _P2P1_ERR00 BIT BIT Contents P2P PARAMETER No. 1 – SERVICE IN NORMAL COMPLETED P2P PARAMETER No.00 – SERVICE IN ABNORMAL COMPLETED Contents Description BLOCK STATE Displays P2P PARAMETER No. 1 – BLOCK SERVICE IN NORMAL STATE COMPLETED BLOCK STATE Displays P2P PARAMETER No.00 – BLOCK SERVICE IN ABNORMAL STATE COMPLETED Displays IF P2P PARAMETER No.00 – BLOCK SERVICE IN ABNORMAL STATE COMPLETED, ERROR CODE _P2P1_STATUS00 WORD IF P2P PARAMETER No.00 – BLOCK SERVICE IN ABNORMAL STATE COMPLETED, ERROR CODE _P2P1_SVCCNT00 DOUBLE WORD P2P PARAMETER No. 00 – THE NUMBER OF BLOCK SERVICE PERFORMANCES IN NORMAL STATE Displays P2P PARAMETER No. 00 – THE NUMBER OF BLOCK SERVICE PERFORMANCES IN NORMAL STATE P2P PARAMETER No. 1. AND No. 00 – THE NUMBER OF BLOCK SERVICE PERFORMANCES IN ABNORMAL STATE Displays P P2P PARAMETER No. 1. AND No. 00 – THE NUMBER OF BLOCK SERVICE PERFORMANCES IN ABNORMAL STATE L00629 _P2P1_ERRCNT00 DOULE WORD L006310 _P2P1_NDR01 BIT L006311 _P2P1_ERR01 BIT L00632 _P2P1_STATUS01 WORD P2P PARAMETER No. 1 and No. 01– BLOCK SERVICE IN NORMAL STATE COMPLETED P2P PARAMETER No. 1 and No. 01– BLOCK SERVICE IN ABNORMAL STATE COMPLETED IF P2P PARAMETER No.1 AND No. 00 – BLOCK SERVICE IN ABNORMAL STATE COMPLETED, ERROR CODE _P2P1_SVCCNT01 DOUBLE WORD P2P PARAMETER No.1 AND No. 01 – THE NUMBER OF BLOCK SERVICE PERFORMANCES IN NORMAL STATE Displays PARAMETER No.1 AND No. 01 – THE NUMBER OF BLOCK SERVICE PERFORMANCES IN NORMAL STATE P2P PARAMETER No.1 AND No. 01 – THE NUMBER OF BLOCK SERVICE PERFORMANCES IN ABNORMAL STATE Displays P2P PARAMETER No.1 AND No. 01 – THE NUMBER OF BLOCK SERVICE PERFORMANCES IN ABNORMAL STATE L00633 L00635 _P2P1_ERRCNT01 DOUBLE WORD Displays P2P PARAMETER No. 1 and No. 01– BLOCK SERVICE IN NORMAL STATE COMPLETED Displays ETER No. 1 and No. 01– BLOCK SERVICE IN ABNORMAL STATE COMPLETED P2P Displays IF P2P PARAMETER No.1 AND No. 00 – BLOCK SERVICE IN ABNORMAL STATE COMPLETED, ERROR CODE [TABLE 2] Communication Flag List in accordance with P2P Service Set-up A-13 Appendix A.3 External Dimension Dimension Unit : mm XGL-EIPT A-14 Warranty and Environmental Policy Warranty 1. Warranty Period The product you purchased will be guaranteed for 18 months from the date of manufacturing. 2. Scope of Warranty Any trouble or defect occurring for the above-mentioned period will be partially replaced or repaired. However, please note the following cases will be excluded from the scope of warranty. (1) (2) (3) (4) (5) (6) Any trouble attributable to unreasonable condition, environment or handling otherwise specified in the manual, Any trouble attributable to others’ products, If the product is modified or repaired in any other place not designated by the company, Due to unintended purposes Owing to the reasons unexpected at the level of the contemporary science and technology when delivered. Not attributable to the company; for instance, natural disasters or fire 3. Since the above warranty is limited to PLC unit only, make sure to use the product considering the safety for system configuration or applications. Environmental Policy LSIS Co., Ltd supports and observes the environmental policy as below. Environmental Management LSIS considers the environmental preservation as the preferential management subject and every staff of LSIS use the reasonable endeavors for the pleasurably environmental preservation of the earth. About Disposal LSIS’ PLC unit is designed to protect the environment. For the disposal, separate aluminum, iron and synthetic resin (cover) from the product as they are reusable. LSIS values every single customers. Quality and service come first at LSIS. Always at your service, standing for our customers. http://eng.lsis.biz 10310001033 ■ HEAD OFFICE LS tower, Hogye-dong, Dongan-gu, Anyang-si, Gyeonggi-do 1026-6, Korea http://eng.lsis.biz Tel : (82-2)2034-4870/Fax : 82-2-2034-4648 e-mail : cshwang@lsis.biz ■ LSIS Tokyo Office _ Tokyo, Japan Address: 16FL. Higashi-Kan. Akasaka Twin Tower 17-22, Akasaka.Monato-ku Tokyo 107-8470. Japan Tel : 81-3-3582-9128/Fax : 81-3-3582-2667 e-mail : jschuna@lsis.biz ■ LSIS (ME) FZE _ Dubai, U.A.E. Address : Jafza View Tower Lob 19, Room 205 Along Sheikh Zayed Road Jebel Aali Free Zone Dubai, United Arab Emirates Tel : 971-4-886-5360/Fax : 971-4-886-5361 e-mail : jungyongl@lsis.biz ■ LSIS Chengdu Office _ Chengdu, China Address : 12FL. Guodong Buiding. No.52 Jindun Road Chengdu.610041. P.R. China Tel : 86-28-8612-9151(9226)/Fax : 86-28-8612-9236 e-mail : comysb@lsis.biz ■ LSIS Qingdao Office _ Qingdao, China Address : YinHe Bldg. 402 Room No. 2P Shandong Road, Qingdao-City,Shandong-province 266071, P.R. China Tel : 86-532-8501-6068/Fax : 86-532-8501-6057 e-mail : wangzy@lsis.com.cn ■ LSIS Europe B.V. , Netherlands Address : 1st. Floor, Tupolevlaan 48, 1119NZ, Schiphol-Rijk, The Netherlands Tel : +31 (0)20 654 1420/Fax : +31 (0)20 654 1429 e-mail : junshickp@lsis.biz ■ Wuxi LSIS Co., Ltd _ Wuxi, China ■ LSIS Shanghai Office _ Shanghai, China Address : Room E-G. 12FL Hiamin Empire Plaza. No.726. West. Yan'an Road Shanghai 200050. P.R. China e-mail : liyong@lsis.com.cn Tel : 86-21-5237-9977(609)/Fax : 89-21-5237-7189 ■ LSIS Beijing Office _ Beijing, China Address : B-Tower 17FL. Beijing Global Trade Center B/D. No. 36. East BeisanHuan-Road. DongCheng-District. Beijing 100013. P.R. China Tel : 86-10-5825-6027(666)/Fax : 86-10-5825-6028 e-mail : xunmj@lsis.com.cn ■ LSIS Guangzhou Office _ Guangzhou, China Address : Room 1403.14FL. New Poly Tower. 2 Zhongshan Liu Road.Guangzhou.P.R China Tel : 86-20-8328-6754/Fax : 86-20-8326-6287 e-mail : chenxs@lsis.com.cn Address : 102-A. National High & New Tech Industrial Development Area. Wuxi. Jiangsu. 214028. P.R. China Tel : 86-510-8534-6666/Fax : 86-510-8534-4078 e-mail : caidx@lsis.com.cn ■ Dalian LSIS Co., Ltd. _ Dalian, China Address : No. 15. Liaohexi 3-Road. Economic and Technical Development zone. Dalian 116600. China Tel : 86-411-273-7777/Fax : 86-411-8730-7560 e-mail : cuibx@lsis.com.cn ※ LSIS constantly endeavors to improve its product so that information in this manual is subject to change without notice. ⓒ LSIS Co., Ltd 2011 All Rights Reserved. 2011. 5