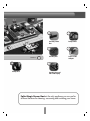
1
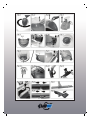
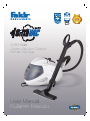
2150 Watt
Steam-Vacuum Cleaner
Buharl› Süpürge
User Manual
Kullan›m K›lavuzu
Dear Customer,
Please read and comply with these
instructions prior to the initial operation
of your appliance. Retain these operating instructions for
future reference or for subsequent possessors.
24) ‘’EcoActive Filter’’ water filter assembly cover
25) Shaped filtering sponge
26) Filter body with microhole net
27) Elbow tube
Proper Use
Accessories
This appliance is designed for domestic use only.
The machine is designed for generating steam and
vacuum cleaning liquids and solid substances according
to the description in this Operating Instructions Manual.
A 1) Fitting for accessories connection
2) Handle
3) Steam button
B 1) Steam+suction hose
2) Monobloc plug
3) Locking button of the monobloc plug
C Accessories locking button
D Steam + suction extension tubes
E 1)Universal brush
2) Bristle inserts
3) Liquid suction inserts
4) Insert for fitted carpet
5) Cotton cloths
K Steam-suction accessory
L Small coloured steam-suction brushes
N Small steam-suction upholstery nozzle
O 1) Squeegee attachment for small steam
-suction upholstery nozzle (200 mm)
P Bristle attachment for small steamsuction
upholstery nozzle
U Filler funnel
V Spare gaskets
20 A)Dirt container cleaning brush
The manufacturer is not responsible for any damages
that may occur on account of improper use or wrong
operations.
Contents
Description of the Appliance
Safety instructions
Preparing the Appliance
Operation
How to Use the Accessories
Maintenance and Care
Troubleshooting
Specifications
01
04
05
06
08
09
10
10
Description of the Appliance
1) Suction switch
2) Boiler switch
3) “Out of water” indicator light
4) Pressure indicator light
5) Suction regulator
6) Carrying handle
7) Safety cap
8) Steam control knob
9) Hose connection flap
10) Hose connection
11) Air outlet grill
12) Pivoting wheels
13) Power supply cable
14) Supply cable channel
15) Supply cable storage
16) Accessories holder
17) Hepa filter
18) Unhooking lever for Hepa filter
19) Hepa filter holders
20) Dirt container
21) MAX level (fig. 5)
22) Dirt container handle
23) ‘’EcoActive Filter’’ water filter assembly
01
12
9
5
14
1
1
2
Cleaning terra cotta
and parquet floors
2
Cleaning sofas
and mattresses
3
Cleaning floors
and tiles
4
Cleaning carpets
and moquette
4
11
6
16
2
Cleaning furniture
3
7
7
Clening bathroom
= Steam cleaning
8
11
Cleaning the
kitchen
Ironing
9
13
Cleaning glass
and mirrors
Purlflying the air
16
Cleaning chrome
fixtures and taps
02
14
Cleaning plants
15
Cleaning roller
shutters
6
13
15
18
14
6
8
4
1
17
Vacuuming wooden
floors
10
3
3
Vacuuming floors
Suction =
18
6
Dusting furniture
17
Suction of solids
and liquids
4
Cleaning the car
Vacuuming carpets and
wall-to-wall carpeting
Fakir Magic Steam Basic is the only appliance you can use for
all these functions for cleaning, vacuuming and sanitising your home.
03
• Never operate the machine bare-foot.
• Do not touch the machine with wet hands or feet when
the mains plug is inserted in the socket.
• Never use the machine in direct vicinity of bath-tubs,
showers and containers filled with water.
• Never dip the machine, the cable or the plugs in water
or other liquids.
• It is not allowed to use the appliance in hazardous
locations. If the appliance is used in hazardous areas
the corresponding safety provisions must be observed.
• Do not use the machine in the presence of toxic
substances.
• Do not place the machine on heat-sensitive surfaces.
• Do not place the machine in the vicinity of swtich-on
stoves, electrical ovens or other sources of heat.
• Protect the appliance against external weather, humidity
and heat sources.
• Protect the unit from rain. Do not store outside.
• The appliance must not be operated by children, young
persons or persons who have not been instructed
accordingly.
• Press the switches lightly and avoid using sharp objects
such as pins, pens/pencils and similar objects.
• The appliance must provide of a stable ground.
• If the machine falls down, first get it checked by an
authorised FAKIR Service agent because there can be
internal damages that hamper the safety of the product.
• Never wind the main cable around the machine,
definitely not till the machine is still hot.
• Do not use the machine to vacuum clean acids or other
solutions as they can damage the machine. Also do not
suck in explosive powders or liquids as this can lead to
explosion when these substances come in contact with
the internal parts of the machine.
• Do not suck in toxic substances.
• Do not suck in burning or glowing objects such as
cigarette buds, ash or other burning or glowing materials.
• Do not use the machine to vacuum clean plaster of
Paris, cement, etc. that can harden on coming into contact
with water and can thus hamper the functioning of
the machine.
• Always switch off the machine and remove the plug
while filling the machine with water.
• Always place the machine in a horizontal position
during operation.
• Do not direct the steam jet on household appliances
that contain electrical parts.
• Never touch the steam jet from a short distance with
your hands and never direct the steam jet to persons or
animals (risk of scalds).
• Never use the appliance to clean objects containing
hazardous substances (e.g. asbestos).
Safety instructions
Apart from the notes contained herein the general safety
provisions and rules for the prevention of accidents of
the legislator must be observed.
Any use of the machine in contravention with the following
instructions will lead to warranty claims being rendered
void.
Electrical connection
• Only connect the appliance to properly earthed sockets.
• The voltage indicated on the type plate must correspond
to the voltage of the socket.
• In wet rooms, e.g. bathrooms, connect the appliance
to sockets with a series connected RCD adapter. If you
are not sure, please contact an electrician.
•Never touch the mains plug and the socket with wet
hands.
• Only use a splashproof extension cable with a minimum
section of 3x1 mm2.
• Never use a damaged power cord or extension cable!
If the power cord is damaged it must be replaced with
a special power cord available from the manufacturer
or his customer service.
• Make sure that the power cord or extension cables
are not damaged by running over, pinching, dragging
or similar. Protect the power cord from heat, oil, and
sharp edges.
• If couplings of the power cord or extension cable are
replace the splash protection and the mechanical tightness
must be ensured.
• Please switch off the machine first using the main switch
before disconnecting the machine from the mains.
• To separate the machine from the mains, pull the plug
and not the power cord.
Application
• The operator must use the appliance properly. He must
consider the local conditions and must pay attention to
third parties, in particular children, when working with
the appliance.
• Check the faultless condition of the appliance and the
accessories before using it. Otherwise, the appliance
must not be used. Please check in particular the power
cord, the steam boiler seal, and the steam hose.
• The steam hose must not be damaged (risk of scalds).
A damaged steam hose must be replaced immediately.
You may only use a steam hose that is recommended
by the manufacturer.
04
• Never fill solvents, solvent-containing liquids or undiluted
acids (e.g. detergents, benzene, paint thinner, and
acetone)
into the water reservoir or the water filter container as
these substances affect the materials used on the appliance.
• Ensure that the machine has cooled down completely
before stowing it away or cleaning it.
• The appliance, if left mattended must be unplugged
from the electric socket.
Warranty
The terms of the guarantee applicable in each country
have been published by our respective national
distributors. We will repair possible faults on your unit
free of charge within the warranty period, insofar as the
faults are caused by material defects or defective
workmanship. Guarantee claims should be addressed
to your dealer or the nearest FAKIR customer service
centre, and supported by documentary evidence of
purchase.
Maintenance
• Turn off the appliance and remove the mains plug
prior to any care and maintenance works.
• To avoid risks, all repairs and replacement of spare
parts in the machine may only be carried out by the
authorised FAKIR service personnel.
• Always use original spare parts and accessories
permitted by the manufacturer so that the safety of the
machine remains intact.
• In hard water areas, we recommend the use of
KALSTOP, a special natural base decalcifier which
inhibits and breaks downlimescale.
Preparing the appliance
Filling the water reservoir
Unscrew the patented safety cap (7) (Fig.1) and fill the
boiler with not more than 1.1 litres of water, using the
filler funnel (U). Make sure that the water does not
overflow, and that space is left in the boiler for the steam
to form.
Normal tapwater can be used. Water by its nature
contains magnesium, mineral salts and other deposits
which in hard water areas can cause limescale build up
in the boiler. It is essential to swill it out with tapwater
every 3 or 4 uses.
Note:Never use distilled and scented water.
Storage
• Caution: Never operate or store the
appliance in a vertical position!
• Protect the unit from rain. Do not store
outside and when the machine is still hot.
Filling the water filter container
Make sure the rubber gasket is present inside the safety
cap, then screw on the safety cap (7) to hand tight. Make
sure the patented safety cap is fully and correctly screwed
on, otherwise you may experience steam escaping around
the cap.
• Lift the dirt container handle (22) unhooking it from its
position (Fig. 2) and remove the container (20) (Fig. 3).
• Turn the container handle (22) as shown in figure 4,
so as to remove the “Eco Active- Filter” water filter
assembly (23).
• Fill the dirt container (20) with about 1,2 litres of tap
water until the MAX level indicator (21) is reached, as
in fig. 5.
• Put the filter assembly (23) back into place in the dirt
container (20) returning it to its initial position.
• Replace the dirt container into position.
• Support the handle (22) until it hooks into its place on
the dirt container (20).
WARNING: Do NOT under any circumstances put or
leave the filler bottle in the water filling aperture of the
appliance when the appliance is connected to the mains
electricity supply. Danger of burns!
Note: The functioning of the vacuum cleaner is based
on the whirling of the suction air in the water filter. In the
Symbols on the machine
Steam
CAUTION - Danger of scalding
Unpacking the appliance
When you unpack the system, check that everything is
complete (see page 3). If there are any missing parts or
you detect any transport damage when unpacking,
please inform your dealer immediately.
Environmental protection
The packaging material can be recycled.
Please do not place the packaging into the
ordinary refuse for disposal, but arrange for
the proper recycling.
Old appliances contain valuable materials
that can be recycled. Please arrange for the
proper recycling of old appliances. Please
dispose of your old appliances using
appropriate collection systems.
05
process, sucked-in materials and deposits of cleaning
agents from floors get collected in the water bath. This
can sometimes lead to the formation of foam. It is
necessary to add the foam stop liquid to the water filter
bath to avoid this situation. The foam stop liquid is
environment friendly and fully bio-degradable. Slight
foam formation is normal and does not hamper the
functioning of the machine.
Patented safety cap ented safety cap
This appliance is equipped with a patented safety cap,
which prevents opening of the boiler as long as there is
any pressure remaining inside. This is an important and
indispensable safety device and it is necessary to follow
certain procedures when re-filling the tank. When you
have used up all the water in the tank, preceed as follows:
• Switch off the machine at the boiler switch (2).
• Disconnect the power supply cable (13) from the mains.
• Unscrew the safety cap (7) anti-clockwise.
• Wait for a good few minutes to allow the boiler to cool
down.
• When the boiler is cool, proceed to carefully refill it as
described in the paragraph headed PREPARATION FOR
USE.
WARNING: When REfilling the boiler always pour
gradually into it only very small quantities at first of HOT,
not cold water, so as to avoid spitting. KEEP FACE AND
EXPOSED SKIN WELL AWAY FROM THE APERTURE.
Operation
Open the hose connection flap (9); fit the monobloc plug
(B2) by pushing it, without pressing the button, until you
hear the click of the locking mechanism, then make sure
it is well locked (fig.6).
• To disconnect the monobloc plug (B2) from the appliance,
push the button (B3) and pull the monobloc so as to
separate it from the appliance (fig.6a).
• Now connect the appliance to the mains.
Suction only mode
• Press suction switch (1). The appliance will begin to
suck.
• To stop suction, simply press suction switch again (1)
• Using the suction regulator (5) it is possible to change
the suction power according to the type of cleaning
required, or to stop suction immediately in case of
accidental suction (e.g. curtains). It is advisable to work
with the suction regulator open on curtains, carpets, and
sofas, etc. Move the suction regulator forward until the
hole on the handle is visible. To return to maximum
power, move the suction regulator backward, gradually
covering the hole.
You can optimise the steam flow by means of the control
knob (8) (Fig. 7).
To obtain a higher flow rate turn the knob in a clockwise
direction. When the knob is turned in an anti-clockwise
direction, the flow rate decreases.
High flow rate of steam: to remove caked dirt, stains,
grease and to sanitise;
Normal flow rate of steam: for wall-to-wall and loose
carpeting, windows, floors; Low flow rate of steam: for
spraying plants, cleaning delicate fabrics, wallpaper.
Steam only mode
Supply cable storage
Regulation of the steam flow
• Press the boiler switch (2) which will light up.
• Wait for the pressure indicator light (4) goes out. When
it does, Magic Steam Vac Basic is ready to generate
steam.
• You may now deliver steam by pressing the steam
button (A3) on the handle.
• If you decide not to use the steam any longer, you may
switch off the boiler by pressing the boiler switch (2).
Before putting away Magic Steam Vac Basic, store the
supply cable (13) in its compartment (15) proceeding as
follows:
• Take out the dirt container (20) as indicated in the
paragraph “preparation for use”.
• Manually wind the cable evenly and put it in the storage
(15), making it go through the power supply cable
channel (14) (Fig.8).
• Put the dirt container (20) back in its place making
sure it is correctly positioned.
Steam + Suction mode
You can use the steam and suction modes together by
activating both as described above.
Lack of water in the boiler
Lack of water in the boiler will be shown by the indicator
light (3). In order to continue working, proceed as
described in the section.
06
Pull the elbow tube (27) away from the net filter housing
(26) until it is removed (Fig. 11a).
Take all the components apart and rinse themin running
water. If the filter sponge has any tears, replace it.
A cleaning brush (20-A) is supplied for easy cleaning of
the dirt container (20); use it also to clean the appliance’s
hose connections and the inside of tools.
Use of the accessor›es holder
The accessories holder (16) allows you to fix the tube
with the brush mounted on it on the body of the appliance.
To attach the hose to the appliance, slide the hook on
the hose into the accessories holder slot on the appliance
(Fig. 9).
NOTE: Do not use the brush for cleaning theoutside of
the appliance If you wish to continue working, top up the
level
of the water. Put the “EcoActiveFilter” water filter assembly
(23) back into the dirt container (20).
Connection of accessories
All Magic Steam Vac Basic accessory tools can be connected
to the handle (A2) or to the extension tubes (D).
To connect accessories for suction and steaming
(D-E-K-N) proceed as follows:
• Connect the handle or the extension tube to the required
accessory until the connector button (C) is hooked (Fig. A)
• To disconnect the accessory, just keep the connector
button pressed (C) and separate the two parts (Fig. B)
ATTENTION: Make the arrow on the elbow tube (27)
coincide with the mark on the net filter housing (26)
(Fig.11b). Put the dirt container (20) back in its place as
described in the “preparation for use” paragraph.
NOTE: Make sure you empty the dirt container (20)
before putting your Magic Steam Vac Basic away. One
of the great advantages of this appliace is precisely the
fact that it is possible to put it away clean.
WARNING: in this situation, it is important not
to press the steam button (A3), to avoid steam
coming out accidentally.
How to clean the bucket
Suction of solids and liquids
Suction up about one and a half litres of clean water,
turning on the suction for a few seconds.
The whirlpool created inside the bucket will rinse the
walls and dislodge any dirt. Clean water cleans the
inside of the tubes as it passes through them. Now
empty the bucket again and put your appliance away.
This appliance can be used to suck up dust or liquids
equally easily.
However, if the water in the filter is very dirty it should be
replaced proceeding as described in the section “Emptying
and cleaning the dirt container”.
When the dirt sucked in reaches the maximum permitted
level in the Dirt container (20), suction is stopped automatically
by the safety float provided for this purpose (you will notice
that the engine speed has increased).
TIP FOR USING THE ACCESSORIES
DO NOT USE STEAM FUNCTION ON DRAYLON,
VELVET, LEATHER OR OTHER SENSITIVE
SURFACES.
If in doubt about the effect of steam on other surfaces,
always proceed only after carrying out a test on a
hidden part or a sample. Allow the area treated with
steam to dry and then check whether any changes in
colour or deformations have occurred before proceeding
further, ensuring exactly the same steam power and
distance as in the test.
When cleaning wooden surfaces (furniture, doors, etc.)
and brick floors always proceed with caution since
excessive use of steam could damage the wax, the
polish or the colour of the surface to be cleaned. It is
therefore advisable to apply the steam to these surfaces
only for short periods at a time or to clean them with
a cloth that has been treated with steam. On particularly
delicate surfaces (e.g. synthetic materials, enamelled
surfaces, etc.) we strongly recommend using the steam
at its lowest output power.
ATTENTION: Switch off the appliance, and only switch
on again after restoring the water level in the conteiner as
described in the “emptying and cleaning the dirt container”
paragraph.
IMMEDIATE RESTART WITHOUT RESTORING
THE WATER LEVEL CAN DAMAGE THE AIR
OUTLET FILTER.
EMPTYING AND CLEANING THE WATER
CONTAINER
Switch off the appliance at the main switch (1) and disconnect
the supply cable from the mains.
Lift the dirt container (20) out of its compartment by the
container handle (22) (Fig.3). Turn the handle and take
out the “EcoActive-Filter” water filter assembly (23), as in
picture 4. Empty the container tilting it towards the small
groove (Fig. 10).
07
When cleaning glazed surfaces, if the weather
is particularly cold pre-heat the glass working
at distance of about 50 cm away from the surface.
To take care of your plants, we recommend
spraying them from a distance of at least
50 cm.
Small steam-suct›on upholstery nozzle (N )
We suggest to use this accessory on large windows,
large mirrors and smooth surfaces, or to clean
upholstery surfaces such as sofas, mattresses, etc.,
using the following attachments supplied with it:
• 200 mm squeegee attachment (O1) for large
windows and surfaces;
• bristle attachment (P) is recommended for carpeting,
stairs, car interiors, and upholstered surfaces (AFTER
TESTING FIRST ON A HIDDEN PART,
WAITING AND SEEING HOW IT REACTS TO
STEAM TREATMENT).
It is also useful for removing animal hair from the
same surfaces; a sponge cover (E5) may also be
attached to the nozzle. Fit the attachments and slide
them onto the nozzle as shown in fig.D. To correctly
use the steam-suction squeegee proceed as follows:
• apply steam uniformly to the surface to be cleaned
to dissolve the soiling.
• Press the rubber squeegee against the surface to
be cleaned, moving it vertically from top to bottom
with the suction function switched on.
Universal brush (E)
It is advisable to use this brush to clean large surfaces, tiled
or marble covered floors, parquet, carpets etc., using the
following inserts supplied with it.
• Bristle inserts (E2), for use when vacuuming only.
• Liquid suction inserts (E3), to pick up liquids; recommended
for smooth surfaces.
• Fitted carpet inserts (E4), suitable for fitted and loose
carpets.
The universal brush can be connected directly to the handle,
or to the hose by means of the extension tubes (D).
Assembling inserts:
To change the inserts, slide out the insert from its position
on the brush and slid in the replacement (Fig.C).
When assembling the inserts for suctioning up liquids (E3),
take care to ensure that their SMOOTH side faces inward.
Warning: in particularly cold weather, pre-heat
windows by applying steam from a distance of about
50 cm from the surface to be cleaned.
Steam-suction accessory (K)
Use this accessory to clean areas that are difficult to reach
with other accessories. This accessory may be used for:
• treating stains on carpeting or loose carpets, before going
over them with the brush;
• cleaning stainless steel, windows, mirrors, layered coating
and paintwork;
• cleaning corners such as stairs, windows frames, door
jambs, aluminium sections;
• cleaning the bases of taps;
• cleaning blinds, radiators, the interiors of cars;
• atomising house plants from a distance.
This accessory can also be fitted directly onto the handle
(A2) or it can be connected to the hose by means of the
extension tubes (D). It is possible to combine this accessory
with the small coloured brushes (L)
*Using the iron, optional
1) Temperature
regulation control
2) "Iron heating"
indicator light
3) Steam request
button
4) Continuous steam
jet button
Magic Steam Vac Basic can be quickly transformed
into a highly effective ironing system to make ironing
quick and easy. Simply connect the product to the iron
accessory
• Connect the iron to the monobloc plug (B2) proceeding
as shown in the “Operation” paragraph.
• For STEAM ironing, turn the dial (1) and set the iron
temperature to its maximum travel on the “COTTONLINEN” steam position. YOU MUST SET AT ITS
MAXIMUM POSITION, DO NOT SET AGAINST
THE PICTURE OF THE IRON ON THE DIAL
(1).
08
Most types of fabric, other than delicates can be
STEAM ironed at this temperature, Fabric indications
on dial are for DRY ironing, NOT steam ironing.
• Wait for a few minutes until the “Iron heating”
indicator light (2) goes out, to show that the soleplate
of the iron has reached the required temperature.
• Press the steam request button (3) to enable the
steam to come out. The steam flow will stop when the
button is released. After each filling, when you first
start to use the iron, a few drops of water mixed with
the steam may be emitted (due to imperfect heat
stabilisation). It is therefore advisable to direct the
first jet of steam onto a rag.
• To obtain a continuous jet of steam move the sliding
button (4). The steam will continue to come out even
when the steam request button (3) is released. To
stop the flow of steam push the sliding button
backwards
(4).
them with the appropriate spares. Also carry out the
same check on the gaskets for connecting the extension
tubes (D) and the handle (A2). To clean the outside of
the appliance, just use a damp cloth. Do not use solvents
or detergents as these might damage the plastic surface.
To clean the “ECOACTIVE-FILTER” holder and clean
or change the sponge filter, follow the instructions in the
paragraph headed “EMPTYING AND CLEANING
THE dirt container”.
Washable hepa filter
WARNING: Magic Steam Vac Basic is equippedwith
a washable filter. To clean the filter, proceed as follows:
• Unfasten the handle (22) of the dirt container and
remove the container (20) as described in the paragraph
headed “PREPARATION FOR USE”.
• Lift the Hepa filter release lever (18) and remove the
filter from its recess (Fig. 14).
• Rinse the filter in cold running water. Shake it gently
after washing to eliminate any residual dirt and excess
water.
NOTE: Let the filter dry naturally, far away from light
and heat sources. You should wait 24 hours before
reassembling the filter in the appliance.
• Replace the filter if it is torn.
• The filter should be cleaned every 4 months for averagefrequency of use.
• To position the Hepa filter correctly (17) make sure that
it fits properly into its recess (19) and then that the release
lever closes over it holding it in place (18) (Fig.14).
WARNING:
• Do not clean the filter with the brush, as this could
damage it, decreasing its filtering capacity.
• Do not use detergents, do not scrape filter, and do not
attempt to wash it in a dishwasher.
Dry Ironing
• If you need to DRY iron (ONLY) (NOT steamironing),
press the boiler switch (2) and adjust the temperature
of the iron by turning dial to the temperature required
for the fabric (as shown on the dial).
ATTENTION: When dry ironing, be careful not to
press the steam request button, as hot water could
come out of the iron onto your garment and board.
Important note
• Do not leave the iron unattended whilst connected
to the mains.
• Iron only on heat resistant surfaces and on surfaces
that allow the steam to escape e.g. mesh ironing boards.
• In case of accidental fall of the appliance it is necessary
to have it checked by an authorized fakir service center
as the internal safety features may have been affected.
ATTENTION: If you iron sitting down, do not
place your legs under the ironing board, the
steam can cause burns.
Troubleshooting
Often, failures have simple causes and you can do the
troubleshooting yourself using the following overview. If
you are in doubt or if the failure is not listed here please
contact the FAKIR customer service.
General maintenance
Before carrying out any type of maintenance make sure
that the power cable has been disconnected from the
mains.
After using the brushes it is advisable to allow the bristles
to cool in their natural position so as to avoid them getting
deformed in any way.
Check the conditions of the gaskets located inside the
monobloc plug (B2) periodically. If necessary, replace
09
Specifications
Power connection
Voltage
Frequency
Life time
Protection Class
Protective Class
220 - 240 V
50 ~ 60 Hz
10 years
IPx4
I
Performance data
Boiler power
Motor power
Maximum power
Max. steam pressure
Max. steam output
1100 W
1050 W
2150 W
4 bar
90 g/min
Filling data
Boiler Capacity
Dirt collection tank capacity
1,1 L
1,2 L +1,8 L
Dimensions
Width
Length
Height
Weight
(without accessories)
520 mm
360 mm
340 mm
10.5 kgs
Dispatch
Send the appliance in the original package or a similar,
well-padded package to prevent damage to the appliance.
TROUBLE
CAUSE
SOLUTION
The suction fan does
not start
No power supply
Check the cable, plug and
socket
The suction power drops
The upholstery nozzle, the
hose or the stiff suction tube
are clogged
The hepa filter is exhausted
Clean the filter and remove
any obstruction from the tubes
andaccessories.
Follow the instructions in the
“GENERAL MAINTENANCE”
The appliance has stopped
vacuuming
The float device has interrupted suction
Switch the appliance off, make
sure that water level in the tank
is correct and switch the appliance
back on.
Water output is manitored
where liquids sucking up
Water filter storage re clogged
Clean “EcoActive Filter system
10
19) Hepa filtre tutaca¤›
Sayın müflterimiz,
Cihazınızı ilk defa kullanmadan önce bu
kullanım kılavuzunu okuyup buna göre
davranınız. Bu kullanım kılavuzunu, daha sonra tekrar
kullanmak ya da cihazın sonraki kullanıcılarına iletmek
üzere saklayın.
20) Kirli su haznesi
21) MAX seviyesi (fig. 5)
22) Kirli su hazne tafl›ma kulbu
23) ‘’EcoActive Filtre’’ su filtre sistemi
Kurallara uygun kullan›m
24) ‘’EcoActive Filter’’ su filtre kapa¤›
Cihaz, bu kullanım kılavuzunda tarif edildi¤i gibi buhar
üretme ve sıvı ve katı partiküllerin emilmesi için üretilmifltir.
Üretici, amacına uygun olmayan ya da hatalı kullanım
sonucu oluflan hasarlar için sorumluluk üstlenmez.
25) Sünger filtre
26) Mikro gözenekli filtre gövdesi
27) Boru dirse¤i
Aksesuarlar
‹çindekiler
Cihaz tanımı
Güvenlik uyarıları
Hazırlık
Çalıfltırma
Aksesuarların kullanımı
Temizlik, Bakım
Arızalarda yardım
Teknik bilgiler
A 1) Boru ba¤lant› soketi
2) Tutacak
3) Buhar püskürtme tuflu
B 1) Buhar ve vakumlama hortumu
2) Hortum ba¤lant› soketi
3) Hortum soket kilidi
C Aksesuar kilitleme tuflu
D Buhar ve vakum borular›
E 1) Çok yönlü zemin aparat›
2) Sert zemin aparat›
3) S›v› emme aparat›
4) Hal› aparat›
5) Havlu k›l›f
K Buhar püskürtme ve vakumlama bafll›¤›
L Küçük buhar püskürtme ve vakumlama f›rças›
N Buhar püskürtme ve vakumlama mobilya aparat›
O 1) Cam silme aparat› (200 mm)
P F›rça halkas›
U Huni
V Yedek contalar (O-ring seti)
20 A)Kirli su haznesi temizleme f›rças›
11
14
15
16
18
19
19
20
Cihaz Tan›m›
1) Açma-kapama tuflu
2) Buhar kazan tuflu
3) Kontrol lambas› - Su eksikli¤i
4) Kontrol lambas› - Bas›nç göstergesi
5) Vakum ayarlama tuflu
6) Katlan›r tafl›ma kulbu
7) Güvenlik tapas›
8) Buhar kontrol dü¤mesi
9) Hortum girifli kapa¤›
10) Hortum girifli
11) Hava ç›k›fl ›zgaras›
12) Dönebilen tekerlekler
13) Elektrik kablosu
14) Elektrik kablo kanal›
15) Elektrik kablo yuvas›
16) Park pozisyon yuvas›
17) Hepa filtre
18) Hepa filtre açma kolu
11
5
12
9
14
1
1
6
2
Parke ve tafl
zeminler
2
Koltuk ve yatak
temizli¤i
3
Zemin ve döfleme
temizli¤i
4
Hal› ve kilim
temizli¤i
4
11
16
2
Mobilya temizli¤i
3
7
7
Banyo temizli¤i
= Buharl› Temizleme
8
11
Mutfak temizli¤i
Ütüleme
13
9
Hava temizleme
Cam ve ayna
temizli¤i
16
Demirbafl temizli¤i
12
02
14
Bitki temizli¤i
15
Stor temzli¤i
6
15
13
18
14
6
8
4
1
17
5
Ahflap zemin
temizli¤i
10
3
17
6
Zemin süpürme
Süpürme =
Mobilya tozu alma
Su vakumlama
4
18
Araba temizli¤i
Perde temizleme
Fakir Magic Steam Basic cihaz› ile evinizde her türlü temizleme,
süpürme ve buharl› temizli¤i gerçeklefltirebilirsiniz.
13
• Cihazı kesinlikle banyo küvetleri, dufllar ve su dolu
depoların yakınında kullanmayın.
• Cihaz, kablo ya da soketleri kesinlikle su ya da di¤er
sıvılara batırmayın.
• Patlama tehlikesi olan odalarda cihazın çalıfltırılması
yasaktır. Tehlikeli alanlarda cihazın kullanılması
durumunda gerekli emniyet tedbirlerinin dikkate alınması
gerekir.
• Zehirli maddeler mevcutken cihazı kullanmayın.
• Sıcak cihazı ısıya duyarlı yüzeylere yerlefltirmeyin.
• Cihazı çalıflır durumdaki fırınlar, elektrikli ocaklar ya
da di¤er ısı kaynaklarının yakınına yerlefltirmeyin.
• Cihazı harici hava etkileri, nem ve ısı kaynaklarına
karflı koruyun.
• Cihazı ya¤murdan koruyun. Açık alanda saklamayın.
• Cihaz çocuklar, gençler veya e¤itimsiz kifliler tarafından
kullanılmamalıdır.
• Tufllara çok kuvvetli basılmamalı ve pim ya da benzeri
sivri cisimlerin kullanılması önlenmelidir.
• Cihaz sa¤lam bir zemin üzerinde bulunmalı.
• Cihazın düflmesi durumunda, ürünün güvenli¤ini
kısıtlayabilecek dahili arızalar olabilece¤i için cihaz,
yetkili bir FAK‹R servisi tarafından kontrol edilmelidir.
• fiebeke kablosunu, özellikle cihaz sıcak oldu¤u sürece
kesinlikle cihazın etrafına sarmayın.
• Cihaza zarar verebilecekleri için asit ya da çözeltileri
emmeyin. Cihazın içindeki bileflenlerle temas etmeleri
durumunda patlamalara neden olabilecekleri için
patlayıcı toz ya da sıvıları vakumlamay›n.
• Hiçbir zehirli maddeyi vakumlamay›n.
• Sigara izmariti, kül gibi ateflli cisimler ya da benzeri
di¤er yanıcı ya da ateflli maddeleri vakumlamay›n.
• Suyla temas etmeleri durumunda sertleflebilecekleri ve
cihazın çalıflmasına zarar verebilecekleri için
alçı, çimento, vb gibi maddeleri vakumlamay›n.
• Su doldururken cihazı kapatın ve elektrik prizini çekin.
• Çalıflma sırasında cihazın yatay konuma getirilmesi
gereklidir.
• Buharı, kesinlikle elektrikli parçalar içeren ev cihazlarına
yöneltmeyin.
• Buhar jetine kısa mesafelerden elinizi tutmayın veya
insanlar, hayvanlar üzerine do¤rultmayın (Yanma
tehlikesi).
• Sa¤lı¤a zarar verebilecek maddelere (örn. asbest)
buhar püskürtmeyin.
• Cihazda kullanılan malzemeleri olumsuz yönde
etkileyecekleri için, kesinlikle çözücü maddeler, çözücü
madde içeren sıvılar ya da inceltilmemifl asitleri (Örn;
temizlik maddesi, benzin, tiner ve aseton) su deposu ya
da su filtresi deposuna doldurmayın.
• Cihazı kenara koyma ya da temizlemeden önce,
cihazın komple so¤umufl olmasına dikkat edin.
• Cihaz çalıflır durumdayken baflından asla ayrılmayınız.
Güvenlik uyar›lar›
Bu kullanım kılavuzundaki uyarılara ek olarak, yasa
koyucunun genel güvenlik ve kaza önleme talimatları
dikkate alınmalıdır.
Mevcut talimatlara uymayan her türlü kullanım garantinin
geçersiz olmasına neden olur.
Elektrik ba¤lant›s›
• Cihazı sadece kurallara uygun topraklaması bulunan
prizlere ba¤layın.
• Tip etiketinde belirtilen voltaj ile prizinizdeki voltaj
örtüflmelidir.
• Nemli odalarda, örn. banyo, cihazı FI-Koruma flalterli
prizlere takın.
• fiüpheleriniz varsa elektrik konusunda e¤itimli bir
uzmana danıflın.
• Fifli ve prizi kesinlikle ıslak veya nemli elle temas
etmeyin.
• Sadece, su geçirmez ve kablo kesiti 3x1 mm2 olan
uzatma kablosu kullanın.
• Kesinlikle arızalı elektrik fifli veya uzatma kablosu
kullanmayın. Elektrik kablosu zarar görürse, kablo, üretici
veya müflteri hizmetlerinden temin edilebilen bir
elektrik kablosuyla de¤ifltirilmelidir.
• Elektrik ya da uzatma kablosunun ezilme, sıkıflma,
kopmaya ya da benzer flekilde zarar görmeye karflı
korunmasına dikkat edin. Elektrik fiflini ısıdan, ya¤ ve
keskin kenarlardan koruyun.
• Elektrik veya uzatma kablosu kavramalarının
de¤fltirilmesinde su geçirmezli¤i ve mekanik sa¤lamlılı¤ı
garanti edilmelidir.
• Cihaz elektrik flebekesinden ayrılmadan önce, cihaz,
her zaman ilk önce ana flalterle kapatılmalıdır.
• Cihazı flebekeden ayırmak için ba¤lantı kablosu yerine
soketi çekin.
Kullan›m
• Kullanıcı cihazı talimatlara uygun olarak kullanmak
zorundadır. Yerel kuralları dikkate almalı ve çalıflma
esnasında 3'üncü flahıslara özellikle çocuklara
dikkat etmelidir.
• Cihazı ve aksesuarları kullanmadan önce kontrol edin.
E¤er hasar veya eksik var ise kullanılmamalıdır. Lütfen
özellikle elektrik kablosu, buhar deposu kilidi ve
buhar hortumunu kontrol edin.
• Buhar hortumu hasarlı olmamalı (yanma tehlikesi).
Hasarlı bir buhar hortumu derhal de¤ifltirilmelidir. Sadece
üretici tarafından tavsiye edilen buhar hortumu
kullanılabilir.
• Cihazı kesinlikle çıplak ayakla kullanmayın.
• fiebeke soketi prizdeyken cihaza kesinlikle ıslak eller
ya da ayaklarla dokunmayın.
14
Bak›m
• Bütün bakım ve temizlik çalıflmalarında cihaz kapatılmalı
flebeke kablosu prizden çıkartılmalıdır.
• Tehlikeleri önlemek için, cihazdaki onarımlar ve yedek
parça de¤iflimleri sadece yetkili FAK‹R servisi
tarafından yapılmalıdır.
• Cihazın güvenli¤ini olumsuz yönde etkilememek için,
sadece üreticinin onayladı¤ı orijinal yedek parça ve
aksesuarlar kullanın.
• E¤er sert (kireçli) su kullan›l›yor ise KALSTOP kullanman›z›
öneririz. KALSTOP, özel do¤al bir kireç önleyici olup
kireci parçalama ve engelleme özelli¤ine sahiptir.
Haz›rl›k
Su haznesinin doldurulmas›
• Patentli güvelik tapas›n› (7) (fiekil 1) ç›kar›n›z ve
1.1 litreyi geçmeyecek flekilde huni (U) vas›tas›yla su
doldurunuz.
• Suyun taflmad›¤›ndan ve kazanda buhar
oluflabilecek kadar boflluk kald›¤›ndan emin olunuz.
Normal musluk suyu kullan›labilir. Su magnezyum,
mineral tuzlar ve di¤er tortular içerdi¤i için zamanla
kazanda kirece sebep olabilir. Bu durumu önlemek
için her 3 veya 4 kullan›mda kazan› musluk suyu ile
çalkalay›n›z.
Not : Saf (ar›t›lm›fl) su ve parfümlü su kullanmay›n›z.
Saklama
Dikkat: Cihazı kesinlikle dikey flekilde çalıfltırmayın ya
da depolamayın!
• Cihazı ya¤murdan koruyun. Açık alanda ve cihaz
s›cak iken saklamayın.
Kirli su haznesinin doldurulmas›
Kauçuk contan›n güvenlik tapas› içinde oldu¤una emin
olunuz. Güvenlik tapas›n› (7) s›k›ca kapat›n›z. Patentli
güvenlik tapas›n›n tamamen ve do¤ru bir flekilde kapal›
oldu¤undan emin olunuz aksi takdirde buhar tapan›n
kenarlar›ndan s›zacakt›r.
Cihazdaki Semboller
Buhar
D‹KKAT - Yanma Tehlikesi
• Kirli su hazne tafl›ma kulbundan (22) tutarak çekiniz
(fiekil 2) ve hazneyi (20) ç›kar›n›z (fiekil 3).
• Hazne tutma kulbunu (22) fiekil 4 ‘teki gibi çevirerek
‘’Eco Active-Filter’’ sistemini (23) ç›kar›n›z.
• Kirli su tank›n› (20) yaklafl›k 1,2 litre musluk suyu ile
MAX seviyesine (21) ulaflana kadar doldurunuz (fiekil 5).
• Filtre sistemini (23) kirli su haznesine (20) geri yerlefltiriniz
ve ilk konumuna getiriniz.
• Kirli su haznesini yerine yerlefltiriniz.
• Tutma kulbunu (22) hazneye (20) oturtunuz.
UYARI: Cihaz›n fifli prize tak›l› durumdayken hiçbir
flekilde su kab›n› haznenin içinde b›rakmay›n›z. Yanma
tehlikesi !
NOT: Vakumlay›c›n›n çal›flma flekli, vakumlanan
havan›n su filtresine santrifuju esas›na dayan›r. Bu s›rada,
vakumlanan malzeme ve temizlik maddesi art›klar› zemin
kaplamalar›ndan su havuzuna toplan›r. Belirli koflullar
alt›nda bu durum köpük oluflmas›na neden olabilir. Bu
oluflumu önlemek için, köpük önleme s›v›s› su filtresi
havuzuna doldurulmal›d›r. Köpük önleme s›v›s›, çevre
dostudur ve biyolojik olarak tümüyle yok edilebilir.
Çal›flma s›ras›nda hafif bir köpük oluflumu normaldir ve
çal›flman›n k›s›tlanmas›na neden olmaz.
Cihaz›n ambalaj›ndan ç›kar›lmas›
Ambalajı açarken eksik parça olup olmadı¤ını kontrol
edin. Herhangi bir parçanın eksik veya ambalajından
çıkarırken hasarlı oldu¤unu fark etti¤inizde, hemen
satıcınıza baflvurun.
Çevre Bilgisi
Ambalaj malzemeleri geri dönüfltürülebilir.
Ambalaj malzemelerini evinizin çöpüne
atmak yerine lütfen tekrar kullanılabilecekleri
yerlere gönderin.
Eski cihazlarda, yeniden de¤erlendirme
ifllemine tabi tutulması gereken de¤erli geri
dönüflüm malzemeleri bulunmaktadır. Bu
nedenle eski cihazları lütfen öngörülen
toplama sistemleri aracılı¤ıyla imha edin.
Garanti
Garanti belgesinde yay›nlaflm›fl olan garanti koflullar›
geçerlidir. Garanti süresi dahilinde cihazda, malzeme
ve üretim hatasından oluflabilecek arızaların giderilmesi
tarafımızdan ücretsiz olarak yapılır. Garanti kapsamındaki
arızaların oluflması halinde, lütfen cihazı tüm aksesuarları
ve satıfl belgesi ile (fifl, fatura) satın aldı¤ınız yere ya da
en yakındaki FAK‹R yetkili servisine götürünüz.
15
Çal›flt›rma
Buhar ç›k›fl h›z›n› ayarlama
Hortum girifl kapa¤›n› (9) aç›n›z; hortum ba¤lant› soketini
(B2) tufla basmadan kilitleme sesini duyana kadar iterek
yerlefltiriniz ve iyice kilitlendi¤inden emin olunuz (fiekil 6).
• Hortum ba¤lant› soketini (B2) cihazdan ç›karmak için
hortum soket kilidine (B3) bas›n›z ve soketi cihazdan
ay›r›n›z (fiekil 6a).
•Elektrik fiflini uygun bir prize tak›n›z.
Buhar kontrol dü¤mesi (8) vas›tas›yla buhar ç›k›fl h›z›n›
ayarlayabilirsiniz (fiekil 7).
Yüksek ak›fl h›z› elde etmek istenirse buhar kontrol dü¤mesi
saat yönünde çevrilmelidir. Saat yönünün tersi çevrilirse
buhar ak›fl h›z› azalacakt›r.
Yüksek buhar ç›k›fl h›z›: kireç, ya¤ lekelerini ç›karmak
ve dezenfekte etmek için;
Normal buhar ç›k›fl› h›z›: duvar, pencere, yer, hal› için;
Düflük buhar ç›k›fl h›z›: bitkilere püskürtme, hassas kumafl
temizli¤i, duvar ka¤›d›.
Vakumlama modu
• Açma- Kapama tufluna (1) bas›n›z. Cihaz vakumlamaya
bafllayacakt›r.
• Vakumlamay› durdurmak için, açma-kapama tufluna
(1) tekrar bas›n›z.
• Vakum ayarlama tuflunu (5) kullanarak temizlik flekline
göre vakum gücünü ayarlayabilir kazara yap›lan
vakumlama ifllemini (ör. perde) hemen durdurabilirsiniz.
Perde, hal›, kanepe vs. vakumlan›rken vakum ayarlama
tuflunun aç›k olmas› önerilir. Vakum ayarlama tuflu ileri
itilerek minimum güç, geri çekilirek maksimum güç elde
edilmektedir.
Kablo yuvas›
Magic Steam Vac Basic buharl› temizleyicinizi kald›rmadan önce elektrik kablosunu (13) elektrik kablo yuvas›na
(15) afla¤›daki gibi yerlefltiriniz:
• Kirli su tank›n› (20) HAZIRLIK bölümünde anlat›ld›¤›
gibi ç›kar›n›z.
• Kabloyu manuel olarak sar›p kablo kanal›ndan geçirerek
(14) (fiekil 8) kablo yuvas›na (15) yerlefltiriniz.
• Kirli su tank›n› (20) yerine geri yerlefltirerek iyice
oturdu¤undan emin olunuz.
Buhar püskürtme modu
Park pozisyon yuvas›n›n kullan›m›
• Buhar püskürtme ve vakumlama modlar›n› yukar›da
aç›klanan talimatlara uyarak birlikte kullanabilirsiniz.
Park pozisyon yuvas› (16), f›rça ile birlikte olan borunun
cihaz›n gövdesine tutunmas›n› sa¤lar.
Hortumun cihaza tutunmas› için, hortumun üzerindeki
kancan›n park pozisyon yivine geçmesini sa¤lay›n›z
(fiekil 9).
Kazanda su eksikli¤i
• Gösterge ›fl›¤› (3) kazanda su bitti¤i zaman yanacakt›r,
çal›flmaya devam etmek için“PATENTL‹ GÜVENL‹K
TAPASI”bölümündeki talimatlara uyunuz.
Aksesuarlar›n tak›lmas›
Patentli güvenlik tapas› ented safety cap
Tüm Magic Steam Vac Basic aksesuarlar› ya tutaca¤a
(A2) ya da uzatma borusuna (D) ba¤lanmaktad›r.
Vakumlama ve buhar püskürtme için gerekli aksesuarlar›n
(D-E-K-N) tak›lmas› afla¤›daki gibidir:
• Tutaca¤› veya uzatma borusunu gerekli aksesuara
kilitleme tuflu (C) yard›m›yla ba¤lay›n›z (fiekil A)
• Aksesuar› ç›karmak için, kilitleme tufluna (C) bas›n›z
ve iki parçay› ay›r›n›z (fiekil B)
• Aksesuarlar› kullanmadan önce düzgün bir flekilde
tak›l› olup olmad›¤›n› kontrol ediniz.
Bu cihaz ; içinde bas›nç birikiminin sebep olaca¤› kazan
aç›lmalar›na karfl› patentli güvenlik tapas›na sahiptir.
Bu önemli ve gerekli bir fleydir. Hazneyi tekrar doldururken
belli kurallara uyulmas› gereklidir. Haznedeki tüm suyu
kulland›ktan sonra afla¤›daki talimatlara uyunuz:
• Buhar kazan tuflunu (2) kapat›n›z.
• Elektrik kablosunu (13) prizden ç›kar›n›z.
• Güvenlik tapas›n› (7) saatin ters yönünde çevirerek
aç›n›z.
• Kazan›n so¤umas› için biraz bekleyiniz.
UYARI: Bu durumda kazara buhar ç›k›fl› olmamas›
için buhar püskürtme tufluna (A3) bas›lmamas› önemlidir.
• Kazan so¤udu¤unda, HAZIRLIK bölümünde anlat›ld›¤›
gibi tekrar doldurunuz.
UYARI: Kazana tekrar dolum yaparken suyu yavaflça
doldurunuz ve s›çramalar› önelemk için so¤uk su
kullanmay›n›z. YÜZÜNÜZÜ VE C‹LD‹N‹Z‹ KORUYUNUZ.
16
Kat› ve s›v›lar›n vakumlanmas›
Haznenin temizlenmesi:
Bir buçuk litre kadar temiz suyu vakumlay›n, birkaç
dakika dönmesini sa¤lay›n.
Haznede oluflan girdap hazne duvarlar›n› ve geçti¤i
borular› temizleyerek pislikleri toplayacakt›r. Hazneyi
tekrar boflalt›n›z, cihaz saklanmaya haz›rd›r.
Bu cihaz hem toz hem de s›v›lar›n vakumlanmas›nda
kolayca kullan›labilmektedir.
E¤er filtredeki su çok kirli ise K‹RL‹ HAZNEN‹N
BOfiALTIMI VE TEM‹ZLENMES‹ bölümünde yaz›lan
talimatlara uyulmal›d›r.
Kirli su haznesindeki (20) maksimum izin verilen seviye
afl›ld›¤› zaman cihaz, bu amaç için tasarlanan güvenlik
flamand›ras› sayesinde vakumlamay› otomatik olarak
durdurmaktad›r. (motor h›z›n›n artt›¤›n› farkedeceksiniz)
UYARI: K‹RL‹ SU HAZNES‹N‹N BOfiALTIMI VE
TEM‹ZLENMES‹ bölümünde aç›kland›¤› gibi cihaz›
kapat›n›z ve sadece haznedeki su seviyesini ayarlad›ktan
sonra cihaz› çal›flt›r›n›z.
SU SEV‹YES‹NE AYARLAMADAN C‹HAZI
ÇALIfiTIRMAK HAVA ÇIKIfi F‹LTRES‹NE ZARAR
VEREB‹L‹R.
Aksesuar kullan›m› için öneriler
BUHAR ÖZELL‹⁄‹N‹ NAYLON, KAD‹FE, DER‹
VEYA D‹⁄ER HASSAS YÜZEYLER ‹Ç‹N
KULLANMAYINIZ.
E¤er buhar›n etkisini di¤er yüzeylerde merak ediyorsan›z
küçük bir parçada ya da gizli bir yerinde deneme yap›n›z.
Öncelikle buhar kullan›ld›¤›nda rengindeki de¤iflimi
veya deformasyon olup olmad›¤›n› gözlemleyiniz daha
sonra iflleme ayn› uzakl›kta ve buhar ç›k›fl›nda devam
ediniz.
Tahta yüzeylerin temizlenmesinde (mobilya kap›, vs.) ve
tu¤la zeminlerde her zaman dikkatli olunuz, buhar fazlas›
cilas›na veya rengine zarar verebilir.
Bu yüzden bu tip yüzeylere k›sa periyotlarda buhar
uygulanmas› veya buhar uygulanm›fl bir bez ile
temizlenmesi tavsiye edilir.
Narin yüzeylerde (sentetik madde, emaye yüzeyler vs.)
en düflük buhar gücünde çal›flt›r›lmas› önemle tavsiye
olunur.
E¤er cam yüzeyler temizlenecek ve hava so¤uk ise cam
yüzeye 50 cm uzakl›ktan ›s›t›lmas› gerekmektedir.
Bitkiler için en az 50 cm uzakl›ktan buhar püskürtülmesi
tavsiye edilmektedir.
Kirli su haznesinin boflalt›m›
• Açma-kapama tuflunu (1) kullanarak cihaz› kapat›n›z
ve fiflini prizden çekiniz.
• Kirli su haznesini (20) kald›r›p tutaca¤› (22) ile yerinden
ç›kar›n›z (fiekil 3).
• Tutaca¤› çevirip ‘’EcoActive-Filter’’ su filtre sistemini
(23) ç›kar›n›z (Resim 4).
• Hazneyi bafl afla¤› çevirerek içini boflalt›n›z (fiekil 10).
• Boru dirse¤ini (27) filtre gövdesinden (26) ay›r›n›z
(fiekil 11a).
• Tüm komponentleri alarak akan su alt›nda durulay›n›z.
• E¤er köpük filtrede herhangi bir y›rt›k var ise de¤ifltiriniz.
Kirli su haznesi temizleme f›rças› (20-A) kirli su haznesinin
(20) kolay temizlenmesi için tasarlanm›flt›r; bu parçay›
ayr›ca hortumlar›n ve di¤er gereçlerin içini temizlemek
için de kullanabilirsiniz.
NOT: F›rçay› cihaz›n yüzeyini temizlemek için
kullanmay›n›z.
Çal›flmaya devam etmek isterseniz, suyu seviyesine kadar
doldurup ‘’EcoActiveFiltre’’ su filtre sistemini (23) hazneye
(20) geri takmal›s›n›z.
UYARI: Boru dirse¤indeki (27) ok yönünde filtre
gövdesine (26) tak›n›z (fiekil 11b). Kirli su haznesini (20)
HAZIRLIK bölümünde aç›kland›¤› gibi yerine geri tak›n›z.
NOT: Magic Steam Vac Basic buharl› temizleyicinizi
saklamadan önce kirli su haznesi (20) boflaltt›¤›n›zdan
emin olunuz.
Bu cihaz›n en büyük avantajlar›ndan biri onun
kullan›ld›ktan sonra temiz bir flekilde saklanmas›d›r.
Çok yönlü zemin aparat› (e)
Çok yönlü zemin aparatlar›n› afla¤›daki aparatlar tak›larak
büyük yüzeyler, seramik, parke zeminler (sadece en
yüksek vakumlama gücü ve minimum buhar gücünde),
hal›larda, vb kullan›lmas› önerilmektedir.
• Sert zemin aparat› (E2) sadece vakumlama yaparken
kullan›lmal›d›r.
• S›v› emme aparat› (E3) s›v›lar› çekmek için düzgün
yüzeylerde kullan›lmas› önerilir.
• Hal› aparat› (E4), suitable for s›k› ve gevflek hal›lar için
kullan›lmal›d›r.
Çok yönlü zemin aparat› do¤rudan tutaca¤a veya uzatma
borusu (D) ile hortuma tak›labilir.
Aparatlar›n tak›lmas›:
Aparatlar› yana kayd›rarak f›rçadan ç›karabilir yerine
geri ayn› flekilde takabilirsiniz (fiekil C).
S›v› emme aparat›n› (E3) takarken düzgün k›sm›n›n içe
bakmas›na dikkat ediniz.
17
Püskürtme ve vakumlama bafll›¤› (k)
Ütü kullan›m› (‹ste¤e ba¤l›)
Buhar püskürtme ve vakumlama bafll›¤› zor ulafl›labilen
noktalarda
kullan›lmas› önerilmektedir.
• F›rça kullan›lmadan önce, hal› döflemeler ya da
hal›lardaki lekelerin ifllenmesi.
• Paslanmaz çelik, pencere camlar›, aynalar ve emaye
zeminlerin temizlenmesi.
• Merdivenler, pencere çerçeveleri, kap› direkleri,
alüminyum profillerin temizlenmesi için.
• Armatürlerin temizlenmesi.
• Panjurlar, kalorifer peteklerinin temizlenmesi,
araçlardaki iç temizlik.
• Oda bitkilerinin uzaktan nemlendirilmesi.
1) S›cakl›k ayar›
dü¤mesi
2) Ütü ›s›nma ›fl›¤›
3) Buhar dü¤mesi
4) Sürekle buhar
dü¤mesi (mod. PRO)
Magic Steam Vac Basic ürünümüz h›zl›ca ve kolay bir
flekilde yüksek verimli bir ütüye dönüflebilmektedir. Ürünü
kolayca ütüye ba¤layabilirsiniz.
• Ütüyü ba¤lant› soketine (B2) ba¤lay›n›z ve ‘Operasyon’
bafll›¤›nda yaz›lan talimatlara uyunuz.
• Buharl› ütü için, ütünün üzerinde bulunan yuvarlak
dü¤meyi çeviriniz (1) ve s›cakl›¤› maksimum olacak
flekilde ‘PAMUK-KETEN’ konumuna getiriniz.
Narin kumafllar hariç, her türlü kumafl için BUHARLI
ütüleme uygulayabilirsiniz.
Ütünün üstündeki kumafl göstergeleri sadece KURU
ütüleme içindir, BUHARLI ütüleme için DE⁄‹LD‹R.
• Ütüleme ifllemine bafllamadan önce birkaç dakika
bekleyin, ütünün s›cakl›k göstergesi (2) söndükten sonra
ütülemeye bafllay›n.
• Buhar dü¤mesine (3) basarak buharl› ütülemeye
bafllayabilirsiniz. Buhar dü¤mesini b›rakt›¤›n›zda buhar
ç›k›fl› engellenecektir. Ütünün ilk kullan›m›nda buharla
kar›fl›k su ç›kacakt›r. Bu sebepten ilk ütülemede buhar
dü¤mesine basmadan cihaz›n, ütülenecek kumafl›n
üstünde olmad›¤›ndan emin olunuz.
• Sürekli buhar elde etmek için ütünün üzerinde bulunan
sürekli buhar dü¤mesini (4) öne do¤ru itmelisiniz.
Böylelikle buhar dü¤mesine (3) basmad›¤›n›z halde
sürekli buhar ç›kacakt›r. Buhar› kesmek için sürekli buhar
dü¤mesini (4) geriye do¤ru çekmelisiniz.
Buhar püskürtme ve vakumlama bafll›¤› do¤rudan
tutaca¤a (A2) monte edilebilir ya da uzatma borular›n›n
(D) vas›tas›yla hortuma tak›labilir.
Buhar püskürtme ve vakumlama bafll›¤›n› küçük f›rça (L)
ile birlikte kullanabilirsiniz:
Püskürtme ve vakumlama aparat› (n)
Bu aksesuar›n genifl camlarda, genifl aynalarda ve düz
yüzeylerde veya kanepe minder gibi döflemelerde
afla¤›daki aksesuarla birlikte kullan›lmas› önerilir:
• 200 mm cam silme aparat› (O1) genifl cam ve yüzeyler
için;
• Sert f›rça aparat› (P) hal›, merdiven, araba içi ve
döflemeli yüzeyler için kullan›lmas› önerilir. (ÖNCEL‹KLE
KÜÇÜK B‹R PARÇADA DENEN‹P BEKLEY‹P
NASIL ETK‹ YAPTI⁄I GÖZLENMEL‹D‹R).
Bu aksesuar ayn› yüzeylerden hayvan tüyü toplanmas›
için de kullan›labilir;
Havlu k›l›f (E5) bu aksesuara tak›labilmektedir..
fiekil D ‘de gösterildi¤i gibi ataçmanlar› aparata
takabilirsiniz. Buhar püskürtme ve vakumlama bafll›¤›n›
do¤ru kullanmak için afla¤›daki talimatlara uyunuz:
Kuru ütüleme
• Sadece kuru ütüleme tercih edecekseniz, buhar kazan
tufluna (2) bas›n›z ve yuvarlak dü¤me yard›m› ile kumafl
cinsine göre s›cakl›¤›n› ayarlay›n›z.
D‹KKAT: Kuru ütüleme yaparken, buhar butonuna
basmamaya dikkat ediniz, s›cak su gelerek kumafla zarar
verebilir.
• Kirleri çözmek ve temizlemek için, buhar› düzgün bir
flekilde yüzeye uygulay›n.
• Vakum fonksiyonu devrede iken cam silme bafll›¤›n›
yukar›dan afla¤›ya do¤ru dikey bir flekilde hareket ettirin.
Dikkat: So¤uk havalarda, temizlenecek cama 50 cm den
buhar uygulayarak ön ›s›tma ifllemine tabi tutunuz.
18
ÖNEML‹ NOT
• Ütüyü kullanmad›¤›n›z zaman fiflini mutlaka prizden
ç›kar›n›z.
• Sadece ›s›ya dayan›kl› yüzeylerde ütü yap›n›z.
•Cihaz›n kazara düflmesi durumunda herhangi bir
güvenlik özelli¤inin zarar görmesi durumunda Fakir
Yetkili Servisine baflvurunuz..
Sorun Giderme
Ar›zalar›n basit nedenleri oldu¤u zaman afla¤›daki
talimatlar› kontrol ederek sorunu kenidiniz de
giderebilirsiniz. E¤er flüphe içindeyseniz ve sorunun
kayna¤› burada yazm›yor ise lütfen FAK‹R Müflteri
Hizmetlerine dan›fl›n.
Teknik Bilgiler
D‹KKAT: E¤er oturarak ütü yap›yorsan›z ütü masas›n›n
alt›nda kalan bacaklar›n›za dikkat ediniz, yanma tehlikesi
vard›r.
Güç Kayna¤›
Gerilim
Elektrik türü
Kullanım ömrü
Koruma derecesi
Koruma s›n›f›
Genel bak›m
Temizlik ve bak›m ifllerini yapmadan önce mutlaka elektrik
fiflinin çekili oldu¤undan emin olunuz.
Aksesuarlar›n deforme olmalar›n› önlemek amac›yla
kald›rmadan tamamen kurumalar›n› bekleyiniz.
Buhar soketindeki (B2) contalar›n durumunu sürekli olarak
kontrol edin. E¤er gerekiyorsa yede¤i ile de¤ifltirin. Ayn›
kontrolü buhar vakumlama borular›ndaki (D) ve tutacaktaki
(A2) contalar için de yap›n›z.
Cihaz›n d›fl temizli¤i için sadece nemli bir bez kullan›n.
Plastik yüzeyin zarar görmemesi için herhangi bir çözücü
veya deterjan kullanmay›n›z.
“ECOACTIVE-FILTER” tutaca¤›n› temizlemek veya
sünger filtreyi de¤ifltirme in”K‹RL‹ SU HAZNES‹N‹N‹N
BOfiALTIMI” BAfiLI⁄INI OKUYUNUZ.
220-240V
50 ~ 60 Hz
10 yıl
IPx4
1
Performans Bilgisi
Kazan gücü
Motor gücü
Maksimum güc
Maksimum buhar bas›nc›
Maksimum buhar miktar›
1100 W
1050 W
2150 W
4 bar
90 g/min
Dolum Bilgisi
Buhar kazan›
Kirli su toplama tank›
1,1 l
1,2 l +1,8 l
Ebatlar
En
Boy
Yükseklik
A¤›rl›k
(aksesuars›z)
YIKANAB‹L‹R HEPA F‹LTRE UYARISI: Cihaz›n
HEPA filtresini afla¤›daki talimatlara göre y›kayabilirsiniz;
• Kirli su hazne tafl›ma kulbunu (22) kald›rarak ‘HAZIRLIK’
aflamas›nda anlat›ld›¤› gibi kirli su haznesini (20) ç›kar›n›z.
• HEPA filtre açma kolunu (18) kald›r›p fitreyi yerinden
ç›kar›n›z (fiekil. 14).
• So¤uk akan suda filtreyi temizleyiniz. Kal›nt›lardan
ar›nmas› ve su fazlal›¤›n›n gitmesi için sallay›n›z.
NOT: HEPA filtrenin kendili¤inden kurumas›n› sa¤lay›n›z,
›s› kaynaklar›ndan uzak tutunuz. Filtreyi cihaza takmadan
önce 24 saat bekleyiniz.
• HEPA filtre y›rt›k ise yenisi ile de¤ifltiriniz.
• HEPA filtre 4 ayl›k periotlarla temizlenmelidir.
• HEPA filtrenin tutuculara (19) düzgün bir flekilde
yerlefltirildi¤inden emin olun. (fiekil.14).
D‹KKAT:
• HEPA filtreyi f›rça ile temizlemeyiniz, zarar verebilir
ve filtre kapasitesini düflürebilir.
• Temizlik maddesi kullanmay›n, HEPA filtreyi ovmay›n
ve bulafl›k makinesinde y›kamay›n›z.
520 mm
360 mm
340 mm
10.5 kg
Sevk
Cihaz›n, orijinal ambalaj›nda veya zarar görmesini
önlemek için, iyi ve yumuflakpakette tafl›nmas› gerekmektedir.
19
SORUN
SEBEP
ÇÖZÜM
Vakum fan› çal›flmaya
bafllamad›
Güç kayna¤›ndan elektrik sa¤lanam›yor
Kablo, priz ve fifli kontrol ediniz.
Vakum gücü düflüyor
Yer aparat›, hortum veya
vakum borusu t›kanm›fl
HEPA filtre tükenmifl
Filtreyi temizleyin ve borulardaki
ve aparatlardaki kal›nt›lar› ç›kar›n.
“GENEL BAKIM”daki talimatlara
uyun.
S›v›lar›n vakumlanmas›
s›ras›nda su ç›k›fl› oluyor
Su filtre deposu t›kanm›fl
“EcoActive Filter”su filtre sistemini
temizleyin.
Cihaz vakumlam›yor
fiamand›ra flalterinin müdahalesi
20
Cihaz› kapat›n, su tank›ndaki su
seviyesinin do¤ru oldu¤u kontrol
edin ve cihaz› tekrar çal›flt›r›n.
2150 Watt
Steam-Vacuum Cleaner
Buharl› Süpürge
‹malatç› / ‹thalatç› Firma: Fakir Elektrikli Ev Aletleri D›fl Tic. A.fi.
Meflrutiyet Cad. No:43 Tepebafl›-‹stanbul TÜRK‹YE
Tel:(212) 249 70 69 (pbx) Fax:(212) 251 51 42