1
THE CSE COMPUTING ENVIRONMENT
A GUIDED TOUR FOR CSE1020 STUDENTS
H. ROUMANI
The objectives of this tour is to enable first-year CSE students to obtain an account and
become familiar with the computing environment in the Prism Lab. Specifically, it
provides an overview of the operating system and step-by-step instructions on creating,
compiling, and editing Java programs.
OBTAINING AN ACCOUNT
The following tasks enable you to obtain an account through which you gain (direct and
remote) access to the Department of Computer Science and Engineering computing
facilities. Note that this cse account is different from your yorku account.
1. Go to the Prism lab, located in the Computer Science and Engineering building,
rooms 1004 and 1006, find a free workstation, and login as newuser (no
password required).
2. You will be prompted for information required to create a new account (ID
number, password, address, telephone, and your acceptance of certain Prism use
conditions). Enter the information as requested. Make sure you memorise the
password you chose, as you will need it to login to your account later.
3. Log out as follows: move the mouse to the desktop (away from any open window), press and hold the right button, highlight Quit, and then release the button.
Confirm in the next window that you do want to quite the session.
4. Go to the Lab Monitor and present your York ID (or another photo ID) and
sessional card (or proof of registration; e.g. a letter from the Registrar Office).
The monitor normally sits at the desk in room 1006, but during the first week of
classes, and to avoid congestion, an additional monitor is assigned to assist in new
account creation.
5. The monitor will validate the information you entered and then ask you to sign a
statement acknowledging that you have read, and do agree with, the Prism Use
Policy. If you like, you can ask the monitor for a copy of the Policy so you can
read it and come back after you do.
6. The monitor will create your account and give you a login ID (also known as a
username). Note that it may take up to 30 minutes before your account becomes
active.
1020/L1/HR
GUIDED TOUR
Page 1
A Guided Tour
CREATING A JAVA PROGRAM
Login to your cse account.
1. Open a terminal.
2. Start a browser by typing the following command in the terminal:
firefox &
It launches a browser.
3. In the browser, open the location
http://www.cse.yorku.ca/course/1020/code/Template.java
4. In the browser, save the page as First.java.
5. Start an editor by typing the following command in the terminal:
nedit First.java &
It launches an editor.
6. In the editor, replace Template with First. Also add
System.out.put("My name is ??");
so that you obtain the program as shown below.
import java.io.PrintStream;
import java.util.Scanner;
public class First
{
public static void main(String[] args)
{
Scanner input = new Scanner(System.in);
PrintStream output = System.out;
System.out.put("My name is ??");
}
}
7. Replace ?? with your name.
1020/L1/HR
GUIDED TOUR
Page 2
A Guided Tour
8. In the editor, save the file.
9. Issue the command:
ls -l
This command lists all files in the current directory. It allows you to verify that
First.java has indeed been created.
10. Issue the command:
cat First.java
This command displays the content of the specified file on the screen. It allows you to
verify the content of First.java.
11. Issue the following command to compile your program:
javac First.java
12. If you typed everything correctly, the compiler will report one error in line number
11. To correct the problem, go to the 11th line, and replace the word put with
println.
13. Re-compile. No errors should be reported this time; otherwise, correct and re-compile. Issue the ls command and note that a new file (named First.class) has
been created by the compiler.
14. Run the created class file by issuing the command:
java First
You should see the phrase "My name is …" on the screen.
CONFIGURING eCheck
Open a terminal and issue the following command:
java Options
It launches a window that allows you to set the parameters needed for communicating
with the departmental eCheck server. Specifically, you must supply three parameters:
•
Login ID
This is the ID of the account you created at the beginning of this tour. It is
typically made up of the letters cse followed by 5 digits.
•
Password
This is the password of your account.
1020/L1/HR
GUIDED TOUR
Page 3
A Guided Tour
•
eCheck URL
Enter the following string and pay attention to letter case:
http://www.cse.yorku.ca/~roumani/type/ec/ec.cgi
This is the URL of the departmental eCheck server. If you discover later (when
you do section L1.3 of Lab 1) that your eCheck cannot communicate with the
server, it means this URL was not entered correctly.
Click Apply when done.
Note:
The above options need to be entered only once. If you changed your account password,
however, then remember to change these options accordingly.
Note:
The checkbox at the top of the Options window allows you to work offline. Make sure
this box is unchecked or else you will not receive credits for eCheck exercises.
THE OPERATING SYSTEM
Unix is an industrial-strength, highly reliable operating system that is heavily used in industry and business for critical or high-volume operations like database servers and web
services. Furthermore, it is the operating system of choice in almost all academic and research institutions. Unix runs on computers made by different vendors and that is why it
has different flavours (Solaris, AIX, UX, IRIS, and Linux, among others); but all these
flavours share the basic commands and utilities.
There are generally two ways to interact with an operating system: through the console or
through a graphical user interface, GUI. In Microsoft Windows, for example, you can
copy a file either by issuing a command at the command prompt console (also known as
the DOS window), or by using the mouse. This guided tour introduces you to the console
interface of Unix/Linux, which is often referred to as the terminal (or the shell).
When you first login to a machine in Prism, you will find yourself at the GUI interface.
From there, you can open a terminal either by right-clicking the desktop and highlighting
Terminal or by clicking the Terminal icon on the taskbar. Note that you can have several
terminals open at the same time. You close a terminal by clicking the x at its top of by
issuing the exit command in it.
SIMPLE COMMANDS
Unix commands are programs that perform actions. You issue a command by typing its
name and pressing Enter or Return (note that Unix is case-sensitive and all its commands
are in lower case). The action performed by a command may need one or more operands
(known as arguments), and you type them after the command name, separated from it by
1020/L1/HR
GUIDED TOUR
Page 4
A Guided Tour
a space. Furthermore, some commands allow you to modify the actions they perform by
supplying options or switches. You specify an option by typing its name, preceded by a
minus sign, in between the command name and its arguments (if any) with a space
delimiter. The action, arguments, options, and syntax of a command are all specified in
its reference (or man) page.
For example, you can change your password by typing:
passwd
When prompted, enter your old password and a new one (you will need to verify the new
password). Your password is the only security you have to prevent other people from
using your computer account, and copying or destroying your files. There are people
who are willing to spend hours trying to guess your password. Therefore, choose a
password that only you could guess, and change it often. Avoid using words in any
language, names or license plate numbers. A good password involves digits, capitals, and
lower-case letters.
Unix comes with on-line documentation. For example, to learn more about the passwd
command, type:
man passwd
The man-pages are displayed one screen at a time. After a screen is displayed, press
space to see the next, b to scroll backward, or q to quit.
The man pages provide information on specific Unix commands. But what if you don't
know the exact command name? In that case you use the -k option, which searches by
keywords. For example, to find out which command(s) handles passwords, type:
man -k password
As an exercise:
1. Try the following two commands (no arguments, no options): date, which gives you
today's date and time, and cal, which displays the calendar of the current month.
2. Look up the man-page of the cal command to find out how to produce a calendar for
any month and year. Specifically, use it to determine on which day of the week you
were born.
3. Look up the man-page of the ls command to find out how to produce a listing sorted
by date.
Note that the terminal maintains a command history list of all the commands you issued
and allows you to recall any of them by simply pressing the up-arrow. Press it several
times and observe. To reissue a command, go back in history until it appears and press
1020/L1/HR
GUIDED TOUR
Page 5
A Guided Tour
Enter. To erase the command, use the delete key or type Ctrl-U (press U while holding
down the control key).
STANDARD OUTPUT & REDIRECTION
Output produced by Unix commands, and indeed your own programs, normally appears
on the screen, which is the default Standard Output unit. You can redirect this output to
a disk file by simply following the command by a greater-than sign followed by a file
name. Note that ">" is placed after options and arguments and that it applies to any
command that produces output.
1. Redirect the output of the date command to a disk file. Since this is the first file we
create, let us call it foo1. Issue the command:
date > foo1
To verify that the file was indeed created, and that it does contain the date, we will
display its content using the command cat whose one-argument version is:
cat foo1
2. Redirect the output of the cal command to the disk file foo2:
cal > foo2
then use cat to verify that the redirection worked.
3. The previous task created a file foo2 and placed in it this month calendar. Suppose
we want to append to it the current date and time; i.e. the output of the date command. If we write:
date > foo2
then this won't work because the new output will overwrite the previous content of
the file rather than append it (in fact, the set-up in Prism prevents you from accidentally overwriting files this way). The proper way to achieve this is to use two greaterthan signs. Issue the following command then use cat to verify that the date was
indeed appended to foo2:
date >> foo2
1020/L1/HR
GUIDED TOUR
Page 6
A Guided Tour
FILES
Data is stored on disk in logical units called files. Unix stores files as a series of bytes
with no inherent structures (flat files), and takes care of (and hides) all the physical
details, so all we need to know in order to access a file is its file name. Unix leaves it up
to you to name files, placing minimal restrictions on the number and type of characters
you use. For example, the slash character cannot be included in a filename, and the
following characters have special meanings, and using them in a file name can lead to
unpredictable results for some commands and, hence, should be avoided:
<
>
|
*
?
[
]
"
'
Moreover, avoid starting a file name with a minus sign ( - ) or with a dot ( . ). Generally,
you choose a name that is descriptive of the content of the file, and since Unix is casesensitive, you can capitalise the first letter of multiword names, or use a dot; e.g. a java
program file that deals with stocks can be called Stock.java, and a data text file containing exam marks can be called ExamMarks.data.
1. The command:
ls
lists all the files in your current directory (except those starting with a dot). You
should find the two files foo1 and foo2 (which we created earlier) included in the list.
2. The command:
cp foo2 foo3
copies the content of file foo2 to a new file named foo3. Note that if foo3 was already
present, it will be overwritten so be careful! Use ls and cat to verify that foo3 was
indeed created and that it is a copy of foo2.
3. The command:
mv foo3 foo4
moves the content of file foo3 to a new file named foo4. Unlike cp, which retains the
original, source file, mv destroys it; i.e. it effectively renames the file. Use ls and
cat to verify that foo3 is no longer there and that its content is now in foo4.
4. The command:
rm foo4
removes (i.e. deletes, kills) the file foo4 permanently. Since there is no easy way of
un-deleting the file, this is a potentially dangerous command so the set-up in Prism
will prompt you to confirm. Type y (for yes) and then use ls to verify that foo4 is
no longer there.
1020/L1/HR
GUIDED TOUR
Page 7
A Guided Tour
DISPLAYING AND PRINTING FILES
There are two types of files, text and binary. A text files (also known as plain or ASCII
file) contains a sequence of keystrokes; i.e. each byte in it represents a keyboard key. If
such a file is displayed on the screen, you can readily read its content. In a binary file,
however, the characters do not represent lines of text and do not have to correspond to
keystrokes. The source code of a program (a file with a java extension) is an example of
a text file, whereas a compiled program (a file with a class extension) is an example of
a binary file.
As shown in the tasks below, the cat and more commands are used to display text files
on the screen, and the enscript command is used to print them on a printer. It should
be noted, however, that some text files contain embedded commands that affect how the
file's content should look like when displayed or printed. For example, if you use cat to
display the file:
This is a <i>text</i> file. It contains text plus
some embedded commands that influence rendering.
you will see a display identical to the above. The tag <i> means that the word "text"
should be shown in italics, but Unix does not look inside the file. If you like to see these
commands properly executed, you should display and print the file using a program that
understands them. In the above example, the text file is actually an html file and, hence, a
browser should be used.
As a rule, unless the file is 100% pure text, you should use a special program to display
or print text files. This rule applies to all binary files as well. You must therefore learn
how to associate a file (based on its extension) with a program, for example:
html, gif, jpg
ps
pdf
associated with
associated with
associated with
browser
ghostview or gv
arcoread or xpdf
1. We have already used the cat command to display the content of a pure text file, but
if listing is long, it will scroll off the screen before we get a chance to examine it. For
this reason, a more preferred command to view the content of a file is more:
more foo2
displays the content of file foo2 one screen at a time, pausing in between until you
press space to see the next screen, b to see the previous one, or q to quit.
2. To print a text file (on the printer), use the command:
1020/L1/HR
GUIDED TOUR
Page 8
A Guided Tour
enscript textFileName
3. This command has many options that give you control over the output layout. See its
man page for full details. A particularly useful combination is:
enscript -2rG textFileName
(2 = two columns; r = rotate by 90 degrees, i.e. landscape; and G for fancy headers.)
4. If you want to print a postscript file, identified by the ps extension, you can use the gv
or ghostview programs to first view it (display it on screen) and then print it. Since the
printers in the lab are postscript printers (i.e. their hardware understands the postscript
commands embedded in ps files), you can print a ps file (without viewing first) using
the lpr command: lpr filename.ps
5. Internally, enscript works by first converting your text file to postscript and then
printing it. Hence, you can also use it to create postscript files:
enscript -2rG -pfilename.ps textFileName
ghostview filename.ps &
The first command uses the p option to save the converted file (rather than print it)
under the same name as the original text file but with a ps extension. The second
invokes ghostview and passes the file name to it.
6. When you print a file, its content is sent to a printing queue, and as long as your job is
in this queue, you can use the following two commands:
lpq
and
lprm
The first shows you the status of the queue while the second allows you to remove a
job you submitted; i.e. aborts it. This is useful when you print a file by mistake, and
want to cancel printing. To use this pair, first issue lpq to determine the job number
of your printing job, and then issue lpr and pass the job number to it.
7. Once the file is placed in the printing queue, it remains there until you release it. To
do that, you go to a so-called print release station and swipe your card. A screen will
display all jobs that belong to you and that are currently in the queue; and by pressing
PRINT, you can print all the selected ones. At that point, the jobs will be sent to the
printer, and whenever a job is successfully printed, it will be removed from the queue.
Note:
1020/L1/HR
GUIDED TOUR
Page 9
A Guided Tour
It is very important that you understand the association between files and programs. If
you ignored this issue and used, for example, the enscript program to print non-text files,
you would end up with a huge print job that wastes paper, delays the queue, and reduces
your paper quota. It is best to always print from the program associated with the file
rather than use a Unix printing command like enscript or lpr. Note, however, that these
are all X programs, and hence, they cannot be executed through remote access.
WILD CARDS & FILENAMES
ls and similar command support wildcards as part of their filename argument. The
following table illustrate some of the various pattern-matching features available:
command
Action
ls or ls *
List all files (except those starting with a dot)
ls foo
List the file foo if present or state that it is not present
ls foo*
List all files beginning with foo, like foo, foo1, foo.dat; i.e. *
matches any number of characters, including none.
ls *.java
List all files ending with .java (but not the file ".java", if
present).
ls f??
List all files beginning with f and followed by exactly two more
characters, like foo, fin, and far
ls [fkz]*
List all files beginning with f or k or z, like foo, kilo, zebra
ls [b-q]*
List all files beginning with a letter in the range b to q, inclusive
ls [fr]??[1-9]*
List all files beginning with f or r followed by exactly two
characters followed by a digit in [1,9] followed by anything; e.g.
raw8.txt
UTILITY COMMANDS
The following commands perform ad-hoc functions and it is useful to know that they
exist so you can look up their man pages and use them when needed:
wc
sort
grep
who
which
jobs
kill
fg
bg
ps
script
Given a file argument (or Standard Input if omitted), wc counts words, sort sorts the
records, and grep finds patterns. who determines who is currently logged in and
which determines the location of a program. The five commands that follow allow you
to control multitasking. The very last command, script, is explained next.
1020/L1/HR
GUIDED TOUR
Page 10
A Guided Tour
LOG GENERATION
When you are handing in an assignment report, you will be asked to include your program and a log of its execution. This is a text file that shows how your program was
invoked, its prompts, the input you provided, and the output it generated. The following
command will create such a log by mirroring everything that appears on the screen in the
file log.txt starting from when you entered this command and lasting until you type exit:
script log.txt
...
...
... (enter commands to launch your program)
...
...
exit
1. Enter a few commands in between the above two. For example, you may want to
issue the ls command, followed by cal, followed by date.
2. After issuing exit, examine the content of the log by typing: cat log.txt.
DIRECTORIES
All the files we created thus far reside on the hard disk in an area that belongs to you, and
is known as your home directory. If you have only a few files, then keeping everything in
the home directory is fine, but as the number of files increase, this approach will not
scale: first of all, you will run out of meaningful file names and second, Unix will
become slower as it now needs to search through hundreds, and perhaps thousands, of
files in order to locate the one named in your command or program.
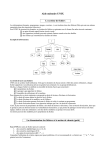
A better approach, adopted by all operating systems, is to divide your home directory into
subdirectories. For example, you may decide to store all files related to this course in the
directory 1020, all your mail messages in the directory mail, and all your Web-related
files in the directory www. Furthermore, you may want to push this strategy further and
divide 1020 into two directories, one for labs and one for assignments. The figure below
is a partial hierarchy tree that can be constructed to accommodate this scheme (Unix uses
tilde ~ to denote your home directory).
~
www
1020
lab
2
1020/L1/HR
mail
asgn
3
1
psnl
2
hr
GUIDED TOUR
york
sa
1020
1030
Page 11
A Guided Tour
Note that files need not reside only in the leaves (lowest level of the tree); any directory
can contain files.
Unix provides the following commands to allow you to manage directories (they all have
useful options and you are advised to consult their man pages):
pwd
print working directory
determines where you are
cd
change directory
changes where you are
mkdir
make directory
creates a new directory,
rmdir
remove directory
deletes a directory.
1. To create the first level of the shown tree, enter the following commands:
cd ~
mkdir 1020
mkdir mail
The first command ensures that we are at home (note that if you omit the ~ argument, the
shell understands that you mean home!). The next command creates the 1020 directory
by providing its name as an argument, and similarly for mail. We did not create www
because the set-up on Prism automatically creates it upon account creation.
2. There are two ways to create the lab directory: either mkdir 1020/lab or
cd 1020
mkdir lab
The argument of mkdir thus depends on where you were prior to issuing the
command.
3. Create the rest of directory structure. Note that a forward slash is used as a separator
when referring to files and subdirectories. If you got confused as to where you are,
simply use pwd.
4. Create the file foo, containing the text "This is a test", in the hr directory. Again, you
can do that in several ways depending on where your current directory is. Two
examples:
1020/L1/HR
GUIDED TOUR
Page 12
A Guided Tour
cd
cat > mail/psnl/hr/foo
This is a test
^D
or
cd mail/psnl/hr
cat > foo
This is a test
^D
5. Copy the file foo that was just created to another, named data, in the psnl directory.
There are several ways to do this depending on where you put yourself prior to
issuing the copy command. If you stick to home, this is what you type:
cd
cp mail/psnl/hr/foo mail/psnl/data
A shorter way obtains if you first switch to either the source or the destination directory. This is shorter because Unix recognises the following two special symbols: . (a
single dot) denotes the current directory, and .. (two dots) denotes the parent of the
current directory:
cd
cd mail/psnl/hr
cp foo ../data
Alternatively, we can start by switching to the target directory:
cd
cd mail/psnl
cp hr/foo ./data
Note:
When you copy files across directories you have the option of changing or keeping the
filename. It is OK to have two files with the same name as long as they reside in
different directories. What must be unique is the path leading to any file: the slashdelimited string of directory names, starting from your home directory and ending with
the file's directory followed by the filename; e.g. ~/mail/psnl/hr/foo
Note:
If you copy (or move) a file across directories without changing its name, you do not
need to specify the filename in the second argument, just the destination directory. This
is especially relevant if you have several files, specified by a wildcard. For example, to
copy the file foo from mail/psnl/hr to mail/psnl (under the same name), you can
write:
cd mail/psnl/hr
cp foo ..
1020/L1/HR
GUIDED TOUR
Page 13
A Guided Tour
6. Suppose you no longer need the hr directory. The command:
cd
rmdir mail/psnl/hr
will refuse to delete it because it is not empty. You must first remove all the files in it
and then remove it, viz.
cd
rm mail/psnl/hr/*
rmdir mail/psnl/hr
USER'S DIRECTORY
We have thus far concentrated on your home directory but you are not the sole owner of
the hard disk! Indeed, other users, common programs, and Unix itself all share the same
hard disk (or array of disks) and each needs a home directory. In fact, your home directory is only a child in a bigger tree that spans the entire disk system. The root of the full
tree is denoted in Unix by a / (a forward slash), and if your login ID is, say, cse12345,
then your home directory will be located in /cs/home/cse12345.
You can find out the actual name of your home directory by typing the following two
commands:
cd
pwd
The first takes you to your home directory and the second displays its name. In general,
the home directory of a user whose login is login is denoted by ~login; e.g. ~cse12345.
A path that starts with the root (i.e. with /) is known as an absolute path because it is
independent of the current working directory, while a path that doesn't begin with a slash
is known as a relative one. As long as you stay within your home directory (including its
subdirectories), you don't have to worry about the hierarchy above it, and you can thus
always use relative paths. But if you want to copy files from elsewhere (e.g. other users
or course-related files) or allow others to examine your files (e.g. publish on the web),
then you will need to think in the context of the full hierarchy.
EDITORS
An editor is a program that allows you to create text files. It is like as a miniature wordprocessor that supports only the basic, text-based operations with no formatting. We use
editors to create the source file of programs and it is important that you become comfortable with one of the powerful, platform-specific editors introduced in Lab 2.
1020/L1/HR
GUIDED TOUR
Page 14
A Guided Tour
As you might expect, most sophisticated editors use a GUI, and hence, cannot be executed remotely through a telnet session. It is therefore useful to be familiar with a textbased Unix editor to be used for ad-hoc editing. We recommend pico because it is easy
to learn, but if you are already familiar with another text-based Unix editor (e.g. vi or
emacs), then you can continue using it.
1. Launch the editor and specify the file to edit by entering:
pico filename
2. If the file does not exist, pico creates it and displays a blank screen for you to write
in. Otherwise, pico opens it so that you can edit (i.e. modify) it.
3. You can type text, navigate using the four arrows, or enter one of the commands
displayed at the bottom two lines of the screen. Of these, ^X is the most important
because it allows you to leave the editor with or without saving any changes you
made to the file.
pico has many useful features including a spell checker (^T). Use its ^G command to
get a help screen about all its commands.
FILE PROTECTION
The ability to set file permissions is an important part of a multi-user operating system.
Although you will often not want other users to have access to your files, there are
circumstances when this is useful. Unix recognises three classes of users: Class u
includes only you, the file owner (u stands for user); class g includes members of your
group; and class o which includes all others. You can also use the convenience class a
(all), which includes all three classes (u, g, and o). For each class, you decide what
permissions to grant, and there are three permission modes:
r (read)
Allows the file to be read (which means it can be copied). If this is a directory, then this
allows its content to be read (using for example the ls command).
w (write)
Allows the file to be written to; i.e. to be edited. If this is a directory, then this allows
creating and deleting files and subdirectories in it.
x (execute)
Allows the file to be executed (assuming it is an executable). If this is a directory, then
this allows searching for specific files in it; e.g. using cd to switch to the directory (but it
does not allow using the ls command).
To see the permission modes, create a file in your home directory and use the -l option of
the ls command. You should see an output similar to the following:
1020/L1/HR
GUIDED TOUR
Page 15
A Guided Tour
cd
cal > sample
ls -l
drwx------rw------drwxr-xr-x
2 roumani
1 roumani
33 roumani
faculty
faculty
faculty
512 Jul
140 Jul
1024 Mar
9 13:45 1020/
9 13:37 sample
7 21:27 www/
What concern us here are the first 10 characters of each line:
• The first indicates the file type, with d indicating a directory and a dash - indicating a
regular file.
• The next 9 characters are the three permission modes for the three classes of users,
with - indicating that this permission is not granted.
In the above example, we see that the owner of the file sample has rw-, which means
read, write and no execute permissions, while members of the group and others, have no
permissions whatsoever (this is usually the default when you create a file). For the 1020
directory, the user has full permissions while others have none (the default when you
create a directories). But for the www directory, read and execute were granted to group
members as well as to all others.
To change the permission modes for a file or a directory named name, use the command:
chmod class ± permission name
where class is either u or g or o, permission is either r or w or x, and where the plus sign
is used to grant permission and the minus to withhold it. For example, to allow others to
read the sample file, you would write:
chmod o+r sample
Note:
It is possible to provide a numeric argument, instead of a class / permission pair, by using
the following mapping: r=4, w=2, x=1 and no permission is 0. To assign a particular set
of permission, you simply add up the permission weights per class. For example, to set
the permissions of a file sample to -rwxrw-r--, you add:
user
group
other
u+rwx
g+rw
o+r
4 + 2 + 1 = 7
4 + 2 + 0 = 6
4 + 0 + 0 = 4
Hence, all these permissions can be set in one shot via the command:
chmod 764 sample
1020/L1/HR
GUIDED TOUR
Page 16
A Guided Tour
FILE PERMISSIONS & WEB PUBLISHING
If you want to post a file on the Web, three conditions must be met:
1. The file must be in the www directory or one of its subdirectories. Only the tree
rooted at www can be made visible to the Web community.
2. The file must be readable by all (a+r)
3. Every directory in its path, starting from www, must be searchable (a+x) and
readable (a+r) by all.
For example, if you like to publish the file Astronomy.html from the directory ~/www/me,
you would issue the commends:
cd
chmod a+rx www
cd www
chmod a+rx me
cd me
chmod a+r Astronomy.html
The URL of the file is:
http://www.cs.yorku.ca/~cs123456/me/Astronomy.htm
Note that even though www is not mentioned in the URL, the Web server recognizes its
existence and treats it as the root of the Web tree of ~cs123456. Note also that if the file
to be posted is named index.htm or index.html or Welcome.html, then it does not need to
be named in the URL; the Web server will assume such a name by default.
STANDARD INPUT & REDIRECTION
To perform its action, the two-argument cp command takes its input from the file named
in its first argument and writes to the second argument. Similarly, the one-argument cat
command reads its input from its argument and writes to the screen. In these, and in
many other Unix commands, the input comes from a file named in an argument. What if
we did not supply that argument? Some commands would protest and issue a message
like "Insufficient arguments". Others would simply decide to take their input from
Standard Input instead of a file. By default Standard Input is nothing but the keyboard,
so these tolerant commands end up reading from the user. cp is an example of the
former (producing an error if an argument is missing), while cat is of the latter group.
When a command takes input from the keyboard, it keeps reading, line-by- line, until you
enter Ctrl-D as the first character on the last entered line (press D while holding down the
1020/L1/HR
GUIDED TOUR
Page 17
A Guided Tour
Control key). Note that this key combination (sometimes written as ^D) is often used to
exit a command that is waiting for input.
Just like Standard Output, you can redirect Standard Input to come from a disk file by
simply following the command by a less-than sign followed by a file name. This is
seldom used for commands because, as stated above, input originally came from a disk
file and we coerced it to Standard Input by omitting the argument. It is very useful for
utilities or our own programs, however, as it allows us to avoid tedious repetitive inputs.
1. Based on the above discussion, describe how the following command would work.
What is it useful for in this form?
cat > foo
2. If command1 produces output on Standard Output and command2 takes input from
Standard Input, then the command:
command1 | command2
pipes the output of command1 to the input of command2. For example, if the output
of the first command is long and would normally scroll of the screen, we can pipe it
to the input of the more command. Try the following ls command (chosen to
produce a long listing) with and without piping it:
ls .* | more
Note: pressing b (to scroll backward) doesn't work here.
REMOTE ACCESS
In order to develop and run Java programs, you can either work in a campus lab, using
the lab's editing and running environment, or work at your home PC, using its editing and
running environment. Hence, remote access (the ability to use the lab's environment from
home) is not needed, nor recommended, for Java development. We are mentioning it here
in the context of Unix (not Java) because it allows you to try Unix commands and inspect
their man pages while at home. You can skip this section and come back to it when you
need such access.
Your home PC can access a remote Unix server provided you have an Internet connection
and a secure telnet program. You can download such a program from the Internet, for
free. The site:
http://www.freessh.org
maintains links to three telnet programs:
1020/L1/HR
GUIDED TOUR
Page 18
A Guided Tour
PuTTY for Windows,
Nifty for MacOS, and
OpenSSH for Linux.
Download the one appropriate for your operating system, install it, and then launch it. To
connect remotely, specify that the server (or host) name is:
red.cs.yorku.ca
and make sure you select the SSH (or Port 22) protocol. Once the connection is made,
you will be prompted to enter your username (login) and password.
Afterwards, you will be at the Unix prompt in a so-called telnet session; and your
computer will be in a so-called terminal emulation mode. The situation will be exactly as
if you are in a campus laboratory except for one key difference: you cannot see or issue X
commands. In particular, you cannot launch ghostview, nedit, or a browser. If you
attempt to launch any X program, you will get an error message similar to:
display variable not set
This does not indicate an installation problem; you simply cannot communicate with X
through a telnet session.
Your telnet session appears to your home operating system as a window. You can copy
and paste in it using the mouse: if you highlight text in the window, you are effectively
copying, and if you right-click while in the window, you are effectively pasting.
To end your telnet session and logout, type exit.
EMAIL
Once you have a Unix account, you automatically get an email address. If your login ID
is cs123456, then your email address is:
cs123456@cs.yorku.ca
It is strongly recommended that you adopt this email address for all your correspondence
because some professors may have filters that block other domains. If it is imperative that
you use some other email address, then make sure you include your login ID in every
email you send, and make sure you forward any received mail. In order to forward mail
to some other address, create a text file named ".forward " in your home directory and
type in it the other address as the very first line. Note that it is your responsibility to keep
the forwarding information up-to-date.
You can check your Unix mail in many ways. The easiest is through the Web: launch a
browser and visit the site:
1020/L1/HR
GUIDED TOUR
Page 19
A Guided Tour
www.cs.yorku.ca/mail
If you do not want to use the Web then pine is recommended because it has an address
book and a message editor, and more importantly, it is text-based, which means it can be
accessed from campus or through remote access.
FILE TRANSFER
We mentioned in the previous section that when you develop Java software, you typically
either work at your home PC or in a campus lab. Occasionally, you need to transfer a file
from one place to another, and this section covers this mechanism.
One approach is to use a diskette. Unix maps the content of any (formatted) diskette you
insert to a virtual directory called /floppy/floppy0. Hence, you can use the normal
Unix copy command (cp) to transfer files. In the following example, we copy all files
from the diskette to the 1020 subdirectory of your home directory:
volcheck
cp /floppy/floppy0/* ~/1020
eject
The first command is needed whenever you insert a diskette in a workstation. The last
command is needed in order to remove the diskette. Conversely, you can copy files from
any directory to the diskette.
The above approach works only if the file is small. A better, and more general, approach
uses ftp (File Transfer Protocol). You can use the console-based ftp program bundled
with your operating system or you can download a GUI one. As with everything else in
this tour, we focus on console applications: The text-based ftp client bundled with most
operating systems is called ftp and you can run it by typing its name. In Windows, you
do this in the DOS console or by clicking Start | Run and typing ftp. Once you launch it,
you will see its ftp> prompt at which you enter the following command to connect:
ftp>open ftp.cs.yorku.ca
Once you login, you can enter Unix commands (to operate on your remote Unix server)
or commands preceded by ! (to operate on your local machine). In addition, you can use
the put and get commands to transfer files.
For example, to transfer the text file Test.java from the local directory C:\1020 to the
remote 1020 subdirectory of your home directory, you type:
ftp>lcd C:\1020
ftp>cd ~/1020/
ftp>put Test.java Test.java
1020/L1/HR
GUIDED TOUR
Page 20
A Guided Tour
To transfer the file the other way, use get instead of put. If the file is binary (e.g. a .class
file), make sure you first enter the binary command (to switch back to text files, use the
ascii command). You can type ? at the ftp prompt to learn more; for example, the mput
and mget commands allow you to transfer many files through a wildcard.
Note
Some ftp programs automatically set the permissions to a+rx for all files transferred! To
ensure your privacy, always transfer files to a subdirectory of your home directory.
1020/L1/HR
GUIDED TOUR
Page 21
Guided Tour (Version 2)
By Steven Castellucci
This document was inspired by the Guided Tour written by Professor H. Roumani. His version of the tour can
be accessed at the following URL: http://www.cse.yorku.ca/~roumani/jbaYork/GuidedTour.pdf.
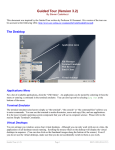
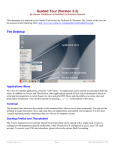
The Xfce (Linux) Desktop
Workspaces
Firefox and Thunderbird
Terminal
Applications Menu
Applications Menu
For a list of available applications, click the Xfce icon or right-click the desktop. An application can be started
by selecting it from the menu. In addition to Firefox and Thunderbird, other applications include NEdit (a text
editor with which to write programs), Acrobat Reader (to view and print PDF files), and OpenOffice (to create,
edit, and print Office documents). You can also log-out by selecting Quit at the bottom of the menu and
clicking OK.
Terminal
The terminal (also known as the console or the command-line) allows you to enter commands. You will use the
terminal to compile, run, and submit your programs. It is the most versatile operating system component that
you will use in computer science.
Starting Firefox and Thunderbird
The Firefox Internet browser and the Thunderbird email client can be started with a single click. Firefox is
configured with department-specific bookmarks, while Thunderbird is configured to access your CSE mail
account
Guided Tour (v.2)
Page 1
CSE 1020 M (2008-09 W)
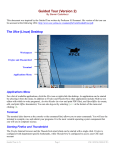
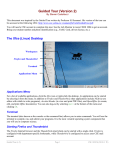
Workspaces
The operating system’s desktop is where you can arrange your application windows. With Xfce, you can arrange
you windows across four (by default) virtual desktops (also known as workspaces). Although you can only
work with one at a time, the applications on all workspaces remain running.
To switch between workspaces, you can click on the thumbnail images. Alternatively, you can scroll the mouse
wheel on an empty portion of the desktop. Even if you do not use the extra workspaces, make sure that you do
not accidentally switch to them as you work.
Focusing with the Mouse
With Windows, you indicate the active window by clicking within it. The window remains active until you
minimize it or select another window. However, with Xfce, the active window is the one that contains the mouse
pointer. If you move your mouse pointer to another window, the new window becomes the active one.
For example, if you want to type a command in a terminal, you must first position your mouse within its
window. If, as you type, your mouse pointer moves outside of the terminal window, the terminal will not
receive your keystrokes.
Simple Commands
Command: pwd
Example: pwd
Description: Displays the current directory (a.k.a. working directory). The same output can be seen a terminal
window’s title bar.
Command: man command
Example: man submit
Description: Displays the user manual for the passed command. The user manual details the type and number
of arguments required by the command, and lists all the available command options. To scroll through the user
manual, press the spacebar. To exit the user manual, simply press the Q-key.
Command: mkdir dirName Example: mkdir eChecks
Description: Creates a subdirectory with the passed name in the current directory. The example creates a
subdirectory called “eChecks”.
Command: cd dirName
Example 1: cd Example 2: cd ..
Example 3: cd mail
Description: Without any argument (Example 1), this command changes the working directory to your home
directory (equivalent to the “My Documents” folder in Windows). With the argument “..” (Example 2), this
command changes the working directory to the parent directory. If you provide the name of a subdirectory as an
argument (Example 3), this command changes the working directory to be that subdirectory (e.g., the
subdirectory called “mail”).
Command: ls dirName
Example 1: ls Example 2: ls mail Example 3: ls *.txt
Description: Lists the contents of the directory specified by the argument. Without any arguments (Example 1),
this command lists the visible contents of the working directory. If the argument is a directory name
(Example 2), this command lists the visible contents of that directory (e.g., the subdirectory called “mail”).
Example 3 lists all files in the current directory that have a “.txt” extension. You can use the “*” wildcard to
search for files that match a pattern. There are many options for this command, such as “-a” to show hidden
files and “-l” to show file and directory details. Enter the command man ls for further details.
Guided Tour (v.2)
Page 2
CSE 1020 M (2008-09 W)
Command: rm fileOrDir Example 1: rm First.java
Example 2: rm –r eChecks
Description: Removes the file or directory indicated by the argument. The first example deletes the file
“First.java”. The second example (note the “-r” option) removes directory called “eChecks” and all of its
contents. Use this command with caution!
Command: cp orgnl cpy Example: cp First.java First_backup.java
Description: Copies the file orgnl to the location cpy. The example creates a copy of “First.java”, called
“First_backup.java”.
Command: mv old new
Example: mv First.java Second.java
Description: Moves the file old to the location new. This command can also be used to rename files. The
example renames “First.java” to “Second.java”.
Command: script log
Example: script A1_log.txt
Description: Records the commands and output generated at the terminal until exit is entered. The record is
written to a file, whose name is passed as an argument.
Auto-Completion and Command History
You do not have to type entire filenames or directory paths. Type the first couple of characters, followed by the
TAB key. The operating system will complete the rest of the name or path. If there are multiple matches, the
operating system will complete only the common portion. You will have to type additional characters to
identify the desired file or directory.
To repeat a command at a terminal, you can use the up- and down-arrow keys to cycle through commands you
previously entered. This can be very beneficial during labs and lab tests, as you will repeatedly compile and run
your program to test it.
Creating and Editing Text Files
To create and edit your programs in 1020, I recommend you use a text editor called NEdit. Other text editors are
installed on the system, such as Pico, Emacs, and Vim. However, NEdit is considered the most user-friendly. To
start NEdit, you can select it from the applications menu, or enter nedit & at a terminal. Optionally, you can
include a filename (e.g., nedit First.java &). If the file already exists, it will be opened automatically.
If not, the file will be created.
When testing a program, its content will be referenced by line number. Under the Preferences menu, click
on Default Settings, and then select Show Line Numbers. This will show the line numbers along
the left margin. Under the same Default Settings menu, select the option Show Matching (..) and
set it to ON. This will help you avoid putting too many or too few parenthesises in your code. Again under the
Preference menu, select Save Defaults and click OK. This will save your preferences.
Guided Tour (v.2)
Page 3
CSE 1020 M (2008-09 W)