1
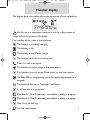
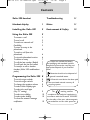
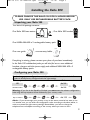
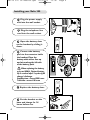
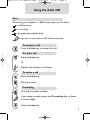
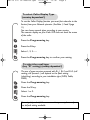
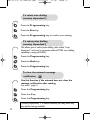
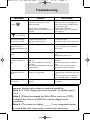
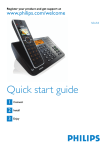
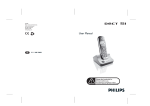
Xalio 300 UK master.qxd 25/03/03 13:08 Page 1 Handset display The display gives information about the operation of your telephone. On first use it is sometimes necessary to wait for a few minutes of charge before seing icons on the display. The meaning of the icons is the following : The battery is currently charging. The battery is full. The battery is low. Please charge. The handset receives an incoming call. There is a call in progress. The handset is within range of the base station. The handset is out of range. Move closer to the base station. The Xalio 300 is in programming mode. A programming operation is in progress. The network has sent a message notification. A call transfer is in progress. Phonebook 1 (0 to 9 memories) : consultation or editing in progress. Phonebook 2 (0 to 9 memories) : consultation or editing in progress. New entry on call log. Call log consultation. 1 Xalio 300 UK master.qxd 25/03/03 13:08 Page 2 Contents Xalio 300 handset 11 Handset display 1 Notes 11 Installing the Xalio 300 3 Environment & Safety 12 Using the Xalio 300 5 To answer a call To end a call To make an external call Predialling To store an entry in the phonebook To make a call from the phonebook To view the phonebook entries To delete an entry To call the last number (Redial) To call back the last five callers To transfer a call to another handset (Xalio 300 multihandset packs) 5 5 5 5 6 6 6 7 7 7 7 Programming the Xalio 300 8 To set the ringer melody To set the ringer volume To change the earpiece volume To select Caller Display type To select the recall type (Key R setting) To select tone dialling To select pulse dialling To clear the network message notification 2 Troubleshooting 8 8 8 9 9 10 10 10 Philips has marked the battery and packaging with standard symbols designed to promote the recycling and appropriate disposal of your eventual waste. Batteries should not be disposed of with general household waste. A financial contribution has been paid to the associated national recovery & recycling system. The marking certifies compliance with technical regulations in accordance with the Directive 1999/5/EC for the safety of the user, electromagnetic perturbations and for radio spectrum. Xalio 300 UK master.qxd 25/03/03 13:08 Page 3 Installing the Xalio 300 PLEASE CHARGE THE XALIO 300 FOR 24 HOURS BEFORE USE. ONLY USE RECHARGEABLE BATTERY PACK. Unpacking your Xalio 300 The Xalio 300 package contains : One Xalio 300 base station , One Xalio 300 handset One NiMH AAA 600 x 2 rechargeable battery pack PHILIPS , , 2,4 V One user guide , one warranty leaflet . If anything is missing, please contact your place of purchase immediately. In the Xalio 300 multihandset packs you will also find one or more additional handsets, chargers with their power supply and additional NiMH AAA 600 x 2 rechargeable battery packs. Configuring your Xalio 300 Dont change your configuration code if you live in UK or Northern Ireland. Your product is already factory configured with the right settings. Country Code UK dial 44 Northern Ireland dial 44 Warning : If you live in the Republic of Ireland, you must enter the relevant configuration code using the key sequence shown followed by your country code. Rep. of Ireland dial 153 Advice : If you have bought your product in any of the above countries but want to use it in another one, you can enter the configuration code, according to the above tables, in order to activate the right country settings. Nevertheless, you have to change the telephone line cord adapter according to the country where you want to use it. 3 Xalio 300 UK master.qxd 25/03/03 Installing your Xalio 300 Plug the power supply unit into the wall socket. Plug the telephone line cord into the wall socket. 3 Open the battery door on the handset by sliding it down. 4 Connect the battery pack to the connector inside the handset. Place the battery with sticker face up and wires along the left side of the battery pack. When replacing the battery, only use NiMH. Optimal battery life is reached after 3 cycles of full charge / discharge. Standby time : around 300 hours Talk time : around 18 hours 5 Replace the battery door. Put the handset on the base and charge for 24 hours before use. 4 13:08 Page 4 Xalio 300 UK master.qxd 25/03/03 13:08 Page 5 Using the Xalio 300 Note : When using your telephone, 3 different beep types can be heard : a validation beep an error beep a programming invitation beep long press to come back on idle mode at any time To answer a call Press the Line key to answer the call. To end a call Press the Line key. Or Replace the handset on the base. To make a call Press the Line key. ABC GHI PQRS JKL TUV DEF MNO WXYZ Dial the number. Predialling ABC GHI PQRS JKL TUV DEF MNO WXYZ First dial the phone number. If you make a mistake press the Correction key to delete incorrect digits. Press the Line key. 5 Xalio 300 UK master.qxd 25/03/03 13:08 Page 6 To store an entry in the phonebooks Press the Phonebook key once to open Phonebook 1 or press the Phonebook key twice to open Phonebook 2. ABC GHI PQRS JKL TUV DEF MNO WXYZ Enter the memory number (0 to 9) you want to give to this entry. Press the Programming key. ABC GHI PQRS JKL TUV DEF MNO WXYZ Enter the telephone number you want to store (up to 16 digits, including a pause by pressing the Transfer key). If you make a mistake press the Correction key to delete incorrect digits. Press the Programming key to confirm your setting. To make a call from the phonebooks Press the Phonebook key once to open Phonebook 1 or press the Phonebook key twice to open Phonebook 2. ABC GHI PQRS JKL TUV DEF MNO WXYZ Enter the memory number. Display shows the corresponding number. Press the Line key to call. To view the phonebooks entries Press the Phonebook key once to open Phonebook 1 or press the Phonebook key twice to open Phonebook 2. ABC GHI PQRS JKL TUV DEF MNO WXYZ Enter the memory number. Display shows the corresponding number. Press the Phonebook key to exit. 6 : Modify a number by pressing the Correction key, press it again to erase digits. Press Programming key to validate. Xalio 300 UK master.qxd 25/03/03 13:08 Page 7 To delete an entry Press the Phonebook key once to open Phonebook 1 or press the Phonebook key twice to open Phonebook 2. ABC GHI PQRS JKL TUV DEF MNO WXYZ Enter the memory number you want to delete. Press the Programming key twice. To call the last number (Redial) Press the Redial key. Display shows the last number called. Press the Line key. To call back the last five callers To use the call log function you must first subscribe to the Caller Line Identification (CLI) Service. (See note 1 page 11). Press the Redial key twice. Display shows the last number received (see note 4 page 11). Use the keys 1 and 3 to navigate within the call log. Press the 2 key if you want to know the date and hour of the call. Press the 6 key if you want to erase the entry or Press the Line key to make the call. To transfer a call to another handset (Xalio 300 multihandset pack) You can forward an external call to another handset. During a call : Press the Transfer key. All handsets will ring. Press the Line key on one of the other handset to take the transfered call. : If you have only one handset, pressing the Transfer key will also make your handset ring. 7 Xalio 300 UK master.qxd 25/03/03 13:08 Page 8 Programming the Xalio 300 To set the ringer melody You can choose from 7 ringer melodies. Press the Programming key. Press the 1 key. ABC GHI PQRS DEF MNO JKL TUV WXYZ Enter your choice of melody 1, 2, ..., or 7. The selected melody is played. Press the Programming key to confirm your setting. To set the ringer volume You can choose from 3 ringer volumes. Press the Programming key. Press the 2 key. ABC GHI PQRS DEF MNO JKL TUV WXYZ Enter your choice of volume 1(low), 2(medium) or 3 (high). The melody is played at the selected volume. Press the Programming key to confirm your setting. To change the earpiece volume You can choose from 3 earpiece volume levels. Press the Programming key. Press the 3 key. ABC GHI PQRS JKL TUV DEF MNO WXYZ Enter your choice of volume 1(low), 2(medium) or 3 (high). Press the Programming key to confirm your setting. 8 Xalio 300 UK master.qxd 25/03/03 13:08 Page 9 To select Caller Display Type (country dependent*) To use the Caller Display function you must first subscribe to the Service from your Network operator. (See Note 1, 2 and 3 page 11). You can choose several types according to your country. The numeric display on your Xalio 300 does not show the name of the caller. Press the Programming key. Press the 0 key. ABC GHI PQRS JKL TUV DEF MNO WXYZ Select 1, 2, 3........ Press the Programming key to confirm your setting. To select the recall type (key R setting) (country dependent*) The use of some services accessed with R+1, R+2 and R+3 (call waiting, call forward...) will depend on the flash setting (short/long) according to your installation type (ISDN, Public, PABX). Press the Programming key. Press the 5 key. ABC GHI PQRS JKL TUV DEF MNO WXYZ Select 1 or 2. Press the Programming key. *(country dependent) = In some countries you may have only one default setting available. 9 Xalio 300 UK master.qxd 25/03/03 13:08 Page 10 To select tone dialling (country dependent*) Press the Programming key. Press the Star key. Press the Programming key to confirm your setting. To select pulse dialling (country dependent*) This allows you to select pulse dialling (also called Loop disconnect and used in countries without DTMF tone dialling capability or using old PABX). Press the Programming key. Press the Hash key. Press the Programming key. To clear the network message notification Use this function if the network does not clear the message notification after reading. See note 1 page 11. Press the Programming key. Press the 4 key. Press the Programming key. *(country dependent) = In some countries you may have only one default setting available. 10 Xalio 300 UK master.qxd 25/03/03 13:09 Page 11 Troubleshooting PROBLEMS - No dialling tone when pressing - . icon is blinking. - When the handset is placed on the charging unit, no beep is heard. CAUSES SOLUTIONS - The base station is not properly connected to electricity or to the telephone sockets. - Check the connections.(p 4). Reset the product by unplugging the power cord for few seconds and then by connecting it again - Too far from the base station - Move closer to the base - Battery pack is low (low battery icon is - Charge battery pack for at least 24 displayed). hours. (page 4). - The handset is out of range. - Move closer to the base station. - The handset is not placed correctly on - Take the handset off the base station the base station charging unit. and put it back again. - Charging contacts are dirty. - Clean them with a clean and dry cloth. - Battery icon remains - Handset battery pack is defective. empty although the handset has charged for 24 hours. - No symbol on the - Battery pack is uncharged. display. Please contact your PHILIPS dealer in order to purchase new rechargeable battery pack. - Bad audio quality (crackles, muted, echo, etc.). - Interference from nearby electrical appliance. - Base station installed in a room with thick walls. - You are using the handset too far from the base station. - Try to plug the base station in elsewhere. - Install the base station in a different room. - Move closer to the base station. - Reduce the volume level (p 8) - The Caller Line Identification does not work. - Service not activated or wrong operator or wrong setting. - The telephone rings while on line. - An attempt to transfer a call is in progress. - Check your subscription with network or change caller identification type (see p 9). Philips cannot guarantee the operation behind an ISDN adpater or a PABX. - Press the line key to take the line if appropriate. Make sure your product is plugged in. (p 4). Charge battery pack. (p 4). Note 1 : For more information on this function, contact your operator. Available also subject to technical availability. Note 2 : If Caller Display type does not work, try another type (1, 2,3...). Note 3 : Philips has designed the Xalio 300 to work on a PSTN (analogue) line. Use on an ISDN line with an adapter is not guaranteed. Note 4 : The screen can display if non recognised number, an unidentified call (unlisted numbers, withheld caller identification). 11 Xalio 300 UK master.qxd 25/03/03 13:09 Page 12 Environment and Safety Safety information The Xalio 300 is not designed for making emergency calls when the power fails. An alternative should be made available for making emergency calls. Power requirements The product requires an electrical supply of 220-240V, alternating monophased current, excluding IT installations defined in standard EN 60-950. WARNING The electrical network is classified as dangerous according to criteria in the standard EN 60-950. The only way to power down the product is to unplug the power supply from the electrical outlet. Ensure the electrical outlet is located close to the apparatus and is always easily accessible. Telephone connections The voltage on the network is classified as TNV-3 (Telecommunications Network Voltages) as defined in the standard EN 60-950. Safety precautions Do not allow the handset to come into contact with liquids. Do not open the handset or the base station. This could expose you to high voltages. Do not allow the charging contacts or the battery to come into contact with conductive materials. Environmental care Please remember to observe the local regulations regarding the disposal of your packaging materials, exhausted batteries and old phones and where possible promote their recycling. Conformity We, Philips, declare that the product Xalio 300 is in compliance with ANNEX III of the R&TTE-Directive 1999/5/EC and then with the following essential requirements : Article 3.1 a : (protection of the health & the safety of the user) EN 60950 (2000) Article 3.1 b : (protection requirements with respect to electromagnetic compatibility) ETSI EN 301 489-6 VI.1.1 (09/200) & ETSI EN 301 489-1 V1.3.1 (09/2001) Article 3.2 : (effective use of the radio spectrum) EN 301 406 (2001) The presumption of conformity with the essential requirements regarding Council Directive 1999/5/EC is ensured. Date : 06/01/2003 Vice president & General manager DECT & Home Telephony The product can only be connected to the analogue telephone network in the 12 countries indicated on the back cover of this manual.