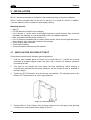
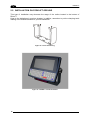
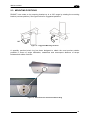
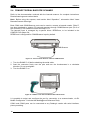
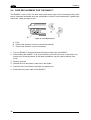
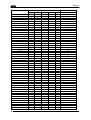
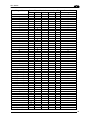
1
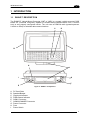
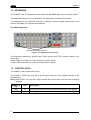
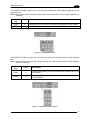
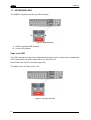
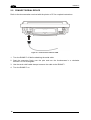
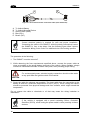
RHINO™
User’s Manual
RHINO™
User’s Manual
DATALOGIC SPA
Via Candini 2
40012 – Lippo di Calderara di Reno
Bologna – Italy
RHINO™ – User's Manual
Ed.: 08/2003
ALL RIGHTS RESERVED
Datalogic reserves the right to make modifications and improvements without prior notification.
Datalogic shall not be liable for technical or editorial errors or omissions contained herein, nor for incidental or
consequential damages resulting from the use of this material.
Product names mentioned herein are for identification purposes only and may be trademarks and or registered
trademarks of their respective companies.
© Datalogic S.p.A. 2000-2003
822000390
CONTENTS
REFERENCES ...........................................................................................................v
Conventions................................................................................................................ v
Reference Documentation .......................................................................................... v
Service, Support and Warranty ................................................................................... v
SAFETY PRECAUTIONS ..........................................................................................vi
FCC Compliance........................................................................................................ vi
RF Safety Notice........................................................................................................ vi
Radio Compliance...................................................................................................... vi
Information for the User ............................................................................................. vi
Vehicle Power Supply Connection Safety Statement ................................................ vii
AC Power Supply Safety Statement..........................................................................viii
GENERAL VIEW .......................................................................................................ix
QUICK START ...........................................................................................................x
1
1.1
1.2
1.3
1.4
1.4.1
1.4.2
1.5
1.6
1.7
INTRODUCTION ........................................................................................................1
Rhino™ Description ....................................................................................................1
Package Contents.......................................................................................................2
Available Models.........................................................................................................2
The Display.................................................................................................................3
LCD Display (640 X 200 pixels) ..................................................................................3
VFD Display (256 X 128 pixels) ..................................................................................3
Keyboard ....................................................................................................................4
Control Keys ...............................................................................................................4
Keyboard LEDs...........................................................................................................6
Caps Lock LED ...........................................................................................................6
Power LED..................................................................................................................7
1.8
PCMCIA Slots .............................................................................................................7
1.9
Power Supply..............................................................................................................8
1.9.1 Backup Battery............................................................................................................8
1.10 Connectors .................................................................................................................8
2
2.1
2.2
2.3
2.4
2.4.1
2.5
2.6
2.7
2.8
INSTALLATION........................................................................................................10
Installation on Forklift Roof........................................................................................10
Installation on Forklift Ground ...................................................................................12
Mounting Positions....................................................................................................13
Connect Serial Barcode Scanner ..............................................................................14
Laser Barcode Scanner Warnings.............................................................................15
Connect Serial Device...............................................................................................16
Connect Power Cable ...............................................................................................17
Vehicle 11-75 VDC Direct Connection ......................................................................17
Fuse Replacement for the RHINO™ .........................................................................20
3
3.1
3.1.1
3.2
3.3
OPERATION ............................................................................................................21
Powering On/Off .......................................................................................................21
Reset Key Sequence (Reboot)..................................................................................21
Panning the Display ..................................................................................................22
Rhino™ Configuration...............................................................................................22
iii
4
4.1
4.2
MAINTENANCE .......................................................................................................23
Cleaning Rhino™......................................................................................................23
Cleaning the Display .................................................................................................23
5
TROUBLESHOOTING..............................................................................................24
6
TECHNICAL FEATURES .........................................................................................27
A
A.1
A.2
KEY MAPS ...............................................................................................................29
Keypads....................................................................................................................29
Key Map - Key Equivalencies....................................................................................29
GLOSSARY..............................................................................................................33
INDEX.......................................................................................................................35
iv
REFERENCES
CONVENTIONS
This manual uses the following conventions:
"User" or "Operator" refers to anyone using a Rhino™.
"Device" refers to the Rhino™.
"You" refers to the System Administrator or Technical Support person using this manual to
install, mount, operate, maintain or troubleshoot a Rhino™.
REFERENCE DOCUMENTATION
For further details refer to the Development System Manual of DS for Mobile@work.
SERVICE, SUPPORT AND WARRANTY
Datalogic provides several services as well as technical support through its website. Log on
to www.datalogic.com/services/support and click on the links indicated for further information
including:
· Services - Warranty Extensions and Maintenance Agreements
· Support - Software Driver Downloads
· Contact Us - Listing of Datalogic Subsidiaries and Quality Partners
· Authorised Repair Centres
v
SAFETY PRECAUTIONS
FCC COMPLIANCE
Changes or modifications to this device not expressly approved by Datalogic S.p.A.,
could void the user’s authority to operate this equipment.
This device complies with FCC Rules, part 15. Operation is subject to the following conditions: (1) This
device may not cause harmful interference, and (2) this device must accept any interference received,
including interference which may cause undesired operation.
This equipment has been tested and found to comply with the limits for a Class A digital device, pursuant to part
15 of the FCC Rules. These limits are designed to provide reasonable protection against harmful interference
when the equipment is operated in a commercial environment. This equipment generates, uses, and can radiate
radio frequency energy and, if not installed and used in accordance with the instruction manual, may cause
harmful interference to radio communications. Operation of this equipment in a residential area is likely to cause
harmful interference in which case the user will be required to correct the interference at his own expense.
RF Safety Notice
CAUTION
This device is intended to transmit RF energy. For protection against RF
exposure to humans and in accordance with FCC rules and Industry
Canada rules, this transmitter should be installed such that a minimum
separation distance of at least 20cm (7.8 in.) is maintained between the
antenna and the general population.
RADIO COMPLIANCE
Information for the User
ENGLISH
Contact the competent authority responsible for the management of radio frequency devices
of your country to verify the eventual necessity of a user license. Refer to the web site
http://europa.eu.int/comm/enterprise/rtte/spectr.htm for further information.
ITALIANO
Prendi contatto con l'autorità competente per la gestione degli apparati a radio frequenza del
tuo paese, per verificarne l'eventuale necessità della licenza d'uso. Inoltre puoi trovare
ulteriori informazioni al sito:
http://europa.eu.int/comm/enterprise/rtte/spectr.htm.
FRANÇAIS
Contactez l'autorité compétente en la gestion des appareils à radio fréquence de votre pays
pour vérifier la nécessité du permis d'usage. Pour tout renseignement vous pouvez vous
adresser au site web:
http://europa.eu.int/comm/enterprise/rtte/spectr.htm.
vi
DEUTSCH
Um die Notwendigkeit der Verwendungslizenz zu prüfen, wenden Sie sich an die Behörde,
die auf der Radiofrequenzgerätsführung Ihres Lands bewandert ist. Weitere Informationen
sind verfügbar auf dem Web Site:
http://europa.eu.int/comm/enterprise/rtte/spectr.htm.
ESPAÑOL
Contacta con la autoridad competente para la gestión de los dispositivos de radio frecuencia
de tu país, para verificar si es necesario la licencia de uso. Además se puede encontrar mas
información en el sitio web:
http://europa.eu.int/comm/enterprise/rtte/spectr.htm.
VEHICLE POWER SUPPLY CONNECTION SAFETY STATEMENT
ENGLISH
Vehicle Power Supply Connection:
If the supply connection is made directly to the battery, a 5A slow-blow fuse should be
installed in the positive lead within 5 inches (12.7 cm.) of the battery positive (+) terminal.
ITALIANO
Collegamento dell'alimentazione del veicolo:
Se il collegamento dell'alimentazione viene stabilito direttamente con la batteria, è
necessario installare un fusibile ad azione lenta da 5 A nel conduttore positivo a meno di 5
in. (12,7 cm) dal terminale positivo (+) della batteria.
FRANÇAIS
Raccordement de l'alimentation du véhicule:
Si l'alimentation est raccordée directement à la batterie, un fusible à action retardée de 5A
doit être installé sur le câble positif à moins de 12,7 cm de la borne positive (+) de la batterie.
DEUTSCH
Anschluss an Fahrzeugbatterie:
Bei direktem Anschluss an die Fahrzeugbatterie sollte eine träge 5A-Sicherung in die
positive Leitung zwischengeschaltet werden, und zwar nicht weiter als ca. 13 cm von der
positiven (+) Batterieklemme entfernt.
ESPAÑOL
Conexión de suministro eléctrico para el vehículo:
Si el suministro eléctrico se proporciona directamente a la batería, se debe instalar un fusible
de retardo de 5 A en el conductor positivo, como máximo a 12,7 cm (5 pulgadas) del
terminal positivo (+).
vii
AC POWER SUPPLY SAFETY STATEMENT
ENGLISH
Optional AC Power Supply:
This product is intended to be powered by an ITE power supply unit, output rated 11-75 Vdc,
3.5 A.
ITALIANO
Alimentazione opzionale a corrente alternata:
Questo prodotto è previsto per essere alimentato con un dispositivo d'alimentazione per
attrezzature informatiche (ITE) la cui tensione in uscita sia pari a 11-75 Vdc, 3.5 A.
FRANÇAIS
Alimentation c.a. optionnelle:
Ce produit est conçue pour être utilisée avec une alimentation ITE de sortie nominale 11-75
Vdc, 3.5 A.
DEUTSCH
Optionales Netzteil (Wechselstrom):
Dieses Gerät muß mit einem ITE-Netzteil gespeist werden, und zwar mit einer Ausspeisung
zwischen 11-75 Vdc, 3.5 A.
ESPAÑOL
Suministro optativo de corriente alterna:
Este aparato se debe utilizar con un alimentador ITE con una salida que tenga la calificación
11-75 Vdc, 3.5 A.
viii
GENERAL VIEW
C
D
B
B
H
A
G
I
F
E
Figure 1 - RHINO™ Components
A.
B.
C.
D.
E.
F.
G.
H.
I.
PC Card Slots
Speaker/Beeper
CapsLock Indicator
Power Status Indicator
COM1 Connector
COM2/SCANNER Connector
Power Connector
Fuse
Power Switch
ix
QUICK START
Verify that Rhino™ and all the parts supplied with the equipment are present and intact when
opening the packaging. Contact the nearest Datalogic distributor for further information.
Keep this package should it be necessary for expedition to technical assistance centre.
This section’s instructions are based on the assumption that your new system is preconfigured and requires only accessory installation (e.g. external barcode scanner) and a
power source.
Use this guide as you would any other source book - reading portions to learn about the
RHINO™, and then referring to it when you need more information about a particular subject.
This guide takes you through installation and operation of the RHINO™.
In general, the sequence of events is:
1.
2.
3.
4.
5.
6.
7.
Install Mounting Bracket on vehicle. (see chapter 2)
Secure RHINO™ in Mounting Bracket Assembly (see chapter 2 and following).
Connect power cable to the RHINO™ (see paragraph 2.6).
Connect vehicle power source to RHINO™ power cable (see paragraph 2.7).
Install accessories on RHINO™, e.g. scanner (see chapter 2.4, 2.5).
Secure cables to the RHINO™ with strain relief cable clamps (see chapter 2.5).
Turn RHINO™ on.
The RHINO™ should be mounted in an area in the vehicle where it:
•
•
•
•
x
Does not obstruct the vehicle operator's vision or safe vehicle operation.
Will be protected from rain or inclement weather.
Will be protected from extremely high concentrations of dust or wind-blown debris.
Can be easily accessed by an operator seated in the driver's seat.
INTRODUCTION
1
1 INTRODUCTION
1.1 RHINO™ DESCRIPTION
The RHINO™ Vehicle Mount Computer (VMT or VMC) is a rugged, vehicle-mounted, DOS
based PC (Personal Computer) capable of wireless data communications from a fork-lift
truck or any properly configured vehicle. The unit uses a PCMCIA radio (spread spectrum
2.4GHz or other) for wireless data communications.
C
D
B
B
H
A
G
I
F
E
Figure 2 - RHINO™ Components
A.
B.
C.
D.
E.
F.
G.
H.
I.
PC Card Slots
Speaker/Beeper
CapsLock Indicator
PWR=Status Indicator
COM1 Connector
COM2/SCANNER Connector
Power Connector
Fuse
Power Switch
1
1
RHINO™
1.2 PACKAGE CONTENTS
The list of the parts of Rhino™ package includes:
1. Terminal unit
2. Universal mounting bracket
3. Mounting kit to secure the terminal to the mounting bracket.
4. Power cable
5. Serial cable for configuration activities through PC direct connection.
6. User’s Manual
7. Mobile@work™ Reference Disk
1.3 AVAILABLE MODELS
Rhino™ is available in different versions. This manual is compatible with the following
models:
-
RHINO™/RF-3 EU
-
RHINO™/RF-3 EU VFD
-
RHINO™/RR
-
RHINO™/RR VFD
2
INTRODUCTION
1
1.4 THE DISPLAY
1.4.1
LCD Display (640 X 200 pixels)
Figure 3 - The Half-Screen LCD Display
The RHINO™ LCD Display is a monochrome LCD unit capable of supporting CGA graphics
modes. The display size is 640 x 200 pixels. Refer to the section titled "Operation" in this
manual for instructions on display panning and adjusting the display's contrast.
1.4.2
VFD Display (256 X 128 pixels)
Figure 4 - VFD display
The RHINO™ VFD Display is a monochrome VFD unit capable of supporting CGA graphics
modes. The display size is 256 X 128 pixels. Refer to the section titled "Operation" in this
manual for instructions on display panning and adjusting the display's contrast.
3
RHINO™
1
1.5 KEYBOARD
The RHINO™ has an integrated, custom keyboard with ABCD layout and universal overlay.
This keyboard features a 57 key keyboard. The keyboard is constantly illuminated.
The keyboard has 101 keyboard functions, including a numeric keypad. Please refer to the
section "Key Maps" for keypress combinations.
The ABCD Keyboard:
FUNC and CTRLSpecial Keys
Figure 5 - The ABCD Universal Keyboard
The keyboard includes two special keys: FUNC (green) and CTRL (yellow) located in the
bottom port.
Select FUNC to activate any of the functions printed in green.
Select CTRL to activate any of the functions printed in yellow.
1.6 CONTROL KEYS
The RHINO™ has several control keys.
The RHINO™ FUNC key plus the A and B keys control the LCD display contrast in the
following way:
Note: press FUNC once and then keep pressed the control letter until the right contrast is
reached.
4
Additional
Key
Key
Description
FUNC
A
Pressing this key sequence increases the contrast of the display
FUNC
B
Pressing this key sequence decreases the contrast of the display
INTRODUCTION
1
The RHINO™ FUNC key plus the C and D keys control the VFD display brightness in the
following way.
Note: press FUNC once and then keep pressed the control letter until the right brightness is
reached.
Additional
Key
Key
Description
FUNC
C
Pressing this key sequence increases the brightness of the display
FUNC
D
Pressing this key sequence decreases the brightness of the display
Figure 6 - The Display Controls
The RHINO™ FUNC key plus the O and P keys control the beeper volume in the following
way.
Note: press FUNC once and then keep pressed the control letter until the right speaker
volume is reached.
Additional
Key
Key
FUNC
O
Pressing and holding this key increases the speaker volume of
the RHINO™.
FUNC
P
Pressing and holding this key decreases the speaker volume
of the RHINO™.
Description
Figure 7 - The Beeper Volume Controls
5
RHINO™
1
1.7 KEYBOARD LEDS
The RHINO™ keyboard has two (2) LED indicators.
B
A
Figure 8 - Keyboard LEDs
A. CAPS Lock Mode LED Indicator
B. Power LED Indicator
Caps Lock LED
This LED indicates the state of the keyboard Caps-Lock mode. If Caps-Lock is enabled this
LED is illuminated red. When Caps-Lock is off, the LED is off.
Press FUNC then SHIFT to activate Caps-Lock.
The default value of Caps-Lock is “Off”.
Figure 9 - The Caps Lock LED
6
INTRODUCTION
1
Power LED
Figure 10 - The PWR LED
When Rhino™ is powered but switched off, the Power LED is ON.
When Rhino™ is switched ON, the Power LED is OFF.
1.8 PCMCIA SLOTS
The RHINO™ has two PCMCIA slots. They support the Personal Computer Memory Card
International Association (PCMCIA) 2.1 standards.
Slot A and Slot B accept Type I, II or III 5V PCMCIA cards.
In particular, the Radio Ready base model accepts some of the most diffused radio cards,
such as CISCO, SYMBOL, LUCENT, ARTEM. The radio card chosen is normally mounted in
Slot A.
Ⓑ
Ⓐ
Figure 11 - The RHINO™ PCMCIA Slots
7
RHINO™
1
1.9 POWER SUPPLY
Vehicle power input for the RHINO™ can range from 11 to 75VDC and is accepted without
the need to perform any adjustments within the RHINO™.
If 11 to 75V DC power is not available – for example, in an office environment – an optional
external FP18 Power Supply can be used to convert AC wall power to an appropriate DC
level. See the section titled “Installation”, sub-section “External Power Supply.”
Power input is protected from fuse externally accessible.
1.9.1
Backup Battery
The internal Lithium (Li) backup battery provides power to the internal clock when primary
power supply has been depleted, removed or has failed. The battery is not rechargeable and
requires no user intervention other than periodic replacement. Replacement is performed by
authorized personnel only. The average duration of backup battery can be 3 years after
stand-by or normal usage.
1.10 CONNECTORS
All external connectors for the RHINO™ are located on the bottom of the unit.
COM 1 port connects any EIA RS232 device. It also can be wired to connect a scanner
powered by an external power source.
COM 2/Scanner port has been designed to connect and power a scanner with 5V power
supply on pin 9. This port can also be used to connect RS232 devices that are not influenced
by the 5V provided on pin 9 of the COM2/Scanner connector.
The maximum current allowed is 1 A @ 5 VDC; therefore, do not exceed this value.
The following tables illustrate the pinout for COM1 and COM2/Scanner ports respectively:
COM1
Pin
1
2
3
4
5
6
7
8
9
8
Function
Type
DCD
Input
RX
TX
DTR
GND
DSR
RTS
CTS
RIN
Input
Output
Output
Ground
Input
Output
Input
Input
INTRODUCTION
1
COM2/Scanner
Pin
1
2
3
4
5
6
7
8
9
Function
Type
DCD
Input
RX
TX
DTR
GND
DSR
RTS
CTS
+5V
Input
Output
Output
Ground
Input
Output
Input
Supply voltage
9
RHINO™
2
2 INSTALLATION
Rhino™ has been designed to guarantee a fast and easy during mechanical installation.
Rhino™ can be mounted either on the roof, on the floor or on a wall of a fork-lift, in addition,
it can be rotated in order to obtain the best display viewing.
Mounting material:
• Rhino™
• ST-222 Bracket (included in the package)
• 4 to 6 screws, ø = 8mm; since screw length depends on each situation, they cannot be
included in the package. It is recommended to use non-oxidable materials.
• Nuts compatible with the screws of step no. 3
• 8 to 12 washers compatible with the above listed screws. Since screw length depends on
each situation, they cannot be included in the package
• Power supply cable (included)
• Two knobs (included)
• Two plain washers and two notched washers
2.1 INSTALLATION ON FORKLIFT ROOF
Follow these instructions as indicative general guidelines:
1
Find the most suitable place on forklift roof to place Rhino™: it should be as much
protected as possible against water and dust, and it should not obstacle operator's
movements as well.
2
The slots on the bracket will help obtain the best positioning. When working in
environments characterized by strong vibrations, set the screws as next as possible to
bracket's edges.
3
Tighten the ST-222 bracket using the screws and washers. The clamping tooth at the
bottom of ST-222 should be at user's right hand side.
Figure 12 - Screw Positioning
4
10
Position Rhino™ at the bottom of the bracket: make sure the two large round openings
coincide to the ones located at the edges of Rhino™.
INSTALLATION
2
5
Rotate the whole device until the best viewing position is reached, then insert the
clamping tooth into one of the small holes located beside the larger threaded holes on
Rhino™'s sides.
6
First insert a notched washer into each knob, then insert an even washer
Figure 13 - Mounting of screws and knob
7
Tighten Rhino™ to its bracket by inserting and screwing the knobs into their holes - one
on each side
8
Insert power supply cable into the Rhino™ socket, stopping and rotating clockwise the
metal part
9
Connect the power supply cable to forklift.
Figure 14 - Vehicle Installation
Rhino™ is now ready.
11
RHINO™
2
2.2 INSTALLATION ON FORKLIFT GROUND
This type of installation may decrease the range of the radios located in the bottom of
Rhino™.
Keep to the indications in previous chapter; in addition, remember to put the clamping tooth
leaning out of bracket's bottom to your left hand side.
Figure 15 - Screw Positioning
Figure 16 - RHINO™ in Vehicle Bracket
12
INSTALLATION
2
2.3 MOUNTING POSITIONS
RHINO™ can rotate on its mounting bracket up to a 180° range by rotating the mounting
bracket (reverse position). See figure below for suggested positions:
90°
90°
Figure 17 - Suggested Mounting Positions
A specially punched steel ring has been designed to obtain the most precise rotation
possible in terms of angle calibration, steadiness and consequent absence of torque
between both sides of device.
Figure 18 - Rhino Side View with Punched Steel Ring
13
RHINO™
2
2.4 CONNECT SERIAL BARCODE SCANNER
Refer to the documentation received with the barcode scanner for complete instructions.
Read all warnings and caution labels.
Note: Before using the scanner, read section titled “Operation”, sub-section titled “Laser
Barcode Scanner Warnings.”
Both COM1 and COM2/Scanner ports can be used to connect a barcode reader. Rhino™
has been designed to support 5V powered scanners through COM2/Scanner port (Pin 9 of
the connector). The maximum current sourced is 1 A.
The barcode input is managed by a specific driver: REDIR.exe, to be included in the
CONFIG.SYS system file.
REDIR.exe is configured for COM2/Scanner input by default.
COM2/Scanner
Figure 19 - Connect Serial Scanner Cable to COM2/Scanner
1. Turn the RHINO™ off before attaching the serial cable.
2. Seat the connector firmly over the pins and turn the thumbscrews in a clockwise
direction. Do not overtighten.
3. Turn the RHINO™ on.
Figure 20 - RHINO™ with Tethered Generic Barcode Scanner
It is possible to select and configure the port for connection to a scanner/reader, via DL
Mobile Configurator™ included the Mobile@work Reference Disk).
COM1 and COM2 ports can be connected to any Datalogic reader with serial interface,
pinout permitting.
14
INSTALLATION
2
As far as linear codes are concerned, the Dragon™ is the most suitable scanner for
Rhino™'s environment:
- Dragon™ D: either connect it to COM2 through CAB-350/CAB-408 without power supply,
or to COM1 through CAB-327/CAB-362 with external power supply.
- Dragon™ M: either connect it to COM2 through STAR-Modem™ without power supply,
or to COM1 with external power.
As far as 2D codes are concerned, the Lynx™ is the most suitable reader to Rhino™'s
environment: connect it to COM1 through CAB-327/CAB-362 with external power supply.
2.4.1
Laser Barcode Scanner Warnings
The following directions are general indications to be observed when using a laser barcode
reader with Rhino™. For further information and details, refer to the reader user's manual.
•
•
•
•
Do not look into the laser’s lens.
Do not stare directly into the laser beam.
Do not remove the laser caution labels from the scanner.
Do not connect the tethered laser barcode scanner to any other device.
CAUTION
Please read the caution labels and the user's manual of connected
scanner. Avoid exposure. Laser light is emitted from the scanner’s
aperture. Use of controls, adjustments or performance of procedures
other than those specified herein may result in hazardous radiation
exposure. The scanner uses laser light.
Do not pour, spray, or spill any liquid on the scanner. The Barcode
Scanner contains the circuitry, scanning motor and laser. Handle with
appropriate care.
CAUTION
15
RHINO™
2
2.5 CONNECT SERIAL DEVICE
Refer to the documentation received with the printer or PC for complete instructions.
Figure 21 - Connect Serial Cable to COM1
1. Turn the RHINO™ off before attaching the serial cable.
2. Seat the connector firmly over the pins and turn the thumbscrews in a clockwise
direction. Do not overtighten.
3. Use the strain relief cable clamps to secure the cable to the RHINO™.
4. Turn the RHINO™ on.
16
INSTALLATION
2
2.6 CONNECT POWER CABLE
1. Turn the RHINO™ off before attaching the power plug.
2. Connect the power cable to vehicle power (See the following section titled “Vehicle 1175VDC Direct Connection.”) or to an AC adapter.
3. Connect power by inserting the power plug into the power connector on the bottom of the
RHINO™.
4. Both the plug and receptacle are keyed and care must be used when connecting the
power cable. Twist the nut of the power plug clockwise until tight.
Figure 22 - Connect Power Cable to RHINO™
5. Turn the RHINO™ on.
2.7 VEHICLE 11-75 VDC DIRECT CONNECTION
CAUTION
For proper and safe installation, the input power cable must be connected
to a fused circuit on the vehicle. This fused circuit requires a 5 Amp
maximum time delay (slow blow) high interrupting rating fuse. If the supply
connection is made directly to the battery, the fuse should be installed in
the positive lead within 5 inches of the battery positive (+) terminal.
For installation by trained service personnel only
CAUTION
Risk of ignition or explosion. Explosive gas mixture may be vented from
battery. Work only in well-ventilated area. Avoid creating arcs and sparks at
battery terminals.
WARNING
17
RHINO™
2
A
B
C
D
E
Figure 23 - Direct Vehicle Power Connection Cable (Fuse Not Shown)
A.
B.
C.
D.
E.
To Vehicle Battery
To Vehicle Mounted Device
Green/Yellow (GND)
Blue (DC+)
Brown (DC-)
NOTE
Correct electrical polarity is required for safe and proper installation.
Connecting the cable to the RHINO™ with the polarity reversed will cause
the RHINO™’s fuse to be blown. See the following figure titled "Vehicle
Connection Wiring Color Codes" for additional wire color-coding specifics.
The procedure is the following:
1. The RHINO™ must be turned off.
2. While observing the fuse requirements specified above, connect the power cable as
close as possible to the actual battery terminals of the vehicle. When available, always
connect to unswitched terminals in vehicle fuse panel, after providing proper fusing.
For uninterrupted power, electrical supply connections should not be made
at any point after the ignition switch of the vehicle.
CAUTION
3. Route the cable the shortest way possible. The input cable from the connection to the
battery is rated for a maximum temperature of 105°C (221°F). When routing this cable it
should be protected from physical damage and from surfaces, which might exceed this
temperature.
Do not expose the cable to chemicals or oil that may cause the wiring insulation to
deteriorate.
If the vehicle is equipped with a panel containing Silicon Controller
Rectifiers (SCR's), avoid routing the power cable in close proximity to these
devices.
NOTE
18
INSTALLATION
2
Always route the cable so that it does not interfere with safe operation and maintenance of
the vehicle.
Use proper electrical and mechanical fastening means for terminating the cable. Properly
sized "crimp" type electrical terminals are an accepted method of termination. Please select
electrical connectors sized for use with 20AWG (0,75 mm Ø) conductors.
Wiring color codes for DATALOGIC supplied DC input power cabling:
Wire Color
VehicleSupply
+11 - 75VDC (DC +)
Blue
Return (DC -)
Brown
Vehicle Chassis (GND)
Green/Yellow
RHINO™ accepts a wide DC input voltage range. Do not connect the
RHINO™ input power cable to any other computer or damage to that
computer may occur.
NOTE
4. Provide mechanical support for the cable by securing it to the vehicle structure at
approximately one foot intervals, taking care not to overtighten and pinch conductors or
penetrate outer cable jacket.
5. Connect the cable to the RHINO™ by aligning the Lumberg connector pins to the power
connector; push down on the Lumberg connector and twist it to fasten securely.
6. Turn the RHINO™ on.
19
RHINO™
2
2.8 FUSE REPLACEMENT FOR THE RHINO™
The RHINO™ uses a 125V, 4A time delay (slow blow), high current interrupting rating fuse
that is externally accessible and user replaceable. Should it need replacement, replace with
same size, rating and type of fuse.
Figure 24 - Fuse Replacement
A. Fuse
B. Twist in this direction to remove (counter-clockwise)
C. Twist in this direction to insert (clockwise)
1. Turn the RHINO™ off and disconnect the power cable from the RHINO™.
2. While holding the RHINO™ over a level surface, push the fuse cover in and twist it one
quarter turn counterclockwise. A flat head screwdriver may be used to twist the fuse
cover.
3. Remove the fuse.
4. Discard the fuse and place a new fuse in the holder.
5. Push the fuse in and twist it clockwise one quarter turn.
6. Reconnect the power cable to the RHINO™.
20
OPERATION
3
3 OPERATION
3.1 POWERING ON/OFF
Connect the RHINO™ to a power source, either AC ADAPTER or Vehicle.
The power (on/off) switch is a toggle switch located on the bottom of the RHINO™. The Pwr
LED or the display, located on the front of the RHINO™, is lit when the power is off and
switch is off.
Always turn the computer off prior to connecting or disconnecting any
power source.
CAUTION
Figure 25 - The RHINO™ Power Switch
Powering off the RHINO™ before a write (to disk) function has completed, may result
in the corruption of the flash drive.
When the system is turned off, the current contents of RAM are lost. Save any needed data
and exit in an orderly fashion from any running programs before turning the system off.
Switch on the terminal: you are now ready to use Rhino™.
Enter data using the keyboard or a Serial Barcode Scanner.
3.1.1
Reset Key Sequence (Reboot)
To reboot the RHINO™ without turning the computer off, press:
<CTRL> + <ALT> + <FUNC> + <BKSP>
Rebooting the RHINO™, before a write (to disk) function has completed,
may result in the corruption of data on the hard drive.
CAUTION
When the system is rebooted, the current contents of RAM are lost. Save any needed data
and exit in an orderly fashion from any running programs before rebooting.
21
RHINO™
3
3.2 PANNING THE DISPLAY
The RHINO™ display can be panned up and down in order to view the entire virtual screen.
Display panning can also be controlled by an application running on the RHINO™.
1. Activate the scrolling mode by pressing the <FUNC> + <ALT> sequence
2. Use the arrow keys to move the display
3. Press the <FUNC> + <ALT> sequence to return to the normal scrolling mode.
3.3 RHINO™ CONFIGURATION
Datalogic provides the DL Mobile Configurator™ utility tool allowing to define all Rhino™
settings.
For example, the following image shows an example of Rhino™ keyboard mapping.
Figure 26 - Parameter Setting Through DL Mobile Configurator™
For further details, about configuration, refer to DL Mobile Configurator™ Help On Line.
22
MAINTENANCE
4
4 MAINTENANCE
4.1 CLEANING RHINO™
Periodically clean Rhino™ terminal with a slightly dampened cloth. Repeat the operation
frequently in particularly dirty environments.
Do not use alcohol, corrosive products or solvents, and avoid any abrasive substances.
4.2 CLEANING THE DISPLAY
When the display becomes soiled or smudged cleaning can be accomplished using a damp
soft cloth. Do not use paper or cleaning fluids since they may result in damage to the display
surface.
23
RHINO™
5
5 TROUBLESHOOTING
CAUTION
The only internal components that personnel not belonging to Datalogic or
ARC technical support can add or replace by removing Rhino™'s cover
are PCMCIA cards as described in chapter 1.8.
Opening Rhino™ may damage internal components and causes warranty
loss.
Before sending Rhino™ to technical support, the Customer has the responsibility of saving
every data and every configuration that have been stored. Datalogic's only responsibility is
the recovery of the exact hardware configuration of Rhino™.
Problem
Possible Solution
Rhino™ does not respond to any Wait some minutes, since the timeout of TCP/IP may
type of input (keyboard entry, be waiting for a transaction occurred in an area with no
barcode scanning).
radio coverage (during such timeouts Rhino™ is
suspended). Timeout normally takes 2 minutes.
If problem persists, reset Rhino™ using the following
sequence:
CTRL+ALT+FUNC+BKSP
If problem still persists, switch Rhino™ off then switch
it on again.
Rhino™ is not on and the red LED Ensure that Rhino™ is correctly powered.
on keyboard is not on.
Check fuse's integrity.
Rhino™ is not on despite the red Contact the nearest Datalogic distributor for technical
LED on keyboard goes off.
assistance.
When rebooting Rhino™, an error Check configuration correctness, since one of the
message appears:
following conditions may have occurred:
"RADIO ERROR".
- some files may have been deleted
- an incorrect driver may have been loaded for the
Radio PCMCIA card mounted (please also refer to
the driver and DL Mobile Configurator™ manuals)
- the radio may be broken
- WEP may have been enabled on CISCO card
without any previous activation of at least one WEP
key (please also refer to the driver's manual)
The boot seems to be correct, but Check configuration correctness, since one of the
Rhino™ does not connect to the following conditions may have occurred:
wireless LAN or cannot reach the - Rhino™ is out of access point coverage area;
host.
- radio configuration files (SSID, Wep Encription,
safety parameters, etc.) may have been set
incorrectly (please also refer to the driver's
manual);
- TCP/IP configuration files may have been set
incorrectly (Rhino™ IP address, Subnet Mask,
Default Router, etc.)
- The configuration files of running application may
have been set incorrectly (DL-TCL, Web Client)
- The radio may be broken or the antenna connector
is disconnected.
24
TROUBLESHOOTING
5
Upon boot, Rhino™ locks up while Reset Rhino™ and press the “F8” key during the
memory check. This implies a “Step-by-step” boot
executing a program or a driver.
activation.
Press the “y” key to confirm (execute) each
program/driver until the one that locks Rhino™. Once
found the locking program/driver, repeat the procedure
from the beginning and skip the execution of the
incorrect program/driver by pressing the “n” key.
If problem persists, format the disk C: and load a fresh
configuration.
If problem still persists, contact the nearest Datalogic
distributor for technical assistance.
The barcode reader (either Laser Check whether one of the following conditions has
or CCD) emits no light source.
occurred:
- Ensure the right cable is being used, then check
the correctness of cable clamping;
- If connected to COM2/Scanner port, check whether
the right cable is being used. That implies that
power supplied through the serial connector is
compatible with Rhino™ COM port.
- Since COM1 does not allow the powering from
external devices, check the right cable is being
used and that the reader receives external power
(check also power source correctness: refer to
reader user's manual).
The barcode reader does not read The type of barcode readers that can be used with
some code symbologies.
Rhino™ are "Decoded" readers: therefore, they require
a dedicated configuration. Refer to reader user's
manual for configuration.
The barcode reader emits a laser Check whether one of the following conditions has
beam and a good read beep but occurred:
the read barcode is not displayed - the RS232 parameter settings of the barcode
by the application running on
reader do not correspond to the Rhino™ settings;
Rhino™.
- the “redir.sys” driver has not been loaded (check
the “newcfg.sys” configuration file in Disk C:) or has
not been configured correctly;
- the barcode reader is connected to a serial port
(COM) different from the one used by the
“redir.sys” driver;
- the Datalogic Transfer Protocol Server (DTPS)
program (ds.exe) has been used through the COM
port already used by the “redir.sys” driver. In this
case, it is necessary to reset Rhino™;
The barcode reader emits a laser Ensure that the reading window of the barcode reader
beam but it hardly reads the is clean. If not, clean it with a slightly dampened cloth.
barcode.
Do not use alcohol, corrosive products or solvent, and
avoid any abrasive substances.
25
5
RHINO™
The serial Datalogic Transfer Check whether one of the following conditions has
Protocol Server (DTPS) has been occurred:
run through the related “ds.bat” - the RS232 parameter settings of the DTPS
command
but
it
cannot
program do not correspond to the settings of the
communicate with other Datalogic
program running on the PC. The DTPS
client
application
programs
transmission speed is 115.200 bps (for further
running on PC side (WinDTP or
details refer to the DTPS, WinDTP or DL Mobile
DL Mobile Configurator™).
Configurator™ manuals);
- Rhino™ has been connected to the PC through a
wrong cable.
After updating the Flash image, If the Flash image has been updated with a new image
Rhino™ does not work properly having a different dimension, ensure that Disk C: is
(boot sequence not completed, formatted by using the FFDISK command (refer to the
Rhino™ lock).
DL Flash Loader manual for further details).
If problem persists, repeat both the Flash updating
procedure and the Disk C: formatting, and ensure that
all disk C: files have been reinstalled correctly (refer to
the DL Mobile Configurator™ manual for further details
about restoring Disk C: on Rhino™).
In case the problem still persists, contact your nearest
Datalogic distributor for technical assistance.
26
TECHNICAL FEATURES
6
6 TECHNICAL FEATURES
Feature
Electrical Features
Power
Control Switches
Status Indicator Lights
Hardware Features
Microprocessor
Operating System
System RAM Memory
System Flash Memory
Real-Time Clock
Mechanical Features
Dimensions
Weight
Display
Keyboard
Buzzer
LED
Environmental Features
Operating Temperature
Storage Temperature
Environmental sealing
Operating Humidity
Vibration
Random Vibration
ESD
Shock
Communication Features
Interfaces
Network
Antenna
Frequency range
Peripherals
Scanners
Accessories
Mounting bracket
LCD
VFD
Internal wide range power supply (11-75 VDC)
Transient spike and over current/voltage protected
Reverse polarity protected
Connects directly to vehicle battery
Power ON/OFF, contrast for LCD models, brightness for
VFD models, beeper volume
Caps lock and Power
AMD Elan SC400 @ 32 MHz
ROM DOS 7.1
2 MB
8 MB
Time and date stamping under software control
320 X 250 X 90 mm
4 Kg Approx. (excluding mounting bracket)
Wide LCD with backlight
VFD Display
57-key alphanumeric keyboard with constant illumination
and audible key beep
2 piezoelectric buzzers
2 keyboard LEDs
0° to 50° C (32° to 122° F)
-30° to 50° C (-22° to 122°
F)
-30 a +70 (-22° to 158° F)
-20 to 70° C (-4° to 158° F)
IP65
Up to 90% non-condensing
at 104°F (40°C)
Based on EN 600 68
3g RMS, 5 Hz to 1000 Hz, 60 min per each axis.
Sawtooth waveform spectrum.
EN 61000-4-2
25G, 6ms duration, 1000 25G, 6ms, 1000 impacts
shock impacts per axis
per axis
2 RS232-C serial interfaces; COM2 with barcode option
WLAN, 802.11b (Wi-Fi)
Integrated
Country dependent, typically 2.4 to 2.5 GHz
Dragon D; Dragon M with STAR-Modem; Gryphon D,
Gryphon M with STAR-Modem
Included in this package
27
RHINO™
6
Feature
Mounting kit to secure the
terminal to the mounting
bracket.
Power cable
Serial cable for configuration
activities though pc direct
connection.
User’s Manual
Mobile@work™ Reference
CD-ROM
28
LCD
Included in this package
Included in this package
Included in this package
Included in this package
Included in this package
VFD
KEY MAPS
A
KEY MAPS
A.1
KEYPADS
A
Figure 27 - The ABCD Keypad
A.2
KEY MAP - KEY EQUIVALENCIES
Note: Key equivalencies may change based on the Terminal Emulator running on the unit.
The terminal emulation reference manuals contain TE-specific key mapping for the unit.
To get this
Increase Brightness
Decrease Brightness
Increase Contrast
Decrease Contrast
Increase Volume
Decrease Volume
FUNC
SHIFT
CTRL
ALT
ESC
Space
Enter
CapsLock
Back Space
Tab
BackTab
Break
Pause
Up Arrow
Down Arrow
Right Arrow
Left Arrow
Insert
Delete
SCROLL
Home
End
Press These Keys in Sequence (L to R)
Func
Shift
Ctrl
Alt
Esc
✔
✔
✔
✔
✔
✔
✔
✔
✔
✔
✔
✔
✔
✔
✔
✔
✔
✔
✔
✔
✔
Press this
key
C
D
A
B
O
P
FUNC
SHIFT
ALT
CTRL
Esc
Enter
Enter
Shift
BKSP
BTAB/TAB
BTAB/TAB
F2
F3
Up Arrow
Down Arrow
Right Arrow
Left Arrow
Ctrl
BKSP
ESC
Left Arrow
Right Arrow
29
RHINO™
A
To get this
Page Up
Page Down
Right Shift
Right Alt
Right Ctrl
F1
F2
F3
F4
F5
F6
F7
F8
F9
F10
F11
F12
F13
F14
F15
F16
F17
F18
F19
F20
F21
F22
F23
F24
a
b
c
d
e
f
g
h
i
j
k
l
m
n
o
p
q
r
s
t
u
v
w
30
Press These Keys in Sequence (L to R)
Func
Shift
Ctrl
Alt
Esc
✔
✔
✔
✔
✔
✔
✔
✔
✔
✔
✔
✔
✔
✔
✔
✔
✔
✔
✔
✔
✔
✔
✔
✔
✔
✔
✔
✔
✔
✔
✔
✔
Press this
key
Up Arrow
Down Arrow
F7
F8
F9
F1
F2
F3
F4
F5
F6
F7
F8
F1
F2
F3
F4
F5
F6
F7
F8
F1
F2
F3
F4
F5
F6
F7
F8
A
B
C
D
E
F
G
H
I
J
K
L
M
N
O
P
Q
R
S
T
U
V
W
KEY MAPS
To get this
x
y
z
A
B
C
D
E
F
G
H
I
J
K
L
M
N
O
P
Q
R
S
T
U
V
W
X
Y
Z
1 (numeric)
2 (numeric)
3 (numeric)
4 (numeric)
5 (numeric)
6 (numeric)
7 (numeric)
8 (numeric)
9 (numeric)
0 (numeric)
DOT (numeric)
<
[
]
>
=
= (numeric)
/
\
+
* (numeric)
: (colon)
A
Press These Keys in Sequence (L to R)
Func
Shift
Ctrl
Alt
Esc
✔
✔
✔
✔
✔
✔
✔
✔
✔
✔
✔
✔
✔
✔
✔
✔
✔
✔
✔
✔
✔
✔
✔
✔
✔
✔
✔
✔
✔
✔
✔
✔
✔
✔
✔
✔
✔
✔
Press this
key
X
Y
Z
A
B
C
D
E
F
G
H
I
J
K
L
M
N
O
P
Q
R
S
T
U
V
W
X
Y
Z
1
2
3
4
5
6
7
8
9
0
DOT
V
I
J
U
M
3
Y
S
L
K
8
R
31
RHINO™
A
To get this
; (semicolon)
?
`
_ (underscore)
, (comma)
‘ (apostrophe)
~ (tilde)
|
“
! (numeric)
@ (numeric)
# (numeric)
$ (numeric)
% (numeric)
^ (numeric)
& (numeric)
( (numeric)
) (numeric)
_ (underscore)
|
32
Press These Keys in Sequence (L to R)
Func
Shift
Ctrl
Alt
Esc
✔
✔
✔
✔
✔
✔
✔
✔
✔
✔
✔
✔
✔
✔
✔
✔
✔
✔
✔
✔
Press this
key
Q
Z
N
M
J
H
F
A
G
1
2
3
4
5
6
7
9
0
N
T
GLOSSARY
Access Point
A device that provides transparent access between Ethernet wired networks and IEEE
802.11 interoperable radio-equipped mobile units (MUs). Datalogic hand-held computers, or
other devices equipped with a PCMCIA slot, communicate with wired networks using Access
Points (AP). The mobile unit may roam among the APs in the same subnet while maintaining
a continuous, seamless connection to the wired network.
AP
See Access Point.
Bar Code
A pattern of variable-width bars and spaces which represents numeric or alphanumeric data
in machine-readable form. The general format of a bar code symbol consists of a leading
margin, start character, data or message character, check character (if any), stop character,
and trailing margin. Within this framework, each recognizable symbology uses its own unique
format.
Baud Rate
A measure for data transmission speed.
BIOS
Basic Input Output System. A collection of ROM-based code with a standard API used to
interface with standard PC hardware.
Bit
Binary digit. One bit is the basic unit of binary information. Generally, eight consecutive bits
compose one byte of data. The pattern of 0 and 1 values within the byte determines its
meaning.
Bits per Second (bps)
Number of bits transmitted or received per second.
Byte
On an addressable boundary, eight adjacent binary digits (0 and 1) combined in a pattern to
represent a specific character or numeric value. Bits are numbered from the right, 0 through
7, with bit 0 the low-order bit. One byte in memory can be used to store one ASCII character.
Data Communications Equipment (DCE)
A device such as a modem that is designed to attach directly to a DTE (Data Terminal
Equipment) device.
Data Terminal Equipment (DTE)
A device such as a terminal or printer that is designed to attach directly to a DCE (Data
Communications Equipment) device.
Decode
To recognize a bar code symbology (e.g., Codabar, Code 128, Code 3 of 9, UPC/EAN, etc.)
and analyze the content of the bar code scanned.
33
DOS
Disk Operating System. This is basic software that allows you to load and use software
applications on your computer.
EEPROM
Electrically Erasable Programmable Read-Only Memory. An on-board non-volatile memory
chip. See NVM.
Flash Disk
Non-volatile memory for storing application and configuration files.
Host
A computer that serves other terminals in a network, providing services such as network
control, database access, special programs, supervisory programs, or programming
languages.
Liquid Crystal Display (LCD)
A display that uses liquid crystal sealed between two glass plates. The crystals are excited
by precise electrical charges, causing them to reflect light outside according to their bias.
They use little electricity and react relatively quickly. They require external light to reflect their
information to the user.
Light Emitting Diode (LED)
A low power electronic light source commonly used as an indicator light. It uses less power
than an incandescent light bulb but more than a Liquid Crystal Display (LCD).
RAM
Random Access Memory. Data in RAM can be accessed in random order, and quickly
written and read.
RF
Radio Frequency.
RTC
Real Time Clock.
Terminal
A Datalogic portable computer product.
Terminal IP Address
The terminal’s network address. Networks use IP addresses to determine where to send
data that is being transmitted over a network. An IP address is a 32-bit number referred to as
a series of 8-bit numbers in decimal dot notation (e.g., 130.24.34.03). The highest 8-bit
number you can use is 254.
Transmission Control Protocol/Internet Protocol (TCP/IP)
A suite of standard network protocols that were originally used in UNIX environments but are
now used in many others. The TCP governs sequenced data; the IP governs packet
forwarding. TCP/IP is the primary protocol that defines the Internet.
Vacuum Fluorescence Display (VFD)
In a VFD apparatus, electrons accelerating within a metal grid net with positive charge strike
anode's fluorescent powder making it shine.
34
INDEX
A
Available Models; 2
C
Connectors; 8
Connect Power Cable; 17
Connect Serial Barcode Scanner; 14
Connect Serial Device; 16
Vehicle 11-75 VDC Direct Connection;
17
D
Display; 3
Cleaning the Display; 23
LCD Display(640 X 200); 3
Panning the Display; 22
VFD Display (256 X 128); 3
G
General View; ix
Glossary; 33
Key Maps; 29
Keyboard LEDs; 6
Power LED; 7
Reset Key Sequence (Reboot); 21
M
Maintenance; 23
Cleaning Rhino™; 23
P
Package Contents; 2
PCMCIA Slots; 7
Power Supply; 8
Backup Battery; 8
Powering ON/OFF; 21
Q
Quick Start; x
R
Reference Documentation; v
Rhino™ Configuration; 22
Rhino™ Description; 1
I
Installation; 10
Installation on forklift ground; 12
Installation on forklift roof; 10
Mounting material; 10
Mounting Positions; 13
K
Keyboard; 4
Caps Lock LED; 6
Control Keys; 4
Key Map - Key Equivalencies; 29
S
Safety Precautions; vi
AC Power Supply Safety Statement; viii
FCC Compliance; vi
Information for the User; vi
Vehicle Power Supply Connection
Safety Statement; vii
T
Technical Features; 27
Troubleshooting; 24
35
DATALOGIC S.p.A.,
Via Candini, 2
40012 - Lippo di Calderara
Bologna - Italy
dichiara che
declares that the
déclare que le
bescheinigt, daß das Gerät
declare que el
RHINO-RR, Vehicle mount computer
RHINO-RR VFD, Vehicle mount computer
e tutti i suoi modelli
and all its models
et tous les modèles
und alle seine modelle
y todos sus modelos
sono conformi alla Direttiva del Consiglio Europeo sottoelencata:
are in conformity with the requirements of the European Council Directive listed below:
sont conformes aux spécifications de la Directive de l'Union Européenne ci-dessous:
der nachstehenden angeführten Direktive des Europäischen Rats entsprechen:
cumple con los requisitos de la Directiva del Consejo Europeo, según la lista siguiente:
89/336/EEC EMC Directive
e 92/31/EEC, 93/68 /EEC
and
et
und
y
emendamenti successivi
further amendments
ses successifs amendements
späteren Abänderungen
succesivas enmiendas
Basate sulle legislazioni degli Stati membri in relazione alla compatibilità elettromagnetica ed alla sicurezza dei
prodotti.
On the approximation of the laws of Member States relating to electromagnetic compatibility and product safety.
Basée sur la législation des Etates membres relative à la compatibilté électromagnétique et à la sécurité des
produits.
Über die Annäherung der Gesetze der Mitgliedsstaaten in bezug auf elektromagnetische Verträglichkeit und
Produktsicherheit entsprechen.
Basado en la aproximación de las leyes de los Países Miembros respecto a la compatibilidad electromagnética
y las Medidas de seguridad relativas al producto.
Questa dichiarazione è basata sulla conformità dei prodotti alle norme seguenti:
This declaration is based upon compliance of the products to the following standards:
Cette déclaration repose sur la conformité des produits aux normes suivantes:
Diese Erklärung basiert darauf, daß das Produkt den folgenden Normen entspricht:
Esta declaración se basa en el cumplimiento de los productos con las siguientes normas:
EN 55022, AUGUST 1994:
LIMITS
AND METHODS OF MEASUREMENTS OF RADIO DISTURBANCE CHARACTERISTICS
OF INFORMATION TECHNOLOGY EQUIPMENT (ITE)
EN 61000-6-2, APRIL 1999:
ELECTROMAGNETIC COMPATIBILITY (EMC).
Part 6-2: Generic Standards – Immunity for industrial environments
Lippo di Calderara, 06.08.2003
Ruggero Cacioppo
Quality Assurance Laboratory Manager
DATALOGIC S.p.A.,
Via Candini, 2
40012 - Lippo di Calderara
Bologna - Italy
dichiara che
declares that the
déclare que le
bescheinigt, daß das Gerät
declare que el
RHINO-RF/3 EU, Vehicle mount computer
RHINO- RF/3 EU VFD, Vehicle mount computer
e tutti i suoi modelli elencati nella pagina allegata
and all its models listed on the attached page
et tous les modèles indiqués à la page jointe
und alle seine modelle, die auf beiliegender Seite aufgezeichnet werden,
y todos sus modelos listados en la página anexa
sono conformi alla Direttiva del Consiglio Europeo sottoelencata:
are in conformity with the requirements of the European Council Directive listed below:
sont conformes aux spécifications de la Directive de l'Union Européenne ci-dessous:
der nachstehenden angeführten Direktive des Europäischen Rats entsprechen:
cumple con los requisitos de la Directiva del Consejo Europeo, según la lista siguiente:
1999/5/EEC R&TTE
Questa dichiarazione è basata sulla conformità dei prodotti alle norme seguenti:
This declaration is based upon compliance of the products to the following standards:
Cette déclaration repose sur la conformité des produits aux normes suivantes:
Diese Erklärung basiert darauf, daß das Produkt den folgenden Normen entspricht:
Esta declaración se basa en el cumplimiento de los productos con las siguientes normas:
EN 60950, OCTOBER 1996:
SAFETY
ETSI EN 300 328-2, JULY 2000:
ELECTRICAL BUSINESS EQUIPMENT
ELECTROMAGNETIC COMPATIBILITY AND RADIO SPECTRUM MATTERS
OF INFORMATION
TECHNOLOGY EQUIPMENT, INCLUDING
(ERM); W IDE-BAND
ETSI EN 301 489-17, SEPTEMBER 2000:
TRANSMISSION SYSTEMS;DATA TRANSMISSION
EQUIPMENT OPERATING IN THE 2,4 GHZ ISM BAND AND USING
SPREAD SPECTRUM MODULATION TECHNIQUES; PART 2: HARMONISED
EN COVERING ESSENTIAL REQUIREMENTS UNDER ARTICLE 3.2 OF THE
R & TTE DIRECTIVE
ELECTROMAGNETIC COMPATIBILITY AND RADIO SPECTRUM MATTERS
(ERM); ELECTROMAGNETIC
COMPATIBILITY (EMC) STANDARD FOR
RADIO EQUIPMENT AND SERVICES; PART 17: SPECIFIC CONDITIONS
FOR W IDEBAND DATA AND HIPERLAN EQUIPMENT
Lippo di Calderara, 06.08.2003
Ruggero Cacioppo
Quality Assurance Laboratori Manager